towing Seat Ibiza ST 2012 User Guide
[x] Cancel search | Manufacturer: SEAT, Model Year: 2012, Model line: Ibiza ST, Model: Seat Ibiza ST 2012Pages: 282, PDF Size: 3.77 MB
Page 181 of 282
179
Driving and the environment
If the trailer has a 7-pin plug you will need to use an adapter cable. This is
available in any Technical Service.
Trailer weight/drawbar load
Never exceed the authorised trailer weight. If you do not load the trailer up
to the maximum permitted trailer weight, you can then climb correspond-
ingly steeper slopes.
The maximum trailer weights listed are only applicable for altitudes up to
1000 m above sea level. With increasing altitude the engine power and
therefore the vehicle climbing ability are impaired because of the reduced
air density. The maximum trailer weight has to be reduced accordingly. The
weight of the vehicle and trailer combination must be reduced by 10% for
every further 1000 m (or part thereof). The gross combination weight is the
actual weight of the laden vehicle plus the actual weight of the laden trailer.
When possible, operate the trailer with the maximum permitted drawbar
load on the ball joint of the towing bracket, but do not exceed the specified
limit.
The figures for trailer weights and drawbar loads that are given on the data
plate of the towing bracket are for certification purposes only. The correct
figures for your specific model, which may be lower than these figures for
the towing bracket, are given in the vehicle documentation or in ⇒ chap-
ter Technical Data.
Distributing the load
Distribute loads in the trailer so that heavy objects are as near to the axle as
possible. Loads carried in the trailer must be secured to prevent them mov-
ing.
Tyre pressure
Set tyre pressure to the maximum permissible pressure shown on the stick-
er on the inside of the fuel tank flap. Set the tyre pressure of the trailer tyres
in accordance with the trailer manufacturer's recommendations. Exterior mirrors
Check whether you can see enough of the road behind the trailer with the
standard rear vision mirrors. If this is not the case, you should have addi-
tional exterior mirrors fitted. Both exterior mirrors should be mounted on
hinged extension brackets. Adjust the mirrors to give sufficient vision to the
rear.
WARNING
Never transport people in a trailer. This could result in fatal accidents.
Note
● Towing a trailer places additional demands on the vehicle. We recom-
mend additional services between the normal inspection intervals if the ve-
hicle is used frequently for towing a trailer.
● Find out whether special regulations apply to towing a trailer in your
country.
Ball coupling of towing bracket*
The ball coupling is provided with instructions on fitting and removing the
ball coupling of the towing bracket.
WARNING
The towing bracket ball coupling must be stored securely in the luggage
compartment to prevent them being flung through the vehicle and caus-
ing injury.
Note
● By law, the ball coupling must be removed if a trailer is not being towed
if it obscures the number plate.
Safety FirstOperating InstructionsPractical TipsTechnical Specifications
Page 194 of 282
192Accessories, replacement of parts and modifications
Note
Please observe the operating instructions of your mobile telephone/two-
way radio.
Fitting a towing bracket*
It is possible to fit a towing bracket to the rear of the vehicle.
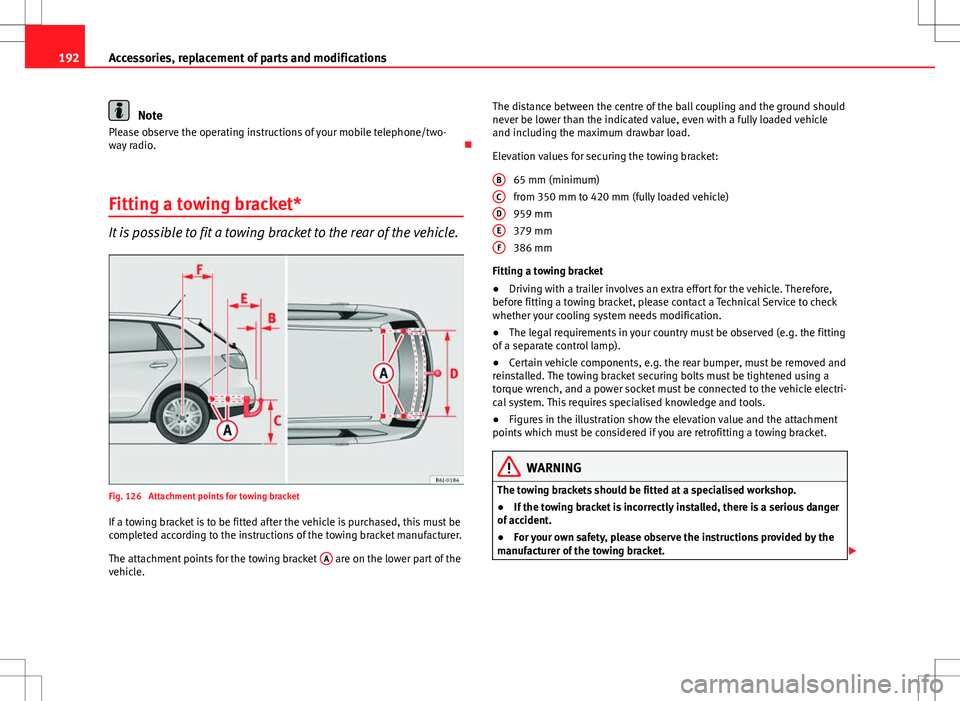
Fig. 126 Attachment points for towing bracket If a towing bracket is to be fitted after the vehicle is purchased, this must be
completed according to the instructions of the towing bracket manufacturer.
The attachment points for the towing bracket A
are on the lower part of the
vehicle. The distance between the centre of the ball coupling and the ground should
never be lower than the indicated value, even with a fully loaded vehicle
and including the maximum drawbar load.
Elevation values for securing the towing bracket:
65 mm (minimum)
from 350 mm to 420 mm (fully loaded vehicle)
959 mm
379 mm
386 mm
Fitting a towing bracket
● Driving with a trailer involves an extra effort for the vehicle. Therefore,
before fitting a towing bracket, please contact a Technical Service to check
whether your cooling system needs modification.
● The legal requirements in your country must be observed (e.g. the fitting
of a separate control lamp).
● Certain vehicle components, e.g. the rear bumper, must be removed and
reinstalled. The towing bracket securing bolts must be tightened using a
torque wrench, and a power socket must be connected to the vehicle electri-
cal system. This requires specialised knowledge and tools.
● Figures in the illustration show the elevation value and the attachment
points which must be considered if you are retrofitting a towing bracket.
WARNING
The towing brackets should be fitted at a specialised workshop.
● If the towing bracket is incorrectly installed, there is a serious danger
of accident.
● For your own safety, please observe the instructions provided by the
manufacturer of the towing bracket.
BCDEF
Page 195 of 282
193
Accessories, replacement of parts and modifications
CAUTION
● If the power socket is incorrectly installed, this could cause damage to
the vehicle electrical system.
Note
● SEAT recommends that the towing hooks be fitted at a specialised work-
shop. In certain versions this may entail fitting a heat insulating plate,
which is why it is recommended that you go to a SEAT dealership. In the
event that the plate is not installed correctly, SEAT is exempt from any liabil-
ity.
● Due to the specific design of the exhaust, the fitting of a conventional
towing hook is not recommended for some sportier versions. Please consult
your Technical Service.
Safety FirstOperating InstructionsPractical TipsTechnical Specifications
Page 226 of 282
224If and when
If you have a puncture on one of the front wheels when using snow chains,
fit the compact temporary spare wheel in place of one of the rear wheels.
You can then attach the snow chains to the wheel taken from the rear and
use this wheel to replace the punctured front wheel.
WARNING
● The tyre pressures must be checked and corrected as soon as possi-
ble after fitting the temporary spare wheel.
● Do not drive faster than 80 km/h (50 mph). Higher speeds can cause
an accident.
● Avoid heavy acceleration, hard braking and fast cornering. Risk of ac-
cident.
● Never use more than one temporary spare wheel at the same time,
risk of accident.
● No other type of tyre (normal summer or winter tyre) may be fitted on
the compact temporary spare wheel rim.
Tyre repair kit*
The tyre repair kit (for vehicles not including a temporary
spare wheel) is stored under the floor panel in the luggage
compartment. Your vehicle is equipped with the Tyre Mobility System “Tyre repair kit”.
The tyre repair kit consists of a container with sealing product to repair the
puncture and a compressor to generate the required tyre pressure. The kit
will reliably seal punctures up to a size of about 4 mm caused by the pene-
tration of a foreign body into the tyre.
Note
● Seek professional assistance if the repair of a tyre puncture is not possi-
ble with the sealing product.
Wheel change Preparation work
What you must do before changing a wheel.
– If you have a flat tyre or puncture, park the vehicle as far away
from the flow of traffic as possible. Choose a location that is as
level as possible.
– All vehicle occupants should leave the vehicle. They should
wait in a safe area (for instance behind the roadside crash barri-
er).
– Switch the engine off. Switch the hazard warning lights on and
place the warning triangles in position.
– Apply the handbrake firmly.
– Engage the first gear , or put the selector lever to position P for
those vehicles with an automatic gearbox.
– If you are towing a trailer, unhitch it from your vehicle.
– Take the vehicle tools and the spare wheel out of the luggage
compartment.
Page 234 of 282
232If and when
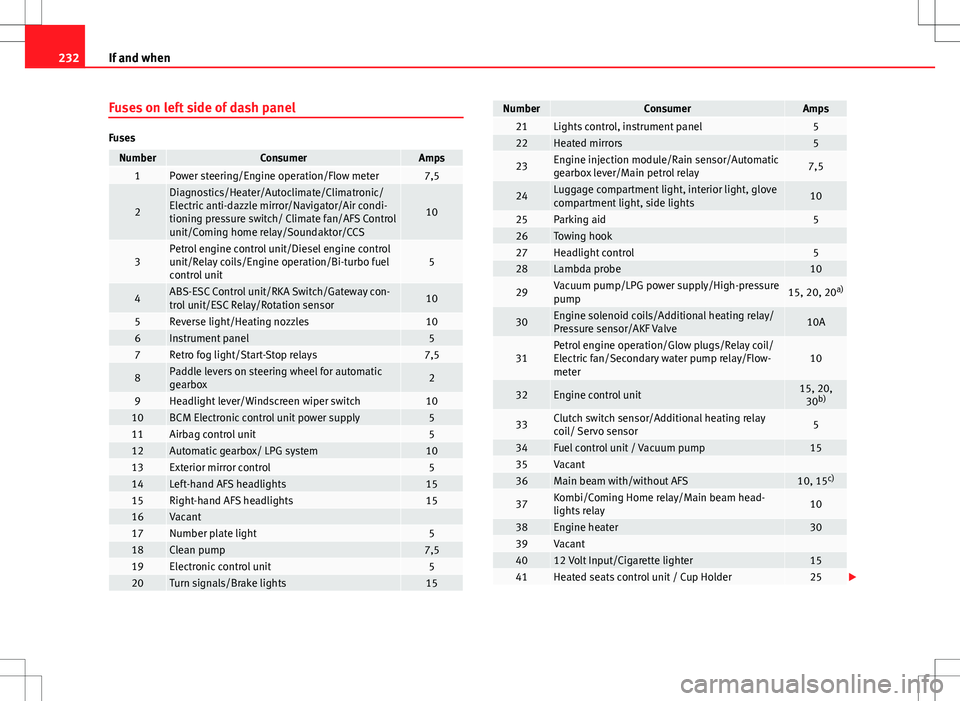
Fuses on left side of dash panel
Fuses
NumberConsumerAmps1Power steering/Engine operation/Flow meter7,5
2
Diagnostics/Heater/Autoclimate/Climatronic/
Electric anti-dazzle mirror/Navigator/Air condi-
tioning pressure switch/ Climate fan/AFS Control
unit/Coming home relay/Soundaktor/CCS
10
3Petrol engine control unit/Diesel engine control
unit/Relay coils/Engine operation/Bi-turbo fuel
control unit5
4ABS-ESC Control unit/RKA Switch/Gateway con-
trol unit/ESC Relay/Rotation sensor10
5Reverse light/Heating nozzles106Instrument panel57Retro fog light/Start-Stop relays7,5
8Paddle levers on steering wheel for automatic
gearbox2
9Headlight lever/Windscreen wiper switch1010BCM Electronic control unit power supply511Airbag control unit512Automatic gearbox/ LPG system1013Exterior mirror control514Left-hand AFS headlights1515Right-hand AFS headlights1516Vacant 17Number plate light518Clean pump7,519Electronic control unit520Turn signals/Brake lights15
NumberConsumerAmps21Lights control, instrument panel522Heated mirrors5
23Engine injection module/Rain sensor/Automatic
gearbox lever/Main petrol relay7,5
24Luggage compartment light, interior light, glove
compartment light, side lights10
25Parking aid526Towing hook 27Headlight control528Lambda probe10
29Vacuum pump/LPG power supply/High-pressure
pump15, 20, 20a)
30Engine solenoid coils/Additional heating relay/
Pressure sensor/AKF Valve10A
31Petrol engine operation/Glow plugs/Relay coil/
Electric fan/Secondary water pump relay/Flow-
meter10
32Engine control unit15, 20,
30 b)
33Clutch switch sensor/Additional heating relay
coil/ Servo sensor5
34Fuel control unit / Vacuum pump1535Vacant 36Main beam with/without AFS10, 15 c)
37Kombi/Coming Home relay/Main beam head-
lights relay10
38Engine heater3039Vacant 4012 Volt Input/Cigarette lighter1541Heated seats control unit / Cup Holder25
Page 254 of 282
252If and when
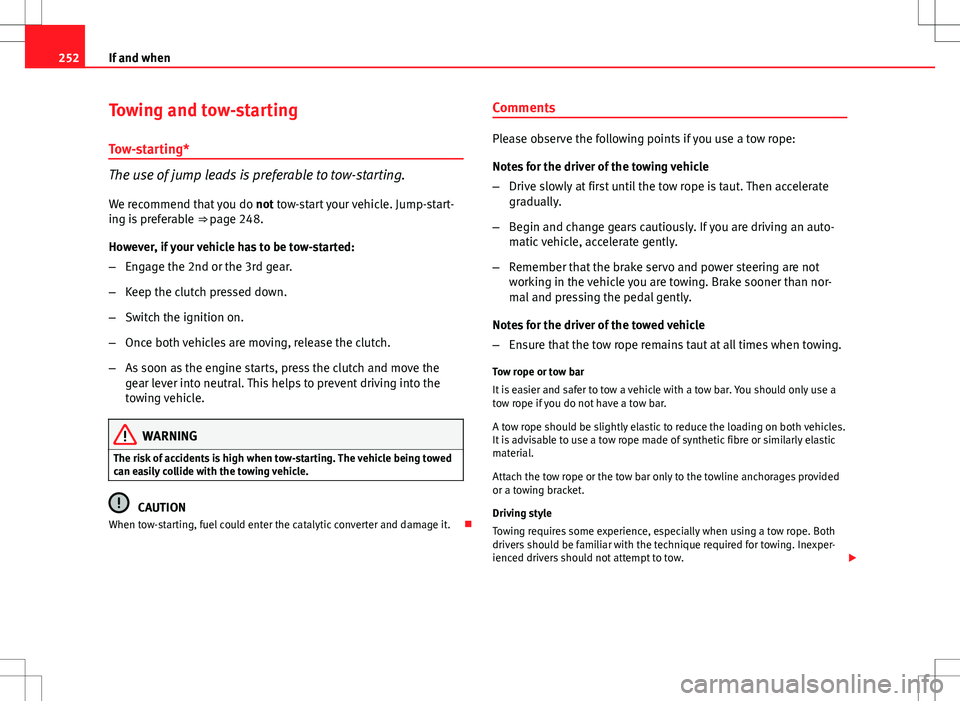
Towing and tow-starting
Tow-starting*
The use of jump leads is preferable to tow-starting.
We recommend that you do not tow-start your vehicle. Jump-start-
ing is preferable ⇒ page 248.
However, if your vehicle has to be tow-started:
– Engage the 2nd or the 3rd gear.
– Keep the clutch pressed down.
– Switch the ignition on.
– Once both vehicles are moving, release the clutch.
– As soon as the engine starts, press the clutch and move the
gear lever into neutral. This helps to prevent driving into the
towing vehicle.
WARNING
The risk of accidents is high when tow-starting. The vehicle being towed
can easily collide with the towing vehicle.
CAUTION
When tow-starting, fuel could enter the catalytic converter and damage it. Comments
Please observe the following points if you use a tow rope:
Notes for the driver of the towing vehicle
–
Drive slowly at first until the tow rope is taut. Then accelerate
gradually.
– Begin and change gears cautiously. If you are driving an auto-
matic vehicle, accelerate gently.
– Remember that the brake servo and power steering are not
working in the vehicle you are towing. Brake sooner than nor-
mal and pressing the pedal gently.
Notes for the driver of the towed vehicle
– Ensure that the tow rope remains taut at all times when towing.
Tow rope or tow bar
It is easier and safer to tow a vehicle with a tow bar. You should only use a
tow rope if you do not have a tow bar.
A tow rope should be slightly elastic to reduce the loading on both vehicles.
It is advisable to use a tow rope made of synthetic fibre or similarly elastic
material.
Attach the tow rope or the tow bar only to the towline anchorages provided
or a towing bracket.
Driving style
Towing requires some experience, especially when using a tow rope. Both
drivers should be familiar with the technique required for towing. Inexper-
ienced drivers should not attempt to tow.
Page 255 of 282
253
If and when
Do not pull too hard with the towing vehicle and take care to avoid jerking
the tow rope. When towing on an unpaved road, there is always a risk of
overloading and damaging the anchorage points.
The ignition of the vehicle being towed must be switched on to prevent the
steering wheel from locking and also to allow the use of the turn signals,
horn, windscreen wipers and washers.
As the brake servo does not work if the engine is not running, you must ap-
ply considerably more pressure to the brake pedal than you normally would.
As the power assisted steering does not work if the engine is not running,
you will need more strength to steer than you normally would.
Towing vehicles with an automatic gearbox
● Put the selector lever into position “N”.
● Do not drive faster than 50 km/h (30 mph).
● Do not tow further than 50 km (30 miles).
● If a breakdown vehicle is used, the vehicle must be towed with the front
wheels raised.
Note
● Observe legal requirements when towing or tow-starting.
● Switch on the hazard warning lights of both vehicles. However, observe
any regulations to the contrary.
● For technical reasons, vehicles with an automatic gearbox must not be
tow-started.
● If damage to your vehicle means that there is no lubricant in the gear-
box, you must raise the driven wheels while the vehicle is being towed.
● If the vehicle has to be towed more than 50 km (30 miles), the front
wheels should be raised during towing, and towing should be carried out by
a qualified person. ●
The steering wheel is locked when the vehicle has no electrical power.
The vehicle must then be towed with the front wheels raised. Towing should
be carried out by a qualified person.
● The towline anchorage should always be kept in the vehicle.
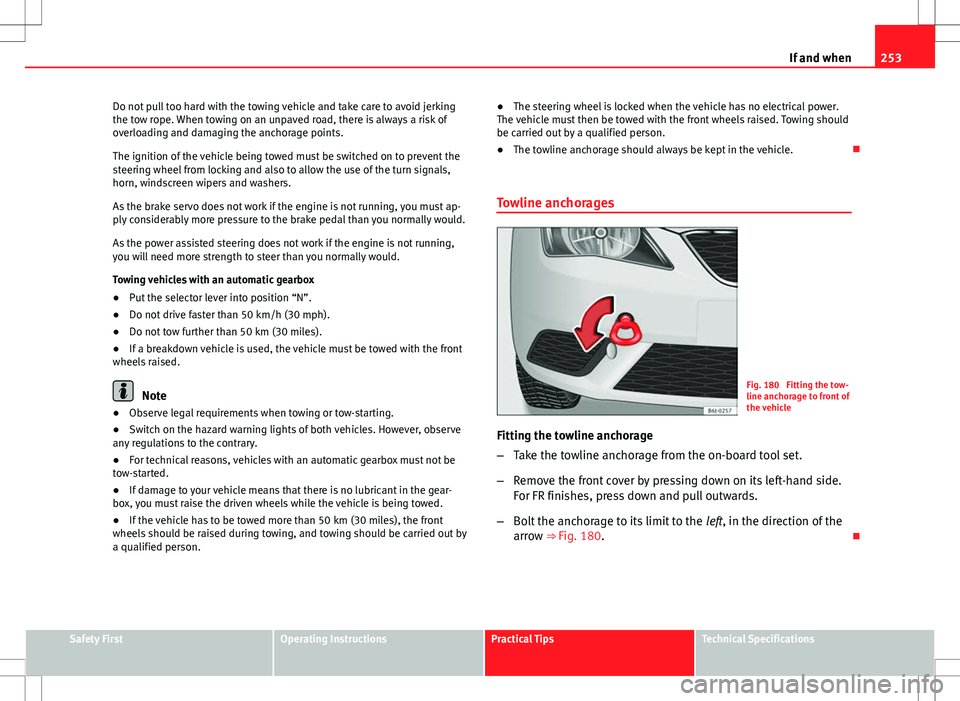
Towline anchoragesFig. 180 Fitting the tow-
line anchorage to front of
the vehicle
Fitting the towline anchorage
– Take the towline anchorage from the on-board tool set.
– Remove the front cover by pressing down on its left-hand side.
For FR finishes, press down and pull outwards.
– Bolt the anchorage to its limit to the left, in the direction of the
arrow ⇒ Fig. 180.
Safety FirstOperating InstructionsPractical TipsTechnical Specifications
Page 259 of 282
257
Description of specifications
Information on fuel consumption
Fuel consumption
The consumption and emission details shown on the vehicle
data sticker differ from one vehicle to another. The vehicle fuel consumption and CO 2 emissions can be consulted on the
vehicle data sticker in the spare wheel well, inside the luggage compart-
ment and on the rear cover of the Maintenance Programme.
The fuel consumption and CO 2 emission values refer to the weight category
assigned to your vehicle according to the engine and gearbox combination,
as well as the specific equipment fitted, and is only used to compare be-
tween the different models.
The fuel consumption and CO 2 emissions do not depend only on the per-
formance of the vehicle, they can also differ from the established values de-
pending on other factors such as driving style, road conditions, traffic con-
ditions, environmental conditions, load and number of passengers.
Calculation of fuel consumption
The consumption values have been calculated based on measurements per-
formed or supervised by certified CE laboratories according to the latest ver-
sion of directives 715/2007/EC and 80/1268/CEE (for more information
consult the European Union Publications Office at EUR-Lex: © European Un-
ion, http://eur-lex.europa.eu/en/index.htm) and are valid for the kerb
weight indicated for the vehicle.
Note
In practice, and considering all the factors mentioned here, consumption
values can differ from those calculated in the current European regulations. Weights
Kerb weight refers to the basic model with a fuel tank filled to 90% capacity
and without optional extras. The figure quoted includes 75 kg to allow for
the weight of the driver.
For special versions and optional equipment fittings or for the addition of
accessories, the weight of the vehicle will increase
⇒
.
WARNING
● Please note that the centre of gravity may shift when transporting
heavy objects; this may affect vehicle handling and lead to an accident.
Always adjust your speed and driving style to suit road conditions and re-
quirements.
● Never exceed the gross axle weight rating or the gross vehicle weight
rating. If the allowed axle load or the allowed total weight is exceeded,
the driving characteristics of the vehicle may change, leading to acci-
dents, injuries and damage to the vehicle.
Towing a trailer Trailer weights
Trailer weight
The trailer weights and drawbar loads approved are selected in intensive tri-
als according to precisely defined criteria. The approved trailer weights are
valid for vehicles in the EU for maximum speeds of 80 km/h (50 mph) (in
certain circumstances up to 100 km/h (60 mph)). The figures may be differ-
ent in other countries. All data in the official vehicle documentation takes
precedence over these data at all times ⇒
.
Safety FirstOperating InstructionsPractical TipsTechnical Specifications
Page 260 of 282
258Description of specifications
Drawbar loads
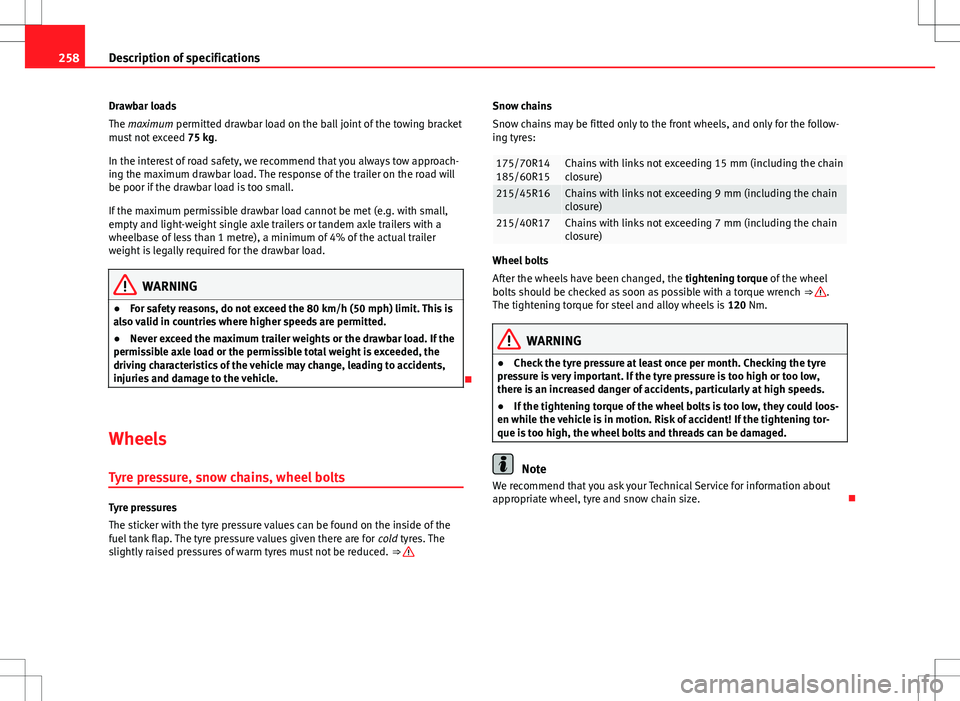
The maximum permitted drawbar load on the ball joint of the towing bracket
must not exceed 75 kg.
In the interest of road safety, we recommend that you always tow approach-
ing the maximum drawbar load. The response of the trailer on the road will
be poor if the drawbar load is too small.
If the maximum permissible drawbar load cannot be met (e.g. with small,
empty and light-weight single axle trailers or tandem axle trailers with a
wheelbase of less than 1 metre), a minimum of 4% of the actual trailer
weight is legally required for the drawbar load.
WARNING
● For safety reasons, do not exceed the 80 km/h (50 mph) limit. This is
also valid in countries where higher speeds are permitted.
● Never exceed the maximum trailer weights or the drawbar load. If the
permissible axle load or the permissible total weight is exceeded, the
driving characteristics of the vehicle may change, leading to accidents,
injuries and damage to the vehicle.
Wheels
Tyre pressure, snow chains, wheel bolts
Tyre pressures
The sticker with the tyre pressure values can be found on the inside of the
fuel tank flap. The tyre pressure values given there are for cold tyres. The
slightly raised pressures of warm tyres must not be reduced. ⇒
Snow chains
Snow chains may be fitted only to the front wheels, and only for the follow-
ing tyres:
175/70R14
185/60R15Chains with links not exceeding 15 mm (including the chain
closure)
215/45R16Chains with links not exceeding 9 mm (including the chain
closure)
215/40R17Chains with links not exceeding 7 mm (including the chain
closure)
Wheel bolts
After the wheels have been changed, the tightening torque of the wheel
bolts should be checked as soon as possible with a torque wrench ⇒
.
The tightening torque for steel and alloy wheels is 120 Nm.
WARNING
● Check the tyre pressure at least once per month. Checking the tyre
pressure is very important. If the tyre pressure is too high or too low,
there is an increased danger of accidents, particularly at high speeds.
● If the tightening torque of the wheel bolts is too low, they could loos-
en while the vehicle is in motion. Risk of accident! If the tightening tor-
que is too high, the wheel bolts and threads can be damaged.
Note
We recommend that you ask your Technical Service for information about
appropriate wheel, tyre and snow chain size.
Page 279 of 282
Seat belt tensionercontrol lamp . . . . . . . . . . . . . . . . . . . . . . . . . 31
Seat heating . . . . . . . . . . . . . . . . . . . . . . . . . . . 119
Selective opening* . . . . . . . . . . . . . . . . . . . . . . . 83
Semiautomatic air conditioning controls . . . . . . . . . . . . . . . . . . . . . . . . . . . . 137
Service interval display . . . . . . . . . . . . . . . . . . . 63
Side airbags . . . . . . . . . . . . . . . . . . . . . . . . . . . . 38 Description . . . . . . . . . . . . . . . . . . . . . . . . . . 38
Operation . . . . . . . . . . . . . . . . . . . . . . . . . . . 39
Safety notes . . . . . . . . . . . . . . . . . . . . . . . . . 39
Side lights . . . . . . . . . . . . . . . . . . . . . . . . . . . . . 100
Single headlight bulb . . . . . . . . . . . . . . . . . . . 236
Sitting position driver . . . . . . . . . . . . . . . . . . . . . . . . . . . . . . . 10
Sitting position, occupants . . . . . . . . . . . . . . . . 10
Snow chains . . . . . . . . . . . . . . . . . . . . . . . 221, 258
Soot accumulation in the diesel engine particu- late filter
control lamp . . . . . . . . . . . . . . . . . . . . . . . . . 70
Spanner symbol . . . . . . . . . . . . . . . . . . . . . . . . . 64
Spare parts . . . . . . . . . . . . . . . . . . . . . . . . . . . . 190
Spare wheel . . . . . . . . . . . . . . . . . . . . . . . . . . . 223
Speedometer . . . . . . . . . . . . . . . . . . . . . . . . . . . 58
Speed selector lever lock control lamp . . . . . . . . . . . . . . . . . . . . . . . . . 74
Start-Stop Activating and deactivating . . . . . . . . . . . . 152
Function . . . . . . . . . . . . . . . . . . . . . . . . . . . 150
Starting petrol engines . . . . . . . . . . . . . . 147, 148
Starting the engine . . . . . . . . . . . . . . . . . 147, 148 After the fuel tank has been run dry . . . . . 148 Steam jets . . . . . . . . . . . . . . . . . . . . . . . . . . . . . 183
Steering . . . . . . . . . . . . . . . . . . . . . . . . . . . . . . 144
Steering lock . . . . . . . . . . . . . . . . . . . . . . . . 145
Steering column controls Audio Control . . . . . . . . . . . . . . . . . . . . . . . . 78
Steering wheel height adjustment . . . . . . . . . 144
Storage compartment . . . . . . . . . . . . . . . . . . . 132 Front passenger side . . . . . . . . . . . . . . . . . 122
front seat . . . . . . . . . . . . . . . . . . . . . . . . . . . 123
Sun visor Sliding/tilting sunroof . . . . . . . . . . . . . . . . . 98
Sun visors . . . . . . . . . . . . . . . . . . . . . . . . . . . . . 108
Switch Hazard warning lights . . . . . . . . . . . . . . . . 105
Heated rear window . . . . . . . . . . . . . . . . . . 104
Light switch . . . . . . . . . . . . . . . . . . . . . . . . 100
Switches Electric windows . . . . . . . . . . . . . . . . . . . . . . 95
panoramic/tilting sunroof . . . . . . . . . . . . . . 98
Switching off the engine . . . . . . . . . . . . . . . . . 148
T Tank Fuel level . . . . . . . . . . . . . . . . . . . . . . . . . . . . 59
Reserve indicator . . . . . . . . . . . . . . . . . . . . . 59
Tank capacity . . . . . . . . . . . . . . . . . . . . . . . . 59
Technical modifications . . . . . . . . . . . . . . . . . . 190
The danger of not using the seat belt . . . . . . . . 22
Tightening torque of wheel bolts . . . . . . . . . . 258
Tilting sunroof . . . . . . . . . . . . . . . . . . . . . . . . . . 98
Tools . . . . . . . . . . . . . . . . . . . . . . . . . . . . . . . . . 223 Top Tether system . . . . . . . . . . . . . . . . . . . . . . . 50
Tow-starting . . . . . . . . . . . . . . . . . . . . . . . . . . . 252
Towing . . . . . . . . . . . . . . . . . . . . . . . . . . . . . . . . 252
Towing a trailer . . . . . . . . . . . . . . . . . . . . . 178, 257
Towing bracket . . . . . . . . . . . . . . . . . . . . . . . . . 179
Towing bracket, fitting . . . . . . . . . . . . . . . . . . . 192
Towline anchorage . . . . . . . . . . . . . . . . . . . . . . 252
Towline anchorages . . . . . . . . . . . . . . . . . . . . . 253
Tow starting
Comments . . . . . . . . . . . . . . . . . . . . . . . . . . 252
Traction control system control lamp . . . . . . . . . . . . . . . . . . . . . . . . . 72
Trailer turn signals control lamp . . . . . . . . . . . . . . . . . . . . . . . . 107
Trailer weights . . . . . . . . . . . . . . . . . . . . . . . . . 257
Turn signals . . . . . . . . . . . . . . . . . . . . . . . . . . . 106 control lamp . . . . . . . . . . . . . . . . . . . . . 76, 107
Two-way radio . . . . . . . . . . . . . . . . . . . . . . . . . . 191
Tyre-Mobility-System (Tyre repair kit) . . . . . . . 229
Tyre Mobility-System (Tyre repair kit) . . . . . . . 224
Tyre pressure . . . . . . . . . . . . . . . . . . . . . . . . . . 217 Control lamp . . . . . . . . . . . . . . . . . . . . . . . . . 73
Tyre pressures . . . . . . . . . . . . . . . . . . . . . . . . . . 258
Tyre repair kit . . . . . . . . . . . . . . . . . . . . . . 224, 229
Tyres and wheels Dimensions . . . . . . . . . . . . . . . . . . . . . . . . . 219
Tyres tread depth . . . . . . . . . . . . . . . . . . . . . . . 218
Tyres useful life . . . . . . . . . . . . . . . . . . . . . . . . . 218
Tyres with directional tread pattern . . . . . . . . 217
277
Index