battery Seat Ibiza ST 2012 Owner's Guide
[x] Cancel search | Manufacturer: SEAT, Model Year: 2012, Model line: Ibiza ST, Model: Seat Ibiza ST 2012Pages: 282, PDF Size: 3.77 MB
Page 217 of 282
215
Checking and refilling levels
WARNING (Continued)
● Fires, sparks, open flames and smoking are prohibited. When han-
dling cables and electrical equipment, avoid causing sparks and electro-
static charge. Never short the battery terminals. High-energy sparks can
cause injury.
● A highly explosive mixture of gases is released when the battery is
under charge. The batteries should be charged in a well-ventilated room
only.
● Keep children away from acid and batteries.
● Before working on the electrical system, you must switch off the en-
gine, the ignition and all consumers. The negative cable on the battery
must be disconnected. When a light bulb is changed, you need only
switch off the light.
● Deactivate the anti-theft alarm by unlocking the vehicle before you
disconnect the battery! The alarm will otherwise be triggered.
● When disconnecting the battery from the vehicle on-board network,
disconnect first the negative cable and then the positive cable.
● Switch off all electrical consumers before reconnecting the battery.
Reconnect first the positive cable and then the negative cable. Never re-
verse the polarity of the connections. This could cause an electrical fire.
● Never charge a frozen battery, or one which has thawed. This could
result in explosions and chemical burns. Always replace a battery which
has frozen. A flat battery can freeze at temperatures around 0°C.
● Ensure that the vent hose is always connected to the battery.
● Never use a defective battery. This could cause an explosion. Replace
a damaged battery immediately.
● For vehicles with the battery in the luggage compartment: Check that
the battery gas ventilation hose is securely attached.CAUTION
● Never disconnect the battery if the ignition is switched on or if the en-
gine is running. This could damage the electrical system or electronic com-
ponents.
● Do not expose the battery to direct sunlight over a long period of time,
as the intense ultraviolet radiation can damage the battery housing.
● If the vehicle is left standing in cold conditions for a long period, protect
the battery from freezing. If it freezes it will be damaged.
Checking the electrolyte level
The electrolyte level should be checked regularly in high-
mileage vehicles, in hot countries and in older batteries. – Open the engine bonnet and the battery cover ⇒
in Safety in-
structions on working in the engine compartment on page 201
⇒
in Warnings on handling the battery on page 214.
– Check the colour display in the "magic eye" on the top of the
battery.
– If there are air bubbles in the window, tap the window gently
until they disperse.
The position of the battery is shown in the corresponding engine compart-
ment diagram ⇒ page 259.
The “magic eye” indicator, located on the top of the battery changes colour,
depending on the charge state and electrolyte level of the battery.
There are two different colours:
Safety FirstOperating InstructionsPractical TipsTechnical Specifications
Page 218 of 282
216Checking and refilling levels
● Black: correct charge status.
● Transparent/clear yellow: the battery must be replaced. Contact a speci-
alised workshop.
Charging and changing the vehicle battery
The battery is maintenance-free and is checked during the
inspection service. All work on the vehicle battery requires
specialist knowledge.
If you often drive short distances or if the vehicle is not driven for long peri-
ods, the battery should be checked by a specialised workshop between the
scheduled services.
If the battery has discharged and you have problems starting the vehicle,
the battery might be damaged. If this happens, we recommend you have
the vehicle battery checked by a Technical Service where it will be re-charg-
ed or replaced.
Charging the battery
The vehicle battery should be charged by a specialised workshop only, as
batteries using special technology have been installed and they must be
charged in a controlled environment.
Replacing a vehicle battery
The battery has been developed to suit the conditions of its location and
has special safety features.
Genuine SEAT batteries fulfil the maintenance, performance and safety
specifications of your vehicle.
WARNING
● We recommend you use only maintenance-free or cycle free leak-proof
batteries which comply with standards T 825 06 and VW 7 50 73. This
standard applies as of August 2001.
● Before starting any work on the batteries, you must read and observe
the warnings ⇒
in Warnings on handling the battery on page 214.
For the sake of the environment
Batteries contain toxic substances such as sulphuric acid and lead. They
must be disposed of appropriately and must not be disposed of with ordi-
nary household waste.
Wheels
General notes
Avoiding damage
– If you have to drive over a kerb or similar obstacle, drive very
slowly and at a right angle.
– Keep grease, oil and fuel off the tyres.
– Inspect the tyres regularly for damage (cuts, cracks or blisters,
etc.). Remove any foreign objects embedded in the treads.
Storing tyres
– When you remove the tyres, mark them in order to maintain the
same direction of rotation when they are installed again.
Page 236 of 282
234If and when
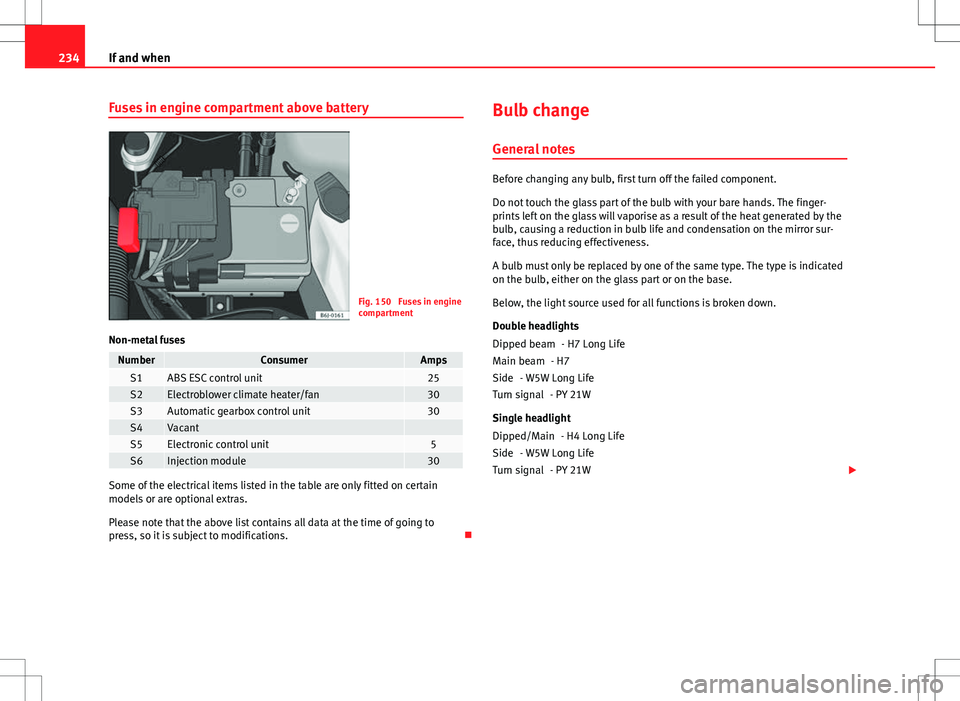
Fuses in engine compartment above battery
Fig. 150 Fuses in engine
compartment
Non-metal fuses
NumberConsumerAmpsS1ABS ESC control unit25S2Electroblower climate heater/fan30S3Automatic gearbox control unit30S4Vacant S5Electronic control unit5S6Injection module30
Some of the electrical items listed in the table are only fitted on certain
models or are optional extras.
Please note that the above list contains all data at the time of going to
press, so it is subject to modifications. Bulb change
General notes
Before changing any bulb, first turn off the failed component.
Do not touch the glass part of the bulb with your bare hands. The finger-
prints left on the glass will vaporise as a result of the heat generated by the
bulb, causing a reduction in bulb life and condensation on the mirror sur-
face, thus reducing effectiveness.
A bulb must only be replaced by one of the same type. The type is indicated
on the bulb, either on the glass part or on the base.
Below, the light source used for all functions is broken down.
Double headlights - H7 Long Life
- H7
- W5W Long Life - PY 21W
Single headlight - H4 Long Life
- W5W Long Life - PY 21W
Dipped beam
Main beam
Side
Turn signal
Dipped/Main
Side
Turn signal
Page 250 of 282
248If and when
–First fit the glass with the fastening tabs over the frame of the
switch. Next press the front part until the two long tabs click on
the support.
Additional brake lights*
Given the difficulty involved in the replacement of this light it should be
done by the Technical Service.
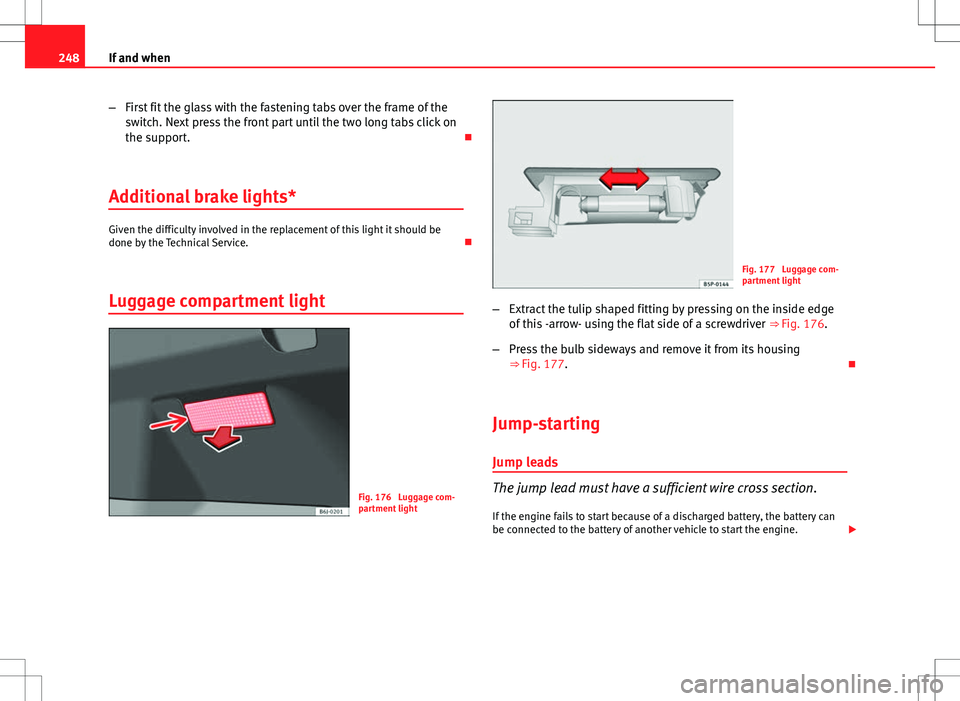
Luggage compartment light
Fig. 176 Luggage com-
partment light
Fig. 177 Luggage com-
partment light
– Extract the tulip shaped fitting by pressing on the inside edge
of this -arrow- using the flat side of a screwdriver ⇒ Fig. 176.
– Press the bulb sideways and remove it from its housing
⇒ Fig. 177.
Jump-starting
Jump leads
The jump lead must have a sufficient wire cross section. If the engine fails to start because of a discharged battery, the battery can
be connected to the battery of another vehicle to start the engine.
Page 251 of 282
249
If and when
Jump leads
Jump leads must comply with standard DIN 72553 (see cable manufactur-
er's instructions). The wire cross section must be at least 25 mm 2
for petrol
engines and at least 35 mm 2
for diesel engines.
Note
● The vehicles must not touch each other, otherwise electricity could flow
as soon as the positive terminals are connected.
● The discharged battery must be properly connected to the on-board net-
work.
How to jump start: description
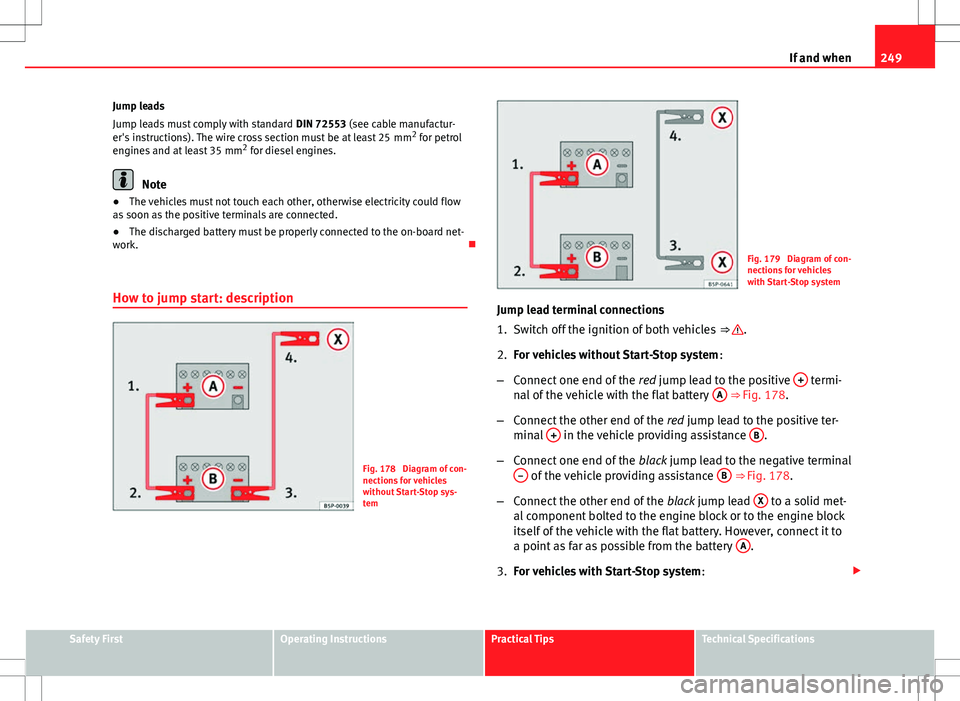
Fig. 178 Diagram of con-
nections for vehicles
without Start-Stop sys-
tem
Fig. 179 Diagram of con-
nections for vehicles
with Start-Stop system
Jump lead terminal connections
1. Switch off the ignition of both vehicles ⇒
.
2. For vehicles without Start-Stop system :
– Connect one end of the red jump lead to the positive +
termi-
nal of the vehicle with the flat battery A ⇒ Fig. 178.
– Connect the other end of the red jump lead to the positive ter-
minal +
in the vehicle providing assistance B.
– Connect one end of the black jump lead to the negative terminal
–
of the vehicle providing assistance B ⇒ Fig. 178.
– Connect the other end of the black jump lead X
to a solid met-
al component bolted to the engine block or to the engine block
itself of the vehicle with the flat battery. However, connect it to
a point as far as possible from the battery A
.
3. For vehicles with Start-Stop system :
Safety FirstOperating InstructionsPractical TipsTechnical Specifications
Page 252 of 282
250If and when
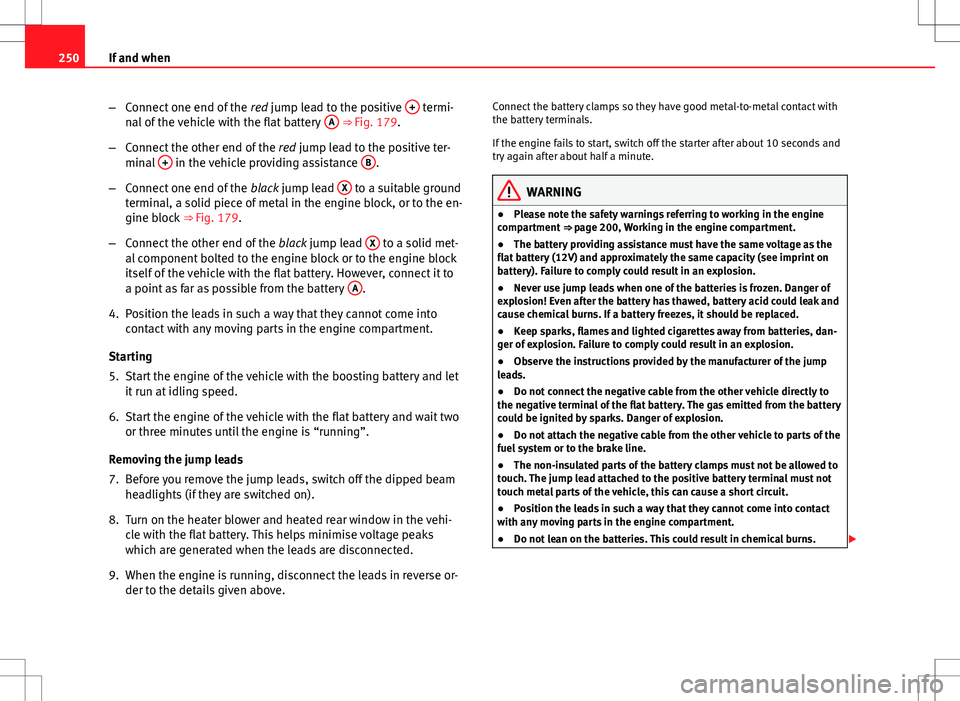
–Connect one end of the red jump lead to the positive +
termi-
nal of the vehicle with the flat battery A ⇒ Fig. 179.
– Connect the other end of the red jump lead to the positive ter-
minal +
in the vehicle providing assistance B.
– Connect one end of the black jump lead X
to a suitable ground
terminal, a solid piece of metal in the engine block, or to the en-
gine block ⇒ Fig. 179.
– Connect the other end of the black jump lead X
to a solid met-
al component bolted to the engine block or to the engine block
itself of the vehicle with the flat battery. However, connect it to
a point as far as possible from the battery A
.
4. Position the leads in such a way that they cannot come into contact with any moving parts in the engine compartment.
Starting
5. Start the engine of the vehicle with the boosting battery and let it run at idling speed.
6. Start the engine of the vehicle with the flat battery and wait two or three minutes until the engine is “running”.
Removing the jump leads
7. Before you remove the jump leads, switch off the dipped beam headlights (if they are switched on).
8. Turn on the heater blower and heated rear window in the vehi- cle with the flat battery. This helps minimise voltage peaks
which are generated when the leads are disconnected.
9. When the engine is running, disconnect the leads in reverse or- der to the details given above. Connect the battery clamps so they have good metal-to-metal contact with
the battery terminals.
If the engine fails to start, switch off the starter after about 10 seconds and
try again after about half a minute.
WARNING
● Please note the safety warnings referring to working in the engine
compartment ⇒ page 200, Working in the engine compartment.
● The battery providing assistance must have the same voltage as the
flat battery (12V) and approximately the same capacity (see imprint on
battery). Failure to comply could result in an explosion.
● Never use jump leads when one of the batteries is frozen. Danger of
explosion! Even after the battery has thawed, battery acid could leak and
cause chemical burns. If a battery freezes, it should be replaced.
● Keep sparks, flames and lighted cigarettes away from batteries, dan-
ger of explosion. Failure to comply could result in an explosion.
● Observe the instructions provided by the manufacturer of the jump
leads.
● Do not connect the negative cable from the other vehicle directly to
the negative terminal of the flat battery. The gas emitted from the battery
could be ignited by sparks. Danger of explosion.
● Do not attach the negative cable from the other vehicle to parts of the
fuel system or to the brake line.
● The non-insulated parts of the battery clamps must not be allowed to
touch. The jump lead attached to the positive battery terminal must not
touch metal parts of the vehicle, this can cause a short circuit.
● Position the leads in such a way that they cannot come into contact
with any moving parts in the engine compartment.
● Do not lean on the batteries. This could result in chemical burns.
Page 261 of 282
259
Technical specifications
Technical specifications
Checking fluid levels
From time to time, the levels of the different fluids in the ve-
hicle must be checked. Never fill with incorrect fluids, other-
wise serious damage to the engine may be caused.
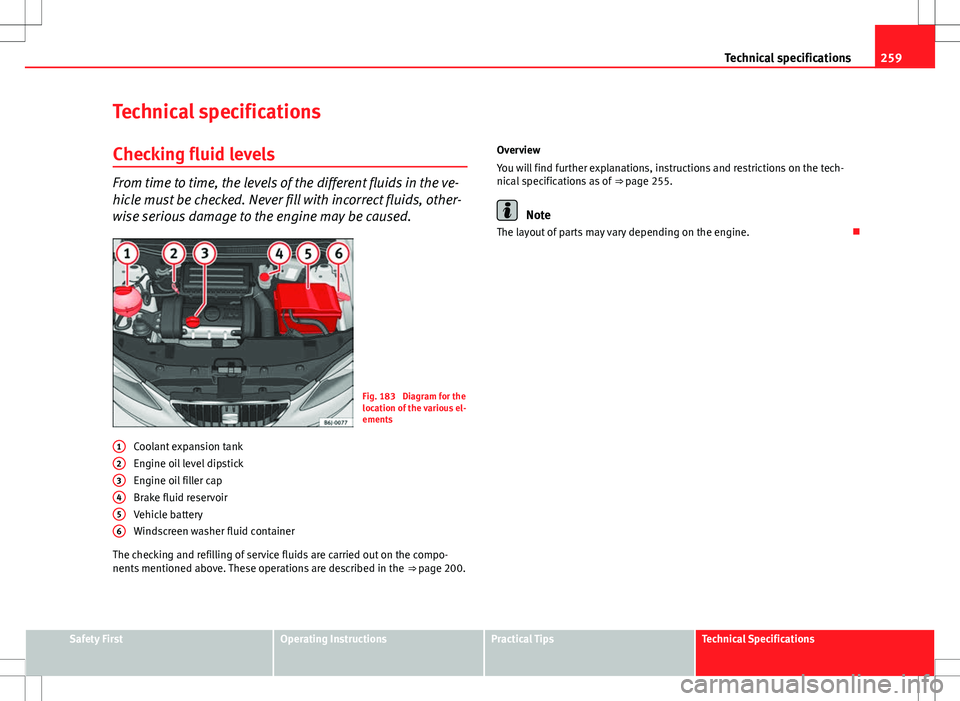
Fig. 183 Diagram for the
location of the various el-
ements
Coolant expansion tank
Engine oil level dipstick
Engine oil filler cap
Brake fluid reservoir
Vehicle battery
Windscreen washer fluid container
The checking and refilling of service fluids are carried out on the compo-
nents mentioned above. These operations are described in the ⇒ page 200.
1
23456
Overview
You will find further explanations, instructions and restrictions on the tech-
nical specifications as of
⇒ page 255.
Note
The layout of parts may vary depending on the engine.
Safety FirstOperating InstructionsPractical TipsTechnical Specifications
Page 273 of 282
Index
A
ABS . . . . . . . . . . . . . . . . . . . . . . . . . . . . . . . . . . 169control lamp . . . . . . . . . . . . . . . . . . . . . . . . . 71
Accessories . . . . . . . . . . . . . . . . . . . . . . . . . . . . 190
Acoustic warning . . . . . . . . . . . . . . . . . . . . . . . 145
Adaptive headlights . . . . . . . . . . . . . . . . . . . . . 103
AFS headlight bulbs . . . . . . . . . . . . . . . . . . . . . 242
Airbag covers . . . . . . . . . . . . . . . . . . . . . . . . . . . 36
Airbag system . . . . . . . . . . . . . . . . . . . . . . . . . . . 30 control lamp . . . . . . . . . . . . . . . . . . . . . . . . . 31
Front airbags . . . . . . . . . . . . . . . . . . . . . . . . 34
side airbags . . . . . . . . . . . . . . . . . . . . . . . . . 38
Air conditioner Climatronic . . . . . . . . . . . . . . . . . . . . . . . . . 140
General notes . . . . . . . . . . . . . . . . . . . . . . . 142
Air conditioning* . . . . . . . . . . . . . . . . . . . . . . . 137
Air outlets . . . . . . . . . . . . . . . . . . . . . . . . . . . . . 136
Air recirculation Semi-automatic air conditioning . . . . . . . . 139
Air recirculation mode Climatronic . . . . . . . . . . . . . . . . . . . . . . . . . 142
Alarm system Switching off . . . . . . . . . . . . . . . . . . . . . . . . . 90
Alternator Warning lamp . . . . . . . . . . . . . . . . . . . . . . . . 76
Anti-lock brake system . . . . . . . . . . . . . . . . . . . 169 control lamp . . . . . . . . . . . . . . . . . . . . . . . . . 71 Anti-theft alarm system . . . . . . . . . . . . . . . . . . . 90
Switching off . . . . . . . . . . . . . . . . . . . . . . . . . 90
Anti-theft wheel bolts . . . . . . . . . . . . . . . . . . . 226
Antifreeze . . . . . . . . . . . . . . . . . . . . . . . . . . . . . 207
Aquaplaning . . . . . . . . . . . . . . . . . . . . . . . . . . . 219
Ashtray . . . . . . . . . . . . . . . . . . . . . . . . . . . . . . . 125
Aspects to note before setting off . . . . . . . . . . . . 8
ASR . . . . . . . . . . . . . . . . . . . . . . . . . . . . . . . . . . 169
ASR (Traction control system) Control lamp . . . . . . . . . . . . . . . . . . . . . . . . . 72
Audible warning . . . . . . . . . . . . . . . . . . . . . . . . . 20
Automatic anti-dazzle interior mirror Deactivating the anti-dazzle function . . . . 112
Automatic anti-dazzle interior mirror* Activating the anti-dazzle function . . . . . . 112
Automatic car washing tunnel . . . . . . . . . . . . . 182
Automatic gearbox . . . . . . . . . . . . . . . . . . . . . . 154 Kick-down feature . . . . . . . . . . . . . . . . . . . . 160
Selector lever positions . . . . . . . . . . . . . . . 158
Automatic lighting . . . . . . . . . . . . . . . . . . . . . . 101
Automatic windscreen wiper/washer . . . . . . . 109
AUX/USB input connection . . . . . . . . . . . . . . . 127
Auxiliary audio input connection (AUX) . . . . . 127
B
Ball coupling . . . . . . . . . . . . . . . . . . . . . . . . . . . 179 Battery
Changing . . . . . . . . . . . . . . . . . . . . . . . . . . 216
Charging . . . . . . . . . . . . . . . . . . . . . . . . . . . 216
Winter conditions . . . . . . . . . . . . . . . . . . . . 214
Before setting off . . . . . . . . . . . . . . . . . . . . . . . . . 8
Belt tensioners . . . . . . . . . . . . . . . . . . . . . . . . . . 28
Biodiesel . . . . . . . . . . . . . . . . . . . . . . . . . . . . . . 199
Biodiesel fuel . . . . . . . . . . . . . . . . . . . . . . . . . . 199
Bonnet . . . . . . . . . . . . . . . . . . . . . . . . . . . . . . . 202
Brake fluid . . . . . . . . . . . . . . . . . . . . . . . . . . . . 213 Changing . . . . . . . . . . . . . . . . . . . . . . . . . . 213
Brake pads . . . . . . . . . . . . . . . . . . . . . . . . . . . . 173
Brakes . . . . . . . . . . . . . . . . . . . . . . . . . . . . . . . . 173
Brake servo . . . . . . . . . . . . . . . . . . . . . . . . 168, 173
Brake system . . . . . . . . . . . . . . . . . . . . . . . . . . 213 warning lamp . . . . . . . . . . . . . . . . . . . . . . . . 73
Braking distance . . . . . . . . . . . . . . . . . . . . . . . 173
Bulb change double headlight . . . . . . . . . . . . . . . . . . . . 238
Single headlight bulb . . . . . . . . . . . . . . . . 236
Bulb changes General notes . . . . . . . . . . . . . . . . . . . . . . . 234
Bulb defect Control lamp . . . . . . . . . . . . . . . . . . . . . . . . . 71
Buzzer . . . . . . . . . . . . . . . . . . . . . . . . . . . . 107, 145
271
Index
Page 274 of 282
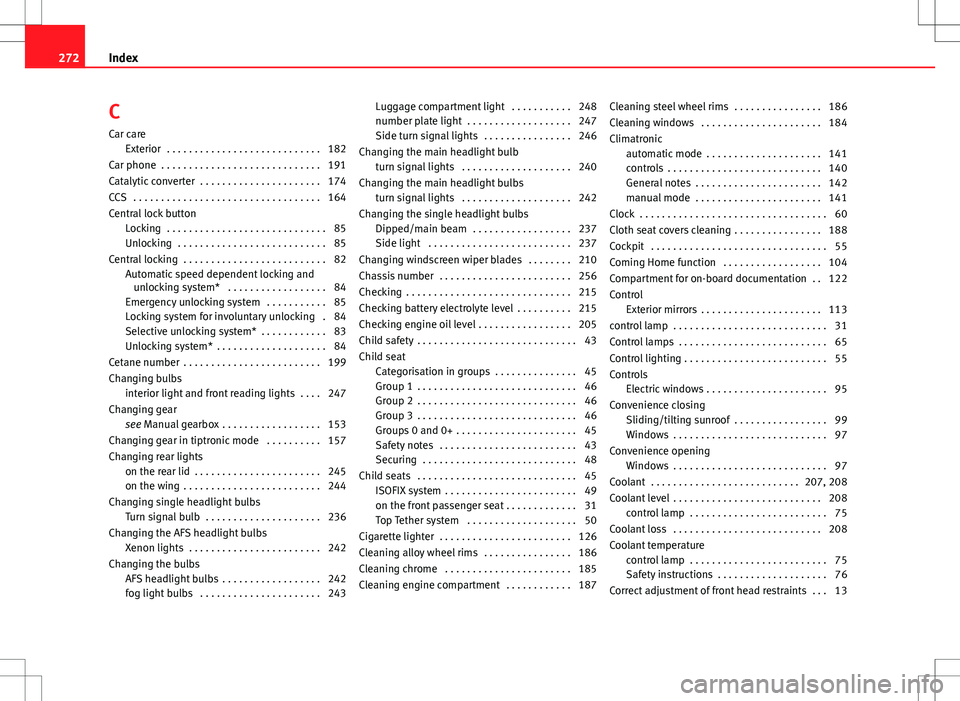
C
Car care Exterior . . . . . . . . . . . . . . . . . . . . . . . . . . . . 182
Car phone . . . . . . . . . . . . . . . . . . . . . . . . . . . . . 191
Catalytic converter . . . . . . . . . . . . . . . . . . . . . . 174
CCS . . . . . . . . . . . . . . . . . . . . . . . . . . . . . . . . . . 164
Central lock button Locking . . . . . . . . . . . . . . . . . . . . . . . . . . . . . 85
Unlocking . . . . . . . . . . . . . . . . . . . . . . . . . . . 85
Central locking . . . . . . . . . . . . . . . . . . . . . . . . . . 82 Automatic speed dependent locking andunlocking system* . . . . . . . . . . . . . . . . . . 84
Emergency unlocking system . . . . . . . . . . . 85
Locking system for involuntary unlocking . 84
Selective unlocking system* . . . . . . . . . . . . 83
Unlocking system* . . . . . . . . . . . . . . . . . . . . 84
Cetane number . . . . . . . . . . . . . . . . . . . . . . . . . 199
Changing bulbs interior light and front reading lights . . . . 247
Changing gear see Manual gearbox . . . . . . . . . . . . . . . . . . 153
Changing gear in tiptronic mode . . . . . . . . . . 157
Changing rear lights on the rear lid . . . . . . . . . . . . . . . . . . . . . . . 245
on the wing . . . . . . . . . . . . . . . . . . . . . . . . . 244
Changing single headlight bulbs Turn signal bulb . . . . . . . . . . . . . . . . . . . . . 236
Changing the AFS headlight bulbs Xenon lights . . . . . . . . . . . . . . . . . . . . . . . . 242
Changing the bulbs AFS headlight bulbs . . . . . . . . . . . . . . . . . . 242
fog light bulbs . . . . . . . . . . . . . . . . . . . . . . 243 Luggage compartment light . . . . . . . . . . . 248
number plate light . . . . . . . . . . . . . . . . . . . 247
Side turn signal lights . . . . . . . . . . . . . . . . 246
Changing the main headlight bulb turn signal lights . . . . . . . . . . . . . . . . . . . . 240
Changing the main headlight bulbs turn signal lights . . . . . . . . . . . . . . . . . . . . 242
Changing the single headlight bulbs Dipped/main beam . . . . . . . . . . . . . . . . . . 237
Side light . . . . . . . . . . . . . . . . . . . . . . . . . . 237
Changing windscreen wiper blades . . . . . . . . 210
Chassis number . . . . . . . . . . . . . . . . . . . . . . . . 256
Checking . . . . . . . . . . . . . . . . . . . . . . . . . . . . . . 215
Checking battery electrolyte level . . . . . . . . . . 215
Checking engine oil level . . . . . . . . . . . . . . . . . 205
Child safety . . . . . . . . . . . . . . . . . . . . . . . . . . . . . 43
Child seat Categorisation in groups . . . . . . . . . . . . . . . 45
Group 1 . . . . . . . . . . . . . . . . . . . . . . . . . . . . . 46
Group 2 . . . . . . . . . . . . . . . . . . . . . . . . . . . . . 46
Group 3 . . . . . . . . . . . . . . . . . . . . . . . . . . . . . 46
Groups 0 and 0+ . . . . . . . . . . . . . . . . . . . . . . 45
Safety notes . . . . . . . . . . . . . . . . . . . . . . . . . 43
Securing . . . . . . . . . . . . . . . . . . . . . . . . . . . . 48
Child seats . . . . . . . . . . . . . . . . . . . . . . . . . . . . . 45 ISOFIX system . . . . . . . . . . . . . . . . . . . . . . . . 49
on the front passenger seat . . . . . . . . . . . . . 31
Top Tether system . . . . . . . . . . . . . . . . . . . . 50
Cigarette lighter . . . . . . . . . . . . . . . . . . . . . . . . 126
Cleaning alloy wheel rims . . . . . . . . . . . . . . . . 186
Cleaning chrome . . . . . . . . . . . . . . . . . . . . . . . 185
Cleaning engine compartment . . . . . . . . . . . . 187 Cleaning steel wheel rims . . . . . . . . . . . . . . . . 186
Cleaning windows . . . . . . . . . . . . . . . . . . . . . . 184
Climatronic
automatic mode . . . . . . . . . . . . . . . . . . . . . 141
controls . . . . . . . . . . . . . . . . . . . . . . . . . . . . 140
General notes . . . . . . . . . . . . . . . . . . . . . . . 142
manual mode . . . . . . . . . . . . . . . . . . . . . . . 141
Clock . . . . . . . . . . . . . . . . . . . . . . . . . . . . . . . . . . 60
Cloth seat covers cleaning . . . . . . . . . . . . . . . . 188
Cockpit . . . . . . . . . . . . . . . . . . . . . . . . . . . . . . . . 55
Coming Home function . . . . . . . . . . . . . . . . . . 104
Compartment for on-board documentation . . 122
Control Exterior mirrors . . . . . . . . . . . . . . . . . . . . . . 113
control lamp . . . . . . . . . . . . . . . . . . . . . . . . . . . . 31
Control lamps . . . . . . . . . . . . . . . . . . . . . . . . . . . 65
Control lighting . . . . . . . . . . . . . . . . . . . . . . . . . . 55
Controls Electric windows . . . . . . . . . . . . . . . . . . . . . . 95
Convenience closing Sliding/tilting sunroof . . . . . . . . . . . . . . . . . 99
Windows . . . . . . . . . . . . . . . . . . . . . . . . . . . . 97
Convenience opening Windows . . . . . . . . . . . . . . . . . . . . . . . . . . . . 97
Coolant . . . . . . . . . . . . . . . . . . . . . . . . . . . 207, 208
Coolant level . . . . . . . . . . . . . . . . . . . . . . . . . . . 208 control lamp . . . . . . . . . . . . . . . . . . . . . . . . . 75
Coolant loss . . . . . . . . . . . . . . . . . . . . . . . . . . . 208
Coolant temperature control lamp . . . . . . . . . . . . . . . . . . . . . . . . . 75
Safety instructions . . . . . . . . . . . . . . . . . . . . 76
Correct adjustment of front head restraints . . . 13
272 Index
Page 278 of 282
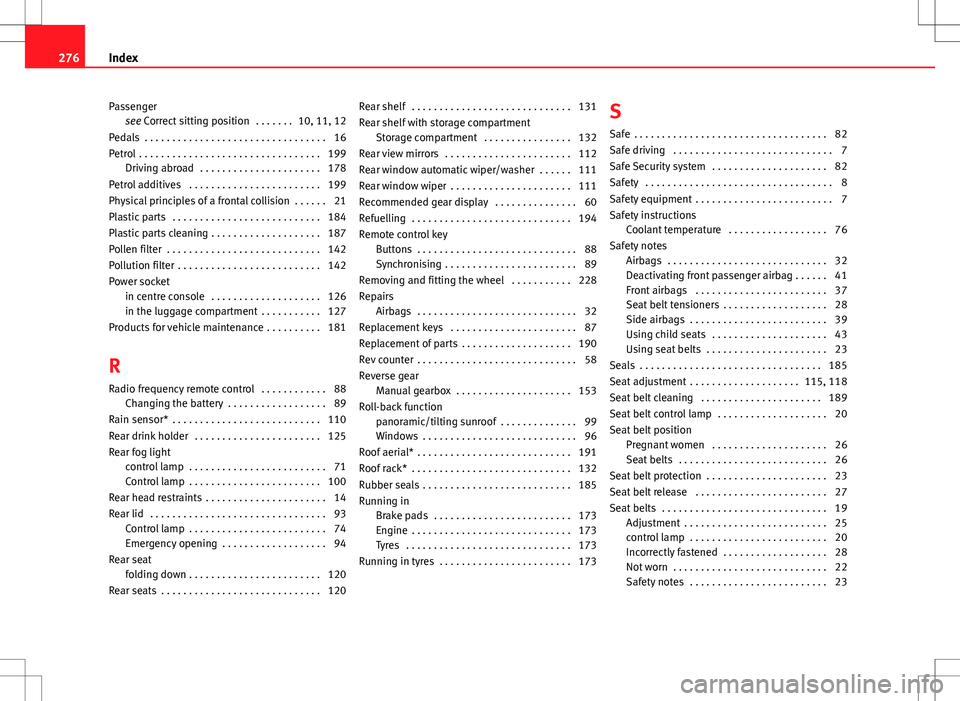
Passengersee Correct sitting position . . . . . . . 10, 11, 12
Pedals . . . . . . . . . . . . . . . . . . . . . . . . . . . . . . . . . 16
Petrol . . . . . . . . . . . . . . . . . . . . . . . . . . . . . . . . . 199 Driving abroad . . . . . . . . . . . . . . . . . . . . . . 178
Petrol additives . . . . . . . . . . . . . . . . . . . . . . . . 199
Physical principles of a frontal collision . . . . . . 21
Plastic parts . . . . . . . . . . . . . . . . . . . . . . . . . . . 184
Plastic parts cleaning . . . . . . . . . . . . . . . . . . . . 187
Pollen filter . . . . . . . . . . . . . . . . . . . . . . . . . . . . 142
Pollution filter . . . . . . . . . . . . . . . . . . . . . . . . . . 142
Power socket in centre console . . . . . . . . . . . . . . . . . . . . 126
in the luggage compartment . . . . . . . . . . . 127
Products for vehicle maintenance . . . . . . . . . . 181
R Radio frequency remote control . . . . . . . . . . . . 88 Changing the battery . . . . . . . . . . . . . . . . . . 89
Rain sensor* . . . . . . . . . . . . . . . . . . . . . . . . . . . 110
Rear drink holder . . . . . . . . . . . . . . . . . . . . . . . 125
Rear fog light control lamp . . . . . . . . . . . . . . . . . . . . . . . . . 71
Control lamp . . . . . . . . . . . . . . . . . . . . . . . . 100
Rear head restraints . . . . . . . . . . . . . . . . . . . . . . 14
Rear lid . . . . . . . . . . . . . . . . . . . . . . . . . . . . . . . . 93 Control lamp . . . . . . . . . . . . . . . . . . . . . . . . . 74
Emergency opening . . . . . . . . . . . . . . . . . . . 94
Rear seat folding down . . . . . . . . . . . . . . . . . . . . . . . . 120
Rear seats . . . . . . . . . . . . . . . . . . . . . . . . . . . . . 120 Rear shelf . . . . . . . . . . . . . . . . . . . . . . . . . . . . . 131
Rear shelf with storage compartment
Storage compartment . . . . . . . . . . . . . . . . 132
Rear view mirrors . . . . . . . . . . . . . . . . . . . . . . . 112
Rear window automatic wiper/washer . . . . . . 111
Rear window wiper . . . . . . . . . . . . . . . . . . . . . . 111
Recommended gear display . . . . . . . . . . . . . . . 60
Refuelling . . . . . . . . . . . . . . . . . . . . . . . . . . . . . 194
Remote control key Buttons . . . . . . . . . . . . . . . . . . . . . . . . . . . . . 88
Synchronising . . . . . . . . . . . . . . . . . . . . . . . . 89
Removing and fitting the wheel . . . . . . . . . . . 228
Repairs Airbags . . . . . . . . . . . . . . . . . . . . . . . . . . . . . 32
Replacement keys . . . . . . . . . . . . . . . . . . . . . . . 87
Replacement of parts . . . . . . . . . . . . . . . . . . . . 190
Rev counter . . . . . . . . . . . . . . . . . . . . . . . . . . . . . 58
Reverse gear Manual gearbox . . . . . . . . . . . . . . . . . . . . . 153
Roll-back function panoramic/tilting sunroof . . . . . . . . . . . . . . 99
Windows . . . . . . . . . . . . . . . . . . . . . . . . . . . . 96
Roof aerial* . . . . . . . . . . . . . . . . . . . . . . . . . . . . 191
Roof rack* . . . . . . . . . . . . . . . . . . . . . . . . . . . . . 132
Rubber seals . . . . . . . . . . . . . . . . . . . . . . . . . . . 185
Running in Brake pads . . . . . . . . . . . . . . . . . . . . . . . . . 173
Engine . . . . . . . . . . . . . . . . . . . . . . . . . . . . . 173
Tyres . . . . . . . . . . . . . . . . . . . . . . . . . . . . . . 173
Running in tyres . . . . . . . . . . . . . . . . . . . . . . . . 173 S
Safe . . . . . . . . . . . . . . . . . . . . . . . . . . . . . . . . . . . 82
Safe driving . . . . . . . . . . . . . . . . . . . . . . . . . . . . . 7
Safe Security system . . . . . . . . . . . . . . . . . . . . . 82
Safety . . . . . . . . . . . . . . . . . . . . . . . . . . . . . . . . . . 8
Safety equipment . . . . . . . . . . . . . . . . . . . . . . . . . 7
Safety instructions Coolant temperature . . . . . . . . . . . . . . . . . . 76
Safety notes Airbags . . . . . . . . . . . . . . . . . . . . . . . . . . . . . 32
Deactivating front passenger airbag . . . . . . 41
Front airbags . . . . . . . . . . . . . . . . . . . . . . . . 37
Seat belt tensioners . . . . . . . . . . . . . . . . . . . 28
Side airbags . . . . . . . . . . . . . . . . . . . . . . . . . 39
Using child seats . . . . . . . . . . . . . . . . . . . . . 43
Using seat belts . . . . . . . . . . . . . . . . . . . . . . 23
Seals . . . . . . . . . . . . . . . . . . . . . . . . . . . . . . . . . 185
Seat adjustment . . . . . . . . . . . . . . . . . . . . 115, 118
Seat belt cleaning . . . . . . . . . . . . . . . . . . . . . . 189
Seat belt control lamp . . . . . . . . . . . . . . . . . . . . 20
Seat belt position Pregnant women . . . . . . . . . . . . . . . . . . . . . 26
Seat belts . . . . . . . . . . . . . . . . . . . . . . . . . . . 26
Seat belt protection . . . . . . . . . . . . . . . . . . . . . . 23
Seat belt release . . . . . . . . . . . . . . . . . . . . . . . . 27
Seat belts . . . . . . . . . . . . . . . . . . . . . . . . . . . . . . 19 Adjustment . . . . . . . . . . . . . . . . . . . . . . . . . . 25
control lamp . . . . . . . . . . . . . . . . . . . . . . . . . 20
Incorrectly fastened . . . . . . . . . . . . . . . . . . . 28
Not worn . . . . . . . . . . . . . . . . . . . . . . . . . . . . 22
Safety notes . . . . . . . . . . . . . . . . . . . . . . . . . 23
276 Index