ESP Seat Ibiza ST 2016 MEDIA SYSTEM PLUS - NAVI SYSTEM - NAVI SYSTEM PLUS
[x] Cancel search | Manufacturer: SEAT, Model Year: 2016, Model line: Ibiza ST, Model: Seat Ibiza ST 2016Pages: 100, PDF Size: 2.53 MB
Page 2 of 100
SEAT S.A. is permanently concerned about continuous development of its t\�ypes and models. For this reason we ask you to under-
stand, that at any given time, changes regarding shape, equipment and te\�chnique may take place on the car delivered. For this reason
no right at all may derive based on the data, drawings and descriptions \�in this current handbook.
All texts, illustrations and standards in this handbook are based on the\� status of information at the time of printing. Except for error
or omission, the information included in the current handbook is valid a\�s of the date of closing print.
Re-printing, copying or translating, whether total or partial is not all\�owed unless SEAT allows it in written form.
SEAT reserves all rights in accordance with the “Copyright” Act.
All rights on changes are reserved.
❀This paper has been manufactured using bleached non-chlorine cellulose.
© SEAT S.A. - Reprint: 15.04.16
About this manual
This manual contains information, recommen-
dations, advice and warnings related to your
radio system. The other publications in the
vehicle documentation contain further infor -
mation of which you should be aware for your
own safety and for that of your passengers.
Ensure that the onboard documentation is
kept in the vehicle at all times. This is espe -
cially important when lending or selling the
vehicle to another person.
This manual contains a description of the
equipment supplied with the vehicle at the
time of press. Some of the units described
herein will not be available until a later date or
is only available in certain markets.
The illustrations are intended as a general
guide and may vary from the equipment fitted
in your vehicle in some details.
The screen colour and the colour of the infor -
mation displayed on it can vary according to
vehicle model. Directions and positions
of components (e.g.
right, left, front, rear) are always relative to the
direction of travel of the vehicle unless other -
wise stated.
The audiovisual material only is intended to
help users to understand certain car function -
alities better. It does not replace the instruc -
tion manual. Please use the instruction manu-
al to obtain more comprehensive information
and indications.
The equipment marked with an aster -
isk* is fitted as standard only in certain
versions, and is only supplied as op -
tional extras for some versions, or are
only offered in certain countries.
® All registered marks are indicated with
®. Although the copyright symbol does
not appear, it is a copyrighted mark.
>> The section is continued on the follow-
ing page.
Audiovisual material on a given page
WARNING
Texts preceded by this symbol contain infor -
mation on safety. They warn you about possi -
ble dangers of accident or injury.
CAUTION
Texts with this symbol draw your attention to
potential sources of damage to your vehicle.
For the sake of the environment
Texts preceded by this symbol contain rele-
vant information concerning environmental
protection.
Note
Texts preceded by this symbol contain additio -
nal information.
Page 10 of 100
Introduction
Introduction Saf ety
instructions relating to the In-
fotainment system Travelling on today's roads requires the driv-
er's
f
ull attention at all times.
Only operate the radio and its various func-
tions when the traffic situation really permits
this. WARNING
● Bef
ore starting the trip, you should famili-
arise yourself with the different radio func-
tions.
● High audio volume may represent a danger
to
you and to others.
● Adjust the volume in a way that you can
dis
tinguish surrounding noise, for example,
horns and sirens, etc.
● Changes to the Infotainment system set-
ting
s should be made when the car is stop-
ped, or by a passenger. WARNING
Distracting the driver in any way can lead to
an ac c
ident and cause injuries. Operating the
Infotainment system can distract your atten-
tion from the traffic.
● Always drive carefully and responsibly. ●
Sel ect
volume settings that allow you to
easily hear signals from outside the vehicle
at all times (e.g. emergency services sirens
and horns).
● Hearing may be impaired if using too high a
vo
lume setting, even if only for short periods
of time. WARNING
The volume level may suddenly change when
y ou sw
itch audio source or connect a new au-
dio source.
● Lower the base volume before connecting
or swit
ching audio sources. WARNING
The driving recommendations and traffic indi-
c ation
s shown on the navigation system may
differ from the current traffic situation.
● Traffic signs and traffic regulations have
priority o
ver the recommendations and dis-
plays provided by the navigation system.
● Adjust your vehicle speed and driving style
to s
uit visibility, weather, road and traffic
conditions. WARNING
Connecting, inserting or removing a data me-
dium whi l
e driving can distract your attention
from the traffic and cause an accident. WARNING
Connecting leads for external devices may
o b
struct the driver.
● Arrange the connecting leads so that they
do not o
bstruct the driver. WARNING
External devices that are loose or not proper-
ly sec
ured could move around the passenger
compartment during a sudden driving or
braking manoeuvre or an accident and cause
damage or injury.
● Never place or fit external devices to the
doors, w
indscreen, steering wheel, dash pan-
el, the backs of the seats, on top of or near
the area marked “AIRBAG” or between these
areas and the occupants. External devices
can cause serious injury in an accident, espe-
cially when the airbags inflate. WARNING
The armrest may obstruct the driver's arm
mo v
ements, which could cause an accident
and severe injuries.
● Always keep the armrest closed while the
vehic
le is in motion. WARNING
Opening a CD or DVD player's housing can
l e
ad to injuries from invisible laser radiation.
● Have CD or DVD players repaired only by a
qualified w
orkshop.8
Page 17 of 100
Introduction
voice control main screen will be displayed,
› ›
› Fig. 9, (the main screen will appear in the
format selected in Voice control settings
››› page 17). The spoken instructions will
guide you through the following “dialogue”.
● Pronounce the desired order and follow the
ins
tructions of the “dialogue”. A function can
often be activated with different spoken com-
mands. If in doubt, try giving a command or
say Help.
● When an action is performed (e.g. calling a
cont
act), the voice control automatically de-
activates and must be reactivated again
when needed. There are certain commands
after which the voice control does not end
and waits with What do you wish to do
now? .
● To finish voice control manually, either
pre
ss and hold the button on the multi-
function steering wheel until the correspond-
ing confirmation signal is heard or give two
quick presses on the button on the steer-
ing wheel, or on the VOICE button of the in-
fotainment system, or press the function
button in the top right corner of the screen.
Help with voice control
Listening to Help when using voice control for
the first time is recommended.
● Activate voice control / VOICE.
● Give the Help comm
and in the language
established in the System setup , and fol-low the dialogue instructions. The
Help com-
m
and can also be spoken followed by the in-
fotainment system function, for example,
“Help with the navigation”.
Interaction with the dialogue mode
Icons in the top left corner:
The system is expecting a command
from the user.
The system has recognised a command
and will act shortly.
The system is sending a spoken com-
mand and confirms the command given.
The system is in pause mode. (max. 3
minutes).Hide or show the voice control menu
››› page 17.
Operation during the dialogue
While the infotainment system transmits a
spoken indication, the display will show the
symbol .
● The announcement can be stopped by
pre
ssing the upper left icon on the screen,
the button on the steering wheel or the
VOICE button, and voice recognition for the
user will resume.
IMPORTANT: The system will ONLY recognise
a command when the symbol is displayed
as “active” on the display or touch screen.
/
If you make a mistake when giving a com-
mand or giv
e an incomplete command, and it
has no effect, you can repeat the command.
The symbol remains active.
● Briefly press the / VOICE butt
on to re-
peat the command.
Instructions for voice control
For optimum functioning of the voice control,
follow these instructions:
● Speak slowly and clearly, as far as possi-
bl
e. The system will not recognise words that
are not pronounced clearly, or words and fig-
ures in which syllables are omitted.
● Telephone numbers must be given digit by
digit or in b
locks of numbers in ones, tens or
hundreds.
● Speak at a normal volume, without exag-
ger
ated intonation or long pauses.
● Avoid noise from the exterior and nearby
(for e
xample, conversations inside the vehi-
cle). Close all doors, windows and the sliding
roof.
● Do not aim the air from the diffusers at the
roof
of the passenger compartment.
● If you are driving very fast, speak a little
louder.
When
you activate voice control you are tak-
en to the main screen ››› Fig. 9 where the »
15
Page 21 of 100
Audio and Media Mode
RDS radio data services (FM band) The RDS (Radio Data System) offers addition-
al
inf
ormation in FM such as the visualisation
of the station name, automatic station track-
ing (Alternative Frequencies AF), text emitted
by radio (Radio Text), traffic reports (TP) and
station types (PTY).
Due to matters of infrastructure, RDS func-
tions may be limited in certain countries, and
you may not be able to receive traffic an-
nouncements, automatic station tracking (AF)
or programme types (PTY).
Depending on the country and the unit in
question, the RDS can be deactivated in the FM setup menu ›››
page 24.
Without RDS it is not possible to use radio
data services.
Name of the station and automatic station
tracking
If equipped with the RDS function, the names
of the stations can be displayed in the main
RADIO menu and in the FM station list .
FM radio stations may occasionally or contin-
uously broadcast different content on differ-
ent regional frequencies under the same sta-
tion name (e.g. Station 3). By default, automatic station tracking always
sw
it
ches to the currently selected station's
frequency that offers the best reception, as
the vehicle travels from one area to the next.
As a result, this may cause the regional sig-
nal to be lost.
Automatic frequency changing and automatic
station tracking can be deactivated in FM setup ››› page 24.
Set a station name 1)
In some cases the name of the station is too
long. This text may be blocked/unblocked by
pressing on the station name for 3 seconds
until hearing an audible signal (a dot will ap-
pear/disappear on the left and right of the
station name).
Radio text
Some RDS-enabled stations also broadcast
additional text information known as radio
text.
Radio Text is displayed in the upper half of
the screen above the memory buttons
››› Fig. 10 A .
The R a
dio Text display can be deactivated in
FM setup ››› page 24. Note
Radio stations are responsible for the content
of the inf
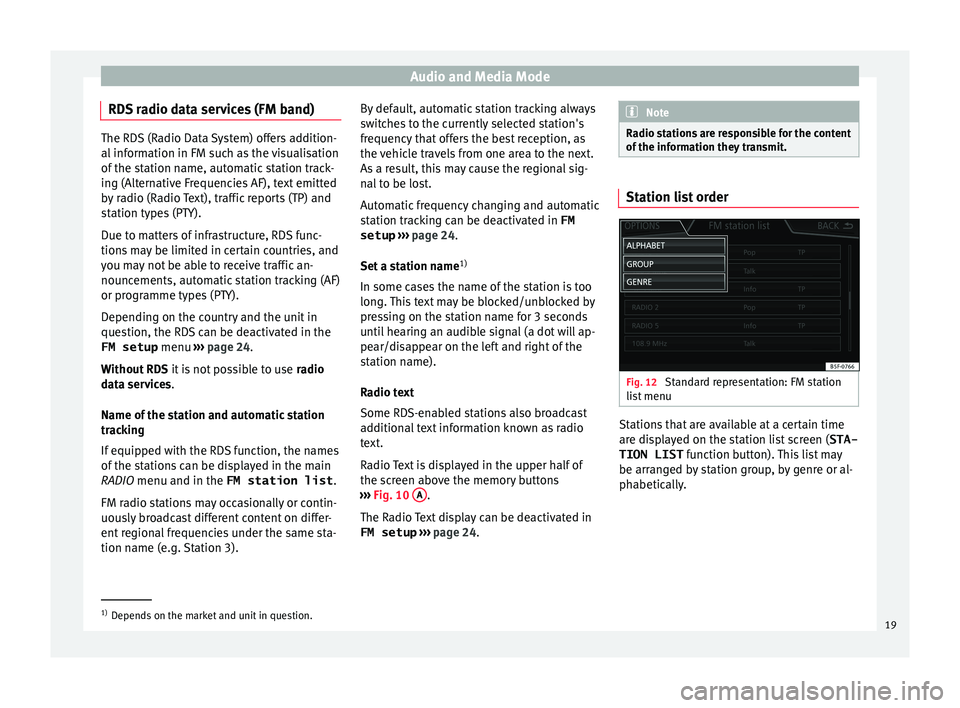
ormation they transmit. Station list order
Fig. 12
Standard representation: FM station
li s
t menu Stations that are available at a certain time
ar
e di
splayed on the station list screen ( STA-
TION LIST function button). This list may
be arranged by station group, by genre or al-
phabetically. 1)
Depends on the market and unit in question.
19
Page 23 of 100
Audio and Media Mode
Once the corresponding FM station has been
f ou
nd, (FM) is displayed after the station
name. When reception for the corresponding
DAB station returns, the unit will switch back
to DAB mode after a short time. The (FM)
display is hidden.
If the reception of the selected DAB station is
too weak and the station can no longer be
found on the FM frequency band, the radio
will be muted.
Automatic station tracking: “Soft linking ”1)
This allows service providers to indicate alter-
native stations with similar content. This way,
if the radio loses reception of a DAB station
and cannot find an alternative frequency for
it on FM or DAB, there is a possibility of tun-
ing in to a station with similar content.
Screen view menu
The function buttons refer to the menu that
appears when the View button is pressed
› ›
› Fig. 13.
Function button: function
Preset list: Memory buttons display ››› Fig. 13.
Station information: Simultaneous display of radio text and
slideshows instead of the memory buttons ››› Fig. 14.
Function button: function
Radio text: Radio text is displayed instead of memory
buttons.
Presentation: The slideshows are displayed in full screen. Note
● Not a
ll DAB stations support Radio Text and
slideshows.
● Radio stations are responsible for the con-
tent
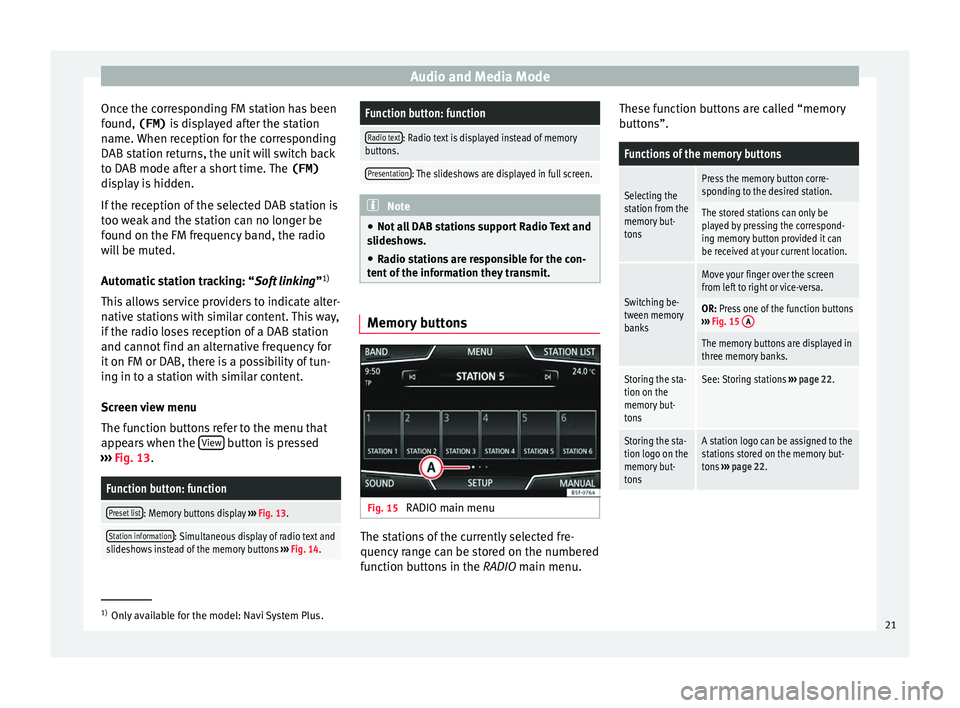
of the information they transmit. Memory buttons
Fig. 15
RADIO main menu The stations of the currently selected fre-
quency r
ange can be stored on the numbered
function buttons in the RADIO main menu. These function buttons are called “memory
butt
ons”.
Functions of the memory buttons
Selecting the
station from the
memory but-
tonsPress the memory button corre-
sponding to the desired station.
The stored stations can only be
played by pressing the correspond-
ing memory button provided it can
be received at your current location.
Switching be-
tween memory
banks
Move your finger over the screen
from left to right or vice-versa.
OR: Press one of the function buttons
››› Fig. 15 A
The memory buttons are displayed in
three memory banks.
Storing the sta-
tion on the
memory but-
tonsSee: Storing stations
››› page 22.
Storing the sta-
tion logo on the
memory but-
tonsA station logo can be assigned to the
stations stored on the memory but-
tons ››› page 22. 1)
Only available for the model: Navi System Plus.
21
Page 28 of 100

Audio and Media Mode
Media mode Intr oduction
› › ›
table on page 2
“Media sources” are audio sources contain-
ing audio files on various different data stor-
age devices (e.g. CD, memory card, external
MP3 player). These audio files can be played
by the Infotainment system via their corre-
sponding drives or audio input sockets (inter-
nal CD drive, memory card slot, AUX-IN multi-
media socket etc.). Copyright
Audio and
v
ideo files on data storage devices
are usually protected by intellectual property
rights, as per the corresponding national and
international laws. Be aware of the current le-
gal provisions! Note
● MPE G-4 HE
-AAC audio coding technology
and patents are licensed from Fraunhofer IIS.
● This product is subject to certain intellectu-
al
property rights and copyrights owned by
the Microsoft Corporation. The use or distri-
bution of this type of technology outside this
product requires a licence from Microsoft or
an authorised Microsoft company. ●
The inf ot
ainment system only plays undam-
aged compatible audio files; other files are
ignored.
● Consult the list of supported devices on the
SEA
T website. Requirements for data storage devices and files
Factory-fitted CD and DVD drives conform to
s
af
ety class 1 according to DIN IEC 76 (CO)
6/ VDE 0837.
The Infotainment system only accepts stand-
ard 12 cm CDs/DVDs and memory cards with these dimensions: 32 mm x 24 mm x 2.1 mm
or 1.4 mm.
The sup
ported file formats listed are collec-
tively referred to below as “audio files”. A CD containing audio files of these types is refer-
red t
o as an “audio data CD”.
26
Page 33 of 100
Audio and Media Mode
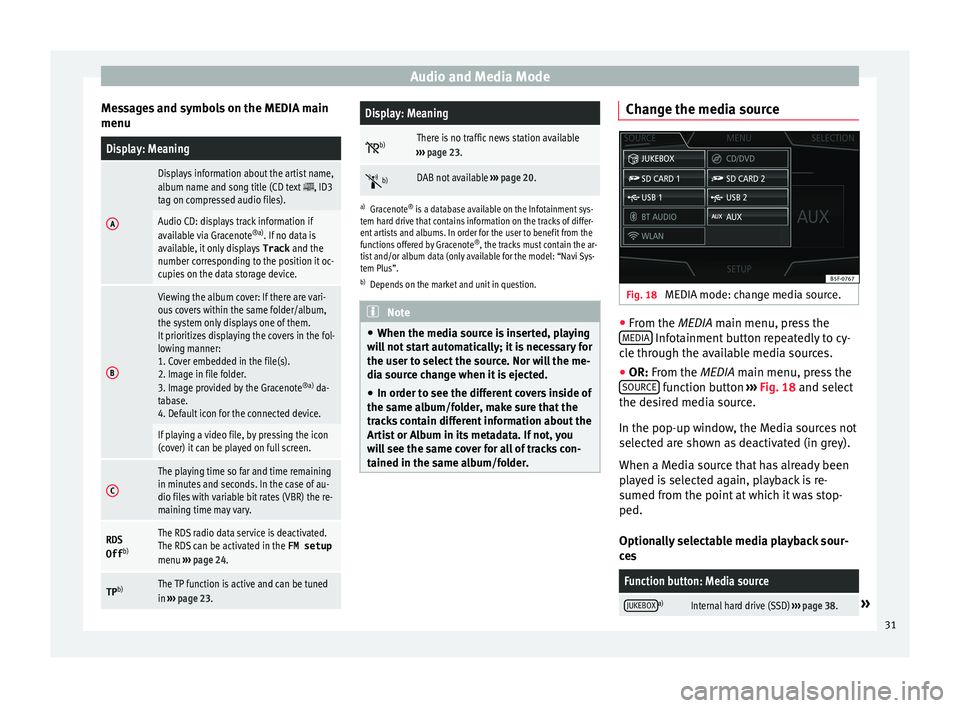
Messages and symbols on the MEDIA main
menuDisplay: Meaning
A
Displays information about the artist name,
album name and song title (CD text , ID3
tag on compressed audio files).
Audio CD: displays track information if
available via Gracenote ®a)
. If no data is
available, it only displays Track and the
number corresponding to the position it oc-
cupies on the data storage device.
B
Viewing the album cover: If there are vari-
ous covers within the same folder/album,
the system only displays one of them.
It prioritizes displaying the covers in the fol-
lowing manner:
1. Cover embedded in the file(s).
2. Image in file folder.
3. Image provided by the Gracenote ®a)
da-
tabase.
4. Default icon for the connected device.
If playing a video file, by pressing the icon
(cover) it can be played on full screen.
C
The playing time so far and time remaining
in minutes and seconds. In the case of au-
dio files with variable bit rates (VBR) the re-
maining time may vary.
RDS
Off b)The RDS radio data service is deactivated.
The RDS can be activated in the
FM setup
menu ››› page 24.
TP b)The TP function is active and can be tuned
in
››› page 23.
Display: Meaning
b)There is no traffic news station available
››› page 23.
b)DAB not available
››› page 20.
a)
Gracenote ®
is a database available on the Infotainment sys-
tem hard drive that contains information on the tracks of differ-
ent artists and albums. In order for the user to benefit from the
functions offered by Gracenote ®
, the tracks must contain the ar-
tist and/or album data (only available for the model: “Navi Sys-
tem Plus”.
b) Depends on the market and unit in question. Note
● When the medi a sour
ce is inserted, playing
will not start automatically; it is necessary for
the user to select the source. Nor will the me-
dia source change when it is ejected.
● In order to see the different covers inside of
the same a
lbum/folder, make sure that the
tracks contain different information about the
Artist or Album in its metadata. If not, you
will see the same cover for all of tracks con-
tained in the same album/folder. Change the media source
Fig. 18
MEDIA mode: change media source. ●
From the MEDIA m ain menu, pr
ess the
MEDIA Infotainment button repeatedly to cy-
c l
e through the available media sources.
● OR: From the MEDIA main menu, press the
SOURC
E function button
››
› Fig. 18 and select
the desired media source.
In the pop-up window, the Media sources not
selected are shown as deactivated (in grey).
When a Media source that has already been
played is selected again, playback is re-
sumed from the point at which it was stop-
ped.
Optionally selectable media playback sour-
ces
Function button: Media source
JUKEBOXa)Internal hard drive (SSD) ››› page 38.» 31
Page 34 of 100

Audio and Media ModeFunction button: Media source
CD/DVDb)Internal CD/DVD drive
››› page 35.
SD CARD 1SD memory card ››› page 35.SD CARD 2*
USB 1External data storage device connected
to the USB port ››› page 36.USB 2*
AUXExternal audio source connected to the
AUX-IN multimedia socket ››› page 37.
BT AUDIOBluetooth ®
audio ››› page 37.
WLANa)External audio source connected by
WLAN ››› page 40
a)
Only available for the model: “Navi System Plus”.
b) The DVD drive is only available for the model: “Navi System
Plus”. Note
The Media source can be changed in the T r
ack
list view ››› page 33. Changing track in the MEDIA main
menu
Fig. 19
MEDIA main menu. It is possible to browse through the tracks of
the M
edi
a source that is currently playing us-
ing the arrow buttons.
It is not possible to exit a playlist or start the
playback of a playlist using the arrow but-
tons. Both actions must be performed man-
ually from the track selection menu
››› page 33. Controlling playback via the MEDIA main
menu
ActionFunction
Briefly press
the func-
tion button once.
Goes to the start of the cur-
rent track. If the track has
been playing for less than 3
seconds, it skips to the be-
ginning of the previous
track.
Quickly press the func-
tion button twice.If the track has been play-
ing for more than 3 sec-
onds, it skips to the begin-
ning of the previous track;
from the first track it skips
to the last track on the data
storage device being
played.
Briefly press the func-
tion button once.Goes to the next track. It
changes from the previous
track to the first track of the
data storage device being
played.
Press and hold the function button.Fast rewind.
Press and hold the function button.Fast forward.
Slide your finger horizon-
tally across the screen.
Changes to the previ-
ous/next track, respecting
the same playing times as
when changing tracks with
the
or buttons.32
Page 37 of 100
Audio and Media Mode
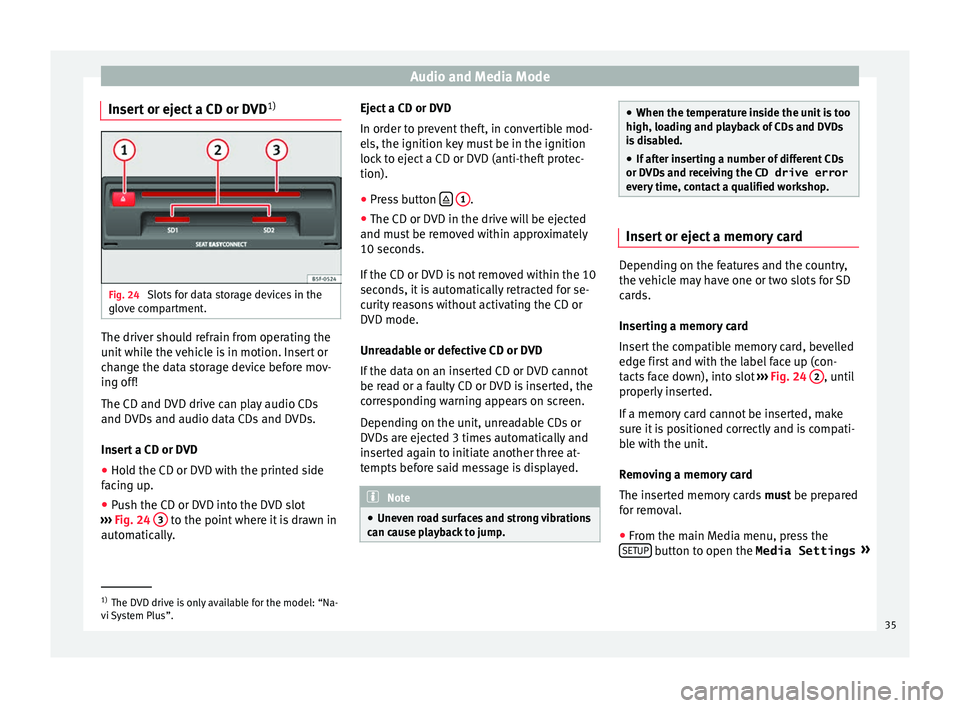
Insert or eject a CD or DVD 1)Fig. 24
Slots for data storage devices in the
glo v
e compartment. The driver should refrain from operating the
u
nit
while the vehicle is in motion. Insert or
change the data storage device before mov-
ing off!
The CD and DVD drive can play audio CDs
and DVDs and audio data CDs and DVDs.
Insert a CD or DVD
● Hold the CD or DVD with the printed side
fac
ing up.
● Push the CD or DVD into the DVD slot
››
› Fig. 24 3 to the point where it is drawn in
aut om
atically. Eject a CD or DVD
In order t
o prevent theft, in convertible mod-
els, the ignition key must be in the ignition
lock to eject a CD or DVD (anti-theft protec-
tion).
● Press button
1 .
● The CD or DVD in the drive will be ejected
and mu s
t be removed within approximately
10 seconds.
If the CD or DVD is not removed within the 10
seconds, it is automatically retracted for se-
curity reasons without activating the CD or
DVD mode.
Unreadable or defective CD or DVD
If the data on an inserted CD or DVD cannot
be read or a faulty CD or DVD is inserted, the
corresponding warning appears on screen.
Depending on the unit, unreadable CDs or
DVDs are ejected 3 times automatically and
inserted again to initiate another three at-
tempts before said message is displayed. Note
● Unev en r
oad surfaces and strong vibrations
can cause playback to jump. ●
When the t emper
ature inside the unit is too
high, loading and playback of CDs and DVDs
is disabled.
● If after inserting a number of different CDs
or DVD
s and receiving the CD drive error
every time, contact a qualified workshop. Insert or eject a memory card
Depending on the features and the country,
the
v
ehicle may have one or two slots for SD
cards.
Inserting a memory card
Insert the compatible memory card, bevelled
edge first and with the label face up (con-
tacts face down), into slot ››› Fig. 24 2 , until
pr operly
inserted.
If a memory card cannot be inserted, make
sure it is positioned correctly and is compati-
ble with the unit.
Removing a memory card
The inserted memory cards must be prepared
for removal.
● From the main Media menu, press the
SETUP button to open the Media Settings
»1)
The DVD drive is only available for the model: “Na-
v i
System Plus”. 35
Page 40 of 100
Audio and Media Mode
Conditions
● The Bluetooth ®
audio sour c
e must support
the A2DP Bluetooth ®
profile.
● In the Bluetooth settings menu, the
Bluetooth Audio (A2DP/A
VRCP) function must
be activ at
ed ››› page 75.
Starting Bluetooth ®
audio transfer
● Activate Bluetooth ®
vi
sibility on the exter-
nal Bluetooth ®
audio source (e.g., mobile tel-
ephone).
● Lower the base volume on the Infotainment
sys
tem.
● Press the Infotainment MEDIA button.
● Press the SOURC
E function button and then
sel ect
BT audio .
● Press Find new dev
ic
e in order to connect an
e xt
ernal Bluetooth ®
audio source for the first
time ››› page 66.
● OR: Select a Bluetooth ®
e
xternal audio
source from the list.
● Please refer to the instructions on the
sc
reen of the Infotainment system and on the
Bluetooth ®
audio source regarding the rest
of the procedure.
You may still need to manually start playback
on the Bluetooth ®
source.
When playback on the Bluetooth ®
audio
source is stopped, the Infotainment system
remains in Bluetooth ®
Audio mode. Controlling playback
The ext
ent to which the Bluetooth ®
audio
source can be controlled via the Infotainment
system depends on the connected Blue-
tooth ®
audio source.
The available functions will depend on the
Bluetooth ®
Audio profile that the connected
external player supports.
With media players that support the AVRCP
Bluetooth ®
profile, playback on the Blue-
tooth ®
audio source can be automatically
started or stopped when the unit is switched
to Bluetooth ®
Audio mode or to a different
audio source. In addition, it is possible to
view or change the track via the Infotainment
system. Note
● Due t
o the large number of possible Blue-
tooth ®
audio sources, it is not possible to
guarantee fault-free operation of all descri-
bed functions.
● Always switch off the warning and service
tone
s on a connected Bluetooth ®
audio
source, e.g. key tones on a mobile telephone,
to prevent possible interference noise and
malfunctions.
● To play music, do not link the external me-
dia p
layer simultaneously to Bluetooth and
the USB interface of the infotainment system,
as this can cause limitations during playback. ●
Dependin
g on the external player connec-
ted, the response time of the system can
vary.
● Do not connect an external media player to
pl
ay music via Bluetooth ®
and via the USB
port ››› page 36 at the same time with the
Infotainment system, as this could cause playback limitations.
● If the external player is an Apple device™,
it
cannot be simultaneously connected by
USB and by Bluetooth. Jukebox (SSD)
3 On
ly
available for the model: Navi System Plus Fig. 25
Manage Jukebox38