window Seat Ibiza ST 2016 Owner's manual
[x] Cancel search | Manufacturer: SEAT, Model Year: 2016, Model line: Ibiza ST, Model: Seat Ibiza ST 2016Pages: 252, PDF Size: 5.56 MB
Page 5 of 252
Table of Contents
Table of Contents
The e s
senti a
ls . . . . . . . . . . . . . . . . . . . . . . . . 5
Exterior view . . . . . . . . . . . . . . . . . . . . . . . . . . . . 5
Exterior view . . . . . . . . . . . . . . . . . . . . . . . . . . . . 6
Interior view (left-hand drive) . . . . . . . . . . . . . . 7
Interior view (right-hand drive) . . . . . . . . . . . . . 8
How it works . . . . . . . . . . . . . . . . . . . . . . . . . . . . 9
Opening and closing . . . . . . . . . . . . . . . . . . . . . 9
Before driving . . . . . . . . . . . . . . . . . . . . . . . . . . . 12
Airbags . . . . . . . . . . . . . . . . . . . . . . . . . . . . . . . . 14
Child seats . . . . . . . . . . . . . . . . . . . . . . . . . . . . . 16
Starting the vehicle . . . . . . . . . . . . . . . . . . . . . . 21
Lights and visibility . . . . . . . . . . . . . . . . . . . . . . 21
Easy Connect . . . . . . . . . . . . . . . . . . . . . . . . . . . 24
Driver information system . . . . . . . . . . . . . . . . . 25
Journey data . . . . . . . . . . . . . . . . . . . . . . . . . . . . 29
Cruise control . . . . . . . . . . . . . . . . . . . . . . . . . . . 34
Warning lamps . . . . . . . . . . . . . . . . . . . . . . . . . . 35
Gearbox lever . . . . . . . . . . . . . . . . . . . . . . . . . . . 37
Air conditioning . . . . . . . . . . . . . . . . . . . . . . . . . 39
Fluid Level control . . . . . . . . . . . . . . . . . . . . . . . 40
Emergencies . . . . . . . . . . . . . . . . . . . . . . . . . . . . 44
Fuses . . . . . . . . . . . . . . . . . . . . . . . . . . . . . . . . . . 44
Bulbs . . . . . . . . . . . . . . . . . . . . . . . . . . . . . . . . . . 45
Action in the event of a puncture . . . . . . . . . . . 45
Changing a wheel . . . . . . . . . . . . . . . . . . . . . . . 47
Snow chains . . . . . . . . . . . . . . . . . . . . . . . . . . . . 50
Emergency towing of the vehicle . . . . . . . . . . . 51
How to jump start . . . . . . . . . . . . . . . . . . . . . . . . 52
Changing the windscreen wiper blades . . . . . . 54
Safety . . . . . . . . . . . . . . . . . . . . . . . . . . . . . . . . 56
Safe driving . . . . . . . . . . . . . . . . . . . . . . . . . . . . 56
Safety first! . . . . . . . . . . . . . . . . . . . . . . . . . . . . . 56
Advice about driving . . . . . . . . . . . . . . . . . . . . . 56 Correct position for passengers . . . . . . . . . . . . 57
Pedal area . . . . . . . . . . . . . . . . . . . . . . . . . . . . . . 61
Seat belts
. . . . . . . . . . . . . . . . . . . . . . . . . . . . . . 61
Why wear a seat belt? . . . . . . . . . . . . . . . . . . . . 61
How to properly adjust your seatbelt . . . . . . . . 64
Belt pretensioners* . . . . . . . . . . . . . . . . . . . . . . 65
Airbag system . . . . . . . . . . . . . . . . . . . . . . . . . . 66
Brief introduction . . . . . . . . . . . . . . . . . . . . . . . . 66
Airbag safety instructions . . . . . . . . . . . . . . . . . 69
Deactivating airbags . . . . . . . . . . . . . . . . . . . . . 70
Transporting children safely . . . . . . . . . . . . . . . 72
Safety for children . . . . . . . . . . . . . . . . . . . . . . . 72
Child seats . . . . . . . . . . . . . . . . . . . . . . . . . . . . . 73
Emergencies . . . . . . . . . . . . . . . . . . . . . . . . . . 75
Self-help . . . . . . . . . . . . . . . . . . . . . . . . . . . . . . . 75
Emergency equipment . . . . . . . . . . . . . . . . . . . . 75
Tyre repair . . . . . . . . . . . . . . . . . . . . . . . . . . . . . . 76
Changing the windscreen wiper blades . . . . . . 78
Towing or tow-starting . . . . . . . . . . . . . . . . . . . . 79
Fuses and bulbs . . . . . . . . . . . . . . . . . . . . . . . . . 81
Fuses . . . . . . . . . . . . . . . . . . . . . . . . . . . . . . . . . . 81
Changing bulbs . . . . . . . . . . . . . . . . . . . . . . . . . 83
Single headlight bulb change . . . . . . . . . . . . . . 84
Double headlight bulb change . . . . . . . . . . . . . 85
Changing the AFS headlight bulbs . . . . . . . . . . 87
Changing the fog light bulbs . . . . . . . . . . . . . . . 88
Changing the tail light bulbs . . . . . . . . . . . . . . . 89
Changing the side and interior bulbs . . . . . . . . 91
Operation . . . . . . . . . . . . . . . . . . . . . . . . . . . . . 95
Controls and displays . . . . . . . . . . . . . . . . . . . . 95
General instrument panel . . . . . . . . . . . . . . . . . 94
Instruments and warning/control lamps . . . . . 96
Instruments . . . . . . . . . . . . . . . . . . . . . . . . . . . . 96
Warning and control lamps . . . . . . . . . . . . . . . . 100
Introduction to the Easy Connect system* . . . . 101
System settings (CAR)* . . . . . . . . . . . . . . . . . . . 101 Communications and multimedia
. . . . . . . . . . . 103
Steering wheel controls* . . . . . . . . . . . . . . . . . . 103
Multimedia . . . . . . . . . . . . . . . . . . . . . . . . . . . . . 107
Opening and closing . . . . . . . . . . . . . . . . . . . . . 107
Central locking system . . . . . . . . . . . . . . . . . . . . 107
Keys . . . . . . . . . . . . . . . . . . . . . . . . . . . . . . . . . . . 111
Radio frequency remote control* . . . . . . . . . . . 112
Anti-theft alarm* . . . . . . . . . . . . . . . . . . . . . . . . 113
Boot hatch . . . . . . . . . . . . . . . . . . . . . . . . . . . . . 115
Electric windows . . . . . . . . . . . . . . . . . . . . . . . . . 115
Tilting panoramic roof* . . . . . . . . . . . . . . . . . . . 117
Lights and visibility . . . . . . . . . . . . . . . . . . . . . . 118
Lights . . . . . . . . . . . . . . . . . . . . . . . . . . . . . . . . . 118
Interior lights . . . . . . . . . . . . . . . . . . . . . . . . . . . 123
Visibility . . . . . . . . . . . . . . . . . . . . . . . . . . . . . . . 124
Windscreen wiper and rear window wiper sys-
tems . . . . . . . . . . . . . . . . . . . . . . . . . . . . . . . . . . 125
Re
ar view mirrors . . . . . . . . . . . . . . . . . . . . . . . . 126
Seats and head restraints . . . . . . . . . . . . . . . . . 128
Adjusting the seat and head restraints . . . . . . 128
Seat functions . . . . . . . . . . . . . . . . . . . . . . . . . . 130
Transport and practical equipment . . . . . . . . . 131
Practical equipment . . . . . . . . . . . . . . . . . . . . . . 131
Luggage compartment . . . . . . . . . . . . . . . . . . . . 135
Roof rack/roof luggage rack* . . . . . . . . . . . . . . 138
Air conditioning . . . . . . . . . . . . . . . . . . . . . . . . . 140
Heating, ventilation and cooling . . . . . . . . . . . . 140
Heating and fresh air . . . . . . . . . . . . . . . . . . . . . 142
Air conditioning* . . . . . . . . . . . . . . . . . . . . . . . . 144
Climatronic* . . . . . . . . . . . . . . . . . . . . . . . . . . . . 146
Driving . . . . . . . . . . . . . . . . . . . . . . . . . . . . . . . . 148
Address . . . . . . . . . . . . . . . . . . . . . . . . . . . . . . . . 148
Starting and stopping the engine . . . . . . . . . . . 150
Braking and parking . . . . . . . . . . . . . . . . . . . . . 152
Braking and stability systems . . . . . . . . . . . . . . 155
Manual gearbox . . . . . . . . . . . . . . . . . . . . . . . . . 161
Automatic gearbox* . . . . . . . . . . . . . . . . . . . . . . 161
Run-in and economical driving . . . . . . . . . . . . . 167 3
Page 13 of 252
The essentials
● Rel
ea
se the bonnet stay and secure it in
the fixture designed for this in the bonnet.
››› in safety notes for work in the en-
gine compartment on page 202
››› page 201 Electric windows*
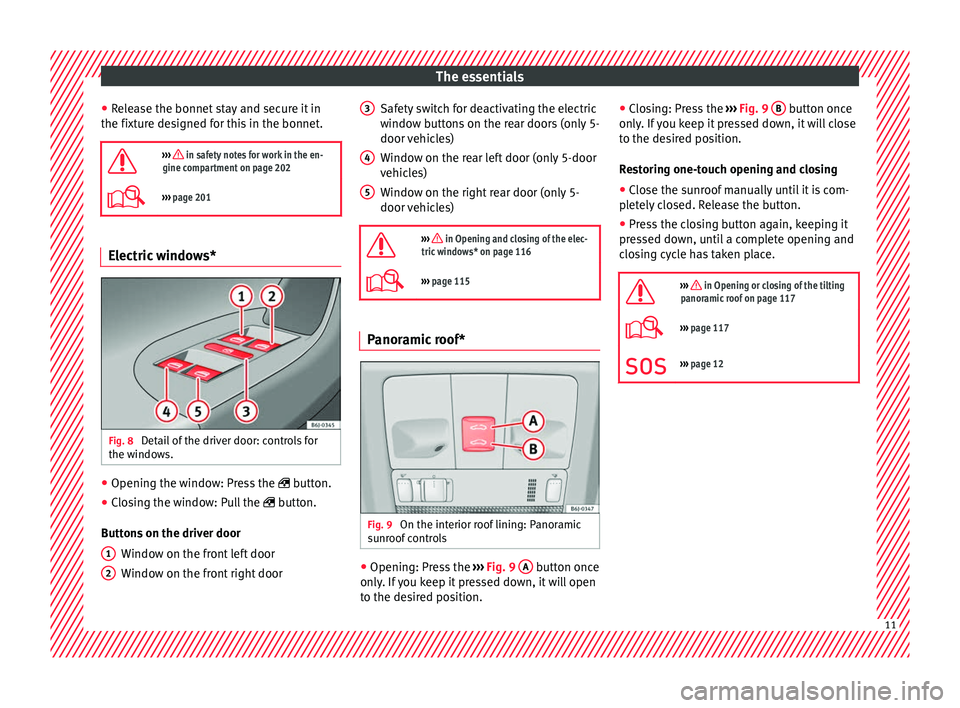
Fig. 8
Detail of the driver door: controls for
the w indo
ws. ●
Opening the window: Press the b
utton.
● Clo
sing the window: Pull the button.
Butt
ons on the driver door
Window on the front left door
Window on the front right door
1 2 Safety switch for deactivating the electric
w
indo
w butt
ons on the rear doors (only 5-
door vehicles)
Window on the rear left door (only 5-door
vehicles)
Window on the right rear door (only 5-
door vehicles)
››› in Opening and closing of the elec-
tric windows* on page 116
››› page 115 Panoramic roof*
Fig. 9
On the interior roof lining: Panoramic
s u
nr oof
controls ●
Opening: Press the ›
›› Fig. 9
A button once
on ly
. If
you keep it pressed down, it will open
to the desired position. 3 4
5 ●
Clo
sin
g: Press the ››› Fig. 9 B button once
on ly
. If
you keep it pressed down, it will close
to the desired position.
Restoring one-touch opening and closing
● Close the sunroof manually until it is com-
pletely
closed. Release the button.
● Press the closing button again, keeping it
pressed do
wn, until a complete opening and
closing cycle has taken place.
››› in Opening or closing of the tilting
panoramic roof on page 117
››› page 117
››› page 12 11
Page 25 of 252
The essentials
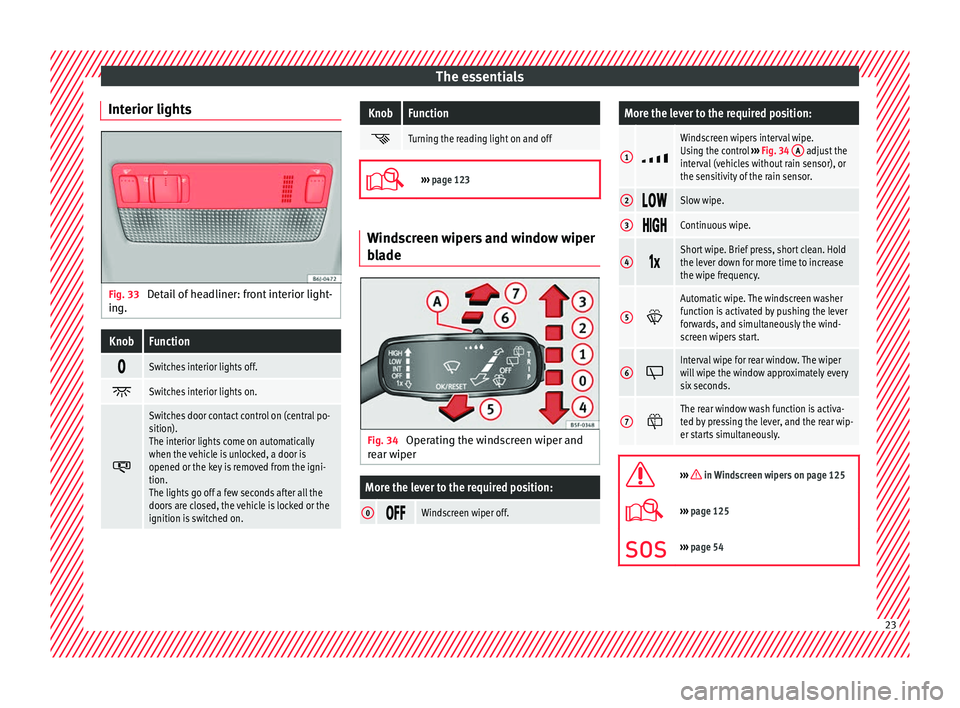
Interior lights Fig. 33
Detail of headliner: front interior light-
in g.KnobFunction
Switches interior lights off.
Switches interior lights on.
Switches door contact control on (central po-
sition).
The interior lights come on automatically
when the vehicle is unlocked, a door is
opened or the key is removed from the igni-
tion.
The lights go off a few seconds after all the
doors are closed, the vehicle is locked or the
ignition is switched on.
KnobFunction
Turning the reading light on and off
›››
page 123 Windscreen wipers and window wiper
bla
de Fig. 34
Operating the windscreen wiper and
r e
ar w iper
More the lever to the required position:
0 Windscreen wiper off.
More the lever to the required position:
1
Windscreen wipers interval wipe.
Using the control
››› Fig. 34 A adjust the
interval (vehicles without rain sensor), or
the sensitivity of the rain sensor.
2 Slow wipe.
3
Continuous wipe.
4
Short wipe. Brief press, short clean. Hold
the lever down for more time to increase
the wipe frequency.
5
Automatic wipe. The windscreen washer
function is activated by pushing the lever
forwards, and simultaneously the wind-
screen wipers start.
6
Interval wipe for rear window. The wiper
will wipe the window approximately every
six seconds.
7
The rear window wash function is activa-
ted by pressing the lever, and the rear wip-
er starts simultaneously.
››› in Windscreen wipers on page 125
›››
page 125
››› page 54 23
Page 41 of 252
The essentials
Air conditioning Ho w doe
s
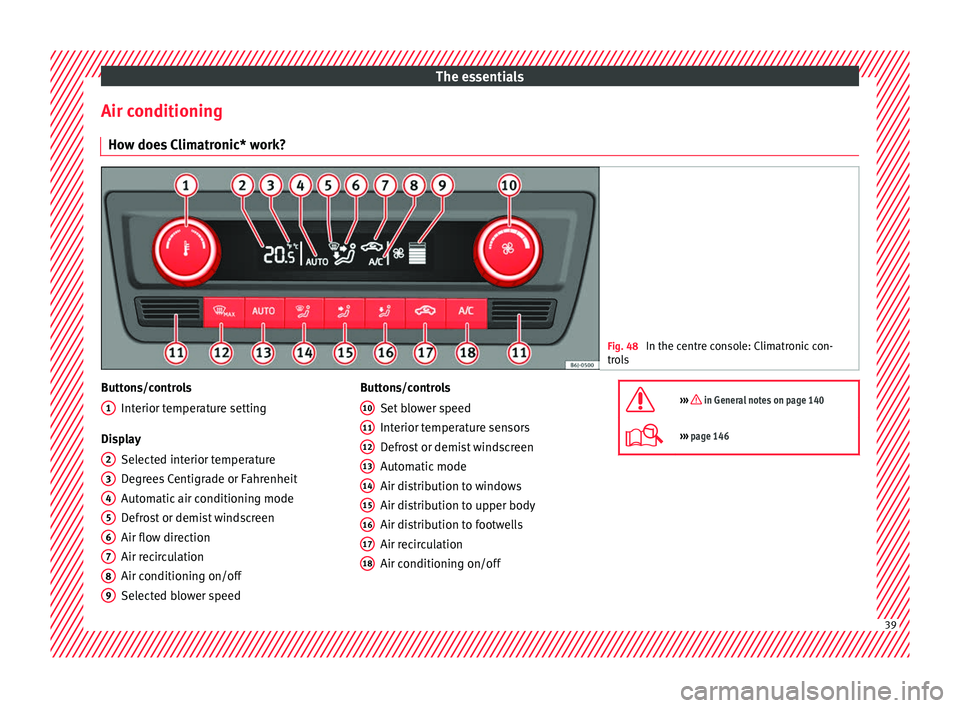
Climatronic* work? Fig. 48
In the centre console: Climatronic con-
trol s Buttons/controls
Interior t
emper at
ure setting
Display Selected interior temperature
Degrees Centigrade or Fahrenheit
Automatic air conditioning mode
Defrost or demist windscreen
Air flow direction
Air recirculation
Air conditioning on/off
Selected blower speed
1 2
3
4
5
6
7
8
9 Buttons/controls
Set b
lo w
er speed
Interior temperature sensors
Defrost or demist windscreen
Automatic mode
Air distribution to windows
Air distribution to upper body
Air distribution to footwells
Air recirculation
Air conditioning on/off
10 11
12
13
14
15
16
17
18 ››› in General notes on page 140
›››
page 146 39
Page 55 of 252
The essentials
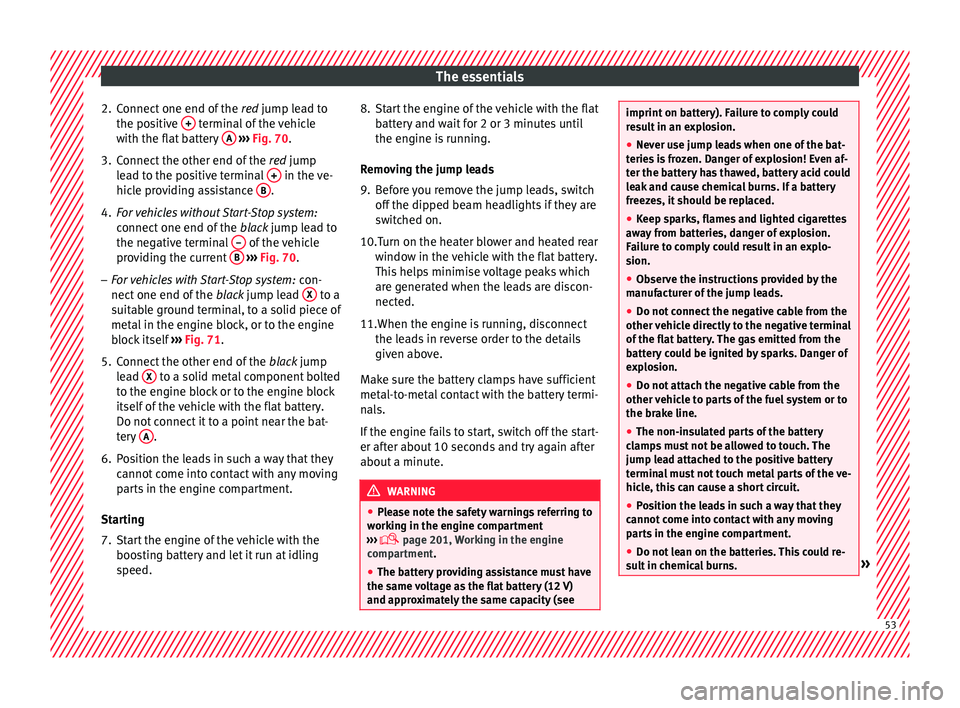
2. Connect one end of the re
d jump l
ead to
the positive + terminal of the vehicle
w ith the fl
at b
attery A
› ››
Fig. 70
.
3. C
onnect the other end of the red jump
l
ead to the positive terminal + in the ve-
hic l
e pr o
viding assistance B .
4. For vehicles without Start-Stop system:
connect
one end of the
b
lack jump lead to
the negative terminal – of the vehicle
pr o
vidin
g the current B
› ››
Fig. 70
.
– For
vehicles with Start-Stop system: con-
nect one end of the b
lack jump lead X to a
s uit
abl
e ground terminal, to a solid piece of
metal in the engine block, or to the engine
block itself ››› Fig. 71.
5. Connect the other end of the black jump
l
ead X to a solid metal component bolted
t o the en
gine bloc
k or to the engine block
itself of the vehicle with the flat battery.
Do not connect it to a point near the bat-
tery A .
6. Position the leads in such a way that they cannot
come int
o contact with any moving
parts in the engine compartment.
Starting
7. Start the engine of the vehicle with the boosting b
attery and let it run at idling
speed. 8. Start the engine of the vehicle with the flat
battery
and wait for 2 or 3 minutes until
the engine is running.
Removing the jump leads
9. Before you remove the jump leads, switch off the dipped beam he
adlights if they are
switched on.
10.Turn on the heater blower and heated rear window in the v
ehicle with the flat battery.
This helps minimise voltage peaks which
are generated when the leads are discon-
nected.
11.When the engine is running, disconnect the lead
s in reverse order to the details
given above.
Make sure the battery clamps have sufficient
metal-to-metal contact with the battery termi-
nals.
If the engine fails to start, switch off the start-
er after about 10 seconds and try again after
about a minute. WARNING
● Plea se not
e the safety warnings referring to
working in the engine compartment
››› page 201, Working in the engine
compartment.
● The battery providing assistance must have
the same vo
ltage as the flat battery (12 V)
and approximately the same capacity (see imprint on battery). Failure to comply could
res
u
lt in an explosion.
● Never use jump leads when one of the bat-
teries i
s frozen. Danger of explosion! Even af-
ter the battery has thawed, battery acid could
leak and cause chemical burns. If a battery
freezes, it should be replaced.
● Keep sparks, flames and lighted cigarettes
away
from batteries, danger of explosion.
Failure to comply could result in an explo-
sion.
● Observe the instructions provided by the
manufactur
er of the jump leads.
● Do not connect the negative cable from the
other vehicl
e directly to the negative terminal
of the flat battery. The gas emitted from the
battery could be ignited by sparks. Danger of
explosion.
● Do not attach the negative cable from the
other vehicl
e to parts of the fuel system or to
the brake line.
● The non-insulated parts of the battery
clamps
must not be allowed to touch. The
jump lead attached to the positive battery
terminal must not touch metal parts of the ve-
hicle, this can cause a short circuit.
● Position the leads in such a way that they
cannot come int
o contact with any moving
parts in the engine compartment.
● Do not lean on the batteries. This could re-
sult in c
hemical burns. » 53
Page 56 of 252
The essentials
Note
The vehicles must not touch each other, oth-
erwi se el
ectricity could flow as soon as the
positive terminals are connected. Changing the windscreen wiper
bla
de
s
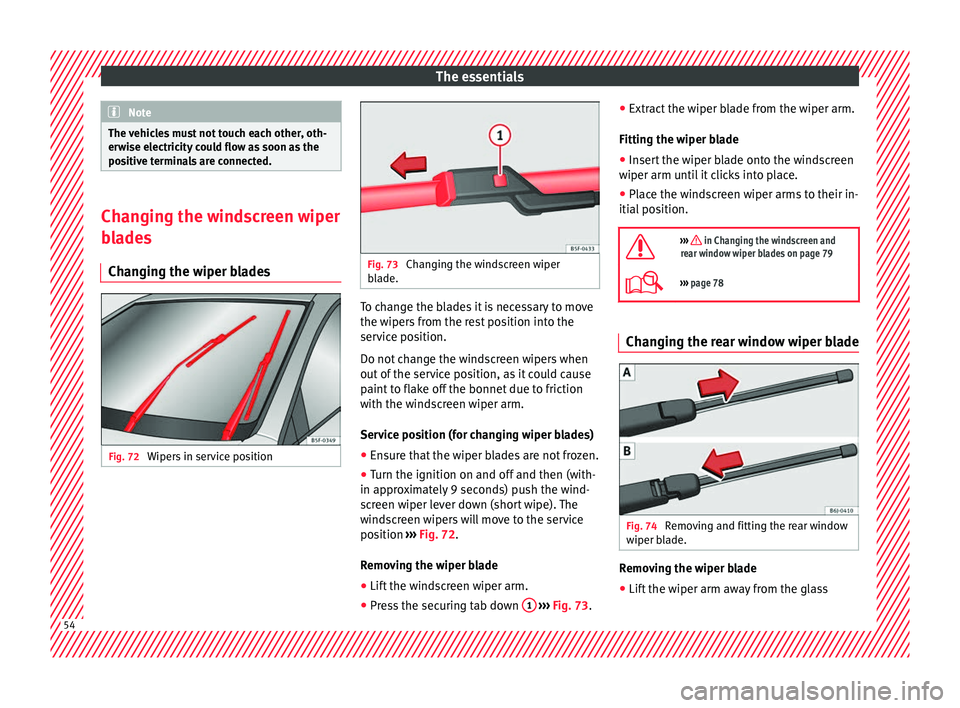
Changing the wiper blades Fig. 72
Wipers in service position Fig. 73
Changing the windscreen wiper
bla de. To change the blades it is necessary to move
the w
iper
s fr
om the rest position into the
service position.
Do not change the windscreen wipers when
out of the service position, as it could cause
paint to flake off the bonnet due to friction
with the windscreen wiper arm.
Service position (for changing wiper blades)
● Ensure that the wiper blades are not frozen.
● Turn the ignition on and off and then (with-
in approx
imately 9 seconds) push the wind-
screen wiper lever down (short wipe). The
windscreen wipers will move to the service
position ››› Fig. 72.
Removing the wiper blade
● Lift the windscreen wiper arm.
● Press the securing tab down 1
› ›
› Fig. 73 .●
Extr
act the wiper b
lade from the wiper arm.
Fitting the wiper blade ● Insert the wiper blade onto the windscreen
wiper arm until
it clicks into place.
● Place the windscreen wiper arms to their in-
itial pos
ition.
››› in Changing the windscreen and
rear window wiper blades on page 79
››› page 78 Changing the rear window wiper blade
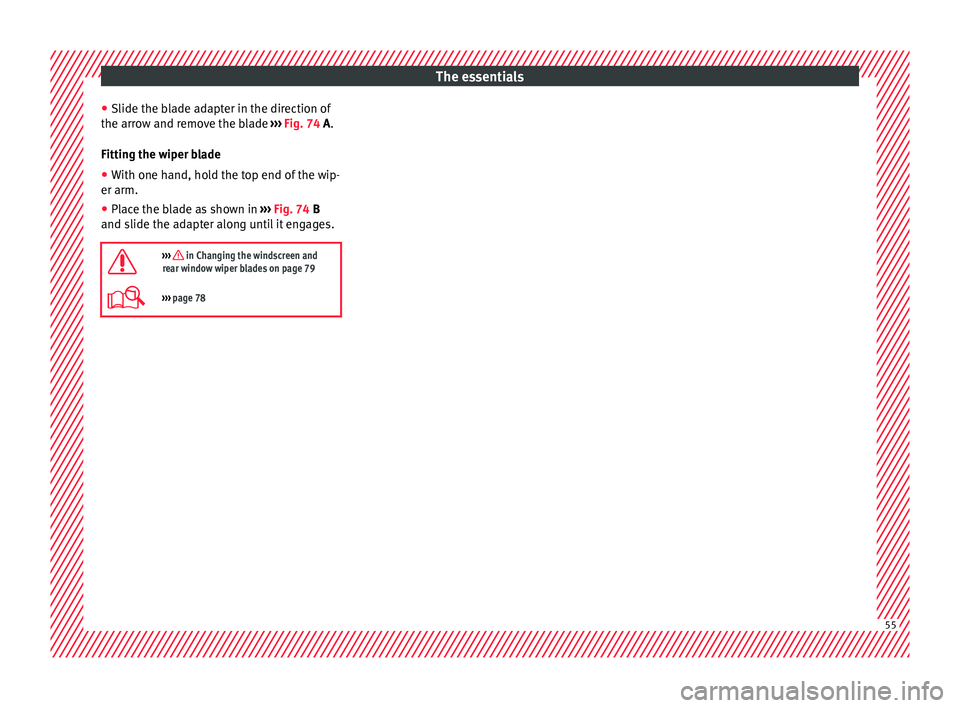
Fig. 74
Removing and fitting the rear window
w iper b
la
de. Removing the wiper blade
● Lift the wiper arm away from the glass 54
Page 57 of 252
The essentials
● Slide the b l
a de a
dapter in the direction of
the arrow and remove the blade ››› Fig. 74 A.
Fitting the wiper blade ● With one hand, hold the top end of the wip-
er arm.
● Place the blade as shown in ››› Fig. 74
B
and slide the adapter along until it engages.
››› in Changing the windscreen and
rear window wiper blades on page 79
››› page 78 55
Page 58 of 252
Safety
Safety
Saf e driv
ing
Saf
ety first! This chapter contains important information,
tips, sug
g
estions and warnings that you
should read and consider for both your own
safety and for your passengers' safety. WARNING
● This m anua
l contains important informa-
tion about the operation of the vehicle, both
for the driver and the passengers. The other
sections of the on-board documentation also
contain further information that you should
be aware of for your own safety and for the
safety of your passengers.
● Ensure that the on-board documentation is
kept in the v
ehicle at all times. This is espe-
cially important when lending or selling the
vehicle to another person. Advice about driving
B ef or
e settin
g offFor your own safety and the safety of your
p
a
ssen
gers, always note the following points
before every trip: –
Make sur
e that the vehicle's lights and turn
signals are working properly.
– Check tyre pressure.
– Ensure that all windows provide a clear and
good view of
the surroundings.
– Ensure that all luggage is correctly secured
››› p
age 135.
– Make sure that no objects can interfere
with the pedals.
– Adju
st front seat, head restraint and mir-
rors pr
operly according to your size.
– Ensure that the passenger in the central
rear seat
always has the head restraint in
the correct position for use.
– Instruct passengers to adjust the head re-
straints ac
cording to their height.
– Protect children with appropriate child
seats and properly
applied seat belts
››› page 72.
– Assume the correct sitting position. Instruct
your pas
sengers also to assume a proper
sitting position. ››› page 57.
– Fasten your seat belt securely. Instruct your
passen
gers also to fasten their seat belts
properly. ››› page 61. What affects driving safety? As a driver, you are responsible for yourself
and your p
a
ssengers. When your concentra-
tion or driving safety is affected by any cir-
cumstance, you endanger yourself as well as
others on the road ››› , for this reason:
– Always pay attention to traffic and do not
get di s
tracted by passengers or telephone
calls.
– Never drive when your driving ability is im-
paired (e.g. b
y medication, alcohol, drugs).
– Observe traffic laws and speed limits.
– Always reduce your speed as appropriate
for ro a
d, traffic and weather conditions.
– When travelling long distances, take
breaks
regularly - at least every two hours.
– If possible, avoid driving when you are tired
or stres
sed. WARNING
When driving safety is impaired during a trip,
the risk of injur
y and accidents increases. Safety equipment
Never put your safety or the safety of your
p
a
ssen
gers in danger. In the event of an acci-
dent, the safety equipment may reduce the
56
Page 61 of 252
Safe driving
●
Alwa y
s keep your feet in the footwell when
the vehicle is moving; never rest them on the
dash panel, out the window or on the seat. An
incorrect sitting position exposes you to an
increased risk of injury in case of a sudden
braking or an accident. If the airbag is trig-
gered, you could sustain severe injuries due
to an incorrect sitting position.
● To reduce the risk of injury to the front pas-
senger in event
s such as sudden braking ma-
noeuvres or an accident, never travel with the
backrest tilted far back! The airbag system
and seat belts can only provide optimal pro-
tection when the backrest is in an upright po-
sition and the front passenger is wearing his
or her seat belt properly. The further the seat
backrests are tilted to the rear, the greater
the risk of injury due to incorrect positioning
of the belt web or to the incorrect sitting po-
sition!
● Adjust the head restraint correctly in order
to achieve m
aximum protection. Correct sitting position for rear seat
p
a
ssen
gers To reduce the risk of injury in the event of a
s
ud
den br ak
ing manoeuvre or an accident,
passengers on the rear seat bench must con-
sider the following:
– Sit up straight.
– Adjust the head restraint to the correct po-
sition ›››
page 60. –
Alway
s keep both feet in the footwell in
front of the rear seat.
– Fasten your seat belt securely ››› p
age 61.
– Use an appropriate child restraint system
when you tak
e children in the vehicle
››› page 72. WARNING
● If the pa s
sengers in the rear seats are not
sitting properly, they could sustain severe in-
juries.
● Adjust the head restraint correctly in order
to achieve m
aximum protection.
● Seat belts can only provide optimal protec-
tion when seat bac
krests are in an upright
position and the vehicle occupants are wear-
ing their seat belts correctly. If passengers In
the rear seats are not sitting in an upright po-
sition, the risk of injury due to incorrect posi-
tioning of the seat belt increases. Examples of incorrect sitting posi-
tion
s Seat belts can provide optimal protection on-
ly
when the belt
we
bs are properly posi-
tioned. Incorrect sitting positions substan-
tially reduce the protective function of seat
belts and increase the risk of injury due to in-
correct seat belt position. As the driver, you
are responsible for all passengers, especially
children. –
Never allow an
yone to assume an incorrect
sitting position in the vehicle while travel-
ling ››› .
The f o
llo
wing list contains examples of sit-
ting positions that could be dangerous for all
vehicle occupants. The list is not complete,
but we would like to make you aware of this
issue.
Therefore, whenever the vehicle is in motion:
● Never stand in the vehicle.
● Never stand on the seats.
● Never kneel on the seats.
● Never tilt your seat backrest far to the rear.
● Never lean against the dash panel.
● Never lie on the rear bench.
● Never sit on the front edge of a seat.
● Never sit sideways.
● Never lean out of a window.
● Never put your feet out of a window.
● Never put your feet on the dash panel.
● Never put your feet on the surface of a seat.
● Do not allow anyone to travel in the foot-
well.
● Nev
er travel without wearing the seat belt.
● Do not allow anyone to travel in the lug-
gage comp
artment. »
59
Technical data
Advice
Operation
Emergencies
Safety
Page 80 of 252
Emergencies
The anti-puncture kit is located underneath
the floor c o
verin
g in the luggage compart-
ment. It includes the following components
››› Fig. 89:
Tyre valve remover
Sticker indicating maximum speed “max.
80 km/h” or “max. 50 mph”
Filler tube with cap
Air compressor
Tube for inflating tyres
Warning provided by tyre pressure moni-
toring system (it can also be integrated in
the compressor).
Air bleed screw (in its place, the compres-
sor may have a button).
ON/OFF switch
12 volt connector
Bottle of sealant
Spare tyre valve
The valve insert remover 1 has a gap at the
lo w
er end f or a
valve insert. The valve insert
can only be screwed or unscrewed in this
way. This also applies to its replacement part 11 .
WARNING
When inflating the wheel, the air compressor
and the inflator t ube m
ay become hot.
● Protect hands and skin from hot parts. 1
2
3
4
5
6
7
8
9
10
11 ●
Do not pl ac
e the hot flexible inflator tube or
hot air compressor on flammable material.
● Allow them to cool before storing the de-
vice.
● If it
is not possible to inflate the tyre to at
leas
t 2.0 bars (29 psi / 200 kPa), the tyre is
too badly damaged. The sealant is not in a
good condition to seal the tyre. Do not con-
tinue driving. Seek specialist assistance. CAUTION
Switch off the air compressor after a maxi-
mum of 8 operation a
l minutes to avoid over-
heating! Before switching on the air compres-
sor again, let it cool for several minutes. Check after 10 minutes of driving
Screw in the inflator tube
››
›
Fig. 89
5 again
and c hec
k the pr
essure on the gauge 6 .
1.3 b ar (19 p
si / 130 kP
a) and lower:
● Stop the vehicle! The tyre cannot
be sealed
sufficiently with the tyre mobility set.
● You should obtain professional assistance
››› .
1.4 b ar (20 p
si / 140 kP
a) and higher:
● Set the tyre pressure to the correct value
again. ●
Carefu
lly resume your journey, without ex-
ceeding 80 km/h (50 mph), until you reach
the nearest specialised workshop and re-
place the tyre. WARNING
Driving with an unsealed tyre is dangerous
and can cau se ac
cidents and serious injury.
● Do not continue driving if the tyre pressure
is 1.3 b
ar (19 psi / 130 kPa) and lower.
● Seek specialist assistance. Changing the windscreen wiper
b
l
a de
s
Changing the windscreen and rear
window wiper blades Read the additional information carefully
› ›
›
p
age 54.
Perfect wiper blade condition is essential for
clear vision. Damaged wiper blades should
be replaced immediately.
The windscreen wiper blades are supplied as
standard with a layer of graphite. This layer is
responsible for ensuring that the wipe is si-
lent. If the graphite layer is damaged, the
noise of the water as it is wiped across the
windscreen will be louder.
78