roof Seat Leon 5D 2005 User Guide
[x] Cancel search | Manufacturer: SEAT, Model Year: 2005, Model line: Leon 5D, Model: Seat Leon 5D 2005Pages: 280, PDF Size: 8.46 MB
Page 118 of 280

Lights and visibility
116Interior lights or both reading lights switched on
Turn the control to position .
Note
If not all the vehicle doors are closed, th e interior lights will be switched off
after approx. 10 minutes, providing th e key has been removed and the cour-
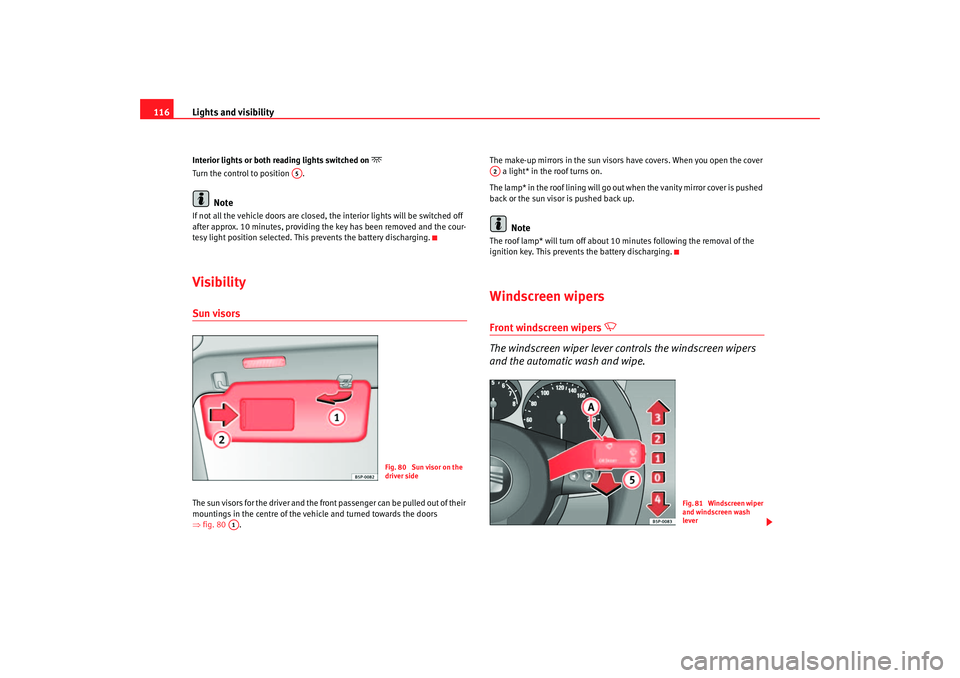
tesy light position selected. This prevents the battery discharging.VisibilitySun visorsThe sun visors for the driver and the front passenger can be pulled out of their
mountings in the centre of the vehicle and turned towards the doors
⇒ fig. 80 . The make-up mirrors in the sun visors
have covers. When you open the cover
a light* in the roof turns on.
The lamp* in the roof lining will go out when the vanity mirror cover is pushed
back or the sun visor is pushed back up.
Note
The roof lamp* will turn off about 10 minutes following the removal of the
ignition key. This prevents the battery discharging.Windscreen wipersFront windscreen wipers
The windscreen wiper lever controls the windscreen wipers
and the automatic wash and wipe.
A5
Fig. 80 Sun visor on the
driver side
A1
A2
Fig. 81 Windscreen wiper
and windscreen wash
lever
leon_ingles Seite 116 Donnerstag, 20. Oktober 2005 12:14 12
Page 137 of 280

Seats and stowage135
Safety First
Operating instructions
Tips and Maintenance
Te c h n i c a l D a t a
Roof carrier*Please observe the following points if you intend to carry loads on the roof:•
For safety reasons, only luggage racks and accessories approved by SEAT
should be used.
•
It is imperative to precisely follow the fitting instructions included for the
rack, taking special care when fitting the front bar in the holes designed for
this and the rear bar between the marks on the upper part of the rear door
frame while respecting the correct direction of travel indicated in the installa-
tion manual. Not following these instructions may lead to paintwork damage
or marks on the bodywork.
•
Pay special attention to the tightening torque of the attachment bolts and
check them following a short journey. If necessary, retighten the bolts and
check them at regular intervals.
•
Distribute the load evenly. A maximum load of 40 kg only is permitted for
each roof carrier system support bar, the load must be distributed evenly over
the entire length. However, the maximu m load permitted for the entire roof
(including the support system) of 75 kg must not be exceeded nor should the
total weight of the vehicle be exceeded. See the chapter on “Technical Data”.
•
When transporting heavy or large objects on the roof, any change in the
normal vehicle behaviour due to a change in the centre of gravity or an
increased wind resistance must be taken into account. For this reason, a suit-
able speed and driving style must be used.
•
For those vehicles fitted with a sunroof*, ensure that it does not interfere
with the load on the roof carrier system when opened.
leon_ingles Seite 135 Donnerstag, 20. Oktober 2005 12:14 12
Page 147 of 280

Heating, ventilation and air conditioning145
Safety First
Operating instructions
Tips and Maintenance
Te c h n i c a l D a t a
General notesThe pollen filter
The pollen filter (a combined particle filter and active carbon filter) serves
as a barrier against impurities in the ambient air, including dust and pollen.
For the air conditioning system to work with maximum efficiency, the pollen
filter must be replaced at the intervals specified in the Service Schedule.
If the filter loses efficiency prematurely due to use in areas with very high
levels of air pollution, the pollen filter must be changed more frequently than
stated in the Service Schedule.
Caution
•
If you suspect that the air conditioner is damaged, switch off the air condi-
tioner with button to prevent further damage and have it checked by a
qualified workshop.
•
Repairs to the air conditioning system require specialist knowledge and
special tools. Therefore, we recommend that you take the vehicle to a quali-
fied workshop should problems occur.Note
•
If the humidity and temperature outside the vehicle are high, condensa-
tion can drip off the evaporator in the cooling system and form a pool under-
neath the vehicle, this is completely normal and there is no need to suspect
a leak.
•
Keep the air intake slots in front of the windscreen free of snow, ice and
leaves to ensure heating and cooling is not impaired, and to prevent the
windows misting over.
•
The air from the vents flows through the passenger compartment and is
extracted by slots designed for this purpose. Do not cover these slots with
articles of clothing or other objects.
•
The air conditioning system operates most effectively with the windows
and the sliding/tilting roof* closed. However, if the sun has heated up the
vehicle, the air inside can be cooled more quickly by opening the windows for
a short period.
•
Do not smoke while air recirculation mode is on, as smoke drawn into the
air conditioning system leaves a residue on the evaporator, producing a
permanent unpleasant odour.
ECON
leon_ingles Seite 145 Donnerstag, 20. Oktober 2005 12:14 12
Page 180 of 280

Cleaning and caring for your vehicle
178Care of the vehicle exteriorAutomatic car washesThe paint is so durable that the car can normally be washed without problems
in an automatic car wash. However, the effect on the paint depends to a large
extent on the design of the car wash, the brushes used, the filtering of the
wash water and the type of detergents and wax solutions used, etc.
After the car has been washed, the brakes could respond later than normal
as the brake discs and brake pads will be wet, or even frozen in winter. You
must “dry” the brakes by applying the brakes carefully several times
⇒ page 169, “Braking effect and braking distance”.
WARNING
Moisture, ice and salt on the brakes may affect braking efficiency. Risk of
accident.Washing by handWashing the vehicle
– First soften the dirt with plenty of water and rinse off.
– Clean the vehicle with a soft sponge, a glove or a brush. Start on
the roof and work your way down. Use only light pressure.
– Rinse the sponge or glove as much as possible.
– Special car shampoo should only be used for very stubborn dirt. – Clean the wheels, sill panels etc. last using a different sponge or
glove.
– Rinse the vehicle thoroughly with water.
– Dry the surface of the vehicle gently using a chamois leather.
–If it is cold , dry the rubber seals and the surfaces they touch with
a cloth to prevent them freezing. Apply silicone spray to the
rubber seals.
After cleaning the vehicle
– If possible, avoid sudden braking directly after washing the vehicle. You must “dry” the brakes by applying the brakes care-
fully several times ⇒page 169, “Braking effect and braking
distance”.
WARNING
•
The ignition must always be switched off before the vehicle is washed.
•
Protect your hands and arms from cuts on sharp metal edges when
cleaning the underbody, the inside of the wheel housings etc. Risk of
injury.
•
Moisture, ice and salt on the brakes may affect braking efficiency. Risk
of accident.Caution
•
Never attempt to remove dirt, mud or dust if the surface of the vehicle is
dry. Never use a dry cloth or sponge for cleaning purposes. This could scratch
the paintwork or glass on your vehicle.
•
Washing the vehicle in cold weather: if the vehicle is rinsed with a hose,
do not direct the water into the lock cylinders or the gaps around the doors,
leon_ingles Seite 178 Donnerstag, 20. Oktober 2005 12:14 12
Page 181 of 280

Cleaning and caring for your vehicle179
Safety First
Operating instructions
Tips and Maintenance
Te c h n i c a l D a t a
luggage compartment, or bonnet. This could cause them to freeze. Otherwise
there is a risk of malfunction.
For the sake of the environment
In the interests of environmental protection, the car should be washed only
in specially provided wash bays. This prevents toxic, oil-laden waste water
entering the sewerage system. In some districts, washing vehicles anywhere
else may be prohibited.
Note
Do not wash the vehicle in direct sunlight.Washing the car with a high pressure cleaner
Be particularly careful when using a high pressure cleaner!– Always observe the instructions for the high-pressure cleaner,
particularly those concerning the pressure and the spraying
distance .
– Increase the spraying distance for soft materials and painted bumpers.
– Do not use a high pressure cleaner to remove ice or snow from windows ⇒page 180.
– Never use concentrated jet nozzl es or so-called “dirt blasters”
⇒ .
– If possible, avoid sudden braking directly after washing the vehicle. You must “dry” the brakes by applying the brakes care-
fully several times ⇒page 169.
WARNING
•
Never wash tyres with a concentrated jet or cylindrical jet (“rotating
nozzle”). Even at large spraying distances and short cleaning times, visible
and invisible damage can occur to the tyres. This may be an accident risk.
•
Moisture, ice and salt on the brakes may affect braking efficiency. Risk
of accident.Caution
•
Do not use water hotter than 60
°C. This could damage the car.
•
To avoid damage to the vehicle, maintain a sufficient distance from sensi-
tive materials for example: flexible hoses, plastic, sound proofing, etc. This is
especially important for bumpers painte d in the same colour as the vehicle.
The closer the nozzle is to the surface, the greater the wear on the material.
Waxing the car
Regular waxing protects the paintwork.You need to apply wax to your car if water does not form small drops and run
off the paintwork when it is clean.
Good quality hard wax is available from your Authorised Service Centre.
A good coat of wax helps to protects the paintwork from environmental
contaminants ⇒page 177. It is also effective in protecting against minor
scratches.
Even if a wax solution is used regularly in the car wash, it is advisable to
protect the paint with a coat of hard wax at least twice a year.
leon_ingles Seite 179 Donnerstag, 20. Oktober 2005 12:14 12
Page 189 of 280

Accessories, parts replacement and modifications187
Safety First
Operating instructions
Tips and Maintenance
Te c h n i c a l D a t a
WARNING
Incorrectly performed modifications or other work on your vehicle can lead
to malfunctions and cause accidents.Roof aerial*The vehicle may be fitted with a collapsible roof aerial* with antitheft
system*, which can be folded backwards, when, for example, going through
an automatic carwash.
To f o l d
Unscrew the aerial rod, tilting it backwards into a horizontal position and then
screw in again.
To return to working position
Continue in the reverse order to that given in the previous instruction.Mobile telephones and two-way radiosAn external aerial is required for mobile phones and two-way
radios.SEAT has approved your vehicle for use with mobile telephones and two-way
radios providing the following conditions are observed:•
The correct installation of an external aerial,
•
transmitting power of maximum 10 watts.
An external aerial is needed to give the equipment its optimal range. First consult your Authorised Service Centre if you wish to use a mobile tele-
phone or a two-way radio with a transmitting power in excess of 10 watts.
Here you will receive information concerning the technical possibilities for
retrofitting this equipment.
Mobile telephones and two-way radios
should be fitted only by a qualified
workshop, for example an Authorised Service Centre.
WARNING
•
Always concentrate primarily on driving. If you are distracted while
driving you could have an accident.
•
Never attach the telephone mountings to the surfaces covering the
airbag units or within the range of the airbags, danger of injury if the airbag
is triggered.
•
If you use mobile telephones or two-way radios in the vehicle without
an external aerial, electromagnetic ra diation in the vehicle could exceed
authorised limits. This also applies to external aerials that have not been
correctly installed.Caution
Failure to observe the above conditions could cause the electronics to
malfunction. The most common causes of faults are:•
no external aerial,
•
external aerial incorrectly installed,
•
transmitting power in excess of 10 watts.Note
Please observe the operating instructions of your mobile telephone / two-way
radio.
leon_ingles Seite 187 Donnerstag, 20. Oktober 2005 12:14 12
Page 211 of 280

Checking and refilling levels209
Safety First
Operating instructions
Tips and Maintenance
Te c h n i c a l D a t a
Charging and changing the vehicle battery
The battery is maintenance-free and is checked during the
inspection service. All work on the vehicle battery requires
specialist knowledge.If you often drive short distances or if the vehicle is not driven for long
periods, the battery should be checked by a qualified workshop between the
scheduled services.
If the battery has discharged and you have problems starting the vehicle, the
battery might be damaged. If this happens, we recommend you have the
vehicle battery checked by an Authorised Service Centre where it will be re-
charged or replaced.
Charging the battery
The vehicle battery should be charged by a qualified workshop only, as
batteries using special technology have been installed and they must be
charged in a controlled environment.
Replacing a vehicle battery
The battery has been developed to suit the conditions of its location and has
special safety features.
Genuine SEAT batteries fulfil the maintenance, performance and safety spec-
ifications of your vehicle.
WARNING
•
We recommend you use only maintenance-free or cycle free leak-proof
batteries which comply with the st andards T 825 06 and VW 7 50 73. This
standard applies as of 2001.
•
Before starting any work on the batteries, you must read and observe
the warnings ⇒ in “Warnings on handling the battery” on page 207.
For the sake of the environment
Batteries contain toxic substances such as sulphuric acid and lead. They
must be disposed of appropriately and must not be disposed of with ordinary
household waste.WheelsGeneral notesAvoiding damage
– If you have to drive over a kerb or similar obstacle, drive very
slowly and as near as possible at a right angle to the kerb.
– Keep grease, oil and fuel off the tyres.
– Inspect the tyres regularly for damage (cuts, cracks or blisters, etc.). Remove any foreign objects embedded in the treads.
Storing tyres
– Mark tyres when you remove them to indicate the direction of rotation. This ensures you will be able to install them correctly
when you replace them.
– When removed, the wheels and/or tyres should be stored in a cool, dry and preferably dark location.
– Store tyres in a vertical position if they are not fitted on wheel rims.
leon_ingles Seite 209 Donnerstag, 20. Oktober 2005 12:14 12
Page 229 of 280

If and when227
Safety First
Operating instructions
Tips and Maintenance
Te c h n i c a l D a t a
22
Heater 40
23 Door control unit 30
24 Cigarette lighter 25
25 Cable control unit 25
26 12 V power sockets 30
27 FSI capacity gauge control unit, fuel relay, EKP 1.6 relay 15
28 Comfort system control unit (without autolock 4F8) 25
29 Flowmeter, engine 10
30 Prewired 20
31 Vacuum pump 20
32 Door control unit 30
33 Sunroof 30
34 Comfort system control unit (autolock 4 K3) 25
35 Alarm sensor, horn 5
36 Headlight washer system 20
37 Seats 30
38 Engine 10
39 Automatic gearbox 20
40 Heater 40
41 Tailgate, power 15
42 Cable control unit 15
43 Trailer control unit 15
44 Trailer control unit 20
45 Trailer control unit 15
Number
Electrical equipment Amperes
leon_ingles Seite 227 Donnerstag, 20. Oktober 2005 12:14 12
Page 242 of 280

If and when
240Sunroof light– Carefully remove the lamp, using the flat side of the screwdriver,
as shown in the figure ⇒fig. 170 . – Remove the lamp, moving it in the direction of the arrow and
outwards ⇒ fig. 171.
– Installation is done in the reverse order.
Jump-startingJump leads
The jump lead must have a sufficient wire cross section.If the engine fails to start because of a discharged battery, the battery can be
connected to the battery of anot her vehicle to start the engine.
Jump leads
Jump leads must comply with the standard DIN 72553 (see manufacturer's
documentation). The wire cross section must be at least 25 mm
2 for petrol
engines and at least 35 mm
2 for diesel engines.
Note
•
The vehicles must not touch each other, otherwise electricity could flow as
soon as the positive terminals are connected.
•
The discharged battery must be properly connected to the vehicles elec-
trical system.
Fig. 170 Removing
sunroof lightFig. 171 Removing
sunroof light
leon_ingles Seite 240 Donnerstag, 20. Oktober 2005 12:14 12
Page 256 of 280

Technical Data
254Weights
Trailer weights
Engine oil capacityPetrol engine 2.0l 110 kW (150 bhp)General engine data Gross vehicle weight
in kg 1783
Weight in working order (with driver) in kg 1280/ 1395
Gross axle weight, front in kg 936
Gross axle weight, rear in kg 890
Permitted roof load in kg 75
With no brakes, gradients up to 12% 640
With brakes, gradients up to 12% 1200
Engine oil capacity with oil filter change. 4.8 litres
Power output in kW (bhp) rpm 110 (150)/ 6000
Maximum torque in Nm at rpm 200/ 3500
No. of cylinders, capacity in cm
3
4/ 1984
Compression 11.5-0.5
Fuel Super Plus unleaded 98 RON or Premium unleaded 95 RON
a)
a)Slight power loss
leon_ingles Seite 254 Donnerstag, 20. Oktober 2005 12:14 12