instrument panel Seat Leon 5D 2006 Maintenance programme
[x] Cancel search | Manufacturer: SEAT, Model Year: 2006, Model line: Leon 5D, Model: Seat Leon 5D 2006Pages: 292, PDF Size: 8.86 MB
Page 63 of 292

Cockpit61
Safety First
Operating instructions
Tips and Maintenance
Te c h n i c a l D a t a
An
overdue service is indicated by a minus sign in front of the mileage or day
information.
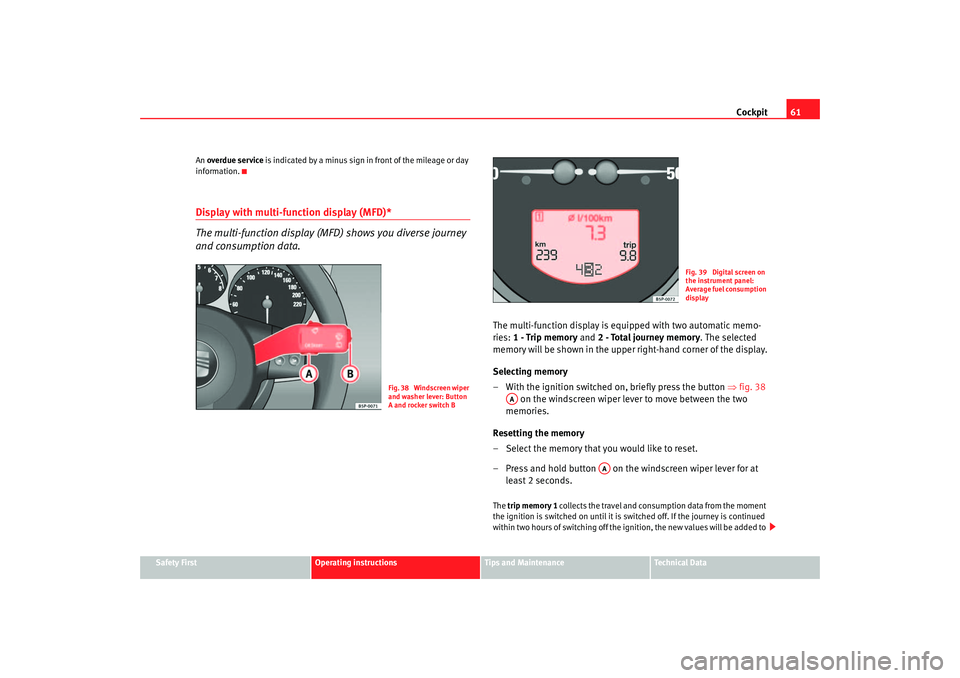
Display with multi-function display (MFD)*
The multi-function display (M FD) shows you diverse journey
and consumption data.
The multi-function display is equipped with two automatic memo-
ries: 1 - Trip memory and 2 - Total journey memory . The selected
memory will be shown in the upper right-hand corner of the display.
Selecting memory
– With the ignition switched on, briefly press the button ⇒fig. 38
on the windscreen wiper lever to move between the two
memories.
Resetting the memory
– Select the memory that you would like to reset.
– Press and hold button on the windscreen wiper lever for at least 2 seconds.The trip memory 1 collects the travel and cons umption data from the moment
the ignition is switched on until it is switched off. If the journey is continued
within two hours of switching off the ignition, the new values will be added to
Fig. 38 Windscreen wiper
and washer lever: Button
A and rocker switch B
Fig. 39 Digital screen on
the instrument panel:
Average fuel consumption
display
AA
AA
leon_ingles Seite 61 Donner stag, 24. August 2006 1:56 13
Page 64 of 292

Cockpit
62the existing trip recorder memory. The memory will automatically be deleted
if the journey is interrupted for more than two hours.
The total journey memory 2 collects the journey data for any number of indi-
vidual journeys (even if the ignition is switched off for longer than two hours)
up to a total of 99 hours and 59 minute s travel time, 9999 miles distance trav-
elled and 999 litres of fuel consumed. The memory will automatically be
deleted if one of the named values is reached.Displays in the multi-function display (MFD)*
You can switch between the following displays in the multi-function display
(MFD) by operating the rocker switch ⇒ fig. 40 on the windscreen wiper
lever.
Memory displays•
Journey duration
•
Speed warning
•
Average speed
•
Distance
•
Distance to empty (the distance you can travel with the remaining fuel)
•
Average fuel consumption
•
Current fuel consumption
min - Journey duration
The display shows the amount of time that has elapsed since the ignition was
switched on.
The maximum display value in both me mories is 99 hours and 59 minutes.
The memory will automatically be deleted once this value has been reached.
Fig. 40 Windscreen wiper
and washer lever: Button
A and rocker switch B
Fig. 41 Digital screen on
the instrument panel:
Average fuel consumption
display
AB
leon_ingles Seite 62 Donner stag, 24. August 2006 1:56 13
Page 67 of 292

Cockpit65
Safety First
Operating instructions
Tips and Maintenance
Te c h n i c a l D a t a
Instrument panel menusMain menu
The menu enables access to the different display functions.Open main menu
– Switch on the ignition.
– Press and hold the eject button for at least 2 seconds. It may
be necessary to repeat this operation until the main menu is
displayed.
Select a menu from the main menu
– To choose an option from the menu, press the upper or lower end of the rocker switch. The selected option is displayed between
two horizontal lines. – Press button to select the entry.
Example of menu use: “Example of menu use”
Fig. 42 Windscreen wiper
lever: button A to confirm
the menu point and rocker
switch B to change the
menu
Fig. 43 Digital display on
the instrument panel:
Main menu
AB
AA
leon_ingles Seite 65 Donner
stag, 24. August 2006 1:56 13
Page 69 of 292

Cockpit67
Safety First
Operating instructions
Tips and Maintenance
Te c h n i c a l D a t a
Example of menu use
All the menus on the instrument panel may be used according to the following procedure.The setting of a speed warning will be used as an example of how to
use the menus. This is a good idea if you are, for example, using
winter tyres which are not suited for the top speed of the vehicle.
1. Open the main menu
– Switch on the ignition.
– Hold down button for two seconds to return to main menu
from other menu. It ma y be necessary to repeat this operation
until the main menu is displayed.
2. Open the main menu “Configuration”
– To choose an option from the menu, press the upper or lower end of the rocker switch. The selected option is displayed between
two lines and there will also be a triangle on the right. –Select menu
Configuration.
– Press button on the windscreen wiper lever. The Configura-
tion menu is opened.
3. Open the main menu “Winter tyres”
– Select option Winter tyres using the rocker switch.
– Press button . The menu Winter tyres is opened.
4. Program a speed limit warning
– Use the rocker switch to select the menu entry +10 km/h or -10
km/h and press the button to either increase or decrease the set
speed.
Fig. 44 Windscreen wiper
lever: button A to confirm
the menu point and rocker
switch B to change the
menu
Fig. 45 Digital screen on
the instrument panel:
winter tyre display
AB
AAAA
leon_ingles Seite 67 Donner stag, 24. August 2006 1:56 13
Page 74 of 292

Cockpit
72Warning lampsOverview of the warning lamps
The warning lamps indicate a number of different functions and possible faults.
Fig. 46 Instrument panel with warning lamps. Some of
the items of equipment listed here are fitted only on
certain models/model years or are optional extras.
leon_ingles Seite 72 Donner stag, 24. August 2006 1:56 13
Page 77 of 292

Cockpit75
Safety First
Operating instructions
Tips and Maintenance
Te c h n i c a l D a t a
•
The engine compartment of any motor vehicle is a dangerous area!
Before you open the bonnet to work on the engine or in the engine compart-
ment, you must switch off the engine and allow it to cool to reduce the risk
of scalding or other injuries. Read and observe the relevant warnings
⇒ page 198.Note
•
The appropriate warning lamp for a fault will light up in vehicles without
warning or information texts in the display.
•
In vehicles with warning or information texts in the display, the appro-
priate warning lamp for a fault will ligh t up and a warning or information text
will also appear in the display.
Fuel level / reserve
This symbol lights up to indicate that the fuel tank is down to
the reserve level.This lights when only 7 litres of fuel remain in the tank. Also, an audible
warning is given. This serves as a reminder to fill up with fuel at the earliest
opportunity ⇒page 195.
The message displayed in the instrument panel display is
8): PLEASE
REFUEL .
Coolant Level* / temperature
The warning lamp lights up if the coolant temperature is too
high or if the coolant level is too low.There is a fault if:•
The warning symbol does not go out again after a few seconds.
•
The warning lamp lights up or flashes while the vehicle is moving, while
three acoustic warning signals ⇒ are emitted.
This means that either the coolant level is too low or the coolant temperature
is too high.
Coolant temperature too high
The following text is displayed in the instrument panel display
9): CHECK
COOLANT! INSTRUCTIONS MANUAL .
First look at the coolant temperature gauge. The coolant temperature is too
high if the needle is over the warning area on the dial. Stop the vehicle,
switch off the engine and wait for it to cool down. Check the coolant level.
If the coolant level is correct, the over heating may be caused by a malfunction
of the radiator fan. Check the radiator fan fuse and have it replaced if neces-
sary ⇒page 232.
If the warning lamp lights up again after driving on for a short distance, stop
the vehicle and switch off the engine . Contact an Authorised Service Centre
or a qualified workshop.
Coolant level too low
The following text is displayed in the instrument panel display10): CHECK
COOLANT! INSTRUCTION MANUAL ⇒ page 205.
8)Depending on the model version.WARNING (continued)
9)Depending on the model version.10)Depending on the model version.
leon_ingles Seite 75 Donner stag, 24. August 2006 1:56 13
Page 78 of 292

Cockpit
76First look at the coolant temperature gauge. If the needle is in the normal
range, top up with coolant at the earliest opportunity ⇒ .
WARNING
•
If your vehicle is immobilised for any technical reasons, move it to a
safe distance from traffic. Turn off the engine, turn on the hazard lights and
place the warning triangle.
•
Never open the bonnet if you can see or hear steam or coolant escaping
from the engine compartment. Risk of scalding. Wait until you can no
longer see or hear escaping steam or coolant.
•
The engine compartment of any motor vehicle is a dangerous area!
Before carrying out any work in the engine compartment, switch off the
engine and allow it to cool down. Alwa ys note the corresponding warnings
⇒ page 198.
Rear fog light
This warning lamp lights up when the rear fog light is switched on
. Further
information ⇒page 111.
Tu r n si g nal s
The warning lamp flashes when the turn signals are in oper-
ation.Depending on which turn signal is operated, either the left
or right
indi-
cator lamp flashes. Both warning lamps will flash at the same time when the
hazard warning lights are switched on.
If one turn signal fails, the warning lamp will start flashing twice as fast. Further information on the turn signals
⇒page 115.
Trailer turn signals
This warning lamp also flashes when the turn signals are
operated while towing a caravan or trailer.The warning lamp
flashes when the turn signals are operated, provided a
trailer is correctly attached and connected to the vehicle.
The warning lamp will not flash if one of the turn signals on the trailer fails.
Main beam headlights
This warning lamp lights up when the main beams are on.The warning lamp
lights up when the main beams are on or when the
headlight flasher is operated.
Further information ⇒page 115.
Bulb defect
The warning lamp lights up when a bulb in the vehicle's exte-
rior lighting is defective.The warning lamp
lights up when a bulb in the vehicle's exterior lighting
(e.g. left-hand main beam) is defective.
The following text is displayed in the instrument panel display
11): MAIN
BEAM LEFT DEFECT .
leon_ingles Seite 76 Donner stag, 24. August 2006 1:56 13
Page 79 of 292

Cockpit77
Safety First
Operating instructions
Tips and Maintenance
Te c h n i c a l D a t a
Cruise control system*
The warning lamp comes on when the cruise control system
is switched on.The warning lamp
lights up when the cruise control system is switched on.
Further notes on the cruise control system ⇒page 165.
Washer fluid
This warning lamp lights up to indicate that the windscreen
washer level is too low.This serves as a reminder to fill up the reservoir at the earliest opportunity
⇒page 208.
The information text displayed in the instrument panel display is
12): REFILL
WASHER FLUID
Brake system* / handbrake
The warning lamp lights up if the handbrake is applied, if the
brake fluid level falls too low or if there is a fault in the brake
system.
This warning lamp
lights up if
•
If the handbrake is on If you drive faster than 6 km/h with the handbrake on, the following message
will appear in the combi-instrument display
13):
HANDBRAKE ON. Also, an
audible warning is given.
•
If the brake fluid level is too low ⇒page 211.
The following text is displayed in the instrument panel display
13): STOP
BRAKE FLUID INSTRUCTIONS MANUAL .
•
If there is a fault in the brake system
The following text is displayed in the instrument panel display
13): BRAKE
FAULT INSTRUCTIONS MANUAL .
This warning lamp can light up together with the anti-lock brake system
warning lamp.
WARNING
•
Before opening the bonnet, read and observe the warnings on
⇒ page 198, “Working in the engine compartment”.
•
If the brake warning lamp does not go out, or if it lights up when
driving, the brake fluid level ⇒page 211, “Brake fluid” in the reservoir is
too low. Risk of accident. Stop the vehicle and do not drive on. Obtain tech-
nical assistance.
•
If the brake warning lamp
lights up together with the ABS warning
lamp
, the control function of the ABS could be out of action. This could
cause the rear wheels to lock quickly when you brake. This could cause the
rear to break away. Risk of skidding. Drive carefully to the nearest qualified
workshop and have the fault corrected.
11)Depending on the model version12)Depending on the model version.
13)Depending on the model version.
leon_ingles Seite 77 Donner stag, 24. August 2006 1:56 13
Page 80 of 292

Cockpit
78Engine oil pressure
This warning lamp indicates that the engine oil pressure is
too low.If this warning symbol starts to flash, and is accompanied by three audible
warnings, switch off the engine and check the oil level. If the oil level is too
low, add more engine oil ⇒page 201.
The following text is displayed in the instrument panel display
14): STOP
ENGINE OIL PRESSURE INSTRUCTIONS MANUAL .
If the symbol flashes although the oil level is correct, do not drive on. The
engine must not even run at idle speed. Obtain technical assistance.
Anti-lock brake system (ABS)
A warning lamp system monitors the ABS.
The warning lamp
should light up for a few seconds when the ignition is
switched on. It goes out again after the system has run through an automatic
test sequence.
There is a fault in the ABS if:
•
The warning lamp
does not light up when the ignition is switched on.
•
The warning lamp does not go out again after a few seconds.
•
The warning lamp lights up when the vehicle is moving.
The vehicle can still be braked in the normal way (except that the ABS control
function will not function). Please take the vehicle to a qualified workshop as
soon as possible. For further information on the ABS see the ⇒page 169.
If a fault occurs in the ABS, the ESP* warning lamp will also light up. Brake system fault
If the ABS warning lamp
lights up together with the brake warning lamp
, this indicates not only a fault in the ABS function, but also a possible fault
in the brake system ⇒.
WARNING
•
Before opening the bonnet, read and observe the warnings on
⇒ page 198.
•
If the brake warning lamp
should light up together with the ABS
warning lamp
, stop the vehicle immediately and check the brake fluid
level in the reservoir ⇒page 211, “Brake fluid”. If the fluid level has
dropped below the “MIN” mark you must not drive on. Risk of accident.
Obtain technical assistance.
•
If the brake fluid level is correct, the fault in the brake system may have
been caused by a failure of the ABS system. This could cause the rear
wheels to lock quickly when you brake. This could cause the rear to break
away. Risk of skidding. Drive carefully to the nearest qualified workshop
and have the fault corrected.
Differential lock fault (EDL)*
EDL operates along with the ABS in vehicles equipped with an
Electronic Stabilisation Program (ESP)*A malfunction in the EDL is indicated by the ABS warning lamp
. Please
take the vehicle to a qualified workshop as soon as possible. For further infor-
mation on the EDL ⇒page 172.
14)Depending on the model version.
leon_ingles Seite 78 Donner stag, 24. August 2006 1:56 13
Page 83 of 292

Cockpit81
Safety First
Operating instructions
Tips and Maintenance
Te c h n i c a l D a t a
Engine management
This warning lamp monitors th e engine management system
for petrol engines.
The warning lamp
(Electronic Power Control) lights up when the ignition
is switched on to show that the lamp is working properly. It should go out
when the engine has started running.
If a fault develops in the electronic engine management system while you are
driving, this warning lamp will light up. Take the vehicle to an Authorised
Service Centre as soon as possible and have the engine checked.
Glow plug system / Engine fault
The warning lamp lights up to show that the glow plugs are
preheating. It flashes if there is an engine fault.
Warning lamp
is lit
The warning lamp lights up while the glow plugs are preheating. When the
warning lamp goes off, the engine should be started straight away.
Warning lamp
flashes
If a fault develops in the engine management system while you are driving,
the glow plug lamp will flash
. Take the vehicle to an Authorised Service
Centre as soon as possible and have the engine checked.
Emission control system*
This warning lamp monitors the exhaust system.
Warning lamp
flashes:
when there is misfiring that can damage the catalytic converter. Reduce
speed and drive carefully to the nearest qualified workshop to have the
engine checked.
The following text is displayed in the instrument panel display
15) : EXHAUST
FUMES GO TO WORKSHOP!
Warning lamp
is lit:
if a fault has developed during driving which has reduced the quality of the
exhaust gas (e. g. lambda probe fault). Reduce speed and drive carefully to
the nearest qualified workshop to have the engine checked.
The following text is displayed in the instrument panel display: EXHAUST
FUMES GO TO WORKSHOP! .
Electronic stabilisation programme (ESP)*
This warning lamp monitors the electronic stabilisation
program.
This program includes the ABS, EDL and TCS.
The warning lamp
has the following functions:
•
It will light for about 2 seconds when the ignition is switched on while a
test of the function is carried out.
•
It flashes when the ESP is activated when driving.
•
It will light up continuously if there is a malfunction in the ESP.
15)Depending on the model version.
leon_ingles Seite 81 Donner stag, 24. August 2006 1:56 13