maintenance Seat Leon 5D 2006 Maintenance programme
[x] Cancel search | Manufacturer: SEAT, Model Year: 2006, Model line: Leon 5D, Model: Seat Leon 5D 2006Pages: 292, PDF Size: 8.86 MB
Page 63 of 292

Cockpit61
Safety First
Operating instructions
Tips and Maintenance
Te c h n i c a l D a t a
An
overdue service is indicated by a minus sign in front of the mileage or day
information.
Display with multi-function display (MFD)*
The multi-function display (M FD) shows you diverse journey
and consumption data.
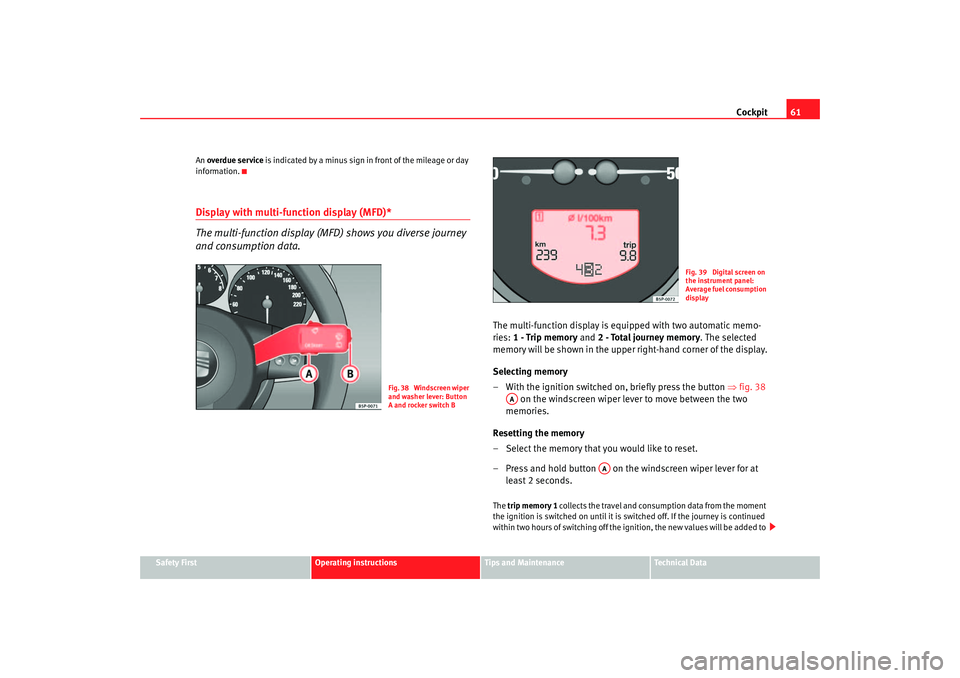
The multi-function display is equipped with two automatic memo-
ries: 1 - Trip memory and 2 - Total journey memory . The selected
memory will be shown in the upper right-hand corner of the display.
Selecting memory
– With the ignition switched on, briefly press the button ⇒fig. 38
on the windscreen wiper lever to move between the two
memories.
Resetting the memory
– Select the memory that you would like to reset.
– Press and hold button on the windscreen wiper lever for at least 2 seconds.The trip memory 1 collects the travel and cons umption data from the moment
the ignition is switched on until it is switched off. If the journey is continued
within two hours of switching off the ignition, the new values will be added to
Fig. 38 Windscreen wiper
and washer lever: Button
A and rocker switch B
Fig. 39 Digital screen on
the instrument panel:
Average fuel consumption
display
AA
AA
leon_ingles Seite 61 Donner stag, 24. August 2006 1:56 13
Page 65 of 292

Cockpit63
Safety First
Operating instructions
Tips and Maintenance
Te c h n i c a l D a t a
Set speed indicator
When driving at the required speed, enter the speed indicator mode and
press the button (Reset), the display remembers the indicated speed. If
the indicated speed is exceeded, a warning text is displayed on the screen
6)
and a warning signal sounds.
This may be deactivated by pressing the button (Reset).
The speed may be altered using the rocker switch in steps of 5 km/h
within 5 seconds of the initial memory value.
Ø mph - Average speed
The average speed will be shown after a distance of approximately 100
metres has been travelled. Dashes will appear in the display until that time.
The display will be updated every 5 seconds whilst the vehicle is in motion.
Miles - Distance travelled
The display shows the distance travelled since the ignition was switched on.
The maximum display value in both memories is 9999 miles. The memory will
automatically be deleted once this value has been reached.
Miles - Fuel range
The fuel range is calculated using the fi gures for tank content and current fuel
consumption. It shows how far the vehicle can travel using the same condi-
tions as a reference.
Ø litre/100km - Average fuel consumption
The average fuel consumption will be shown ⇒page 62, fig. 41 after a
distance of approximately 100 metres has been travelled. Dashes will appear
in the display until that time. The display will be updated every 5 seconds
whilst the vehicle is in motion. The am ount of fuel used will not be shown. litres/100km or litres/hr - Current fuel consumption
The display will show the current fuel consumption in litre/km whilst the
vehicle is in motion or in litre/hour when
the vehicle is in a stationary position
with the engine running.
Using this display you can see how your driving style affects fuel consump-
tion ⇒page 180.
Ambient temperature display
The measurement margin extends from -45°C to +58°C. At temperatures
lower than +4°C, an “ice crystal symbol” is displayed and a “warning” sounds
if the vehicle is moving at more than 20 km/h (ice warning). This symbol will
flash for about 10 seconds and remains lit until the exterior temperature rises
above +4°C or 6°C if it was already lit.
WARNING
There could be black ice on the road surface even if the “snowflake symbol”
is not shown. You should, for this reason, not rely exclusively on this
display - Risk of accident!
Note
When the vehicle is stationary or travelling at very low speeds, the tempera-
ture displayed may be slightly higher than the actual ambient temperature as
a result of the heat radiated from the engine.Warning or information text in the display
Faults are shown in the display with warning lamps and
warning/information reports.The system runs a check on certain components and functions when the igni-
tion is switched on and while the vehicle is moving. Functional faults are indi-
6)Depending on the model version, the message on the screen may vary and may be
represented by flashing of the speed indication or by a speed message.
AA
AAAB
leon_ingles Seite 63 Donner stag, 24. August 2006 1:56 13
Page 67 of 292

Cockpit65
Safety First
Operating instructions
Tips and Maintenance
Te c h n i c a l D a t a
Instrument panel menusMain menu
The menu enables access to the different display functions.Open main menu
– Switch on the ignition.
– Press and hold the eject button for at least 2 seconds. It may
be necessary to repeat this operation until the main menu is
displayed.
Select a menu from the main menu
– To choose an option from the menu, press the upper or lower end of the rocker switch. The selected option is displayed between
two horizontal lines. – Press button to select the entry.
Example of menu use: “Example of menu use”
Fig. 42 Windscreen wiper
lever: button A to confirm
the menu point and rocker
switch B to change the
menu
Fig. 43 Digital display on
the instrument panel:
Main menu
AB
AA
leon_ingles Seite 65 Donner
stag, 24. August 2006 1:56 13
Page 69 of 292

Cockpit67
Safety First
Operating instructions
Tips and Maintenance
Te c h n i c a l D a t a
Example of menu use
All the menus on the instrument panel may be used according to the following procedure.The setting of a speed warning will be used as an example of how to
use the menus. This is a good idea if you are, for example, using
winter tyres which are not suited for the top speed of the vehicle.
1. Open the main menu
– Switch on the ignition.
– Hold down button for two seconds to return to main menu
from other menu. It ma y be necessary to repeat this operation
until the main menu is displayed.
2. Open the main menu “Configuration”
– To choose an option from the menu, press the upper or lower end of the rocker switch. The selected option is displayed between
two lines and there will also be a triangle on the right. –Select menu
Configuration.
– Press button on the windscreen wiper lever. The Configura-
tion menu is opened.
3. Open the main menu “Winter tyres”
– Select option Winter tyres using the rocker switch.
– Press button . The menu Winter tyres is opened.
4. Program a speed limit warning
– Use the rocker switch to select the menu entry +10 km/h or -10
km/h and press the button to either increase or decrease the set
speed.
Fig. 44 Windscreen wiper
lever: button A to confirm
the menu point and rocker
switch B to change the
menu
Fig. 45 Digital screen on
the instrument panel:
winter tyre display
AB
AAAA
leon_ingles Seite 67 Donner stag, 24. August 2006 1:56 13
Page 71 of 292

Cockpit69
Safety First
Operating instructions
Tips and Maintenance
Te c h n i c a l D a t a
Vehicle status menu
This menu shows warning or information textsOpen Vehicle Condition menu
– Choose option Vehicle condition from main menu: “Main menu”
and press the button on the windscreen wiper lever.
Priority 2 warning messages and inform ation texts: “Warning and information
texts on the screen” automatically di sappear after a certain time and are
saved in the menu “Vehicle condition”.
The warning and information texts may be viewed in this menu. If there are no
messages, ok appears on the display. If there are several messages, each one
is shown for four seconds.
Configuration menu
This menu is used to make the settings for the vehicle functions.Open Configuration menu
– Choose the Configuration option from main menu “Main menu” and press the button on the windscreen wiper lever.
Example of use of menus: “E xample of use of menus”.
Configuration Function
Time The hours and minutes of the clock and the navigation system can be changed. Both 12- and 24-hour
formats are available and the time may be changed to summer time (an S appears in the upper part of
the screen)
Winter tyres The menu allows the setting of a speed at which an optical and acoustic warning will be given by the
system. You can use this function, for example, if you have fitted winter tyres which are not suited for the
top speed of your vehicle . See chapter “Wheels” in owner's manual
Settings: Language The display texts and the navigation system texts can be seen in seven different languages
Units This option allows you to select the units for displaying temperature, fuel consumption values and dis-
tances.
Comfort and Convenience From this menu it is possible to alter the Comfort function settings.
leon_ingles Seite 69 Donnerstag, 24. August 2006 1:56 13
Page 73 of 292

Cockpit71
Safety First
Operating instructions
Tips and Maintenance
Te c h n i c a l D a t a
Note
For electronic and vehicle equipment on e or more of these menus will be
displayed.Lights and visibility menu
From this menu it is possible to alter the vehicle lighting settings.Open Lights and visibility Menu
– Choose the option Configuration from main menu: “Main menu”
and press the button on the windscreen wiper lever. – Select the option
Lights & visibility from the menu and press
button on the windscreen wiper lever.
Example of menu use: “Example of menu use”
Note
For electronic and vehicle equipment on e or more of these menus will be
displayed.
AA
AA
Lights & visibility Function
Coming Home/
Leaving Home The lighting dura
tion may be modified, in steps of 10 seconds, from a minimum of 10 seconds to a maxi-
mum of 90 seconds
The function may also be deactivated.
Indicator conf. With the convenience mode activated, the indicator will blink at least three times when turned on.
Manufacturer's settings The manufacturer's predefined values for the functions of this menu are restored.
Back This returns to the Configuration menu
leon_ingles Seite 71 Donner stag, 24. August 2006 1:56 13
Page 75 of 292

Cockpit73
Safety First
Operating instructions
Tips and Maintenance
Te c h n i c a l D a t a
Item
Symbol Meaning of warning and control lamps Further information
Fuel level / reserve ⇒page 75
Coolant level / coolant temperature ⇒page 75
Rear fog light switched on ⇒page 76
Turn signals in operation ⇒page 76
Trailer turn signals in operation ⇒page 76
Main beam switched on ⇒page 76
Bulb defective ⇒page 76
Cruise control system switched on ⇒page 77
Washer fluid level ⇒page 77
Parking brake applied
or low brake fluid level or
fault in brake system ⇒
page 77
Engine oil pressure ⇒page 78
ABS system fault ⇒page 78
Pollen accumulation in the diesel engine particulate filter ⇒page 79
Alternator fault ⇒page 79
A1A2A3A4A5A6A7A8A9A10A11A12A13A14
leon_ingles Seite 73 Donner stag, 24. August 2006 1:56 13
Page 77 of 292

Cockpit75
Safety First
Operating instructions
Tips and Maintenance
Te c h n i c a l D a t a
•
The engine compartment of any motor vehicle is a dangerous area!
Before you open the bonnet to work on the engine or in the engine compart-
ment, you must switch off the engine and allow it to cool to reduce the risk
of scalding or other injuries. Read and observe the relevant warnings
⇒ page 198.Note
•
The appropriate warning lamp for a fault will light up in vehicles without
warning or information texts in the display.
•
In vehicles with warning or information texts in the display, the appro-
priate warning lamp for a fault will ligh t up and a warning or information text
will also appear in the display.
Fuel level / reserve
This symbol lights up to indicate that the fuel tank is down to
the reserve level.This lights when only 7 litres of fuel remain in the tank. Also, an audible
warning is given. This serves as a reminder to fill up with fuel at the earliest
opportunity ⇒page 195.
The message displayed in the instrument panel display is
8): PLEASE
REFUEL .
Coolant Level* / temperature
The warning lamp lights up if the coolant temperature is too
high or if the coolant level is too low.There is a fault if:•
The warning symbol does not go out again after a few seconds.
•
The warning lamp lights up or flashes while the vehicle is moving, while
three acoustic warning signals ⇒ are emitted.
This means that either the coolant level is too low or the coolant temperature
is too high.
Coolant temperature too high
The following text is displayed in the instrument panel display
9): CHECK
COOLANT! INSTRUCTIONS MANUAL .
First look at the coolant temperature gauge. The coolant temperature is too
high if the needle is over the warning area on the dial. Stop the vehicle,
switch off the engine and wait for it to cool down. Check the coolant level.
If the coolant level is correct, the over heating may be caused by a malfunction
of the radiator fan. Check the radiator fan fuse and have it replaced if neces-
sary ⇒page 232.
If the warning lamp lights up again after driving on for a short distance, stop
the vehicle and switch off the engine . Contact an Authorised Service Centre
or a qualified workshop.
Coolant level too low
The following text is displayed in the instrument panel display10): CHECK
COOLANT! INSTRUCTION MANUAL ⇒ page 205.
8)Depending on the model version.WARNING (continued)
9)Depending on the model version.10)Depending on the model version.
leon_ingles Seite 75 Donner stag, 24. August 2006 1:56 13
Page 79 of 292

Cockpit77
Safety First
Operating instructions
Tips and Maintenance
Te c h n i c a l D a t a
Cruise control system*
The warning lamp comes on when the cruise control system
is switched on.The warning lamp
lights up when the cruise control system is switched on.
Further notes on the cruise control system ⇒page 165.
Washer fluid
This warning lamp lights up to indicate that the windscreen
washer level is too low.This serves as a reminder to fill up the reservoir at the earliest opportunity
⇒page 208.
The information text displayed in the instrument panel display is
12): REFILL
WASHER FLUID
Brake system* / handbrake
The warning lamp lights up if the handbrake is applied, if the
brake fluid level falls too low or if there is a fault in the brake
system.
This warning lamp
lights up if
•
If the handbrake is on If you drive faster than 6 km/h with the handbrake on, the following message
will appear in the combi-instrument display
13):
HANDBRAKE ON. Also, an
audible warning is given.
•
If the brake fluid level is too low ⇒page 211.
The following text is displayed in the instrument panel display
13): STOP
BRAKE FLUID INSTRUCTIONS MANUAL .
•
If there is a fault in the brake system
The following text is displayed in the instrument panel display
13): BRAKE
FAULT INSTRUCTIONS MANUAL .
This warning lamp can light up together with the anti-lock brake system
warning lamp.
WARNING
•
Before opening the bonnet, read and observe the warnings on
⇒ page 198, “Working in the engine compartment”.
•
If the brake warning lamp does not go out, or if it lights up when
driving, the brake fluid level ⇒page 211, “Brake fluid” in the reservoir is
too low. Risk of accident. Stop the vehicle and do not drive on. Obtain tech-
nical assistance.
•
If the brake warning lamp
lights up together with the ABS warning
lamp
, the control function of the ABS could be out of action. This could
cause the rear wheels to lock quickly when you brake. This could cause the
rear to break away. Risk of skidding. Drive carefully to the nearest qualified
workshop and have the fault corrected.
11)Depending on the model version12)Depending on the model version.
13)Depending on the model version.
leon_ingles Seite 77 Donner stag, 24. August 2006 1:56 13
Page 81 of 292

Cockpit79
Safety First
Operating instructions
Tips and Maintenance
Te c h n i c a l D a t a
Traction control system (TCS)*
The traction control system prevents the driven wheels from
spinning when the vehicle is acceleratingThe warning lamp lights up when the ignition is switched on and should turn
off after about 2 seconds.
When the TCS is operating while driving, the warning lamp flashes. If the
system is deactivated or if there is any fault in the same, the warning lamp will
remain lit.
It will also come on if a fault should occur in the ABS because the TCS oper-
ates in conjunction with the ABS. For further information see ⇒page 169.Soot accumulation in the dies el engine particulate filter*
if the symbol
lights, soot has built up in the diesel engine particulate filter
due to continuous short trips. In this case, drive the vehicle at a constant
speed of at least 60 km/h (with an engine speed of about 1400 rpm) for
about 10 minutes. The increase in temperature generated may burn the accu-
mulated soot in the filter.
If the symbol is not deactivated, bring the vehicle to a specialized work-
shop to repair the fault.
For more information on the diesel particulate filter ⇒page 175.
WARNING
•
The diesel engine particulate filter may reach extremely high tempera-
tures; it should not enter into contact with flammable materials under-
neath the vehicle. Failure to comply could result in fire.
Caution
Vehicles equipped with a diesel engine particulate filter must not be refuelled
using biodiesel (RME), given that the fuel system may be damaged.Alternator
This warning lamp signals a fault in the alternator.
The warning lamp
lights up when the ignition is switched on. It should go
out when the engine has started running.
If the warning lamp lights up while driving, th e alternator is no longer
charging the battery. You should immediately drive to the nearest qualified
workshop.
You should avoid using electrical equipment that is not absolutely necessary
because this will drain the battery.
If the indicator flashes, the voltage is insufficient for normal vehicle
operation.
leon_ingles Seite 79 Donner stag, 24. August 2006 1:56 13