ECO mode Seat Leon 5D 2007 User Guide
[x] Cancel search | Manufacturer: SEAT, Model Year: 2007, Model line: Leon 5D, Model: Seat Leon 5D 2007Pages: 302, PDF Size: 9.14 MB
Page 83 of 302

Cockpit81
Safety First
Operating instructions
Tips and Maintenance
Te c h n i c a l D a t a
Engine management
This warning lamp monitors th e engine management system
for petrol engines.
The warning lamp
(Electronic Power Control) lights up when the ignition
is switched on to show that the lamp is working properly. It should go out
when the engine has started running.
If a fault develops in the electronic engine management system while you are
driving, this warning lamp will light up. Take the vehicle to an Authorised
Service Centre as soon as possible and have the engine checked.
Glow plug system / Engine fault
The warning lamp lights up to show that the glow plugs are
preheating. It flashes if there is an engine fault.
Warning lamp
is lit
The warning lamp lights up while the glow plugs are preheating. When the
warning lamp goes off, the engine should be started straight away.
Warning lamp
flashes
If a fault develops in the engine management system while you are driving,
the glow plug lamp will flash
. Take the vehicle to an Authorised Service
Centre as soon as possible and have the engine checked.
Emission control system*
This warning lamp monitors the exhaust system.
Warning lamp
flashes:
When there is misfiring that can damage the catalytic converter. Reduce
speed and drive carefully to the nearest qualified workshop to have the
engine checked.
The instrument panel displays shows the following message
16): EXHAUST
GAS SEE WORKSHOP .
Warning lamp
is lit:
If a fault has developed during driving which has reduced the quality of the
exhaust gas (e.g. lambda probe fault). Reduce speed and drive carefully to
the nearest qualified workshop to have the engine checked.
The following information text displayed in the instrument panel display :
EXHAUST GAS SEE WORKSHOP .
Electronic stabilisation programme (ESP)*
This warning lamp monitors the electronic stabilisation
programme.
This programme includes the ABS, EDL and TCS.
The warning lamp
has the following functions:
•
It will light for about 2 seconds when the ignition is switched on while a
test of the function is carried out.
•
It flashes when the ESP is activated when driving.
•
It will light up continuously if there is a malfunction in the ESP.
16)Depending on the model version
leon ingles.book Seite 81 Dienstag, 11. September 2007 1:47 13
Page 84 of 302

Cockpit
82•
It will light up continuously if the ESP is switched off.
•
It will also come on if a fault should occur in the ABS because the ESP
operates in conjunction with the ABS.
If the ESP warning lamp
lights up and stays on after the engine is started,
this may mean that the control system has temporarily switched off the ESP.
In this case the ESP can be reactivated by switching the ignition off and then
on again. If the warning lamp goes out, this means the system is fully
functional.
Operating the foot brake
The footbrake must be depressed when this warning lamp lights up. This is
necessary when the automatic gearbox* selector lever is moved out of the
positions P or N.Power steering system*
For vehicles with power steering, the level of steering assistance depends on
the vehicle's speed and on the steering angle.
The warning lamp should light up for a few seconds when the ignition is
switched on. It should go out when the engine has started running.
If the battery is disconnected, the indicator remains lit, even with the engine
running. The warning light only goes off after a distance of approx. 50 m.
There is a fault in the electromechanica l steering system if the lamp does not
go out or lights up whilst the vehicle is in motion. The indicator may appear
in two different colours to indicate fault s. If it lights yellow, this indicates a
minor fault. If it lights red, seek wo rkshop assistance immediately, if no
assistance is available stop driving. Stop the vehicle and seek technical
assistance. The power steering does not work if the battery is flat or if the engine is off (for example, for towing). You should take into account that you
will need considerably more power than normal to steer the vehicle if the
steering assistance is reduced
or has failed completely.
Brake pad wear indicator*
As the brake pad wear indicator only monitors the front brake pads, it is advis-
able to have the rear brake pads inspected at the same time.
The instrument panel displays shows the following message
17): CHECK
BRAKE PADS .
WARNING
Have the brake pads inspected immediately by a qualified dealership if the
warning display
lights up.
Indicator for open doors or tailgate
This indicator lights if one of th e doors or the tailgate is open.The warning light
should go off when all the doors are closed correctly.
The system also works when the ignition is switched off. It should go off
about 15 seconds after the vehicle is locked.
17)Depending on the model version
leon ingles.book Seite 82 Dienstag, 11. September 2007 1:47 13
Page 93 of 302

Steering wheel controls91
Safety First
Operating instructions
Tips and Maintenance
Te c h n i c a l D a t a
b)
Cyclic change of source
Radio - CD / CDC - Radio - ...
When in Navigation mode the system leaves the navigation screen. Repeat the last Navigation instruction
Only if the Navigation function is activated.
Voice recognition activation Press to speak No specified function
Make a call or
Direct access to the phone book or
Accept a call No specified function
Terminate call or
Refuse call or
Quite telephone menu No specified function
a)Only for those Radio-Navigation Systems compatible with the MP3 format.b)Button E, rapid flashing: Depending on the equipment, the radio frequency band may be selected.AEAFAGAH
leon ingles.book Seite 91 Dienstag, 11. September 2007 1:47 13
Page 150 of 302

Heating, Ventilation and Air conditioning
148
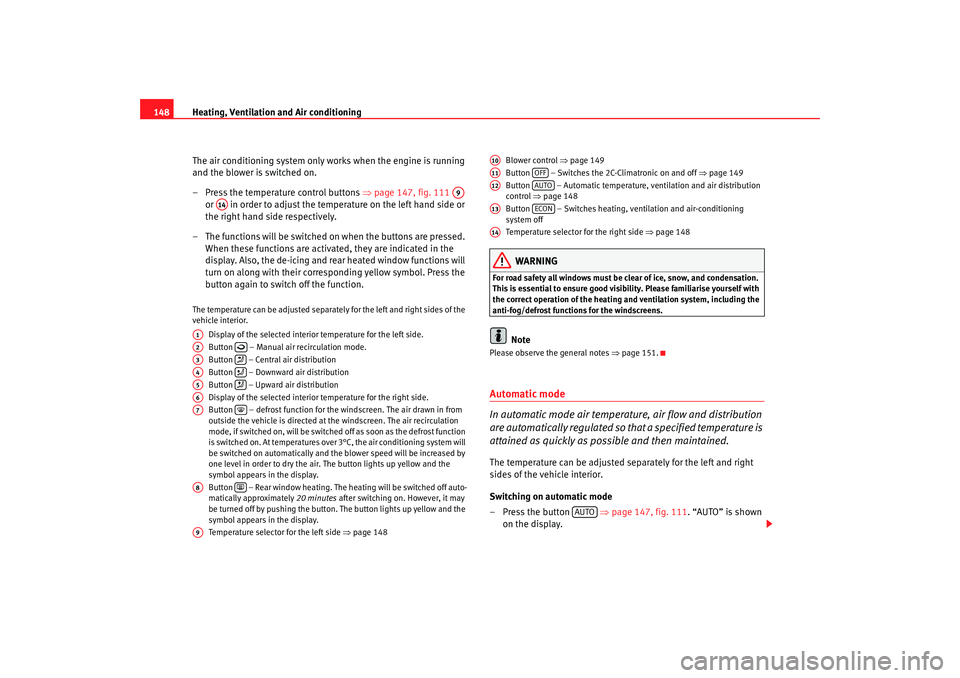
The air conditioning system only works when the engine is running
and the blower is switched on.
– Press the temperature control buttons ⇒page 147, fig. 111
or in order to adjust the temperature on the left hand side or
the right hand side respectively.
– The functions will be switched on when the buttons are pressed. When these functions are activate d, they are indicated in the
display. Also, the de-icing and re ar heated window functions will
turn on along with their corresponding yellow symbol. Press the
button again to switch off the function.The temperature can be adjusted separately for the left and right sides of the
vehicle interior.
Display of the selected interior temperature for the left side.
Button – Manual air recirculation mode.
Button – Central air distribution
Button – Downward air distribution
Button – Upward air distribution
Display of the selected interior temperature for the right side.
Button – defrost function for the windscreen. The air drawn in from
outside the vehicle is directed at the windscreen. The air recirculation
mode, if switched on, will be switched off as soon as the defrost function
is switched on. At temperatures over 3°C, the air conditioning system will
be switched on automatically and the blower speed will be increased by
one level in order to dry the air. The button lights up yellow and the
symbol appears in the display.
Button – Rear window heating. The heating will be switched off auto-
matically approximately 20 minutes after switching on. However, it may
be turned off by pushing the button. Th e button lights up yellow and the
symbol appears in the display.
Temperature selector for the left side ⇒page 148 Blower control
⇒page 149
Button – Switches the 2C-Climatronic on and off ⇒page 149
Button – Automatic temperature, ventilation and air distribution
control ⇒page 148
Button – Switches heating, ventilation and air-conditioning
system off
Temperature selector for the right side ⇒page 148
WARNING
For road safety all windows must be clear of ice, snow, and condensation.
This is essential to ensure good visibility. Please familiarise yourself with
the correct operation of the heating and ventilation system, including the
anti-fog/defrost functions for the windscreens.
Note
Please observe the general notes ⇒page 151.Automatic mode
In automatic mode air temperatur e, air flow and distribution
are automatically regulated so that a specified temperature is
attained as quickly as possible and then maintained.The temperature can be adjusted separately for the left and right
sides of the vehicle interior.
Switching on automatic mode
– Press the button ⇒page 147, fig. 111 . “AUTO” is shown
on the display.
A9
A14
A1A2
A3
A4
A5
A6A7
A8
A9
A10A11
OFF
A12
AUTO
A13
ECON
A14
AUTO
leon ingles.book Seite 148 Dienst ag, 11. September 2007 1:47 13
Page 151 of 302

Heating, Ventilation and Air conditioning 149
Safety First
Operating instructions
Tips and Maintenance
Te c h n i c a l D a t a
– Press the temperature selectors to set the desired temperatures
for the left and right sides of the interior. We recommend 22°C
(72°F).A comfortable interior climate is quickly reached when a temperature of
+22°C (72°F) is set in automatic mode. It can be changed as necessary to suit
individual preferences or particular cir cumstances. It is possible to select
interior temperatures from +16°C (61°F) to +29.5°C (86°F). These are approx-
imate temperatures and the actual temp erature may be slightly higher or
lower depending on the ambient conditions. Climatronic maintains a constant temperature level fully automatically. The
temperature of the air supplied to the interior, the blower speed and the air
distribution are regulated automatically. The system also allows for the effect
of strong sunlight, so there is no n
eed for manual adjustment. Therefore,
automatic mode provides the best comfort for the vehicle occupants in virtu-
ally all conditions throughout the year.
Automatic mode is switched off whenever an adjustment is made using the
buttons for the air distribution, air flow or . The temperature will
continue to be regulated within the parameters manually selected by the
user.Manual mode
In manual mode you can adjust the air temperat ure, air flow and distribution as required.Switching on manual mode
– To enter manual mode, press one of the buttons ⇒fig. 112 to , or press the air flow control . The symbol will
disappear from the display.
ECON
Fig. 112 On the dash panel: 2C Climatronic controls
A3
A5
ECON
A10
AUTO
leon ingles.book Seite 149 Dienst ag, 11. September 2007 1:47 13
Page 152 of 302

Heating, Ventilation and Air conditioning
150Temperature
There are separate temperature selectors for the left and right sides of the
vehicle interior. The selected temperatur e is displayed above the selector. It
is possible to select interior temper atures from +16°C (61°F) to +29.5°C
(86°F). These are approximate temperat ures and the actual temperature may
be slightly higher or lower depending on the ambient conditions.
If a temperature below 16°C (61°F) is selected, the display switches to LO. In
this setting the system runs at maximum cooling output and the temperature
is not regulated.
If a temperature above 29.5°C (86°F) is selected the display switches to HI. In
this setting the system runs at maximum heating output and the temperature
is not regulated.
Blower
The air flow may be adjusted freely using the control . Always have the
blower running at a low setting to ensure a constant flow of fresh air into the
vehicle. Pushing the button
to the minimum -1, turns the Climatronic off.
Air distribution
The air distribution is adjusted using the buttons , and . It is also
possible to open and close some of the air vents separately.
Switching the air conditioning system on and off
Pressing the button switches off th e air conditioning system to save
fuel. The temperature continues to be regulated. The set temperature can
then only be reached if it is higher than the ambient temperature.
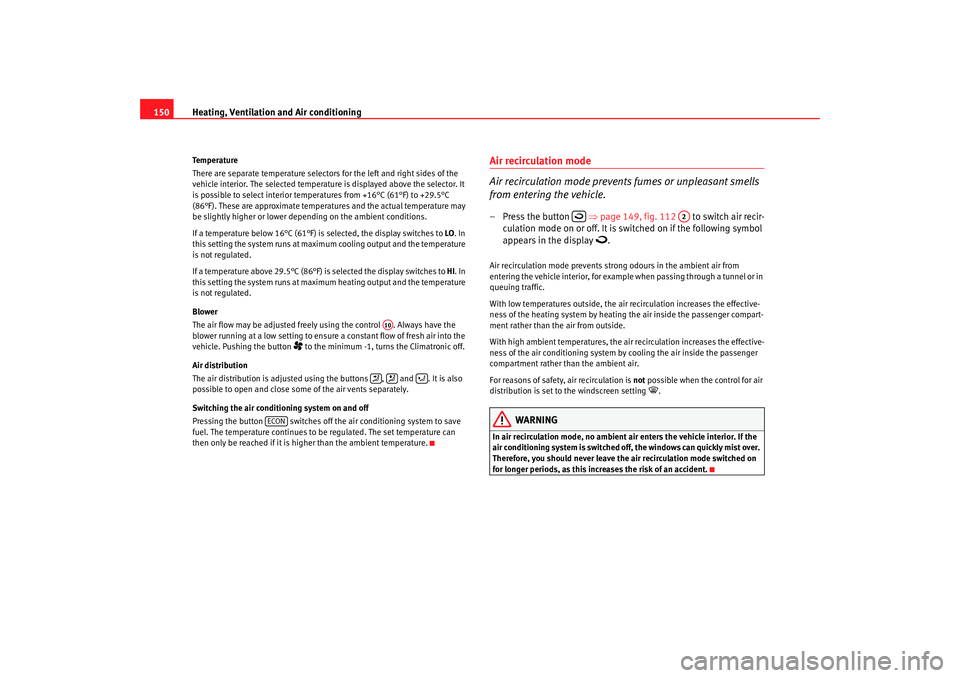
Air recirculation mode
Air recirculation mode prevents fumes or unpleasant smells
from entering the vehicle.– Press the button ⇒page 149, fig. 112 to switch air recir-
culation mode on or off. It is sw itched on if the following symbol
appears in the display
.
Air recirculation mode pr events strong odours in the ambient air from
entering the vehicle interior, for example when passing through a tunnel or in
queuing traffic.
With low temperatures outside, the air recirculation increases the effective-
ness of the heating system by heating the air inside the passenger compart-
ment rather than th e air from outside.
With high ambient temperatures, the ai r recirculation increases the effective-
ness of the air conditioning system by cooling the air inside the passenger
compartment rather than the ambient air.
For reasons of safety, air recirculation is not possible when the control for air
distribution is set to the windscreen setting
.
WARNING
In air recirculation mode, no ambient air enters the vehicle interior. If the
air conditioning system is switched off, the windows can quickly mist over.
Therefore, you should never leave the air recirculation mode switched on
for longer periods, as this increases the risk of an accident.
A10
ECON
A2
leon ingles.book Seite 150 Dienst ag, 11. September 2007 1:47 13
Page 153 of 302

Heating, Ventilation and Air conditioning 151
Safety First
Operating instructions
Tips and Maintenance
Te c h n i c a l D a t a
General notesThe pollen filter
The pollution filter (a combined particulate filter and active carbon filter)
serves as a barrier against impurities in the ambient air, including dust and
pollen.
For the air conditioning system to work with maximum efficiency, the pollen
filter must be replaced at the intervals specified in the Service Schedule.
If the filter loses efficiency prematurely due to use in areas with very high
levels of air pollution, the pollen filter must be changed more frequently than
stated in the Service Schedule.
Caution
•
If you suspect that the air conditioning is damaged, switch off the air
conditioning with button to prevent further damage and have it
checked by a qualified workshop.
•
Repairs to the air conditioning system require specialist knowledge and
special tools. Therefore, we recommend that you take the vehicle to a quali-
fied workshop should problems occur.Note
•
If the humidity and temperature outside the vehicle are high, condensa-
tion can drip off the evaporator in the cooling system and form a pool under-
neath the vehicle, this is completely normal and there is no need to suspect
a leak.
•
Keep the air intake slots in front of the windscreen free of snow, ice and
leaves to ensure heating and cooling is not impaired, and to prevent the
windows misting over.
•
The air from the vents flows through the passenger compartment and is
extracted by slots designed for this purpose. Do not cover these slots with
articles of clothing or other objects.
•
The air conditioning system operates most effectively with the windows
and the sliding/tilting roof* closed. However, if the sun has heated up the
vehicle, the air inside can be cooled more quickly by opening the windows for
a short period.
•
Do not smoke while air recirculation mode is on, as smoke drawn into the
air conditioning system leaves a residue on the evaporator, producing a
permanent unpleasant odour.
•
It is advisable to connect the air conditioning at least once a month, to
lubricate the system gasket s and prevent leaks. If a decrease in the cooling
capacity is detected, an Authorised Service Centre should be consulted to
check the system.
ECON
leon ingles.book Seite 151 Dienst ag, 11. September 2007 1:47 13
Page 162 of 302

Driving
160Driving programmes
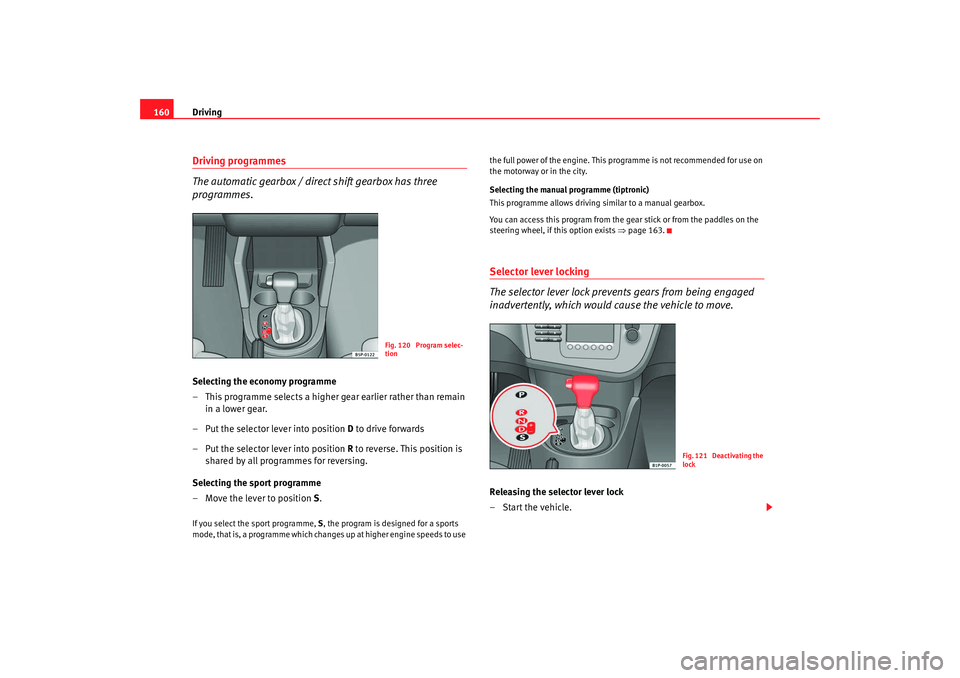
The automatic gearbox / direct shift gearbox has three
programmes.Selecting the economy programme
– This programme selects a higher gear earlier rather than remain
in a lower gear.
– Put the selector lever into position D to drive forwards
– Put the selector lever into position R to reverse. This position is
shared by all programmes for reversing.
Selecting the sport programme
– Move the lever to position S.If you select the sport programme, S, the program is designed for a sports
mode, that is, a programme which changes up at higher engine speeds to use the full power of the engine. This pr
ogramme is not recommended for use on
the motorway or in the city.
Selecting the manual programme (tiptronic)
This programme allows driving similar to a manual gearbox.
You can access this program from the gear stick or from the paddles on the
steering wheel, if this option exists ⇒page 163.
Selector lever locking
The selector lever lock prevents gears from being engaged
inadvertently, which would cause the vehicle to move.Releasing the selector lever lock
–Start the vehicle.
Fig. 120 Program selec-
tion
Fig. 121 Deactivating the
lock
leon ingles.book Seite 160 Dienst ag, 11. September 2007 1:47 13
Page 163 of 302

Driving161
Safety First
Operating instructions
Tips and Maintenance
Te c h n i c a l D a t a
– Press and release the brake pedal, at the same time press the
button on the selector lever.The lock is only activated when the vehicle is stopped or at a speed of less
than 5 km/h. At higher speeds, the lock is automatically released in position
N.
For rapid changes of position (e.g. from R to D) the lever will not lock. If the
lever remains in the position N more than one second then it is locked. With
the automatic lock, the lever is prevented passing from P and N to any other
gear without first pressing the brake pedal.
The selector lever must be put in the position P in order to remove the key.Driving with an automatic gearbox* / DSG automatic gearbox*
The drive and reverse gears are automatically engaged.
Driving
– Press and hold the foot brake.
– Press on the button on the selector lever knob (on the left,
⇒fig. 122).
– Select a gear for driving ( R, D or S).
– Release the button and wait a few seconds for the gear to engage, a light jerk will be felt.
– Release the brake and accelerate.
Short stop
– Hold the vehicle stationary with the brake pressed down (for example at traffic lights). The selector lever does not need to be
put into the positions P or N for this.
– Do not press the accelerator.
Parking the vehicle
– Press the foot brake and hold to bring the vehicle to a stop.
– Apply the handbrake firmly.
– Press in the button on the select or lever knob, move the lever to
the position P and release the button.
Driving slowly
– Move the selector lever to the position D and press to the right to
put the lever into Tiptronic mode.
– Press the gear lever towards (-) to select a lower gear.
Fig. 122 Driving
leon ingles.book Seite 161 Dienst ag, 11. September 2007 1:47 13
Page 177 of 302

Intelligent technology175
Safety First
Operating instructions
Tips and Maintenance
Te c h n i c a l D a t a
instance, city traffic, frequent short trips or hard driving with abrupt starts
and stops.
Wet roads; road salt
When the velocity is
over 80 km/h, and the windscreen wipers are on, the
brake system moves the pads towards the brake discs for a few seconds. This
occurs - without warning to the driver - in regular intervals and requires a
more rapid response from the brakes when driving on wet roads.
In certain conditions, such as in heavy rain, or after washing the car or driving
through water, the full braking effect can be delayed by moisture (or in winter
by ice) on the discs and brake pads. The brakes should be dried by pressing
the pedal to restore full braking effect.
The effectiveness of the brakes can also be temporarily reduced if the car is
driven for some distance without using the brakes when there is a lot of salt
on the road in winter. In this case, the layer of salt on the brake discs and pads
has to wear off before braking.
Corrosion
There may be a tendency for dirt to build up on the brake pads and corrosion
to form on the discs if the car is used infrequently, or if you only drive low
mileages without using the brakes very much.
If the brakes are not used frequently, or if corrosion has formed on the discs,
it is advisable to clean off the pads and discs by braking firmly a few times
from a moderately high speed ⇒.
Faults in the brake system
If the brake pedal travel should ever increase suddenly, this may mean that
one of the two brake circuits has failed. Drive immediately to the nearest qual-
ified workshop and have the fault rectified. On the way to the dealer, be
prepared to use more pressure on the brake pedal, and allow for longer stop-
ping distances. Low brake fluid level
Malfunctions can occur in the brake system if the brake fluid level is too low.
The brake fluid level is monitored electronically.
Brake servo
The brake servo amplifies the pressure you apply to the brake pedal. The
brake servo works only when the engine is running.
WARNING
•
When applying the brakes to clean o
ff deposits on the pads and discs,
select a clear, dry road. Be sure no t to inconvenience or endanger other
road users. Risk of accident.
•
Ensure the vehicle does not move whil e in neutral, when the motor is
stopped. Failure to do so could result in an accident.Caution
•
Never let the brakes “drag” by leaving your foot on the pedal when you do
not really intend to brake. This overheats the brakes, resulting in longer stop-
ping distances and greater wear.
•
Before driving down a long, steep gradient, it is advisable to reduce speed
and change to a lower gear (or move the selector lever to a lower gear position
if your car has automatic transmission). This makes use of engine braking
and prolongs the service life of the brakes. If you still have to use the brakes,
it is better to brake firmly at intervals than to apply the brakes continuously.Note
•
If the brake servo is not functioning due to a malfunction, or if the vehicle
has to be towed, you will have to press the brake pedal considerably harder
to make up for the lack of servo assistance.
leon ingles.book Seite 175 Dienst ag, 11. September 2007 1:47 13