key Seat Leon 5D 2011 MEDIA SYSTEM 2.2
[x] Cancel search | Manufacturer: SEAT, Model Year: 2011, Model line: Leon 5D, Model: Seat Leon 5D 2011Pages: 112, PDF Size: 2.42 MB
Page 11 of 112
10Introduction
General operating information
Introduction
If system settings are modified, some aspects of the unit's operation may
differ from the descriptions given in this manual. For this reason, SEAT rec-
ommends that you reset the unit to its factory settings the first time you use
it ⇒ page 100.
Additional Information:
● Safety notes ⇒ page 6
● Unit overview ⇒ page 8
● Multifunction steering wheel, to change track or station ⇒ Booklet Own-
er's Manual, chapter Vehicle overview
Note
Lightly pressing the buttons or briefly pressing the touchscreen is sufficient
to operate the unit.
Note
Never press a button down for longer than 10 minutes. Otherwise the sys-
tem will interpret this as a malfunction ( button jammed).
Note
Due to country-specific legislation, certain functions cannot be selected on
the screen when the vehicle is travelling above a certain speed.
Note
Using a mobile telephone in the vehicle may cause noise from the vehicle
speakers.
Note
In some vehicles equipped with a parking distance warning system, the vol-
ume of the current audio source is automatically lowered when reverse gear
is engaged. If talking on the telephone through the radio and navigation
system, the volume of the conversation is also lowered automatically when
reverse gear is engaged.
Note
Restrictions on the use of devices using Bluetooth technology may be appli-
cable in some countries. Please ask your local authority for further informa-
tion.
Switching on and off
With the ignition on, press the rotary/push knob
⇒ fig. 2 1 briefly to
manually switch the unit on or off.
When the unit is switched on, the system starts, and the last selected audio
source is played at the last selected volume, provided this is not greater
than the “start-up volume”.
When the key is removed from the ignition, the radio and navigation unit
automatically switches off. By pressing the rotary/push knob
⇒ fig. 2 1
,
the radio switches on and switches off automatically after approx. 30 mi-
nutes (switch-off delay), or manually if the rotary/push knob is pressed
again.
Anti-theft code
The anti-theft code is stored in the vehicle once it has been entered (con-
venience radio code). The anti-theft coding lock then only needs to be re-
leased manually if the unit is installed in another vehicle. In such a case, a
keypad field and a prompt to enter the code will appear when the unit is
switched on. In this case, you should contact a SEAT dealer.
Page 20 of 112
19
Audio mode
You can delete the stations stored to the station buttons individually or all
together ⇒ page 19.
Note
If you do not usually use the station buttons to select stations, SEAT recom-
mends that you hide the station buttons. You can then go straight to the
station list by turning the setting knob ⇒ page 16.
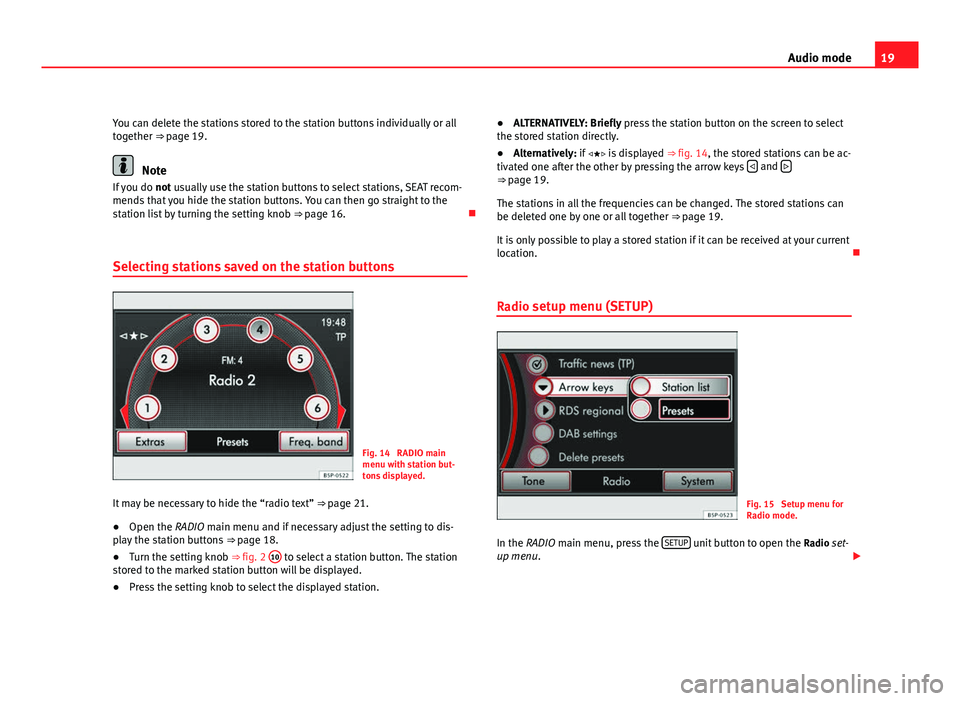
Selecting stations saved on the station buttons
Fig. 14 RADIO main
menu with station but-
tons displayed.
It may be necessary to hide the “radio text” ⇒ page 21.
● Open the RADIO main menu and if necessary adjust the setting to dis-
play the station buttons ⇒ page 18.
● Turn the setting knob ⇒ fig. 2 10
to select a station button. The station
stored to the marked station button will be displayed.
● Press the setting knob to select the displayed station. ●
ALTERNATIVELY: Briefly press the station button on the screen to select
the stored station directly.
● Alternatively: if is displayed ⇒ fig. 14, the stored stations can be ac-
tivated one after the other by pressing the arrow keys
and ⇒
page 19.
The stations in all the frequencies can be changed. The stored stations can
be deleted one by one or all together ⇒ page 19.
It is only possible to play a stored station if it can be received at your current
location.
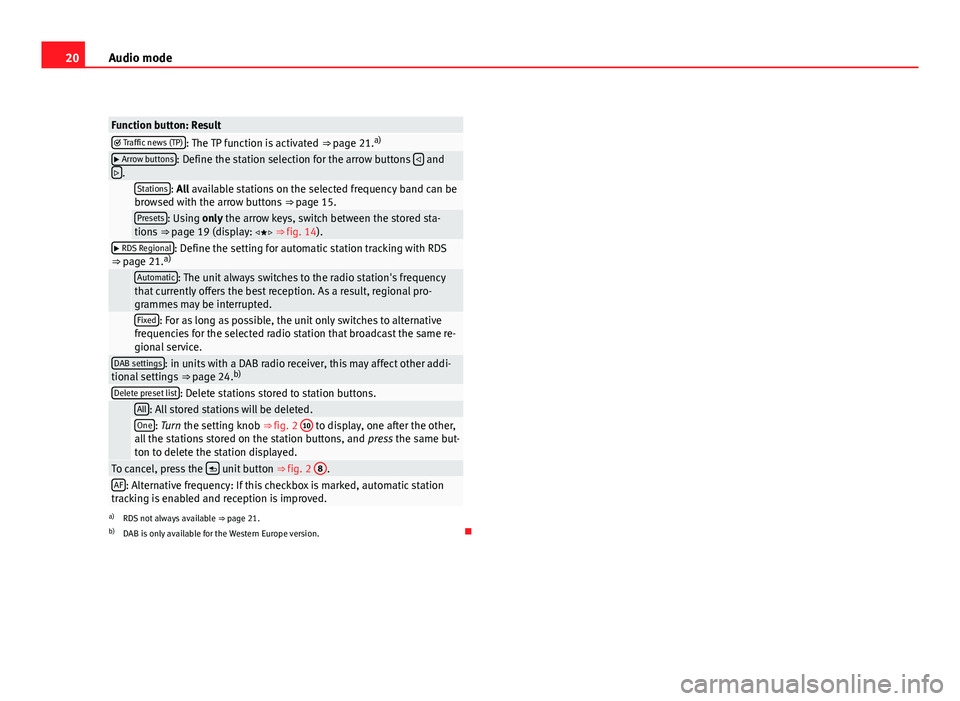
Radio setup menu (SETUP)
Fig. 15 Setup menu for
Radio mode.
In the RADIO main menu, press the SETUP
unit button to open the
Radio set-
up menu.
Page 21 of 112
20Audio mode
Function button: Result Traffic news (TP): The TP function is activated ⇒ page 21. a) Arrow buttons: Define the station selection for the arrow buttons
and
.
Stations: All available stations on the selected frequency band can be
browsed with the arrow buttons ⇒ page 15.
Presets: Using only the arrow keys, switch between the stored sta-
tions ⇒ page 19 (display: ⇒ fig. 14).
RDS Regional: Define the setting for automatic station tracking with RDS
⇒ page 21. a)
Automatic: The unit always switches to the radio station's frequency
that currently offers the best reception. As a result, regional pro-
grammes may be interrupted.
Fixed: For as long as possible, the unit only switches to alternative
frequencies for the selected radio station that broadcast the same re-
gional service.
DAB settings: in units with a DAB radio receiver, this may affect other addi-
tional settings ⇒ page 24.b)
Delete preset list: Delete stations stored to station buttons.
All: All stored stations will be deleted.One: Turn the setting knob ⇒
fig. 2 10 to display, one after the other,
all the stations stored on the station buttons, and press the same but-
ton to delete the station displayed.
To cancel, press the unit button
⇒ fig. 2 8.AF: Alternative frequency: If this checkbox is marked, automatic station
tracking is enabled and reception is improved.
a) RDS not always available ⇒ page 21.
b) DAB is only available for the Western Europe version.
Page 38 of 112
37
Audio mode
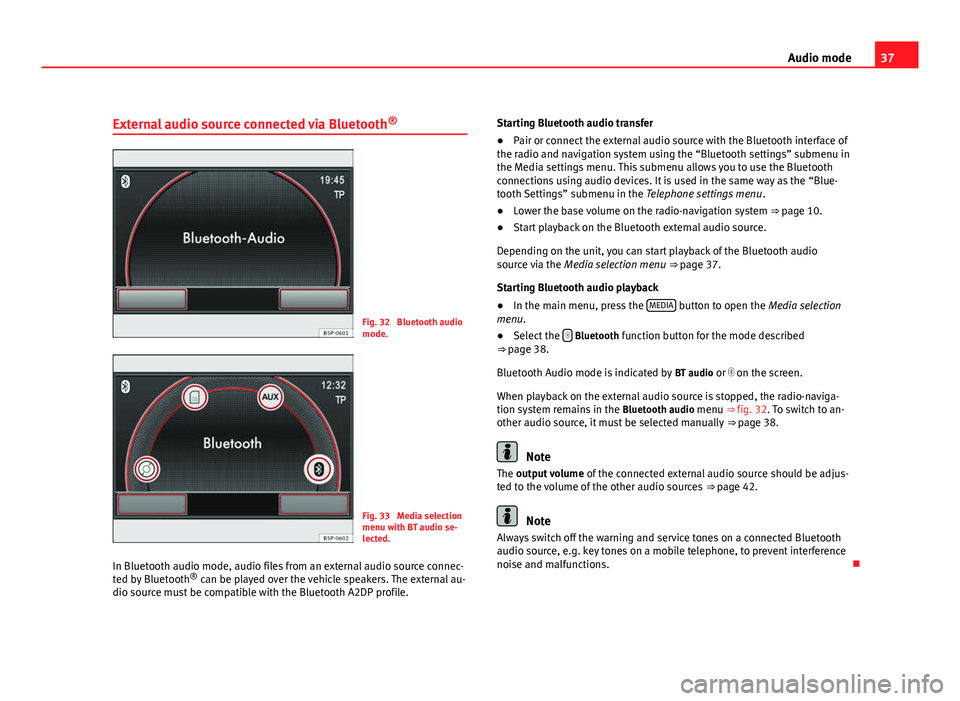
External audio source connected via Bluetooth ®
Fig. 32 Bluetooth audio
mode.
Fig. 33 Media selection
menu with BT audio se-
lected.
In Bluetooth audio mode, audio files from an external audio source connec-
ted by Bluetooth ®
can be played over the vehicle speakers. The external au-
dio source must be compatible with the Bluetooth A2DP profile. Starting Bluetooth audio transfer
●
Pair or connect the external audio source with the Bluetooth interface of
the radio and navigation system using the “Bluetooth settings” submenu in
the Media settings menu. This submenu allows you to use the Bluetooth
connections using audio devices. It is used in the same way as the “Blue-
tooth Settings” submenu in the Telephone settings menu .
● Lower the base volume on the radio-navigation system ⇒ page 10.
● Start playback on the Bluetooth external audio source.
Depending on the unit, you can start playback of the Bluetooth audio
source via the Media selection menu ⇒ page 37.
Starting Bluetooth audio playback
● In the main menu, press the MEDIA
button to open the Media selection
menu.
● Select the
Bluetooth function button for the mode described
⇒ page 38.
Bluetooth Audio mode is indicated by BT audio or on the screen.
When playback on the external audio source is stopped, the radio-naviga-
tion system remains in the Bluetooth audio menu ⇒ fig. 32. To switch to an-
other audio source, it must be selected manually ⇒ page 38.
Note
The output volume of the connected external audio source should be adjus-
ted to the volume of the other audio sources ⇒ page 42.
Note
Always switch off the warning and service tones on a connected Bluetooth
audio source, e.g. key tones on a mobile telephone, to prevent interference
noise and malfunctions.
Page 53 of 112
52Navigation
Input windows with on-screen keyboard
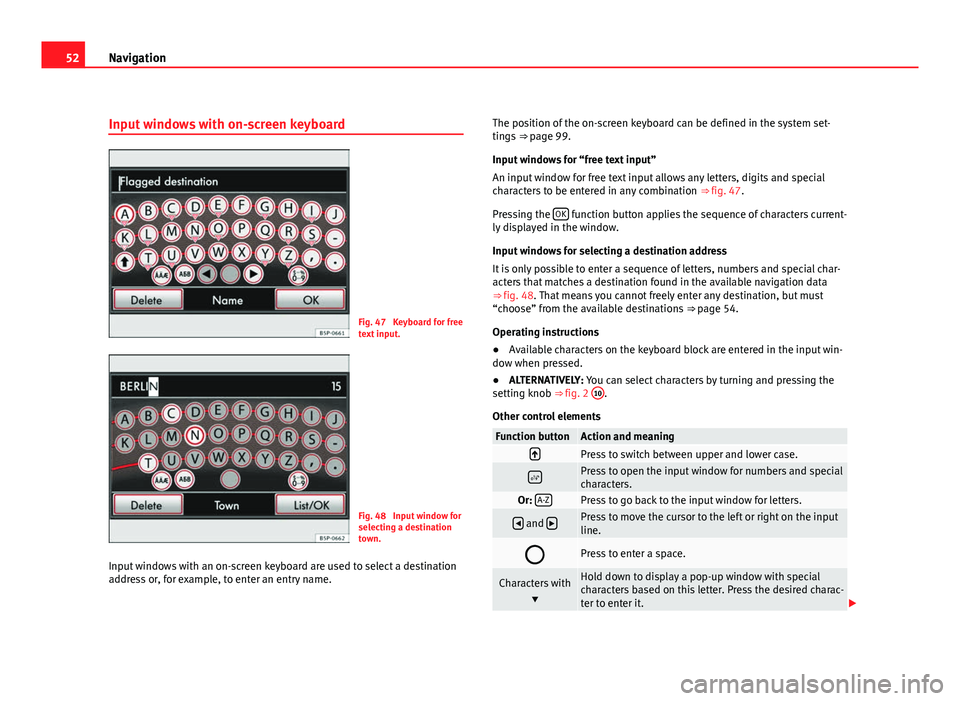
Fig. 47 Keyboard for free
text input.
Fig. 48 Input window for
selecting a destination
town.
Input windows with an on-screen keyboard are used to select a destination
address or, for example, to enter an entry name. The position of the on-screen keyboard can be defined in the system set-
tings
⇒ page 99.
Input windows for “free text input”
An input window for free text input allows any letters, digits and special
characters to be entered in any combination ⇒ fig. 47.
Pressing the OK
function button applies the sequence of characters current-
ly displayed in the window.
Input windows for selecting a destination address
It is only possible to enter a sequence of letters, numbers and special char-
acters that matches a destination found in the available navigation data
⇒ fig. 48. That means you cannot freely enter any destination, but must
“choose” from the available destinations ⇒ page 54.
Operating instructions
● Available characters on the keyboard block are entered in the input win-
dow when pressed.
● ALTERNATIVELY: You can select characters by turning and pressing the
setting knob ⇒ fig. 2 10
.
Other control elements
Function buttonAction and meaningPress to switch between upper and lower case.
Press to open the input window for numbers and special
characters.
Or: A-ZPress to go back to the input window for letters.
and Press to move the cursor to the left or right on the input
line.
Press to enter a space.
Characters with
Hold down to display a pop-up window with special
characters based on this letter. Press the desired charac-
ter to enter it.
Page 54 of 112
53
Navigation
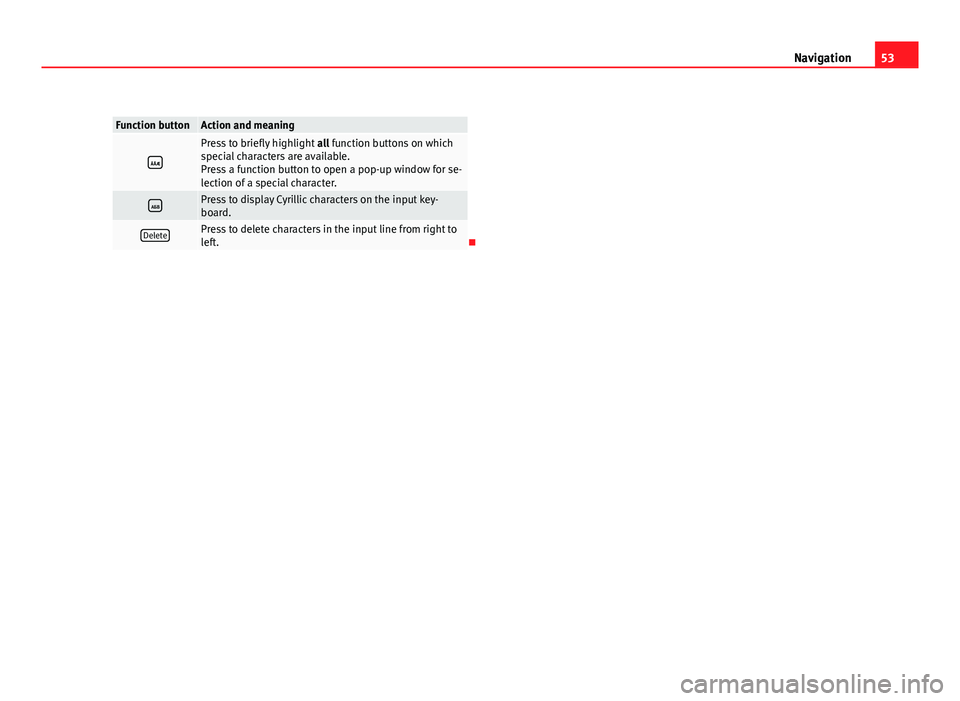
Function buttonAction and meaning
Press to briefly highlight all function buttons on which
special characters are available.
Press a function button to open a pop-up window for se-
lection of a special character.
Press to display Cyrillic characters on the input key-
board.
DeletePress to delete characters in the input line from right to
left.
Page 59 of 112
58Navigation
Selecting a point of interest as a destination
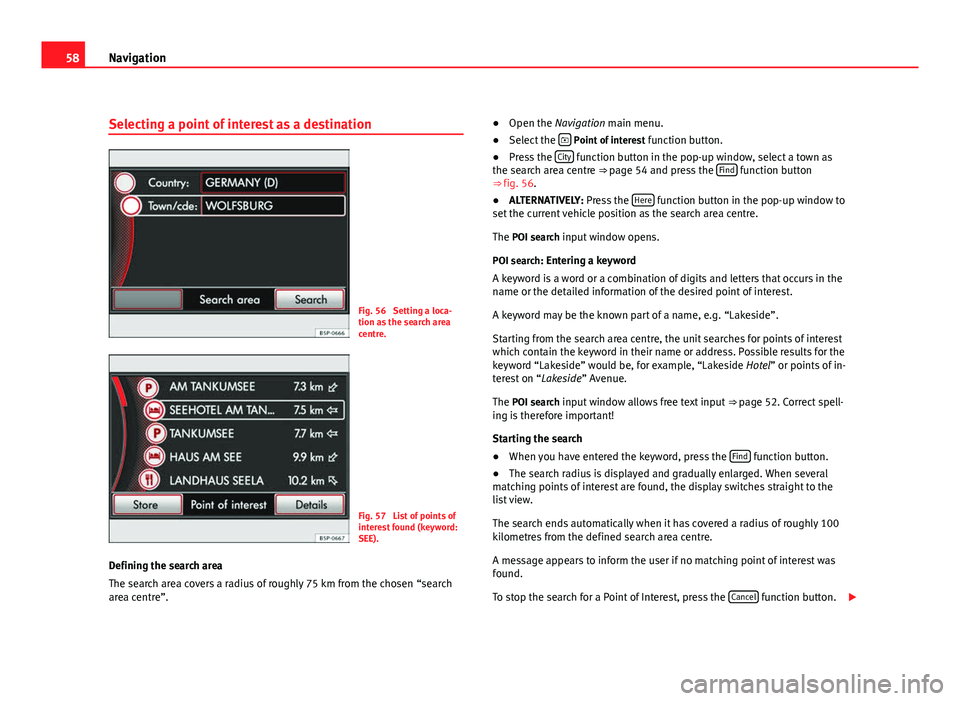
Fig. 56 Setting a loca-
tion as the search area
centre.
Fig. 57 List of points of
interest found (keyword:
SEE).
Defining the search area
The search area covers a radius of roughly 75 km from the chosen “search
area centre”. ●
Open the Navigation main menu.
● Select the
Point of interest
function button.
● Press the City function button in the pop-up window, select a town as
the search area centre ⇒ page 54 and press the Find function button
⇒ fig. 56.
● ALTERNATIVELY: Press the Here
function button in the pop-up window to
set the current vehicle position as the search area centre.
The POI search input window opens.
POI search: Entering a keyword
A keyword is a word or a combination of digits and letters that occurs in the
name or the detailed information of the desired point of interest.
A keyword may be the known part of a name, e.g. “Lakeside”.
Starting from the search area centre, the unit searches for points of interest
which contain the keyword in their name or address. Possible results for the
keyword “Lakeside” would be, for example, “Lakeside Hotel” or points of in-
terest on “Lakeside” Avenue.
The POI search input window allows free text input ⇒ page 52. Correct spell-
ing is therefore important!
Starting the search
● When you have entered the keyword, press the Find
function button.
● The search radius is displayed and gradually enlarged. When several
matching points of interest are found, the display switches straight to the
list view.
The search ends automatically when it has covered a radius of roughly 100
kilometres from the defined search area centre.
A message appears to inform the user if no matching point of interest was
found.
To stop the search for a Point of Interest, press the Cancel
function button.
Page 73 of 112
72Navigation
Directly excluding a route section further ahead
(congestion)
During a route guidance, the route section of the remaining stretch of route
can be excluded manually.
●Press the unit button
in any of the navigation menus (except SETUP).
● In the information window, press the Route function button.
● Press the Congestion ahead function button in the pop-up window.
● Enter the length of the section to be excluded by turning the setting
knob ⇒ fig. 2 10
.
The length indicated for the route section is shown on the lower line of the
screen. If (Max) is displayed, this indicates that the maximum permitted
length for exclusion has been reached.
● Press the OK
setting knob or function key to confirm the exclusion.
The excluded route section is displayed on the map.
Route guidance will start again when the navigation system has calculated
an alternative route to the excluded section.
Re-opening a section
● Press the unit button
in any of the navigation menus (except SETUP).
● In the information window, press the Route function button.
● Press the Lift cong. excl. function button in the pop-up window.
Note
It is also possible to enter or cancel an exclusion while viewing the TMC traf-
fic announcements using the function button Congestion ahead
⇒ page 73.
Note
Information on manually excluding route sections further ahead ⇒ page 71.Dynamic route guidance with TMC (Traffic Message
Channel)
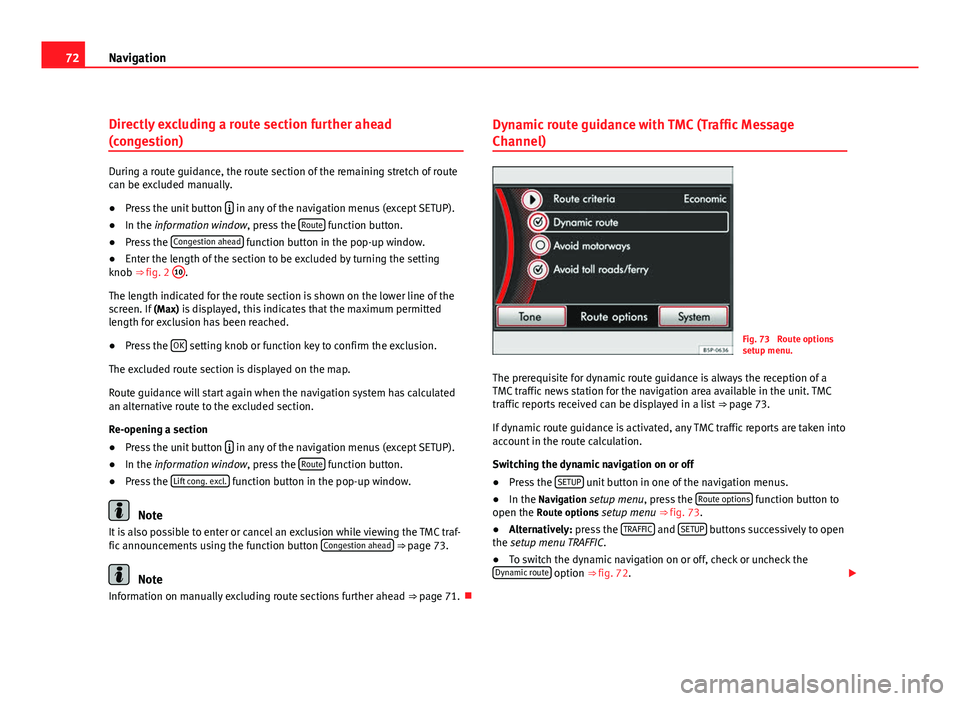
Fig. 73 Route options
setup menu.
The prerequisite for dynamic route guidance is always the reception of a
TMC traffic news station for the navigation area available in the unit. TMC
traffic reports received can be displayed in a list ⇒ page 73.
If dynamic route guidance is activated, any TMC traffic reports are taken into
account in the route calculation.
Switching the dynamic navigation on or off
● Press the SETUP
unit button in one of the navigation menus.
● In the Navigation setup menu, press the Route options function button to
open the Route options setup menu ⇒ fig. 73.
● Alternatively: press the TRAFFIC
and SETUP buttons successively to open
the setup menu TRAFFIC.
● To switch the dynamic navigation on or off, check or uncheck the
Dynamic route
option ⇒ fig. 72.
Page 82 of 112
81
Telephone control (Phone)
The mobile phone can be connected to the radio and navigation system in
two ways:
● active connection
● passive connection
With the active connection, the search for the unit is started using the radio
and navigation system. With the passive connection, the search for the unit
is started using the mobile phone. Sometimes the search process is unable
to find the device it wishes to pair to the radio and navigation system. It
may be necessary to repeat the search several times.
The following settings in the mobile phone and in the radio and navigation
system are required for both types of connection:
● The Bluetooth ®
function must be on or visible in the mobile phone and
in the radio and navigation system.
● The mobile phone keypad must be unlocked.
● The mobile phone notification and keypad tones should be switched off.
It will be necessary to enter information using the telephone keypad during
the connection process. Therefore, the mobile phone should be to hand.
This is followed by the synchronisation process between the two devices.
The mobile phone book and the list of received, missed and last dialled
calls is automatically loaded into the navigation system.
Start active connection of the mobile phone
When making an active connection, any existing connections to other mo-
bile phones are ended.
● Press the PHONE
unit button.
● Press the SETUP unit button.
● Press the Bluetooth Settings function button.
● Press the Bluetooth Settings function button. The search process may last 15 to 20 seconds. On completion, the names of
any mobile phones found are displayed on the screen. Sometimes the
search process is unable to find the device it wishes to pair to the radio and
navigation system. It may be necessary to repeat the search several times.
●
Select the entry corresponding to the mobile phone to be connected
from the list of Bluetooth devices ⇒ fig. 79.
● Establish a connection by pressing the Connect
function button.
● Alternatively: establish the connection by pressing the right unit button.
● Alternatively: establish the connection by pressing the name of the
phone in the entry in the list.
Now establish a connection between the mobile phone and the radio and
navigation system. To confirm the connection between the two units, certain
information should be entered in the mobile phone.
● Confirm connection in the mobile phone.
● Enter PIN shown on the radio and navigation display via the mobile
phone and confirm.
When the PIN has been correctly entered, a message confirming the connec-
tion is displayed on the radio and navigation system screen. The address
book stored in the mobile phone and the call lists are automatically loaded.
The time taken to load the information will depend upon the quantity of da-
ta stored in the mobile phone. Once the data has been loaded, the tele-
phone control data will be available in the radio and navigation system. The
main menu, PHONE, is displayed on the screen.
Start passive connection of the mobile phone
● Press the PHONE
unit button.
● Press the SETUP unit button.
● Press the Bluetooth Settings function button.
● Press the Activate BT visibility function button.
● Start searching for Bluetooth audio accessories in the mobile phone.
Page 89 of 112
88Telephone control (Phone)
Incoming
callsThe numbers of the most recent answered calls are dis-
played.
Recent
callsThe numbers of the most recent calls are displayed.In the main telephone menu, when button ⇒ fig. 81 on the
multifunction steering wheel is pressed, you are taken direct-
ly to the list of dialled numbers.
Menu Voice mailbox
Consult voicemail messages
Use the Voice mailbox menu to listen to the messages which have been left
in the voice mailbox.
● The first time this menu option is used, the Bluetooth system will search
the phone book for the voicemail number. It searches for key words, such as
"voice mailbox", "mailbox", or even "Automatic answer phone".
● If a suitable entry is not found, enter the voice mailbox number manual-
ly.