change time Seat Leon 5D 2011 SOUND SYSTEM 2.0
[x] Cancel search | Manufacturer: SEAT, Model Year: 2011, Model line: Leon 5D, Model: Seat Leon 5D 2011Pages: 44, PDF Size: 0.9 MB
Page 7 of 44
6Introduction
Introduction
Before using the unit for the first time
Before using the unit for the first time, carry out the following steps. This
will enable you to use the unit safely and make full use of the functions it
provides:
Observe the basic safety notes .
Familiarise yourself with the unit overview.⇒ page 8
Use suitable data media for Media mode.⇒ page 18
Safety notes
WARNING
Using the radio system while the vehicle is in motion can distract you
from the road and lead to accidents.
● Observe legal requirements.
● Always drive carefully and responsibly.
● Select volume settings that allow you to easily hear signals from out-
side the vehicle at all times (e.g. emergency service sirens).
WARNING
External devices that are placed loose in the vehicle or not properly se-
cured could be flung though the interior during a sudden driving or brak-
ing manoeuvre, or in the event of an accident.
● While the vehicle is in motion, always secure external devices proper-
ly outside the airbag deployment zones.
WARNING
Connecting leads for external devices may obstruct the driver.
● Arrange the connecting leads so that they do not obstruct the driver.
WARNING
The volume level may suddenly change when you switch audio source or
connect a new audio source.
● Reduce the base volume before switching audio source or connecting
a new audio source ⇒ page 11.
WARNING
Opening a CD/DVD player's housing can lead to injuries from invisible la-
ser radiation.
● Have CD/DVD players repaired only by a qualified workshop.
Page 11 of 44
10Introduction
General operating information
Introduction
Additional information:
● Safety notes ⇒ page 6
● Unit overview ⇒ page 8
● Multi-function steering wheel for changing track or station ⇒ book-
let Operating instructions.
Additional display information
Depending on the vehicle specification, changes to air conditioning set-
tings or information on factory-fitted driver assistance systems may be tem-
porarily displayed on the screen. These displays disappear automatically
when they are no longer required.
All displays appear only after completely restarting the radio system.
CAUTION
Only a small amount of pressure is needed to operate the unit.
Note
● Never press a button down for longer than 10 minutes. Otherwise the
system will interpret this as a malfunction ( button jammed).
● Due to country-specific legislation, certain functions cannot be selected
on the screen when the vehicle is travelling above a certain speed.
● Using a mobile phone in the vehicle may cause noise from the vehicle
speakers.
● In some vehicles equipped with a parking distance warning system, the
volume of the current audio source is automatically lowered when reverse
gear is engaged. This volume can be changed while reverse is engaged. If
the volume is not modified, when reverse is disengaged the previous vol-
ume setting is restored. If the volume is modified, when reverse gear is dis- engaged the audio source will stay at the set volume and, as long as the
maximum volume is not exceeded, it will be memorised for the next time re-
verse gear is engaged.
Switching on and off
FunctionActivationSwitch the unit on or off
manually.Press the rotary/push knob
After the ignition key is removed the unit
switches off automatically after approx. 30 mi-
nutes (switch-off delay).
Switch on the unit auto-
matically.Insert the vehicle key into the ignition lock.
The unit switches on automatically if it was on
when the ignition key was removed.
Switch off the unit auto-
matically.Remove the vehicle key from the ignition lock.
When the unit is switched on the system starts up. The last audio source
used is played at the last selected volume setting, provided this does not
exceed the preselected switch-on volume ( ON-VOL ⇒ page 35).
Energy management
If, when the ignition is switched off and the unit switched on, the battery
voltage falls below the minimum onboard power supply voltage, a signal
sounds and LOW BATTERY appears. You should switch the radio off.
If the battery voltage level continues to fall, LOW BATTERY and RADIO OFF are
briefly shown on the display. The unit will switch off automatically.
Page 19 of 44
18Audio mode
Media mode
Introduction
Media sources are audio sources containing audio files on various different
data media (e.g. CD, external MP3 player). These audio files can be played
by the radio system from its corresponding players or audio input sockets
(internal CD player , external CD changer, AUX-IN multimedia socket).
Additional information:
● Safety notes ⇒ page 6
● Unit overview ⇒ page 8
● External audio sources (AUX, MDI) ⇒ page 26
● MEDIA-IN multimedia interface ⇒ page 29
● Settings menus ⇒ page 34
Media source and audio file requirements
Factory-fitted CD players conform to safety class 1 according to
DIN IEC 76 (CO) 6/ VDE 0837.
The unit only accepts 12-cm standard CDs.
The supported file formats listed are collectively referred to below as audio
files. A CD containing audio files of these types is referred to as an audio
data CD.
Media sourceRequirements for playing in the unit Audio CDs with CD
Digital Audio logo.CD Digital Audio specification.
CD, CD-ROM, CD-R,
CD-RW with audio data
of up to 700 MB (mega-
bytes) in accordance
with ISO 9660 or Joliet
file system.MP3 files (.mp3) with bit rates of between
48 and 320 kbit/s or with variable bit rate.
WMA files (.wma) up to 9.0 without copy protec-
tion.
File names not longer than 64 characters.
Folder structures with a maximum of ten levels.
Max. 120 folders and max. 500 files on a data
medium.
Playlists in the formats PLS, M3U and WPL.
Playlists no larger than 20 KB and containing no
more than 250 links.
Max. 32 playlists on a data medium.
Playing audio files via
Bluetooth ®a)
.The external audio source must be compatible
with the Bluetooth A2DP profile and paired with
the factory-fitted UHV mobile phone preparation.
AUX. External audio
source.3.5 mm jack plug for audio output can be con-
nected ⇒ fig. 1 10.MDI. External data me-
dium.Compatible with MEDIA-IN multimedia interface
⇒ page 29.
a) Bluetooth ®
is a registered trademark of Bluetooth SIG, Inc.
Restrictions and notes
Contamination, exposure to high temperatures and mechanical damage
may render a data medium unusable. Observe the manufacturer's instruc-
tions.
Variations in the quality of data media produced by different manufacturers
may lead to problems during playback.
Observe copyright laws!
CDs recorded in UDF or Direct CD format cannot be played. Under Windows
Vista ®
ensure that the correct format is selected.
Page 21 of 44
20Audio mode
Subfolders are treated like folders and numbered in accordance with the se-
quence on the CD.
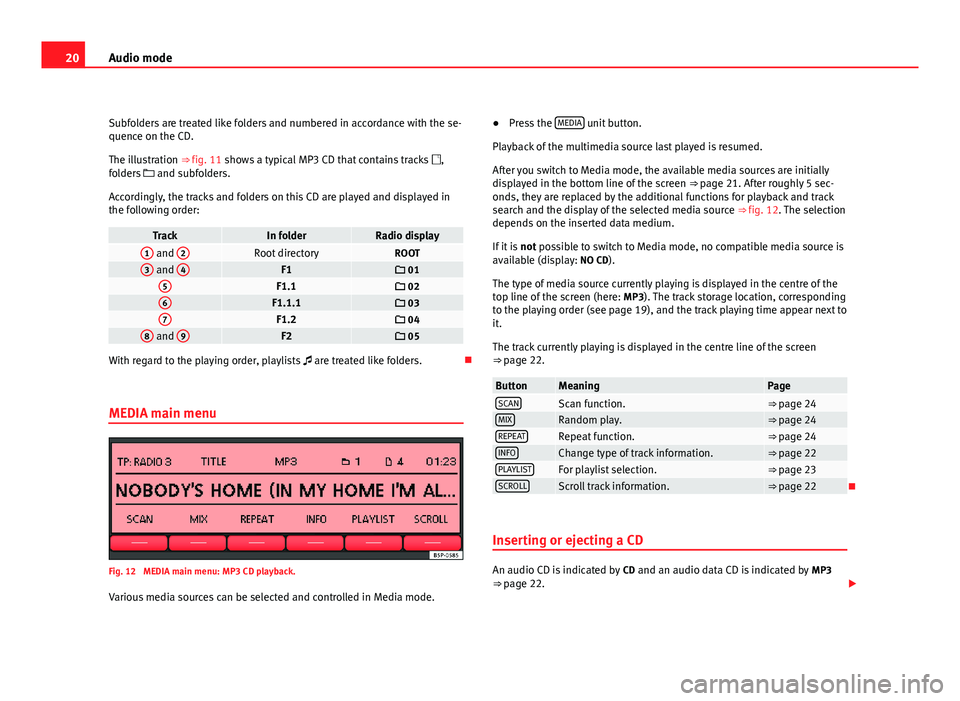
The illustration ⇒ fig. 11 shows a typical MP3 CD that contains tracks ,
folders and subfolders.
Accordingly, the tracks and folders on this CD are played and displayed in
the following order:
TrackIn folderRadio display1 and 2Root directoryROOT3 and 4F1 015F1.1 026F1.1.1 037F1.2 048 and 9F2 05
With regard to the playing order, playlists
are treated like folders.
MEDIA main menu
Fig. 12 MEDIA main menu: MP3 CD playback. Various media sources can be selected and controlled in Media mode. ●
Press the MEDIA
unit button.
Playback of the multimedia source last played is resumed.
After you switch to Media mode, the available media sources are initially
displayed in the bottom line of the screen ⇒ page 21. After roughly 5 sec-
onds, they are replaced by the additional functions for playback and track
search and the display of the selected media source ⇒ fig. 12. The selection
depends on the inserted data medium.
If it is not possible to switch to Media mode, no compatible media source is
available (display: NO CD).
The type of media source currently playing is displayed in the centre of the
top line of the screen (here: MP3). The track storage location, corresponding
to the playing order (see page 19), and the track playing time appear next to
it.
The track currently playing is displayed in the centre line of the screen
⇒ page 22.
ButtonMeaningPageSCANScan function.⇒ page 24MIXRandom play.⇒ page 24REPEATRepeat function.⇒ page 24INFOChange type of track information.⇒ page 22PLAYLISTFor playlist selection.⇒ page 23SCROLLScroll track information.⇒ page 22
Inserting or ejecting a CD
An audio CD is indicated by CD and an audio data CD is indicated by MP3
⇒ page 22.
Page 23 of 44
22Audio mode
Opening the Media selection menu manually and selecting a media source
● In Media mode, briefly press the MEDIA
unit button to display the
Media
selection menu again ⇒ fig. 13.
● Select the desired media source by pressing its function button.
● Alternatively: Press the MEDIA
unit button as often as required to switch
between the available media sources.
Function but-
tonMedia sourceSee
CDAudio or audio data CD in the inter-
nal CD drive.⇒ page 20
AUX
or MEDIA-INExternal audio source connected to
the AUX-IN multimedia socket.
Or
External data medium (MDI) connec-
ted to the MEDIA-IN multimedia
socket.⇒ page 27
⇒ page 29
BT-AUDIOBluetooth audio source connected.⇒ page 28
When a media source that has already been played is selected again, play-
back is resumed from the point that was last played. Exception: External au-
dio sources ⇒ page 27. Track information display
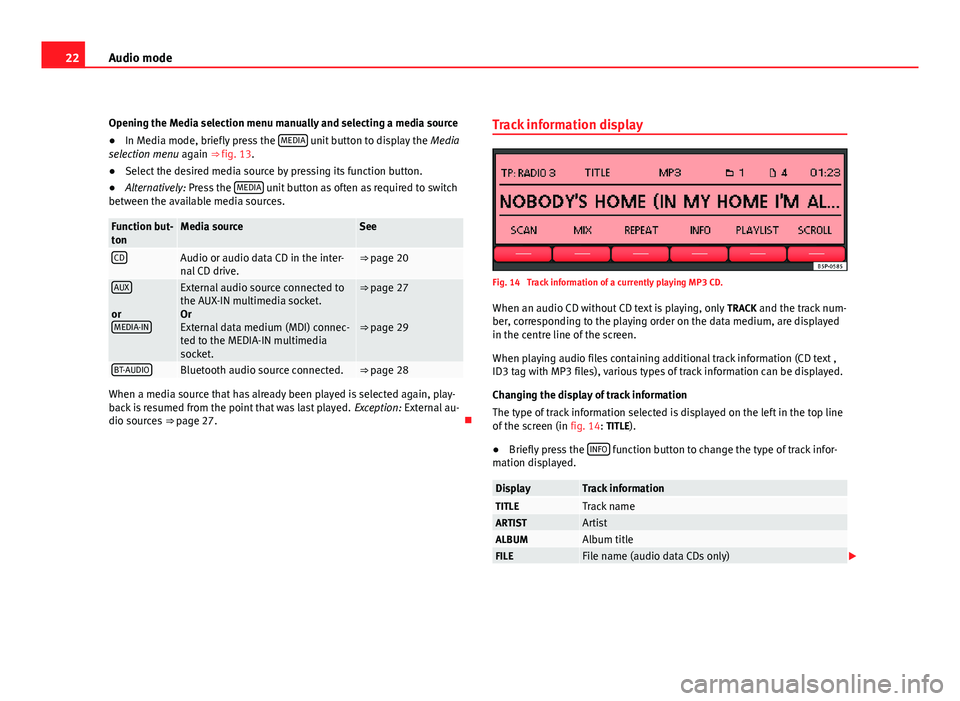
Fig. 14 Track information of a currently playing MP3 CD.
When an audio CD without CD text is playing, only TRACK and the track num-
ber, corresponding to the playing order on the data medium, are displayed
in the centre line of the screen.
When playing audio files containing additional track information (CD text ,
ID3 tag with MP3 files), various types of track information can be displayed.
Changing the display of track information
The type of track information selected is displayed on the left in the top line
of the screen (in fig. 14: TITLE).
● Briefly press the INFO
function button to change the type of track infor-
mation displayed.
DisplayTrack informationTITLETrack nameARTISTArtistALBUMAlbum titleFILEFile name (audio data CDs only)
Page 24 of 44
23
Audio mode
DisplayTrack informationFOLDER
or
PLAYLISTFolder name (only with audio data CDs).
Playlist name (only with audio data CDs).
No displayStorage location corresponding to playing order
⇒ page 19
If the selected track information is too long for the centre line of the screen,
the SCROLL function button also appears
⇒ fig. 14.
● When you briefly press the SCROLL
function button, the displayed track
information scrolls across the screen once.
Changing track manually
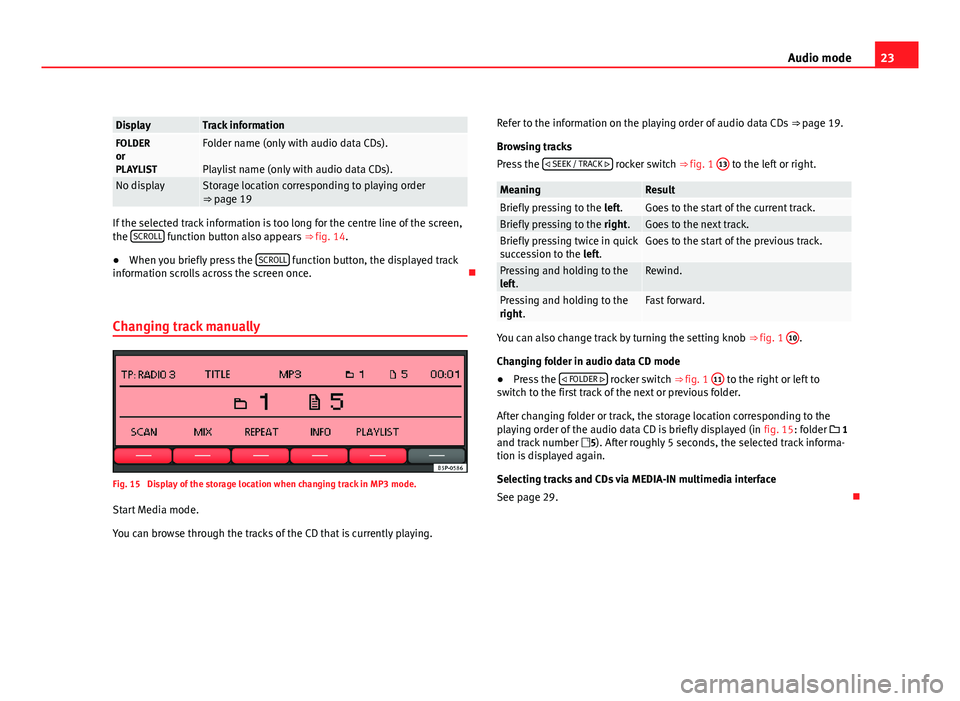
Fig. 15 Display of the storage location when changing track in MP3 mode.
Start Media mode.
You can browse through the tracks of the CD that is currently playing. Refer to the information on the playing order of audio data CDs
⇒ page 19.
Browsing tracks
Press the SEEK / TRACK
rocker switch ⇒ fig. 1 13 to the left or right.
MeaningResultBriefly pressing to the
left.Goes to the start of the current track.Briefly pressing to the right.Goes to the next track.Briefly pressing twice in quick
succession to the left.Goes to the start of the previous track.
Pressing and holding to the
left.Rewind.
Pressing and holding to the
right.Fast forward.
You can also change track by turning the setting knob ⇒ fig. 1 10.
Changing folder in audio data CD mode
● Press the FOLDER
rocker switch ⇒ fig. 1 11 to the right or left to
switch to the first track of the next or previous folder.
After changing folder or track, the storage location corresponding to the
playing order of the audio data CD is briefly displayed (in fig. 15: folder 1
and track number 5). After roughly 5 seconds, the selected track informa-
tion is displayed again.
Selecting tracks and CDs via MEDIA-IN multimedia interface
See page 29.
Page 28 of 44
27
Audio mode
AUX-IN* connection
A JACK 1)
audio adaptor is required.
Connect the portable audio player (MP3, Walkman, CD, etc. ) to the AUX-IN
connector, ensuring that the jack fits perfectly. Folders, tracks... are man-
aged from the connected device.
To listen to the audio from the portable device, press the MEDIA button on
the radio.
The USB connection takes priority over AUX-IN inputs. A device connected to
the AUX-IN input can only be heard when there is no other device connected
to the USB port ⇒ page 29.
The audio source of the devices connected in the MEDIA-IN device
⇒ page 29 (USB as AUX-IN) takes priority over those connected in the RSE. Where both options are available, make sure that there is nothing connec-
ted in the MEDIA-IN* connections when you wish to listen to the audio
source of the RSE in the car. (See Rear Seat Entertainment manual).
Note
Keep in mind that if you change temporarily to a different source without
stopping the playback on the portable device, when you go back to the aux-
iliary source using the menu displayed with the MEDIA
button, it will not
continue to play at the point where you left it.
External audio source connected to the AUX-IN multimedia
socket
The AUX-IN multimedia socket can only be used with a 3.5 mm jack plug. An external audio source connected to the socket is indicated by
AUX in the
Media selection menu .
If AUX is not displayed, AUX must be activated in the SETUP menu
⇒ page 35.
Connecting an external audio source to the AUX-IN multimedia socket
● Connect the audio source to the AUX-IN multimedia socket.
● Start playback on the external audio source.
● Open the Media selection menu and select the AUX
function button
⇒ page 21.
The output volume of a connected external audio source should be adjusted
to the volume of the other audio sources ⇒ page 36.
Information on operating an external audio source connected to the AUX-IN
multimedia socket
MeaningResultSelection of another audio source
on the radio system.The external audio source continues
to run in the background.
Stopping playback on the external
audio source or disconnecting the
plug from the AUX-IN multimedia
socket.The radio system remains in the AUX
menu.
Vehicles with MEDIA-IN multimedia interface
See page 29.
Note
Interference noise may be heard if the external audio source is powered
from the vehicle's 12-volt socket.
1)
The cable is not supplied.
Page 32 of 44
31
Audio mode
Connecting and disconnecting an external data medium
● Connect the appropriate adapter to the MEDIA-IN multimedia interface
⇒ page 29.
● Connect the external data medium to the MEDIA-IN multimedia interface
via the adapter.
● If necessary, switch on the external data medium or select the appropri-
ate data mode.
Even though the display may indicate otherwise, the external data medium
may be disconnected from the MEDIA-IN multimedia interface at any time
without data loss.
If the selected media source is disconnected from the MEDIA-IN multimedia
interface while being played, the radio system will remain in MDI mode. An-
other audio source must be selected manually.
Operation via the radio system
An external data medium that is correctly connected to the MEDIA-IN multi-
media interface can be operated from the radio system.
The radio system does not automatically switch to playback from an exter-
nal data medium when a data medium is connected to the MEDIA-IN multi-
media interface or when a connected data medium is switched on.
● Display the Media selection menu and select the MEDIA-IN
function but-
ton ⇒ page 21.
● Playback from the external data medium will start ⇒ fig. 21.
● When you press the BROWSE
function button, the function buttons for
searching the folder structure appear on the screen ⇒ fig. 22.
● You can browse folders or playlists with the function buttons TOP
(high-
est level), UP (one higher) and OPEN (open folder). The selected folder level
is displayed in the top line of the screen ⇒ fig. 22.
● You can switch between folders and playlists on the same level using
the
FOLDER
rocker switch ⇒ fig. 1 10. ●
To browse through the tracks within a folder or a playlist, turn the setting
knob and to play the displayed track press the PLAY
function button.
● To change track directly within a folder or playlist press the
SEEK / TRACK
rocker switch ⇒ fig. 1 12 to the left or right.
For a description of the different playback modes ( SCAN, MIX, REPEAT) and
instructions on selecting them, please refer to page 24.
iPod ®
and iPhone ®
The top level of a connected iPod ®
or iPhone ®
allows you to select menu
items specific to the device. This iPod selection menu always has the same
structure and is operated in the familiar way.
The music controls on the connected iPod ®
or iPhone ®
are disabled.
The output volume of a connected iPod ®
or iPhone ®
should be adjusted to
the volume of the other audio sources ⇒ page 36.
Possible error messages after connecting an external data medium
Error mes-
sageCauseHow to proceed
Device not
supportedThe external data medium
cannot be played or commu-
nication is not possible with
the adapter cable being
used.Check adapter cable.
Update the software of the
MEDIA-IN multimedia inter-
face at your Authorised Serv-
ice.
If possible, update the soft-
ware of the external data me-
dium.
Device defec-
tiveCommunication interrupted.Check the connection and
make sure the external data
medium is working correctly.
Due to the large number of different data media and various iPod ®
and
iPhone ®
generations available, it is not possible to guarantee fault-free
operation of all functions described here.
Page 37 of 44
36Settings menus
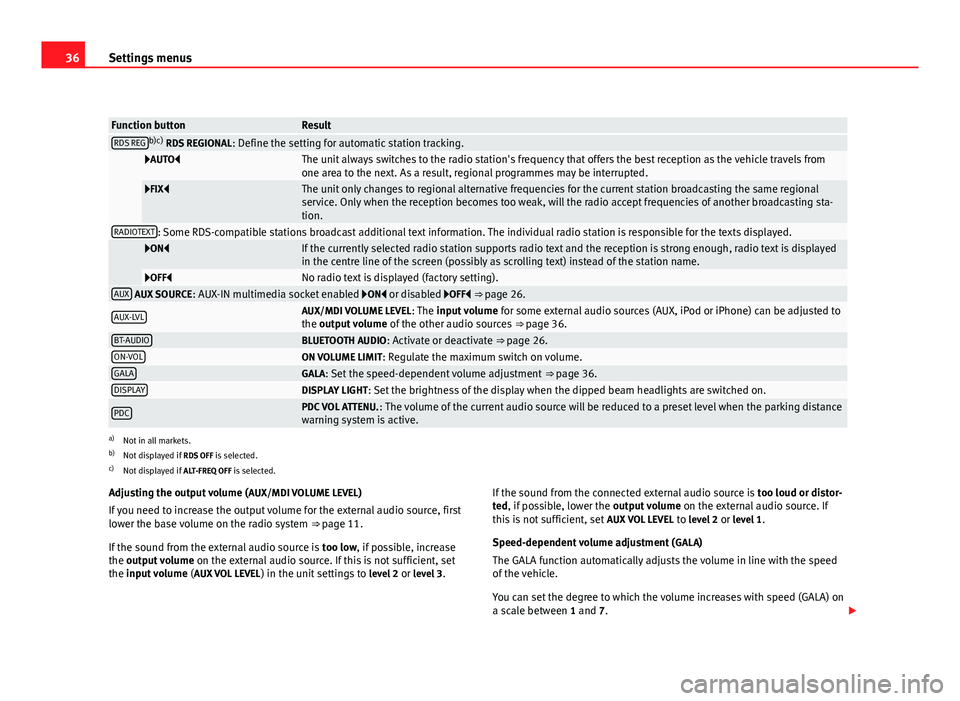
Function buttonResultRDS REGb)c)
RDS REGIONAL : Define the setting for automatic station tracking.
AUTOThe unit always switches to the radio station's frequency that offers the best reception as the vehicle travels from
one area to the next. As a result, regional programmes may be interrupted.
FIXThe unit only changes to regional alternative frequencies for the current station broadcasting the same regional
service. Only when the reception becomes too weak, will the radio accept frequencies of another broadcasting sta-
tion.
RADIOTEXT: Some RDS-compatible stations broadcast additional text information. The individual radio station is responsible for the texts displayed.
ONIf the currently selected radio station supports radio text and the reception is strong enough, radio text is displayed
in the centre line of the screen (possibly as scrolling text) instead of the station name.
OFFNo radio text is displayed (factory setting).AUX AUX SOURCE: AUX-IN multimedia socket enabled ON or disabled OFF ⇒ page 26.
AUX-LVLAUX/MDI VOLUME LEVEL : The input volume for some external audio sources (AUX, iPod or iPhone) can be adjusted to
the output volume of the other audio sources ⇒ page 36.
BT-AUDIOBLUETOOTH AUDIO: Activate or deactivate ⇒ page 26.ON-VOLON VOLUME LIMIT: Regulate the maximum switch on volume.GALAGALA: Set the speed-dependent volume adjustment ⇒ page 36.DISPLAYDISPLAY LIGHT: Set the brightness of the display when the dipped beam headlights are switched on.
PDCPDC VOL ATTENU. : The volume of the current audio source will be reduced to a preset level when the parking distance
warning system is active.
a) Not in all markets.
b) Not displayed if RDS OFF is selected.
c) Not displayed if ALT-FREQ OFF is selected.
Adjusting the output volume ( AUX/MDI VOLUME LEVEL)
If you need to increase the output volume for the external audio source, first
lower the base volume on the radio system ⇒ page 11.
If the sound from the external audio source is too low, if possible, increase
the output volume on the external audio source. If this is not sufficient, set
the input volume (AUX VOL LEVEL) in the unit settings to level 2 or level 3 . If the sound from the connected external audio source is
too loud or distor-
ted, if possible, lower the output volume on the external audio source. If
this is not sufficient, set AUX VOL LEVEL to level 2 or level 1 .
Speed-dependent volume adjustment ( GALA)
The GALA function automatically adjusts the volume in line with the speed
of the vehicle.
You can set the degree to which the volume increases with speed (GALA) on
a scale between 1 and 7.
Page 43 of 44

SEAT S.A. is permanently concerned about continuous development of its types and models. For this reason we ask you to understand,
that at any given time, changes regarding shape, equipment and tec hnique may take place on the car delivered. For this reason no
right at all may derive based on the data, drawings and descriptions in this current handbook.
All texts, illustrations and standards in this handbook are based on the status of information at the time of printing. Except for error
or omission, the information included in the current handbook is valid as of the date of closing print.
Re-printing, copying or translating, whether total or partial is not allowed unless SEAT allows it in written form.
SEAT reserves all rights in accordance with the "Copyright" Act.
All rights on changes are reserved.
❀This paper has been manufactured using bleached non-chlorine cellulose.
© SEAT S.A. - Reprint: 15.04.11
Portada ALTEA_interior_maquetación 03/03/11 13:49 Página 3