audio Seat Leon 5D 2012 MEDIA SYSTEM 2.2
[x] Cancel search | Manufacturer: SEAT, Model Year: 2012, Model line: Leon 5D, Model: Seat Leon 5D 2012Pages: 112, PDF Size: 2 MB
Page 18 of 112
17
Audio mode
Starting and stopping the scan function
● Open the RADIO main menu and select a frequency band ⇒ page 15.
● Press the Extras
function button.
● In the pop-up window, press the Scan function button ⇒ Fig. 8.
● The scan function starts and the Extras function button changes to Scan⇒ Fig. 9.
●
Briefly press the Scan function button or the setting knob ⇒
Fig. 1 10 to
stop the scan function at the station that is currently playing.
The scan function also stops when you manually select a station with the
arrow buttons or station buttons, or the scan is interrupted by a traffic an-
nouncement (traffic news TP ⇒ page 21).
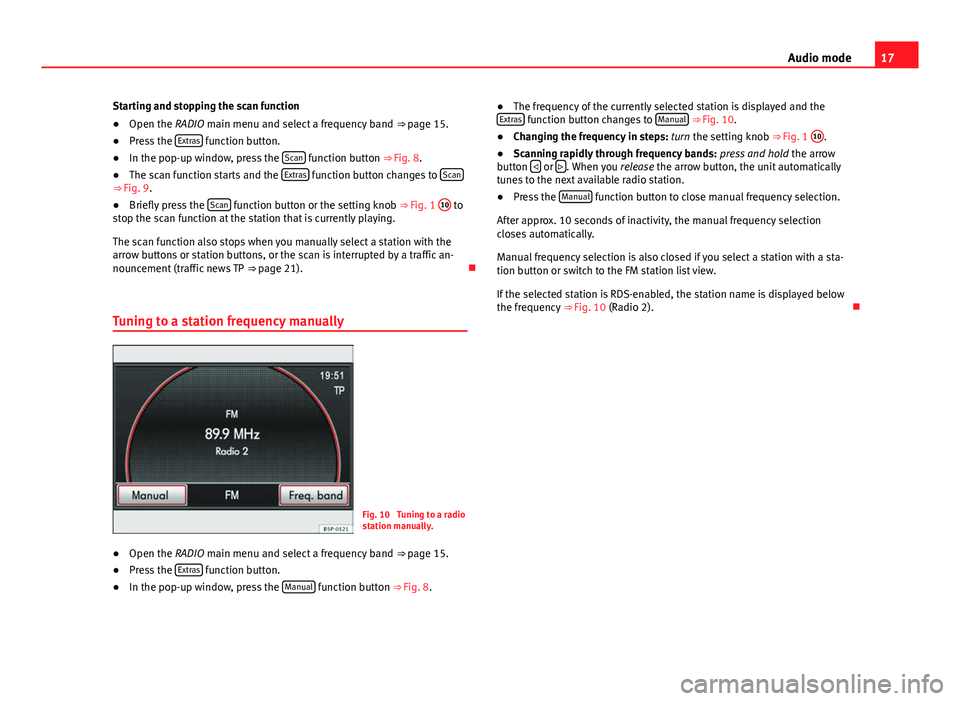
Tuning to a station frequency manually
Fig. 10 Tuning to a radio
station manually.
● Open the RADIO main menu and select a frequency band
⇒ page 15.
● Press the Extras
function button.
● In the pop-up window, press the Manual function button
⇒ Fig. 8. ●
The frequency of the currently selected station is displayed and the
Extras
function button changes to Manual ⇒ Fig. 10.
● Changing the frequency in steps: turn the setting knob ⇒ Fig. 1 10.
● Scanning rapidly through frequency bands: press and hold the arrow
button
or . When you
release the arrow button, the unit automatically
tunes to the next available radio station.
● Press the Manual
function button to close manual frequency selection.
After approx. 10 seconds of inactivity, the manual frequency selection
closes automatically.
Manual frequency selection is also closed if you select a station with a sta-
tion button or switch to the FM station list view.
If the selected station is RDS-enabled, the station name is displayed below
the frequency ⇒ Fig. 10 (Radio 2).
Page 19 of 112
18Audio mode
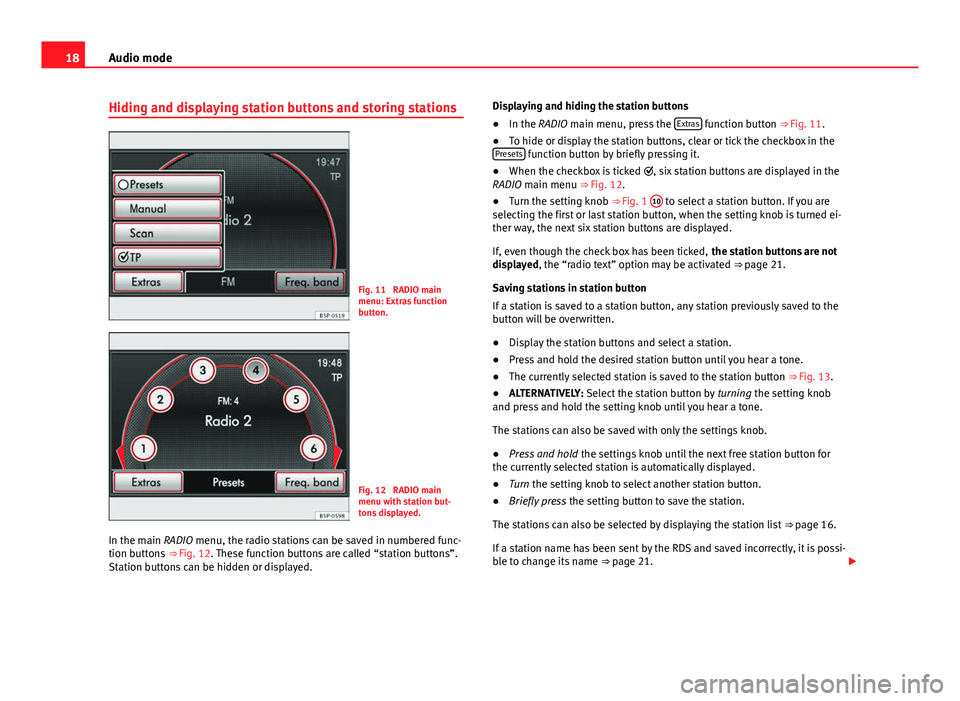
Hiding and displaying station buttons and storing stations
Fig. 11 RADIO main
menu: Extras function
button.
Fig. 12 RADIO main
menu with station but-
tons displayed.
In the main RADIO menu, the radio stations can be saved in numbered func-
tion buttons ⇒ Fig. 12. These function buttons are called “station buttons”.
Station buttons can be hidden or displayed. Displaying and hiding the station buttons
●
In the RADIO main menu, press the Extras
function button ⇒
Fig. 11.
● To hide or display the station buttons, clear or tick the checkbox in the
Presets
function button by briefly pressing it.
● When the checkbox is ticked , six station buttons are displayed in the
RADIO main menu ⇒ Fig. 12.
● Turn the setting knob ⇒ Fig. 1 10
to select a station button. If you are
selecting the first or last station button, when the setting knob is turned ei-
ther way, the next six station buttons are displayed.
If, even though the check box has been ticked, the station buttons are not
displayed, the “radio text” option may be activated ⇒ page 21.
Saving stations in station button
If a station is saved to a station button, any station previously saved to the
button will be overwritten.
● Display the station buttons and select a station.
● Press and hold the desired station button until you hear a tone.
● The currently selected station is saved to the station button ⇒ Fig. 13.
● ALTERNATIVELY: Select the station button by turning the setting knob
and press and hold the setting knob until you hear a tone.
The stations can also be saved with only the settings knob.
● Press and hold the settings knob until the next free station button for
the currently selected station is automatically displayed.
● Turn the setting knob to select another station button.
● Briefly press the setting button to save the station.
The stations can also be selected by displaying the station list ⇒ page 16.
If a station name has been sent by the RDS and saved incorrectly, it is possi-
ble to change its name ⇒ page 21.
Page 20 of 112
19
Audio mode
You can delete the stations stored to the station buttons individually or all
together ⇒ page 19.
Note
If you do not usually use the station buttons to select stations, SEAT recom-
mends that you hide the station buttons. You can then go straight to the
station list by turning the setting knob ⇒ page 16.
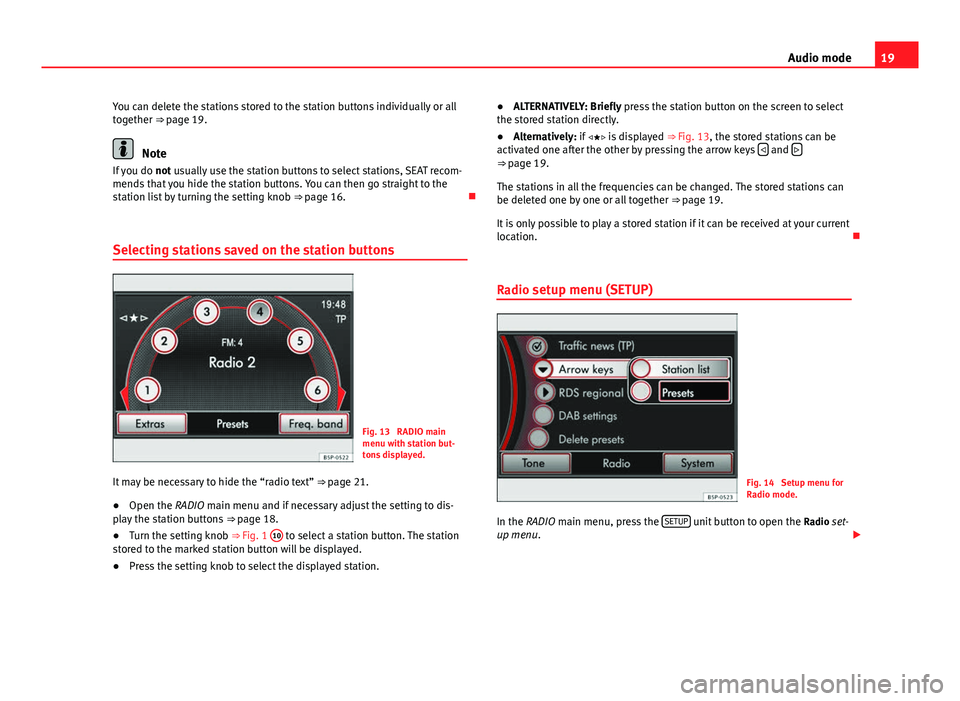
Selecting stations saved on the station buttons
Fig. 13 RADIO main
menu with station but-
tons displayed.
It may be necessary to hide the “radio text” ⇒ page 21.
● Open the RADIO main menu and if necessary adjust the setting to dis-
play the station buttons ⇒ page 18.
● Turn the setting knob ⇒ Fig. 1 10
to select a station button. The station
stored to the marked station button will be displayed.
● Press the setting knob to select the displayed station. ●
ALTERNATIVELY: Briefly press the station button on the screen to select
the stored station directly.
● Alternatively: if is displayed ⇒ Fig. 13, the stored stations can be
activated one after the other by pressing the arrow keys
and ⇒
page 19.
The stations in all the frequencies can be changed. The stored stations can
be deleted one by one or all together ⇒ page 19.
It is only possible to play a stored station if it can be received at your current
location.
Radio setup menu (SETUP)
Fig. 14 Setup menu for
Radio mode.
In the RADIO main menu, press the SETUP
unit button to open the
Radio set-
up menu.
Page 21 of 112
20Audio mode
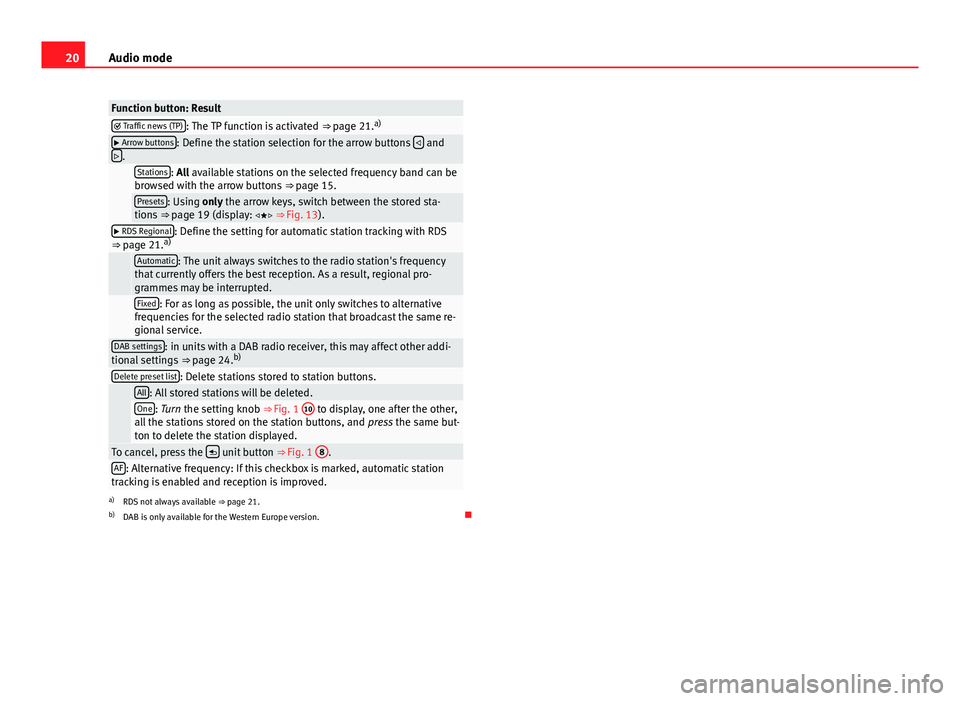
Function button: Result Traffic news (TP): The TP function is activated ⇒ page 21. a) Arrow buttons: Define the station selection for the arrow buttons
and
.
Stations: All available stations on the selected frequency band can be
browsed with the arrow buttons ⇒ page 15.
Presets: Using only the arrow keys, switch between the stored sta-
tions ⇒ page 19 (display: ⇒ Fig. 13).
RDS Regional: Define the setting for automatic station tracking with RDS
⇒ page 21. a)
Automatic: The unit always switches to the radio station's frequency
that currently offers the best reception. As a result, regional pro-
grammes may be interrupted.
Fixed: For as long as possible, the unit only switches to alternative
frequencies for the selected radio station that broadcast the same re-
gional service.
DAB settings: in units with a DAB radio receiver, this may affect other addi-
tional settings ⇒ page 24.b)
Delete preset list: Delete stations stored to station buttons.
All: All stored stations will be deleted.One: Turn the setting knob ⇒
Fig. 1 10 to display, one after the other,
all the stations stored on the station buttons, and press the same but-
ton to delete the station displayed.
To cancel, press the unit button
⇒ Fig. 1 8.AF: Alternative frequency: If this checkbox is marked, automatic station
tracking is enabled and reception is improved.
a) RDS not always available ⇒ page 21.
b) DAB is only available for the Western Europe version.
Page 22 of 112
21
Audio mode
RDS radio data and TP (Traffic Programme)
services
Introduction
RDS (Radio Data System) is a radio data service for broadcasting pro-
gramme and additional service identifiers, and displaying station names
and radio text, automatic station tracking and traffic programmes.
The RDS is not compatible with all equipment and is not available every-
where or on all radio stations.
Without RDS it is not possible to use the RDS radio services .
Additional Information:
● Safety notes ⇒ page 6
● Unit overview ⇒ page 8
● Radio mode ⇒ page 14
Note
The radio station is responsible for the content of the broadcast informa-
tion. RDS and radio text
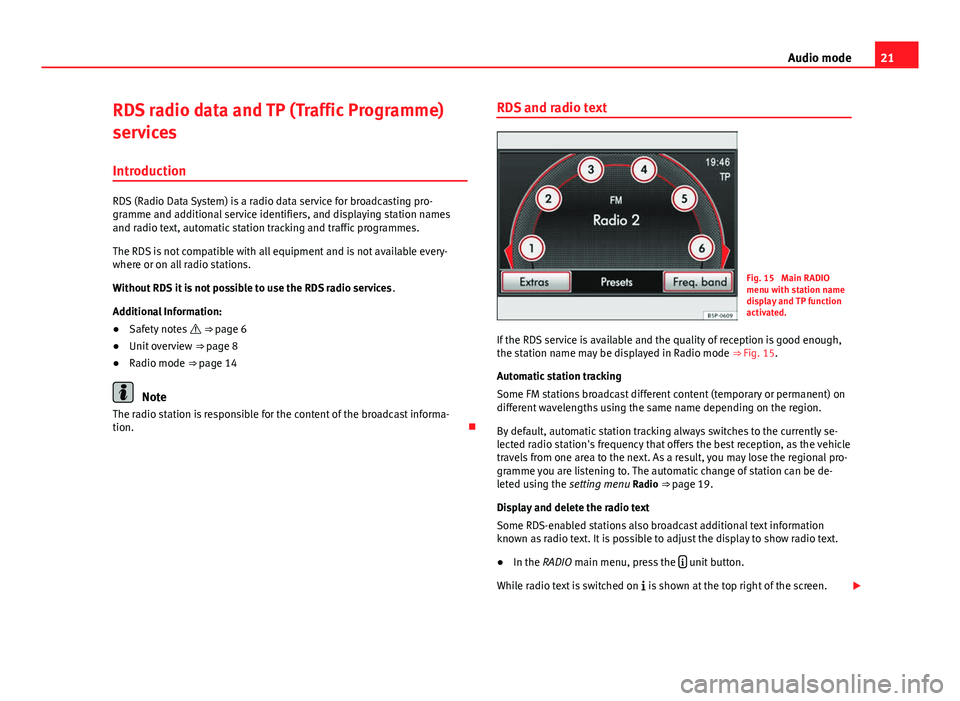
Fig. 15 Main RADIO
menu with station name
display and TP function
activated.
If the RDS service is available and the quality of reception is good enough,
the station name may be displayed in Radio mode ⇒ Fig. 15.
Automatic station tracking
Some FM stations broadcast different content (temporary or permanent) on
different wavelengths using the same name depending on the region.
By default, automatic station tracking always switches to the currently se-
lected radio station's frequency that offers the best reception, as the vehicle
travels from one area to the next. As a result, you may lose the regional pro-
gramme you are listening to. The automatic change of station can be de-
leted using the setting menu Radio ⇒ page 19.
Display and delete the radio text
Some RDS-enabled stations also broadcast additional text information
known as radio text. It is possible to adjust the display to show radio text.
● In the RADIO main menu, press the
unit button.
While radio text is switched on is shown at the top right of the screen.
Page 23 of 112

22Audio mode
Radio text is switched off as the default factory setting.
Changing stored radio station names (RDS)
Sometimes when a station is stored, the station name is not correctly dis-
played.
● Select the stored station ⇒ page 14.
● Wait until the correct station name is displayed and then briefly press
the setting knob ⇒ Fig. 1 10
.
● The text that is currently displayed will be stored as the station name.
TP function (Traffic Programme)
Fig. 16 Switching on the
TP function.
Fig. 17 Media mode with
traffic news monitoring
active.
While the traffic news tracking function is on, the news bulletins will be acti-
vated in the audio mode currently playing.
Traffic news monitoring with the TP function is only possible if the TP station
is available.
Some stations that do not broadcast their own traffic news support the TP
function by being linked to a traffic news station (EON). Traffic announce-
ments broadcast by the linked traffic news station interrupt the current au-
dio mode.
Switching the TP function on and off
● Open the RADIO main menu and select the FM frequency band
⇒ page 14.
● Press the Extras
function button.
● Press the TP function button to tick the checkbox
⇒ Fig. 16.
● If the station that is currently selected does not support the TP function,
the unit will automatically search for a TP station.
● Clearing the checkbox switches the TP function off.
You can also activate or deactivate the TP function in the Media setup menu
⇒ page 41.
Page 24 of 112
23
Audio mode
TP function on
Irrespective of the currently selected station, an additional component of
the receiver ensures that a station which broadcasts traffic programmes is
always received.
While the Media mode is on, it will always try to tune in to a traffic station in
the background.
If the traffic news tracking function is available, TP is displayed on the upper
right corner of the screen ⇒ Fig. 17.
When no radio stations are received, for example, when the reception is
generally poor, No TP is displayed.
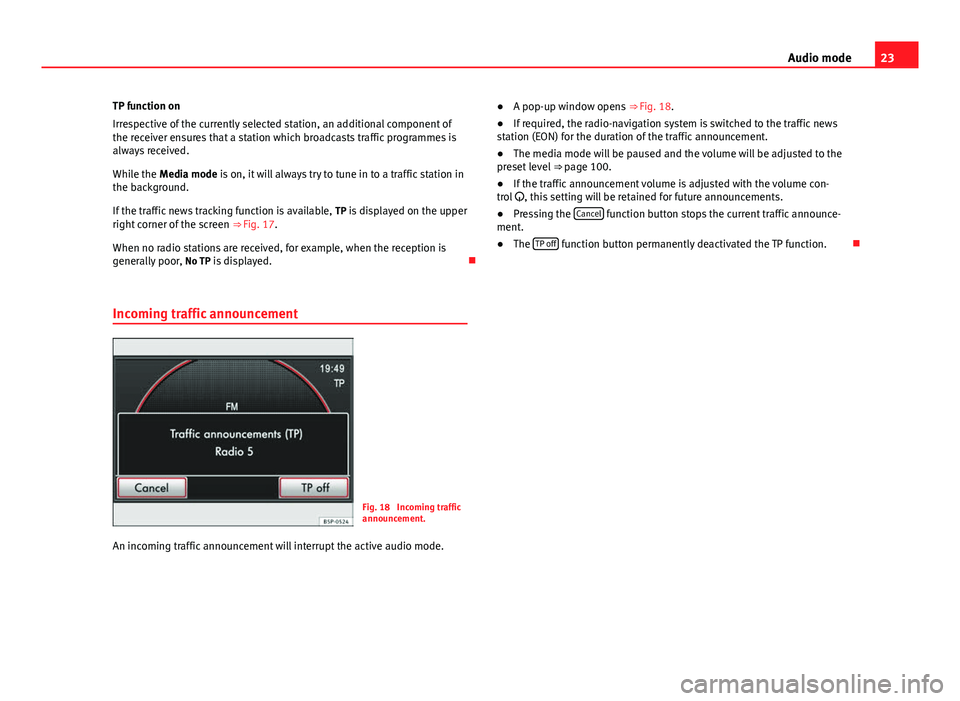
Incoming traffic announcement
Fig. 18 Incoming traffic
announcement.
An incoming traffic announcement will interrupt the active audio mode. ●
A pop-up window opens ⇒ Fig. 18.
● If required, the radio-navigation system is switched to the traffic news
station (EON) for the duration of the traffic announcement.
● The media mode will be paused and the volume will be adjusted to the
preset level ⇒ page 100.
● If the traffic announcement volume is adjusted with the volume con-
trol , this setting will be retained for future announcements.
● Pressing the Cancel
function button stops the current traffic announce-
ment.
● The TP off
function button permanently deactivated the TP function.
Page 25 of 112
24Audio mode
DAB digital radio mode
Introduction
Some units also have a DAB radio receiver. DAB is a broadcasting standard
for the overland reception of radio programmes
Additional Information:
● Safety notes ⇒ page 6
● Unit overview ⇒ page 8
● Basic information on use ⇒ page 10
● Radio mode ⇒ page 14
Note
The radio station is responsible for the content of the broadcast informa-
tion.
Operation
In Europe, digital radio has two DAB broadcasting standards, DAB+ and
DMB radio. The digital radio broadcasts on frequencies from waveband III
(174 MHz to 240 MHz) and waveband L (1452 MHz to 1492 MHz).
The frequencies of both bands are called “channels”, and are abbreviated
accordingly (for example, 12 A).
In one channel, several DAB stations join together with the additional avail-
able services, forming an “Ensemble”.
These additional services are used to send additional information to the ra-
dio (e.g. news, sports, weather, warnings, etc.). DAB is currently
not available in all areas. When the DAB radio mode is ac-
tive, in areas where DAB is not available, the symbol of an aerial crossed
out is displayed.
Depending on the settings, in DAB mode incoming DAB messages are
played (for example, news, sport, weather forecasts, warnings, etc.)
⇒ page 27.
As a general rule, while you are driving the DAB tracking function changes
to the channel of the currently playing digital station with the best recep-
tion. This permits additional settings to be made ⇒ page 27.
Note
If the symbol of a crossed-out aerial is displayed “”, this indicates that
the currently playing digital station on the channel selected is no longer
available in this location.
Note
Some digital stations also offer the radio text service. This is activated in
exactly the same way as for a conventional radio station ⇒ page 21.
Note
The DAB radio receiver is compatible with the DAB and DAB+ standards.
Page 26 of 112
25
Audio mode
Operation
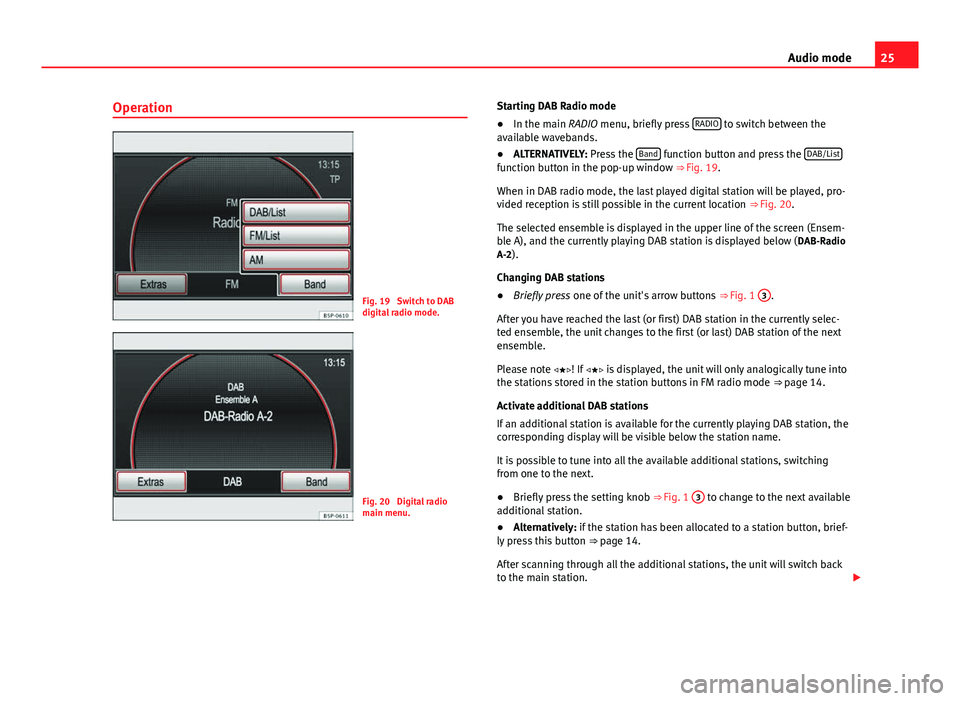
Fig. 19 Switch to DAB
digital radio mode.
Fig. 20 Digital radio
main menu. Starting DAB Radio mode
●
In the main RADIO menu, briefly press RADIO
to switch between the
available wavebands.
● ALTERNATIVELY: Press the Band
function button and press the DAB/Listfunction button in the pop-up window ⇒ Fig. 19.
When in DAB radio mode, the last played digital station will be played, pro-
vided reception is still possible in the current location
⇒ Fig. 20.
The selected ensemble is displayed in the upper line of the screen (Ensem-
ble A), and the currently playing DAB station is displayed below ( DAB-Radio
A-2).
Changing DAB stations
● Briefly press one of the unit's arrow buttons ⇒ Fig. 1 3
.
After you have reached the last (or first) DAB station in the currently selec-
ted ensemble, the unit changes to the first (or last) DAB station of the next
ensemble.
Please note ! If is displayed, the unit will only analogically tune into
the stations stored in the station buttons in FM radio mode ⇒ page 14.
Activate additional DAB stations
If an additional station is available for the currently playing DAB station, the
corresponding display will be visible below the station name.
It is possible to tune into all the available additional stations, switching
from one to the next.
● Briefly press the setting knob ⇒ Fig. 1 3
to change to the next available
additional station.
● Alternatively: if the station has been allocated to a station button, brief-
ly press this button ⇒ page 14.
After scanning through all the additional stations, the unit will switch back
to the main station.
Page 27 of 112
26Audio mode
● Alternatively: press the function button Extras
and Additional stations1)
in
the pop-up window.
● Alternatively: switch on the additional stations from the list of DAB sta-
tions ⇒ page 26.
Note
The stations are stored to the station buttons in the same way as that de-
scribed for the conventional radio mode ⇒ page 14.
Note
The scan function stops and starts in the same way as that described for the
conventional Radio mode ⇒ page 14.
DAB station list
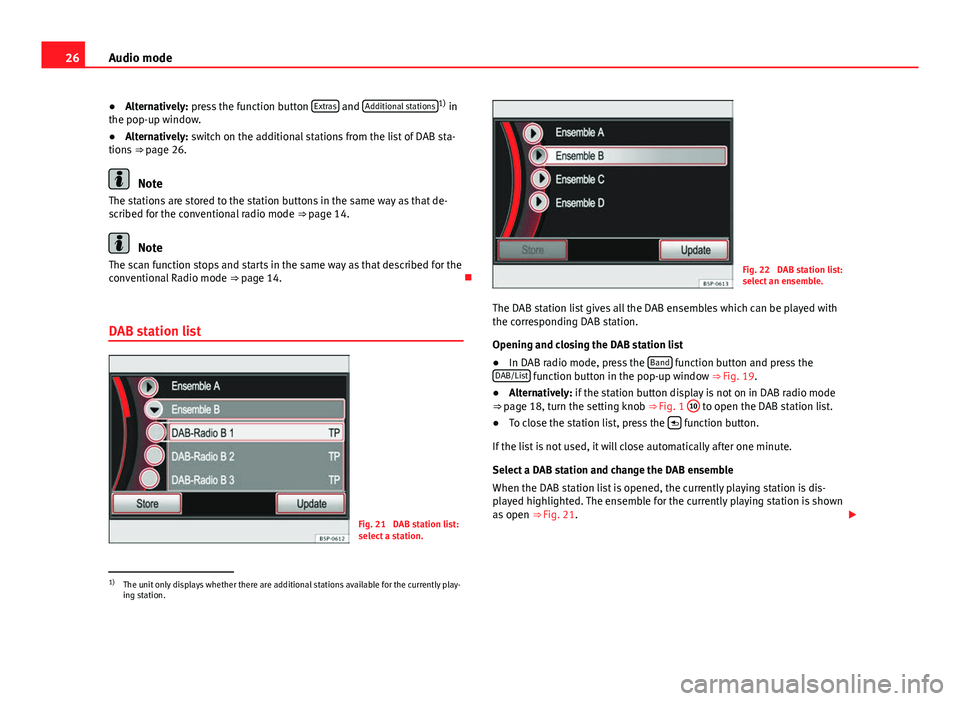
Fig. 21 DAB station list:
select a station.
Fig. 22 DAB station list:
select an ensemble.
The DAB station list gives all the DAB ensembles which can be played with
the corresponding DAB station.
Opening and closing the DAB station list
● In DAB radio mode, press the Band
function button and press the
DAB/List function button in the pop-up window ⇒ Fig. 19.
● Alternatively: if the station button display is not on in DAB radio mode
⇒ page 18, turn the setting knob
⇒ Fig. 1 10
to open the DAB station list.
● To close the station list, press the function button.
If the list is not used, it will close automatically after one minute.
Select a DAB station and change the DAB ensemble
When the DAB station list is opened, the currently playing station is dis-
played highlighted. The ensemble for the currently playing station is shown
as open ⇒ Fig. 21.
1)
The unit only displays whether there are additional stations available for the currently play-
ing station.