display Seat Leon 5D 2012 MEDIA SYSTEM 2.2
[x] Cancel search | Manufacturer: SEAT, Model Year: 2012, Model line: Leon 5D, Model: Seat Leon 5D 2012Pages: 112, PDF Size: 2 MB
Page 49 of 112
48Navigation
If navigation data are unavailable or incomplete, the navigation system may
be unable to determine the exact vehicle position. As a result, the naviga-
tion may not be as exact as usual.
Navigation area and age of navigation data
The accuracy of the data (small villages, streets and house numbers) de-
pends on the respective version for the country.
Roads and streets are subject to constant change (e.g. new roads, changes
to street names and house numbers). After some time, navigation data will
no longer be up-to-date. This may lead to inaccurate or incorrect route guid-
ance.
In the case of small villages, they may have to be searched for as Points of
Interest (POI) rather than by their name.
Map updates and different map versions (East/West Europe) are available
through SD cards. Please consult a Technical Service.
Updating the internal navigation data memory
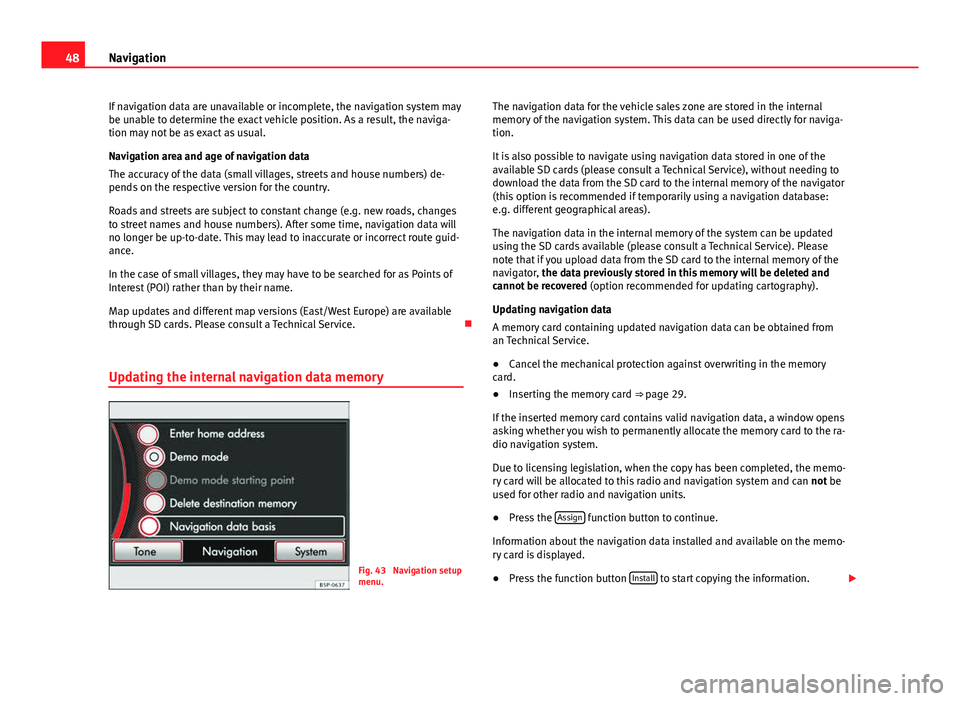
Fig. 43 Navigation setup
menu. The navigation data for the vehicle sales zone are stored in the internal
memory of the navigation system. This data can be used directly for naviga-
tion.
It is also possible to navigate using navigation data stored in one of the
available SD cards (please consult a Technical Service), without needing to
download the data from the SD card to the internal memory of the navigator
(this option is recommended if temporarily using a navigation database:
e.g. different geographical areas).
The navigation data in the internal memory of the system can be updated
using the SD cards available (please consult a Technical Service). Please
note that if you upload data from the SD card to the internal memory of the
navigator, the data previously stored in this memory will be deleted and
cannot be recovered
(option recommended for updating cartography).
Updating navigation data
A memory card containing updated navigation data can be obtained from
an Technical Service.
● Cancel the mechanical protection against overwriting in the memory
card.
● Inserting the memory card ⇒ page 29.
If the inserted memory card contains valid navigation data, a window opens
asking whether you wish to permanently allocate the memory card to the ra-
dio navigation system.
Due to licensing legislation, when the copy has been completed, the memo-
ry card will be allocated to this radio and navigation system and can not be
used for other radio and navigation units.
● Press the Assign
function button to continue.
Information about the navigation data installed and available on the memo-
ry card is displayed.
● Press the function button Install
to start copying the information.
Page 50 of 112
49
Navigation
No navigation functions are available during the copying process. The copy-
ing process lasts approximately 2 hours.
Do not remove the memory card while the navigation data is being copied.
This could damage the memory card!
If the unit is switched off during the copying process, the process stops and
will start automatically when the unit is switched back on.
Starting the copying process manually
If the copying process does not start automatically after the memory card
containing valid navigation data has been inserted, the updating process
can be started manually.
● Press the NAV
unit button.
● Press the SETUP unit button.
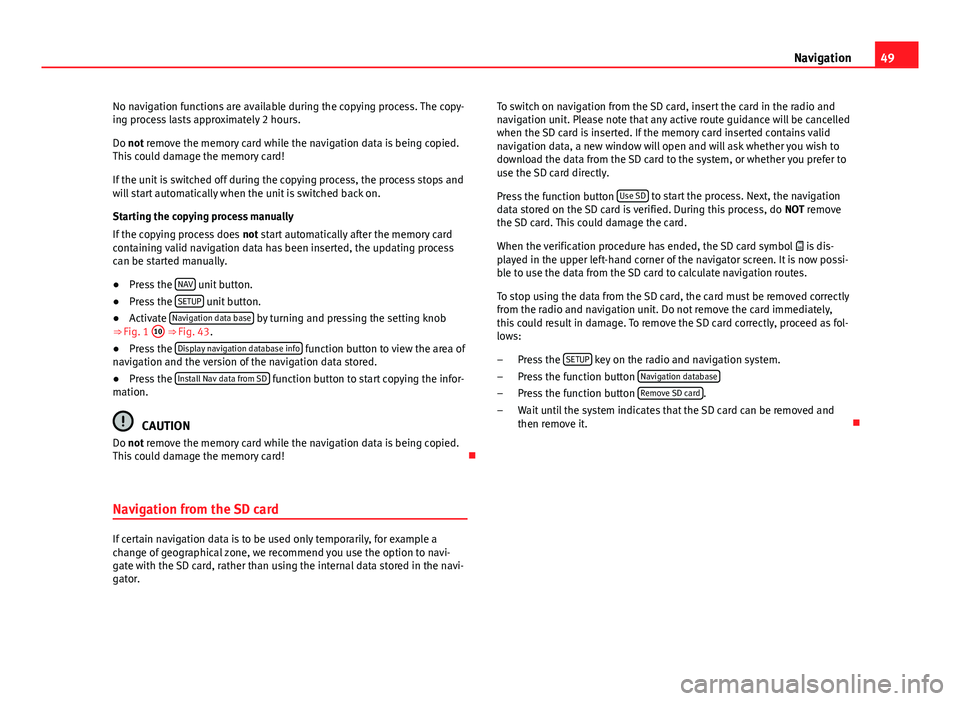
● Activate Navigation data base by turning and pressing the setting knob
⇒ Fig. 1 10 ⇒
Fig. 43.
● Press the Display navigation database info function button to view the area of
navigation and the version of the navigation data stored.
● Press the Install Nav data from SD
function button to start copying the infor-
mation.
CAUTION
Do not remove the memory card while the navigation data is being copied.
This could damage the memory card!
Navigation from the SD card
If certain navigation data is to be used only temporarily, for example a
change of geographical zone, we recommend you use the option to navi-
gate with the SD card, rather than using the internal data stored in the navi-
gator. To switch on navigation from the SD card, insert the card in the radio and
navigation unit. Please note that any active route guidance will be cancelled
when the SD card is inserted. If the memory card inserted contains valid
navigation data, a new window will open and will ask whether you wish to
download the data from the SD card to the system, or whether you prefer to
use the SD card directly.
Press the function button
Use SD
to start the process. Next, the navigation
data stored on the SD card is verified. During this process, do NOT remove
the SD card. This could damage the card.
When the verification procedure has ended, the SD card symbol is dis-
played in the upper left-hand corner of the navigator screen. It is now possi-
ble to use the data from the SD card to calculate navigation routes.
To stop using the data from the SD card, the card must be removed correctly
from the radio and navigation unit. Do not remove the card immediately,
this could result in damage. To remove the SD card correctly, proceed as fol-
lows:
Press the SETUP
key on the radio and navigation system.
Press the function button Navigation database
Press the function button Remove SD card.
Wait until the system indicates that the SD card can be removed and
then remove it.
–
–
–
–
Page 51 of 112
50Navigation
Navigation main menu
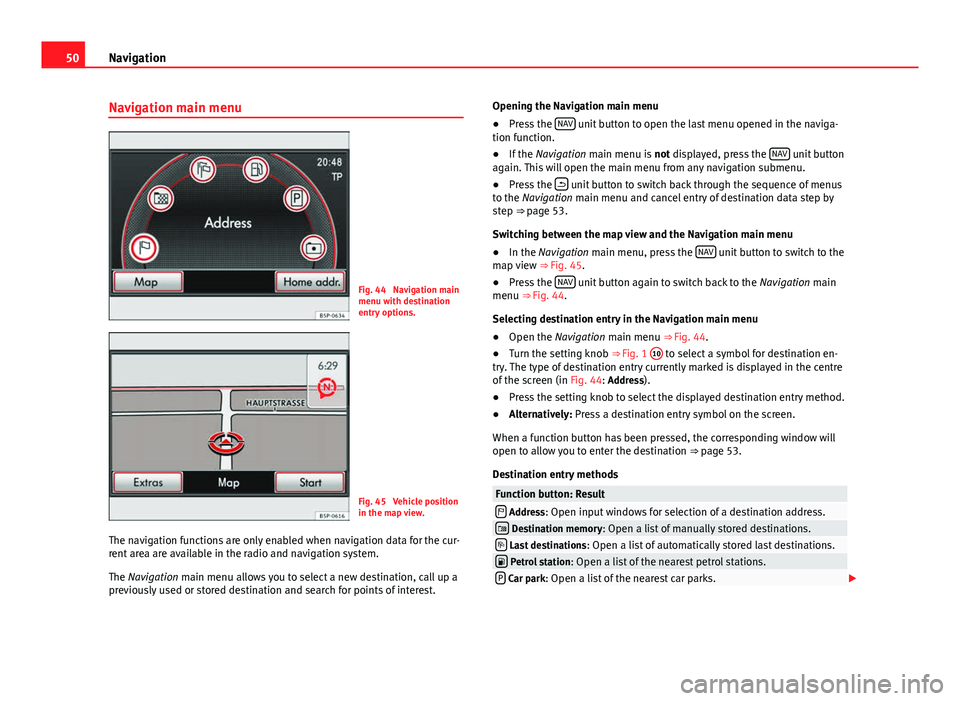
Fig. 44 Navigation main
menu with destination
entry options.
Fig. 45 Vehicle position
in the map view.
The navigation functions are only enabled when navigation data for the cur-
rent area are available in the radio and navigation system.
The Navigation main menu allows you to select a new destination, call up a
previously used or stored destination and search for points of interest. Opening the Navigation main menu
●
Press the NAV
unit button to open the last menu opened in the naviga-
tion function.
● If the Navigation main menu is not displayed, press the NAV
unit button
again. This will open the main menu from any navigation submenu.
● Press the
unit button to switch back through the sequence of menus
to the Navigation main menu and cancel entry of destination data step by
step ⇒ page 53.
Switching between the map view and the Navigation main menu
● In the Navigation main menu, press the NAV
unit button to switch to the
map view ⇒ Fig. 45.
● Press the NAV
unit button again to switch back to the
Navigation main
menu ⇒ Fig. 44.
Selecting destination entry in the Navigation main menu
● Open the Navigation main menu ⇒ Fig. 44.
● Turn the setting knob ⇒ Fig. 1 10
to select a symbol for destination en-
try. The type of destination entry currently marked is displayed in the centre
of the screen (in Fig. 44: Address).
● Press the setting knob to select the displayed destination entry method.
● Alternatively: Press a destination entry symbol on the screen.
When a function button has been pressed, the corresponding window will
open to allow you to enter the destination ⇒ page 53.
Destination entry methods
Function button: Result Address: Open input windows for selection of a destination address. Destination memory: Open a list of manually stored destinations. Last destinations : Open a list of automatically stored last destinations. Petrol station: Open a list of the nearest petrol stations.P Car park: Open a list of the nearest car parks.
Page 52 of 112
51
Navigation
Function button: Result Point of interest : First select the search area and then enter the search
term.
Home address: Enter the home address, or go to one of the saved address-
es.
Input windows with on-screen keyboard
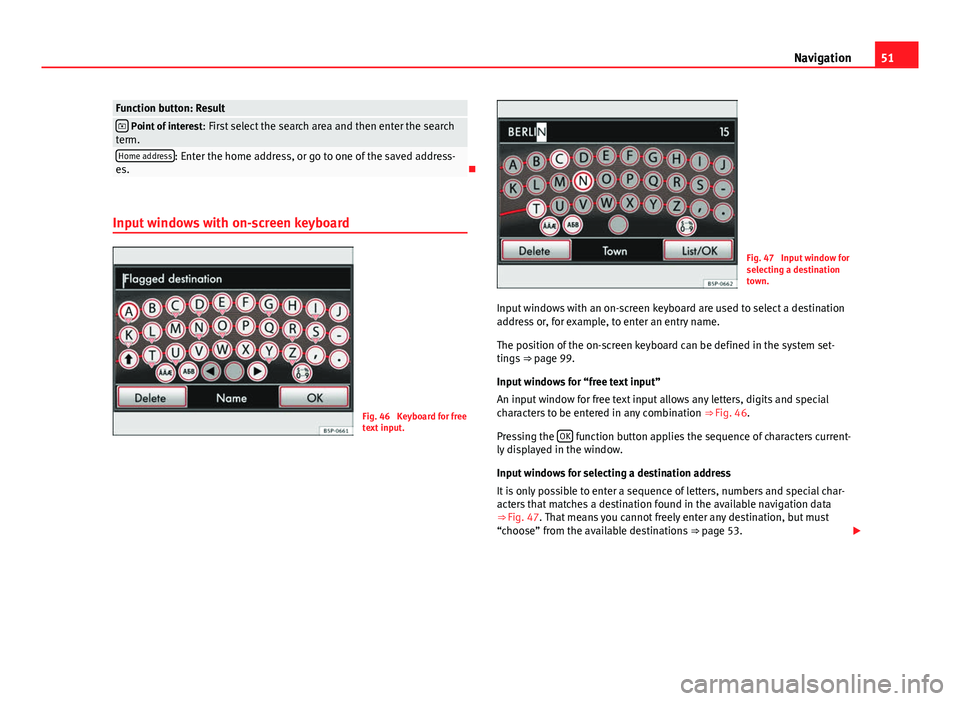
Fig. 46 Keyboard for free
text input.
Fig. 47 Input window for
selecting a destination
town.
Input windows with an on-screen keyboard are used to select a destination
address or, for example, to enter an entry name.
The position of the on-screen keyboard can be defined in the system set-
tings ⇒ page 99.
Input windows for “free text input”
An input window for free text input allows any letters, digits and special
characters to be entered in any combination ⇒ Fig. 46.
Pressing the OK
function button applies the sequence of characters current-
ly displayed in the window.
Input windows for selecting a destination address
It is only possible to enter a sequence of letters, numbers and special char-
acters that matches a destination found in the available navigation data
⇒ Fig. 47. That means you cannot freely enter any destination, but must
“choose” from the available destinations ⇒ page 53.
Page 53 of 112
52Navigation
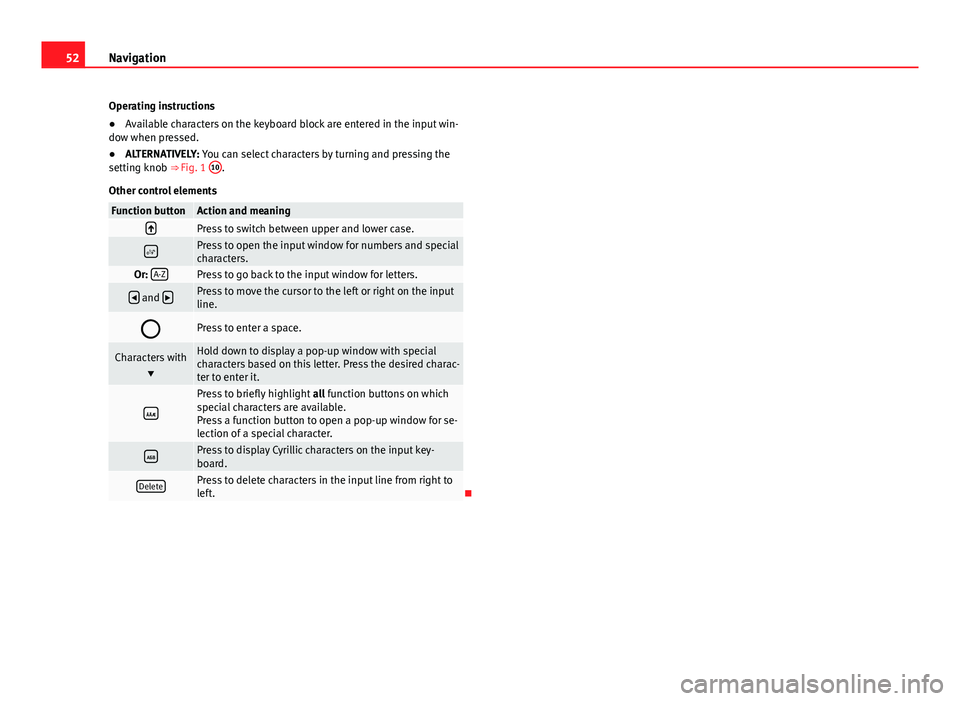
Operating instructions
● Available characters on the keyboard block are entered in the input win-
dow when pressed.
● ALTERNATIVELY: You can select characters by turning and pressing the
setting knob ⇒ Fig. 1 10
.
Other control elements
Function buttonAction and meaningPress to switch between upper and lower case.
Press to open the input window for numbers and special
characters.
Or: A-ZPress to go back to the input window for letters.
and Press to move the cursor to the left or right on the input
line.
Press to enter a space.
Characters with
Hold down to display a pop-up window with special
characters based on this letter. Press the desired charac-
ter to enter it.
Press to briefly highlight all function buttons on which
special characters are available.
Press a function button to open a pop-up window for se-
lection of a special character.
Press to display Cyrillic characters on the input key-
board.
DeletePress to delete characters in the input line from right to
left.
Page 54 of 112
53
Navigation
Enter destination
Introduction
Additional Information:
● Safety notes ⇒ page 6
● Unit overview ⇒ page 8
● Introduction to navigation ⇒ page 47
Note
The correct spelling and use of accents, diaeresis, etc. is important when
entering a destination. If the destination is not written correctly, the naviga-
tion system may not recognise it.
Selecting a destination address (address entry)
Fig. 48 Input window for
selecting a destination
town.
Fig. 49 Selecting a
street from a list.
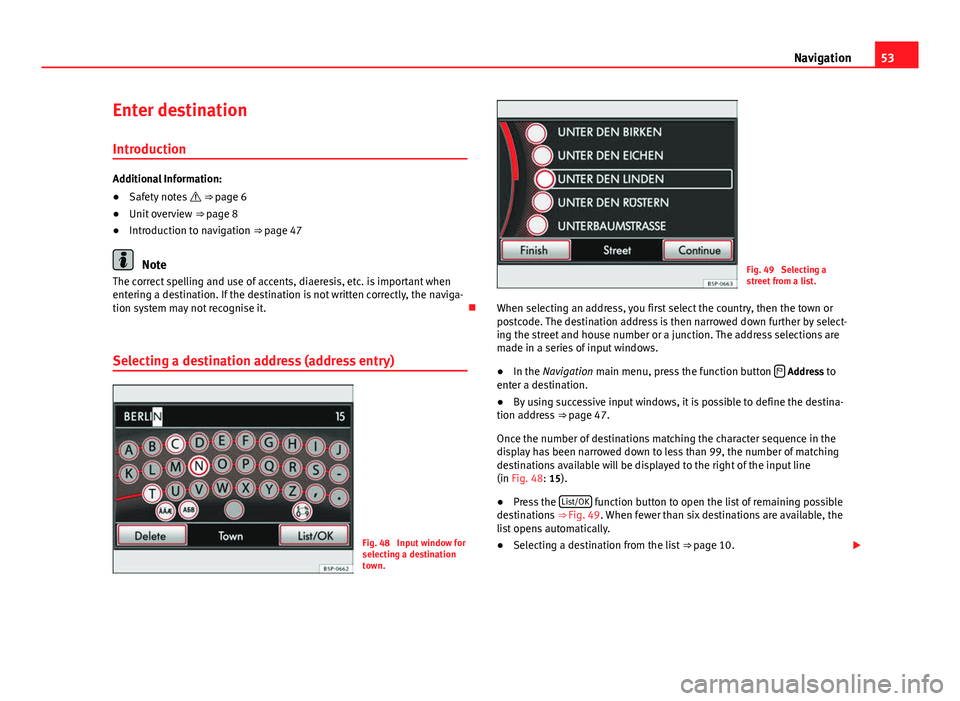
When selecting an address, you first select the country, then the town or
postcode. The destination address is then narrowed down further by select-
ing the street and house number or a junction. The address selections are
made in a series of input windows.
● In the Navigation main menu, press the function button
Address to
enter a destination.
● By using successive input windows, it is possible to define the destina-
tion address ⇒ page 47.
Once the number of destinations matching the character sequence in the
display has been narrowed down to less than 99, the number of matching
destinations available will be displayed to the right of the input line
(in Fig. 48: 15).
● Press the List/OK
function button to open the list of remaining possible
destinations ⇒ Fig. 49. When fewer than six destinations are available, the
list opens automatically.
● Selecting a destination from the list
⇒ page 10.
Page 55 of 112
54Navigation
Depending upon the unit (RNS 315), press the unit button
⇒ Fig. 1 to
open a window with additional information about the selected entry in the
list.
In names made up of more than one word, you must include the blank
space, e.g. “High Wycombe”.
A “town” refers to a locality or a postcode district and can also be selected
by entering its postcode.
When narrowing down the destination address, please note that every entry
restricts the available range of subsequent selections. For instance, if the
street you are looking for is not in the postcode area you have selected in a
previous window, you will not be able to find the street at the street selec-
tion stage.
● Press the
unit button to close the current menu and cancel the desti-
nation data entered so far step by step.
Ending destination entry
Once the destination data entered are sufficient for route guidance, it is
possible to end destination entry.
● After selecting a city, press the City centre
function button to end the des-
tination entry and start route guidance to the city centre.
● The Finish
function button appears in the list view for selection of a des-
tination if the destination data entered so far are sufficient to carry out route
guidance ⇒ Fig. 49. Press the Finish
function button to apply the destina-
tion marked in the list ( PORTSMOUTH AVENUE) and end destination entry.
When you have finished entering the destination, the address is displayed
in the “destination window” ⇒ page 54. Destination window
Fig. 50 Destination ad-
dress displayed in the
destination window.
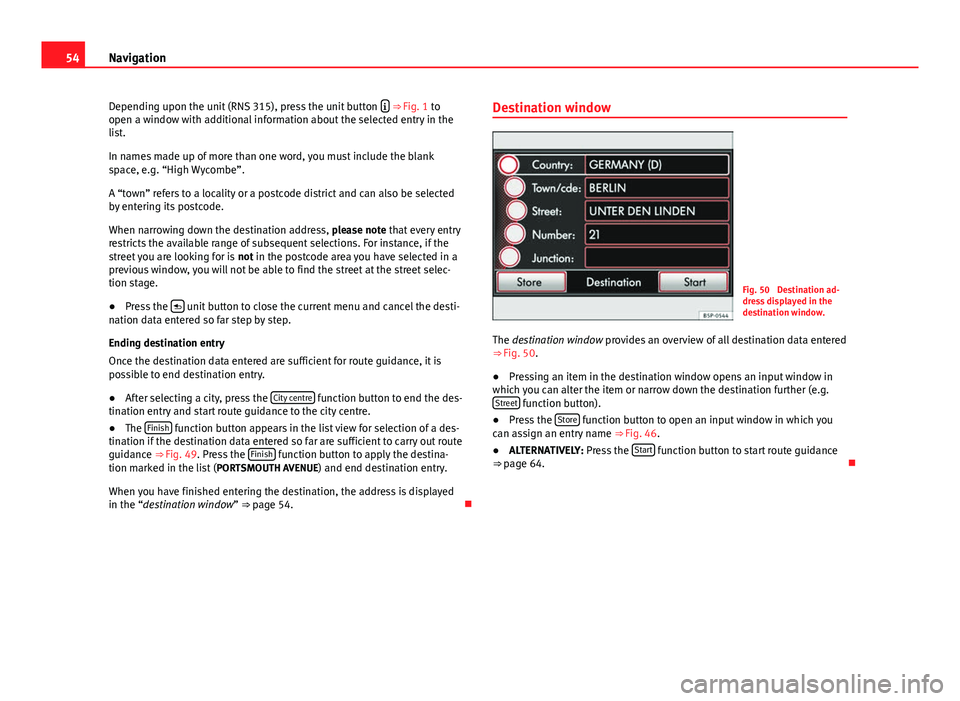
The destination window provides an overview of all destination data entered
⇒ Fig. 50.
● Pressing an item in the destination window opens an input window in
which you can alter the item or narrow down the destination further (e.g. Street
function button).
● Press the Store function button to open an input window in which you
can assign an entry name ⇒ Fig. 46.
● ALTERNATIVELY: Press the Start
function button to start route guidance
⇒ page 64.
Page 56 of 112
55
Navigation
Selecting stored destinations
Fig. 51 List of the auto-
matically stored last des-
tinations.
Fig. 52 List of destina-
tions stored manually in
the destination memory.
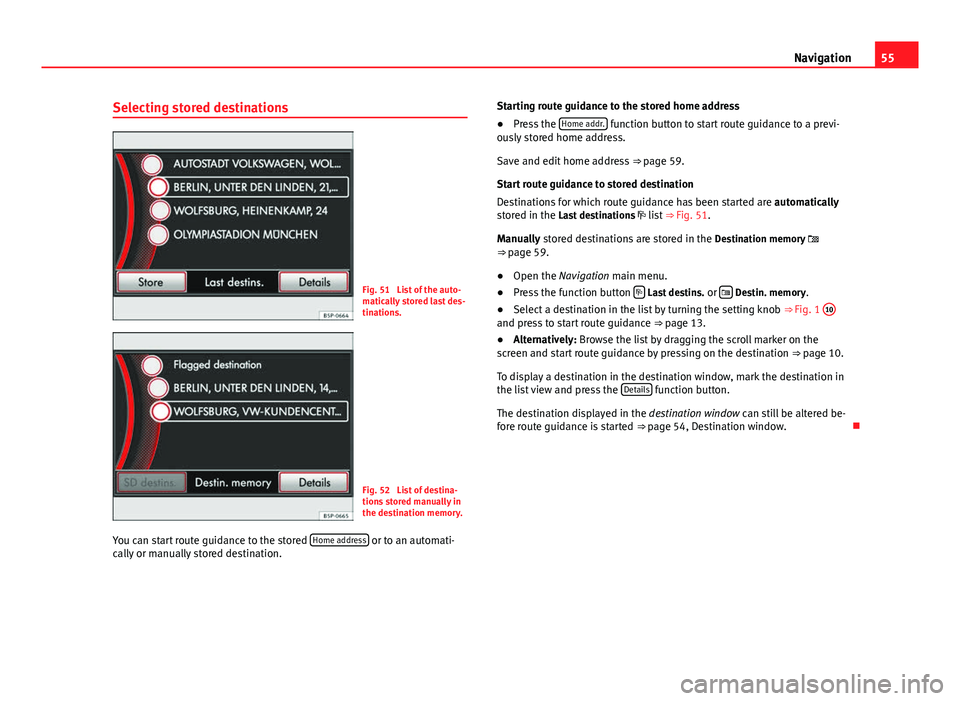
You can start route guidance to the stored Home address
or to an automati-
cally or manually stored destination. Starting route guidance to the stored home address
●
Press the Home addr.
function button to start route guidance to a previ-
ously stored home address.
Save and edit home address ⇒ page 59.
Start route guidance to stored destination
Destinations for which route guidance has been started are automatically
stored in the Last destinations list ⇒ Fig. 51.
Manually stored destinations are stored in the Destination memory
⇒ page 59.
● Open the Navigation main menu.
● Press the function button
Last destins.
or Destin. memory.
● Select a destination in the list by turning the setting knob ⇒ Fig. 1 10
and press to start route guidance
⇒ page 13.
● Alternatively: Browse the list by dragging the scroll marker on the
screen and start route guidance by pressing on the destination ⇒ page 10.
To display a destination in the destination window, mark the destination in
the list view and press the Details
function button.
The destination displayed in the destination window can still be altered be-
fore route guidance is started ⇒ page 54, Destination window.
Page 57 of 112
56Navigation
Selecting a petrol station or car park
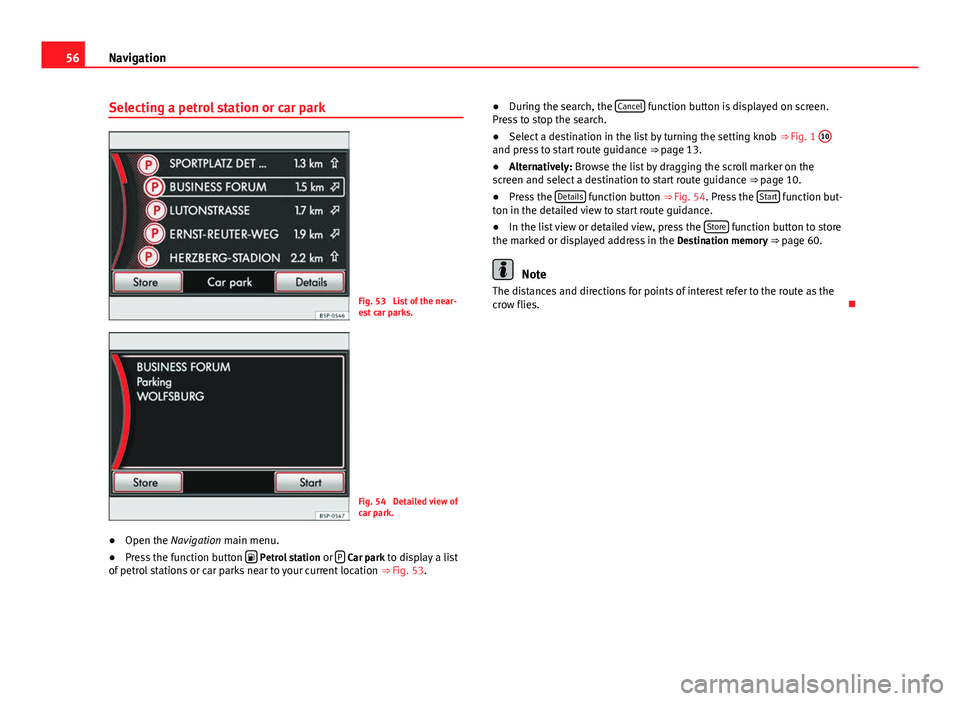
Fig. 53 List of the near-
est car parks.
Fig. 54 Detailed view of
car park.
● Open the Navigation main menu.
● Press the function button
Petrol station
or P Car park to display a list
of petrol stations or car parks near to your current location ⇒ Fig. 53. ●
During the search, the Cancel
function button is displayed on screen.
Press to stop the search.
● Select a destination in the list by turning the setting knob ⇒ Fig. 1 10
and press to start route guidance
⇒ page 13.
● Alternatively: Browse the list by dragging the scroll marker on the
screen and select a destination to start route guidance ⇒ page 10.
● Press the Details
function button ⇒
Fig. 54. Press the Start function but-
ton in the detailed view to start route guidance.
● In the list view or detailed view, press the Store
function button to store
the marked or displayed address in the Destination memory ⇒ page 60.
Note
The distances and directions for points of interest refer to the route as the
crow flies.
Page 58 of 112
57
Navigation
Selecting a point of interest as a destination
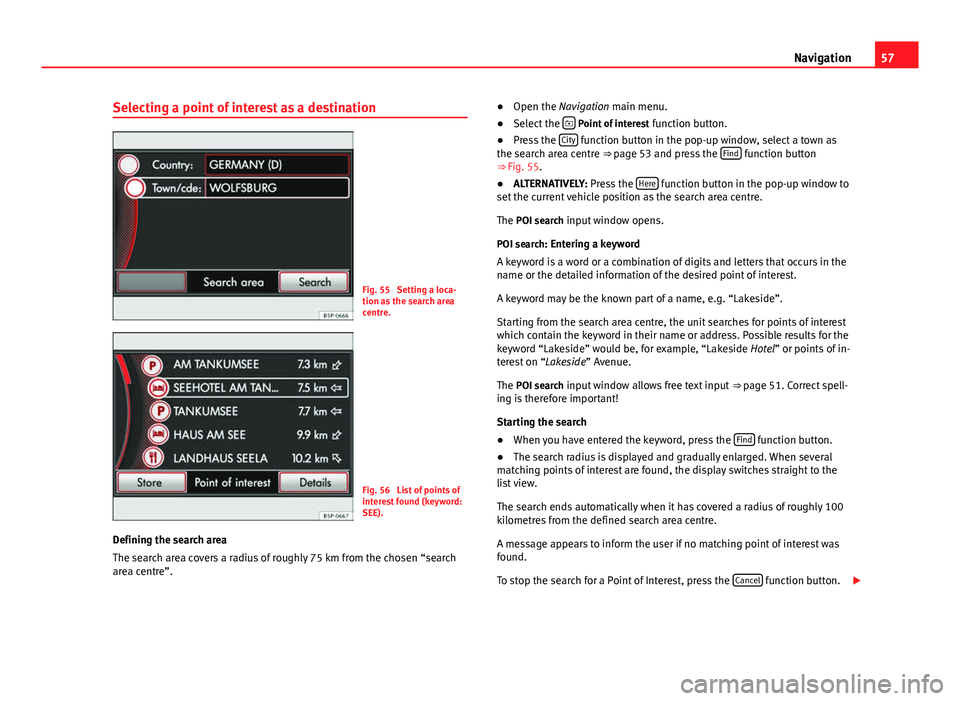
Fig. 55 Setting a loca-
tion as the search area
centre.
Fig. 56 List of points of
interest found (keyword:
SEE).
Defining the search area
The search area covers a radius of roughly 75 km from the chosen “search
area centre”. ●
Open the Navigation main menu.
● Select the
Point of interest
function button.
● Press the City function button in the pop-up window, select a town as
the search area centre ⇒ page 53 and press the Find function button
⇒ Fig. 55.
● ALTERNATIVELY: Press the Here
function button in the pop-up window to
set the current vehicle position as the search area centre.
The POI search input window opens.
POI search: Entering a keyword
A keyword is a word or a combination of digits and letters that occurs in the
name or the detailed information of the desired point of interest.
A keyword may be the known part of a name, e.g. “Lakeside”.
Starting from the search area centre, the unit searches for points of interest
which contain the keyword in their name or address. Possible results for the
keyword “Lakeside” would be, for example, “Lakeside Hotel” or points of in-
terest on “Lakeside” Avenue.
The POI search input window allows free text input ⇒ page 51. Correct spell-
ing is therefore important!
Starting the search
● When you have entered the keyword, press the Find
function button.
● The search radius is displayed and gradually enlarged. When several
matching points of interest are found, the display switches straight to the
list view.
The search ends automatically when it has covered a radius of roughly 100
kilometres from the defined search area centre.
A message appears to inform the user if no matching point of interest was
found.
To stop the search for a Point of Interest, press the Cancel
function button.