ABS Seat Leon 5D 2012 Owner's manual
[x] Cancel search | Manufacturer: SEAT, Model Year: 2012, Model line: Leon 5D, Model: Seat Leon 5D 2012Pages: 289, PDF Size: 3.81 MB
Page 22 of 289

21
Seat belts
Why wear seat belts? Physical principles of frontal collisions
In the event of a frontal collision, a large amount of kinetic
energy must be absorbed.
Fig. 6 Vehicle about to
hit a wall: the occupants
are not wearing seat
belts
Fig. 7 The vehicle hits
the wall: the occupants
are not wearing seat
belts
It is easy to explain how the laws of physics work in the case of a head-on
collision: When a vehicle starts moving ⇒ Fig. 6, a certain amount of energy
known as kinetic energy is produced in the vehicle and its occupants.
The amount of kinetic energy depends on the speed of the vehicle and the
weight of the vehicle and its passengers. The higher the speed and the
greater the weight, the more energy there is to be released in an accident.
The most significant factor, however, is the speed of the vehicle. If the
speed doubles from 25 km/h (15 mph) to 50 km/h (30 mph), for example,
the kinetic energy is multiplied by four.
Because the vehicle occupants in our example are not restrained by seat
belts, all of the occupants' kinetic energy has to be absorbed at the point of
impact ⇒ Fig. 7.
Even at speeds of 30 km/h (20 mph) to 50 km/h (30 mph), the forces acting
on bodies in a collision can easily exceed one tonne (1000 kg). At greater
speed these forces are even higher.
Safety FirstOperating instructionsPractical TipsTechnical specifications
Page 24 of 289
23
Seat belts
Seat belt protection
Passengers not wearing seat belts risk severe injuries in the
event of an accident.
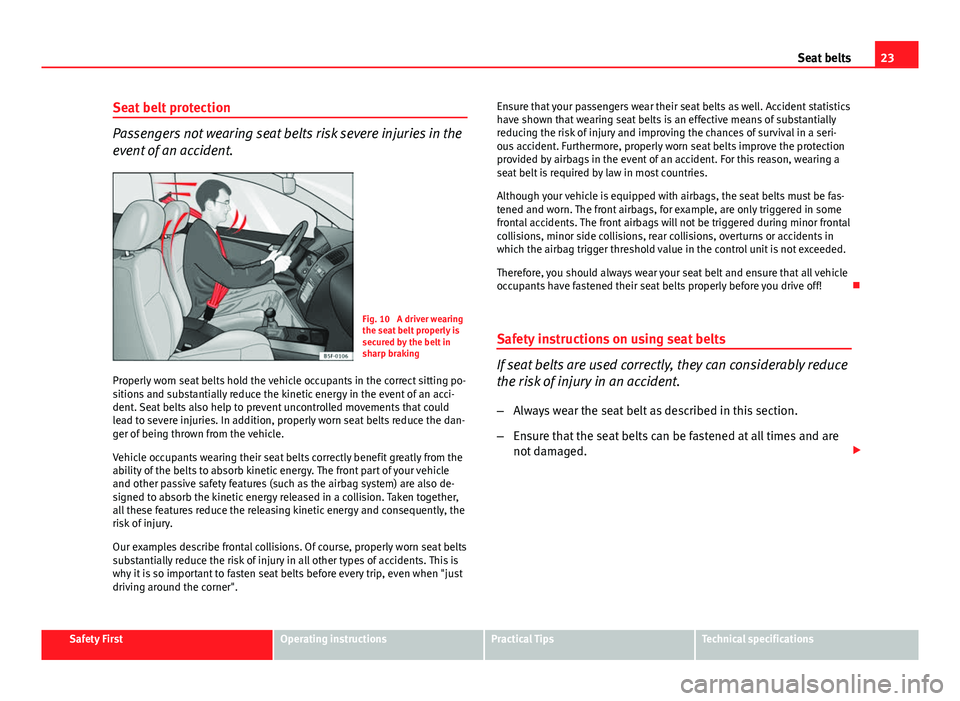
Fig. 10 A driver wearing
the seat belt properly is
secured by the belt in
sharp braking
Properly worn seat belts hold the vehicle occupants in the correct sitting po-
sitions and substantially reduce the kinetic energy in the event of an acci-
dent. Seat belts also help to prevent uncontrolled movements that could
lead to severe injuries. In addition, properly worn seat belts reduce the dan-
ger of being thrown from the vehicle.
Vehicle occupants wearing their seat belts correctly benefit greatly from the
ability of the belts to absorb kinetic energy. The front part of your vehicle
and other passive safety features (such as the airbag system) are also de-
signed to absorb the kinetic energy released in a collision. Taken together,
all these features reduce the releasing kinetic energy and consequently, the
risk of injury.
Our examples describe frontal collisions. Of course, properly worn seat belts
substantially reduce the risk of injury in all other types of accidents. This is
why it is so important to fasten seat belts before every trip, even when "just
driving around the corner". Ensure that your passengers wear their seat belts as well. Accident statistics
have shown that wearing seat belts is an effective means of substantially
reducing the risk of injury and improving the chances of survival in a seri-
ous accident. Furthermore, properly worn seat belts improve the protection
provided by airbags in the event of an accident. For this reason, wearing a
seat belt is required by law in most countries.
Although your vehicle is equipped with airbags, the seat belts must be fas-
tened and worn. The front airbags, for example, are only triggered in some
frontal accidents. The front airbags will not be triggered during minor frontal
collisions, minor side collisions, rear collisions, overturns or accidents in
which the airbag trigger threshold value in the control unit is not exceeded.
Therefore, you should always wear your seat belt and ensure that all vehicle
occupants have fastened their seat belts properly before you drive off!
Safety instructions on using seat belts
If seat belts are used correctly, they can considerably reduce
the risk of injury in an accident.
– Always wear the seat belt as described in this section.
– Ensure that the seat belts can be fastened at all times and are
not damaged.
Safety FirstOperating instructionsPractical TipsTechnical specifications
Page 32 of 289

31
Airbag system
WARNING (Continued)
● To reduce the risk of injury from an inflating airbag, always wear the
seat belt properly ⇒ page 19.
● Always adjust the front seats properly.
The danger of fitting a child seat on the front passenger
seat
Rear-facing child seats must never be used on the front pas-
senger seat when the front passenger airbag is enabled. The front passenger front airbag is a serious risk for a child if it is activated.
The front passenger seat is life threatening to a child if he/she is transpor-
ted in a rear-facing child seat. Children up to 12 years old should always
travel on the rear seat.
If a rear-facing child seat is secured to the front passenger seat, an inflating
airbag can strike it with such force that it can cause critical or fatal injuries.
Therefore we strongly recommend you to transport children on the rear
seats. That is the safest place for children in the vehicle. Alternatively, the
front passenger airbag can be disabled with a key-operated switch
⇒ page 44. When transporting children, use a child seat suitable for the
age and size of each child ⇒ page 47.
For those vehicles that do not include a key lock switch to turn the airbag
off, a Technical Service must be consulted.
WARNING
● If a child seat is secured to the front passenger seat, the risk to the
child of sustaining critical or fatal injuries in the event of an accident in-
creases.
● Never secure a rear-facing child seat to the front passenger seat if the
front passenger airbag is enabled. The child can suffer critical or fatal in-
juries if the front passenger airbag is triggered.
● An inflating front passenger airbag can strike the rear-facing child
seat and project it with great force against the door, the roof or the back-
rest.
● For those vehicles that do not include a key lock switch to turn the
airbag off, a Technical Service must be consulted.
● If, under special circumstances, it is necessary to transport a child in
a rear-facing child seat on the front passenger seat, it is absolutely es-
sential that you observe the following safety measures:
–Deactivate the front passenger airbag ⇒ page 44.
– Child seats must be approved by the child seat manufacturer for
use on a front passenger seat with front or side airbag.
– Follow the installation instructions given by the child seat manu-
facturer and observe the safety instructions ⇒ page 47, Child safe-
ty.
– Before properly installing the child seat, push the front passenger
seat completely backwards so that the greatest possible distance to
the front passenger airbag is ensured.
– Ensure that no objects prevent the front passenger seat from being
pushed completely back.
– The backrest of the front passenger seat must be in an upright po-
sition.
Safety FirstOperating instructionsPractical TipsTechnical specifications
Page 71 of 289
70Instruments and warning/control lamps
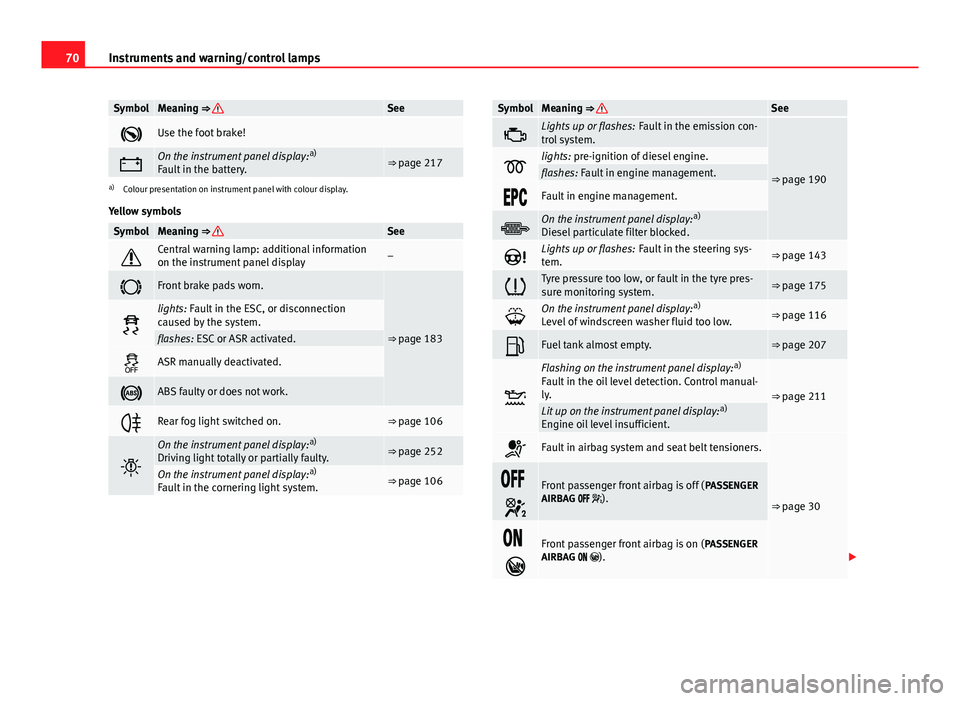
SymbolMeaning ⇒ See
Use the foot brake!
On the instrument panel display: a)
Fault in the battery.⇒ page 217
a) Colour presentation on instrument panel with colour display.
Yellow symbols
SymbolMeaning ⇒ See
Central warning lamp: additional information
on the instrument panel display–
Front brake pads worn.
⇒ page 183
lights: Fault in the ESC, or disconnection
caused by the system.
flashes: ESC or ASR activated.
ASR manually deactivated.
ABS faulty or does not work.
Rear fog light switched on.⇒ page 106
On the instrument panel display: a)
Driving light totally or partially faulty.⇒ page 252
On the instrument panel display: a)
Fault in the cornering light system.⇒ page 106
SymbolMeaning ⇒ See
Lights up or flashes: Fault in the emission con-
trol system.
⇒ page 190lights: pre-ignition of diesel engine.flashes: Fault in engine management.
Fault in engine management.
On the instrument panel display: a)
Diesel particulate filter blocked.
Lights up or flashes: Fault in the steering sys-
tem.⇒ page 143
Tyre pressure too low, or fault in the tyre pres-
sure monitoring system.⇒ page 175
On the instrument panel display: a)
Level of windscreen washer fluid too low.⇒ page 116
Fuel tank almost empty.⇒ page 207
Flashing on the instrument panel display: a)
Fault in the oil level detection. Control manual-
ly.
⇒ page 211Lit up on the instrument panel display: a)
Engine oil level insufficient.
Fault in airbag system and seat belt tensioners.
⇒ page 30
Front passenger front airbag is off ( PASSENGER
AIRBAG ).
Front passenger front airbag is on ( PASSENGER
AIRBAG ).
Page 123 of 289

122Lights and visibility
Recommended windscreen wipers
● For the hottest seasons we recommend summer G 052 184 A1 for clear
glass. Proportions of the mixture in the washer fluid tank: 1:100 (1 part con-
centrate per 100 parts water).
● All year round, G 052 164 A2 for clear glass. Approximate proportion of
the winter mixture, up to -18 °C (0 °F): 1:2 (1 part concentrate per 2 parts
water); otherwise, a 1:4 proportion of mixture in the washer fluid tank.
Reservoir capacity
The reservoir holds approximately 3 - 4 litres; in vehicles with headlight
washer, it is approximately 3 -6 litres.
WARNING
Never mix an unsuitable antifreeze or other similar additives with the
windscreen washer water. A greasy layer may be formed on the wind-
screen which will impair visibility.
● Use clean water with a window cleaner recommended by SEAT.
● If necessary, add a suitable antifreeze to the water in the reservoir.
CAUTION
● Do not mix cleaning products recommended by SEAT with other prod-
ucts. This could lead to flocculation and may block the windscreen washer
jets.
● When topping up service fluids, make absolutely certain that you fill the
fluids into the correct reservoirs. Using the wrong fluids could cause serious
malfunctions and engine damage! Rear vision mirror
Adjusting the exterior mirrors
Fig. 69 Driver door: con-
trol for the exterior mirror
Turn the knob to the appropriate position: – In these positions you can adjust the exterior mirrors (left or right) by
moving the control in the desired direction.
– The surfaces of the exterior mirrors are heated* depending on the
outside temperature, and on the equipment fitted in the vehicle.
– The exterior mirrors are retracted*.
Synchronized regulation of the exterior mirrors
● In the Settings - Convenience menu, select whether or not the exterior
mirrors should move in synchronisation ⇒ page 77.
● Turn the knob to position L.
● Adjust the left-hand exterior mirror. The right exterior mirror will be ad-
justed at the same time (synchronised).
L/R
Page 178 of 289

177
Driver assistance systems
Tyre monitoring indicator
Fig. 102 Glove compart-
ment: tyre control switch
The tyre monitor indicator compares wheel revolutions and, with this infor-
mation, the tread of each wheel using the ABS sensors. If the tread of one or
more wheels is changed, the tyre monitoring indicator will indicate as such
on the instrument panel.
Wheel tread change
The wheel tread changes when:
● Tyre pressure is manually changed
● Tyre pressure is insufficient
● Tyre structure is damaged
● The vehicle is unbalanced because of a load
● The wheels on an axle are subject to a heavier load (e.g. when towing a
heavy load)
● The vehicle is fitted with snow chains
● The temporary spare wheel is fitted
● The wheel on one axle is changed There may be a delay in the reaction of the tyre monitoring indicator
or it
may not indicate anything under certain circumstances (e.g. sporty driving,
snow-covered or unpaved roads, or when driving with snow chains).
Calibrating the tyre monitoring indicator
After changing the tyre pressure or replacing one or more wheels, the tyre
monitoring indicator must be recalibrated. Do the same, for example, when
the front and rear wheels are swapped.
● Switch the ignition on.
● Store the new tyre pressure in the Easy Connect system with the button
and the function button Setup ⇒ page 80 or using the switch located in
the glove compartment* ⇒ Fig. 102.
When driving, the system self-calibrates the tyre pressure provided by the
driver and the wheels fitted. After a long journey with varied speeds the pro-
grammed values are collected and monitored.
With the wheels under very heavy loads, the tyre pressure must be in-
creased to the total recommended tyre pressure before the calibration
⇒ page 266.
Note
● The tyre monitoring indicator does not function when there is a fault in
the ESC or ABS ⇒ page 183.
● An erroneous indication may be given when snow chains are in use be-
cause the chains increase the tread of the wheel.
Safety FirstOperating instructionsPractical TipsTechnical specifications
Page 184 of 289
183
Intelligent technology
Practical Tips Intelligent technology
Electronic Stability Control (ESC)
Description
EI ESC helps to improve safety. It reduces the tendency to skid and improves
the stability and roadholding of the vehicle. EI ESC detects critical handling
situations, such as vehicle understeer or oversteer, or wheelspin on the
driving wheels. It stabilises the vehicle by braking individual wheels or by
reducing the engine torque. The warning lamp will flash on the instrument
panel when the ESC is intervening .
ESC includes the Anti-lock brake system (ABS), the brake assist system, the
traction control system (ASR), electronic differential lock (EDL), electronic
self-locking*, selective torque control* and tractor-trailer sway mitigation*.
ESC also helps stabilise the vehicle by changing the torque.
Anti-lock brake system (ABS)
ABS prevents the wheels from locking up under braking until the vehicle
has reached a virtual standstill. You can continue to steer the vehicle even
when the brakes are on full. Keep your foot on the brake pedal and do not
pump the brakes. You will feel the brake pedal pulsate while the ABS is
working.
Brake assist system
The brake assist system can reduce the required braking distance. The brak-
ing force is automatically boosted if you press the brake pedal quickly in an
emergency. You must keep pressing the brake pedal until the danger has
passed. Traction control system (ASR)
In the event of wheelspin, the traction control system reduces the engine
torque to match the amount of grip available. This helps the car to start
moving, accelerate or climb a gradient.
Electronic differential lock (EDL)
When the EDL detects wheelspin, it brakes the spinning wheel and directs
the power to the other driven wheel. This function is available up to a speed
of around 100 km/h, 62 mph).
To prevent the disc brake of the braked wheel from overheating, the EDL
cuts out automatically if subjected to excessive loads. The vehicle can still
be driven. The EDL will switch on again automatically when the brake has
cooled down.
Tractor-trailer sway mitigation*
If the vehicle is pulling a trailer, it will control the following: Tractor-trailers
tend to sway. When the swaying of the trailer is felt by the vehicle and de-
tected by the ESC, it will automatically brake the towing vehicle within the
limits of the system and mitigate the sway. Tractor-trailer sway mitigation is
not available in all countries.
Electronic self-locking*/Selective torque control*
When driving around bends, an electronic self-locking intervenes. The front
wheel on the inside of the curve, or the two inside wheels, respectively, are
selectively braked as required. This minimises the traction of the front
wheels, allowing you to take bends with greater precision and neutrality. In
certain circumstances, where roads are wet or snow-covered, the respective
system may not intervene.
Safety FirstOperating instructionsPractical TipsTechnical specifications
Page 185 of 289
184Intelligent technology
Multi-collision brake
In an accident, the multi-collision brake can help the driver by braking to
avoid the risk of skidding during the accident, which could lead to further
collisions.
The multi-collision brake works for front, side or rear accidents, when the
airbag control unit records its activation level and the accident takes place
at a speed of over 10 km/h (6 mph). The EI ESC automatically brakes the
vehicle, as long as the accident has not damaged the ESC, the brake hy-
draulics or the on-board network.
The following actions control automatic braking during the accident:
● When the driver presses the accelerator. The automatic braking does not
take place.
● When the braking pressure through pressing the brake pedal is greater
than the system’s braking pressure. The vehicle will brake manually.
● Multi-collision braking will not be available if ESC is malfunctioning.
WARNING
● Nor can the ESC, ABS, ASR, EDL, electronic self-locking differential or
selective torque control systems exceed the limits imposed by the laws
of physics. Always bear this in mind, especially on wet or slippery roads.
If you notice the systems cutting in, you should reduce your speed imme-
diately to suit the road and traffic conditions. Do not be encouraged to
take risks by the presence of more safety systems. If you do, an accident
may occur.
● Please remember that the accident risk always increases if you drive
fast, especially in corners or on a slippery road, or if you follow too close
behind the vehicle in front of you. The ESC, ABS, brake assist, EDL, elec-
tronic self-locking and selective torque control systems cannot prevent
accidents: risk of accidents!
● Accelerate with caution on slippery surfaces (for example, icy or
snow-covered). Despite the control systems, the driven wheels could
spin, affecting the stability of the vehicle: risk of accident!
Note
● The ABS and ASR will only operate correctly if the four wheels have iden-
tical tyres. Any differences in the rolling radius of the tyres can cause the
system to reduce engine power when this is not desired.
● The regulating processes of the systems can make noises when they in-
tervene.
● If the warning lamp lights up, or alternatively, there could be a
fault ⇒ page 69.
Switching on/off the ESC and ASR
The ESC is switched on automatically when the engine is
started. The ESC cannot be deactivated. ESC in "Sport" mode
Sport mode is activated through the Easy Connect system ⇒ page 79 menu.
The ability of the ESC to stabilise the vehicle is limited; the traction control
system (ASR) becomes disabled ⇒
.
The control lamp will light up. For vehicles with a driver information sys-
tem*, the driver will be shown the electronic stability control (ESC) option:
sport. Warning! Limited stability .
In the following exceptional circumstances enabling the ESC Sport mode to
improve the traction of the wheels is tenable:
● when rocking the vehicle backwards and forwards to free it.
● Driving in deep snow or on loose surfaces.
Disable ESC Sport mode
Through the Easy Connect system ⇒ page 79. The warning lamp will
switch off. For vehicles with a driver information system*, the driver will be
shown the electronic stability control (ESC) option: on .
Page 203 of 289

202Care and cleaning
Care of the vehicle interior
Radio display/Easy Connect* and control panel*
The display can be cleaned with a soft cloth and a professionally available
“LCD cleaner”. Moisten the cloth with a small amount of the cleaning fluid.
The Easy Connect control panel* should first be cleaned with a brush so
that no dirt goes into the device or between the keys and housing. Next, we
recommend cleaning the Easy Connect control panel* using a cloth damp-
ened with water and washing-up liquid.
CAUTION
● To avoid scratching the screen, do not wipe the display with a dry cloth.
● To avoid damage, ensure that no liquid goes into the Easy Connect con-
trol panel*.
Plastic and leatherette parts
Plastic parts and leatherette can be cleaned with a damp cloth. If this is not
sufficient, plastic parts and leatherette should only be treated with a special
solvent-free plastic cleaner .
Textile covers and trim parts
Textile covers and trim parts (e.g. seats, door trim) should be cleaned regu-
larly with a vacuum cleaner. This will remove surface dirt which could other-
wise be rubbed into the textile material during use. Do not use steam clean-
ers, as the steam could carry the dirt deeper into the textile material. Normal cleaning
We recommend that you use a soft sponge or a commercially available lint-
free, micro-fibre cloth for normal cleaning. Only use brushes on floor cover-
ings and mats, as other textile surfaces could become damaged.
In the case of normal surface dirt you can use a foam cleaner. Use a sponge
to spread the foam on the textile surface and to work it into the material
lightly. However, make sure that the textile material does not become soak-
ing wet. Then dab off the foam with a dry and absorbent cloth (e.g. a micro-
fibre cloth) and vacuum off any residue once the surface is completely dry.
Cleaning stains
Treat drink stains (such as coffee or fruit juice, etc.) with a cleaning solution
for delicate fabrics. The cleaning product solution should be applied with a
sponge. If the stains are difficult to remove, a washing paste can be applied
directly onto the stain and worked into the fabric. The surface will then have
to be wiped with clear water to remove any residue left by the paste. To do
so, use a damp cloth or sponge and then dab the stain with an absorbent
cloth.
Remove chocolate or make-up stains with a cleaning paste (for e.g., soft
soap). Then remove the soap with water (wet sponge).
A spirit-based cleaner can be used to remove grease, oil, lipstick or ball
point pen. Then dab the dissolved grease or colour particles off with an ab-
sorbent cloth or similar. You may also have to treat the stain once more us-
ing washing paste and water.
If the covers or textile trim panels are badly soiled we recommend that you
have them cleaned by a professional cleaning company with a shampoo
and spray.Note
Open Velcro fasteners on clothes can damage the seat upholstery. Make
sure that Velcro fasteners are closed.
Page 205 of 289
204Care and cleaning
More stubborn dirt
–More stubborn dirt can be removed using a mild soap solution
(pure liquid soap: two tablespoons dissolved in one litre of wa-
ter).
– Do not let the water soak through the leather or penetrate into
the seams.
– Then wipe off with a soft, dry cloth.
Removal of stains
– Remove fresh water-based stains such as coffee, tea, juices,
blood etc. with an absorbent cloth or kitchen roll, dried-on
stains with the cleaning agent from the care set.
– Remove fresh fat-based stains that have not penetrated the sur-
face such as butter, mayonnaise, chocolate, etc. with an ab-
sorbent cloth or kitchen roll or with the cleaning agent from the
care set.
– Treat fat-based, dried-in stains with grease-dissolving spray.
– Treat less common stains such as ball-pen and other inks, felt-
tip pens, nail polish, dispersion paint, shoe cream etc. with a
special leather stain remover.
Leather maintenance
– The leather should be treated regularly (about twice a year) with
a special leather-care product.
– Apply these products very sparingly.
– Then wipe off with a soft, dry cloth. Should you have questions regarding the care and cleaning of the leather
upholstery in your vehicle, we recommend that you contact your SEAT Offi-
cial Service. Our representatives will be happy to advise you and tell you
about the product range for leather conservation, for example:
●
Cleaning and care set
● Coloured leather-care cream
● Stain remover for ball-pen inks, shoe cream etc.
● Grease dissolving spray
● New products and further developments
CAUTION
On no account use solvents (such as petrol, turpentine), wax polish, shoe
cream or similar materials.
Cleaning Alcantara upholstery
Removing dust and dirt
– Moisten a cloth just a little and wipe down the seat covers.
Removing stains
– Moisten a cloth with lukewarm water or diluted white spirits.
– Dab at the stain. Start at the outside and work inwards.
– Dry the area you have cleaned with a soft cloth.
Do not use leather cleaning products on Alcantara seat covers.
You may use a suitable shampoo on dust and dirt.
Dust and grit in the pores and seams can scratch and damage the surface. If
the car is left standing in the sun for long periods, Alcantara leather should