infotainment Seat Leon 5D 2014 MEDIA SYSTEM PLUS - NAVI SYSTEM
[x] Cancel search | Manufacturer: SEAT, Model Year: 2014, Model line: Leon 5D, Model: Seat Leon 5D 2014Pages: 64, PDF Size: 1.71 MB
Page 41 of 64
CAR menu
CAR menu Introduction to managing the
CAR menu Car menu By pressing the “CAR” infotainment button
you will access the main menu with the fol-
lowing options:
● VIEW
● MINIPLAYER (Radio and Media function)
● PREVIOUS-NEXT (to change screen)
● SETUP ›››
Booklet Instruction Manual,
chapter System setup (CAR)
With the function button View you can access
the following information:
● DRIVING DATA
● ECO
● VEHICLE STATUS Driving data
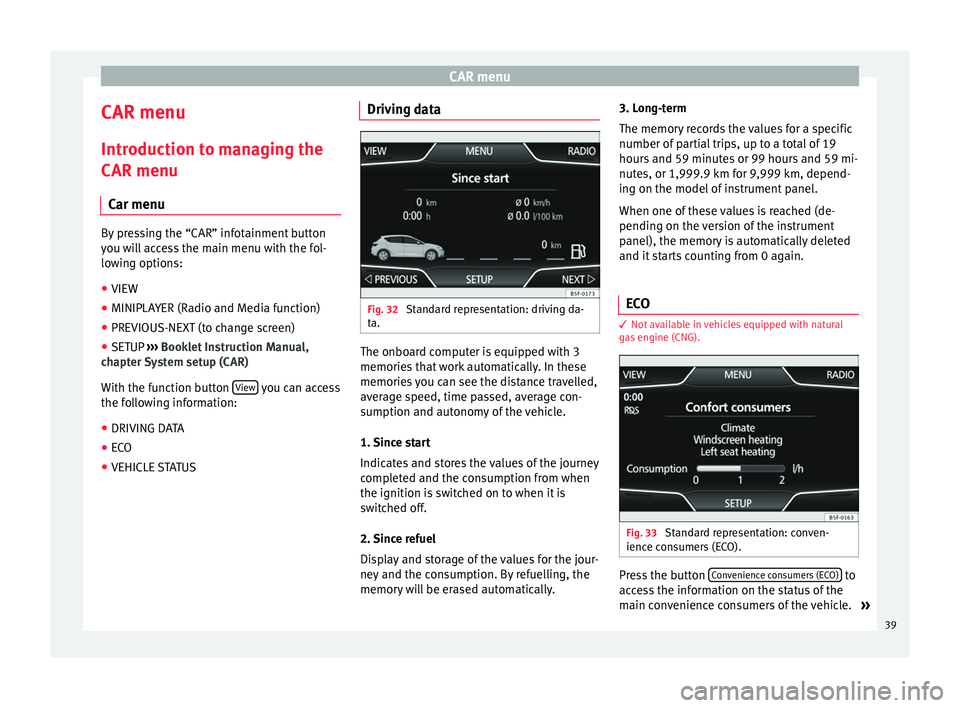
Fig. 32
Standard representation: driving da-
ta. The onboard computer is equipped with 3
memories that work automatically. In these
memories you can see the distance travelled,
average speed, time passed, average con-
sumption and autonomy of the vehicle.
1. Since start
Indicates and stores the values of the journey
completed and the consumption from when
the ignition is switched on to when it is
switched off.
2. Since refuel
Display and storage of the values for the jour-
ney and the consumption. By refuelling, the
memory will be erased automatically.3. Long-term
The memory records the values for a specific
number of partial trips, up to a total of 19
hours and 59 minutes or 99 hours and 59 mi-
nutes, or 1,999.9 km for 9,999 km, depend-
ing on the model of instrument panel.
When one of these values is reached (de-
pending on the version of the instrument
panel), the memory is automatically deleted
and it starts counting from 0 again.
ECO 3
Not available in vehicles equipped with natural
gas engine (CNG). Fig. 33
Standard representation: conven-
ience consumers (ECO). Press the button
Convenience consumers (ECO) to
access the information on the status of the
main convenience consumers of the vehicle. »
39
Page 42 of 64
Telephone management (PHONE)
It is shown via a consumption indicator bar in
l/h (gal/h),
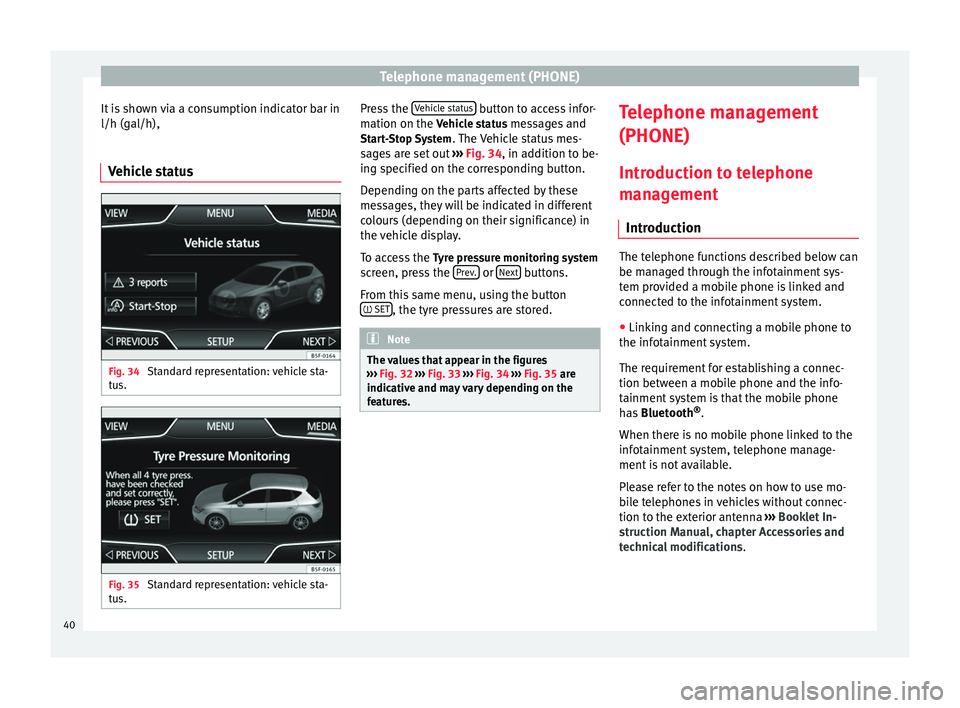
Vehicle status Fig. 34
Standard representation: vehicle sta-
tus. Fig. 35
Standard representation: vehicle sta-
tus. Press the
Vehicle status button to access infor-
mation on the Vehicle status messages and
St ar
t-Stop System . The Vehicle status mes-
sages are set out ››› Fig. 34, in addition to be-
ing s
pecified on the corresponding button.
Depending on the parts affected by these
messages, they will be indicated in different
colours (depending on their significance) in
the vehicle display.
To access the Tyre pressure monitoring system
screen, press the Prev. or
Next buttons.
From this same menu, using the button SET , the tyre pressures are stored.
Note
The values that appear in the figures
››› Fig. 32 ››› Fig. 33
››› Fig. 34 ››› Fig. 35 are
indicativ
e and may vary depending on the
features. Telephone management
(PHONE)
Introduction to telephone
management Introduction The telephone functions described below can
be managed through the infotainment sys-
tem provided a mobile phone is linked and
connected to the infotainment system.
● Linking and connecting a mobile phone to
the infotainment system.
The requirement for establishing a connec-
tion between a mobile phone and the info-
tainment system is that the mobile phone
has Bluetooth ®
.
When there is no mobile phone linked to the
infotainment system, telephone manage-
ment is not available.
Please refer to the notes on how to use mo-
bile telephones in vehicles without connec-
tion to the exterior antenna ›››
Booklet In-
struction Manual, chapter Accessories and
technical modifications .
40
Page 44 of 64
Telephone management (PHONE)
Note
In areas with special requirements and where
the use of mobile phones is prohibited, you
must keep the mobile phone and its prein-
stallation switched off at all times. The radia-
tion emitted by mobile phones when switch-
ed on can cause interference in sensitive
technical and medical equipment, which
could damage this equipment or cause it to
stop working properly. Linking and connecting your mobile
phone to the infotainment system
To operate a mobile phone through the info-
tainment system, you need to link both devi-
ces
one time only .
F or
your safety, we recommend you make the
link when the vehicle is stationary. In some
countries you cannot
make the link with the
vehicle running.
You must guarantee the following setup in
the mobile phone and the infotainment sys-
tem:
● The
Bluetooth ®
function must be active
and visible on the mobile phone and info-
tainment system, respectively.
● The keypad lock of the mobile phone must
be disconnected.
● The
notification and key tones of your mo-
bile phone must be disconnected. In some countries, after switching the igni-
tion on, the
Bluetooth
®
function of the info-
tainment system should be activated or re-
main visible for around 3 minutes.
During the linking process you must enter da-
ta using your mobile phone's keypad. To do
so, you must have your mobile phone to
hand.
Once the link has been made, the schedule
and call lists stored in your mobile phone will
be loaded. The duration of the loading proc-
ess depends on the amount of data stored on
your mobile phone. When the loading proc-
ess is complete, the data will be available to
the infotainment system.
Starting the link from the system
● Make sure the mobile device is active and
visible.
● Press the PHONE unit button.
● Press the Find phone function button.
ALTERNATIVELY:
● Press the PHONE unit button.
● Press the Setup function button.
● Press the function button Select phone and
then Find phone .
ALTERNATIVELY:
● Press the PHONE unit button.
● Press the Setup function button.●
Press the Bluetooth setup function button.
● Press the Find devices function button.
ALTERNATIVELY:
● Make the connection from the mobile de-
vice itself (ensure that the visibility of the in-
fotainment system in the menu Phone setup >
BT setup is active).
The search process can take up to 1 minute.
On the screen the system will dynamically
update the names of the bluetooth devices
found.
● Select the infotainment system or the mo-
bile phone to which you want to connect from
the list of Bluetooth devices found.
The infotainment system and the mobile
phone will now be connected to each other.
In certain circumstances, it is possible that to
finish the connection between the two devi-
ces, you must enter additional data in the
mobile phone and infotainment system.
● If necessary, confirm the link to the mobile
phone.
● Use your mobile phone to enter and con-
firm your PIN code, as indicated in the dis-
play of the infotainment system.
● ALTERNATIVELY: Compare the PIN code
sho wn in the di
splay of the infotainment sys-
tem with the PIN code that appears on the
42
Page 45 of 64
Telephone management (PHONE)
mobile phone. If they coincide, you must
confirm it on both devices.
Onc e the link
is complete, the main menu
PHONE
will be shown.
Linking and connecting mobile telephones
You can link up to 20
mobile telephones to
the infotainment system, but only one mobile
phone can be connected as hands-free, and
only one device as BT audio at any time.
When you turn on the infotainment system
the connection is automatically established
with the mobile phone that was last connec-
ted. If it cannot establish a connection with
that mobile phone, the telephone manager
will automatically try to establish a connec-
tion with the next mobile phone that appears
on the list of linked devices.
The working radius of the Bluetooth connec-
tion is a maximum of 10 metres . If this work-
ing radius is exceeded, the connection estab-
lished through Bluetooth will be interrupted.
The connection is automatically re-establish-
ed as
soon as this device comes back into
the Bluetooth working radius.
If the maximum number of linked devices is
reached and you wish to link another one to
the system, it will automatically replace the
one that has recently been used the least. If you wish to replace it with another one, the
user must erase it beforehand. To do so:
●
Press the unit button Setup within the tele-
phone context.
● Press the function button Bluetooth setup .
● Press the function button My devices .
● In the list of devices linked, press the func-
tion button remove after the mobile phone to
be deleted and then press Delete to confirm
the process. Note
● The behaviour may vary depending on the
device connected.
● For some android mobile devices you must
accept the request to access the PBAP phone-
book after linking, to be able to access the
phonebook. It is recommended to activate
the option “always” so as not to have to ac-
cept it every time you connect. General information
Please refer to the notes on using a mobile
phone in the vehicle without connection to
exterior antenna
›››
Booklet Instruction Man-
ual, chapter Accessories and technical modi-
fications .
On ly
use devices that support Bluetooth. At
your SEAT dealership, or on the Internet, you will find information about products that sup-
port Bluetooth.
Take into account the instruction manual of
the mobile phone and of the manufacturer of
the accessories. In areas with poor coverage
there may be anomalies in the reception and
calls may be interrupted.
Most electronic devices are shielded against
radio frequency signals (high-frequency). On
some occasions, nevertheless, electronic de-
vices cannot be protected against the radio
frequency signals from the telephone manag-
er. This may produce interference.
Note
● There may be restrictions on the use of
Bluetooth devices in some countries. Infor-
mation is available from the local authorities.
● To connect the telephone manager to a de-
vice via Bluetooth technology, read the corre-
sponding instruction manual for the particu-
lar safety instructions. Only use products
that support Bluetooth. Bluetooth
® Bluetooth
®
Bluetooth technology is used to connect a
mobile phone to the vehicle's telephone
manager. To use the telephone manager with
a mobile phone with Bluetooth, the linking
process must be carried out once. »
43
Page 46 of 64
Telephone management (PHONE)
If a connection has already been established,
some mobile telephones with Bluetooth are
recognised and a connection is established
with them automatically when the ignition is
switched on. For this purpose, the mobile
phone and its Bluetooth must be connected,
and all the live Bluetooth connections with
other devices must be closed.
The Bluetooth wireless connection is free.
Bluetooth R
is a registered trademark of Blue-
tooth ®
SIG, Inc.
Bluetooth ®
profiles
When you connect a mobile phone to the tel-
ephone manager, the data exchange is
through one of the 2 Bluetooth profiles.
● Hands-free Bluetooth profile (HFP): If a mo-
b i
le phone is connected to the telephone
manager through the HFP, calls can be made
wirelessly through the hands-free device.
● Advanced audio profile (A2DP): Bluetooth
profile for transmitting audio signals with
stereo quality.
Voice control Many radio, media, telephone and navigation
functions may be activated through voice
commands. The voice control of the infotainment system
is only available for the language that has
been selected in system settings
››› page 53 .
V oic
e control settings ››› page 54.
When voice control is activated, you can
choose what text and icons take on the col-
our of the different functions:
● Red (RADIO and MEDIA) ››› page 45 and
››› page 45
● Green (PHONE) ››› page 46
● Blue (NAV) ››› page 46
Start and stop the voice control
● To activate the voice control, briefly press
the button on the multi-function steering
wheel . It can also be activated with the
VOICE button in the MIB.
● When voice control is activated, a rising
signal will sound and a menu containing the
main commands will be displayed (the menu
will be displayed if this option ››› page 54 is
activated in the voice control settings). The
spoken instructions will guide you through
the following “dialogue”.
● Pronounce the desired order and follow the
instructions of the “dialogue”. A function can
often be activated with different spoken com-
mands. In case of doubt, try to give a com-
mand. ●
When an action is carried out (e.g. calling a
contact), the voice control automatically de-
activates and must be reactivated when nee-
ded again. There are certain commands after
which the voice control does not end and
waits with What do you wish to do now? .
● To manually end voice control, keep the
button pressed on the multi-function steering
wheel until you hear the corresponding con-
firmation (falling sound), or press the but-
ton on the di
splay. You can also press the
VOICE button twice to deactivate voice con-
trol. (Voice control is deactivated in the fol-
lowing ways: by briefly pressing the VOICE
button or Command on the steering wheel
twice; or by pressing VOICE or Command on
the steering wheel for a few moments, and
touching the screen or any button on the ra-
dio).
Help with voice control
The first time you use the voice control, listen
to the Help.
● Press the function button .
● Give the “
Help” command in the language
established in the System setting, and follow
the dialogue instructions.
Operation during the dialogue
While the infotainment system transmits a
spoken indication, the display will show the
symbol .
44
Page 47 of 64
Telephone management (PHONE)
● Briefly press the button on the multi-
f u
nction steering wheel to interrupt the spo-
ken indication of the infotainment system
and give the next command.
IMPORTANT: The system will ONLY recognise
a command when the
“active” symbol is
displayed on the panel or the touch screen.
If you make a mistake when giving a com-
mand or give an incomplete command, and it
has no effect, you can repeat the command.
The symbol remains active.
● Briefly pr
ess the button of the multi-
function steering wheel to repeat the com-
mand.
Instructions for voice control
For optimum functioning of the voice control,
follow these instructions:
● Speak slowly and clearly, as far as possi-
ble. The system will not recognise mispro-
nounced words, or words and figures in
which syllables are omitted.
● Telephone numbers must be indicated fig-
ure by figure or in blocks of numbers in units,
tens or hundreds.
● Speak at a normal volume, without exag-
gerated intonation or long pauses.
● Avoid noise from the exterior and nearby
(for example, conversations inside the vehi- cle). Close all doors, windows and the sliding
roof.
●
Do not aim the air from the diffusers at the
roof of the passenger compartment.
● If you are driving very fast, speak a little
louder.
You can access the instructions by saying:
“Instructions, tutorial, introduction”. You can
also li
sten to the instructions in parts. These
are divided into 7 blocks. To access them,
give any of the previous commands followed
by “part +
xample “Tutorial
part 1 ”.
Voice control (RADIO) – Red
ButtonMain radio commands (FM)
Next station
Previous station
Station
Scan mode
AM mode:
DAB band Voice control (MEDIA) – Red
ButtonMain media commands
Next source
Previous source
Next track
Previous track
Mix Mode
Repeat track mode
Repeat all mode
Scan mode»
45
Page 48 of 64
Telephone management (PHONE)
Voice control (PHONE) - GreenButtonMain Telephone commands
Dial number
Call name
Call
Call voice mail
Redial
Read contacts
See calls
Missed calls
Incoming calls
Numbers dialled Voice control (NAV) – Blue
ButtonMain Navigation commands
New destination
Enter street
Home address
Navigate to
Last destinations
Begin navigation
Stop navigation
Load destination
Save position
Activate/Deactivate directions
Note
Voice control is unavailable during parking
manoeuvres Description of the telephone
manager
Introduction Some functions and settings can only be car-
ried out when the vehicle is stationary, andare not compatible with all mobile tele-
phones.
Description*
The telephone manager described in these
instructions is approved for use on the fol-
lowing networks: GSM 850, GSM 900, GSM
1800 and GSM 1900.
With the help of the telephone manager, up
to 2 mobile telephones can be connected to
the infotainment system via the Bluetooth
profiles (for example, one used as a Blue-
tooth-audio player and another as a hands-
free telephone).
Note
● Using a mobile phone inside the vehicle
may provoke noise in the speakers.
● It is possible that some networks may not
offer the characters of all languages, nor cer-
tain services. 46
Page 49 of 64
Telephone management (PHONE)
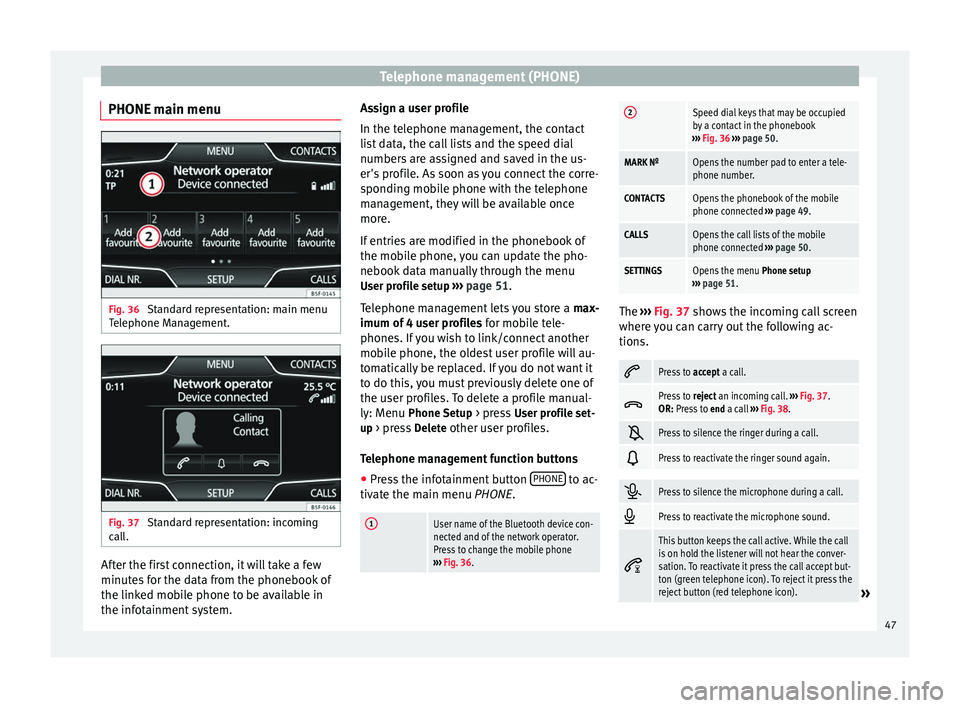
PHONE main menu Fig. 36
Standard representation: main menu
Telephone Management. Fig. 37
Standard representation: incoming
call. After the first connection, it will take a few
minutes for the data from the phonebook of
the linked mobile phone to be available in
the infotainment system. Assign a user profile
In the telephone management, the contact
list data, the call lists and the speed dial
numbers are assigned and saved in the us-
er's profile. As soon as you connect the corre-
sponding mobile phone with the telephone
management, they will be available once
more.
If entries are modified in the phonebook of
the mobile phone, you can update the pho-
nebook data manually through the menu
User profile setup ››› page 51 .
T el
ephone management lets you store a max-
imum of 4 user profiles for mobile tele-
phones. If you wish to link/connect another
mobile phone, the oldest user profile will au-
tomatically be replaced. If you do not want it
to do this, you must previously delete one of
the user profiles. To delete a profile manual-
ly: Menu Phone Setup > press User profile set-
up > press Delete other user profiles.
Telephone management function buttons
● Press the infotainment button PHONE to ac-
tivate the main menu PHONE.
1User name of the Bluetooth device con-
nected and of the network operator.
Press to change the mobile phone
››› Fig. 36.
2Speed dial keys that may be occupied
by a contact in the phonebook
››› Fig. 36 ››› page 50.
MARK NºOpens the number pad to enter a tele-
phone number.
CONTACTSOpens the phonebook of the mobile
phone connected ››› page 49.
CALLSOpens the call lists of the mobile
phone connected ››› page 50.
SETTINGSOpens the menu Phone setup
››› page 51. The
››› Fig. 37 shows the incoming call screen
wher e
you can carry out the following ac-
tions.
Press to
accept a call.
Press to
reject an incoming call. ››› Fig. 37.
OR: Press to end a call ››› Fig. 38.
Press to silence the ringer during a call.
Press to reactivate the ringer sound again.
Press to silence the microphone during a call.
Press to reactivate the microphone sound.
This button keeps the call active. While the call
is on hold the listener will not hear the conver-
sation. To reactivate it press the call accept but-
ton (green telephone icon). To reject it press the
reject button (red telephone icon).
»
47
Page 51 of 64
Telephone management (PHONE)Redial but-
tonPress the button and the last number
dialled will be shown on the display. To
make a connection press the button
again
.
Call voice
mailbox Keep button number 1 pressed for ap-
proximately 2 seconds or press the button.
If you still have not saved the voice mail
number, enter the number and confirm it
with OK
.
A phone number that has already been
stored can be modified in the User pro-
file settings ››› page 51 menu.
Activating voice control
Enter a na-
tional dial-
ling codeWhen you enter a country code, instead
of the two first digits (for example,
“00”), you can enter the “+” symbol.
Keep the function button pressed
0
for
about 2 seconds to add the + symbol.
Breakdown
service call
Press the function button to obtain help
in the event of breakdown. For this the
network of SEAT dealerships is available
to you with their Mobile Service.
Information
call Press the function button to obtain infor-
mation on the SEAT brand and the addi-
tional services contracted related to traf-
fic and travel. Note
Breakdown service and information calls can
incur an additional cost on your telephone
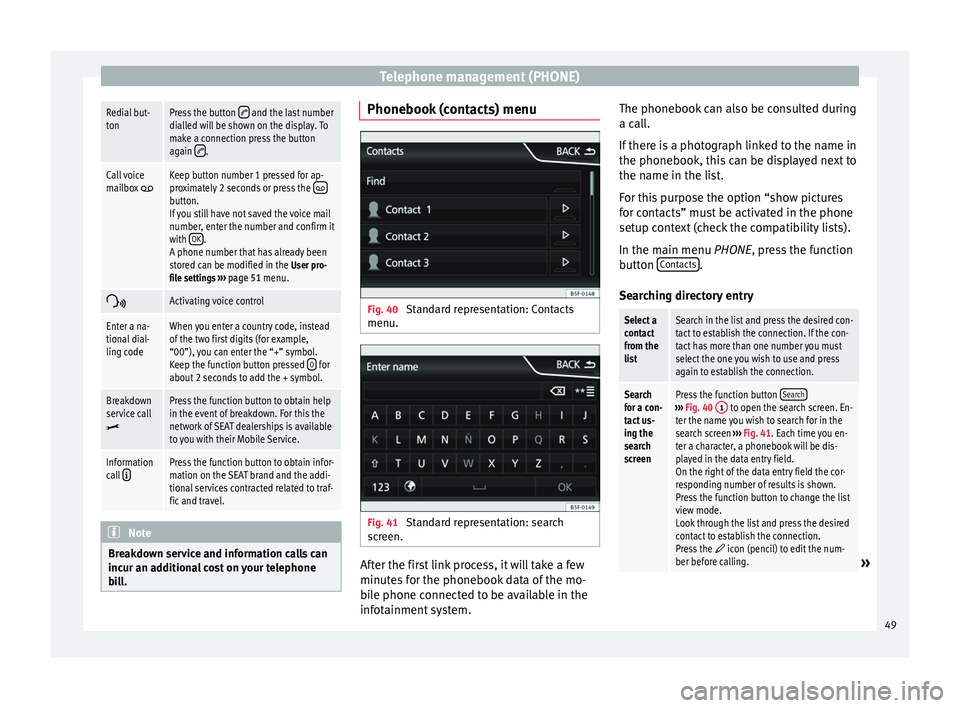
bill. Phonebook (contacts) menu
Fig. 40
Standard representation: Contacts
menu. Fig. 41
Standard representation: search
screen. After the first link process, it will take a few
minutes for the phonebook data of the mo-
bile phone connected to be available in the
infotainment system.The phonebook can also be consulted during
a call.
If there is a photograph linked to the name in
the phonebook, this can be displayed next to
the name in the list.
For this purpose the option “show pictures
for contacts” must be activated in the phone
setup context (check the compatibility lists).
In the main menu
PHONE
, press the function
b
utton Contacts .
Searching directory entry
Select a
contact
from the
listSearch in the list and press the desired con-
tact to establish the connection. If the con-
tact has more than one number you must
select the one you wish to use and press
again to establish the connection.
Search
for a con-
tact us-
ing the
search
screenPress the function button Search›››
Fig. 40 1 to open the search screen. En-
ter the name you wish to search for in the
search screen ››› Fig. 41. Each time you en-
ter a character, a phonebook will be dis-
played in the data entry field.
On the right of the data entry field the cor-
responding number of results is shown.
Press the function button to change the list
view mode.
Look through the list and press the desired
contact to establish the connection.
Press the
icon (pencil) to edit the num-
ber before calling.» 49
Page 52 of 64
Telephone management (PHONE)
Note
If you edit the number before calling, this will
only be used for the call and will not be stor-
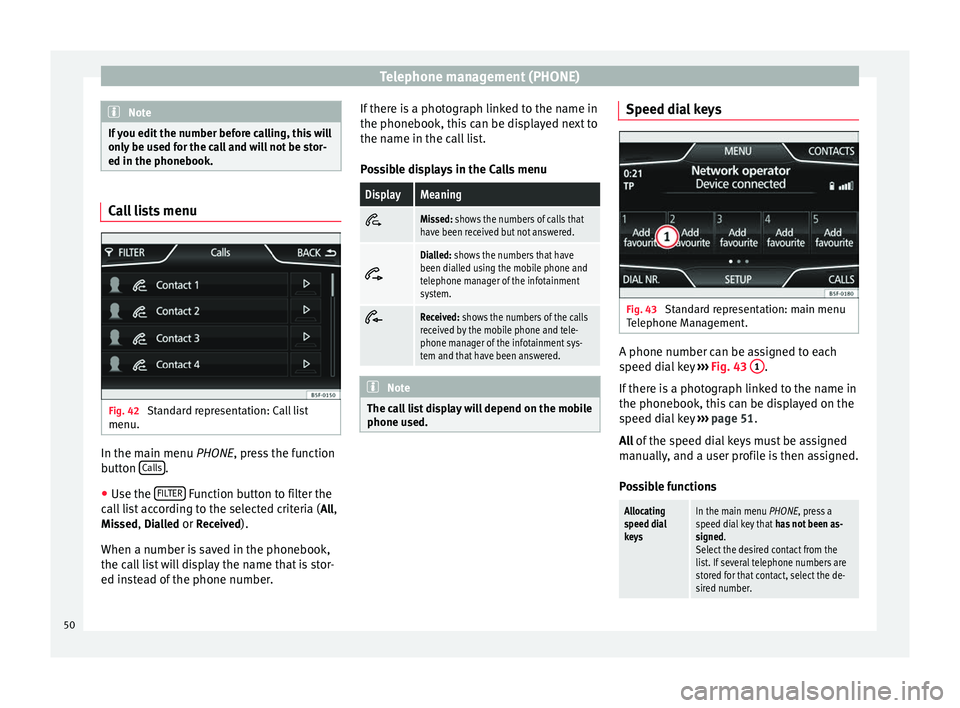
ed in the phonebook. Call lists menu
Fig. 42
Standard representation: Call list
menu. In the main menu
PHONE
, press the function
b
utton Calls .
● Use the FILTER Function button to filter the
call list according to the selected criteria ( All
,
Missed , Dialled
or Received
).
When a number is saved in the phonebook,
the call list will display the name that is stor-
ed instead of the phone number. If there is a photograph linked to the name in
the phonebook, this can be displayed next to
the name in the call list.
Possible displays in the Calls menu
DisplayMeaningMissed: shows the numbers of calls that
have been received but not answered.
Dialled: shows the numbers that have
been dialled using the mobile phone and
telephone manager of the infotainment
system.
Received: shows the numbers of the calls
received by the mobile phone and tele-
phone manager of the infotainment sys-
tem and that have been answered.
Note
The call list display will depend on the mobile
phone used. Speed dial keys
Fig. 43
Standard representation: main menu
Telephone Management. A phone number can be assigned to each
speed dial key
›››
Fig. 43 1 .
If there is a photograph linked to the name in
the phonebook, this can be displayed on the
speed dial key ›››
page 51.
All of the speed dial keys must be assigned
m anual
ly, and a user profile is then assigned.
Possible functions
Allocating
speed dial
keysIn the main menu PHONE, press a
speed dial key that has not been as-
signed.
Select the desired contact from the
list. If several telephone numbers are
stored for that contact, select the de-
sired number. 50