navigation update Seat Leon 5D 2014 NAVI SYSTEM PLUS
[x] Cancel search | Manufacturer: SEAT, Model Year: 2014, Model line: Leon 5D, Model: Seat Leon 5D 2014Pages: 84, PDF Size: 2.08 MB
Page 42 of 84
Navigation
Navigation Navigation, entry and control Introduction General information
The current vehicle position is determined by
means of the GPS satellite system (Global Po-
sitioning System). Sensors in the vehicle
measure distances that have been driven.
The measurement values are compared with
the detailed map data and the road informa-
tion stored therein. Traffic reports, if any, will
also be taken into account in the route calcu-
lation (dynamic route guidance
››› page 47 ). Using all the data available,
the Inf ot
ainment system calculates the opti-
mum route to the destination.
The destination is defined by entering an ad-
dress or a point of interest, e.g. a petrol sta-
tion or hotel.
Spoken instructions and visual guidance on
the navigation unit and on the dash panel
will direct you to your destination.
Depending on the country, some infotain-
ment system functions can no longer be se-
lected when the vehicle is travelling above a
certain speed. This is not a malfunction, but
simply a legal requirement. Navigation messages When the Infotainment system is unable to
receive any data from GPS satellites (due to a
dense tree canopy, underground car park),
navigation can still continue using the vehi-
cle sensors.
Possible navigation limitations
In areas that are not or are only partially digi-
tised on the data storage device (e.g. insuffi-
cient definition of one-way streets and road
categories), the Infotainment system will still
attempt to provide route guidance.
If navigation data are unavailable or incom-
plete, the navigation system may be unable
to determine the exact vehicle position. As a
result, the navigation may not be as exact as
usual.
Navigation area and updating of navigation
data
Roads and streets are subject to constant
change (e.g. new roads, changes to street
names and building numbers). Therefore, if
the navigation data is not updated, then er-
rors or inaccuracies may occur during guid-
ance.
SEAT recommends updating navigation data
on a regular basis. Up to date navigation da-
ta can be acquired at a SEAT dealer.
Updating and installing navigation
data The Infotainment system is equipped with an
internal navigation data memory. The re-
quired navigation data may already be prein-
stalled, depending on the country.
The Infotainment system always requires the
navigation data that is currently valid for this
unit in order to allow all functions to be used
in full. Using an old version may lead to er-
rors during navigation.
Updating navigation data
Compatible memory cards can be obtained
from SEAT dealers.
The navigation data must be installed after
downloading. Navigation is not possible from
the memory card.
Installing navigation data
The installation process takes about 2 hours.
If the Infotainment system is switched off, the
installation process is paused and will auto-
matically resume when switched back on.
● Switch the ignition on.
● Insert the memory card containing the navi-
gation data ›››
page 23 .
● Pr e
ss the Infotainment MENU button and
then select Setup .
40
Page 43 of 84
Navigation
● In the System setup menu, press the
S y
stem information function button.
● Press Update software to import the stored
navigation data.
● Follow the instructions displayed on the
screen.
Once installed, the memory card can be re-
moved. The memory card must be prepared
for removal ››› page 23. CAUTION
Do not remove the memory card while the
navigation data is being installed. The memo-
ry card may be irreparably damaged! Note
● The navigation memory card may not be
used as memory storage for other files. The
Infotainment system will not recognise the
files saved on it.
● SEAT recommends a CLASS 10 1)
memory
card for the use of navigation data. The use of
other memory cards could limit its operation. Navigation main men
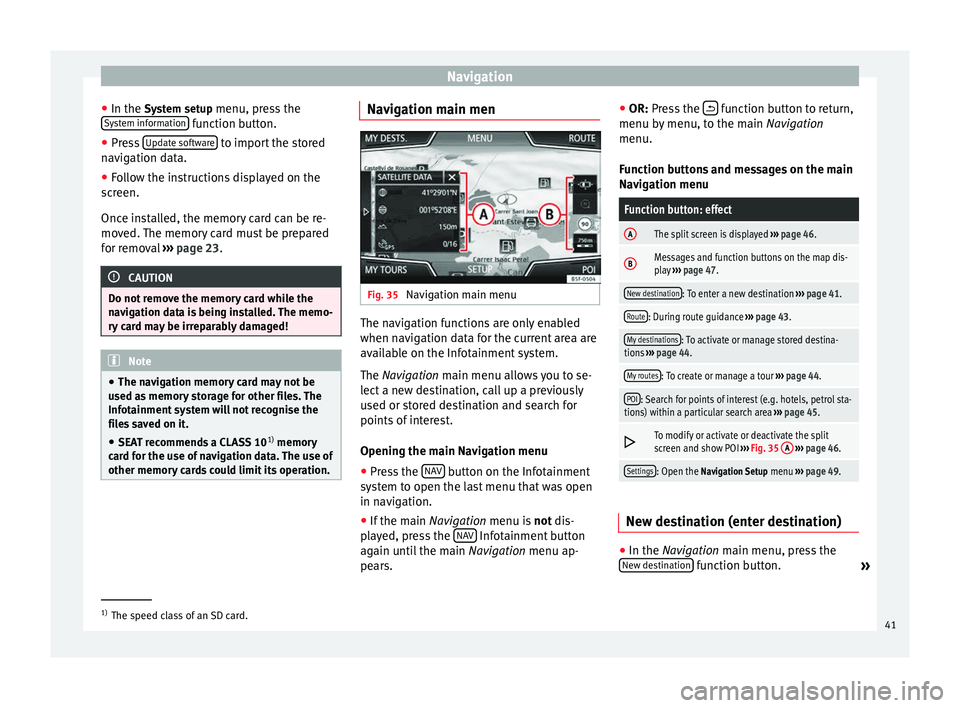
Fig. 35
Navigation main menu The navigation functions are only enabled
when navigation data for the current area are
available on the Infotainment system.
The
Navigation
main menu allows you to se-
l
ect a new destination, call up a previously
used or stored destination and search for
points of interest.
Opening the main Navigation menu
● Press the NAV button on the Infotainment
system to open the last menu that was open
in navigation.
● If the main Navigation menu is
not
dis-
p
layed, press the NAV Infotainment button
again until the main Navigation menu ap-
pe ar
s. ●
OR: Press the function button to return,
menu by menu, to the main Navigation
menu.
Function buttons and messages on the main
Navigation menu
Function button: effect
AThe split screen is displayed ››› page 46.
BMessages and function buttons on the map dis-
play ››› page 47.
New destination: To enter a new destination ››› page 41.
Route: During route guidance ››› page 43.
My destinations: To activate or manage stored destina-
tions ››› page 44.
My routes: To create or manage a tour ››› page 44.
POI: Search for points of interest (e.g. hotels, petrol sta-
tions) within a particular search area ››› page 45.
To modify or activate or deactivate the split
screen and show POI
››› Fig. 35 A
››› page 46.
Settings: Open the Navigation Setup menu ››› page 49. New destination (enter destination)
●
In the Navigation
main menu, press the
New de
stination function button.
»1)
The speed class of an SD card.
41
Page 47 of 84
Navigation
Several destinations can be defined in tour
mode. A trip with multiple destinations is
called a “Tour”.
The “starting point” of a tour is always the
vehicle position determined by the Infotain-
ment system. The “destination” is the end
point of a tour. “Stopover destinations” are
driven to before the destination.
● Press the My tours function button in the
main Navigation
menu.
● Sel
ect the desired function button ( Edit
tour, New tour or Tour Memory).
Function buttons on the My tours pop-up
window
Function button: effect
Edit waypoint toura) : To edit and store the active tour.
New tour: To create a new tour.
Tour memory: To Delete, Edit or Start a stored tour.
a)
This function button is only displayed when route guidance is
activated in tour mode.
Display and function buttons on the New tour
and Edit tour
menu
Function button or message: function or meaning
Stopover.
Destination.
...Estimated time of arrival at destination.
...Calculated distance to destination.
Press on the destination to display the function but-
tons.
Delete destination.
To start guidance direct to the selected
destination. Destinations that come before
the selected destination are ignored.
To open the detailed view of the destina-
tion in question.
Available function buttons.
New desti-
nationTo add a new destination to the tour.
My desti-
nationsTo add a new destination from My destina-
tions to the tour.
StoringTo store the created tour in the tour memo-
ry.
StartTo start route guidance.
CalculateTo update calculated distance and estima-
ted arrival time. a)
StopTo stop route guidance to the active desti-
nation.b)
To move a stopover or a destination to an-
other position on the list. Press and drag
to move the destination.
a)
This function button is only displayed with route guidance ac-
tivated and when a destination has been added to the tour.
b) This function button is only displayed with route guidance ac-
tivated.
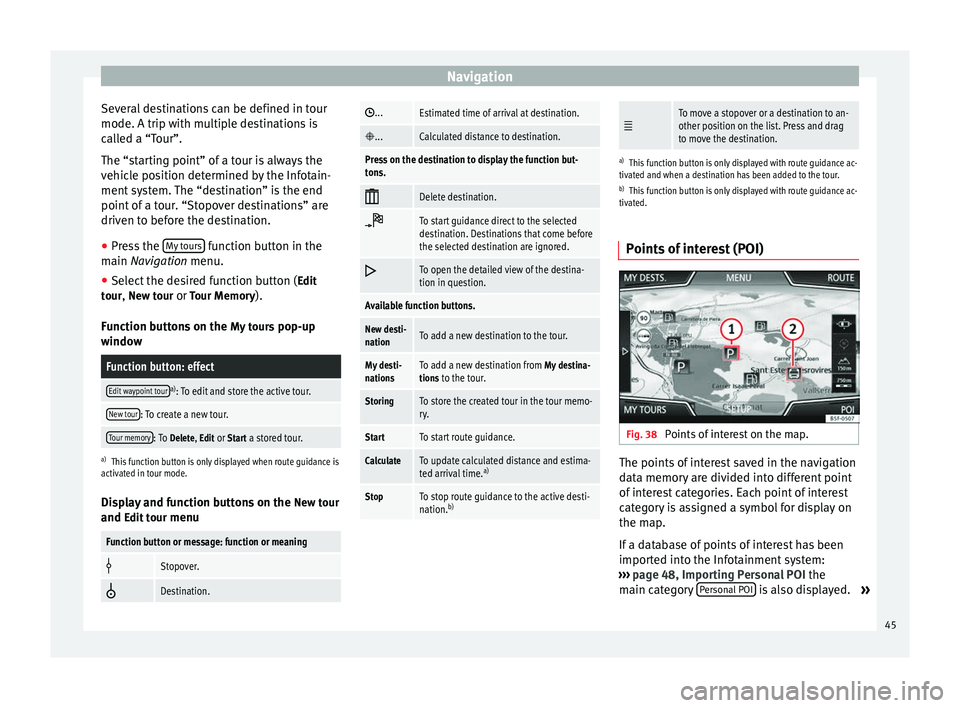
Points of interest (POI) Fig. 38
Points of interest on the map. The points of interest saved in the navigation
data memory are divided into different point
of interest categories. Each point of interest
category is assigned a symbol for display on
the map.
If a database of points of interest has been
imported into the Infotainment system:
››› page 48, Importing Personal POI the
main category Personal POI is also displayed.
»
45
Page 50 of 84
Navigation
Shortly before arriving at the announced con-
gested traffic, it will be announced once
again.
Avoiding congestion by following the instruc-
tions of a traffic report does not always save
time as the alternate roads may be at a
standstill. The quality of the dynamic route
guidance depends on the information con-
tained in the traffic reports.
The remainder of the route to be travelled
may be manually excluded to cause a new
route calculation ››› page 43.
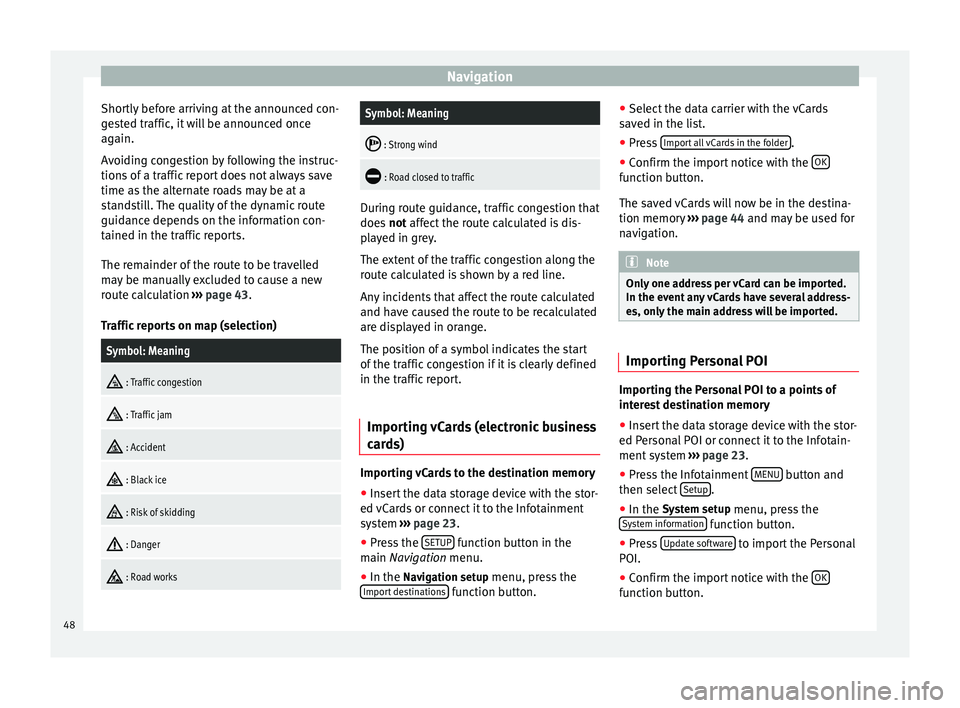
Traffic reports on map (selection)Symbol: Meaning
: Traffic congestion
: Traffic jam
: Accident
: Black ice
: Risk of skidding
: Danger
: Road works
Symbol: Meaning
: Strong wind
: Road closed to traffic
During route guidance, traffic congestion that
does
not affect the route calculated is dis-
p l
ayed in grey.
The extent of the traffic congestion along the
route calculated is shown by a red line.
Any incidents that affect the route calculated
and have caused the route to be recalculated
are displayed in orange.
The position of a symbol indicates the start
of the traffic congestion if it is clearly defined
in the traffic report.
Importing vCards (electronic business
cards) Importing vCards to the destination memory
● Insert the data storage device with the stor-
ed vCards or connect it to the Infotainment
system ›››
page 23 .
● Pr e
ss the SETUP function button in the
main Navigation
menu.
● In the Nav
igation setup menu, press the
Import destinations function button.●
Select the data carrier with the vCards
saved in the list.
● Press Import all vCards in the folder .
● Confirm the import notice with the OK function button.
The saved vCards will now be in the destina-
tion memory
››› page 44 and may be used for
n av
igation. Note
Only one address per vCard can be imported.
In the event any vCards have several address-
es, only the main address will be imported. Importing Personal POI
Importing the Personal POI to a points of
interest destination memory
● Insert the data storage device with the stor-
ed Personal POI or connect it to the Infotain-
ment system ›››
page 23 .
● Pr e
ss the Infotainment MENU button and
then select Setup .
● In the System setup
menu, press the
System information function button.
● Press Update software to import the Personal
POI.
● Confirm the import notice with the OK function button.
48
Page 53 of 84
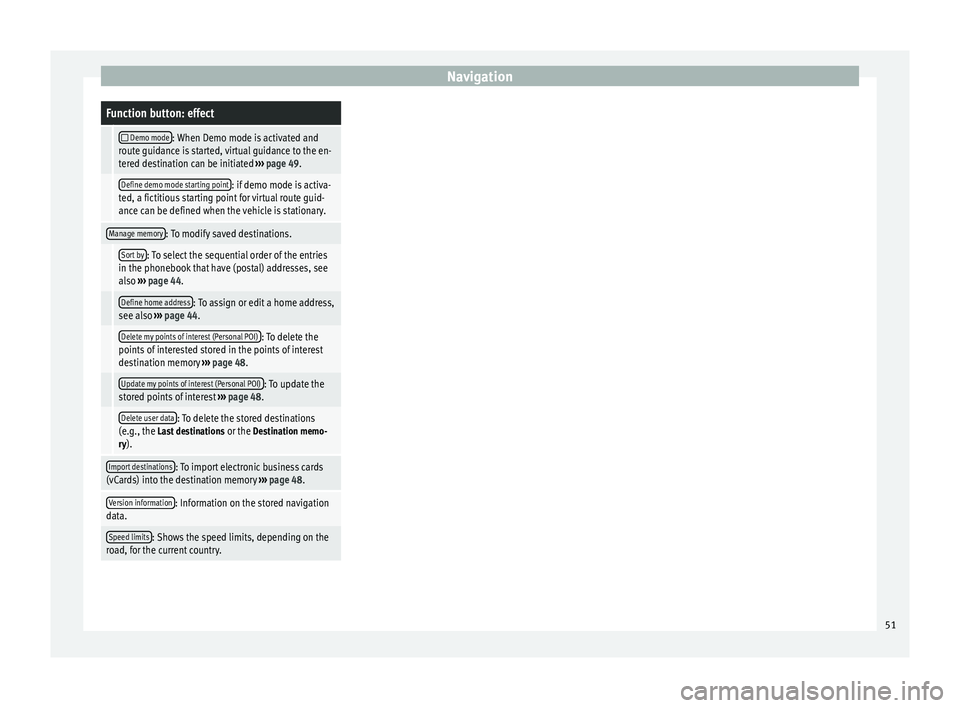
NavigationFunction button: effect
Demo mode: When Demo mode is activated and
route guidance is started, virtual guidance to the en-
tered destination can be initiated ››› page 49.
Define demo mode starting point: if demo mode is activa-
ted, a fictitious starting point for virtual route guid-
ance can be defined when the vehicle is stationary.
Manage memory: To modify saved destinations.
Sort by: To select the sequential order of the entries
in the phonebook that have (postal) addresses, see
also ››› page 44.
Define home address: To assign or edit a home address,
see also ››› page 44.
Delete my points of interest (Personal POI): To delete the
points of interested stored in the points of interest
destination memory ››› page 48.
Update my points of interest (Personal POI): To update the
stored points of interest ››› page 48.
Delete user data: To delete the stored destinations
(e.g., the Last destinations or the Destination memo-
ry).
Import destinations: To import electronic business cards
(vCards) into the destination memory ››› page 48.
Version information: Information on the stored navigation
data.
Speed limits: Shows the speed limits, depending on the
road, for the current country. 51
Page 68 of 84
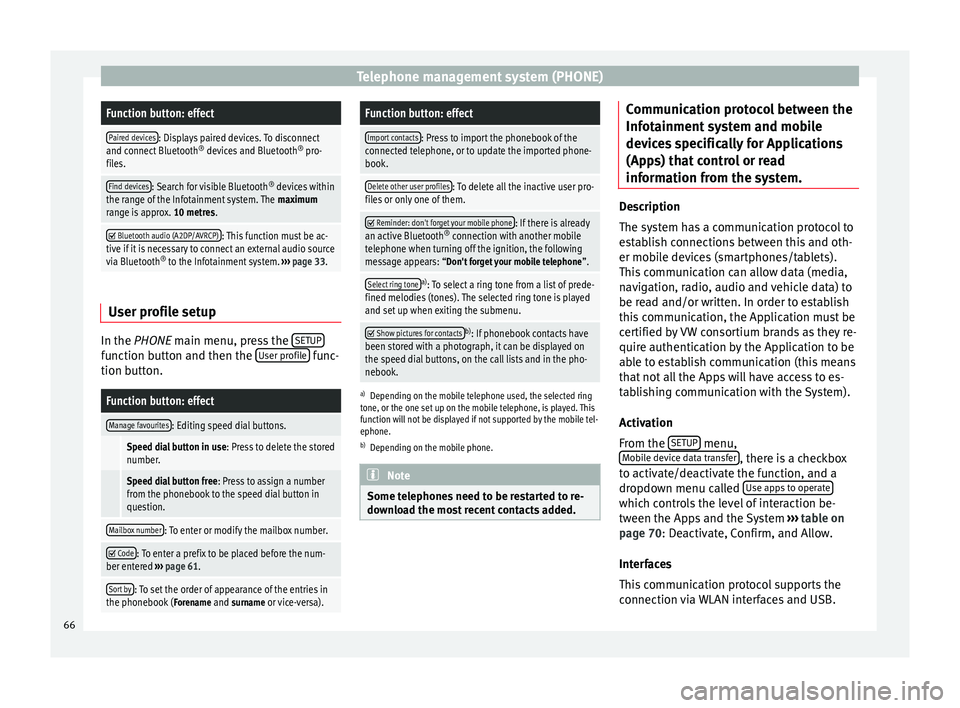
Telephone management system (PHONE)Function button: effect
Paired devices: Displays paired devices. To disconnect
and connect Bluetooth ®
devices and Bluetooth ®
pro-
files.
Find devices: Search for visible Bluetooth ®
devices within
the range of the Infotainment system. The maximum
range is approx. 10 metres.
Bluetooth audio (A2DP/AVRCP): This function must be ac-
tive if it is necessary to connect an external audio source
via Bluetooth ®
to the Infotainment system. ››› page 33. User profile setup
In the
PHONE
main menu, press the S
ETUPfunction button and then the
User profile func-
tion button.
Function button: effect
Manage favourites: Editing speed dial buttons.
Speed dial button in use : Press to delete the stored
number.
Speed dial button free : Press to assign a number
from the phonebook to the speed dial button in
question.
Mailbox number: To enter or modify the mailbox number.
Code: To enter a prefix to be placed before the num-
ber entered ››› page 61.
Sort by: To set the order of appearance of the entries in
the phonebook ( Forename and surname or vice-versa).
Function button: effect
Import contacts: Press to import the phonebook of the
connected telephone, or to update the imported phone-
book.
Delete other user profiles: To delete all the inactive user pro-
files or only one of them.
Reminder: don't forget your mobile phone: If there is already
an active Bluetooth ®
connection with another mobile
telephone when turning off the ignition, the following
message appears: “Don't forget your mobile telephone ”.
Select ring tonea)
: To select a ring tone from a list of prede-
fined melodies (tones). The selected ring tone is played
and set up when exiting the submenu.
Show pictures for contactsb)
: If phonebook contacts have
been stored with a photograph, it can be displayed on
the speed dial buttons, on the call lists and in the pho-
nebook.
a) Depending on the mobile telephone used, the selected ring
tone, or the one set up on the mobile telephone, is played. This
function will not be displayed if not supported by the mobile tel-
ephone.
b) Depending on the mobile phone. Note
Some telephones need to be restarted to re-
download the most recent contacts added. Communication protocol between the
Infotainment system and mobile
devices specifically for Applications
(Apps) that control or read
information from the system.
Description
The system has a communication protocol to
establish connections between this and oth-
er mobile devices (smartphones/tablets).
This communication can allow data (media,
navigation, radio, audio and vehicle data) to
be read and/or written. In order to establish
this communication, the Application must be
certified by VW consortium brands as they re-
quire authentication by the Application to be
able to establish communication (this means
that not all the Apps will have access to es-
tablishing communication with the System).
Activation
From the
SETUP menu,
Mobile device data transfer , there is a checkbox
to activate/deactivate the function, and a
dropdown menu called Use apps to operate which controls the level of interaction be-
tween the Apps and the System
›››
table on
page 70 : Deactivate, Confirm, and Allow.
Int er
faces
This communication protocol supports the
connection via WLAN interfaces and USB.
66
Page 73 of 84
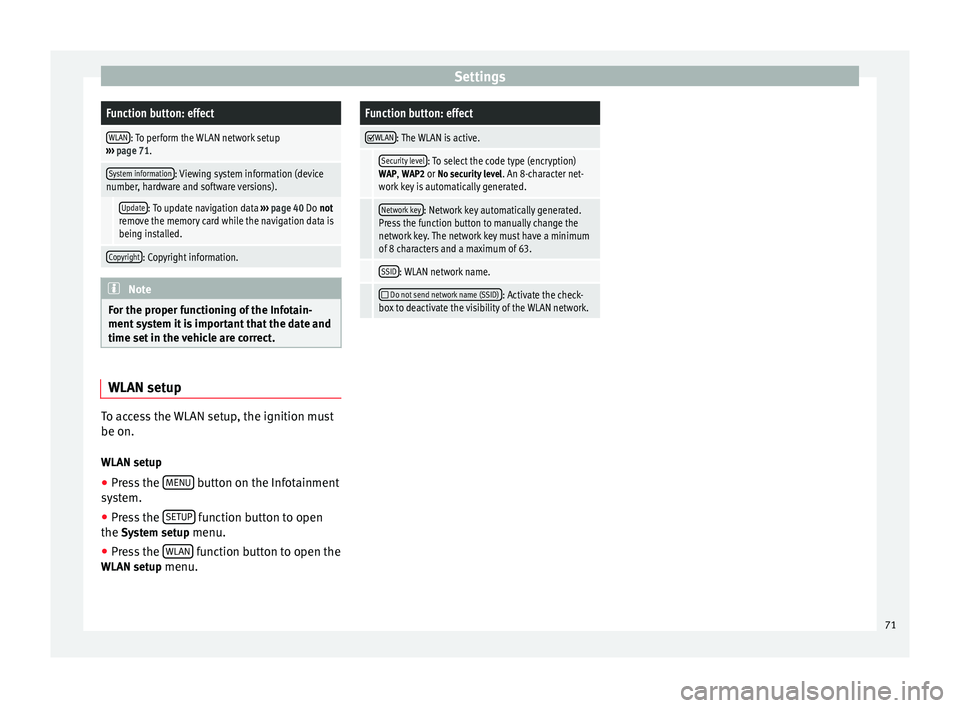
SettingsFunction button: effect
WLAN: To perform the WLAN network setup
››› page 71.
System information: Viewing system information (device
number, hardware and software versions).
Update: To update navigation data ››› page 40 Do not
remove the memory card while the navigation data is
being installed.
Copyright: Copyright information. Note
For the proper functioning of the Infotain-
ment system it is important that the date and
time set in the vehicle are correct. WLAN setup
To access the WLAN setup, the ignition must
be on.
WLAN setup ● Press the MENU button on the Infotainment
system.
● Press the SETUP function button to open
the System setup menu.
● Press the WLAN function button to open the
WLAN setup menu.
Function button: effect
WLAN: The WLAN is active.
Security level: To select the code type (encryption)
WAP , WAP2 or No security level . An 8-character net-
work key is automatically generated.
Network key: Network key automatically generated.
Press the function button to manually change the
network key. The network key must have a minimum
of 8 characters and a maximum of 63.
SSID: WLAN network name.
Do not send network name (SSID): Activate the check-
box to deactivate the visibility of the WLAN network. 71
Page 78 of 84
Index
Images display . . . . . . . . . . . . . . . . . . . . . . . . . . . . . . . . . 38
main menu . . . . . . . . . . . . . . . . . . . . . . . . . . . . . 38
setup . . . . . . . . . . . . . . . . . . . . . . . . . . . . . . . . . . 39
Infotainment buttons . . . . . . . . . . . . . . . . . . . . . . . . 5
Infotainment system buttons . . . . . . . . . . . . . . . . . 6
Input mask . . . . . . . . . . . . . . . . . . . . . . . . . . . . . . . . 9
Interference from a mobile telephone . . . . . . . . . . 6
Introduction . . . . . . . . . . . . . . . . . . . . . . . . . . . . . . . 3
iPad . . . . . . . . . . . . . . . . . . . . . . . . . . . . . . . . . . . . . 31
iPhone . . . . . . . . . . . . . . . . . . . . . . . . . . . . . . . . . . . 31
iPod . . . . . . . . . . . . . . . . . . . . . . . . . . . . . . . . . . . . . 31
K Keypad . . . . . . . . . . . . . . . . . . . . . . . . . . . . . . . . . . . 9
L Lowering the volume . . . . . . . . . . . . . . . . . . . . . . . . 6
M Main menu images . . . . . . . . . . . . . . . . . . . . . . . . . . . . . . . . . 38
MEDIA . . . . . . . . . . . . . . . . . . . . . . . . . . . . . . . . . 25
PHONE . . . . . . . . . . . . . . . . . . . . . . . . . . . . . . . . . 60
RADIO . . . . . . . . . . . . . . . . . . . . . . . . . . . . . . . . . 14
setup . . . . . . . . . . . . . . . . . . . . . . . . . . . . . . . . . . 70
sound . . . . . . . . . . . . . . . . . . . . . . . . . . . . . . . . . 72
Map display change . . . . . . . . . . . . . . . . . . . . . . . . . . . . . . . . 46
function buttons . . . . . . . . . . . . . . . . . . . . . . . . . 47
MEDIA AUX-IN multimedia socket . . . . . . . . . . . . . . . . . 32
bit rate . . . . . . . . . . . . . . . . . . . . . . . . . . . . . . . . . 23
Bluetooth audio . . . . . . . . . . . . . . . . . . . . . . . . . 33
CD mode . . . . . . . . . . . . . . . . . . . . . . . . . . . . . . . 30
CD with audio data . . . . . . . . . . . . . . . . . . . . . . . 23
Change media source . . . . . . . . . . . . . . . . . . . . 27 Changing track . . . . . . . . . . . . . . . . . . . . . . . . . . 27
Copyright . . . . . . . . . . . . . . . . . . . . . . . . . . . . . . . 23
DVD mode . . . . . . . . . . . . . . . . . . . . . . . . . . . . . . 30
external data storage device connected to
USB port . . . . . . . . . . . . . . . . . . . . . . . . . . . . . 31
Fast forward . . . . . . . . . . . . . . . . . . . . . . . . . . . . 27
Fast reverse . . . . . . . . . . . . . . . . . . . . . . . . . . . . . 27
Faulty CD or DVD . . . . . . . . . . . . . . . . . . . . . . . . . 30
function buttons . . . . . . . . . . . . . . . . . . . . . . 25, 26
hard drive memory (jukebox SSD) . . . . . . . . . . . 34
insert a memory card . . . . . . . . . . . . . . . . . . . . . 30
insert and eject a CD or DVD . . . . . . . . . . . . . . . 30
iPod, iPad and iPhone . . . . . . . . . . . . . . . . . . . . 31
main menu . . . . . . . . . . . . . . . . . . . . . . . . . . . . . 25
MEDIA-IN . . . . . . . . . . . . . . . . . . . . . . . . . . . . . . . 31
Media mode . . . . . . . . . . . . . . . . . . . . . . . . . . . . 23
Media source selection menu . . . . . . . . . . . . . . 27
memory card unreadable . . . . . . . . . . . . . . . . . . 30
messages and symbols . . . . . . . . . . . . . . . . . . . 26
MP3 files . . . . . . . . . . . . . . . . . . . . . . . . . . . . . . . 23
notes . . . . . . . . . . . . . . . . . . . . . . . . . . . . . . . . . . 25
Playing order . . . . . . . . . . . . . . . . . . . . . . . . . . . . 25
playlists . . . . . . . . . . . . . . . . . . . . . . . . . . . . . . . . 24
play modes . . . . . . . . . . . . . . . . . . . . . . . . . . . . . 26
prepare a memory card for removal . . . . . . . . . 30
random play (Mix) . . . . . . . . . . . . . . . . . . . . . . . 26
remove a memory card . . . . . . . . . . . . . . . . . . . . 30
repeat function (Repeat) . . . . . . . . . . . . . . . . . . 26
requirements . . . . . . . . . . . . . . . . . . . . . . . . . . . 23
restrictions . . . . . . . . . . . . . . . . . . . . . . . . . . . . . 24
Scan (SCAN) . . . . . . . . . . . . . . . . . . . . . . . . . . . . 26
select data storage device . . . . . . . . . . . . . . . . . 27
select track . . . . . . . . . . . . . . . . . . . . . . . . . . . . . 28
setup . . . . . . . . . . . . . . . . . . . . . . . . . . . . . . . . . . 36
store audio files (jukebox SSD) . . . . . . . . . . . . . 34
track information . . . . . . . . . . . . . . . . . . . . . . . . 26
track list . . . . . . . . . . . . . . . . . . . . . . . . . . . . . . . . 28
Unreadable CD or DVD . . . . . . . . . . . . . . . . . . . . 30 WLAN audio . . . . . . . . . . . . . . . . . . . . . . . . . . . . 36
WMA files . . . . . . . . . . . . . . . . . . . . . . . . . . . . . . 23
Media playback sources . . . . . . . . . . . . . . . . . . . . 27 CD . . . . . . . . . . . . . . . . . . . . . . . . . . . . . . . . . . . . 27
SD card . . . . . . . . . . . . . . . . . . . . . . . . . . . . . . . . 27
select . . . . . . . . . . . . . . . . . . . . . . . . . . . . . . . . . . 27
USB . . . . . . . . . . . . . . . . . . . . . . . . . . . . . . . . . . . 27
Media sources Bluetooth audio . . . . . . . . . . . . . . . . . . . . . . . . . 27
Memory card insert . . . . . . . . . . . . . . . . . . . . . . . . . . . . . . . . . . 30
prepare a memory card for removal . . . . . . . . . 30
remove . . . . . . . . . . . . . . . . . . . . . . . . . . . . . . . . 30
select . . . . . . . . . . . . . . . . . . . . . . . . . . . . . . . . . . 27
unreadable . . . . . . . . . . . . . . . . . . . . . . . . . . . . . 30
Menu summary (MENU) . . . . . . . . . . . . . . . . . . . . . . 6
Messages navigation . . . . . . . . . . . . . . . . . . . . . . . . . . . . . . 40
MirrorLink™ . . . . . . . . . . . . . . . . . . . . . . . . . . . . . . 67 Setup . . . . . . . . . . . . . . . . . . . . . . . . . . . . . . . . . . 68
Mute . . . . . . . . . . . . . . . . . . . . . . . . . . . . . . . . . . . . . 7
My destinations . . . . . . . . . . . . . . . . . . . . . . . . . . . 44
My tours navigation . . . . . . . . . . . . . . . . . . . . . . . . . . . . . . 44
N
Navigation announcements . . . . . . . . . . . . . . . . . 43
Navigation data . . . . . . . . . . . . . . . . . . . . . . . . . . . 40 data update . . . . . . . . . . . . . . . . . . . . . . . . . . . . 40
install . . . . . . . . . . . . . . . . . . . . . . . . . . . . . . . . . 40
NAV (navigation) . . . . . . . . . . . . . . . . . . . . . . . . . . 40 after starting route guidance . . . . . . . . . . . . . . . 42
areas not fully digitalised . . . . . . . . . . . . . . . . . 40
avoid congestion . . . . . . . . . . . . . . . . . . . . . . . . 47
change destination . . . . . . . . . . . . . . . . . . . . . . 43
change view . . . . . . . . . . . . . . . . . . . . . . . . . . . . 46
compass display . . . . . . . . . . . . . . . . . . . . . . . . . 46
76
Page 79 of 84
Index
congestion ahead . . . . . . . . . . . . . . . . . . . . . . . . 43
contacts . . . . . . . . . . . . . . . . . . . . . . . . . . . . . . . . 44
data update . . . . . . . . . . . . . . . . . . . . . . . . . . . . 40
Demo mode . . . . . . . . . . . . . . . . . . . . . . . . . . . . 49
destination memory . . . . . . . . . . . . . . . . . . . . . . 44
destinations and contacts . . . . . . . . . . . . . . . . . 44
dynamic route guidance . . . . . . . . . . . . . . . 43, 47
entering destination . . . . . . . . . . . . . . . . . . . . . . 41
entering the home address . . . . . . . . . . . . . . . . 44
enter new destination . . . . . . . . . . . . . . . . . . . . 42
enter stopover . . . . . . . . . . . . . . . . . . . . . . . . . . . 43
exclude section . . . . . . . . . . . . . . . . . . . . . . . . . . 43
function buttons . . . . . . . . . . . . . . . . . . . . . . . . . 41
importing Personal POI . . . . . . . . . . . . . . . . . . . 48
importing vCards . . . . . . . . . . . . . . . . . . . . . . . . 48
installing navigation data . . . . . . . . . . . . . . . . . 40
List of driving manoeuvres . . . . . . . . . . . . . . . . . 46
map display . . . . . . . . . . . . . . . . . . . . . . . . . . . . 47
map, select the destination on the map . . . . . . 42
messages and symbols . . . . . . . . . . . . . . . . . . . 41
my destinations . . . . . . . . . . . . . . . . . . . . . . . . . 44
my tours . . . . . . . . . . . . . . . . . . . . . . . . . . . . . . . 44
navigation announcements . . . . . . . . . . . . . . . . 43
navigation area . . . . . . . . . . . . . . . . . . . . . . . . . . 40
Navigation main menu . . . . . . . . . . . . . . . . . . . . 41
navigation messages . . . . . . . . . . . . . . . . . . . . . 40
opening the main menu . . . . . . . . . . . . . . . . . . . 41
points of interest . . . . . . . . . . . . . . . . . . . . . 42, 45
possible limitations . . . . . . . . . . . . . . . . . . . . . . 40
road sign indicators . . . . . . . . . . . . . . . . . . . . . . 49
route information . . . . . . . . . . . . . . . . . . . . . . . . 43
route list . . . . . . . . . . . . . . . . . . . . . . . . . . . . . . . 43
search for point of interest . . . . . . . . . . . . . . . . . 46
setup . . . . . . . . . . . . . . . . . . . . . . . . . . . . . . . . . . 49
show traffic congestion . . . . . . . . . . . . . . . . . . . 47
split screen . . . . . . . . . . . . . . . . . . . . . . . . . . . . . 46
stop route guidance . . . . . . . . . . . . . . . . . . . . . . 43 store position . . . . . . . . . . . . . . . . . . . . . . . . . . . 44
tour mode . . . . . . . . . . . . . . . . . . . . . . . . . . . . . . 44
TRAFFIC . . . . . . . . . . . . . . . . . . . . . . . . . . . . . . . . 47
traffic reports . . . . . . . . . . . . . . . . . . . . . . . . . . . 47
updating navigation data . . . . . . . . . . . . . . . . . 40
O On-screen keypad . . . . . . . . . . . . . . . . . . . . . . . . . . 9
Online traffic information . . . . . . . . . . . . . . . . . . . 47
Operation additional displays . . . . . . . . . . . . . . . . . . . . . . . 10
Changing the volume . . . . . . . . . . . . . . . . . . . . . . 7
function buttons . . . . . . . . . . . . . . . . . . . . . . . . . . 8
general instructions for use . . . . . . . . . . . . . . . . . 6
Infotainment system buttons . . . . . . . . . . . . . . . . 6
input . . . . . . . . . . . . . . . . . . . . . . . . . . . . . . . . . . . 9
input mask . . . . . . . . . . . . . . . . . . . . . . . . . . . . . . 9
on-screen keypad . . . . . . . . . . . . . . . . . . . . . . . . . 9
PHONE . . . . . . . . . . . . . . . . . . . . . . . . . . . . . . 56, 59
RADIO . . . . . . . . . . . . . . . . . . . . . . . . . . . . . . . . . 14
rotary knobs . . . . . . . . . . . . . . . . . . . . . . . . . . . . . 6
search lists . . . . . . . . . . . . . . . . . . . . . . . . . . . . . . 9
slider . . . . . . . . . . . . . . . . . . . . . . . . . . . . . . . . . . . 9
slide (screen) . . . . . . . . . . . . . . . . . . . . . . . . . . . . 9
sound suppression (mute) . . . . . . . . . . . . . . . . . . 7
switch on and switch off . . . . . . . . . . . . . . . . . . . 7
touchscreen . . . . . . . . . . . . . . . . . . . . . . . . . . . . . 8
voice control . . . . . . . . . . . . . . . . . . . . . . . . . . . . 11
P
Personal POI importing . . . . . . . . . . . . . . . . . . . . . . . . . . . . . . 48
PHONE A2DP . . . . . . . . . . . . . . . . . . . . . . . . . . . . . . . . . . 57
Areas where special regulations apply . . . . . . . 57
Bluetooth profiles . . . . . . . . . . . . . . . . . . . . . . . . 57
Bluetooth setup . . . . . . . . . . . . . . . . . . . . . . . . . 65 call lists . . . . . . . . . . . . . . . . . . . . . . . . . . . . . . . . 64
call mailbox . . . . . . . . . . . . . . . . . . . . . . . . . . . . . 61
connect and disconnect the telephone man-
agement system . . . . . . . . . . . . . . . . . . . . . . . 65
connection via the Infotainment system . . . . . . 58
contacts . . . . . . . . . . . . . . . . . . . . . . . . . . . . . . . . 62
description of the function . . . . . . . . . . . . . . . . 57
dial . . . . . . . . . . . . . . . . . . . . . . . . . . . . . . . . 61, 62
Display and symbols . . . . . . . . . . . . . . . . . . . . . 61
enter telephone number . . . . . . . . . . . . . . . . . . 61
Explosion risk areas . . . . . . . . . . . . . . . . . . . . . . 57
favourites (speed dial buttons) . . . . . . . . . . . . . 65
general information . . . . . . . . . . . . . . . . . . . . . . 56
GSM network . . . . . . . . . . . . . . . . . . . . . . . . . . . 57
HFP . . . . . . . . . . . . . . . . . . . . . . . . . . . . . . . . . . . 57
main menu . . . . . . . . . . . . . . . . . . . . . . . . . . . . . 60
mobile telephone pairing . . . . . . . . . . . . . . . . . 58
pairing of mobile telephone . . . . . . . . . . . . . . . 58
pairing via the Infotainment system . . . . . . . . . 58
phonebook . . . . . . . . . . . . . . . . . . . . . . . . . . . . . 62
setup . . . . . . . . . . . . . . . . . . . . . . . . . . . . . . . . . . 65
short messages (SMS) . . . . . . . . . . . . . . . . . . . . 63
telephone management system . . . . . . . . . 56, 59
user profile setup . . . . . . . . . . . . . . . . . . . . . . . . 66
Voice control . . . . . . . . . . . . . . . . . . . . . . . . . . . . 11
Physical buttons see: Infotainment system buttons . . . . . . . . . . . . 6
Play CD . . . . . . . . . . . . . . . . . . . . . . . . . . . . . . . . . . . . 30
DVD . . . . . . . . . . . . . . . . . . . . . . . . . . . . . . . . . . . 30
external data storage device (USB) . . . . . . . . . . 31
MEDIA . . . . . . . . . . . . . . . . . . . . . . . . . . . . . . . . . 25
RADIO . . . . . . . . . . . . . . . . . . . . . . . . . . . . . . . . . 14
SD card . . . . . . . . . . . . . . . . . . . . . . . . . . . . . . . . 25
track . . . . . . . . . . . . . . . . . . . . . . . . . . . . . . . . . . . 28
Playback AUX-IN . . . . . . . . . . . . . . . . . . . . . . . . . . . . . . . . . 32
77