bluetooth Seat Leon 5D 2016 MEDIA SYSTEM PLUS - NAVI SYSTEM - NAVI SYSTEM PLUS
[x] Cancel search | Manufacturer: SEAT, Model Year: 2016, Model line: Leon 5D, Model: Seat Leon 5D 2016Pages: 96, PDF Size: 2.6 MB
Page 64 of 96
Telephone management system (PHONE)
Telephone management sys-
t em (PHONE)
Intr oduction t
o the telephone
management system
General information
›› ›
table on page 2
The Telephone functions described below
can be used through the Infotainment system
if there is a mobile telephone connected to it
via Bluetooth ®
››› page 64.
In order for the mobile telephone to be able
to connect to the Infotainment system the tel-
ephone must be equipped with Bluetooth®
.
If there is no mobile telephone connected to
the Infotainment system, the telephone man-
agement system will not be available.
The instructions shown on the screen for the
telephone menus will depend on the mobile
telephone used. There may be variations.
Only use compatible Bluetooth ®
devices. For
further information on compatible Blue-
tooth ®
products, ask your nearest SEAT deal-
er or check on the internet.
Use the instruction manual of the mobile tel-
ephone and of any accessories. If you detect any operating issues between
your mo
b
ile telephone and the Infotainment
system, restart your mobile by switching it off
and on again.
You may experience poor reception or may be
cut off in areas where the signal is weak.
Most electronic devices are shielded against
HF (high-frequency) signals. In any case, the
electronic equipment may not be protected
from the HF signals of the telephone man-
agement system. This may cause interfer-
ence. WARNING
Speaking by telephone and operating the mo-
bi l
e telephone whilst driving can distract you
from the road and cause an accident.
● Always drive carefully and responsibly.
● Select volume settings that allow you to
eas
ily hear signals from outside the vehicle
at all times (e.g. emergency services sirens
and horns).
● In areas of little or no coverage or, in some
case
s, in a tunnel, garage or underpass, your
call may be cut off and you may not be able to
make even emergency calls. WARNING
If a mobile telephone is not secured or is in-
corr ectly
secured in the vehicle, it could move
around the passenger compartment in the event of a sudden driving manoeuvre or emer-
gency
s
top, resulting in injury.
● While the vehicle is in motion, always se-
cure the mo
bile telephone properly outside
the airbag deployment zone. WARNING
Mobile telephones may interfere with and al-
t er the c orr
ect operation of pacemakers if
they are carried directly over them.
● Maintain a minimum distance of at least
20 centimetre
s between the aerials of the
mobile telephone and the pacemaker, as mo-
bile phones may affect the functioning of
pacemakers.
● Do not carry your switched-on mobile tele-
phone in your br
east pocket directly over the
pacemaker.
● If you suspect interference, switch off the
mobi
le telephone immediately. CAUTION
High speeds, poor weather or road conditions
and the quality of
reception can all affect the
quality of a telephone conversation in the ve-
hicle. Note
● Re s
trictions on the use of devices using
Bluetooth ®
technology may apply in some
countries. For further information, contact the
local authorities. 62
Page 65 of 96
Telephone management system (PHONE)
●
If y
ou wish to connect a device to the tele-
phone management system via Bluetooth ®
technology, consult the safety warnings in its
instruction manual. Only use compatible
Bluetooth ®
devices. Areas where special regulations apply
Switch off the mobile telephone and the mo-
bi
l
e Bluetooth function in places with a risk
of explosion. In the majority of cases, these
places are signposted, but not always clearly
››› in General information on page 62.
They
inc lude, f
or example:
● the vicinity of chemical pipelines and tanks
● The lower decks of boats and ferries.
● In the proximity of vehicles that run on liq-
uid gas
(such as propane or butane).
● places where the air is laden with chemi-
cals
or particles such as flour, dust or metal
powder.
● all other places where the vehicle engine
must
be switched off. WARNING
Switch off the mobile phone in areas with a
risk of
explosion! The mobile telephone can
automatically connect to the mobile tele-
phone network again if it loses the Blue-
tooth ®
connection to the telephone manage-
ment system. CAUTION
In areas where special regulations apply or
the use of mo
bile telephones is prohibited,
both the telephone and the telephone man-
agement system must be switched off. The
radiation produced by the mobile telephone
when switched on may interfere with sensi-
tive technical and medical equipment, possi-
bly resulting in a malfunction or damage to
the equipment. Bluetooth
® Bluetooth
®
tec
hno
logy allows a mobile tele-
phone to be connected to your vehicle's tele-
phone management system. In order to use
the telephone management system with a
mobile telephone with Bluetooth ®
technolo-
gy, it is first necessary to pair them.
Some Bluetooth ®
mobile telephones detect
and automatically connect when turning on
the ignition if a connection has been previ-
ously established. For this to take place the
telephone must be switched on and its Blue-
tooth ®
function activated, and there must be
no active Bluetooth ®
connection with other
devices.
Bluetooth ®
connections are free.
Bluetooth ®
is a registered trademark of
Bluetooth ®
SIG, Inc. Bluetooth profiles
®
When a mobi
le phone is connected to the tel-
ephone management system, a data ex-
change takes place via one of the Bluetooth ®
profiles.
● Hands-free Bluetooth profile (HFP): If a mo-
bi
le telephone is connected to the telephone
manager through the HFP, calls can be made
wirelessly through the hands-free device.
This function also requires other Bluetooth
profiles such as the phonebook download
and instant messaging.
● Audio profile (A2DP): Bluetooth profi
le for
transmitting audio signals with stereo quali-
ty. This function can also connect other addi-
tional Bluetooth profiles for viewing tracks
and for controlling playback on the mobile
device. Note
To prevent them from being heard through
the spe ak
ers, the button and mobile tele-
phone alert tones must be disconnected.
Where necessary, disconnect the headset
from the mobile telephone you wish to con-
nect to the system. 63
Page 66 of 96
Telephone management system (PHONE)
Pair and connect a mobile telephone
t o the Inf
ot
ainment systemIn order to manage a mobile telephone via
the Infot
ainment
system, it is necessary to
pair both devices once.
For your safety, we recommend you make the
link when the vehicle is stationary. In some
countries it is not possible to perform the
pairing with the vehicle running.
Conditions
You must guarantee the following setup in
the mobile phone and the Infotainment sys-
tem:
● The ignition must be switched on.
● The Bluetooth ®
fu
nction of the mobile tele-
phone and the Infotainment system must be
active as well as visibility.
● The keypad lock on the mobile telephone
mus
t be deactivated.
Follow instructions in the manual for the mo-
bile telephone.
After turning on the ignition, the visibility of
the Bluetooth ®
function activates.
During the pairing process it is necessary to
enter data via the mobile telephone's key-
pad. To do so, the mobile telephone must be
ready. Starting mobile telephone pairing
● Make sure the Bluetooth function of the
mobi
le device is active and visible.
● Press the MENU infotainment button
› ›
›
Fig. 1 1 and then select
Tel
ephone .
● Press the Find telephone function button and
then R
e
s
ults .
OR:
● Press the MENU infotainment button
› ›
›
Fig. 1 1 and then select
Tel
ephone .
● Press the Setup function button.
● Press the Sel
ect
t
elephone function button
and then R
e
s
ults .
OR:
● Press the MENU infotainment button
› ›
›
Fig. 1 1 and then select
Tel
ephone .
● Press the Setup function button.
● Press the Bluet
ooth function button.
● Press the Find dev
ic
e
s function button and
then R
e
s
ults .
OR:
● Connect from the mobile device itself.
The n ame of
the Bluet
ooth function of your
Infotainment system will be displayed in the
main PHONE screen and you can edit this via
the Bluetooth Setup menu
››
› p
age 72 The search process can take up to 1 minute.
On the scr
een the system will dynamically
update the names of the Bluetooth devices
found.
As soon as the search is completed, the
names of the Bluetooth ®
devices found are
displayed on-screen.
● In the Infotainment system select the mo-
bil
e telephone to which you want to connect
from the list of Bluetooth devices found. In
certain circumstances, it is possible that to
finish the connection between the two devi-
ces, you must enter additional data in the
mobile telephone and Infotainment system.
● If necessary, confirm the link to the mobile
telephone.
● U
se your mobile telephone to enter and
confirm y
our PIN code, as indicated in the
display of the infotainment system.
OR:
● Compare the PIN code shown on the dis-
pla
y of the Infotainment system with that
shown on the mobile telephone. If they
match, confirm on both devices.
The infotainment system and the mobile tele-
phone will now be connected to each other.
When the pairing has been finalized correct-
ly, the PHONE main menu will appear. The
phonebook and call lists stored in the mobile
phone will be loaded once the requests have
64
Page 67 of 96
Telephone management system (PHONE)
been accepted in the mobile phone. The du-
r ation of
the lo
ading process depends on the
amount of data stored on the mobile tele-
phone. After loading, the data will be availa-
ble on the Infotainment system.
Pairing and connection of mobile telephones
You can pair up to 20 mobile telephones to
the Infotainment system, but there can only
be two mobile phones simultaneously con-
nected as hands-free, and a third device as
BT audio at any time.
When the Infotainment system is switched
on, it automatically connects to the last con-
nected mobile telephone. If it is not possible
to connect to this mobile telephone, the tele-
phone management system will try to auto-
matically connect to the next mobile tele-
phone on the list of paired devices.
The maximum range of the Bluetooth ®
is ap-
proximate. 10 metres. The active Bluetooth ®
connection disconnects if this distance is ex-
ceeded. The connection is automatically re-
established as soon as the device is once
again within Bluetooth ®
range.
If the maximum number of paired devices is
reached and you wish to pair another one to
the system, it will automatically replace the
one least used recently. If you wish to replace
it with another one, the user must erase it be-
forehand. To do so: ●
Pres s the Setup button on the device while
in telephone mode.
● Press the function button Bluetooth setup .
● Activate the P
air
ed dev
ices function button.
● In the list of paired devices, press the function button next to the mobile telephone
t
o be del
et
ed and then press Delete to con-
firm the process. Note
● It m a
y be necessary to confirm the phone-
book data transfer request on the mobile tel-
ephone.
● Check that there are no requests pending
accept
ance in your mobile phone. If there are,
this could block some of the functions in the
PHONE menu. Description of the telephone
m
an
ag
ement system
Introduction Some functions and setup can only be per-
f
ormed when the
v
ehicle is stopped and are
not available on all mobile telephones.
With the help of the telephone manager, up
to 3 mobile telephones can be connected to
the Infotainment system via the Bluetooth
profiles (for example, one used as a Blue- tooth-audio player and/or another two as
hands-fr
ee telephones). Note
● Us in
g a mobile telephone inside the vehicle
may provoke noise in the speakers.
● Some networks may not recognise all lan-
guage ch
aracters or offer all services. PHONE main menu
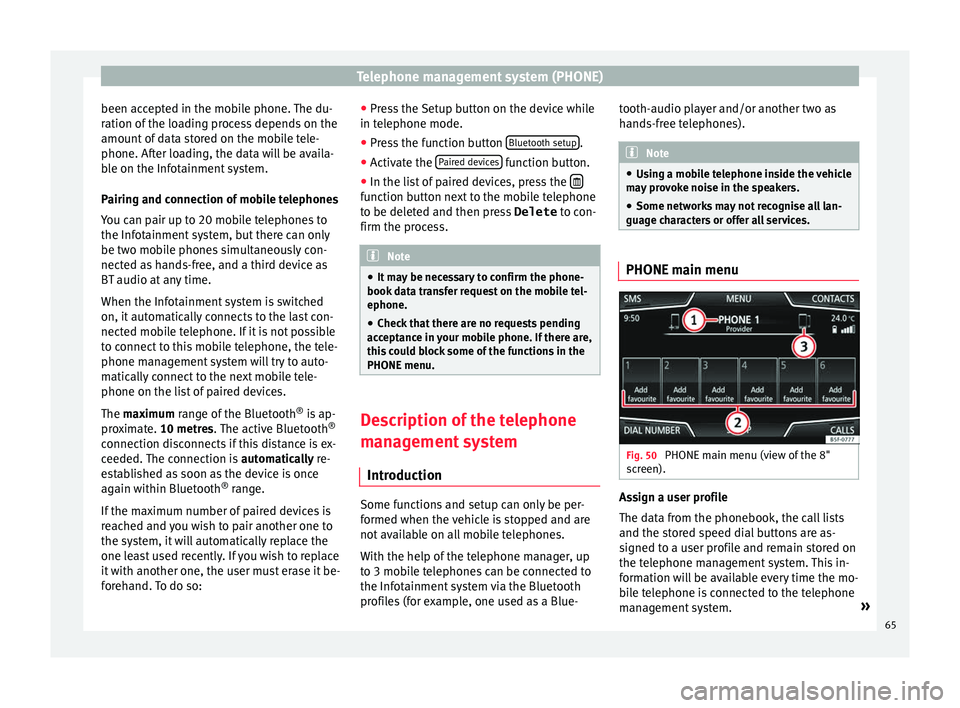
Fig. 50
PHONE main menu (view of the 8"
s c
r
een). Assign a user profile
The d
at
a fr
om the phonebook, the call lists
and the stored speed dial buttons are as-
signed to a user profile and remain stored on
the telephone management system. This in-
formation will be available every time the mo-
bile telephone is connected to the telephone
management system. »
65
Page 69 of 96
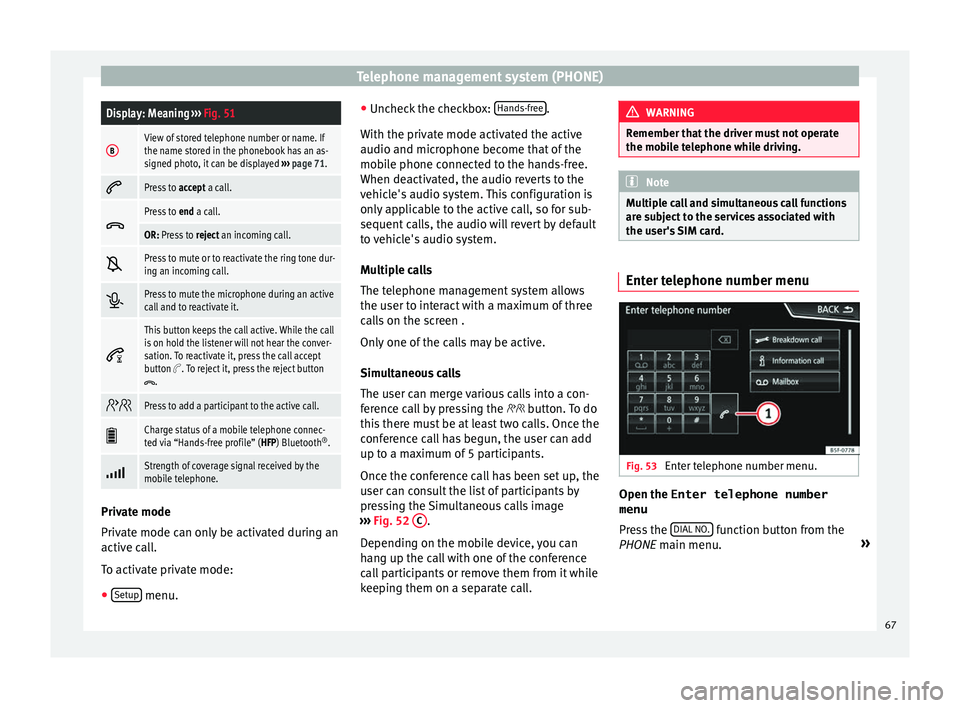
Telephone management system (PHONE)Display: Meaning
››› Fig. 51
BView of stored telephone number or name. If
the name stored in the phonebook has an as-
signed photo, it can be displayed ››› page 71.
Press to
accept a call.
Press to
end a call.
OR: Press to reject an incoming call.
Press to mute or to reactivate the ring tone dur-
ing an incoming call.
Press to mute the microphone during an active
call and to reactivate it.
This button keeps the call active. While the call
is on hold the listener will not hear the conver-
sation. To reactivate it, press the call accept
button
. To reject it, press the reject button.
Press to add a participant to the active call.
Charge status of a mobile telephone connec-
ted via “Hands-free profile” (HFP) Bluetooth
®
.
Strength of coverage signal received by the
mobile telephone.
Private mode
Priv
at
e mode c
an only be activated during an
active call.
To activate private mode:
● Setup menu. ●
Unc hec
k
the checkbox: Hands-free .
W ith the priv
at
e mode activated the active
audio and microphone become that of the
mobile phone connected to the hands-free.
When deactivated, the audio reverts to the
vehicle's audio system. This configuration is
only applicable to the active call, so for sub-
sequent calls, the audio will revert by default
to vehicle's audio system.
Multiple calls
The telephone management system allows
the user to interact with a maximum of three
calls on the screen .
Only one of the calls may be active.
Simultaneous calls
The user can merge various calls into a con-
ference call by pressing the button. To do
this there must be at least two calls. Once the
conference call has begun, the user can add
up to a maximum of 5 participants.
Once the conference call has been set up, the
user can consult the list of participants by
pressing the Simultaneous calls image
››› Fig. 52 C .
D ependin
g on the mo
bile device, you can
hang up the call with one of the conference
call participants or remove them from it while
keeping them on a separate call. WARNING
Remember that the driver must not operate
the mob i
le telephone while driving. Note
Multiple call and simultaneous call functions
are s ub
ject to the services associated with
the user's SIM card. Enter telephone number menu
Fig. 53
Enter telephone number menu. Open the
Enter telephone number
menu
Pr e
s
s the DIAL NO. function button from the
PHONE m ain menu. »
67
Page 73 of 96
Telephone management system (PHONE)Display: Meaning
Dialled numbers: Indicates the numbers dialled on
the mobile telephone and on the Infotainment
system telephone management system.
Received calls: Indicates the numbers of the calls
received on the mobile telephone and on the Info-
tainment system telephone management system. Note
The availability of the call lists will depend on
the mob i
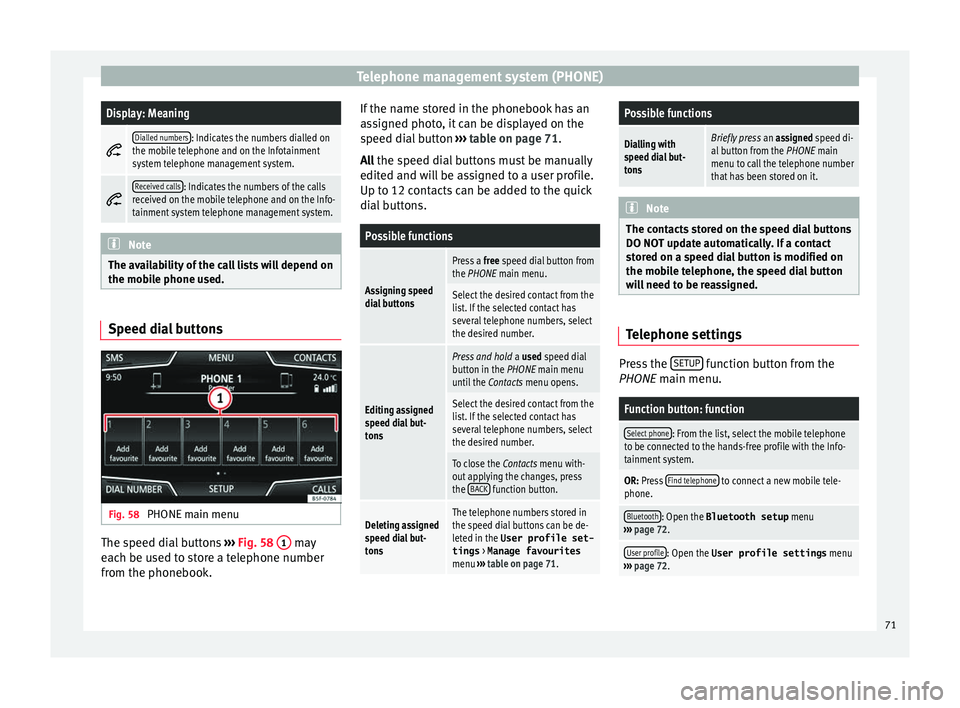
le phone used. Speed dial buttons
Fig. 58
PHONE main menu The speed dial buttons
››
›
Fig. 58 1 may
e ac
h be u
sed to store a telephone number
from the phonebook. If the name stored in the phonebook has an
ass
igned photo, it can be displayed on the
speed dial button ››› table on page 71.
All the speed dial buttons must be manually
edited and will be assigned to a user profile.
Up to 12 contacts can be added to the quick
dial buttons.
Possible functions
Assigning speed
dial buttons
Press a free speed dial button from
the PHONE main menu.
Select the desired contact from the
list. If the selected contact has
several telephone numbers, select
the desired number.
Editing assigned
speed dial but-
tons
Press and hold a used speed dial
button in the PHONE main menu
until the Contacts menu opens.
Select the desired contact from the
list. If the selected contact has
several telephone numbers, select
the desired number.
To close the Contacts menu with-
out applying the changes, press
the BACK
function button.
Deleting assigned
speed dial but-
tonsThe telephone numbers stored in
the speed dial buttons can be de-
leted in the User profile set-
tings
> Manage favourites
menu ››› table on page 71.
Possible functions
Dialling with
speed dial but-
tonsBriefly press an assigned speed di-
al button from the PHONE main
menu to call the telephone number
that has been stored on it. Note
The contacts stored on the speed dial buttons
DO NOT upd at
e automatically. If a contact
stored on a speed dial button is modified on
the mobile telephone, the speed dial button
will need to be reassigned. Telephone settings
Press the
S
ETUP function button from the
PHONE m ain menu.
Function button: function
Select phone: From the list, select the mobile telephone
to be connected to the hands-free profile with the Info-
tainment system.
OR: Press Find telephone to connect a new mobile tele-
phone.
Bluetooth: Open the Bluetooth setup menu
››› page 72.
User profile: Open the User profile settings menu
››› page 72. 71
Page 74 of 96
Telephone management system (PHONE)
Bluetooth ®
settin g
s In the PHONE main menu, pr
e ss the SETUP function button and then the
Bluetooth func-
tion butt on.
Function button: function
Bluetooth: Press to deactivate Bluetooth
®
. Disconnects
all active connections.
Visibility: Activation and deactivation of Bluetooth ®
visi-
bility.
Visible: Bluetooth ®
visibility is active.
Hidden: Bluetooth ®
visibility is deactivated. Blue-
tooth ®
visibility must be active for the external
pairing of a Bluetooth ®
device with the Infotain-
ment system. If you have a Bluetooth audio device
active and playing, the visibility is automatically
set to Hidden .
Name: Viewing and changing the name the Bluetooth ®
of the Infotainment system. This will be the name dis-
played to other Bluetooth ®
devices.
Paired devices: Displays paired devices. To disconnect
and connect Bluetooth ®
devices and Bluetooth ®
pro-
files.
Find devices: Search for visible Bluetooth ®
devices within
the range of the Infotainment system. The maximum
range is approx. 10 metres.
Bluetooth audio (A2DP/AVRCP): This function must be ac-
tive if it is necessary to connect an external audio source
via Bluetooth ®
to the Infotainment system. ››› page 34. User profile settings
In the PHONE main menu, pr
e
ss the SETUP function button and then the
User pr
ofi le func-
tion butt on.
Function button: function
Manage favourites: Editing speed dial buttons.
Speed dial button in use : Press to delete the stored
number.
Speed dial button free : Press to assign a number
from the phonebook to the speed dial button in
question.
Mailbox number: To enter or edit the voicemail number.
Sort by: To set the order of appearance of the entries in
the phonebook ( Forename and surname or vice-versa).
Import contacts: Press to import the phonebook of the
connected telephone, or to update the imported phone-
book.
Reminder: remember your mobile phone: If there is already
an active Bluetooth ®
connection with another mobile
telephone when turning off the ignition, the following
message appears: “Remember your mobile
phone ”.
Show pictures for contactsa)
: If phonebook contacts have
been stored with a photograph, it can be displayed on
the speed dial buttons, on the call lists and in the pho-
nebook.
a) Depending on the mobile phone. Note
Some telephones need to be restarted to re-
down lo
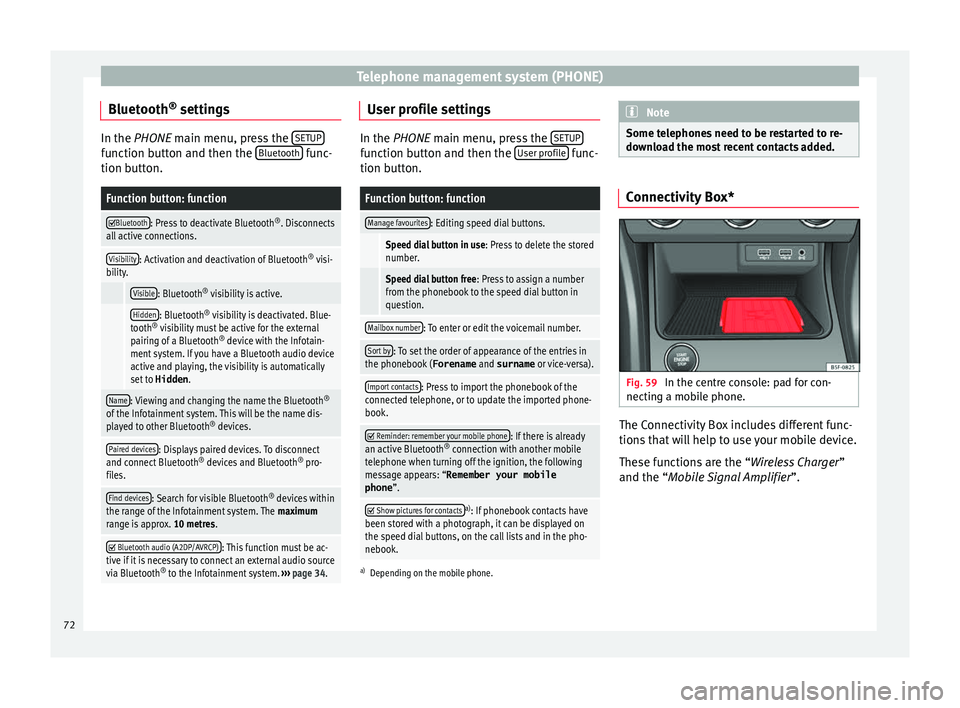
ad the most recent contacts added. Connectivity Box*
Fig. 59
In the centre console: pad for con-
nectin g a mo
b
ile phone. The Connectivity Box includes different func-
tion
s
th
at will help to use your mobile device.
These functions are the “Wireless Charger ”
and the “Mobile Signal Amplifier”.
72
Page 75 of 96
Telephone management system (PHONE)
The “W ireless Charger
” al
lo ws mobile devi-
ces with Qi technology 1)
to be charged with-
out a cable.
The “Mobile Signal Amplifier” allows you to
reduce the radiation in the vehicle and enjoy
better reception.
For safety reasons, it is recommended that
you pair the radio and the mobile device us-
ing Bluetooth and place the mobile phone on
the Connectivity Box pad, so as to have bet-
ter reception without having to handle the
mobile phone.
“Wireless Charger”
To charge your mobile phone wirelessly:
● Place your mobile device with Qi technolo-
gy 1)
in the middl
e of the pad with the screen
facing up ››› Fig. 59.
When you do so, make sure there are no ob-
jects between the pad and the mobile phone.
The mobile phone will start charging auto-
matically. For further information about
whether your mobile device uses Qi technolo-
gy, please check your mobile phone's user
manual or visit the SEAT website:
www.seat.com. “Mobile Signal Amplifier”
To es
tablish a connection with the vehicle's
external aerial:
● Place your mobile device in the middle of
the pad w
ith the screen facing up ››› Fig. 59.
When you do so, make sure there are no ob-
jects between the pad and the mobile phone.
Your mobile phone will automatically be
ready to make use of the external aerial. WARNING
The mobile phone may heat up due to the
wir el
ess charging. Think about the tempera-
ture of your device before you pick it up, and
take care when removing it. Note
● Your mo b
ile device must support the Qi
wireless inductive charging interface stand-
ard for proper operation.
● If your mobile phone has a cover or a pro-
tective c
asing, this may affect the Connectivi-
ty Box functions.
● There must be no metallic objects between
the pad and the mo
bile device that might af-
fect the wireless charging or the connection
with the external aerial. ●
The ch ar
ging time and the temperature
vary in accordance with the device used.
● To avoid malfunction, ensure that the mo-
bil
e phone is correctly placed on the pad.
● The maximum charging capacity is 5 W.
● Qi technology does not allow you to charge
more than one mo
bile device simultaneously.
● No improvement in the transmission quali-
ty can be guar
anteed if there is more than
one mobile phone on the pad. 1)
Qi technology allows you to charge your mobile
phone wir el
essly. 73
Page 82 of 96
Full Link*Function button: function
Activate MirrorLink pop-up windows: Allows MirrorLink
®
pop-up windows in applications that support it. Apple CarPlay™*
3 Valid for compatible iPhone™ mobile telephones.
A l
so, iPhone™ mobile telephones only support Ap-
ple CarPlay™
Apple CarPlay™ is a protocol which enables
communication between a mobile telephone
and the Infotainment system via USB.
This makes it possible to display and operate
the mobile telephone on the Infotainment
system screen.
Requirements
In order to use Apple CarPlay™, the following
requirements must be met:
● The mobile device must be compatible with
App l
e CarPlay™.
● The mobile device must be connected to
the Infotainment
system via USB.
Initiating the connection
In order to initiate the connection with the
mobile device, it is simply necessary to con-
nect it to the Infotainment system via the
USB connection. ●
A pop-up scr
een will appear, which will re-
quest that you accept the device.
● If you are initiating the session using Apple
CarPla
y™ technology it will not be possible
to pair another device via Bluetooth™. The
following message will appear in the main
PHONE menu.
Please disconnect Apple CarPlay
first, before you can connect
another mobile telephone.
Holding down the button on the multi-
function steering wheel will start the Apple™
“voice engine”.
To return to the basic contents of the Infotain-
ment system, press the SEAT icon.
Android Auto™* 3 V
alid for compatible Android mobile phones.
Andr
oid Auto™ is a protocol which enables
communication between a portable device
and the Infotainment system via USB.
This makes it possible to display and operate
the mobile telephone on the Infotainment
system screen.
Requirements
In order to use Android Auto™, the following
requirements must be met: ●
The mob i
le device must be compatible with
Android Auto™.
● The mobile device must be connected to
the Infotainment
system via USB.
● The Android Auto™ application should al-
rea
dy be downloaded and installed on the
mobile device.
Initiating the connection
In order to initiate the connection with the
mobile device, it is simply necessary to con-
nect it to the Infotainment system via the
USB connection, and to be sure to follow the
instructions of the device being paired.
● The first connection to Android Auto™
must
be done while the vehicle is stationary.
● Once the first pop-up window about accept-
ing dat
a transfer between the car and the de-
vice has been accepted, a message will ap-
pear requesting that you check your mobile
device for the confirmations needed to pair it
with the Infotainment system.
● If you are initiating the session using
Android Auto™ t
echnology via USB, the mo-
bile telephone connects automatically via
Bluetooth™ to the Infotainment system tele-
phone and it will not be possible to pair an-
other mobile telephone via Bluetooth™.
Holding down the button on the multi-
function steering wheel will start the
Android™ “voice engine”.
80
Page 85 of 96
Setup
Setup
M enu and sy
s
tem settings
Main menu System settings
›› ›
table on page 2
The selection of possible settings will de-
pend on the country, the unit in question and
the vehicle equipment.
● Press the MENU infotainment button
› ›
›
Fig. 1 1 and then select
Setting
s .
● To adjust the settings for a certain function,
pres
s the appropriate function button in the
main menu. Changes are automatically stor-
ed when a menu is closed.
Function button: function
Screen: To perform screen setup.
Select display mode: Grid or Carousel.
Switch off screen (in 10 seconds): If this function is ac-
tive and the Infotainment system is not in use, the
screen will switch off after approximately 10 sec-
onds. Pressing the screen or pressing one of the Info-
tainment system buttons will switch the screen back
on.
Brightness: To select the brightness level of the
screen.
Day/Night: To select the display type ( Day, Night or
Automatic ).
Function button: function
Touchscreen tone: Confirmation tone for pressing a
function button is activated.
Show clock in standby mode: In standby mode, the cur-
rent time is shown on the Infotainment system dis-
play.
Date and time: To alter the time and date.
Clock time source: To select the time source (GPS or
manual).
GPS: The date and time can be selected using the
Time zone function button. In this case, the Dateand Time function buttons for manually entering
the data will not be active.
Manually: The date and time can be manually ad-
justed using the Date and Time function buttons.
Time: To manually alter the time.
Automatic summer time (DST)*: The time is set auto-
matically.
Time zone: To change to the desired time zone.
Time format: To select the time display format (12- or
24-hour clock).
Date: To adjust the current time.
Date format: To select the display format for the date
(DD.MM.YYYY , YY-MM-DD or MM-DD-YY ).
Idioma/Language: To select the desired language for the
texts and announcements in the voice control system.
Additional keypad languages: To select the additional key-
pad languages.
Function button: function
Units: To set the measurement units for the vehicle dis-
plays.
Distance , vehicle speed , temperature, volume,
consumption and pressure .
Mobile device data transfer
Data transfer for SEAT apps: Allows the exchange of data
between the vehicle and SEAT applications. These
are not personal data.
Use apps to operate: Changes the level of interaction
with the applications.
Deactivate: Limits specific functions that require a
higher level of security. Confirm
: Allows 100% functionality of the App but
with certain actions relating to the Infotainment
system requiring confirmation. Allow
: Allows the execution of all the available
functions from the App.
Voice control: To perform the voice control setup
››› page 12.
Remove safely: To eject the data storage device (SD card
1/SD card 2/USB) from the system. After correctly eject-
ing the data storage device from the system, the func-
tion button becomes inactive (grey colour).
Factory settings: When resetting factory settings, all en-
tries and changes made are deleted, depending on the
selected setup.
Bluetooth: To perform Bluetooth ®
settings ››› page 72.
WLANa)
: To adjust the WLAN mobile hotspot settings
››› page 37.» 83