infotainment Seat Leon 5D 2016 MEDIA SYSTEM TOUCH - COLOUR
[x] Cancel search | Manufacturer: SEAT, Model Year: 2016, Model line: Leon 5D, Model: Seat Leon 5D 2016Pages: 52, PDF Size: 1.5 MB
Page 26 of 52
Media
●
Dependin
g on the external player connec-
ted, the response time of the system can
vary.
● Do not connect an external media player at
the same time t
o play music via Bluetooth®
and via the USB port with the Infotainment
system, as this could cause playback limita-
tions.
● If the external player is an Apple device™,
it c
annot be simultaneously connected by
USB and by Bluetooth. Select a track from the list
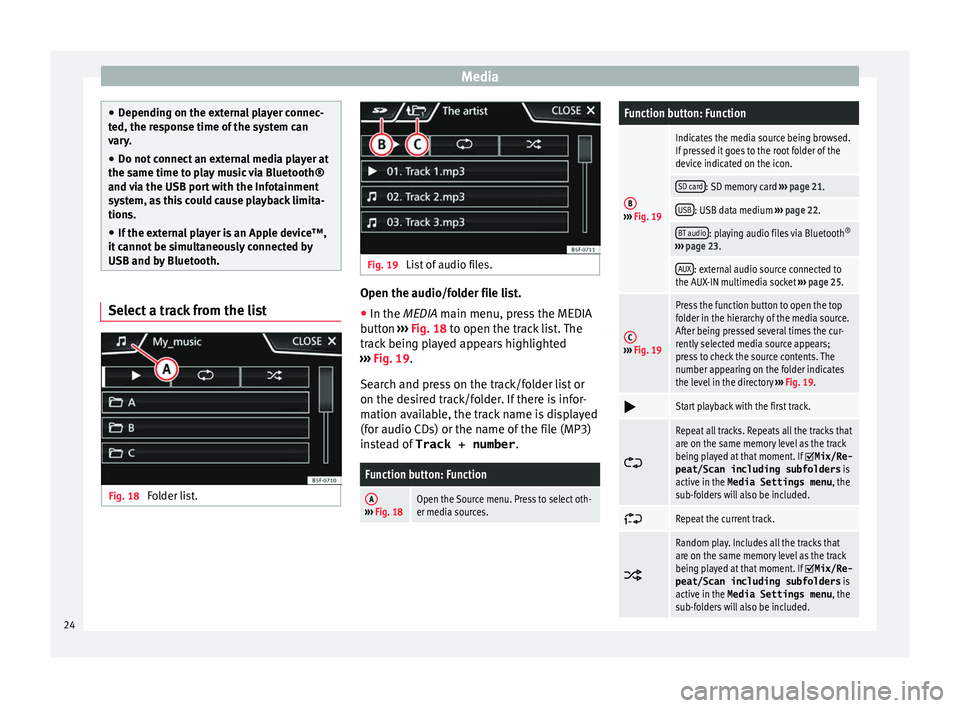
Fig. 18
Folder list. Fig. 19
List of audio files. Open the audio/folder file list.
● In the MEDIA m ain menu, pr
ess the MEDIA
button ››› Fig. 18 to open the track list. The
track being played appears highlighted
››› Fig. 19.
Search and press on the track/folder list or
on the desired track/folder. If there is infor-
mation available, the track name is displayed
(for audio CDs) or the name of the file (MP3)
instead of Track + number .
Function button: Function
A››› Fig. 18Open the Source menu. Press to select oth-
er media sources.
Function button: Function
B››› Fig. 19
Indicates the media source being browsed.
If pressed it goes to the root folder of the
device indicated on the icon.
SD card: SD memory card ››› page 21.
USB: USB data medium ››› page 22.
BT audio: playing audio files via Bluetooth ®
››› page 23.
AUX: external audio source connected to
the AUX-IN multimedia socket ››› page 25.
C››› Fig. 19
Press the function button to open the top
folder in the hierarchy of the media source.
After being pressed several times the cur-
rently selected media source appears;
press to check the source contents. The
number appearing on the folder indicates
the level in the directory ››› Fig. 19.
Start playback with the first track.
Repeat all tracks. Repeats all the tracks that
are on the same memory level as the track
being played at that moment. If
Mix/Re‐
peat/Scan including subfolders is
active in the Media Settings menu , the
sub-folders will also be included.
Repeat the current track.
Random play. Includes all the tracks that
are on the same memory level as the track
being played at that moment. If
Mix/Re‐
peat/Scan including subfolders is
active in the Media Settings menu , the
sub-folders will also be included. 24
Page 27 of 52
Media
Note
The tracks, folders and playlists can also be
sel ect
ed by turning the right-hand setup but-
ton, and can be played or opened by pressing
it. Media settings
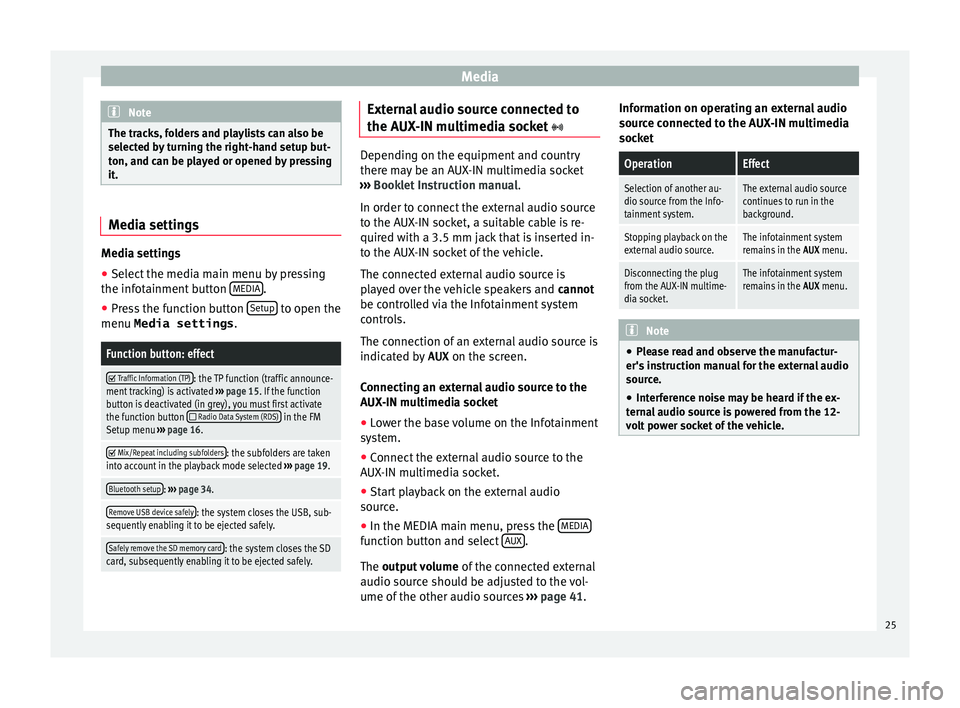
Media settings
●
Select the media main menu by pressing
the inf ot
ainment button MEDIA .
● Press the function button Set
up to open the
menu Media settings .
Function button: effect
Traffic Information (TP): the TP function (traffic announce-
ment tracking) is activated ››› page 15. If the function
button is deactivated (in grey), you must first activate
the function button
Radio Data System (RDS) in the FM
Setup menu ››› page 16.
Mix/Repeat including subfolders: the subfolders are taken
into account in the playback mode selected ››› page 19.
Bluetooth setup: ››› page 34.
Remove USB device safely: the system closes the USB, sub-
sequently enabling it to be ejected safely.
Safely remove the SD memory card: the system closes the SD
card, subsequently enabling it to be ejected safely. External audio source connected to
the A
UX
-IN multimedia socket Depending on the equipment and country
ther
e m
ay be an AUX-IN multimedia socket
››› Booklet Instruction manual.
In order to connect the external audio source
to the AUX-IN socket, a suitable cable is re-
quired with a 3.5 mm jack that is inserted in-
to the AUX-IN socket of the vehicle.
The connected external audio source is
played over the vehicle speakers and cannot
be controlled via the Infotainment system
controls.
The connection of an external audio source is
indicated by AUX on the screen.
Connecting an external audio source to the
AUX-IN multimedia socket ● Lower the base volume on the Infotainment
sy s
tem.
● Connect the external audio source to the
AUX
-IN multimedia socket.
● Start playback on the external audio
sourc
e.
● In the MEDIA main menu, press the MEDIA function button and select
A
UX .
The outp ut
volume of the connected external
audio source should be adjusted to the vol-
ume of the other audio sources ›››
page 41. Information on operating an external audio
sourc
e connected to the AUX-IN multimedia
socket
OperationEffect
Selection of another au-
dio source from the Info-
tainment system.The external audio source
continues to run in the
background.
Stopping playback on the
external audio source.The infotainment system
remains in the AUX menu.
Disconnecting the plug
from the AUX-IN multime-
dia socket.The infotainment system
remains in the AUX menu. Note
● Ple
ase read and observe the manufactur-
er's instruction manual for the external audio
source.
● Interference noise may be heard if the ex-
tern
al audio source is powered from the 12-
volt power socket of the vehicle. 25
Page 28 of 52
Telephone management system (PHONE)*
Telephone management sys-
t em (PHONE)*
Intr
oduction to the telephone
management system
General information The Telephone functions described below
c
an be u
sed through the Infotainment system
if there is a mobile telephone connected to it
via Bluetooth ®
››› page 28.
In order for the mobile telephone to be able
to connect to the Infotainment system the tel-
ephone must be equipped with Bluetooth®
.
If there is no mobile telephone connected to
the Infotainment system, the telephone man-
agement system will not be available.
The instructions shown on the screen for the
telephone menus will depend on the mobile
telephone used. There may be variations.
Only use compatible Bluetooth ®
devices. For
further information on compatible Blue-
tooth ®
products, ask your nearest SEAT deal-
er or check on the internet.
Use the instruction manual of the mobile tel-
ephone and of any accessories.
If you detect any operating issues between
your mobile telephone and the Infotainment system, restart your mobile by switching it off
and on ag
ain.
Y
ou may experience poor reception or may be
cut off in areas where the signal is weak.
Most electronic devices are shielded against
HF (high-frequency) signals. In any case, the
electronic equipment may not be protected
from the HF signals of the telephone man-
agement system. This may cause interfer-
ence. WARNING
Speaking by telephone and operating the mo-
b i
le telephone whilst driving can distract you
from the road and cause an accident.
● Always drive carefully and responsibly.
● Select volume settings that allow you to
ea
sily hear signals from outside the vehicle
at all times (e.g. emergency services sirens
and horns).
● In areas of little or no coverage or, in some
ca
ses, in a tunnel, garage or underpass, your
call may be cut off and you may not be able to
make even emergency calls. WARNING
If a mobile telephone is not secured or is in-
c orr
ectly secured in the vehicle, it could move
around the passenger compartment in the
event of a sudden driving manoeuvre or emer-
gency stop, resulting in injury. ●
Whi l
e the vehicle is in motion, always se-
cure the mobile telephone properly outside
the airbag deployment zone. WARNING
Mobile telephones may interfere with and al-
t er the c
orrect operation of pacemakers if
they are carried directly over them.
● Maintain a minimum distance of at least
20 centimetr
es between the aerials of the
mobile telephone and the pacemaker, as mo-
bile phones may affect the functioning of
pacemakers.
● Do not carry your switched-on mobile tele-
phone in y
our breast pocket directly over the
pacemaker.
● If you suspect interference, switch off the
mob
ile telephone immediately. CAUTION
High speeds, poor weather or road conditions
and the qua lity
of reception can all affect the
quality of a telephone conversation in the ve-
hicle. Note
● Re
strictions on the use of devices using
Bluetooth ®
technology may apply in some
countries. For further information, contact the
local authorities. 26
Page 30 of 52
Telephone management system (PHONE)*
Pair and connect a mobile telephone
t o the Inf
otainment systemIn order to manage a mobile telephone via
the Inf
ot
ainment system, it is necessary to
pair both devices once.
For your safety, we recommend you make the
link when the vehicle is stationary. In some
countries it is not possible to perform the
pairing with the vehicle running.
Conditions
You must guarantee the following setup in
the mobile phone and the Infotainment sys-
tem:
● The ignition must be switched on.
● The Bluet ooth®
f
unction of the mobile tele-
phone and the Infotainment system must be
active as well as visibility.
● The keypad lock on the mobile telephone
mu
st be deactivated.
Follow instructions in the manual for the mo-
bile telephone.
After turning on the ignition, the visibility of
the Bluetooth ®
function activates.
During the pairing process it is necessary to
enter data via the mobile telephone's key-
pad. To do so, the mobile telephone must be
ready. Starting mobile telephone pairing
● Make sure the Bluetooth function of the
mob
ile device is active and visible.
● Press the PHONE button on the Infotain-
ment sy
stem.
● Press the Find tel
ephone function button.
OR:
● Press the PHONE button on the Infotain-
ment sy
stem.
● Press the Setup function button.
● Press the Sel
ect
telephone function button
and then Find .
OR:
● Press the PHONE unit button of the Infotain-
ment sy
stem.
● Press the Setup function button.
● Press the Bluet
ooth function button.
● Press the Find dev
ic
es function button.
OR:
● Connect from the mobile device itself.
The n ame of
the Bluetooth function of your
Infotainment system will be displayed in Setup >
Bluet
ooth >
Name
› ›
›
page 34.
The search process can take up to 1 minute.
On the screen the system will dynamically update the names of the Bluetooth devices
fou
nd.
As soon as the search is completed, the
names of the Bluetooth ®
devices found are
displayed on-screen.
● In the Infotainment system select the mo-
bi
le telephone to which you want to connect
from the list of Bluetooth devices found. In
certain circumstances, it is possible that to
finish the connection between the two devi-
ces, you must enter additional data in the
mobile telephone and Infotainment system.
● If necessary, confirm the link to the mobile
tel
ephone.
● Use your mobile telephone to enter and
confirm
your PIN code, as indicated in the
display of the infotainment system.
OR:
● Compare the PIN code shown on the dis-
pl
ay of the Infotainment system with that
shown on the mobile telephone. If they
match, confirm on both devices.
The infotainment system and the mobile tele-
phone will now be connected to each other.
When the pairing has been finalized correct-
ly, the PHONE main menu will appear. The
phonebook and call lists stored in the mobile
phone will be loaded once the requests have
been accepted in the mobile phone. The du-
ration of the loading process depends on the
28
Page 31 of 52
Telephone management system (PHONE)*
amount of data stored on the mobile tele-
phone. Af t
er loading, the data will be availa-
ble on the Infotainment system.
Pairing and connection of mobile telephones
You can pair up to 20 mobile telephones to
the Infotainment system, but only one mobile
telephone can be connected as hands-free,
and this or another device as a Bluetooth au-
dio profile.
When the Infotainment system is switched
on, it automatically connects to the last con-
nected mobile telephone. If it is not possible
to connect to this mobile telephone, the tele-
phone management system will try to auto-
matically connect to the next mobile tele-
phone on the list of paired devices.
The maximum range of the Bluetooth ®
con-
nection is approx. 10 metres. The active
Bluetooth ®
connection disconnects if this
distance is exceeded. The connection is auto-
matically re-established as soon as the de-
vice is once again within Bluetooth ®
range.
If the maximum number of paired devices is
reached and you wish to pair another one to
the system, it will automatically replace the
one least used recently. If you wish to replace
it with another one, the user must erase it be-
forehand. To do so:
● Press the Setup button on the device while
in tel
ephone mode. ●
Pre
ss the Bluetooth function button.
● Activate the P
air
ed devices function button.
● In the list of paired devices, press the function button next to the mobile telephone
t
o be del
eted and then press Delete to con-
firm the process. Note
● It m
ay be necessary to confirm the phone-
book data transfer request on the mobile tel-
ephone.
● Check that there are no requests pending
acc
eptance in your mobile phone. If there are,
this could block some of the functions in the
PHONE menu. Description of the telephone
m
an
agement system
Introduction Some functions and setup can only be per-
f
ormed when the
vehicle is stopped and are
not available on all mobile telephones.
With the help of the telephone manager, up
to 2 mobile telephones can be connected to
the Infotainment system via the Bluetooth
profiles (for example, one used as a Blue-
tooth-audio player and/or another as a
hands-free telephone). Note
● Us
ing a mobile telephone inside the vehicle
may provoke noise in the speakers.
● Some networks may not recognise all lan-
guage c
haracters or offer all services. PHONE main menu
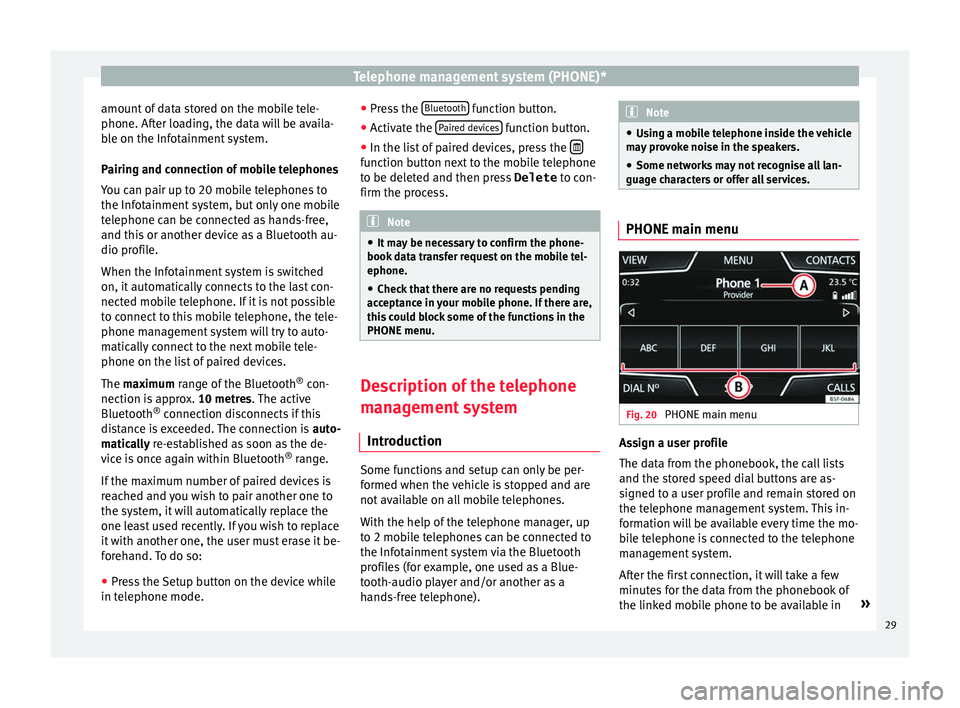
Fig. 20
PHONE main menu Assign a user profile
The d
at
a from the phonebook, the call lists
and the stored speed dial buttons are as-
signed to a user profile and remain stored on
the telephone management system. This in-
formation will be available every time the mo-
bile telephone is connected to the telephone
management system.
After the first connection, it will take a few
minutes for the data from the phonebook of
the linked mobile phone to be available in »
29
Page 32 of 52
Telephone management system (PHONE)*
the Infotainment system. The next time that
the mo b
ile telephone is connected (e.g. on
the next journey) the phonebook is updated
automatically.
If any entries in the mobile phonebook have
been modified while connected, a manual
update of the phonebook data can be initi-
ated from the User profile settings
menu ››› page 35.
Telephone management can store a maxi-
mum of 4 user profiles for mobile tele-
phones. If you wish to link/connect another
mobile phone, the oldest user profile will au-
tomatically be replaced.
Telephone management system function but-
tons ● Press the PHONE button on the Infotain-
ment sy
stem to open the PHONE main menu.
Function button: function ››› Fig. 20
AName of connected mobile telephone.
Press on the name to access the Select
telephone menu.
BSpeed dial buttons, to which telephone
numbers from the phonebook may be as-
signed respectively ››› page 33.
and Shortcut keys scroll arrows. Allows you to
move between the various speed di-
al/phonebook shortcut banks.
Function button: function
››› Fig. 20
DIAL NO.To open the number pad and enter a tele-
phone number ››› page 31.
CONTACTSTo open the phonebook of the connected
mobile telephone ››› page 32.
VIEWAllows you to choose between the dis-
play of speed dial and phonebook short-
cut keys ››› page 33.
CALLSTo open call lists of the connected mobile
telephone ››› page 33.
SETUPTo open the Telephone settings
menu ››› page 34. WARNING
Remember that the driver must not operate
the mo b
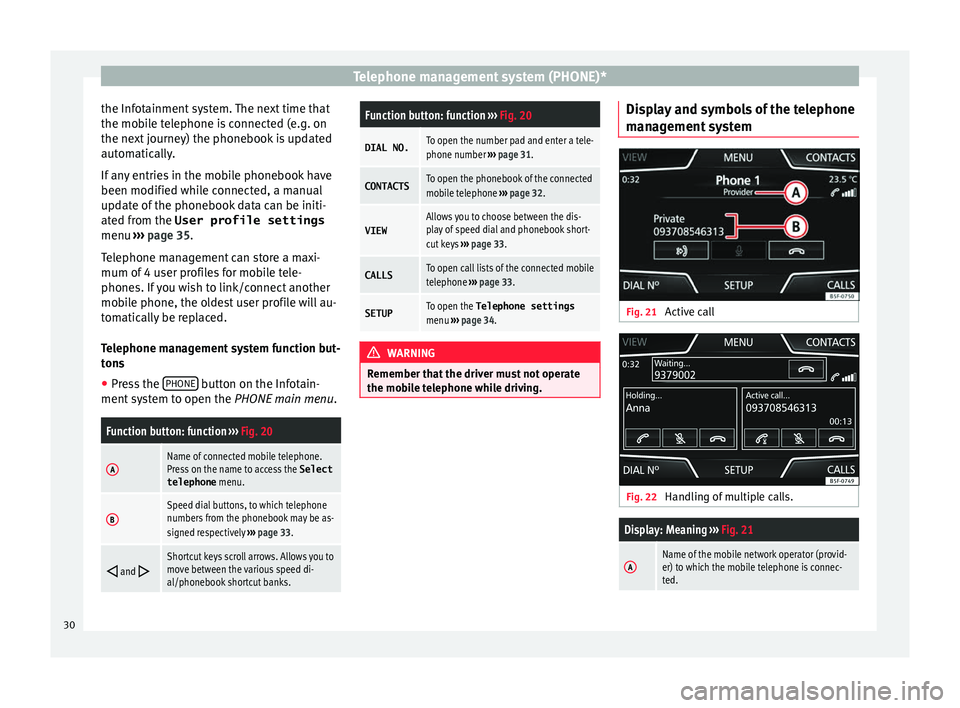
ile telephone while driving. Display and symbols of the telephone
m
an
agement system Fig. 21
Active call Fig. 22
Handling of multiple calls.
Display: Meaning ››› Fig. 21
AName of the mobile network operator (provid-
er) to which the mobile telephone is connec-
ted.30
Page 34 of 52
Telephone management system (PHONE)*
Note
Breakdown service and information calls can
inc ur an a
dditional cost on your telephone
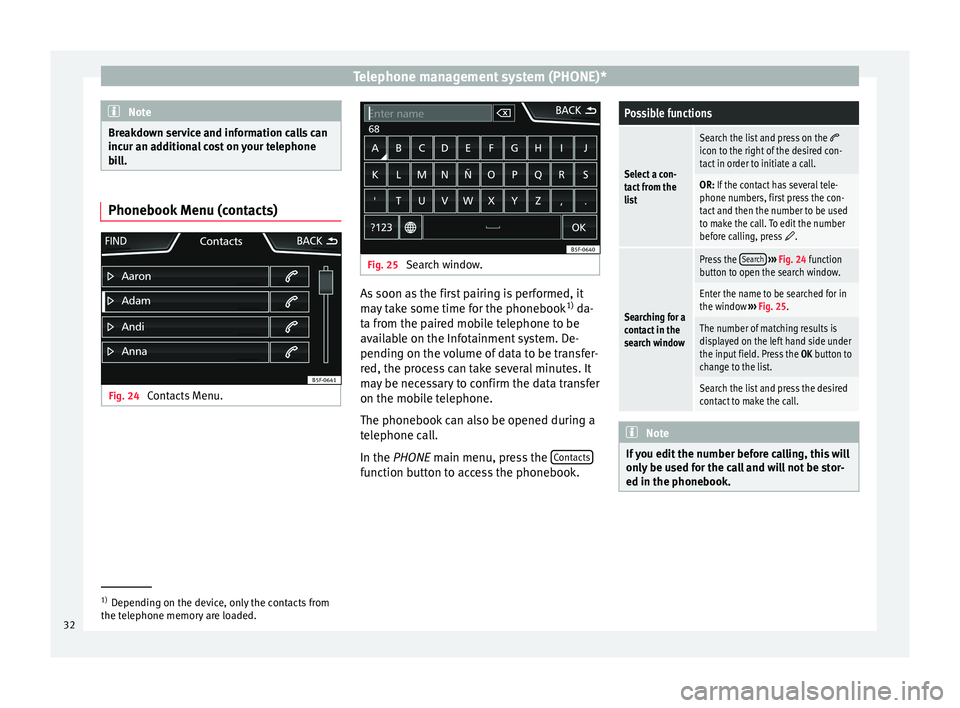
bill. Phonebook Menu (contacts)
Fig. 24
Contacts Menu. Fig. 25
Search window. As soon as the first pairing is performed, it
m
a
y take some time for the phonebook 1)
da-
ta from the paired mobile telephone to be
available on the Infotainment system. De-
pending on the volume of data to be transfer-
red, the process can take several minutes. It
may be necessary to confirm the data transfer
on the mobile telephone.
The phonebook can also be opened during a
telephone call.
In the PHONE main menu, press the Contacts function button to access the phonebook.
Possible functions
Select a con-
tact from the
list
Search the list and press on the icon to the right of the desired con-
tact in order to initiate a call.
OR: If the contact has several tele-
phone numbers, first press the con-
tact and then the number to be used
to make the call. To edit the number
before calling, press
.
Searching for a
contact in the
search window
Press the
Search
››› Fig. 24 function
button to open the search window.
Enter the name to be searched for in
the window ››› Fig. 25.
The number of matching results is
displayed on the left hand side under
the input field. Press the OK button to
change to the list.
Search the list and press the desired
contact to make the call. Note
If you edit the number before calling, this will
on ly
be used for the call and will not be stor-
ed in the phonebook. 1)
Depending on the device, only the contacts from
the t el
ephone memory are loaded.
32
Page 35 of 52
Telephone management system (PHONE)*
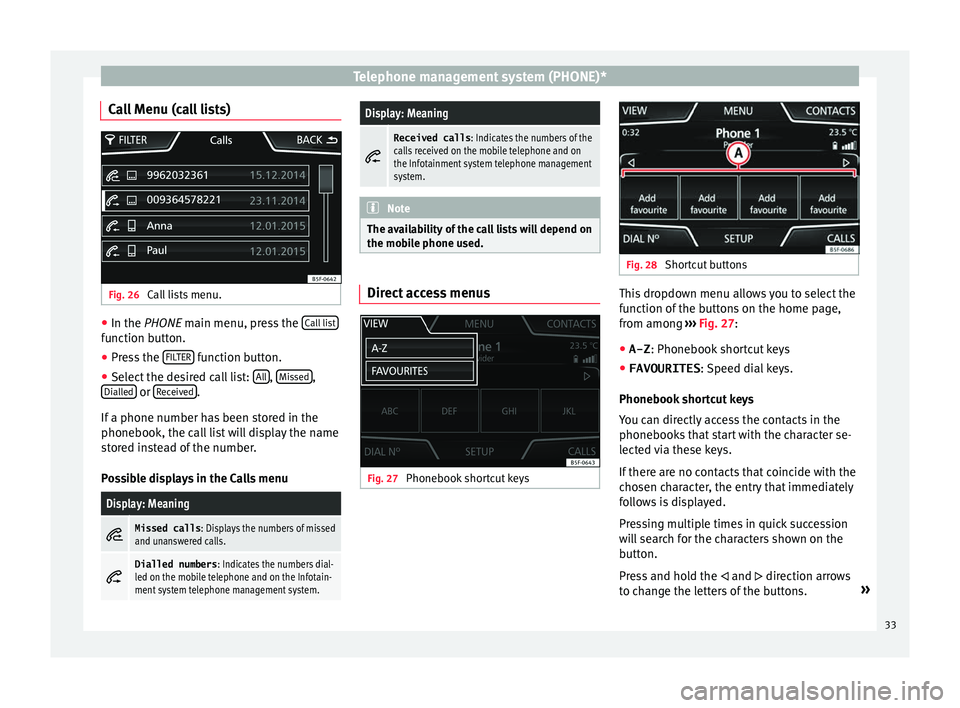
Call Menu (call lists) Fig. 26
Call lists menu. ●
In the PHONE m ain menu, pr
ess the Call list function button.
● Press the FIL
TER function button.
● Select the desired call list: A
l
l ,
Mi
s sed ,
Di al
led or
R
ec eived .
If a phone number h
as been stored in the
phonebook, the call list will display the name
stored instead of the number.
Possible displays in the Calls menu
Display: Meaning
Missed calls
: Displays the numbers of missed
and unanswered calls.
Dialled numbers
: Indicates the numbers dial-
led on the mobile telephone and on the Infotain-
ment system telephone management system.
Display: Meaning
Received calls
: Indicates the numbers of the
calls received on the mobile telephone and on
the Infotainment system telephone management
system. Note
The availability of the call lists will depend on
the mo b
ile phone used. Direct access menus
Fig. 27
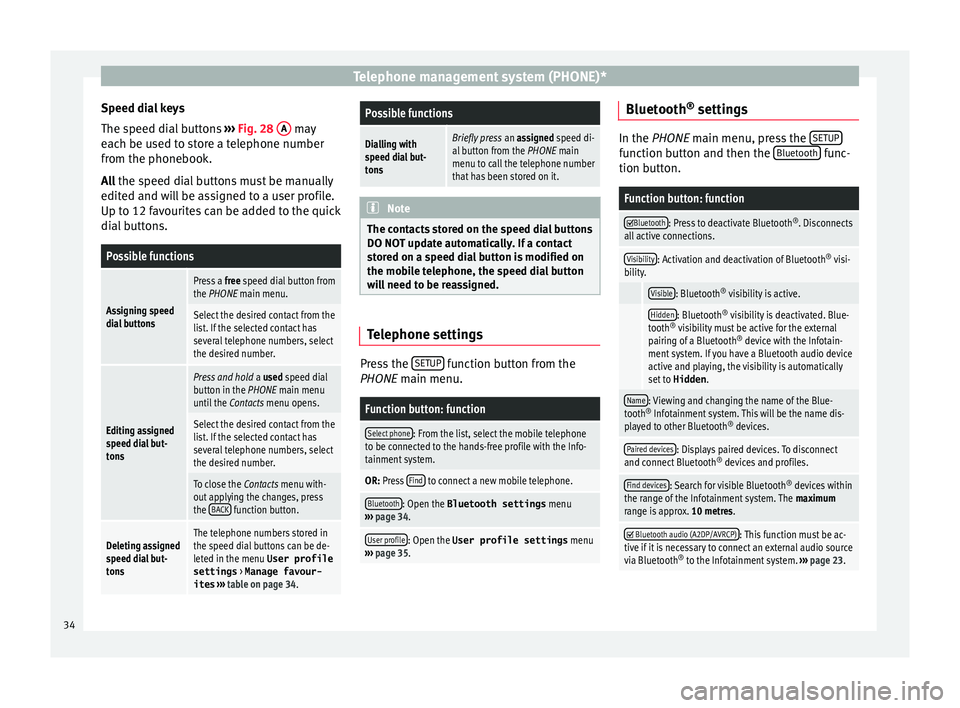
Phonebook shortcut keys Fig. 28
Shortcut buttons This dropdown menu allows you to select the
f
u
nction of the buttons on the home page,
from among ››› Fig. 27:
● A-Z : Phone book
shortcut keys
● FAVOURITES : S
peed dial keys.
Phonebook shortcut keys
You can directly access the contacts in the
phonebooks that start with the character se-
lected via these keys.
If there are no contacts that coincide with the
chosen character, the entry that immediately
follows is displayed.
Pressing multiple times in quick succession
will search for the characters shown on the
button.
Press and hold the and direction arrows
to change the letters of the buttons. »
33
Page 36 of 52
Telephone management system (PHONE)*
Speed dial keys
The s peed di
al buttons ››› Fig. 28 A may
e ac
h be used to store a telephone number
from the phonebook.
All the speed dial buttons must be manually
edited and will be assigned to a user profile.
Up to 12 favourites can be added to the quick
dial buttons.
Possible functions
Assigning speed
dial buttons
Press a free speed dial button from
the PHONE main menu.
Select the desired contact from the
list. If the selected contact has
several telephone numbers, select
the desired number.
Editing assigned
speed dial but-
tons
Press and hold a used speed dial
button in the PHONE main menu
until the Contacts menu opens.
Select the desired contact from the
list. If the selected contact has
several telephone numbers, select
the desired number.
To close the Contacts menu with-
out applying the changes, press
the BACK
function button.
Deleting assigned
speed dial but-
tonsThe telephone numbers stored in
the speed dial buttons can be de-
leted in the menu User profile
settings
> Manage favour-
ites ››› table on page 34.
Possible functions
Dialling with
speed dial but-
tonsBriefly press an assigned speed di-
al button from the PHONE main
menu to call the telephone number
that has been stored on it. Note
The contacts stored on the speed dial buttons
DO NO T upd
ate automatically. If a contact
stored on a speed dial button is modified on
the mobile telephone, the speed dial button
will need to be reassigned. Telephone settings
Press the
S
ETUP function button from the
PHONE m ain menu.
Function button: function
Select phone: From the list, select the mobile telephone
to be connected to the hands-free profile with the Info-
tainment system.
OR: Press Find to connect a new mobile telephone.
Bluetooth: Open the Bluetooth settings
menu
››› page 34.
User profile: Open the User profile settings menu
››› page 35. Bluetooth
®
settin g
s In the PHONE m
ain menu, pr
ess the SETUP function button and then the
Bluet
ooth func-
tion b utt
on.
Function button: function
Bluetooth: Press to deactivate Bluetooth
®
. Disconnects
all active connections.
Visibility: Activation and deactivation of Bluetooth ®
visi-
bility.
Visible: Bluetooth ®
visibility is active.
Hidden: Bluetooth ®
visibility is deactivated. Blue-
tooth ®
visibility must be active for the external
pairing of a Bluetooth ®
device with the Infotain-
ment system. If you have a Bluetooth audio device
active and playing, the visibility is automatically
set to Hidden .
Name: Viewing and changing the name of the Blue-
tooth ®
Infotainment system. This will be the name dis-
played to other Bluetooth ®
devices.
Paired devices: Displays paired devices. To disconnect
and connect Bluetooth ®
devices and profiles.
Find devices: Search for visible Bluetooth ®
devices within
the range of the Infotainment system. The maximum
range is approx. 10 metres.
Bluetooth audio (A2DP/AVRCP): This function must be ac-
tive if it is necessary to connect an external audio source
via Bluetooth ®
to the Infotainment system. ››› page 23. 34
Page 38 of 52

CAR menu
CAR menu Intr oduction t
o managing the
CAR menu
CAR menu Fig. 29
View menu By pressing the
CAR infotainment button you
w i
ll access its main menu with the following
options:
● VIEW
● MINIPLAYER, in the top right corner (Radio
or Medi
a function if the HDC* descent control
is not active).
● PREVIOUS-NEXT (to change screen)
● SETUP ››
›
Booklet Instruction Manual,
chapter System setup (CAR) Press the
CAR Infotainment button and the
VIEW fu
nction button to access the following
options, described below:
● CONSUMERS
● DRIVING DATA
● ECOTRAINER
● VEHICLE STATUS
Consumers Fig. 30
Consumers menu Press the button, Convenience consumers
(ECO) to ac
cess the information on the sta-
tus of the main convenience consumers of
the vehicle. It is shown via a consumption in-
dicator bar in l/h (gal/h). Note
The values that appear in the figure are indi-
c ativ
e and may vary depending on the fea-
tures. Driving data
Fig. 31
Driving data menu The onboard computer is equipped with 3
memorie
s
that work automatically. In these
memories you can see the distance travelled,
average speed, time passed, average con-
sumption and autonomy of the vehicle.
Since start
Indicates and stores the values of the journey
completed and the consumption from when
the ignition is switched on to when it is
switched off.
36