window Seat Leon 5D 2016 User Guide
[x] Cancel search | Manufacturer: SEAT, Model Year: 2016, Model line: Leon 5D, Model: Seat Leon 5D 2016Pages: 324, PDF Size: 6.93 MB
Page 72 of 324
Safety
Rear head restraints – The rear head restraints have 2 positions:
use
and
non-use.
– One position for use (he
ad restraint raised)
››› Fig. 85. In this position, the head re-
straints are used normally, protecting pas-
sengers along with the rear seat belts.
– And one position for non-use (he
ad re-
straint lowered).
– To fit the head restraints in position for use,
pul
l on the edges with both hands in the
direction of the arrow. WARNING
● Under no cir c
umstances should the rear
passengers travel while the head restraints
are in the non-use position. See the warning
label located on the rear side fixed window
››› Fig. 86.
● Do not swap the centre rear head restraint
with either of the out
er seat rear head re-
straints. Risk of injury in case of an accident! CAUTION
Note the instructions on the adjustment of
the hea d r
estraints ››› page 144. Pedal area
P ed
a
ls –
Ensure that you can always press the accel-
erat or
, brake and clutch pedals unimpaired
to the floor.
– Ensure that the pedals can return unim-
paired t
o their initial positions.
– Ensure that the floor mats are securely fas-
tened during the trip and do not
obstruct
the pedals ››› .
On ly
u
se floor mats which leave the pedals
clear and which are secured to prevent them
from slipping. You can obtain suitable floor
mats from a specialised dealership. Fasten-
ers* for floor mats are fitted in the footwells.
If a brake circuit fails, the brake pedal must
be pressed down thoroughly in order to stop
the vehicle.
Wear suitable footwear
Always wear shoes which support your feet
properly and give you a good feeling for the
pedals. WARNING
● Re s
tricting pedal operation can lead to crit-
ical situations while driving. ●
Never l a
y or fit floor mats or other floor cov-
erings over the original floor mats. This
would reduce the pedal area and could ob-
struct the pedals. Risk of accident.
● Never place objects in the driver footwell.
An obj
ect could move into the pedal area and
impair pedal operation. In the event of a sud-
den driving or braking manoeuvre, you will
not be able to operate the brake, clutch or ac-
celerator pedal. Risk of accident! 70
Page 89 of 324
Self-help
CAUTION
Switch off the air compressor after a maxi-
mum of 8 oper ation
al minutes to avoid over-
heating! Before switching on the air compres-
sor again, let it cool for several minutes. Check after 10 minutes of driving
Screw the inflator tube
›››
Fig. 96 5 again
and chec k
the pressure on the gauge 6 .
1.3 bar (19 p s
i / 130 kPa) and lower:
● Stop the vehicle! The tyre c
annot be sealed
sufficiently with the tyre mobility set.
● You should obtain professional assistance
›››
.
1.4 b ar (20 p
s
i / 140 kPa) and higher:
● Set the tyre pressure to the correct value
again.
● Car
efully resume your journey until you
reac
h the nearest specialised workshop with-
out exceeding 80 km/h (50 mph).
● Have the damaged tyre replaced. WARNING
Driving with an unsealed tyre is dangerous
and can c au
se accidents and serious injury.
● Do not continue driving if the tyre pressure
is 1.3
bar (19 psi / 130 kPa) and lower. ●
Seek s pec
ialist assistance. Manual unlocking/locking
Introduction Read the additional information carefully
›› ›
page 11,
›››
page 12.
The doors, rear lid and panoramic tilting sun-
roof can be locked manually and partially
opened, for example if the key or the central
locking is damaged. WARNING
Opening and closing doors carelessly can
cau se seriou
s injury.
● If the vehicle is locked from outside, the
doors and w
indows cannot be opened from
the inside.
● Never leave children or disabled people
alone in the car
. They could be trapped in the
car in an emergency and will not be able to
get themselves to safety.
● Depending on the time of the year, temper-
ature
s inside a locked and closed vehicle can
be extremely high or extremely low resulting
in serious injuries and illness or even death,
particularly for young children. WARNING
Getting in the way of the doors and the rear
lid is d
angerous and can lead to serious in-
jury.
● Open and close the doors and the rear lid
only when ther
e is nobody in the way. CAUTION
When opening and closing in an emergency,
car ef
ully disassemble components and then
reassemble them carefully to avoid damage
to the vehicle. Changing the windscreen wiper
b
la
des
Changing the windscreen and rear
window wiper blades Read the additional information carefully
› ›
›
page 64.
The windscreen wiper blades are supplied as
standard with a layer of graphite. This layer is
responsible for ensuring that the wipe is si-
lent. If the graphite layer is damaged, the
noise of the water as it is wiped across the
windscreen will be louder.
Check the condition of the wiper blades regu-
larly. If the wipers scrape across the glass ,»
87
Technical data
Advice
Operation
Emergencies
Safety
Page 94 of 324
Emergencies
Vehicle fuses Fig. 100
On the driver-side dash panel: fuse
bo x
c
over Fig. 101
In the engine compartment: fuse box
c o
v
er Read the additional information carefully
› ›
›
page 54
Only replace fuses with a fuse of the same
amperage (same colour and markings) and
size. Opening and closing the fuse box situated
below the da
sh panel
● Opening: fold the cover down ››
› Fig. 100.
● Closing: push back the cover it in until it
clic
ks into place.
To open the engine compartment fuse box
● Open the bonnet ›››
page 262.
● Press the locking tabs to release the fuse
box c
over ››› Fig. 101.
● Then lift the cover out.
● To fit the cover, place it on the fuse box.
Pu
sh the locking tabs down until they click
audibly into place.
Fuses in the vehicle interior
No.Consumers/Amps
4Taxis3
5Gateway5
6Automatic gearbox lever5
7Air conditioning and heating control
panel, heating the back window.10
8Diagnosis, handbrake switch, light
switch, reverse light, interior lighting10
9Steering column5
10Radio display5
12Radio20
No.Consumers/Amps
13Driving mode.15
14Air conditioner fan40
15KESSY10
16Connectivity Box7.5
17Instrument panel5
18Rear camera7.5
19KESSY7.5
214x4 Haldex Control Unit15
22Trailer15
23Right lights40
24Electric sunroof30
25Left door30
26Heated seats20
28Trailer25
31Left lights40
32Control unit for parking aid, front cam-
era and radar7.5
33Airbag5
34Reverse switch, clima sensor, electro-
chromic mirror7.5
35Diagnosis, headlight control unit,
headlight adjuster10 92
Page 95 of 324
Fuses and bulbsNo.Consumers/Amps
36Right LED headlight10
37Left LED headlight10
38Trailer25
39Right door30
4012V socket20
42Central locking40
43Interior light30
44Trailer15
45Electric driver's seat15
47Rear window wiper15
49Starter motor; clutch sensor5
53Heated rear window30
Fuse arrangement in engine compartment
No.Consumers/Amps
1ESP control unit40/20
2ESP control unit40/60
3Engine control unit (diesel/pet-
rol)30/15
4Engine sensors5/10
5Engine sensors7.5/10
6Brake light sensor5
No.Consumers/Amps
7Engine power supply5/10
8Lambda probe10/15
9Engine5/10/20
10Fuel pump control unit10/15/20
11PTC40
12PTC40
13Automatic gearbox control unit15/30
15Horn15
16Fuel pump control unit5/15/20
17Engine control unit7.5
18Terminal 30 (positive reference)5
19Front windscreen washer30
20Alarm horn10
22Engine control unit5
23Starter motor30
24PTC40
31Electronic differential CUPRA15
33Automatic gearbox pump30
CAUTION
● Alw a
ys carefully remove the fuse box cov-
ers and refit them correctly to avoid problems
with your vehicle.
● Protect the fuse boxes when open to avoid
the entry of
dust or humidity. Dirt and humid-
ity inside fuse boxes can cause damage to
the electrical system. Note
● In the v ehic
le, there are more fuses than
those indicated in this chapter. These should
only be changed by a specialised workshop.
● Positions not containing a fuse do not ap-
pear in the fo
llowing tables.
● Some of the equipment listed in the tables
below pert
ain only to certain versions of the
model or are optional extras.
● Please note that the above lists, while cor-
rect at
the time of printing, are subject to
change. Changing bulbs
Topic
intr
oduction Read the additional information carefully
› ›
›
page 55.
Changing bulbs requires a certain degree of
practical skill. »
93
Technical data
Advice
Operation
Emergencies
Safety
Page 105 of 324
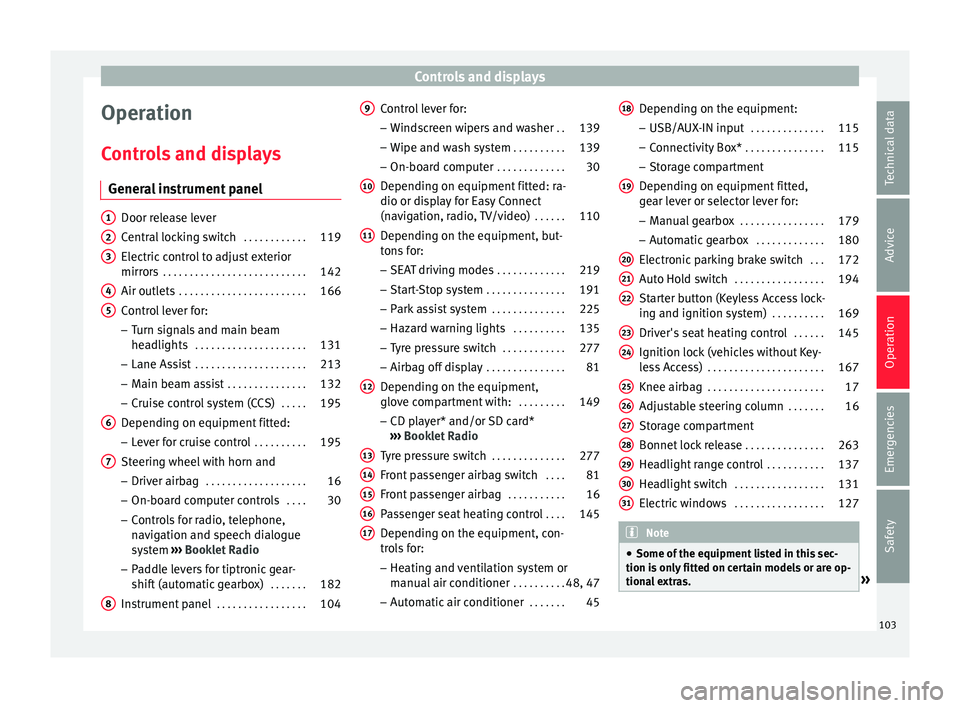
Controls and displays
Operation
C ontr
o
ls and displays
General instrument panel Door release lever
Centr
al
locking switch . . . . . . . . . . . .119
Electric control to adjust exterior
mirrors . . . . . . . . . . . . . . . . . . . . . . . . . . . 142
Air outl
ets . . . . . . . . . . . . . . . . . . . . . . . . 166
Control lever for:
– Turn s ign
als and main beam
headlights . . . . . . . . . . . . . . . . . . . . . 131
– Lane Ass i
st . . . . . . . . . . . . . . . . . . . . . 213
– Main beam a
ssist . . . . . . . . . . . . . . . 132
– Cruise c
ontrol system (CCS) . . . . .195
Depending on equipment fitted:
– Lev er f
or cruise control . . . . . . . . . .195
Steering wheel with horn and – Driver airbag . . . . . . . . . . . . . . . . . . . 16
– On-boar d c
omputer controls . . . .30
– Contro
ls for radio, telephone,
navigation and speech dialogue
system ›››
Booklet Radio
– Paddle levers for tiptronic gear-
shift (automatic gearbox) . . . . . . .182
Instrument panel . . . . . . . . . . . . . . . . . 104
1 2
3
4
5
6
7
8 Control lever for:
– Wind
s
creen wipers and washer . .139
– Wipe and wa
sh system . . . . . . . . . . 139
– On-board c
omputer . . . . . . . . . . . . . 30
Depending on equipment fitted: ra-
dio or disp
lay for Easy Connect
(navigation, radio, TV/video) . . . . . .110
Depending on the equipment, but-
tons
for:
– SEAT driving modes . . . . . . . . . . . . .219
– Star t
-Stop system . . . . . . . . . . . . . . . 191
– Park a
ssist system . . . . . . . . . . . . . . 225
– Hazard w
arning lights . . . . . . . . . .135
– Tyr
e pressure switch . . . . . . . . . . . .277
– Airbag off di
splay . . . . . . . . . . . . . . . 81
Depending on the equipment,
glov e c
ompartment with: . . . . . . . . .149
– CD pl a
yer* and/or SD card*
››› Booklet Radio
Tyre pressure switch . . . . . . . . . . . . . .277
Front passenger airbag switch . . . .81
Front passenger airbag . . . . . . . . . . .16
Passenger seat heating control . . . .145
Depending on the equipment, con-
tro l
s for:
– Heating and ventilation system or
manual air conditioner . . . . . . . . . .48, 47
– Autom atic
air conditioner . . . . . . .45
9
10
11
12
13
14
15
16
17 Depending on the equipment:
– USB/A UX
-IN inp
ut . . . . . . . . . . . . . . 115
– Connectivity
Box* . . . . . . . . . . . . . . . 115
– Storag
e compartment
Depending on equipment fitted,
gear lever or selector lever for: – Manual gearbox . . . . . . . . . . . . . . . . 179
– Automatic
gearbox . . . . . . . . . . . . . 180
Electronic parking brake switch . . .172
Auto Hold switch . . . . . . . . . . . . . . . . . 194
Starter button (Keyless Access lock-
ing and ignition sys
tem) . . . . . . . . . . 169
Driver's seat heating control . . . . . .145
Ignition lock (vehicles without Key-
les
s Access) . . . . . . . . . . . . . . . . . . . . . . 167
Knee airbag . . . . . . . . . . . . . . . . . . . . . . 17
Adjustable steering column . . . . . . .16
Storage compartment
Bonnet lock
release . . . . . . . . . . . . . . . 263
Headlight range control . . . . . . . . . . .137
Headlight switch . . . . . . . . . . . . . . . . . 131
Electric windows . . . . . . . . . . . . . . . . . 127 Note
● Some of the equipment li
sted in this sec-
tion is only fitted on certain models or are op-
tional extras. » 18
19
20
21
22
23
24
25
26
27
28
29
30
31
103
Technical data
Advice
Operation
Emergencies
Safety
Page 118 of 324

Operation
Opening and closing C entr
a
l locking system
Description Read the additional information carefully
›› ›
page 10
The vehicle can be locked and unlocked via
the central locking system. There are several
methods, depending on the vehicle equip-
ment:
● key with remote control ››
›
page 118 ,
● lock on driver door (emergency opening
›››
page 10) or
● interior central locking switch ›››
page 119.
Unlocking one side of the vehicle only
When you lock the vehicle with the key, the
doors and the rear lid are locked. When you
open the door, you can either unlock only the
driver door, or all the vehicle doors. To select
the required option, use Easy Connect*
››› page 119.
Automatic locking (Auto Lock)*
The Auto Lock function locks the doors and
the rear lid when the vehicle exceeds a speed
of about 15 km/h (9 mph). The vehicle is unlocked again when the igni-
tion key i
s removed. Alternatively, the vehicle
can also be unlocked via the central locking
switch or by pulling one of the inside door
handles. The Auto Lock function can be
switched on and off on the sound system or
on the Easy Connect* system ››› page 119.
In the event of an accident in which the air-
bags inflate, the doors will be automatically
unlocked to facilitate access and assistance.
Anti-theft alarm system*
If the anti-theft alarm system senses interfer-
ence with the vehicle it triggers an audible
and visible alarm.
The anti-theft alarm system is automatically
switched on when locking the vehicle. It
switches off when the vehicle is unlocked
from a distance.
When the driver door is unlocked with the
key, you should switch on the ignition within
15 seconds. Otherwise the alarm will be trig-
gered. On some export versions, the alarm is
triggered immediately when you open a door.
To deactivate the alarm, press the button on the remote control key, or switch on the
ignition. Af
t
er a c
ertain time, the alarm will
automatically switch off.
Switch off the vehicle interior monitoring and
tow-away protection if you wish to prevent the alarm from being triggered accidentally
›››
page 126.
Turn signals
The turn signals will flash twice when the ve-
hicle is unlocked and once when the vehicle
is locked.
If it does not flash, this indicates that one of
the doors, the rear lid or the bonnet is not
closed correctly.
Accidental lock-out
The central locking system prevents you from
being locked out of the vehicle in the follow-
ing situations: ● If the driver door is open, the vehicle can-
not be lock
ed with the central locking switch
››› page 119.
Lock the vehicle with the remote control key,
when all the doors and the rear lid have been
closed. This prevents the accidental locking
of the vehicle. WARNING
Do not leave anyone (especially children) in
the v ehic
le if it is locked from the outside and
the anti-theft security system* is enabled, as
the doors and windows cannot then be
opened from the inside. Locked doors could
delay assistance in an emergency, potentially
putting lives at risk. 116
Page 119 of 324
Opening and closing
Note
● Never l e
ave any valuable items in the vehi-
cle unattended. Even a locked vehicle is not a
safe.
● If the diode on the driver door sill lights up
for about 30 sec
onds when the vehicle is
locked, the central locking system or anti-
theft alarm* is not working properly. You
should have the fault repaired at a SEAT Offi-
cial Service or specialised workshop.
● The vehicle interior monitoring of the anti-
theft a
larm* system will only function as in-
tended if the windows and the sunroof* are
closed. Car key
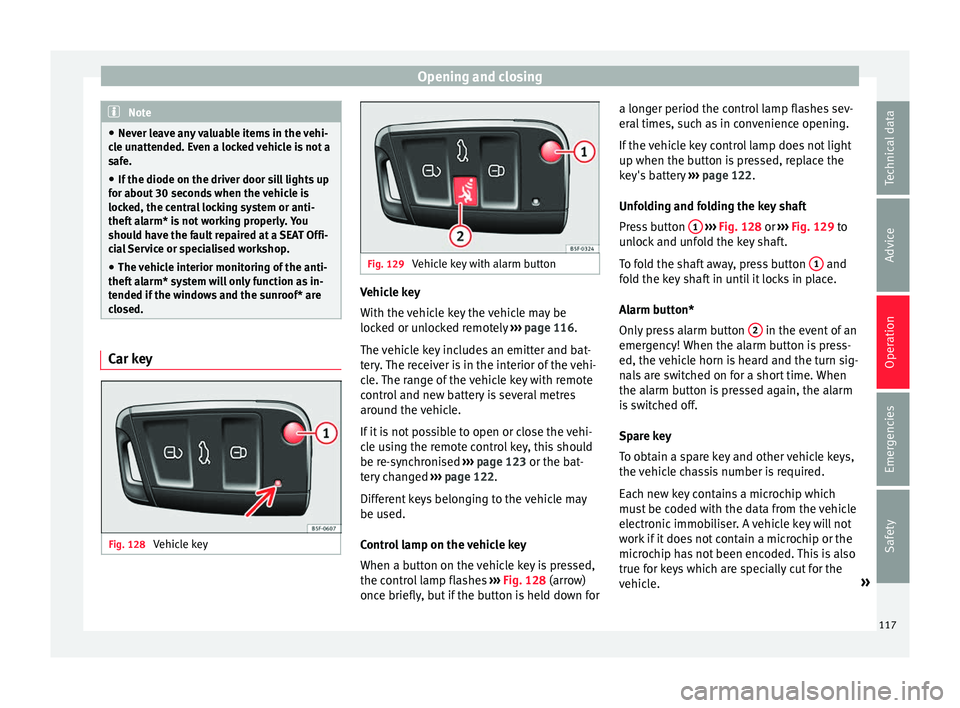
Fig. 128
Vehicle key Fig. 129
Vehicle key with alarm button Vehicle key
W
ith the
v
ehicle key the vehicle may be
locked or unlocked remotely ››› page 116.
The vehicle key includes an emitter and bat-
tery. The receiver is in the interior of the vehi-
cle. The range of the vehicle key with remote
control and new battery is several metres around the vehicle.
If it is not possible to open or close the vehi-
cle using the remote control key, this should
be re-synchronised ››› page 123 or the bat-
tery changed ››› page 122.
Different keys belonging to the vehicle may
be used.
Control lamp on the vehicle key
When a button on the vehicle key is pressed,
the control lamp flashes ››› Fig. 128 (arrow)
once briefly, but if the button is held down for a longer period the control lamp flashes sev-
eral time
s, such as in convenience opening.
If the vehicle key control lamp does not light
up when the button is pressed, replace the
key's battery ››› page 122.
Unfolding and folding the key shaft
Press button 1
› ››
Fig. 128
or ›
›› Fig. 129 to
unlock and unfold the key shaft.
To fold the shaft away, press button 1 and
f o
l
d the key shaft in until it locks in place.
Alarm button*
Only press alarm button 2 in the event of an
emer g
ency!
When the alarm button is press-
ed, the vehicle horn is heard and the turn sig-
nals are switched on for a short time. When
the alarm button is pressed again, the alarm
is switched off.
Spare key
To obtain a spare key and other vehicle keys,
the vehicle chassis number is required.
Each new key contains a microchip which
must be coded with the data from the vehicle
electronic immobiliser. A vehicle key will not
work if it does not contain a microchip or the
microchip has not been encoded. This is also
true for keys which are specially cut for the
vehicle. »
117
Technical data
Advice
Operation
Emergencies
Safety
Page 123 of 324

Opening and closing
Unlocking and opening the doors (Keyless-
Entr y)
● Ho l
d one of the front door handles. In do-
ing this, the sen
sor surface ››› Fig. 131 A (ar-
r o
w) i
s touched on the handle and the vehi-
cle unlocks.
● Open the door.
On vehic
les with selective opening or info-
tainment system configuration, pulling the
door handle twice will unlock all doors.
On vehicles without a “Safe” security sys-
tem: shutting and locking doors (Keyless-Ex-
it)
● Switch the ignition off.
● Close the driver's door.
● Touch the locking sensor surface B (arrow)
of the h
andl
e of one of the front doors once.
The door being operated must be closed.
On vehicles with a “Safe” security system:
shutting and locking doors (Keyless-Exit)
● Switch the ignition off.
● Close the driver's door.
● Touch the sensor surface B (arrow) of the
h andl
e of
one of the front doors once. The ve-
hicle locks with the “Safe” security system
››› page 122. The door being operated must
be closed.
● Touch the sensor surface B (arrow) of the
h andl
e of
one of the front doors twice to lockthe vehicle without activating the “Safe” se-
curity sy
stem ››› page 122.
Unlocking and locking the rear lid
When the vehicle is locked, the rear lid auto-
matically unlocks on opening if there is a val-
id vehicle key in the proximity ››› Fig. 130.
Open or close the rear lid normally.
After closing, the rear lid locks automatically.
If the complete vehicle is unlocked, the rear
lid will not lock automatically after closing it.
What happens when locking the vehicle with
a second key
If there is a vehicle key inside the vehicle and
it is locked from the outside with a second
vehicle key, the key inside the vehicle is
blocked for engine ignition ››› page 167. In
order to enable engine ignition, the button
on the key inside the vehicle needs to be
pr e
s
sed.
Automatically disabling sensors
If the vehicle is not locked or unlocked for a
long period of time, the proximity sensors on
the passenger doors are automatically disa-
bled.
If one of the sensor surfaces on the door han-
dles is often activated in a unusual manner
with the vehicle locked (e.g. by the branches
of a bush rubbing against it), all proximity sensors are disabled for a certain period of
time.
Sensors
will again be enabled:
● After a time.
● OR: if the vehicle is unlocked with the but-
ton on the key.
● OR: if the rear lid is open.
● OR: if
the vehicle is unlocked manually with
the key
.
Convenience functions
To close all the electric windows and the
glass roof using the convenience function,
keep a finger for a few seconds on the lock-
ing sensor surface ››› Fig. 131 B (arrow) of
the door h andl
e u
ntil the windows and roof
have closed.
The doors may be opened by touching the
sensor surface of the door handle depending
on the settings that have been activated in
the infotainment system with the button
and the S
ETUP and
Openin
g and c
lo
sing func-
tion b utt
on
s. CAUTION
The sensor surfaces on the door handles
cou l
d engage if hit with a water jet or high
pressure steam if there is a valid vehicle key
in the proximity. If at least one of the win-
dows is open and the sensor surface B on
» 121
Technical data
Advice
Operation
Emergencies
Safety
Page 127 of 324

Opening and closing
●
If the v
ehicle battery is run down or flat
then the anti-theft alarm will not operate cor-
rectly.
● Vehicle monitoring remains active even if
the batter
y is disconnected or not working for
any reason.
● The alarm is triggered immediately if one of
the batter
y cables is disconnected while the
alarm system is active. Vehicle interior monitoring and anti-
to
w sy
stem* It is a monitoring or control function incorpo-
r
at
ed in the anti-thef
t alarm* which detects
unauthorised vehicle entry by means of ultra-
sound.
Activation
– It is automatically switched on when the
anti-theft al
arm is activated.
Deactivation – Open the vehicle with the key, either me-
chanic
ally or by pressing the button on
the r emot
e c
ontrol. The time period from
when the door is opened until the key is in-
serted in the contact should not exceed 15
seconds, otherwise the alarm will be trig-
gered. –
Pres
s the button on the remote control
tw ic
e.
The volumetric sensor and tilt sen-
sors will be deactivated. The alarm system
remains activated.
The vehicle interior monitoring and the anti-
tow system are automatically switched on
again next time the vehicle is locked.
The vehicle interior monitoring and anti-tow
sensor (tilt sensor) are automatically switch-
ed on when the anti-theft alarm is switched
on. In order to activate it, all the doors and
the rear lid must be closed.
If you wish to switch off the vehicle interior
monitoring and the anti-tow system, it must
be done each time that the vehicle is locked;
if not, they will be automatically switched on.
The vehicle interior monitoring and the anti-
tow system should be switched off if animals
are left inside the locked vehicle (otherwise,
their movements will trigger the alarm) or
when, for example, the vehicle is transported
or has to be towed with only one axle on the
ground.
False alarms
Interior monitoring will only operate correctly
if the vehicle is completely closed. Please ob-
serve related legal requirements.
The following cases may cause a false alarm: ● Open windows (partially or fully). ●
Panoramic/ti lting sunroof open (partially or
completely).
● Movement of objects inside the vehicle,
such a
s loose papers, items hanging from
the rear vision mirror (air fresheners), etc. Note
● If the v
ehicle is relocked and the alarm is
activated without the volumetric sensor func-
tion, relocking will activate the alarm with all
its functions, except the volumetric sensor.
This function is reactivated when the alarm is
switched on again, unless it is deliberately
switched off.
● If the alarm has been triggered by the volu-
metric sensor
, this will be indicated by a
flashing of the warning lamp on the driver
door when the vehicle is opened. The flash is
different to the flash indicating the alarm is
activated.
● The vibration of a mobile phone left inside
the vehic
le may cause the vehicle interior
monitoring alarm to trigger, as both sensors
react to movements and shakes inside the ve-
hicle.
● If on activating the alarm, any door or the
rear lid i
s open, only the alarm will be activa-
ted. The vehicle interior monitoring and the
anti-tow system will only be activated once
all the doors are closed (including the rear
lid). 125
Technical data
Advice
Operation
Emergencies
Safety
Page 128 of 324

Operation
Deactivating the vehicle interior moni-
t orin
g and anti-t
ow systems*Fig. 135
Vehicle interior monitoring/tow-
a w
a
y protection button. When the vehicle is locked, the alarm will be
trig
g
er
ed if movements are detected in the
interior (e.g. by animals) or if the vehicle's in-
clination is changed (e.g. during transport).
You can prevent the alarm from being trig-
gered accidentally by switching off the vehi-
cle interior monitoring and/or tow-away pro-
tection.
– To switch off the vehicle interior monitoring
and tow-
away protection, switch off the ig-
nition and press button ››› Fig. 135. The in-
dicator on the button will light up.
– When the vehicle is locked now, the vehicle
interior monitorin
g and the tow-away pro-
tection are switched off until the next time
the door is opened. If the anti-theft security system (Safelock)*
›››
page 122 is switched off, the vehicle interi-
or monitoring and the tow-away protection
are automatically switched off. WARNING
Observe the safety warnings ›››
in Descrip-
tion on pag e 116
. Rear lid (luggage compart-
ment)
Tai l
gate automatic lock Where the vehicle has been locked by press-
in
g the button on the remote control with
the r e
ar lid open, the r
ear lid will lock auto-
matically when closed.
The automatic tailgate locking time extension
function can be activated. Where this func-
tion is activated and once the rear lid has
been unlocked by pressing the button on
the r emot
e c
ontrol key ›››
page 118, the rear
lid can be re-opened for a certain length of
time.
Where required, the automatic tailgate lock-
ing time extension function can be activated
or deactivated at an Authorised SEAT Service,
which will provide all the necessary informa-
tion. Before the vehicle locks automatically, there
is a ri
sk of intruders getting into the vehicle.
Therefore, we recommend you always lock
the vehicle by pressing the button on the
r emot
e c
ontrol or by using the central locking
button. WARNING
Observe the safety warnings ›››
in Intro-
duction on pag e 87
.
● Always close the rear lid properly. Risk of
accident
or injury.
● The rear lid must not be opened when the
rever
se or rear fog lights are lit. This may
damage the tail lights.
● Do not close the rear lid by pushing it down
with y
our hand on the rear window. The glass
could smash. Risk of injury!
● Ensure the rear lid is locked after closing it.
If not, it m
ay open unexpectedly while driv-
ing.
● Closing the rear lid without observing and
ensurin
g it is clear could cause serious injury
to you and to third parties. Make sure that no
one is in the path of the rear lid.
● Never drive with the rear lid open or half-
closed, e
xhaust gases may penetrate into the
interior of the vehicle. Danger of poisoning!
● If you only open the rear lid, do not leave
the key in
side. The vehicle cannot be opened
if the key is left inside. 126