phone Seat Leon 5D 2017 MEDIA SYSTEM PLUS - NAVI SYSTEM - NAVI SYSTEM PLUS
[x] Cancel search | Manufacturer: SEAT, Model Year: 2017, Model line: Leon 5D, Model: Seat Leon 5D 2017Pages: 104, PDF Size: 2.7 MB
Page 25 of 104
Connectivity
Apple CarPlay‚ĄĘ* 3 Valid for compatible iPhone‚ĄĘ mobile telephones.
A l
so, iPhone‚ĄĘ mobile telephones only support Ap-
ple CarPlay‚ĄĘ
Apple CarPlay‚ĄĘ is a protocol which enables
communication between a mobile telephone
and the Infotainment system via USB.
This makes it possible to display and operate
the mobile telephone on the Infotainment
system screen.
Requirements
In order to use Apple CarPlay‚ĄĘ, the following
requirements must be met:
‚óŹ Make sure that you do not have Apple
CarPl a
y‚ĄĘ restricted on your device, at: Set-
tings > General > Restrictions > CarPlay > ON.
‚óŹ The mobile device must be compatible with
Appl
e CarPlay‚ĄĘ.
‚óŹ The mobile device must be connected to
the Infotainment
system via USB.
Initiating the connection
In order to initiate the connection with the
mobile device, it is simply necessary to con-
nect it to the Infotainment system via the
USB connection.
‚óŹ A pop-up screen will appear, which will re-
quest
that you accept the device. ‚óŹ
If y
ou start the session using Apple
CarPlay‚ĄĘ technology, it will not be possible
to pair another device via Bluetooth‚ĄĘ. The
following message will appear in the main
PHONE menu:
Please disconnect Apple CarPlay
first, before you can connect
another mobile telephone.
Holding down the steering wheel multifunc-
tion ÔÉÉ button or the VOICE button of the Info-
t ainment
sy
stem will start the Apple‚ĄĘ voice
‚Äúengine‚ÄĚ.
To return to the basic contents of the Infotain-
ment system, press the SEAT icon.
Android Auto‚ĄĘ* 3 V
alid for compatible Android mobile phones.
Andr
oid Auto‚ĄĘ is a protocol which enables
communication between a portable device
and the Infotainment system via USB.
This makes it possible to display and operate
the mobile telephone on the Infotainment
system screen.
Requirements
In order to use Android Auto‚ĄĘ, the following
requirements must be met:
‚óŹ The mobile device must be compatible with
Android Aut o‚ĄĘ. ‚óŹ
The mo
bi
le device must be connected to
the Infotainment system via USB.
‚óŹ The Android Auto‚ĄĘ application should al-
rea
dy be downloaded and installed on the
mobile device.
Initiating the connection
In order to initiate the connection with the
mobile device, it is simply necessary to con-
nect it to the Infotainment system via the
USB connection, and to be sure to follow the
instructions of the device being paired.
‚óŹ The first connection to Android Auto‚ĄĘ
must
be done while the vehicle is stationary.
‚óŹ Once the first pop-up window about accept-
ing dat
a transfer between the car and the de-
vice has been accepted, a message will ap-
pear requesting that you check your mobile
device for the confirmations needed to pair it
with the Infotainment system.
‚óŹ If you are initiating the session using
Android Auto‚ĄĘ t
echnology via USB, the mo-
bile telephone connects automatically via
Bluetooth‚ĄĘ to the Infotainment system tele-
phone and it will not be possible to pair an-
other mobile telephone via Bluetooth‚ĄĘ.
Holding down the steering wheel multifunc-
tion ÔÉÉ button or the VOICE button of the Info-
t ainment
sy
stem will start the Android‚ĄĘ
voice ‚Äúengine‚ÄĚ. ¬Ľ
23
Page 27 of 104
Connectivity
Frequently asked questions about Full LinkWhat is the connection method?USB cable.
Will the USB cable be supplied with the vehicle?No. The USB cable supplied with the device should be used.
Is navigation possible?Navigation is possible in each one of the Full Link technologies if the technology is available in your coun-
try and if you have the Navigation app.
What is the difference between using the Full Link system navigator (via
telephone) instead of another navigator?Advantages: daily updates.
Disadvantages: data consumption, reception problems.
Can I send voice messages?With certified apps, such as SEAT ConnectApp, you can answer but not send.
What apps will be visible as I am driving?Depending on the technology:
‚Äď for MirrorLink ¬ģ
: apps certified by SEAT and the CCC,
‚Äď for Android Auto‚ĄĘ: the Apps selected by Google‚ĄĘ,
‚Äď for Apple CarPlay‚ĄĘ: the Apps selected by Apple‚ĄĘ.
Where can I find compatible Apps?The compatible apps are shown at the following
links:www.mirrorlink.com/
www.android.com/auto/
www.apple.com/ios/carplay/
Where can I download the apps?From Google Play‚ĄĘ for Android Auto‚ĄĘ/MirrorLink ¬ģ
and from the Apple Store‚ĄĘ for Apple CarPlay‚ĄĘ.
If Full Link stops working, where can I have it repaired?If the problem is in the car, you should go to the dealer. If the problem is in the mobile device, you should
see your mobile telephone vendor.
Will WhatsApp be certified?This depends on the technology.
Is MirrorLink ¬ģ
available in my country?Yes, MirrorLink ¬ģ
is available in all the countries and regions where SEAT operates.
What are the differences between MirrorLink ¬ģ
, Android Auto‚ĄĘ and Apple
CarPlay‚ĄĘ?MirrorLink ¬ģ
is not compatible with Android Auto‚ĄĘ and Apple CarPlay‚ĄĘ, as they are different technolo-
gies. They all coexist in Full Link, although Android Auto‚ĄĘ is designed for mobile devices with the An-
droid‚ĄĘ operating system, and Apple CarPlay‚ĄĘ for iPhone.
Can MirrorLink ¬ģ
be installed in a previous SEAT model?No, that is not possible.
Where can I find more information about Full Link?If in doubt, please refer to the Innovation/Connectivity sections of our website: www.seat.es or
www.seat.com, or send your query to [email protected] 25
Page 28 of 104
Connectivity
SEAT Media Control Intr oduction 3 Only available for the model: Navi System Plus
The S
EAT Media Control 1)
app can be used to
remotely operate some partial functions in
Radio mode, Media mode and Navigation
mode. Information can be exchanged be-
tween a device and the Infotainment System.
Each one of the functions is operated by
means of a Tablet or partially by means of a
mobile phone.
Operating requirements:
‚óŹ A tablet or mobile phone.
‚óŹ The app must be available on the corre-
spondin g dev
ice.
‚óŹ There must be a WLAN connection between
the Infotainment
System and the device
‚Äļ‚Äļ‚Äļ page 51.
Make sure that data transfer for apps is acti-
vated:
‚óŹ From the SETTINGS menu > Data transfer for
SE
AT apps, there is a checkbox to acti-
vate/deactivate the function and a dropdown
menu called Operation via apps which con-trols the level of interaction between the
apps
and the system ‚Äļ‚Äļ‚Äļ table on page 90.
You can obtain information about technical
requirements on the SEAT website or at SEAT
dealerships.
Telephone functions are not part of the func-
tions of this app.
Data transmission and control func-
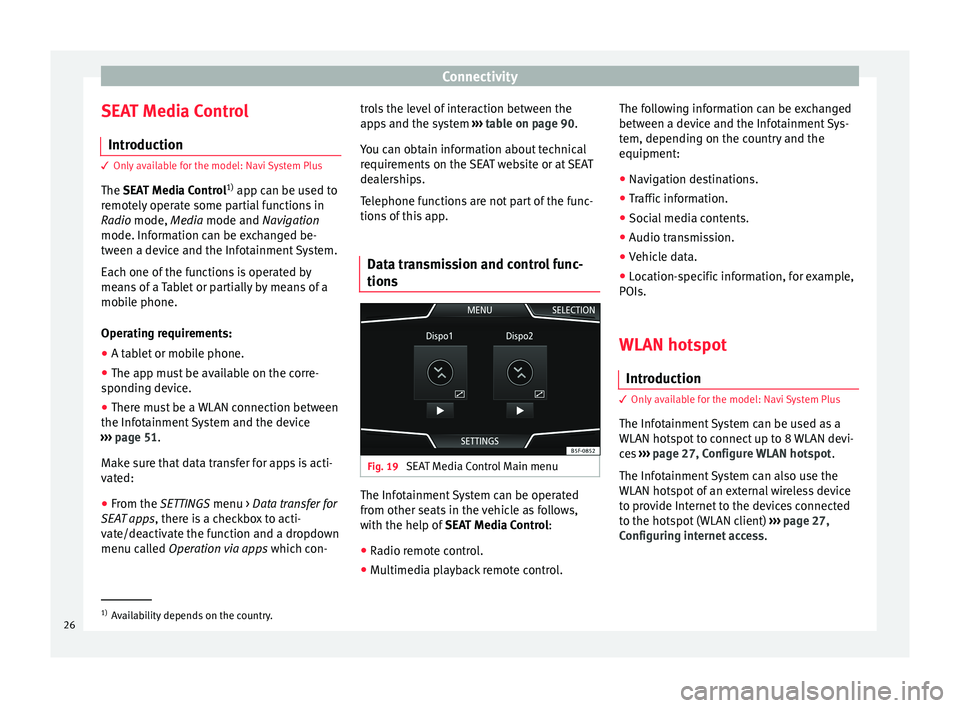
tions Fig. 19
SEAT Media Control Main menu The Infotainment System can be operated
fr
om other se
ats
in the vehicle as follows,
with the help of SEAT Media Control:
‚óŹ Radio remote control.
‚óŹ Multimedia playback remote control. The following information can be exchanged
between a devic
e and the Infotainment Sys-
tem, depending on the country and the
equipment:
‚óŹ Navigation destinations.
‚óŹ Traffic information.
‚óŹ Social media contents.
‚óŹ Audio transmission.
‚óŹ Vehicle data.
‚óŹ Location-specific information, for example,
POIs.
WLAN hotspot
Introduction 3 Only
available for the model: Navi System Plus
The Inf
otainment System can be used as a
WLAN hotspot to connect up to 8 WLAN devi-
ces ‚Äļ‚Äļ‚Äļ page 27, Configure WLAN hotspot .
The Infotainment System can also use the
WLAN hotspot of an external wireless device
to provide Internet to the devices connected
to the hotspot (WLAN client) ‚Äļ‚Äļ‚Äļ page 27,
Configuring internet access .1)
Availability depends on the country.
26
Page 29 of 104
Connectivity
Note
‚óŹ Data tr an
smission may incur charges. Due
to the high volume of data exchanged, SEAT
recommends the use of a flat rate mobile
phone deal for data transmission. Mobile
phone operators can provide the relevant in-
formation.
‚óŹ The exchange of data packages over the in-
ternet m
ay generate additional costs, de-
pending on your mobile phone rate, particu-
larly if you are abroad (for example, roaming
rates). Configure WLAN hotspot
The Infotainment System can be used as a
w
ir
el
ess hotspot to connect up to 8 wireless
devices.
Establishing the connection with the wire-
less network (WLAN)
‚óŹ Press the Infotainment MENU button and
then pr
ess the SETTINGS menu.
‚óŹ Activate the wireless network (WLAN) on
the Infotainment
System. To do so, press the
WLAN function button.
‚óŹ Activate the wireless network (WLAN) on
the wirel
ess device that is to be connected. If
necessary, refer to the manufacturer’s in-
struction manual. ‚óŹ
Activat
e the mobile device assignment on
the Infotainment System. To do so, press the
Mobile hotspot function button and activate
the checkbox.
‚óŹ Enter and confirm the network key dis-
pla
yed on the wireless device.
The following hotspot settings can also be
made on the Hotspot settings menu:
WPA2 encryption automatical-
ly generates a network key.
Network key automatically gen-
erated. Press the function button to
manually change the network key. The
network key must have a minimum of 8
characters and a maximum of 63.
WLAN Network name (maximum of 32
characters).
Activate
the checkbox to deactivate the visibility
of the wireless (WLAN) network.
The wireless (WLAN) connection is establish-
ed. To complete the connection, it may be
necessary to enter other data into the wire-
less device.
Repeat this process to connect other wireless
devices. Security level:
Network key:
SSID:
Do not send network name (SSID): Configuring internet access The Infotainment System can use the WLAN
hotspot
of
an external wireless device to es-
tablish an internet connection.
Establishing the connection with the wire-
less network (WLAN)
‚óŹ Activate the wireless hotspot on the exter-
nal dev
ice. If necessary, refer to the manufac-
turer’s instruction manual.
‚óŹ Press the Infotainment MENU button and
then pr
ess the SETTINGS menu; OR access
Media or SEAT Media Control mode and
press the SETTINGS menu.
‚óŹ Press the WLAN menu and then enter IN-
TERNET A
CCESS SETTINGS and activate the
checkbox.
‚óŹ Press the Find f
unction button and select
the wireless device you want from the list.
‚óŹ If necessary, enter the network key of the
wirel
ess device in the Infotainment System
and confirm with OK.
To manually enter the net-
work settings of an external wireless
(WLAN) device.
The wireless (WLAN) connection is establish-
ed. To complete the connection, it may be
necessary to enter other data into the wire-
less device. ¬Ľ
Manual settings:
27
Page 40 of 104
Audio and Media ModeValid for the model: Navi System Plus
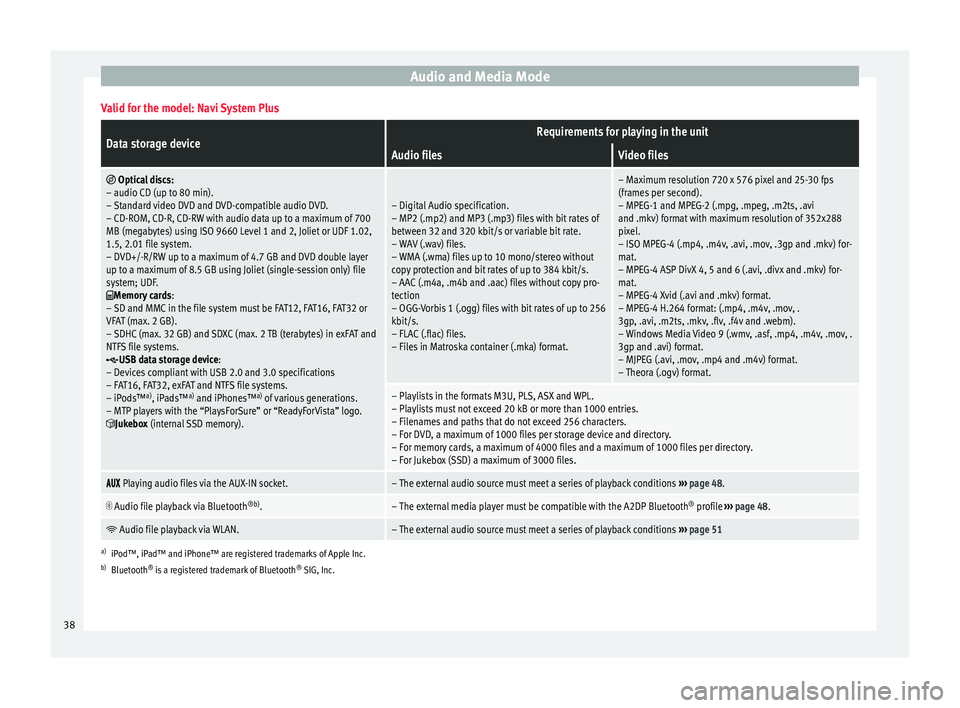
Data storage deviceRequirements for playing in the unit
Audio filesVideo files
ÔĀ©
Optical discs:
‚Äď audio CD (up to 80 min).
‚Äď Standard video DVD and DVD-compatible audio DVD.
‚Äď CD-ROM, CD-R, CD-RW with audio data up to a maximum of 700
MB (megabytes) using ISO 9660 Level 1 and 2, Joliet or UDF 1.02,
1.5, 2.01 file system.
‚Äď DVD+/-R/RW up to a maximum of 4.7 GB and DVD double layer
up to a maximum of 8.5 GB using Joliet (single-session only) file
system; UDF.
ÔÉěMemory cards :
‚Äď SD and MMC in the file system must be FAT12, FAT16, FAT32 or
VFAT (max. 2 GB).
‚Äď SDHC (max. 32 GB) and SDXC (max. 2 TB (terabytes) in exFAT and
NTFS file systems.
ÔÉßUSB data storage device:
‚Äď Devices compliant with USB 2.0 and 3.0 specifications
‚Äď FAT16, FAT32, exFAT and NTFS file systems.
‚Äď iPods‚ĄĘ a)
, iPads‚ĄĘ a)
and iPhones‚ĄĘ a)
of various generations.
‚Äď MTP players with the ‚ÄúPlaysForSure‚ÄĚ or ‚ÄúReadyForVista‚ÄĚ logo.
ÔĀźJukebox (internal SSD memory).
‚Äď Digital Audio specification.
‚Äď MP2 (.mp2) and MP3 (.mp3) files with bit rates of
between 32 and 320 kbit/s or variable bit rate.
‚Äď WAV (.wav) files.
‚Äď WMA (.wma) files up to 10 mono/stereo without
copy protection and bit rates of up to 384 kbit/s.
‚Äď AAC (.m4a, .m4b and .aac) files without copy pro-
tection
‚Äď OGG-Vorbis 1 (.ogg) files with bit rates of up to 256
kbit/s.
‚Äď FLAC (.flac) files.
‚Äď Files in Matroska container (.mka) format.
‚Äď Maximum resolution 720 x 576 pixel and 25-30 fps
(frames per second).
‚Äď MPEG-1 and MPEG-2 (.mpg, .mpeg, .m2ts, .avi
and .mkv) format with maximum resolution of 352x288
pixel.
‚Äď ISO MPEG-4 (.mp4, .m4v, .avi, .mov, .3gp and .mkv) for-
mat.
‚Äď MPEG-4 ASP DivX 4, 5 and 6 (.avi, .divx and .mkv) for-
mat.
‚Äď MPEG-4 Xvid (.avi and .mkv) format.
‚Äď MPEG-4 H.264 format: (.mp4, .m4v, .mov, .
3gp, .avi, .m2ts, .mkv, .flv, .f4v and .webm).
‚Äď Windows Media Video 9 (.wmv, .asf, .mp4, .m4v, .mov, .
3gp and .avi) format.
‚Äď MJPEG (.avi, .mov, .mp4 and .m4v) format.
‚Äď Theora (.ogv) format.
‚Äď Playlists in the formats M3U, PLS, ASX and WPL.
‚Äď Playlists must not exceed 20 kB or more than 1000 entries.
‚Äď Filenames and paths that do not exceed 256 characters.
‚Äď For DVD, a maximum of 1000 files per storage device and directory.
‚Äď For memory cards, a maximum of 4000 files and a maximum of 1000 files per directory.
‚Äď For Jukebox (SSD) a maximum of 3000 files. ÔĀĀÔĀēÔĀė
Playing audio files via the AUX-IN socket.‚Äď The external audio source must meet a series of playback conditions
‚Äļ‚Äļ‚Äļ page 48. ÔÄ™
Audio file playback via Bluetooth
¬ģb)
.‚Äď The external media player must be compatible with the A2DP Bluetooth ¬ģ
profile ‚Äļ‚Äļ‚Äļ page 48. ÔĶ
Audio file playback via WLAN.‚Äď The external audio source must meet a series of playback conditions
‚Äļ‚Äļ‚Äļ page 51
a)
iPod‚ĄĘ, iPad‚ĄĘ and iPhone‚ĄĘ are registered trademarks of Apple Inc.
b) Bluetooth ¬ģ
is a registered trademark of Bluetooth ¬ģ
SIG, Inc.
38
Page 41 of 104
Audio and Media ModeValid for the model: Media System Plus/Navi System
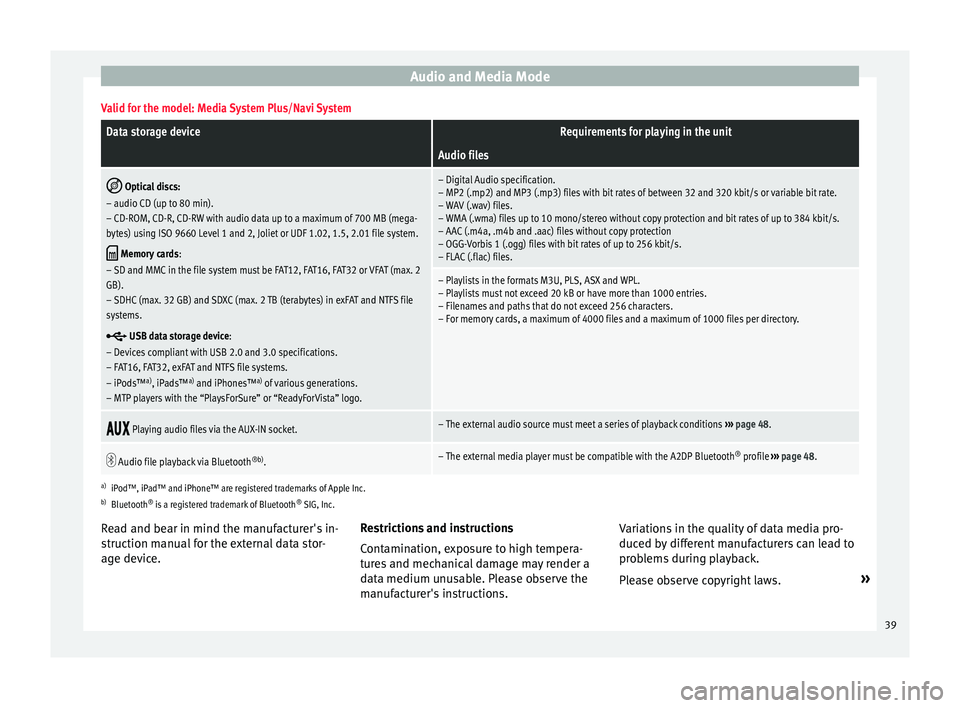
Data storage deviceRequirements for playing in the unit
Audio files
ÔĀ©
Optical discs:
‚Äď audio CD (up to 80 min).
‚Äď CD-ROM, CD-R, CD-RW with audio data up to a maximum of 700 MB (mega-
bytes) using ISO 9660 Level 1 and 2, Joliet or UDF 1.02, 1.5, 2.01 file system.
ÔÉě Memory cards :
‚Äď SD and MMC in the file system must be FAT12, FAT16, FAT32 or VFAT (max. 2
GB).
‚Äď SDHC (max. 32 GB) and SDXC (max. 2 TB (terabytes) in exFAT and NTFS file
systems.
ÔÉß USB data storage device:
‚Äď Devices compliant with USB 2.0 and 3.0 specifications.
‚Äď FAT16, FAT32, exFAT and NTFS file systems.
‚Äď iPods‚ĄĘ a)
, iPads‚ĄĘ a)
and iPhones‚ĄĘ a)
of various generations.
‚Äď MTP players with the ‚ÄúPlaysForSure‚ÄĚ or ‚ÄúReadyForVista‚ÄĚ logo.
‚Äď Digital Audio specification.
‚Äď MP2 (.mp2) and MP3 (.mp3) files with bit rates of between 32 and 320 kbit/s or variable bit rate.
‚Äď WAV (.wav) files.
‚Äď WMA (.wma) files up to 10 mono/stereo without copy protection and bit rates of up to 384 kbit/s.
‚Äď AAC (.m4a, .m4b and .aac) files without copy protection
‚Äď OGG-Vorbis 1 (.ogg) files with bit rates of up to 256 kbit/s.
‚Äď FLAC (.flac) files.
‚Äď Playlists in the formats M3U, PLS, ASX and WPL.
‚Äď Playlists must not exceed 20 kB or have more than 1000 entries.
‚Äď Filenames and paths that do not exceed 256 characters.
‚Äď For memory cards, a maximum of 4000 files and a maximum of 1000 files per directory. ÔĀĀÔĀēÔĀė
Playing audio files via the AUX-IN socket.‚Äď The external audio source must meet a series of playback conditions
‚Äļ‚Äļ‚Äļ page 48. ÔÄ™
Audio file playback via Bluetooth
¬ģb)
.‚Äď The external media player must be compatible with the A2DP Bluetooth ¬ģ
profile ‚Äļ‚Äļ‚Äļ page 48.
a)
iPod‚ĄĘ, iPad‚ĄĘ and iPhone‚ĄĘ are registered trademarks of Apple Inc.
b) Bluetooth ¬ģ
is a registered trademark of Bluetooth ¬ģ
SIG, Inc.
Read and bear in mind the manufacturer's in-
struction manual for the external data stor-
age device. Restrictions and instructions
Contamin
ation, exposure to high tempera-
tures and mechanical damage may render a
data medium unusable. Please observe the
manufacturer's instructions. Variations in the quality of data media pro-
duced by
different manufacturers can lead to
problems during playback.
Please observe copyright laws. ¬Ľ
39
Page 49 of 104
Audio and Media Mode
card from the system, the function button be-
c ome
s
inactive (grey colour).
‚óŹ Press the inserted memory card. The mem-
ory c
ard ‚Äújumps‚ÄĚ to the eject position.
‚óŹ Remove the memory card.
Unrea
dable memory card
If a memory card is inserted and the data
cannot be read, the relevant warning ap-
pears.
External data storage device connec-
ted to USB por
t ÔÉß Depending on the features and the country,
the
v
ehic
le may have one or two USB connec-
tions. For their location consult the ‚Äļ‚Äļ‚Äļ Booklet
Instruction Manual.
Audio files on an external data storage de-
vice connected to the USB port ÔÉß can be
played and controlled via the Infotainment
system.
Where this manual refers to external data
storage devices, this means USB mass stor-
age devices containing supported audio
files, such as MP3 players, iPods‚ĄĘ and USB
sticks.
Only supported audio files are displayed and
played. Other files are ignored. Further operation of the external data medi-
um (chan
ging track, selecting tracks and
playback modes) is described in the appro-
priate chapters of this manual ‚Äļ‚Äļ‚Äļ page 37.
Instructions and restrictions
Compatibility with Apple‚ĄĘ devices and other
media players depends on the unit.
The USB port ÔÉß supplies the usual USB volt-
age of 5 volts for a USB connection.
External hard disks with a capacity greater
than 32 GB must be reformatted for the
FAT32 file system in some circumstances. You
will find the necessary software and informa-
tion on the Internet.
Take into account all other instructions and
limitations regarding requirements for media
sources ‚Äļ‚Äļ‚Äļ page 37.
iPod‚ĄĘ, iPad‚ĄĘ and iPhone‚ĄĘ
Depending on the country and the equip-
ment, iPods‚ĄĘ, iPads‚ĄĘ or iPhones‚ĄĘ can be
connected using the device's USB cable to
the USB port ÔÉß of the vehicle and used as
audio sources.
After connecting an iPod‚ĄĘ, iPad‚ĄĘ or
iPhone‚ĄĘ, the specific list views of the iPod
are displayed in the upper selection level
(ÔÄĪ Playlists , ÔÄĪ Artists, ÔÄĪ Albums ,
ÔÄĪ Tracks , ÔÄĪ Podcasts etc.). Possible error messages after connecting an
extern
al data storage device
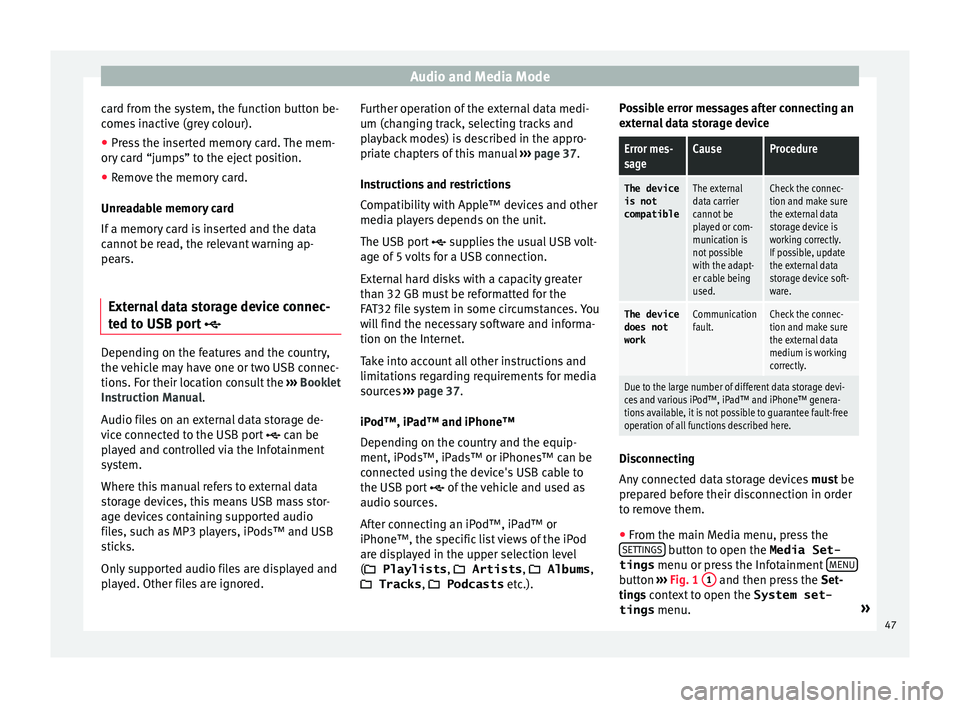
Error mes-
sageCauseProcedure
The device
is not
compatibleThe external
data carrier
cannot be
played or com-
munication is
not possible
with the adapt-
er cable being
used.Check the connec-
tion and make sure
the external data
storage device is
working correctly.
If possible, update
the external data
storage device soft-
ware.
The device
does not
workCommunication
fault.Check the connec-
tion and make sure
the external data
medium is working
correctly.
Due to the large number of different data storage devi-
ces and various iPod‚ĄĘ, iPad‚ĄĘ and iPhone‚ĄĘ genera-
tions available, it is not possible to guarantee fault-free
operation of all functions described here. Disconnecting
An
y
c
onnected data storage devices must be
prepared before their disconnection in order
to remove them.
‚óŹ From the main Media menu, press the
SETTINGS button to open the Media Set-
tings menu or pr e
s
s the Infotainment MENU button
‚Äļ‚Äļ
‚Äļ
Fig. 1 1 and then press the
Set-
tin g
s context to open the System set-
tings menu. ¬Ľ
47
Page 50 of 104
Audio and Media Mode
‚óŹ Pr e
s
s the Remove safely function button. A
dr opdo
wn menu ap
pears with the following
options: SD1 Card, SD2 Card*, USB1 and
USB2*. After correctly ejecting the data stor-
age device from the system, the function but-
ton becomes inactive (grey colour).
‚óŹ Now the data storage device can be discon-
nected. Note
‚óŹ Do not c onnect
an external media player at
the same time to play music via Bluetooth ¬ģ
and via the USB port ÔÉß with the Infotain-
ment system, as this could cause playback
limitations.
‚óŹ If the external player is an Apple device‚ĄĘ,
it cannot
be simultaneously connected by
USB and by Bluetooth.
‚óŹ If a connected device is not recognised, dis-
connect a
ll the connected devices and try
connecting the device again.
‚óŹ Do not use memory card adaptors, USB ex-
tens
ion cords or USB hubs! External audio source connected to
the A
UX
-IN mu
ltimedia socket Depending on the equipment and country
ther
e m
a
y be an AUX-IN multimedia socket
‚Äļ‚Äļ‚Äļ Booklet Instruction Manual.
In order to connect the external audio source
to the AUX-IN socket, a suitable cable is re- quired with a 3.5 mm jack that is inserted in-
to the AUX
-IN socket of the vehicle.
The connected external audio source is
played over the vehicle speakers and cannot
be controlled via the Infotainment system
controls.
The connection of an external audio source is
indicated by AUX on the screen.
Connecting an external audio source to the
AUX-IN multimedia socket ‚óŹ Lower the base volume on the Infotainment
syst
em.
‚óŹ Connect the external audio source to the
AUX-IN mu
ltimedia socket.
‚óŹ Start playback on the external audio
source.
‚óŹ In the MEDIA m
ain menu, press the SOURCE function button and select
A
UX .
The outp ut
volume of the connected external
audio source should be adjusted to the vol-
ume of the other audio sources ‚Äļ‚Äļ‚Äļ page 91.
Information on operating an external audio
source connected to the AUX-IN multimedia
socket
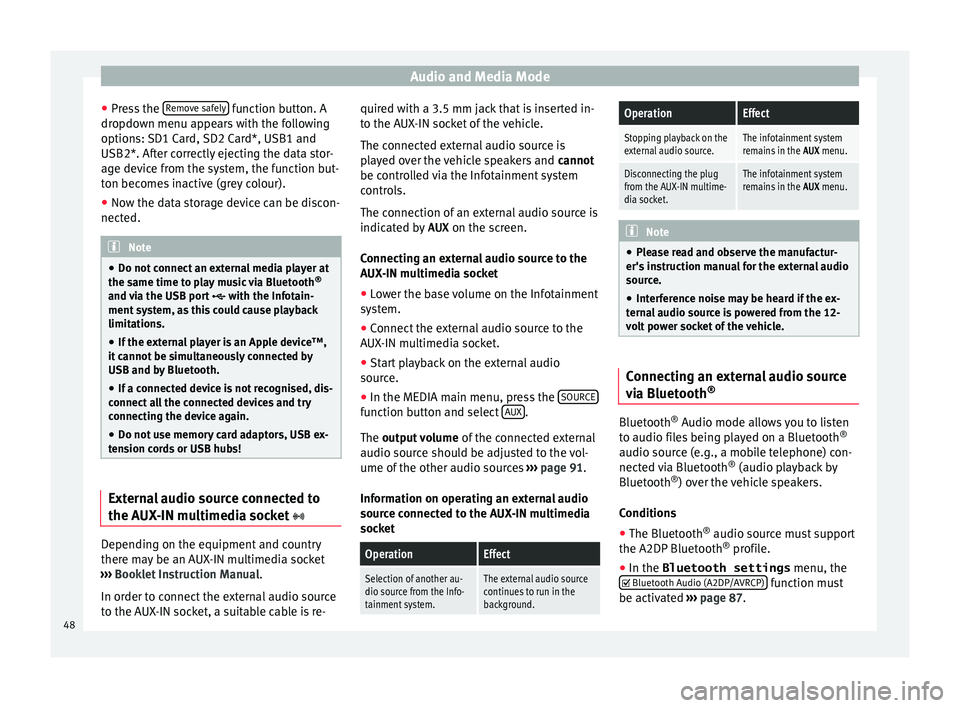
OperationEffect
Selection of another au-
dio source from the Info-
tainment system.The external audio source
continues to run in the
background.
OperationEffect
Stopping playback on the
external audio source.The infotainment system
remains in the AUX menu.
Disconnecting the plug
from the AUX-IN multime-
dia socket.The infotainment system
remains in the AUX menu. Note
‚óŹ Ple a
se read and observe the manufactur-
er's instruction manual for the external audio
source.
‚óŹ Interference noise may be heard if the ex-
terna
l audio source is powered from the 12-
volt power socket of the vehicle. Connecting an external audio source
v
i
a Bluet
ooth¬ģ Bluetooth
¬ģ
Audio mode al lo
w
s you to listen
to audio files being played on a Bluetooth ¬ģ
audio source (e.g., a mobile telephone) con-
nected via Bluetooth ¬ģ
(audio playback by
Bluetooth ¬ģ
) over the vehicle speakers.
Conditions ‚óŹ The Bluetooth ¬ģ
audio source mu
st support
the A2DP Bluetooth ¬ģ
profile.
‚óŹ In the Bluetooth settings menu, the
ÔĀĚ Bluetooth Audio (A2DP/A
VRCP) function must
be activ at
ed ‚Äļ
‚Äļ‚Äļ page 87.
48
Page 51 of 104
Audio and Media Mode
Starting Bluetooth ¬ģ
audio tr an
sf er
‚óŹ Activate Bluetooth ¬ģ
vis
ibility on the exter-
nal Bluetooth ¬ģ
audio source (e.g., mobile tel-
ephone).
‚óŹ Lower the base volume on the Infotainment
syst
em.
‚óŹ In the MEDIA main menu, press the SOURCEfunction button and select
B
T audio .
‚óŹ Press Se
ar
c
h for new device in order to con-
nect an e
xt
ernal Bluetooth ¬ģ
audio source for
the first time ‚Äļ‚Äļ‚Äļ page 78.
‚óŹ OR: Select a Bluetooth ¬ģ
ext
ernal audio
source from the list.
‚óŹ Please refer to the instructions on the
scr
een of the Infotainment system and on the
Bluetooth ¬ģ
audio source regarding the rest
of the procedure.
You may still need to manually start playback
on the Bluetooth ¬ģ
source.
When playback on the Bluetooth ¬ģ
audio
source is stopped, the Infotainment system
remains in Bluetooth ¬ģ
Audio mode.
Controlling playback
The extent to which the Bluetooth ¬ģ
audio
source can be controlled via the Infotainment
system depends on the connected Blue-
tooth ¬ģ
audio source. The available functions will depend on the
Bluetooth
¬ģ
Audio profi
le that the connected
external player supports.
With media players that support the AVRCP
Bluetooth ¬ģ
profile, playback on the Blue-
tooth ¬ģ
audio source can be automatically
started or stopped when the unit is switched
to Bluetooth ¬ģ
Audio mode or to a different
audio source. In addition, it is possible to
view or change the track via the Infotainment
system. Note
‚óŹ Due t o the l
arge number of possible Blue-
tooth ¬ģ
audio sources, it is not possible to
guarantee fault-free operation of all descri-
bed functions.
‚óŹ Always switch off the warning and service
tones
on a connected Bluetooth ¬ģ
audio
source, e.g. key tones on a mobile telephone,
to prevent possible interference noise and
malfunctions.
‚óŹ To play music, do not link the external me-
dia pl
ayer simultaneously to Bluetooth and
the USB interface of the infotainment system,
as this can cause limitations during playback.
‚óŹ Depending on the external player connec-
ted, the re
sponse time of the system can
vary. ‚óŹ
Do not c onnect
an external media player to
play music via Bluetooth ¬ģ
and via the USB
port ÔÉß ‚Äļ‚Äļ‚Äļ page 47 at the same time with the
Infotainment system, as this could cause
playback limitations.
‚óŹ If the external player is an Apple device‚ĄĘ,
it c
annot be simultaneously connected by
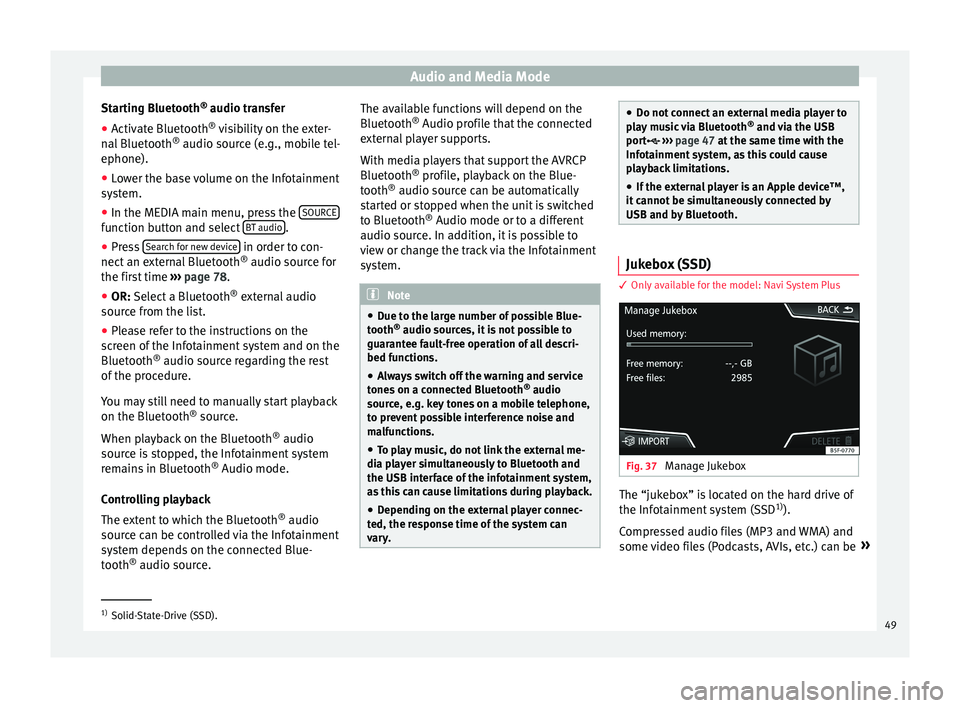
USB and by Bluetooth. Jukebox (SSD)
3 Only
available for the model: Navi System Plus Fig. 37
Manage Jukebox The ‚Äújukebox‚ÄĚ is located on the hard drive of
the Inf
ot
ainment
system (SSD1)
).
Compressed audio files (MP3 and WMA) and
some video files (Podcasts, AVIs, etc.) can be ¬Ľ1)
Solid-State-Drive (SSD).
49
Page 53 of 104
Audio and Media Mode
‚óŹ Mu
s
ic genre
‚óŹ Title
‚óŹ Video
‚óŹ Non-playable files (an unsupported file has
been imported). Note
‚óŹ If the Inf ot
ainment system cancels a copy-
ing operation, check the storage space on the
internal hard drive and check the data stor-
age device.
‚óŹ Due to copyright laws, before any change in
ownership of
the Infotainment system, all
files stored on the jukebox must be deleted.
‚óŹ There are various possible reasons why
file
s may be shown with inactive status (grey
colour): files that cannot be imported (e.g.
images), files that are already present in
Jukebox or files that occupy more space than
is available in the internal memory. Connecting an external audio source
v
i
a
WLAN 3 Only
available for the model: Navi System Plus
WLAN al
lows wireless connection between an
external audio source (for example a smart
phone) and the Infotainment system.
To use this connection, the device being con-
nected must have an app compatible with
the UPnP (Universal Plug and Play) communi- cation protocol, allowing the app to provide
the sys
t
em with the available media content.
Conditions ‚óŹ Having a compatible (UPnP) app installed
on the mobi
le device.
‚óŹ Having the mobile hotspot found in the
w
ireless connection configuration active
‚Äļ‚Äļ‚Äļ page 51, WLAN setup.
‚óŹ Pairing the mobile device to the Infotain-
ment sys
tem using a password generated by
the system. The pairing must be done from
the mobile device that you wish to connect to
the Infotainment system.
Starting the WLAN audio transfer
‚óŹ Lower the base volume on the Infotainment
syst
em.
‚óŹ Start the UPnP app or the app for the play-
back
of the WLAN audio source.
‚óŹ In the MEDIA main menu, press the SOURCE function button and select
WLAN .
‚óŹ Please refer to the instructions on the
s c
r
een of the Infotainment system and on the
WLAN audio source regarding the rest of the
procedure.
Controlling playback
The extent to which the WLAN audio source
can be controlled via the Infotainment sys- tem depends on the connected WLAN audio
source and the ap
plication used. Note
‚óŹ The Infot ainment
system does not provide
an internet connection, it only establishes a
wireless connection between the mobile de-
vice and said system.
‚óŹ Via the WLAN, only the connection between
the device and the Inf
otainment system can
be guaranteed, its operation depends on the
application itself. WLAN setup
3 Only
available for the model: Navi System Plus
T
o access the WLAN settings, the ignition
must be on.
‚óŹ Select the Media Main menu by pressing
the Infot ainment
MENU button
‚Äļ‚Äļ
‚Äļ
Fig. 1 1 and then selecting the M
edi
a context.
‚óŹ Press the SETTINGS function button to open
the Media Settings menu.
‚óŹ Press the WLAN function button, then the
Hotspot settings butt
on w
ill appear, to-
gether with a text with information about us-
ing the WLAN.
‚óŹ Press the Hotspot settings function
b
utton, and you will then be able to switch
on/off the Mobile hotspot and access the
Configuration of the WLAN network. ¬Ľ
51