Seat Leon 5D 2017 Workshop Manual
Manufacturer: SEAT, Model Year: 2017, Model line: Leon 5D, Model: Seat Leon 5D 2017Pages: 332, PDF Size: 7.25 MB
Page 51 of 332

The essentials
Ignition: Do not carry on
driving! Engine coolant level
too low, coolant temperature
too high
››› page
274
Flashing: Fault in the engine
coolant system.
Do not continue driving!
Engine oil pressure too low. If
the warning lamp flashes,
stop driving, even if the oil
level is correct. Do not even
run the engine at idle speed!
››› page
272
Fault in the battery.›››
page
277
Driving light totally or partially
faulty.›››
page
103
Fault in the cornering light
system.››› page
140
Diesel particulate filter
blocked›››
page
203
Level of windscreen washer
fluid too low.›››
page
148
Flashing: Fault in the oil level
detection. Control manually.
›››
page
272
Ignition: Insufficient engine
oil.
Fault in the gearbox.›››
page
198
Light Assist on.›››
page
142
Immobiliser active.›››
page
131
Service interval display›››
page 44
Mobile telephone is connec-
ted via Bluetooth to the origi-
nal telephone device.›››
page
121
››› page
123
››› Booklet
Audio or
navigation
system
Mobile telephone battery
charge meter. Available only
for devices pre-installed in fac-
tory.
Freezing warning. The outside
temperature is lower than
+4°C (+39°F).›››
page 42
Start-Stop system activated.›››
page
205
Start-Stop system unavailable.
Low consumption driving sta-
tus›››
page
115
›››
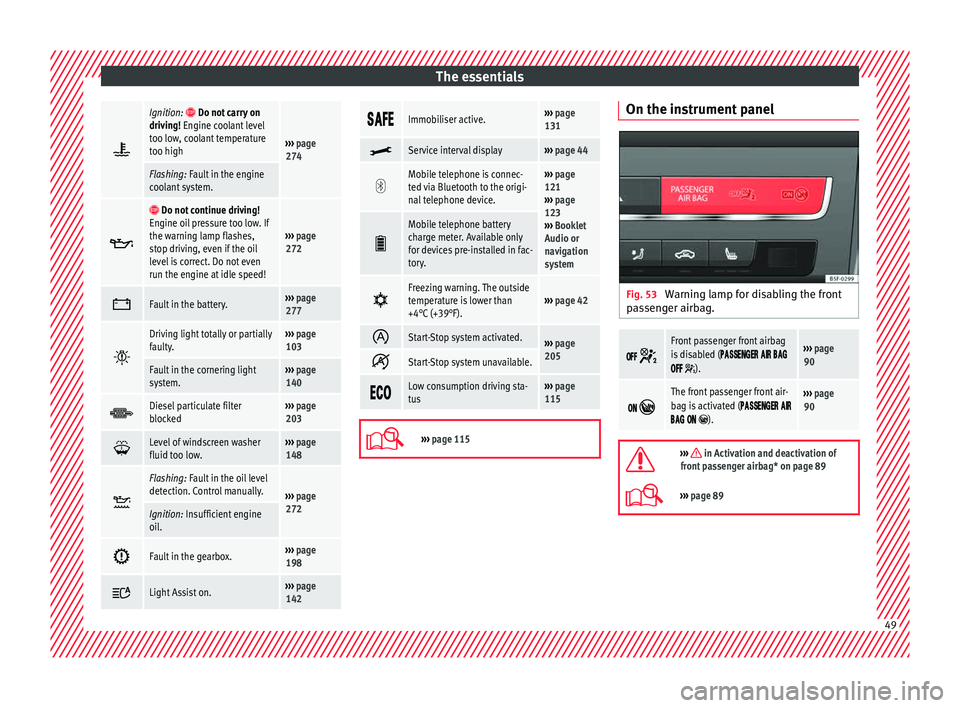
page 115 On the instrument panel
Fig. 53
Warning lamp for disabling the front
p a
s
senger airbag.
Front passenger front airbag
is disabled (
).
››› page
90
The front passenger front air-
bag is activated (
).
››› page
90
››› in Activation and deactivation of
front passenger airbag* on page 89
››› page 89 49
Page 52 of 332

The essentials
Gearbox lever M anua
l
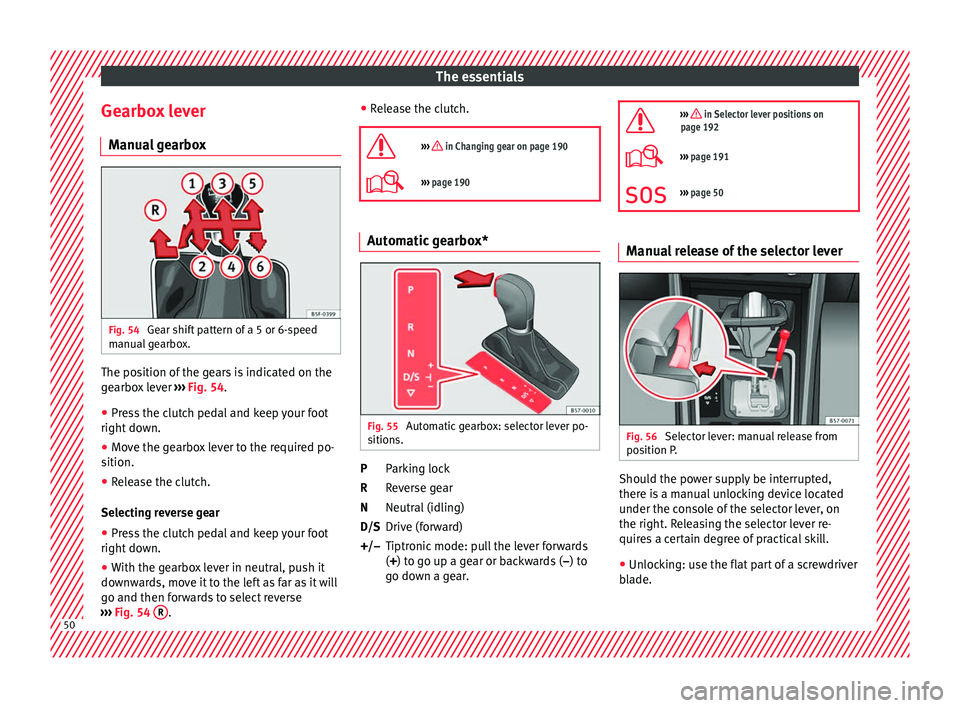
gearbox Fig. 54
Gear shift pattern of a 5 or 6-speed
m anual
g
earbox. The position of the gears is indicated on the
g
e
arbo
x lever ››› Fig. 54.
● Press the clutch pedal and keep your foot
right down.
● Mo
ve the gearbox lever to the required po-
sition.
● Rel
ease the clutch.
Selecting r
everse gear
● Press the clutch pedal and keep your foot
right down.
● W
ith the gearbox lever in neutral, push it
downw
ards, move it to the left as far as it will
go and then forwards to select reverse
››› Fig. 54 R . ●
Rel
e
ase the clutch.
››› in Changing gear on page 190
››› page 190 Automatic gearbox*
Fig. 55
Automatic gearbox: selector lever po-
s ition
s. Parking lock
R
ev
er
se gear
Neutral (idling)
Drive (forward)
Tiptronic mode: pull the lever forwards
(+) to go up a gear or backwards ( –) to
go down a gear.
P
R
N
D/S
+/–
››› in Selector lever positions on
page 192
››› page 191
››› page 50 Manual release of the selector lever
Fig. 56
Selector lever: manual release from
po s
ition P
. Should the power supply be interrupted,
ther
e i
s
a manual unlocking device located
under the console of the selector lever, on
the right. Releasing the selector lever re-
quires a certain degree of practical skill.
● Unlocking: use the flat part of a screwdriver
bla
de. 50
Page 53 of 332

The essentials
Removing the cover from the selector lever
● Apply the handbrake › ›
› to ensure that
the c ar doe
s
not move.
● Carefully pull the corners of the selector
lever boot
and twist it upwards above the lev-
er handle.
Releasing the selector lever
● Using a screwdriver, press and hold the yel-
low un
locking tab sideways ››› Fig. 56. ●
Now pre
ss the interlock button on the se-
lector lever A and move the selector lever to
po s
ition
N.
● After carrying out the manual release, at-
tach the sel
ector lever boot on the gearbox
console again.
If the power supply should ever fail (e.g. dis-
charged battery) and the vehicle has to be
pushed or towed, the selector lever must first be moved to position N, after oper
ating the
manual release mechanism. WARNING
The selector lever may be moved out of posi-
tion P only when the h
andbrake is firmly ap-
plied. If this does not work, secure the vehi-
cle with the brake pedal. On a slope the vehi-
cle could otherwise start to move inadver-
tently after shifting the selector lever out of
position P - accident risk! 51
Page 54 of 332

The essentials
Air conditioning Ho w doe
s
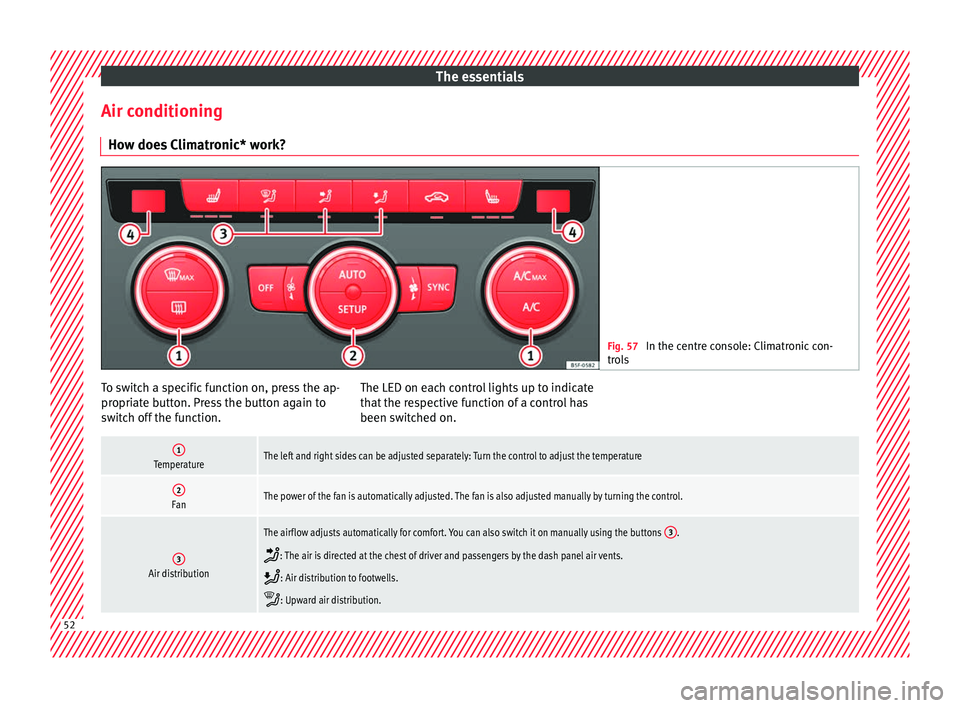
Climatronic* work? Fig. 57
In the centre console: Climatronic con-
tro l
s To switch a specific function on, press the ap-
pr
opri
at
e button. Press the button again to
switch off the function. The LED on each control lights up to indicate
that the r
espective function of a control has
been switched on.
1TemperatureThe left and right sides can be adjusted separately: Turn the control to adjust the temperature
2FanThe power of the fan is automatically adjusted. The fan is also adjusted manually by turning the control.
3Air distribution
The airflow adjusts automatically for comfort. You can also switch it on manually using the buttons 3.
: The air is directed at the chest of driver and passengers by the dash panel air vents.
: Air distribution to footwells.
: Upward air distribution.52
Page 55 of 332

The essentials4Indications on the temperature display screen selected for the right and left sides.
Defrost functionThe air drawn in from outside the vehicle is directed at the windscreen and air recirculation is automatically switched off. To defrost the wind-
screen more quickly, the air is dehumidified at temperatures over approximately +3°C (+38°F) and the fan runs at maximum output.
Heated rear window: this only works when the engine is running and switches off automatically after a maximum of 10 minutes.
Air recirculation
Seat heating buttons
Press the button to switch on or off the cooling system.
Press the button to make maximum cooling capacity available. The recirculation of air and the cooling system turn on automatically and air distri-
bution adjusts automatically to the position .
When the warning light for button lights up, the settings on the driver side also apply to the passenger side. Press the button or the temper-
ature control on the passenger side
Automatic adjustment of temperature, fan, and air distribution. Press the button: the warning lamp on the button will light up .
Press the configuration button : the air conditioning operation menu will be displayed on the Easy Connect system screen.
Switching offTurn the blower control to the position or press the button.
››› in Introduction on page 173
›››
page 173 53
Page 56 of 332

The essentials
How does the manual air conditioning work*? Fig. 58
In the centre console: Manual air condi-
tioning c ontr
ols. To switch a specific function on, press the ap-
pr
opri
at
e button. Press the button again to
switch off the function. The LED on each control lights up to indicate
that the r
espective function of a control has
been switched on.
1Temperature
Turn the control to adjust the temperature.
: Maximum cooling power. The recirculation of air and the cooling system turn on automatically and air distribution adjusts automatically to the
position .
2FanSetting 0: blower and manual air conditioning switched off
Level 6: maximum fan level. 54
Page 57 of 332

The essentials3Air distribution
: Defrost function. The airflow is directed at the windscreen. Air recirculation is automatically switched off or is not switched on. Increase the fan power
to clear the windscreen of condensation as soon as possible. To dehumidify the air, the cooling system will automatically switch on.
: The air is directed at the chest of driver and passengers by the dash panel air vents.
: Distribution of air towards the chest and the footwell area.
: Air distribution to footwells.
: Air distribution towards the windscreen and the footwell.
Press the button to switch on or off the cooling system.
Heated rear window: this only works when the engine is running and switches off automatically after a maximum of 10 minutes.
Air recirculation
Seat heating buttons
››› in Introduction on page 173
›››
page 173 55
Page 58 of 332

The essentials
How does the heating and the fresh air system work? Fig. 59
In the centre console: heating system and
fre sh air c
ontrols. To switch a specific function on, press the ap-
pr
opri
at
e button. Press the button again to
switch off the function. The LED on each control lights up to indicate
that the r
espective function of a control has
been switched on.
1TemperatureTurn the control to adjust the temperature. The temperature cannot be lower than that of the exterior air temperature, as this system cannot cool or dehumid-
ify the air
2FanSetting 0: blower, heating and fresh air systems switched off
Level 6: maximum fan level
3Air distribution
: Defrost function. The airflow is directed at the windscreen.
: The air is directed at the chest of driver and passengers by the dash panel air vents.
: Distribution of air towards the chest and the footwell area.
: Air distribution to footwells.
: Air distribution towards the windscreen and the footwell.
56
Page 59 of 332

The essentials
Heated rear window: this only works when the engine is running and switches off automatically after a maximum of 10 minutes
Air recirculation
››› page 176
››› in Introduction on page 173
›››
page 173 57
Page 60 of 332

The essentials
Fluid Level control Fi l
lin
g capacities
Tank level
Petrol and diesel
engines50 l, of which, approx. 7 l reserveVehicles with all-wheel-drive :
55 l, of which, approx. 8.5 l re- serve
Natural gas en-
ginea)approx. 15 kg
a)
The capacity depends on the efficacy and characteristics of
the natural gas pumps. The capacity indicated is based on a
minimum loading pressure of 200 bar.
Capacity of the windscreen washer fluid container
Versions without
headlight washer
systemapprox. 3 litres
Versions with
headlight washer
systemapprox. 5 litres Fuel
Fig. 60
Fuel tank flap with tank cap attached. The flap that covers the tank cap is unlocked
and loc
k
ed aut
omatically using the central
locking.
Opening the fuel tank cap
● Open the fuel tank flap by pressing on the
left
side.
● Unscrew the cap by turning it to the left. ●
Place it
in the space on the hinge of the
open flap ››› Fig. 60.
Closing the fuel tank cap ● Unscrew the cap by turning it to the right as
far as
it will go.
● Close the lid.
››› in Refuelling on page 265
››› page 264 58