air condition Seat Leon SC 2014 MEDIA SYSTEM 2.2
[x] Cancel search | Manufacturer: SEAT, Model Year: 2014, Model line: Leon SC, Model: Seat Leon SC 2014Pages: 114, PDF Size: 2.47 MB
Page 5 of 114
4Introduction
Introduction
Before using the unit for the first time
Before using the unit for the first time, carry out the following steps. This
will enable you to use the unit safely and make full use of the functions it
provides
● Observe the basic safety notes ⇒ page 4.
● Familiarise yourself with the unit overview ⇒ page 6.
● Restore factory settings (standard settings) in the system settings menu
⇒ page 101.
● Use suitable data media for media mode ⇒ page 27.
Safety instructions
WARNING
Your attention may be distracted from the traffic if you use the radio and
navigation system while driving, resulting in accident.
● Always stay alert and drive responsibly.
● Select volume settings that allow you to easily hear signals from out-
side the vehicle at all times (e.g. emergency service sirens).
● If the volume is too high, you could damage your hearing. Even if the
volume is too loud for a short period only.
WARNING
The recommendations and traffic signs shown by the navigation system
may differ from the true traffic conditions.
● Traffic signs and traffic regulations have priority over the recommen-
dations and displays provided by the navigation system.
● Adjust your speed and driving style to visibility, road, traffic and
weather conditions.
WARNING
External devices that are placed loose in the vehicle or not properly se-
cured could be flung though the interior and cause injuries during a sud-
den driving or braking manoeuvre, or in the event of an accident.
● While the vehicle is in motion, always fasten or store external devices
securely outside the airbag deployment zones.
● Arrange the connecting leads of external devices so that they do not
obstruct the driver.
WARNING
The volume level may suddenly change when you switch audio source or
connect a new audio source.
● Reduce the base volume before switching audio sources or connect-
ing a new audio source ⇒ page 9.
Page 10 of 114
9
Introduction
If the vehicle battery has been disconnected, switch on the ignition before
re-connecting the unit.
Adjusting the base volume
effectActionIncrease the vol-
ume.On the radio: Turn the volume control ⇒ Fig. 1 1clockwise.
On the multifunction steering wheel:
Turn the volume
control up or press the corresponding button (depend-
ing on equipment fitted) ⇒ Booklet Instruction Manual
Lower the vol-
ume.On the radio: Turn the volume control ⇒ Fig. 1 1counter-clockwise.
On the multifunction steering wheel:
Turn the volume
control down or press the corresponding button (de-
pending on equipment fitted) ⇒ Booklet Instruction
Manual
Changes to the volume are indicated by a “bar” on the screen. During this
time the unit cannot be operated.
At “0” the unit is muted (display: ) and the current Media source is stop-
ped.
It is possible to preset certain volume settings and adjustments
⇒ page 101.
WARNING
Your attention may be distracted from the traffic if you use the radio and
navigation system while driving, resulting in accident.
● Always stay alert and drive responsibly.
WARNING (Continued)
● Select volume settings that allow you to easily hear signals from out-
side the vehicle at all times (e.g. emergency service sirens).
● If the volume is too high, you could damage your hearing. Even if the
volume is too loud for a short period only.
CAUTION
The vehicle loudspeakers may be damaged if the volume is too high or the
sound is distorted.
Note
If the base volume has been turned up high to play an audio source
(e.g. due to very quiet audio output from an external audio source), lower
the volume again before switching audio source.
Additional information and display options
The text displayed on the screen may vary depending on the settings and
may not match the illustrations shown here.
All displays appear only after the radio-navigation system has completed
start-up.
Depending on the vehicle, the changes to the air conditioning settings or
the texts relating to driver assistance systems fitted at the factory are dis-
played. These displays disappear automatically when they are no longer re-
quired.
Page 77 of 114
76Telephone control (Phone)
Changing between user profiles
When a mobile phone is connected to the radio and navigation system, a
user profile is created for that mobile.
Up to four different user profiles can be created. If four user profiles have
already been created and you wish to create a new profile, it will be neces-
sary to first delete one of the previous profiles.
It is only possible to connect one mobile phone to the hands-free profile of
the radio and navigation system at a given time.
Up to two different Bluetooth devices can be connected at the same time.
Each device will be linked to a different profile (one as hands-free and one
as multimedia). It is not possible to connect two devices under the same
profile (e.g. two mobile phones as hands-free or two multimedia players at
the same time).
To delete a user profile, proceed as follows:
● Press the SETUP
unit button.
● Press the Bluetooth Settings function button.
● Alternatively: select the Bluetooth Settings by turning the setting knob
⇒ Fig. 1 10 and press knob to confirm.
● Press the Paired devices list function button.
● OR: Select the Paired device list function button by turning the setting
knob and press knob to confirm.
● Select the mobile phone to be deleted from the list of connected units.
● Press the Delete
function button or the lower button to confirm the pro-
cedure.
After deleting the phone, there will only be three entries in the list of con-
nected units. It will now be possible to start a new connection to another
mobile phone.
Note
For the purposes of security, Bluetooth visibility in the radio and navigation
system is limited to 5 minutes.
Note
The Bluetooth connection has a maximum range of 10 metres. An existing
Bluetooth connection will be disconnected if the distance between the con-
nected units is greater than this. The connection is automatically resumed
when the units are back within the range.
Note
When a mobile phone is connected for the first time from the navigation
system telephone menu, the phone is paired as a telephone and as a media
player (for playing music stored in the phone via Bluetooth). With a mobile
phone that has already been paired with the navigation system:
● If you try to pair a second mobile phone with the telephone menu, the
first mobile phone will be completely disconnected from the navigation sys-
tem.
● If you try to pair a second mobile phone from the media menu, the first
mobile phone will only be disconnected as a media player, but will continue
to be paired as a mobile phone. This means that the first mobile phone will
operate as a telephone, while the music played will be taken from the song
list on the second mobile phone.
Automatic pairing
When the telephone has been connected and the corresponding user pro-
file created, your telephone will automatically link up with the SEAT tele-
phone system under the following conditions:
Page 88 of 114
87
Bluetooth System
WARNING
Telephone calls and the use of the mobile phone pre-installation while
driving may distract the driver from the road and result in accident.
● Always stay alert and drive responsibly.
● Select volume settings that allow you to easily hear signals from out-
side the vehicle at all times, e.g. emergency service sirens.
● Your call may be cut off or you may be unable to make calls if you are
in an area with no mobile phone network coverage, an area where the
network is very weak or, in some cases, in a tunnel, garage or underpass.
This also means that no emergency calls can be made.
● The speech system must not be used in cases of emergency, since the
voice changes in stressful situations. This could result in a failed or de-
layed telephone connection. Always dial emergency numbers manually!
● Always observe applicable legislation.
WARNING
If the mobile phone is not securely fastened in position, it could be sent
flying around the vehicle in the event of sharp braking, sudden manoeu-
vres or accident, causing injury.
● While the vehicle is in motion, always secure the mobile phone prop-
erly outside the airbag deployment zone.
WARNING
Mobile phones may affect the operation of pacemakers. Always maintain
a suitable distance between the phone and the pacemaker.
● Maintain a gap of roughly 20 centimetres between the aerials of the
mobile phone and the pacemaker, as mobile phones may affect the func-
tioning of pacemakers.
WARNING (Continued)
● Do not keep mobile phones in breast pockets directly above pacemak-
ers.
● Switch off the mobile phone immediately if you suspect there may be
interference.
WARNING
An unfolded armrest may restrict the driver's movements causing a seri-
ous accident.
● While driving, the armrest should always be closed.
CAUTION
High speeds, poor weather or road conditions and the quality of reception
can all affect the quality of a telephone conversation in the vehicle.
Note
● The instructions shown on the screen for each telephone menu will de-
pend on the mobile phone used. There may be variations.
● Please observe instructions for the use of the mobile phone and phone
accessories, together with instructions referring to the use of headphones.
● You may experience problems with reception or your call may be cut off
in areas without network coverage.
● Most electronic devices are shielded against high-frequency signals.
However, some electronic devices may not be shielded against radio fre-
quency signals from the telephone. This could lead to malfunction.
● The voice control system is only available in the following languages:
Spanish, Mexican Spanish, German, English, French, Canadian French, Ital-
ian, Portuguese, Czech, Russian and Dutch. For other languages, the prede-
fined language for the voice control system will depend on the country in
which the vehicle is sold. Please ask the Technical Service to change the
predefined language if required.
Page 92 of 114
91
Bluetooth System
the system will ask you to confirm that the password shown on the dash
panel display is the same as that displayed on the mobile phone. Confirma-
tion must be made both on the mobile device and on the instrument panel
using controls on the steering wheel. This password will be a 6 digit code
generated randomly each time according to SSP technology. The system is
capable of supporting SSP (Secure Simple Pairing) in order for the pairing to
be performed in a completely secure manner. SSP pairing can only be car-
ried out if your device supports the SSP function.
● Next, accept the connection instructions on the mobile phone.
● When asked to do so, enter the PIN number 1234 and confirm.
● The contacts from the mobile phone's memory and/or SIM card 1)
are
transferred to the vehicle system. Some mobile phones may display a mes-
sage asking for confirmation of access to the phone book or other options,
these messages should be accepted in order for the hands free system to
access the information contained on the mobile and in order to carry out the
complete functions of the system.
● The pairing is complete.
Note
● The visibility of the Bluetooth system in the vehicle is activated for 3 mi-
nutes when the ignition is turned on with the key. After 3 minutes, if you
want to reactivate the visibility you can do so by using the menus on the in-
strument panel ⇒ page 98 or via voice control ⇒ page 93.
● If for any reason you take more than 3 minutes to perform these steps or
more than 30 seconds to enter the PIN, you will have to start the process
over again. Automatic pairing
When the telephone has been connected and the corresponding user pro-
file created, your telephone will automatically link up with the SEAT tele-
phone system under the following conditions:
● The mobile phone is switched on and the Bluetooth function and visibili-
ty are activated. The mobile phone must be close to the vehicle.
● The vehicle system has Bluetooth visibility switched on (during the 3 mi-
nutes following activation of the contact or after pressing the button “PTT”).
● The automatic connection was accepted during the questions of the first
connection.
Controlled from the steering wheel
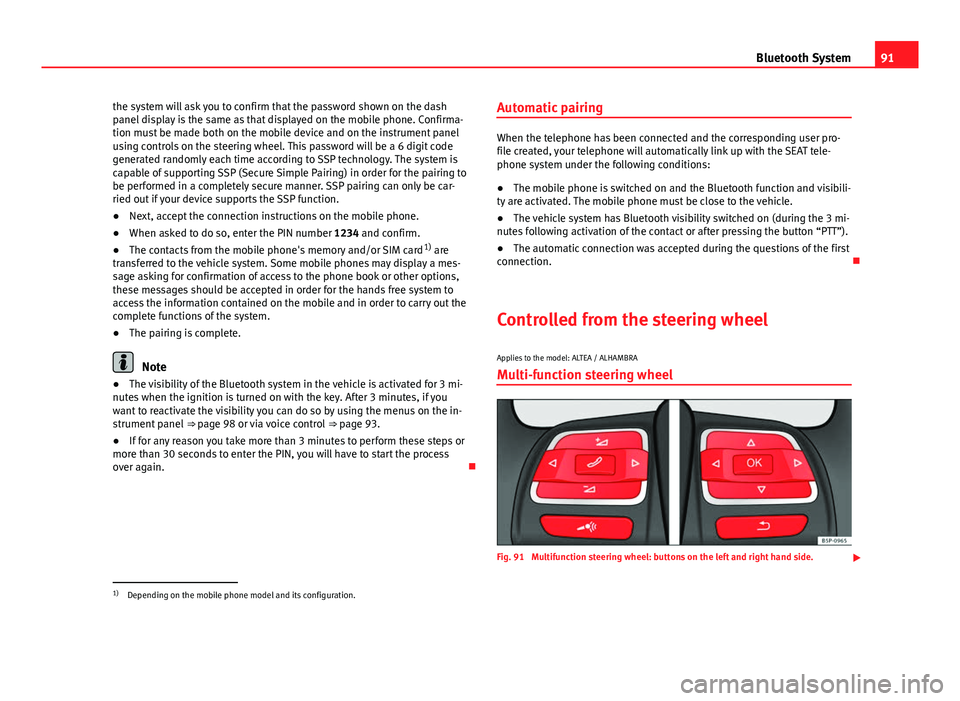
Applies to the model: ALTEA / ALHAMBRA Multi-function steering wheel
Fig. 91 Multifunction steering wheel: buttons on the left and right hand side.
1)
Depending on the mobile phone model and its configuration.
Page 104 of 114

103
Settings (SETUP)
Function button: EffectView of keyboard ABC: The keyboard in input windows has an alphabetic layout. QWERTY: The keyboard in input windows has the usual computer layout.Screen: Change display settings. Brightness: press to select the screen brightness setting. Day/Night: changes the map view.
Automatic: the map view changes when the dipped beams are switch-
ed on.
Day: the map view remains in daytime mode (bright). Night: the map view remains in night-time mode (dark).
Acoustic feedback signal: Switch the confirmation tone for pressing a func-
tion button on or off.
Factory settings: restore the unit to its original factory settings.Air conditioning announcements
3 s, 5 s, 10 s Changes to the air conditioning are displayed on the
screen for approximately 3, 5 or 10 seconds.
Off: Changes to the air conditioning settings are not displayed on the
screen.
Clock Display: Switch time display on or off ⇒ page 9.Status of the SD card: Display whether the memory card contains navigation
data.
Remove the SD card: In some units the memory card inserted in the unit must
be prepared before extracting it.
Note
The system of units used in the navigation menu (metric or imperial) is set
on the instrument panel.
Page 107 of 114

Deleting station list . . . . . . . . . . . . . . . . . . . 25
Ensemble . . . . . . . . . . . . . . . . . . . . . . . . . . . 22
FM programme tracking . . . . . . . . . . . . . . . . 25
Incoming messages . . . . . . . . . . . . . . . . . . . 22
Main menu . . . . . . . . . . . . . . . . . . . . . . . . . . 23
Operation . . . . . . . . . . . . . . . . . . . . . . . . . . . 22
Programme tracking . . . . . . . . . . . . . . . . . . . 25
Radio text . . . . . . . . . . . . . . . . . . . . . . . . . . . 22
Selecting a station . . . . . . . . . . . . . . . . . . . . 24
SETUP . . . . . . . . . . . . . . . . . . . . . . . . . . . . . . 25
Station list . . . . . . . . . . . . . . . . . . . . . . . . . . 24
Switching incoming messages on or off . . . 25
Switching on . . . . . . . . . . . . . . . . . . . . . . . . . 23
Updating the station list . . . . . . . . . . . . . . . 25
Data, deleting See: Deleting . . . . . . . . . . . . . . . . . . . . . . . 102
Day or night design . . . . . . . . . . . . . . . . . . . . . 102
Delete Destination memory . . . . . . . . . . . . . . . . . . . 58
Destinations . . . . . . . . . . . . . . . . . . . . . . . . . 58
Telephone user profile . . . . . . . . . . . . . . . . . 78
Delete memory See: Deleting . . . . . . . . . . . . . . . . . . . . . . . 102
Deleting All entries . . . . . . . . . . . . . . . . . . . . . . . . . . 102
Navigation data on memory card . . . . . . . . 45
Radio presets . . . . . . . . . . . . . . . . . . . . . . . . 17
Station list (DAB) . . . . . . . . . . . . . . . . . . . . . 25
Stored DAB stations . . . . . . . . . . . . . . . . . . . 25
Demo mode (navigation) . . . . . . . . . . . . . . . . . . 70
Destination Displaying . . . . . . . . . . . . . . . . . . . . . . . . . . . 51
Home address . . . . . . . . . . . . . . . . . . . . . . . 52 Last destinations . . . . . . . . . . . . . . . . . . . . . 56
Petrol station or car park . . . . . . . . . . . . . . . 53
Searching for a point of interest . . . . . . . . . 54
Stored destinations . . . . . . . . . . . . . . . . . . . 52
Destination memory . . . . . . . . . . . . . . . . . . . . . . 56 Delete . . . . . . . . . . . . . . . . . . . . . . . . . . . . . . 58
Editing destinations . . . . . . . . . . . . . . . . . . . 57
Last destinations . . . . . . . . . . . . . . . . . . . . . 56
Storing destinations . . . . . . . . . . . . . . . . . . 57
Destinations Editing . . . . . . . . . . . . . . . . . . . . . . . . . . . . . . 57
Destination window . . . . . . . . . . . . . . . . . . . . . . 51
Detour . . . . . . . . . . . . . . . . . . . . . . . . . . . . . . . . . 65
Dialogue Options . . . . . . . . . . . . . . . . . . . . . . . . . . . . . 96
Push To Talk . . . . . . . . . . . . . . . . . . . . . . . . . 93
Digital radio See: "DAB" . . . . . . . . . . . . . . . . . . . . . . . . . . 22
Display Additional display information . . . . . . . . . . . 9
Air conditioning displays . . . . . . . . . . . . . . 102
Brightness . . . . . . . . . . . . . . . . . . . . . . . . . 102
Keyboard layout . . . . . . . . . . . . . . . . . . . . . 102
Kilometres or miles . . . . . . . . . . . . . . . . . . 103
Map view . . . . . . . . . . . . . . . . . . . . . . . . . . . 102
DTMF . . . . . . . . . . . . . . . . . . . . . . . . . . . . . . . . . . 93
Dynamic route guidance . . . . . . . . . . . . . . . . . . 68
E
Enter mark Cursor . . . . . . . . . . . . . . . . . . . . . . . . . . . . . . 49 Entries, deleting
See: Deleting . . . . . . . . . . . . . . . . . . . . . . . 102
EON . . . . . . . . . . . . . . . . . . . . . . . . . . . . . . . 20, 104
Explosion: areas of risk Telephone . . . . . . . . . . . . . . . . . . . . . . . . . . . 88
External audio source Bluetooth audio . . . . . . . . . . . . . . . . . . . . . . 35
Data medium requirements (MDI) . . . . . . . . 40
External data medium (USB) . . . . . . . . . . . . 40
MDI . . . . . . . . . . . . . . . . . . . . . . . . . . . . . . . . 40
MEDIA-IN multimedia interface . . . . . . . . . . 40
MP3 player . . . . . . . . . . . . . . . . . . . . . . . . . . 40
See: AUX . . . . . . . . . . . . . . . . . . . . . . . . . 32, 39
See: AUX2 . . . . . . . . . . . . . . . . . . . . . . . . . . . 33
External data medium See: MDI . . . . . . . . . . . . . . . . . . . . . . . . . . . . 40
F
Factory defaults . . . . . . . . . . . . . . . . . . . . . . . . . 95
Factory settings . . . . . . . . . . . . . . . . . . . . . . . . 102
Fader . . . . . . . . . . . . . . . . . . . . . . . . . . . . . . . . . 101
Fast forward . . . . . . . . . . . . . . . . . . . . . . . . . . . . 37
Flagged destination . . . . . . . . . . . . . . . . . . . . . . 59
FM . . . . . . . . . . . . . . . . . . . . . . . . . . . . . . . . . . . . 13
Function buttons (soft keys) . . . . . . . . . . . . . . . 10
Function keys See: Function buttons . . . . . . . . . . . . . . . . . 10
Functions during a call . . . . . . . . . . . . . . . . . . . . 93
106 Index