technical specifications Seat Leon SC 2014 Owner's manual
[x] Cancel search | Manufacturer: SEAT, Model Year: 2014, Model line: Leon SC, Model: Seat Leon SC 2014Pages: 284, PDF Size: 5.85 MB
Page 203 of 284
Checking and refilling levels
Oil propertiesEngine typeSpecification
Petrol without flexible
service intervalVW 502 00/VW 504 00
Petrol with flexible serv-
ice interval (LongLife)VW 504 00
Diesel. Engines without
Particulate filter (DPF)VW 505 01/VW 506 01/VW
507 00
Diesel. Particulate Filter
Engines (DPF).
With or without flexible
service interval (with
and without LongLife) a)VW 507 00
Natural gas enginesVW 502 00
a)
Only use recommended oils, otherwise you may damage the
engine.
Engine oil additives
No type of additive should be mixed with the
engine oil. The deterioration caused by these
additives is not covered by the warranty. Note
Before a long trip, we recommend finding an
engine oil that conforms to the correspond-
ing VW specifications and recommend keep-
ing it in the vehicle. This way, the correct en-
gine oil will always be available for a top-up if
needed. Checking engine oil level
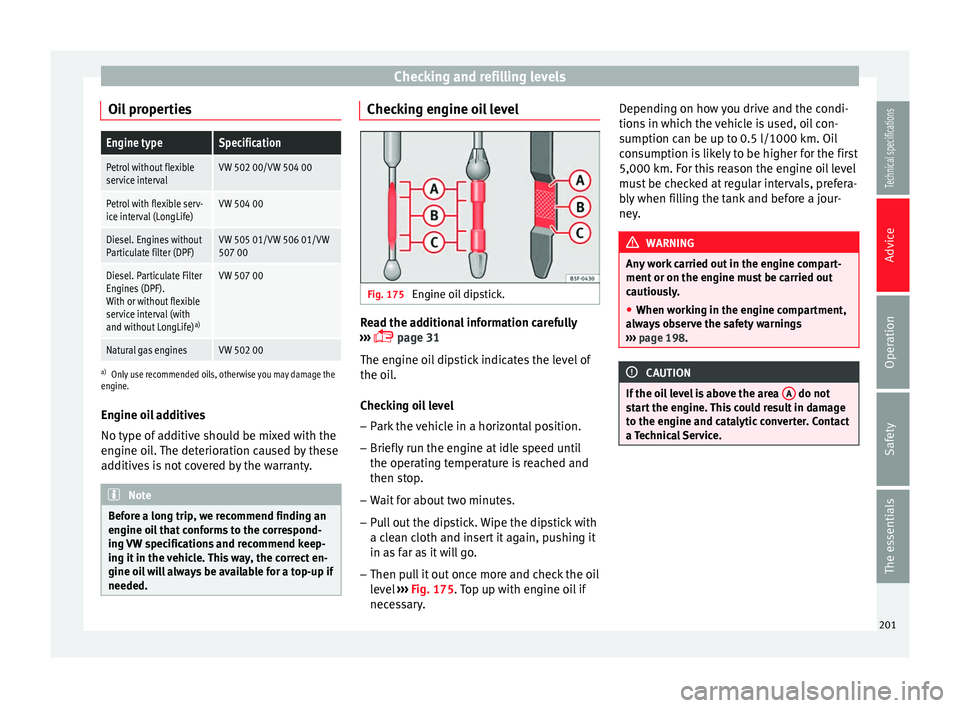
Fig. 175
Engine oil dipstick. Read the additional information carefully
››› page 31
The engine oil dipstick indicates the level of
the oil.
Checking oil level
– Park the vehicle in a horizontal position.
– Briefly run the engine at idle speed until
the operating temperature is reached and
then stop.
– Wait for about two minutes.
– Pull out the dipstick. Wipe the dipstick with
a clean cloth and insert it again, pushing it
in as far as it will go.
– Then pull it out once more and check the oil
level ››› Fig. 175 . Top up with engine oil if
nec e
ssary. Depending on how you drive and the condi-
tions in which the vehicle is used, oil con-
sumption can be up to 0.5 l/1000 km. Oil
consumption is likely to be higher for the first
5,000 km. For this reason the engine oil level
must be checked at regular intervals, prefera-
bly when filling the tank and before a jour-
ney.
WARNING
Any work carried out in the engine compart-
ment or on the engine must be carried out
cautiously.
● When working in the engine compartment,
always observe the safety warnings
››› page 198. CAUTION
If the oil level is above the area A do not
start the engine. This could result in damage
to the engine and catalytic converter. Contact
a Technical Service. 201
Technical specifications
Advice
Operation
Safety
The essentials
Page 205 of 284
Checking and refilling levels
Cooling system Engine coolant specifications The engine cooling system is supplied from
the factory with a specially treated mixture of
water and, at least, 40 % of the additive
G 13
(TLVW 774 J). The engine coolant additive is
recognisable by its purple colour. This mix-
ture of water and additive gives the necessa-
ry frost protection down to -25°C (-13°F) and
protects the light alloy parts of the cooling
system against corrosion. It also prevents
scaling and considerably raises the boiling
point of the coolant.
To protect the engine cooling system, the
percentage of additive must always
be at
l e
ast 40 %, even in warm climates where an-
ti-freeze protection is not required.
If greater frost protection is required in very
cold climates, the proportion of additive can
be increased. However, the percentage of ad-
ditive should not exceed 60%, as this would
reduce the frost protection and, in turn, de-
crease the cooling capacity.
When the coolant is topped up, use a mixture
of distilled water and, at least, 40 % of the G
13 or G 12 plu
s-plus (TL-VW 774 G) additive
(both are purple) to obtain an optimum anti-
corrosion protection ››› . The mixture of G
13 with G 12 plus (TL-VW 774 F), G 12 (red) or
G 11 (green-blue) engine coolants will signifi- cantly reduce the anticorrosion protection
and should, therefore be avoided
››› .
WARNING
If there is not enough anti-freeze in the cool-
ant system, the engine may fail leading to se-
rious damage.
● Please make sure that the percentage of
additive is correct with respect to the lowest
expected ambient temperature in the zone in
which the vehicle is to be used.
● When the outside temperature is very low,
the coolant could freeze and the vehicle
would be immobilised. In this case, the heat-
ing would not work either and inadequately
dressed passengers could die of cold. CAUTION
The original additives should never be mixed
with coolants which are not approved by
SEAT. Otherwise, you run the risk of causing
severe damage to the engine and the engine
cooling system. ● If the fluid in the expansion tank is not pur-
ple but is, for example, brown, this indicates
that the G 13 additive has been mixed with
an inadequate coolant. The coolant must be
changed as soon as possible if this is the
case! This could result in serious faults and
engine damage. For the sake of the environment
Coolants and additives can contaminate the
environment. If any fluids are spilled, they
should be collected and correctly disposed
of, with respect to the environment. Topping up coolant
Read the additional information carefully
››› page 32
Top up coolant when the level is below the
MIN (minimum) mark.
Checking coolant level – Park the vehicle in a horizontal position.
– Switch the ignition off.
– Read off the coolant level on coolant ex-
pansion tank. When the engine is cold, the
coolant level should be between the marks.
When the engine is hot, it may be slightly
above the upper mark.
Topping up coolant – Wait for the engine to cool down.
– Cover the coolant expansion tank cap with
a cloth and carefully unscrew it to the left
››› .
– Top up the coolant only if there is still cool-
ant in the expansion tank, otherwise you »
203
Technical specifications
Advice
Operation
Safety
The essentials
Page 207 of 284
Checking and refilling levels
Check the water level in the windscreen
washer reservoir regularly and top up as re-
quired.
The container for the windscreen washer con-
tains the cleaning fluid for the windscreen,
the rear window and the headlight washer
system*.
● Open the bonnet ››› page 198.
● The windscreen washer reservoir is marked
with the symbol on the cap.
● Chec k
there is enough windscreen water in
the reservoir.
Recommended windscreen wipers
● For the hottest seasons we recommend
summer G 052 184 A1 for clear glass. Propor-
tions of the mixture in the washer fluid tank:
1:100 (1 part concentrate per 100 parts wa-
ter).
● All year round, G 052 164 A2 for clear
glass. Approximate proportion of the winter
mixture, up to -18°C (0°F): 1:2 (1 part con-
centrate per 2 parts water); otherwise, a 1:4
proportion of mixture in the washer fluid
tank.
Top-up quantities
The reservoir holds approximately 3 litres in
versions without headlight washer and 5 li-
tres in versions with headlight washer. WARNING
If the water from the windscreen washer does
not contain enough anti-freeze, it may freeze
on the windscreen and rear window, reducing
forward and rear visibility.
● In winter, ensure the windscreen washer
contains enough anti-freeze.
● In cold conditions, you should not use the
windscreen washer system unless you have
warmed the windscreen with the ventilation
system. The antifreeze could freeze on the
windscreen and reduce visibility. WARNING
Never mix an unsuitable antifreeze or other
similar additives with the windscreen washer
water. A greasy layer may be formed on the
windscreen which will impair visibility.
● Use clean water with a window cleaner rec-
ommended by SEAT.
● If necessary, add a suitable antifreeze to
the water in the reservoir. CAUTION
● Do not mix cleaning products recommen-
ded by SEAT with other products. This could
lead to flocculation and may block the wind-
screen washer jets.
● When topping up service fluids, make abso-
lutely certain that you fill the fluids into the
correct reservoirs. Using the wrong fluids could cause serious malfunctions and engine
damage!
● Not having windscreen wiper fluid reduces
visibility through the windscreen, and leads
to loss of visibility in headlights in models
with headlight washer. Battery
General information The battery is located in the engine compart-
ment and is almost
maintenance-free. It is
checked as part of the Inspection Service.
Nevertheless, check the terminals are clean
and have the correct tightening torque, espe-
cially in summer and winter.
Disconnecting the battery
The battery should only be disconnected in
exceptional cases. When the battery is dis-
connected, some of the vehicle's functions
are “lost” ( ››› table on page 206). These
functions will require resetting after the bat-
tery is reconnected.
Deactivate the anti-theft alarm* before you
disconnect the battery Otherwise the alarm
will be triggered. »
205
Technical specifications
Advice
Operation
Safety
The essentials
Page 209 of 284
Checking and refilling levels
exclusively to an earth on the bodywork
(–) .
– On ly
use a charger which is compatible for
use with 12 V nominal voltage batteries.
The charge must not exceed a voltage of 15
V.
– Now connect the battery charger to the
power socket and switch on.
– After charging the battery: switch off the
battery charger and disconnect the power
socket cable.
– Finally disconnect the charger cables from
the battery.
– Replace the battery cover correctly.
– Close the bonnet ››› page 199.
Important: Before you charge the battery
make sure you read the manufacturer's in-
structions for using the battery charger. WARNING
Never charge a battery that has frozen: re-
place battery! Failure to do so may lead to an
explosion. Note
Use only the terminals in the engine compart-
ment to charge the battery. Replacing the battery
The new battery should have the same speci-
fications (amperage, load and voltage) as the
used battery.
Your vehicle is equipped with an intelligent
power management system to control the
distribution of electrical energy
››› page 191.
The power management function ensures
that the battery is charged much more effi-
ciently than on vehicles without a power
management system. To maintain this func-
tion after replacing the battery, we recom-
mend that the replacement battery used is of
the same make and type as the original fitted
battery. To make proper use of the power
management function after the battery has
been changed, have the battery coded to the
power management mode at a specialised
workshop. CAUTION
● Some vehicles, for example those with the
Start-Stop system* are fitted with a special
battery (AGM-type or EFB-type battery). If any
other type of battery is fitted, the Start-Stop
function may be considerably reduced and
the vehicle may not stop on repeated occa-
sions.
● Make sure that the vent hose is always at-
tached to the original opening on the side of
the battery. Gases or battery acid can other-
wise escape and possibly cause damage. ●
The battery holder and clamps must always
be correctly secured.
● Before starting any work on the battery, al-
ways observe the warnings listed under
››› page 206, Important safety warnings for
handling a vehicle battery .
● Do not forget to replace the battery cover-
ings, where applicable. It is a protection for
high temperatures. This in turn extends the
vehicle service life. For the sake of the environment
Batteries contain toxic substances includ-
in g s
ulphuric acid and lead. They must be
disposed of appropriately and must not be
disposed of with ordinary household waste.
Make sure disconnected batteries cannot tip
over. Sulphuric acid could be spilt! 207
Technical specifications
Advice
Operation
Safety
The essentials
Page 211 of 284
Wheels
Depending on the vehicle, tyre pressure can
be adjusted (“comfort” tyre pressure) to in-
crease driving comfort. When driving with
comfort tyre pressure fuel consumption may
increase slightly.
The tyre pressure must be adjusted according
to the load the vehicle is carrying. If the vehi-
cle is going to carry the maximum load, the
tyre pressure should be increased to maxi-
mum value indicated on the sticker on the in-
side of the fuel tank flap.
Do not forget the spare wheel when checking
the tyre pressures: Keep this spare wheel in-
flated to the highest pressure required for the
road wheels.
In the case of a minimised temporary spare
wheel (125/70 R16 or 125/70 R18) inflate to
a pressure of 4.2 bar as indicated on the tyre
pressure label on the fuel tank flap.
Driving style
Fast cornering, heavy acceleration and hard
braking (squealing tyres) all increase tyre
wear.
Wheel balance
The wheels on new vehicles are balanced.
However, certain circumstances may lead to
imbalance (run-out), which is detected as vi-
brations in the steering wheel. Unbalanced wheels should be rebalanced, as
they otherwise cause excessive wear on
steering, suspension and tyres. A wheel must
also be rebalanced when a new tyre is fitted
or if a tyre is repaired.
Incorrect wheel alignment
Incorrect wheel alignment causes excessive
tyre wear, impairing the safety of the vehicle.
If you notice excessive tyre wear, you should
check wheel alignment at a SEAT Official
Service.
WARNING
● Always adapt the tyre pressure accordingly
when the vehicle load changes.
● A tyre with low air pressure has to flex a lot
more when the vehicle is heavily loaded or at
high speeds, therefore causing overheating
to occur. Under these conditions, the tyre
bead may be released or the tyre may burst.
Risk of accident! For the sake of the environment
Under-inflated tyres will increase fuel con-
sumption. Wear indicators
Fig. 177
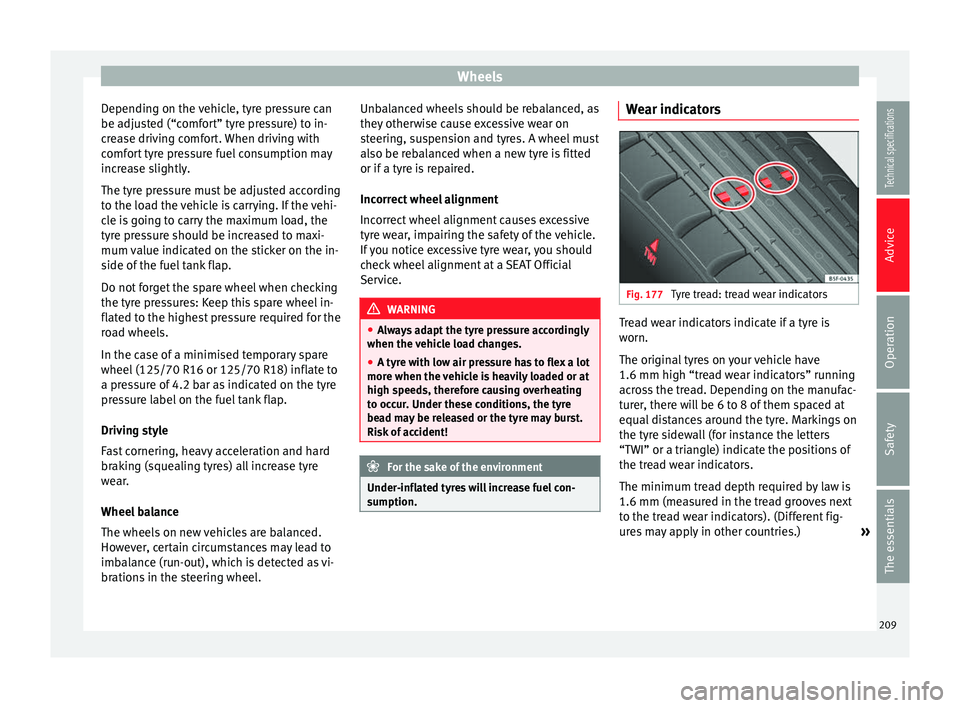
Tyre tread: tread wear indicators Tread wear indicators indicate if a tyre is
worn.
The original tyres on your vehicle have
1.6 mm high “tread wear indicators” running
across the tread. Depending on the manufac-
turer, there will be 6 to 8 of them spaced at
equal distances around the tyre. Markings on
the tyre sidewall (for instance the letters
“TWI” or a triangle) indicate the positions of
the tread wear indicators.
The minimum tread depth required by law is
1.6 mm (measured in the tread grooves next
to the tread wear indicators). (Different fig-
ures may apply in other countries.)
»
209Technical specifications
Advice
Operation
Safety
The essentials
Page 213 of 284
Wheels
205/55 R16 91V
This contains the following information:205Tyre width in mm
55Height/width ratio in %
RTyre construction: Radial
16Rim diameter in inches
91Load rating code
VSpeed index The
manufacturing date
is also indicated on
the ty
re sidewall (possibly only on the inner
part):
DOT... 2212...
it means, for example, that the tyre was man-
ufactured in the 22nd week of 2012.
But note that with some types of tyre, the ac-
tual tyre size can differ from the nominal size
marked on the tyre (for instance 205/55 R 16
91 W), and there may be significant differen-
ces in the contours of the tyres, even though
the tyres are marked with the same nominal
size designation. When replacing the tyres,
it is therefore important to make sure that
the actual size of the new tyres does not ex-
ceed the dimensions of the factory-approved
makes of tyre.
Failure to observe this requirement can af-
fect the clearance needed for the tyres. If the tyres rub against the bodywork, in certain
circumstances the tyres , suspension or
bodywork and pipes may be damaged, and
vehicle safety could be severely impaired
››› .
If you use tyres that are approved by SEAT
you can be sure that the actual tyre dimen-
sions will be correct for your vehicle. If you
decide to fit a different type of tyre, you must
obtain the appropriate manufacturer's certif-
icate from the tyre retailer to confirm that
the tyres are suitable for your vehicle. Keep
this certificate in a safe place.
Your SEAT Official Service will be able to ad-
vise you on which tyres may be fitted to your
vehicle.
It is best to have all servicing of wheels and
tyres performed by a specialised workshop.
They are familiar with the procedure and
have the necessary special tools and spare
parts as well as the proper facilities for dis-
posing of the old tyres respecting the envi-
ronment. WARNING
● It is very important to ensure that the tyres
you have chosen have adequate clearance.
When selecting replacement tyres, do not re-
ly entirely on the nominal tyre size marked on
the tyre, since the effective tyre size can dif-
fer significantly depending on the manufac-
turer. Inadequate tyre clearance can result in
damage to the tyres or the vehicle, causing a serious safety risk. Risk of accident! It may
also invalidate the vehicle's registration for
use on public roads.
●
Avoid running the vehicle on tyres that are
more than 6 years old. If you have no alterna-
tive, you should drive slowly and with extra
care at all times.
● If wheel trims are fitted after the car is pur-
chased, ensure that there is an adequate flow
of air for cooling the brake system. For the sake of the environment
Old tyres must be disposed of according to
the laws in the country concerned. Note
● Never mount used tyres if you are not sure
of their “previous history”.
● For technical reasons, it is not generally
possible to use the wheels from other vehi-
cles. In some cases, this may also be true for
the same model of wheel. Wheel bolts
The
wheel bolts
ar
e m
atched to the rims.
When installing different wheels (for instance
alloy wheels or wheels with winter tyres) it is
important to use the correct wheel bolts with
the right length and correctly shaped bolt
heads. This ensures that wheels are fitted »
211
Technical specifications
Advice
Operation
Safety
The essentials
Page 215 of 284
Wheels
control of the vehicle and a serious or fatal
accident.
●
If the warning lamp lights up, stop im-
mediately and check the tyres.
● If the tyres are inflated at different pres-
sures or if a tyre pressure is too low, this will
increase tyre wear, negatively affecting vehi-
cle stability and increasing braking distan-
ces.
● If tyres are inflated at different pressures or
a tyre pressure is too low, a tyre may be dam-
aged and burst resulting in a loss of control
of the vehicle.
● The driver is responsible for ensuring that
all of the vehicle tyres are correctly inflated
to the right pressure. The recommended tyre
pressure is indicated on the label
››› page 243.
● The ty r
e monitoring system can only oper-
ate correctly if all of the tyres are inflated to
the correct pressure when cold.
● Driving with tyres at the wrong pressure
can damage them and result in an accident.
Ensure that the tyre pressures of all the tyres
correspond to the vehicle load.
● Before starting a journey, always inflate
tyres to the correct pressure.
● Tyres with insufficient pressure are subjec-
ted to more flexing. Due to this, the tyre
could become excessively hot, causing tread
separation and also tyre blow-out.
● With an overloaded vehicle at high speed,
the tyres can overheat and burst resulting in
a loss of vehicle control. ●
Tyre pressures which are too high or too
low reduce the useful life of the tyre, affect-
ing vehicle performance.
● If a tyre has not been punctured and it does
not have to be changed immediately, drive to
the nearest specialised workshop at a moder-
ate speed and have the tyre checked and in-
flated to the correct pressure. WARNING
Observe the safety warnings ››› in Control
and warning lamps on page 71. Note
● If excessively low tyre pressure is detected
with the ignition on, an audible warning will
sound. In the event that there is a fault in the
system, an audible warning will sound.
● Driving on dirt tracks for a long period of
time or driving in a sporty style can tempora-
rily deactivate the TPMS. The control lamp
shows a fault, but disappears when road con-
ditions or the driving style change. Tyre monitoring indicator
Fig. 179
Instrument panel: warning of loss of
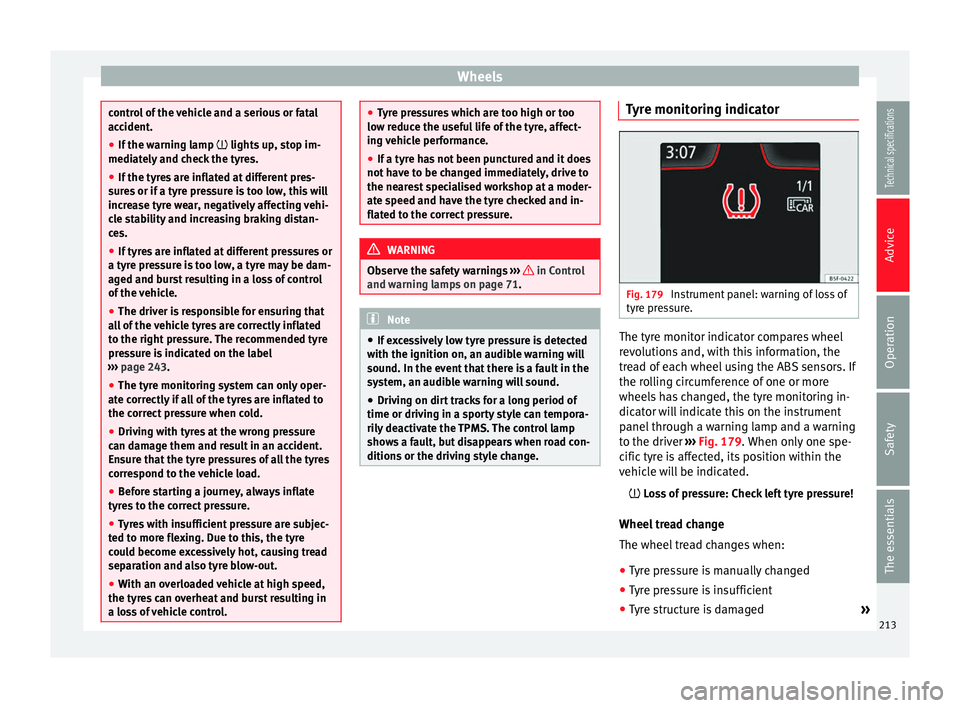
tyre pressure. The tyre monitor indicator compares wheel
revolutions and, with this information, the
tread of each wheel using the ABS sensors. If
the rolling circumference of one or more
wheels has changed, the tyre monitoring in-
dicator will indicate this on the instrument
panel through a warning lamp and a warning
to the driver
››› Fig. 179 . When only one spe-
c ific
tyre is affected, its position within the
vehicle will be indicated.
Loss of pressure: Check left tyre pressure!
Wheel tread change
The wheel tread changes when: ● Tyre pressure is manually changed
● Tyre pressure is insufficient
● Tyre structure is damaged »
213
Technical specifications
Advice
Operation
Safety
The essentials
Page 217 of 284
Wheels
Removing the temporary spare wheel
– Lift and hold up the floor panel to remove
the temporary spare wheel ››› Fig. 181 .
– Turn the thumb wheel anti-clockwise.
– Take out the temporary spare wheel.
Chains
For technical reasons, snow chains must not
be used on the temporary spare wheel.
If you have a puncture on one of the front
wheels when using snow chains, fit the tem-
porary spare wheel in place of one of the rear
wheels. Fit the snow chains on the rear wheel
that you have removed and replace the punc-
tured front wheel with this wheel. WARNING
● After fitting the temporary spare wheel,
check the tyre pressures as soon as possible.
Failure to do so may cause an accident. The
tyre pressures are listed on the inside of the
fuel tank flap.
● Do not drive at over 80 km/h (50 mph)
when the temporary spare wheel is fitted on
the vehicle: risk of accident!
● Avoid heavy acceleration, hard braking and
fast cornering: risk of accident!
● Never use more than one temporary spare
wheel at the same time, risk of accident. ●
No other type of tyre (normal summer or
winter tyre) may be fitted on the compact
temporary spare wheel rim.
● If you are driving using the spare wheel,
the ACC system could automatically switch
off during the journey. Switch off the system
when starting off. Extraction of the spare wheel in
vehicles with SEAT SOUND 10
speakers (with
subwoofer)* –
Disassemble the subwoofer's
floor panel
(c
arpet) as follows:
– LEON/LEON SC model: first, pull the carpet
in the direction of the backrest and then
pull it upwards to remove it. LEON ST mod-
el: lift and secure the floor storage com-
par
tment as explained in ››› page 121.
– Disconnect the subwoofer's speaker cable.
– Turn the sec
uring wheel anti-clockwise.
– Remove the subwoofer speaker and the
s
pare wheel.
– When replacing the spare wheel, place the
subwoofer speaker in the direction indica-
ted b
y the arrow and with the word
“FRONT” facing forward.
– Reconnect the speaker cable and firmly ro-
tate the securing wheel clockwise so that the subwoofer system and wheel are firmly
in place.
Winter service Winter tyres –
Winter tyres must be fitted on all four
wheels.
– Only use winter tyres that are approved for
your vehicle.
– Please note that the maximum permissible
speed for winter tyres may be lower than
for summer tyres.
– Also note that winter tyres are no longer ef-
fective when the tread is worn down.
– Af
ter fitting the wheels you must always
check the tyre pressures. The correct tyre
pressures are listed on the sticker on the
inside of the fuel tank flap ›››
page 208.
In winter road conditions winter tyres will
considerably improve vehicle handling. The
design of summer tyres (width, rubber com-
pound, tread pattern) gives less grip on ice
and snow. This applies particularly to vehi-
cles equipped with wide section tyres or with
high speed tyres (code letters H, V or Y on
the sidew
all). »
215
Technical specifications
Advice
Operation
Safety
The essentials
Page 219 of 284
Emergencies
Snow chains will improve braking ability as
well as traction in winter conditions.
F or t
echnical reasons snow chains may only
be used with the following wheel rim/tyre
combination.
195/65 R15Chains with links of maximum 15 mm
205/55 R16Chains with links of maximum 15 mm
225/45 R17Chains with links of maximum 9 mm
225/40 R18Chains with links of maximum 9 mm Remove wheel covers and any
integral trim
ring before fitting snow chains.
R emo
ve the chains when roads are free of
snow
. Otherwise they will impair handling,
damage the tyres and wear out very quickly. Emergencies
Changing a wheel What to do first Read the additional information carefully
››› page 34
– If you have a flat tyre or puncture, park the
car as far away from the flow of traffic as
possible in a safe place. If you have a punc-
ture, stop the vehicle on a horizontal sur-
face. If you are on a slope, take extra care.
– Apply the handbrake.
– Switch on the hazard warning lights.
– Manual gearbox: select the 1st gear.
– Automatic gearbox: move the selector lever
to P.
– When towing a trailer: unhitch the trailer
from your vehicle.
– Have the vehicle tool kit ›››
page 220 and
the spare wheel ready ›››
page 214.
– Observe the applicable legislation for each
country (reflective vest, warning triangles,
etc.).
– All vehicle occupants should leave the car.
They should wait in a safe area (for in-
stance behind the roadside crash barrier). WARNING
● Always observe the above steps and pro-
tect yourself and other road users.
● If you change the wheel on a slope, block
the wheel on the opposite side of the car with
a stone or similar to prevent the vehicle from
moving. Wheel covers*
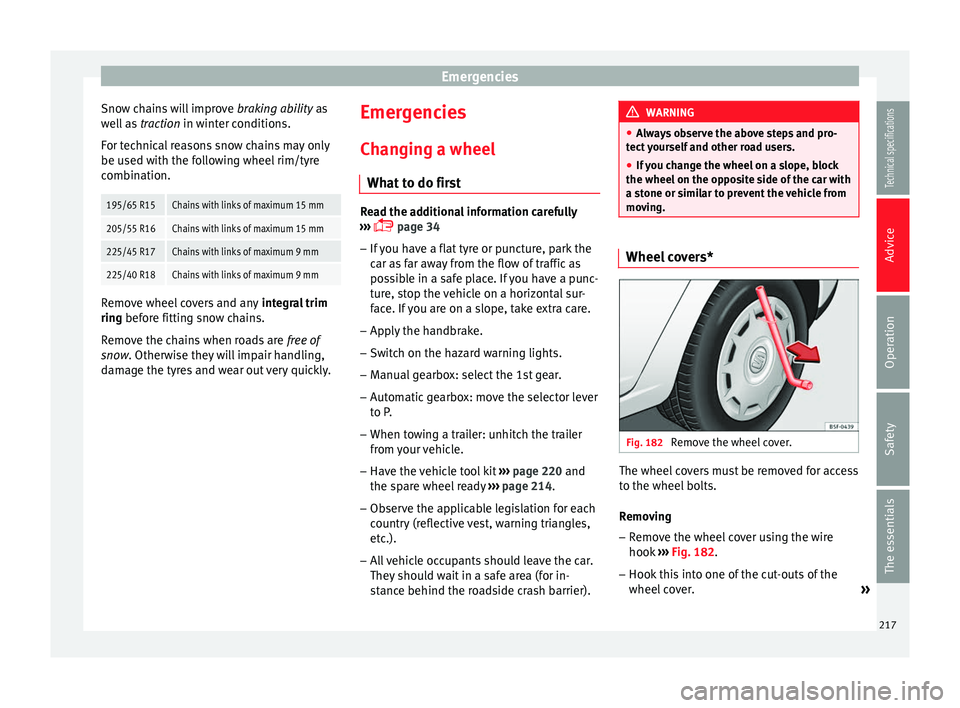
Fig. 182
Remove the wheel cover. The wheel covers must be removed for access
to the wheel bolts.
Removing
– Remove the wheel cover using the wire
hook ›››
Fig. 182 .
– Hook thi
s into one of the cut-outs of the
wheel cover. »
217
Technical specifications
Advice
Operation
Safety
The essentials
Page 221 of 284
Emergencies
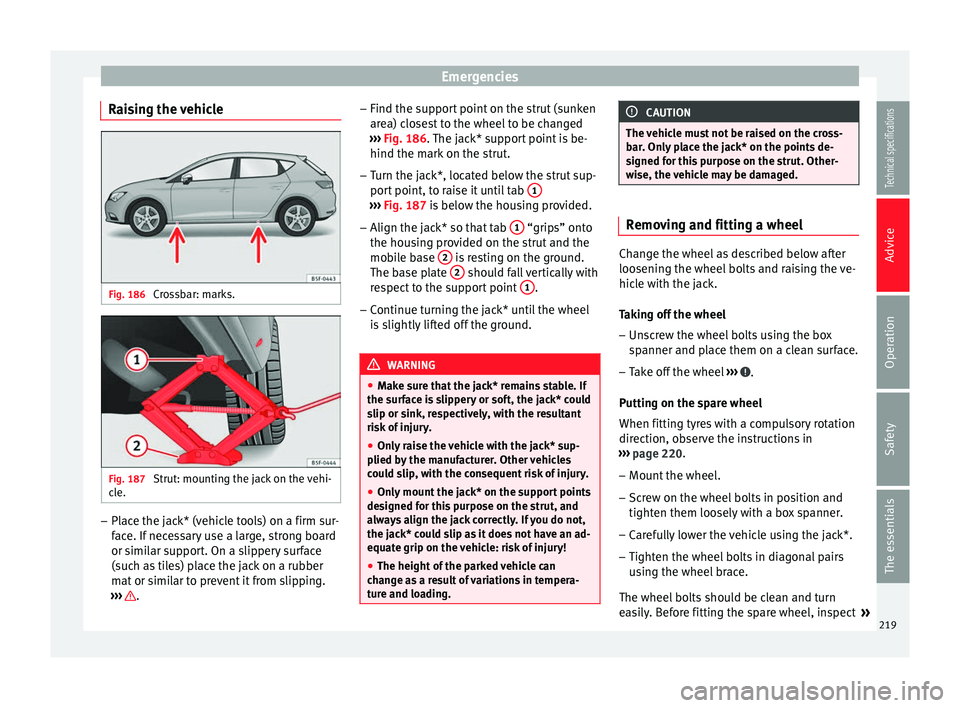
Raising the vehicle Fig. 186
Crossbar: marks. Fig. 187
Strut: mounting the jack on the vehi-
cle. –
Place the jack* (vehicle tools) on a firm sur-
face. If necessary use a large, strong board
or similar support. On a slippery surface
(such as tiles) place the jack on a rubber
mat or similar to prevent it from slipping.
››› . –
Find the support point on the strut (sunken
area) closest to the wheel to be changed
››› Fig. 186 . The jack* support point is be-
hind the m ark
on the strut.
– Turn the jack*, located below the strut sup-
port point, to raise it until tab 1 ›››
Fig. 187 is below the housing provided.
– Align the j
ack* so that tab 1 “grips” onto
the housing provided on the strut and the
mobile base 2 is resting on the ground.
The base plate 2 should fall vertically with
respect to the support point 1 .
– Continue turning the jack* until the wheel
is slightly lifted off the ground. WARNING
● Make sure that the jack* remains stable. If
the surface is slippery or soft, the jack* could
slip or sink, respectively, with the resultant
risk of injury.
● Only raise the vehicle with the jack* sup-
plied by the manufacturer. Other vehicles
could slip, with the consequent risk of injury.
● Only mount the jack* on the support points
designed for this purpose on the strut, and
always align the jack correctly. If you do not,
the jack* could slip as it does not have an ad-
equate grip on the vehicle: risk of injury!
● The height of the parked vehicle can
change as a result of variations in tempera-
ture and loading. CAUTION
The vehicle must not be raised on the cross-
bar. Only place the jack* on the points de-
signed for this purpose on the strut. Other-
wise, the vehicle may be damaged. Removing and fitting a wheel
Change the wheel as described below after
loosening the wheel bolts and raising the ve-
hicle with the jack.
Taking off the wheel
– Unscrew the wheel bolts using the box
spanner and place them on a clean surface.
– Take off the wheel ››› .
Putting on the spare wheel
When fitting tyres with a compulsory rotation
direction, observe the instructions in
››› page 220 .
– Mou nt
the wheel.
– Screw on the wheel bolts in position and
tighten them loosely with a box spanner.
– Carefully lower the vehicle using the jack*.
– Tighten the wheel bolts in diagonal pairs
using the wheel brace.
The wheel bolts should be clean and turn
easily. Before fitting the spare wheel, inspect »
219
Technical specifications
Advice
Operation
Safety
The essentials