cooling Seat Leon Sportstourer 2017 User Guide
[x] Cancel search | Manufacturer: SEAT, Model Year: 2017, Model line: Leon Sportstourer, Model: Seat Leon Sportstourer 2017Pages: 332, PDF Size: 7.25 MB
Page 176 of 332
Operation
CAUTION
● Switc h the air c
onditioner off if you think it
may be broken. This will avoid additional
damage. Have the air conditioner checked by
a specialised workshop.
● Repairs to the air conditioner require spe-
ciali
st knowledge and special tools. SEAT rec-
ommends visiting a SEAT Official Service. Note
● When the coolin g sy
stem is turned off, air
coming from the outside will not be dried. To
prevent fogging of the windows, SEAT recom-
mends leaving the cooling system (compres-
sor) turned on. To do this, press the but-
ton. The button lamp should light up.
● The maximum heat output required to de-
frost
windows as quickly as possible is only
available when the engine has reached its
normal running temperature.
● Keep the air intake slots in front of the
windsc
reen free of snow, ice and leaves to en-
sure heating and cooling are not impaired,
and to prevent the windows from misting
over. Operating the Climatronic through the
E
a
sy C
onnect* system 3 Applies to vehicles with a Media System
Touc h/C
olour.
In the Easy Connect system it is also possible
to perform various adjustments to the Clima-
tronic.
Open the air conditioner menu
● Press the button on the Climatronic
contro l
panel.
● OR: press the button in Easy Connect.
W ith the r
otatin
g switch select the air con-
ditioner menu and open it.
On the touch screen you can see and change
the current settings, for example, the temper-
ature set for the driver and passenger sides,
the air distribution and the fan speed.
To switch a function on or off, or to select a
submenu, you must press the corresponding
function button.
Function button: function
OFFSwitch off and switch on the Climatron-
ic.
SYNCSynchronise driver and front passenger
temperatures.
Function button: function
SETTINGS
The air conditioning settings submenu
is opened. The following settings can al-
so be adjusted:
Air conditioning profile. : Ad-
just the power of the fan in AUTO mode.
You can choose between low, medium
and high.
Automatic air recirculation :
Switching automatic air recirculation on
and off ››› page 176.
BACK : Close the submenu. Operating the Climatronic through the
E
a
sy C
onnect* system 3
Applie
s
to vehicles with Media System Plus/Navi
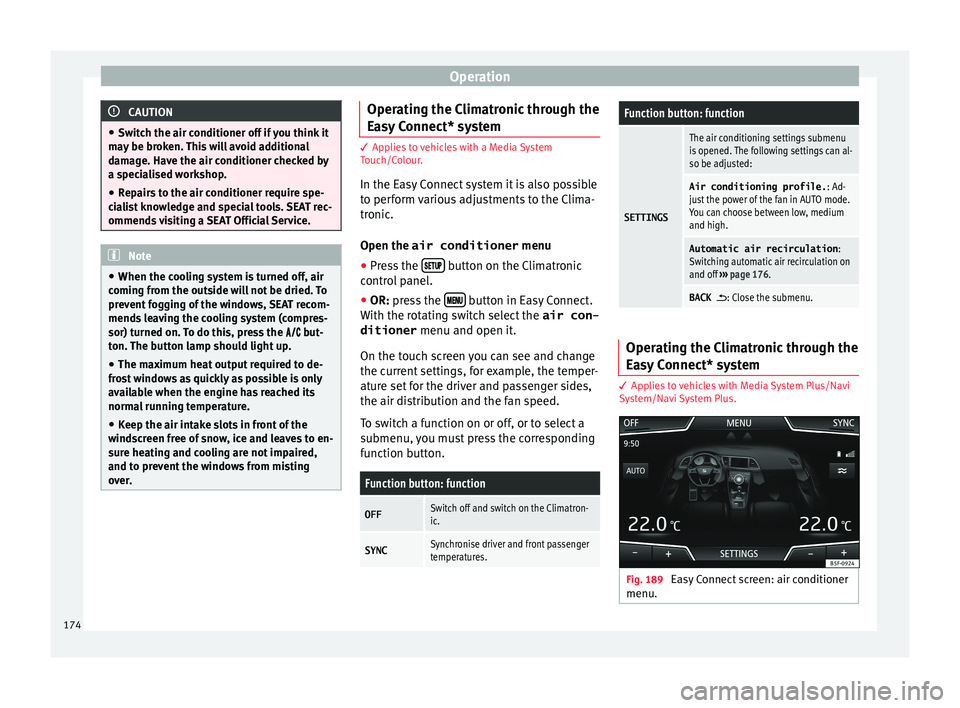
System/Navi System Plus. Fig. 189
Easy Connect screen: air conditioner
menu. 174
Page 177 of 332
Air conditioning
In the Easy Connect system it is also possible
t o per
form
various adjustments to the Clima-
tronic ››› Fig. 189.
Open the air conditioner menu
● Press the button on the Climatronic
c ontr
ol
panel.
On the top of the screen you can see and
change the current settings, such as, for ex-
ample, the temperature set for the driver side
and for that of passenger. Temperatures up
to +22°C (+72°F) are shown with blue arrows,
and temperatures over +22°C (+72°F) with
red arrows.
To switch a function on or off, or to select a
submenu, you must press the corresponding
function button.
Function button: function
OFFClimatronic is switched off.
ONClimatronic is switched on.
SYNCSynchronise driver and front passenger
temperatures.
Function button: function
SETTINGS
The air conditioning settings submenu
is opened. The following settings can al-
so be adjusted:
Air conditioning profile. : Ad-
just the power of the fan in AUTO mode.
You can choose between low, medium
and high.
Automatic air recirculation :
Switching automatic air recirculation on
and off ››› page 176.
Automatic supplementary heat-
er : Activate/deactivate the automatic
activation of the auxiliary heater for
colder countries (only for engines with
auxiliary heater). With the option deacti-
vated, depending on the outside tem-
perature the heating may need more
time than normal to reach a comfortable
temperature.
BACK : Close the submenu. Air conditioning user instructions
The interior cooling system only works when
the en
gine i
s ru
nning and fan is switched on.
The air conditioner operates most effectively
with the windows and the panoramic sliding
sunroof closed. However, if the vehicle has
heated up after standing in the sun for some
time, the air inside can be cooled more quick- ly by opening the windows and the panoram-
ic sliding s
unroof briefly.
Climatronic: change the temperature unit on
the screen of the radio or on the factory-fit-
ted navigation system
Changing the temperature display from Cel-
sius to Fahrenheit on radio or on the factory-
fitted navigation system is done using the
menu on the instrument panel
››› page 36.
The cooling system cannot be activated
If the air conditioning system cannot be
switched on, this may be caused by the fol-
lowing:
● The engine is not running.
● The fan is switched off.
● The air conditioner fuse has blown.
● The outside temperature is lower than ap-
proxim
ately +3°C (+38°F).
● The air conditioner compressor has been
temporarily
switched off because the engine
coolant temperature is too high.
● Another fault in the vehicle. Have the air
conditioner check
ed by a specialised work-
shop.
Special Characteristics
If the humidity and temperature outside the
vehicle are high, condensation can drip off »
175
Technical data
Advice
Operation
Emergencies
Safety
Page 178 of 332
Operation
the evaporator in the cooling system and
f orm a poo
l
underneath the vehicle. This is
normal and does not indicate a leak! Note
After starting the engine, any residual humid-
ity in the air c onditioner c
ould mist over the
windscreen. Switch on the defrost function as soon as possible to clear the windscreen of
conden
s
ation. Air outlets
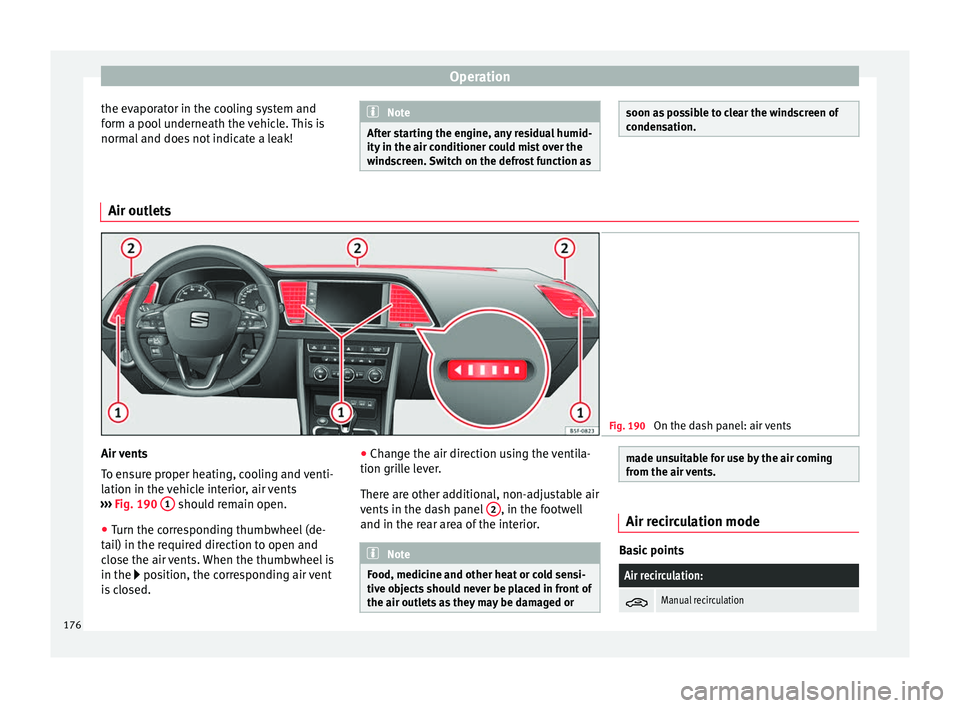
Fig. 190
On the dash panel: air vents Air vents
T
o en
s
ure proper heating, cooling and venti-
lation in the vehicle interior, air vents
››› Fig. 190 1 should remain open.
● Turn the corresponding thumbwheel (de-
t ai
l) in the r
equired direction to open and
close the air vents. When the thumbwheel is
in the position, the corresponding air vent
is closed. ●
Chang
e the air direction using the ventila-
tion grille lever.
There are other additional, non-adjustable air
vents in the dash panel 2 , in the footwell
and in the r e
ar ar
ea of the interior. Note
Food, medicine and other heat or cold sensi-
tive o b
jects should never be placed in front of
the air outlets as they may be damaged or made unsuitable for use by the air coming
from the air
v
ents. Air recirculation mode
Basic points
Air recirculation:
Manual recirculation
176
Page 179 of 332
Air conditioning
Air recirculation mode prevents the ambient
air fr om ent
erin
g the interior.
When the outside temperature is very high,
selecting manual air recirculation mode for a
short period refreshes the vehicle interior
more quickly.
For safety reasons, air recirculation mode is
switched off when the button is press-
ed or the air distributor turned to .
Switching the manual air recirculation mode
on and off
To switch system on: press the button un-
til the warning lamp lights up.
To switch system off: press the button un-
til the warning lamp goes off.
Functioning mode of automatic air recircula-
tion (air conditioning menu)
With the automatic air recirculation mode ac-
tivated, the entry of fresh air into the cabin
interior is enabled. If the system detects a
high concentration of hazardous substances
in the ambient air, air recirculation mode is
switched on automatically. When the level of
impurities drops to within a normal range, re-
circulation mode is switched off.
The system is unable to detect unpleasant
smells. The air recirculation will
not connect aut o-
matically in versions without humidity sensor
and in the following external conditions:
● The outside temperature is lower than +3°C
(+38°F).
● The cooling system is switched off and the
outside temper
ature is below +10°C (+50°F).
● The cooling system is switched off, the out-
side temper
ature is below +15°C (+59°F) and
the windscreen wipers are switched on.
Activation/deactivation of automatic air recir-
culation is done in the air conditioner menu,
under Configuration. WARNING
Observe the safety warnings ›››
in Intro-
duction on pag e 173
.
● If the cooling system is switched off and air
recir
culation mode switched on, the windows
can mist over very quickly, considerably limit-
ing visibility.
● Switch air recirculation mode off when it is
not requir
ed. CAUTION
Do not smoke when air recirculation is
swit c
hed on in vehicles with an air condition-
er. The smoke taken in could lie on the cool-
ing system vaporiser and on the activated
charcoal cartridge of the dust and pollen fil- ter, leading to a permanently unpleasant
smell
. Note
Climatronic: air recirculation mode is activa-
t ed t o pr
event exhaust gas or unpleasant
odours from entering the vehicle interior
when it is in reverse and while the automatic
windscreen wiper is working. 177Technical data
Advice
Operation
Emergencies
Safety
Page 184 of 332
Operation
WARNING
Cold start sprays could explode or cause a
sud den inc
rease in the engine speed.
● Never use sprays to cold start the engine. CAUTION
● The st ar
ter motor or the engine may be
damaged if you try to start the engine while
driving or if you restart it immediately after
switching it off.
● If the engine is cold, avoid high engine
speeds, p
ushing the engine too hard and rap-
id acceleration.
● Do not start the engine by pushing the ve-
hicle or t
owing it. Unburnt fuel could enter
the catalytic converter and damage it. Note
● Do not w ait
until the engine warms up with
the vehicle stationary; if you have good visi-
bility through the windows, start driving im-
mediately. This helps the engine reach oper-
ating temperature faster and reduces emis-
sions.
● Electrical components with a high power
cons
umption are switched off temporarily
when the engine starts.
● When starting with a cold engine, noise
level
s may briefly increase. This is quite nor-
mal, and no cause for concern.
● When the outside temperature is below
+5°C (+41°F), if the en
gine is diesel, some smoke may appear under the vehicle when
the fuel-oper
at
ed auxiliary heater is on. Stopping the engine
3 Valid for vehicles: with starter button
StepSwitch off the engine with the starter
button
››› page 180.
1.Stop the vehicle completely ››› .
2.Press and hold the brake pedal until the step
4 is performed.
3.If you are driving an automatic vehicle, place
the selector lever in position P.
4.Connect the electronic parking brake
››› page 183.
5.
Briefly press the start-up button ››› Fig. 192.
The START ENGINE STOP button blinks again. If
the engine fails to switch off, perform an
emergency disconnect ››› page 180.
6.If the vehicle is equipped with a manual
gearbox, put it into 1st or reverse. WARNING
Never switch off the engine while the vehicle
is mo
ving. This could cause loss of control of
the vehicle, accidents and serious injury.
● The airbags and belt tensioners do not
work when the ignition i
s switched off. ●
The brak e ser
vo does not work with the en-
gine off. Therefore, you need to press the
break pedal harder to brake the vehicle.
● Power steering does not work when the en-
gine is not
running. You need more strength
to steer when the engine is switched off.
● If the ignition is switched off, the steering
column c
ould be locked, making it impossible
to control the vehicle. CAUTION
If the engine is made to work hard for a long
time, it ma
y overheat after being switched
off. To prevent damage to the engine before
switching it off, leave it idle for approx. 2 mi-
nutes in neutral. Note
After switching off the engine, the cooling fan
ma y
continue to operate in the engine com-
partment for a few more minutes, even with
the ignition off. The radiator fan is automati-
cally switched off. 182
Page 198 of 332
Operation
– When the en gine i
s
running, switch off the
traction control (ASR) 1)
.
– Turn the selector lever to the position “S”
or tiptronic, or else sel
ect the sport driv-
ing mode from the SEAT Drive Profile*
››› page 230.
– Press the brake pedal firmly with your left
foot and ho
ld it down for at least one sec-
ond.
– With your right foot, press the accelerator
down to the f
ull throttle or kick-down posi-
tion. The engine speed will stabilise at
about 3,200 rpm (petrol engine) or about
2,000 rpm (diesel engine).
– Take your left foot off the brake pedal. WARNING
● Alw a
ys adapt your driving style to the traf-
fic conditions.
● Only use the launch control programme
when roa
d and traffic conditions permit, and
make sure your manner of driving and accel-
erating the vehicle does not inconvenience or
endanger other road users.
● Make sure that the ESC remains switched
on. Plea
se note that when the ASR and ESC
are deactivated, the wheels may start to spin, causing the vehicle to lose grip. Risk of acci-
dent!
●
After moving off, the ESC “sport” mode
shoul d be de
activated by briefly pressing the
button. Note
● Af ter u
sing the Launch control programme,
the temperature in the gearbox may have in-
creased considerably. In this case, the pro-
gramme could be disabled for several mi-
nutes. The programme can be used again af-
ter the cooling phase.
● Accelerating with the Launch control pro-
gramme pl
aces a heavy load on all parts of
the vehicle. This can result in increased wear
and tear. Downhill speed control*
The downhill speed control function helps
the driv
er when driv
in
g down steep gradi-
ents.
Downhill speed control is activated when the
selector lever is in D/S and the driver applies
the foot brake. The automatic gearbox auto-
matically engages a lower gear that is suita-
ble for the slope. The downhill speed control function attempts to maintain the speed at
which the v
ehicle was travelling when the
foot brake was applied (subject to the laws of
physics and technical drive limitations). It
may be necessary to adjust the speed again
using the foot brake in certain situations. Giv-
en that the downhill speed control can only
change down to 3rd gear, on very steep de-
scents the tiptronic mode may be required. In
this case, manually reduce the tiptronic to
2nd or 1st gear to use the engine brake and
reduce the charge on the brakes.
Downhill speed control is deactivated as
soon as the road levels out again or you
press the accelerator pedal.
On vehicles with cruise control system*
››› page 209, downhill speed control is acti-
vated when you set a cruising speed. WARNING
The downhill speed control cannot defy the
la w
s of physics. Therefore, speed cannot be
maintained constant in all situations. Always
be prepared to use the brakes! 1)
Vehicles without driver information system: the
warnin g l
amp flashes slowly/Vehicles with driver in-
formation system: the warning lamp stays on.
196
Page 201 of 332
Driving
power steering only works when the engine
i s
ru
nning.
In city traffic you do not need to turn so much
on parking, manoeuvring or in very tight
turns.
On the road or on the motorway, progressive
steering transmits, for example, in bends, a
sportier, more direct and noticeably more dy-
namic driving sensation.
Run-in and economical driving
Runnin
g in the engine A new vehicle should be run in over a dis-
t
anc
e of
1500 km (1000 miles). For the first
1,000 km the engine speed should not ex-
ceed 2/3 of the maximum permissible engine
speed. In doing so, do not accelerate at full
throttle and do not drive with a trailer! From
1000 to 1500 km (600 to 1000 miles) you
can gradually increase the engine rpm and
road speed.
During its first few hours of running, the in-
ternal friction in the engine is greater than
later on when all the moving parts have bed-
ded down.
How the vehicle is driven for the first 1,500
km influences the future engine perform-
ance. Subsequently, also drive at a moderate
rate, especially when the engine is still cold: this will lead to less engine wear and tear
and wil
l prolong its useful life.
You should also avoid driving with the engine
speed too low. Change down to a lower gear
when the engine no longer runs “smoothly”.
If the engine revs too much, cut fuel injection
to protect the engine.
Environmental compatibility Environmental protection is a top priority in
the des
ign, c
hoice of materials and manufac-
ture of your new SEAT.
Constructive measures to encourage recy-
cling
● Joints and connections designed for easy
dism antlin
g.
● Modular construction to facilitate disman-
tling.
● Incr
eased use of single-grade materials.
● Plastic parts and elastomers are marked in
accor
dance with ISO 1043, ISO 11469 and
ISO 1629.
Choice of materials
● Use of recycled materials.
● Use of compatible plastics in the same part
if its c
omponents are not easily separated. ●
Use of r
ecycled materials and/or materials
originating from renewable sources.
● Reduction of volatile components, includ-
ing odour, in p
lastic materials.
● Use of CFC-free coolants.
Ban on heavy
metals, with the exceptions
dictated by law (Annex II of ELV Directive
2000/53/EC): cadmium, lead, mercury, hexa-
valent chromium.
Manufacturing methods
● Reduction of the quantity of thinner in the
protectiv
e wax for cavities.
● Use of plastic film as protection during ve-
hicle tr
ansport.
● Use of solvent-free adhesives.
● Use of CFC-free coolants in cooling sys-
tems.
● Recy
cling and energy recovery from resi-
dues (RDF).
● Impr
ovement in the quality of waste water.
● Use of systems for the recovery of residual
heat (therm
al recovery, enthalpy wheels,
etc.).
● The use of water-soluble paints.
199
Technical data
Advice
Operation
Emergencies
Safety
Page 257 of 332
Towing bracket device
If a towing bracket is to be fitted after the ve-
hic l
e i
s purchased, this must be completed
according to the instructions of the towing
bracket manufacturer.
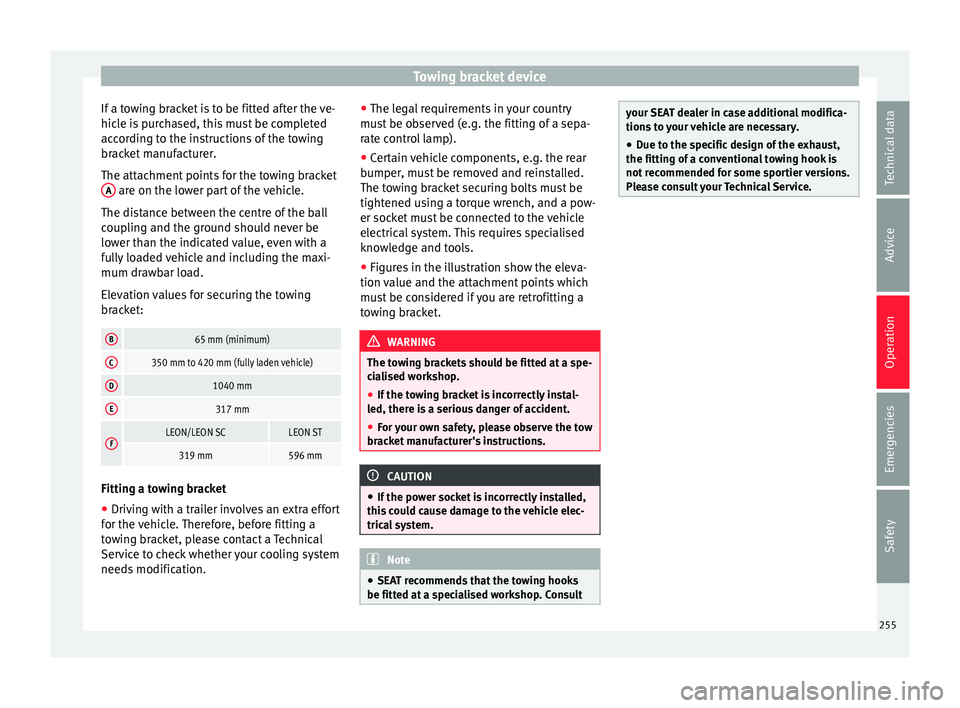
The attachment points for the towing bracket A are on the lower part of the vehicle.
The di s
t
ance between the centre of the ball
coupling and the ground should never be
lower than the indicated value, even with a
fully loaded vehicle and including the maxi-
mum drawbar load.
Elevation values for securing the towing
bracket:
B65 mm (minimum)
C350 mm to 420 mm (fully laden vehicle)
D1040 mm
E317 mm
FLEON/LEON SCLEON ST
319 mm596 mm Fitting a towing bracket
●
Driving with a trailer involves an extra effort
f or the
v
ehicle. Therefore, before fitting a
towing bracket, please contact a Technical
Service to check whether your cooling system
needs modification. ●
The leg
al requirements in your country
must be observed (e.g. the fitting of a sepa-
rate control lamp).
● Certain vehicle components, e.g. the rear
bumper, mu
st be removed and reinstalled.
The towing bracket securing bolts must be
tightened using a torque wrench, and a pow-
er socket must be connected to the vehicle
electrical system. This requires specialised
knowledge and tools.
● Figures in the illustration show the eleva-
tion value and the att
achment points which
must be considered if you are retrofitting a
towing bracket. WARNING
The towing brackets should be fitted at a spe-
ci a
lised workshop.
● If the towing bracket is incorrectly instal-
led, there i
s a serious danger of accident.
● For your own safety, please observe the tow
brack
et manufacturer's instructions. CAUTION
● If the po w
er socket is incorrectly installed,
this could cause damage to the vehicle elec-
trical system. Note
● SEA T r
ecommends that the towing hooks
be fitted at a specialised workshop. Consult your SEAT dealer in case additional modifica-
tions
t
o your vehicle are necessary.
● Due to the specific design of the exhaust,
the fitting of a c
onventional towing hook is
not recommended for some sportier versions.
Please consult your Technical Service. 255
Technical data
Advice
Operation
Emergencies
Safety
Page 270 of 332
Advice
is equipped with a particulate filter, the sul-
phur c ont
ent
of the fuel must be below 50
parts per million.
Winter-grade diesel
Summer fuel becomes thicker in winter and it
is more difficult to start the engine. For this
reason, petrol stations in some countries al-
so offer winter diesel with improved fluidity
when cold (winter-grade diesel).
Water in the fuel filter 1)
If your vehicle has a diesel engine and is
equipped with a fuel filter with a water sepa-
rator, the instrument panel may display the
following warning: Water in the
fuel filter. If this is the case, take the
vehicle to a specialised workshop so that
they can drain the fuel filter. CAUTION
● The v ehic
le is not designed for the use of
FAME fuel (biodiesel). The fuel system would
be damaged if you used biodiesel.
● Do not mix fuel additives, the so-called
“thinners”, petro
l or similar additives with
diesel fuel.
● If poor-quality diesel fuel is used, it may be
neces
sary to drain the fuel filter more fre-
quently than is specified in the Maintenance Programme. We recommend having this done
by
a s
pecialised workshop. If water is allowed
to collect in the filter, this can cause engine
performance problems. Natural gas
Natural gas can be compressed or in liquid
form, a
d
dition to others.
Liquefied natural gas (LNG) is the result of
heavy cooling of natural gas. Therefore its
volume is considerably reduced compared
with compressed natural gas (CNG). In vehi-
cles with a natural gas engine, liquefied nat-
ural gas cannot be directly refilled, as the gas
would expand excessively in the vehicle gas
tank.
Therefore, vehicles with a natural gas engine
must only be refuelled using compressed
natural gas ››› .
Nat ur
a
l gas quality and consumption
Natural gas is divided into the groups H and
L depending on its quality.
Gas type H has a superior heating power and
inferior nitrogen and carbon dioxide content
than type L. The higher the heating power of the natural gas, the lower the consumption
wil
l be.
However, the heating power and the propor-
tion of nitrogen and carbon dioxide can fluc-
tuate within the quality groups. Therefore, ve-
hicle consumption can also vary when using
a single type of gas only.
The engine management automatically
adapts to the natural gas used according to
its quality. Therefore, different quality gases
can be mixed in the tank, without the need
for comprehensive draining before applying a
different quality gas.
Updated information relating to natural gas
quality is displayed on the instrument panel
››› page 36.
Natural gas and safety
If you can smell gas or suspect that there is a
leak ››› :
● Stop the vehicle immediately.
● Switch the ignition off.
● Open the doors to appropriately ventilate
the v
ehic
le.
● Extinguish cigarettes immediately.
● Move away from the vehicle or switch off
obj
ects that may cause sparks or a fire. 1)
Valid for the market: Algeria.
268
Page 273 of 332
Checking and refilling levels
●
Tak e c
are not to cause short circuits in the
electrical system, especially when working
on the battery.
● If working inside the engine compartment,
remember that, ev
en when the ignition is
switched off, the radiator fan may start up au-
tomatically, and therefore there is a risk of in-
jury.
● Never cover the engine with additional in-
sul
ating materials such as a blanket. Risk of
fire!
● Do not unscrew the cap on the coolant ex-
pans
ion tank when the engine is hot. The
cooling system is under pressure.
● Protect face, hands and arms by covering
the cap with a l
arge, thick rag to protect
against escaping coolant and steam.
● If it is necessary to work in the engine com-
partment
while the engine is running, the ro-
tating components (for example, poly-V belt,
alternator, radiator fan) and the high voltage
ignition system are an additional hazard.
● Observe the following additional warnings
if work
on the fuel system or the electrical
system is necessary:
– Always disconnect the battery from the
on-board network.
– Do not smoke.
– Never work near naked flames.
– Always keep an approved fire extinguish-
er immediately available. CAUTION
When topping up fluids make sure the correct
fluid is p
ut into the correct filler opening, oth-
erwise this can cause serious malfunctions or
engine damage. For the sake of the environment
Inspect the ground underneath your vehicle
re gu
larly so that any leaks are detected at an
early stage. If you find spots of oil or other
fluids in the area where it was parked, have
your vehicle inspected at the workshop. Note
In right-hand drive vehicles* some brake flu-
id re ser
voirs are on the other side of the en-
gine compartment ››› Fig. 247. Opening the bonnet
Read the additional information carefully
› ›
›
page 17
The bonnet is released from inside the vehi-
cle.
Check that the windscreen wiper arms are
not unfolded. Otherwise the paint may be
damaged.
The bonnet can only be unlocked when the
driver door is open. WARNING
Never open the bonnet if you see steam or
drips of
coolant being released from the en-
gine compartment. Failure to comply could
result in burns. Wait until no steam or coolant
can be seen before opening the bonnet. Closing the bonnet
–
Slightly lift the bonnet.
– Release the bonnet stay before pressing it
bac k
into its support.
– Carefully close the bonnet.
– Press the bonnet down until it locks into
plac
e.
– Make sure that the bonnet catches onto its
cla
sp. Do not press down too hard ››› .
WARNING
● For s af
ety reasons the bonnet must always
be completely closed when the vehicle is
moving. Therefore, after closing the bonnet,
always check that the locking element is
properly engaged. This is the case if the bon-
net is flush with the adjacent body panels.
● Should you notice that the bonnet is not
safely
secured when the vehicle is moving,
stop the vehicle immediately and close the
bonnet. Failure to follow this instruction
could result in an accident. 271
Technical data
Advice
Operation
Emergencies
Safety