brake light Seat Mii 2013 Owner's manual
[x] Cancel search | Manufacturer: SEAT, Model Year: 2013, Model line: Mii, Model: Seat Mii 2013Pages: 306, PDF Size: 4.3 MB
Page 10 of 306
8Exterior views
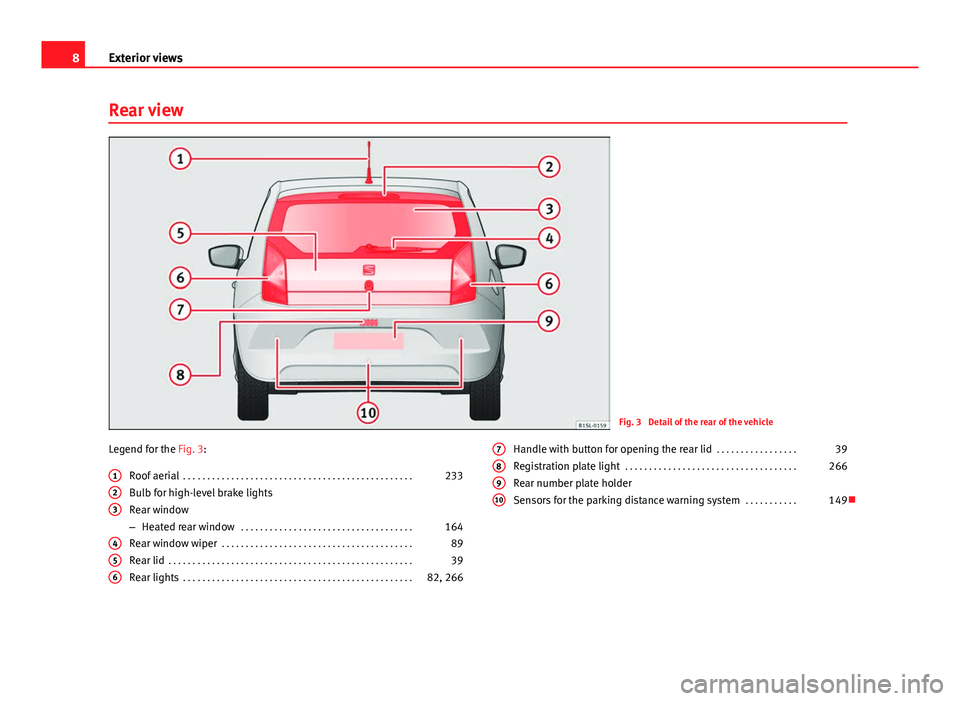
Rear view
Fig. 3 Detail of the rear of the vehicle
Legend for the Fig. 3: Roof aerial . . . . . . . . . . . . . . . . . . . . . . . . . . . . . . . . . . . . . . . . . . . . . . . . 233
Bulb for high-level brake lights
Rear window
– Heated rear window . . . . . . . . . . . . . . . . . . . . . . . . . . . . . . . . . . . . 164
Rear window wiper . . . . . . . . . . . . . . . . . . . . . . . . . . . . . . . . . . . . . . . . 89
Rear lid . . . . . . . . . . . . . . . . . . . . . . . . . . . . . . . . . . . . . . . . . . . . . . . . . . . 39
Rear lights . . . . . . . . . . . . . . . . . . . . . . . . . . . . . . . . . . . . . . . . . . . . . . . . 82, 266
1
23
456
Handle with button for opening the rear lid
. . . . . . . . . . . . . . . . .39
Registration plate light . . . . . . . . . . . . . . . . . . . . . . . . . . . . . . . . . . . . 266
Rear number plate holder
Sensors for the parking distance warning system . . . . . . . . . . .14978910
Page 15 of 306
13
Vehicle interior
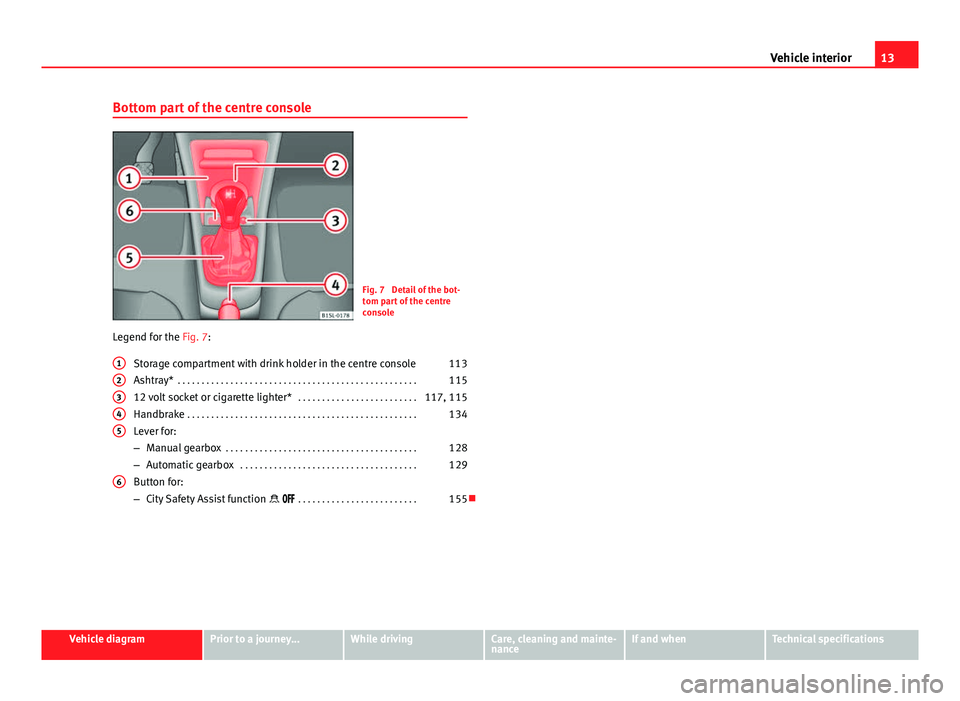
Bottom part of the centre console
Fig. 7 Detail of the bot-
tom part of the centre
console
Legend for the Fig. 7:
Storage compartment with drink holder in the centre console 113
Ashtray* . . . . . . . . . . . . . . . . . . . . . . . . . . . . . . . . . . . . . . . . . . . . . . . . . . 115
12 volt socket or cigarette lighter* . . . . . . . . . . . . . . . . . . . . . . . . .117, 115
Handbrake . . . . . . . . . . . . . . . . . . . . . . . . . . . . . . . . . . . . . . . . . . . . . . . . 134
Lever for:
– Manual gearbox . . . . . . . . . . . . . . . . . . . . . . . . . . . . . . . . . . . . . . . . 128
– Automatic gearbox . . . . . . . . . . . . . . . . . . . . . . . . . . . . . . . . . . . . . 129
Button for:
– City Safety Assist function . . . . . . . . . . . . . . . . . . . . . . . . . 155
12345
6
Vehicle diagramPrior to a journey...While drivingCare, cleaning and mainte-
nanceIf and whenTechnical specifications
Page 17 of 306
15
Instrument panel
Instrument panel Control and warning lamps
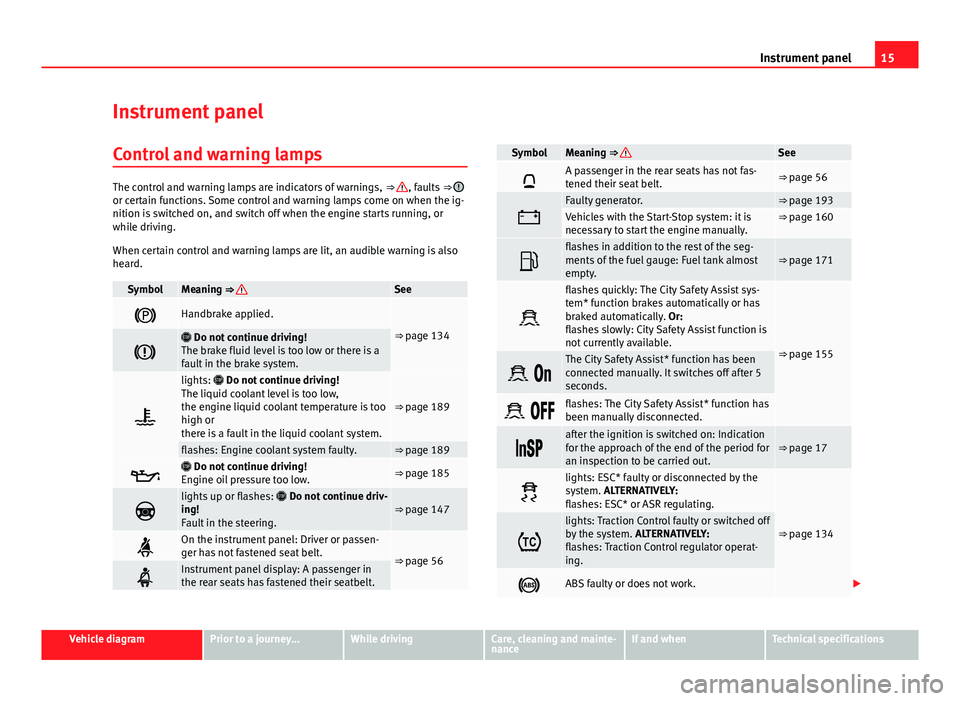
The control and warning lamps are indicators of warnings, ⇒ , faults ⇒ or certain functions. Some control and warning lamps come on when the ig-
nition is switched on, and switch off when the engine starts running, or
while driving.
When certain control and warning lamps are lit, an audible warning is also
heard.
SymbolMeaning ⇒ See
Handbrake applied.
⇒ page 134
Do not continue driving!
The brake fluid level is too low or there is a
fault in the brake system.
lights: Do not continue driving!
The liquid coolant level is too low,
the engine liquid coolant temperature is too
high or
there is a fault in the liquid coolant system.
⇒ page 189
flashes: Engine coolant system faulty.⇒ page 189
Do not continue driving!
Engine oil pressure too low.⇒ page 185
lights up or flashes: Do not continue driv-
ing!
Fault in the steering.⇒ page 147
On the instrument panel: Driver or passen-
ger has not fastened seat belt.
⇒ page 56
Instrument panel display: A passenger in
the rear seats has fastened their seatbelt.
SymbolMeaning ⇒ See
A passenger in the rear seats has not fas-
tened their seat belt.⇒ page 56
Faulty generator.⇒ page 193Vehicles with the Start-Stop system: it is
necessary to start the engine manually.⇒ page 160
flashes in addition to the rest of the seg-
ments of the fuel gauge: Fuel tank almost
empty.⇒ page 171
flashes quickly: The City Safety Assist sys-
tem* function brakes automatically or has
braked automatically. Or:
flashes slowly: City Safety Assist function is
not currently available.
⇒ page 155
The City Safety Assist* function has been
connected manually. It switches off after 5
seconds.
flashes: The City Safety Assist* function has
been manually disconnected.
after the ignition is switched on: Indication
for the approach of the end of the period for
an inspection to be carried out.⇒ page 17
lights: ESC* faulty or disconnected by the
system. ALTERNATIVELY:
flashes: ESC* or ASR regulating.
⇒ page 134
lights: Traction Control faulty or switched off
by the system. ALTERNATIVELY:
flashes: Traction Control regulator operat-
ing.
ABS faulty or does not work.
Vehicle diagramPrior to a journey...While drivingCare, cleaning and mainte-
nanceIf and whenTechnical specifications
Page 49 of 306
47
Ensuring you are correctly and safely seated
Ensuring you are correctly and safely seated Adjusting the seat position
Introduction
Number of seats
The vehicle has a total of 4 seats: 2 front seats and 2 rear seats. Each seat is
equipped with a seat belt.
Additional information and warnings:
● Seat functions ⇒ page 54
● Seat belts ⇒ page 56
● Airbag system ⇒ page 65
● Child seats (accessories) ⇒ page 74
WARNING
An incorrect sitting position in the vehicle can lead to severe injuries or
death in the event of sudden braking or manoeuvres, collision or acci-
dents or if the airbag deploys.
● Before the vehicle moves, assume the proper sitting position and
maintain it throughout the trip. This also includes fastening the seat
belt.
● Never transport more people than there are seats with a seat belt
available in the vehicle.
WARNING (Continued)
● Children must always be protected with an approved child restraint
system suited to their height and weight ⇒ page 74, ⇒ page 65.
● Always keep your feet in the footwell while the vehicle is in motion.
Never, for example, put your feet on the surface of a seat or on the dash
panel and never put them out of a window. Otherwise the airbag and seat
belt offer insufficient protection and the risk of injury in the event of an
accident is increased.
WARNING
Before every trip, adjust the seat, the seat belt and the head restraints
and instruct your passengers to fasten their seat belts properly.
● Move the front passenger seat back as far as possible.
● Adjust the driver seat so that there is a distance of at least 25 cm be-
tween the centre of your chest and the hub of the steering wheel. Adjust
the driver seat so that you are able to press the accelerator, brake and
clutch pedals to the floor with your knees slightly angled and that the
distance between your knees and the dash panel is at least 10 cm. If your
physical constitution prevents you from meeting these requirements,
contact a specialised workshop to make any modifications required.
● Never drive with the seat backrest tilted far back. The further the seat
backrests are tilted to the rear, the greater the risk of injury due to incor-
rect positioning of the belt web or to the incorrect sitting position!
● Never drive with the seat backrest tilted forwards. Should a front air-
bag deploy, it could throw the seat backrest backwards and injure the
passengers of the rear seats.
● Sit as far away as possible from the steering wheel and the dash pan-
el.
Vehicle diagramPrior to a journey...While drivingCare, cleaning and mainte-
nanceIf and whenTechnical specifications
Page 51 of 306
49
Ensuring you are correctly and safely seated
Correct sitting position
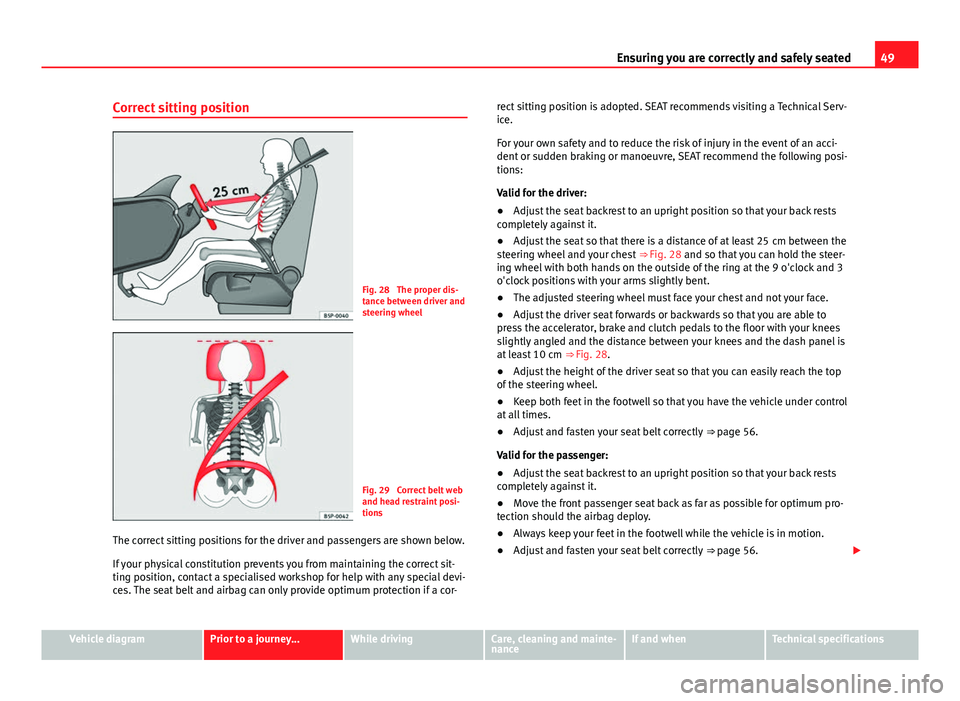
Fig. 28 The proper dis-
tance between driver and
steering wheel
Fig. 29 Correct belt web
and head restraint posi-
tions
The correct sitting positions for the driver and passengers are shown below.
If your physical constitution prevents you from maintaining the correct sit-
ting position, contact a specialised workshop for help with any special devi-
ces. The seat belt and airbag can only provide optimum protection if a cor- rect sitting position is adopted. SEAT recommends visiting a Technical Serv-
ice.
For your own safety and to reduce the risk of injury in the event of an acci-
dent or sudden braking or manoeuvre, SEAT recommend the following posi-
tions:
Valid for the driver:
●
Adjust the seat backrest to an upright position so that your back rests
completely against it.
● Adjust the seat so that there is a distance of at least 25 cm between the
steering wheel and your chest ⇒ Fig. 28 and so that you can hold the steer-
ing wheel with both hands on the outside of the ring at the 9 o'clock and 3
o'clock positions with your arms slightly bent.
● The adjusted steering wheel must face your chest and not your face.
● Adjust the driver seat forwards or backwards so that you are able to
press the accelerator, brake and clutch pedals to the floor with your knees
slightly angled and the distance between your knees and the dash panel is
at least 10 cm ⇒ Fig. 28.
● Adjust the height of the driver seat so that you can easily reach the top
of the steering wheel.
● Keep both feet in the footwell so that you have the vehicle under control
at all times.
● Adjust and fasten your seat belt correctly ⇒ page 56.
Valid for the passenger:
● Adjust the seat backrest to an upright position so that your back rests
completely against it.
● Move the front passenger seat back as far as possible for optimum pro-
tection should the airbag deploy.
● Always keep your feet in the footwell while the vehicle is in motion.
● Adjust and fasten your seat belt correctly ⇒ page 56.
Vehicle diagramPrior to a journey...While drivingCare, cleaning and mainte-
nanceIf and whenTechnical specifications
Page 97 of 306
95
Transporting
Transporting
Driving tips Introduction
Always transport heavy loads in the luggage compartment and place the
seat backs in a vertical position. Never overload the vehicle. Both the carry-
ing capacity as well as the distribution of the load in the vehicle have ef-
fects on the driving behaviour and braking ability ⇒
.
Additional information and warnings:
● Rear lid ⇒ page 39
● To lower the front passenger seat back ⇒ page 54
● Light ⇒ page 82
● Luggage compartment ⇒ page 98
● Roof carrier ⇒ page 104
● Wheels and tyres ⇒ page 210
WARNING
Unsecured or incorrectly secured objects can cause serious injury in case
of a sudden manoeuvring or breaking or in case of an accident. This is es-
pecially true when objects are struck by a detonating airbag and fired
through the vehicle interior. To reduce the risks, please note the follow-
ing:
● Secure all objects in the vehicle. Always keep equipment and heavy
objects in the luggage compartment.
WARNING (Continued)
● Always secure objects with suitable rope or slings so that they cannot
enter the deployment areas around the frontal or side airbags in case of
sudden braking or an accident.
● Always ensure that objects inside the vehicle cannot move into the
deployment area of the bags while driving.
● While driving, always keep object compartments closed.
● Remove all objects from the front passenger seat when this is fol-
lowed down. When the seat backrest is folded down, it presses on small
and light objects and these are detected by the weight sensor on the
seat; this sends false information to the airbag control unit.
● While the backrest of the front passenger seat is folded, the frontal
airbag must remain disconnected and the PASSENGER AIRBAG OFF
light on.
● Objects secured in the vehicle should never be placed in such a way
as to make passengers sit in an incorrect position.
● If secured objects occupy a seat then this should not be occupied or
used by anybody.
WARNING
The driving behaviour and braking ability change when transporting
heavy and large objects.
● Adjust your speed and driving style to visibility, road, traffic and
weather conditions.
● Accelerate gently and carefully.
● Avoid sudden braking and manoeuvres.
● Brake early.
Vehicle diagramPrior to a journey...While drivingCare, cleaning and mainte-
nanceIf and whenTechnical specifications
Page 126 of 306
124Starting, changing gears, parking
Changing gear
Introduction
When reverse gear is engaged and the ignition is switched on the following
takes place:
● Reverse lights light up.
● The rear wiper blade performs one movement when the windscreen wip-
er is activated.
● If necessary, connect the parking distance warning system.
Additional information and warnings:
● Detail of the centre console ⇒ page 12
● Instruments ⇒ page 17
● Braking, stopping and parking ⇒ page 134
● Parking sensor system ⇒ page 149
● Electronic power control and exhaust gases purification system
⇒ page 237
● Emergency locking and unlocking ⇒ page 244
WARNING
Rapid acceleration can cause loss of traction and skidding, especially on
slippery ground. This could cause loss of control of the vehicle resulting
in an accident and considerable damage.
● Use rapid acceleration only when visibility, weather, road conditions
and traffic permit.
WARNING
Do not allow the brakes to “rub” for a prolonged period of time, or brake
frequently or for long periods of time. Continuous braking heats up the
brakes. This could significantly reduce braking power, increase braking
distance or even result in the total failure of the brake system.
CAUTION
● Never make the brakes slip by pressing the pedal gently, if it is not really
necessary to brake. This will increase wear.
● Reduce speed or reduce the gear when faced with steep and long
slopes. This allows you to use the engine braking effect and to reduce the
strain on the brake system. Otherwise, the brakes may overheat and fail.
Only use the brakes to reduce speed or to stop.
Page 127 of 306
125
Starting, changing gears, parking
Warning and control lamps
If lit upPossible causeSolution
(red)Fault in the automatic gear-
box.
Do not drive on!
Seek professional advice. Fail-
ure to do so could result in
considerable damage to the
transmission ⇒ page 132.
(yellow)
In the automatic gearbox
the gears can engage incor-
rectly.
Switch the ignition on and off.
When the control lamp does
not light up, find the nearest
specialised workshop and
have the automatic gearbox
checked.
The automatic gearbox
overheats temporarily.
Let the transmission cool with
the gearbox lever in the posi-
tion . When the control lamp
does not light up, find the
nearest specialised workshop
and have the automatic gear-
box checked.
If lit upPossible causeSolution
Place the automatic gear-
box lever in the position
and do not press the brake
pedal.Press the brake pedal to select
a gear range.
Together with the yellow
control lamp for the temper-
ature of the transmission
: the automatic gearbox
overheats.
Press brake pedal and let the
transmission cool. Avoid
pressing the accelerator.
When the control lamp does
not light up, find the nearest
specialised workshop and
have the automatic gearbox
checked.
Together with the turn sig-
nal display in the instru-
ment panel display: the au-
tomatic gearbox lever is not
in the position , indication
to start the engine.
Move the gearbox lever to the
position and start the en-
gine.
Vehicle diagramPrior to a journey...While drivingCare, cleaning and mainte-
nanceIf and whenTechnical specifications
Page 128 of 306

126Starting, changing gears, parking
If
flash- ingPossible causeSolution
An automatic gearbox in the
vehicle does not guarantee
that the vehicle will not roll
away.
Apply the handbrake.
In the instrument panel dis-
play, in addition to the control
lamp requesting the brake
pedal to be pressed : Indica-
tion to start the engine.
Move the gearbox lever to the po-
sition and start the engine.
On the instrument panel dis-
play: Whilst driving in a for-
ward direction, try to move the
automatic gearbox lever to the
position .Stop the vehicle and move the
gearbox lever to the position in
order to subsequently change to
the position .
On the instrument panel dis-
play: The automatic gearbox
lever was placed in the posi-
tion or , but the brake pedal
was not pressed.Press the brake pedal, move the
gearbox lever to the position ,
and subsequently to the required
position or .
When switching on the ignition some warning and control lamps light up for
a short time to check the operations. They will switch off after a few sec-
onds.
Page 134 of 306
132Starting, changing gears, parking
Automatic gearbox malfunction
Back-up programme
When automatic gearbox warning and control lamps light up on the instru-
ment panel, there may be a system malfunction ⇒ page 124. In the event of
some faults the automatic gearbox functions using a backup programme.
When the backup programme is activated, it is possible to drive the vehicle,
however, at low speeds and within a selected range of gears.
With the manual gearbox, in some cases it is not possible to drive with all
the gears.
In all cases the automatic gearbox must be checked at a specialised work-
shop.
Automatic gearbox overheating
The automatic gearbox can overheat with a prolonged start up, or when
stopping and starting continuously. This overheating is displayed with a
warning lamp in the instrument panel. Additionally, an audible warning
can be heard. Stop and let the gearbox cool ⇒
.
The vehicle moves forward or back despite having selected a gear range
When the vehicle does not move in the required direction, the system may
not have the gear range correctly engaged. Press the brake pedal and en-
gage the gear range again. If the vehicle still does not move in the required
direction, there is a system malfunction. Seek specialist assistance and
have the system checked.
CAUTION
● When the gearbox is displayed as overheating for the first time, the vehi-
cle must be parked safely or must be driven at a speed of more than 20 km/
h (12 mph).
● When the warning lamp lights up and the audible warning is sounded,
the vehicle must be parked safely and the engine switched off. Let the gear-
box cool down.
● To prevent damage to the gearbox, driving must only be continued when
the warning lamps are no longer lit up. While the gearbox is overheated,
starting up and driving at walking speed should be avoided.
Recommended gear display
In some vehicles, the recommended gear for reducing fuel consumption is
displayed on the instrument panel:
displayMeaning
Optimum gear.
Recommendation to change up a gear.
Recommendation to change down a gear.
WARNING
The recommended gear display is intended as a guideline only; it should
never replace the driver's attention to driving carefully.
● Responsibility for selecting the correct gear for each situation contin-
ues to lie with the driver, for example when overtaking or climbing a hill.