air condition Seat Mii 2015 Owner's manual
[x] Cancel search | Manufacturer: SEAT, Model Year: 2015, Model line: Mii, Model: Seat Mii 2015Pages: 232, PDF Size: 4.23 MB
Page 5 of 232
Table of Contents
Table of Contents
The e s
senti
als . . . . . . . . . . . . . . . . . . . . . . . . 5
Exterior view . . . . . . . . . . . . . . . . . . . . . . . . . . . . 5
Exterior view . . . . . . . . . . . . . . . . . . . . . . . . . . . . 6
Interior view (left guide) . . . . . . . . . . . . . . . . . . 7
How it works . . . . . . . . . . . . . . . . . . . . . . . . . . . . 8
Unlocking and locking . . . . . . . . . . . . . . . . . . . . 8
Before driving . . . . . . . . . . . . . . . . . . . . . . . . . . . 12
Airbags . . . . . . . . . . . . . . . . . . . . . . . . . . . . . . . . 14
Child seats . . . . . . . . . . . . . . . . . . . . . . . . . . . . . 16
Starting the vehicle . . . . . . . . . . . . . . . . . . . . . . 20
Lights and visibility . . . . . . . . . . . . . . . . . . . . . . 21
SEAT information system . . . . . . . . . . . . . . . . . . 23
Cruise control . . . . . . . . . . . . . . . . . . . . . . . . . . . 25
Warning lamps . . . . . . . . . . . . . . . . . . . . . . . . . . 25
Gearbox lever . . . . . . . . . . . . . . . . . . . . . . . . . . . 27
Air conditioning . . . . . . . . . . . . . . . . . . . . . . . . . 28
Level control . . . . . . . . . . . . . . . . . . . . . . . . . . . . 30
Emergencies . . . . . . . . . . . . . . . . . . . . . . . . . . . . 33
Fuses . . . . . . . . . . . . . . . . . . . . . . . . . . . . . . . . . . 33
Bulbs . . . . . . . . . . . . . . . . . . . . . . . . . . . . . . . . . . 34
Action in the event of a puncture . . . . . . . . . . . 34
Changing a wheel . . . . . . . . . . . . . . . . . . . . . . . 35
Snow chains . . . . . . . . . . . . . . . . . . . . . . . . . . . . 40
Emergency towing of the vehicle . . . . . . . . . . . 41
How to jump start . . . . . . . . . . . . . . . . . . . . . . . . 42
Changing the wiper blades . . . . . . . . . . . . . . . . 44
Safety . . . . . . . . . . . . . . . . . . . . . . . . . . . . . . . . 46
Safe driving . . . . . . . . . . . . . . . . . . . . . . . . . . . . 46
Safety first! . . . . . . . . . . . . . . . . . . . . . . . . . . . . . 46
Driving advice . . . . . . . . . . . . . . . . . . . . . . . . . . . 46
Correct position of the vehicle occupants . . . . 47
Pedal area . . . . . . . . . . . . . . . . . . . . . . . . . . . . . . 51 Seat belts
. . . . . . . . . . . . . . . . . . . . . . . . . . . . . . 51
Why wear a seat belt? . . . . . . . . . . . . . . . . . . . . 51
How to properly adjust your seat belt . . . . . . . . 55
Seat belt tensioners . . . . . . . . . . . . . . . . . . . . . . 57
Airbag system . . . . . . . . . . . . . . . . . . . . . . . . . . 58
Brief introduction . . . . . . . . . . . . . . . . . . . . . . . . 58
Airbag safety instructions . . . . . . . . . . . . . . . . . 61
Deactivating airbags . . . . . . . . . . . . . . . . . . . . . 62
Transporting children safely . . . . . . . . . . . . . . . 63
Safety for children . . . . . . . . . . . . . . . . . . . . . . . 63
Child seats . . . . . . . . . . . . . . . . . . . . . . . . . . . . . 65
Emergencies . . . . . . . . . . . . . . . . . . . . . . . . . . 69
Self-help . . . . . . . . . . . . . . . . . . . . . . . . . . . . . . . 69
In case of emergency . . . . . . . . . . . . . . . . . . . . . 69
Vehicle tool kit* . . . . . . . . . . . . . . . . . . . . . . . . . 69
Changing a wheel . . . . . . . . . . . . . . . . . . . . . . . 71
Tyre repair . . . . . . . . . . . . . . . . . . . . . . . . . . . . . . 71
Changing the windscreen wiper blades . . . . . . 74
Tow-starting and towing . . . . . . . . . . . . . . . . . . 74
Emergency locking and unlocking . . . . . . . . . . 76
Fuses and bulbs . . . . . . . . . . . . . . . . . . . . . . . . . 77
Fuses . . . . . . . . . . . . . . . . . . . . . . . . . . . . . . . . . . 77
Changing bulbs . . . . . . . . . . . . . . . . . . . . . . . . . 78
Operation . . . . . . . . . . . . . . . . . . . . . . . . . . . . . 85
General instrument panel . . . . . . . . . . . . . . . . . 85
Instrument panel . . . . . . . . . . . . . . . . . . . . . . . . 84
Instruments . . . . . . . . . . . . . . . . . . . . . . . . . . . . 86
Opening and closing . . . . . . . . . . . . . . . . . . . . . 90
Vehicle key set . . . . . . . . . . . . . . . . . . . . . . . . . . 90
Central locking* and locking system . . . . . . . . 92
Doors . . . . . . . . . . . . . . . . . . . . . . . . . . . . . . . . . . 96
Rear lid . . . . . . . . . . . . . . . . . . . . . . . . . . . . . . . . 97
Electric windows . . . . . . . . . . . . . . . . . . . . . . . . . 99
Sliding/tilting electric panoramic sunroof . . . . 100 Lights and visibility
. . . . . . . . . . . . . . . . . . . . . . 101
Lights . . . . . . . . . . . . . . . . . . . . . . . . . . . . . . . . . 101
Visibility . . . . . . . . . . . . . . . . . . . . . . . . . . . . . . . 105
Windscreen wiper and window wiper sys-
tems . . . . . . . . . . . . . . . . . . . . . . . . . . . . . . . . . . 106
R
ear vision mirror . . . . . . . . . . . . . . . . . . . . . . . . 107
Seats and head restraints . . . . . . . . . . . . . . . . . 108
Adjusting the seat and head restraints . . . . . . 108
Seat functions . . . . . . . . . . . . . . . . . . . . . . . . . . 109
Transport and practical equipment . . . . . . . . . 110
Transporting objects . . . . . . . . . . . . . . . . . . . . . 110
Practical equipment . . . . . . . . . . . . . . . . . . . . . . 112
Luggage compartment . . . . . . . . . . . . . . . . . . . . 118
Roof carrier . . . . . . . . . . . . . . . . . . . . . . . . . . . . . 122
Air conditioning . . . . . . . . . . . . . . . . . . . . . . . . . 124
Heating, ventilation and air conditioning sys-
tem . . . . . . . . . . . . . . . . . . . . . . . . . . . . . . . . . . . 124
Driv
ing . . . . . . . . . . . . . . . . . . . . . . . . . . . . . . . . 128
Steering . . . . . . . . . . . . . . . . . . . . . . . . . . . . . . . 128
Stopping and starting the engine . . . . . . . . . . . 130
Braking and parking . . . . . . . . . . . . . . . . . . . . . 132
Changing gear . . . . . . . . . . . . . . . . . . . . . . . . . . 137
Run-in and economical driving . . . . . . . . . . . . . 141
Engine management and exhaust gas purifica-
tion syst
em . . . . . . . . . . . . . . . . . . . . . . . . . . . . . 145
Driving abroad . . . . . . . . . . . . . . . . . . . . . . . . . . 146
Driving along flooded roadways . . . . . . . . . . . . 146
Driver assistance systems . . . . . . . . . . . . . . . . . 147
Braking and stability systems . . . . . . . . . . . . . . 147
Parking distance warning system* . . . . . . . . . . 149
Cruise control* (Cruise control system -
CCS)
. . . . . . . . . . . . . . . . . . . . . . . . . . . . . . . . . . . 151
Safety Assist* (City Safety Assist function) . . . . 152
Hill driving assistant* . . . . . . . . . . . . . . . . . . . . 156
Start-Stop System . . . . . . . . . . . . . . . . . . . . . . . . 156
Towing bracket device . . . . . . . . . . . . . . . . . . . . 158
Driving with a trailer . . . . . . . . . . . . . . . . . . . . . . 158
3
Page 30 of 232
The essentials
››› in Automatic gear change on
page 139
››› page 139 Air conditioning
Ho w doe
s
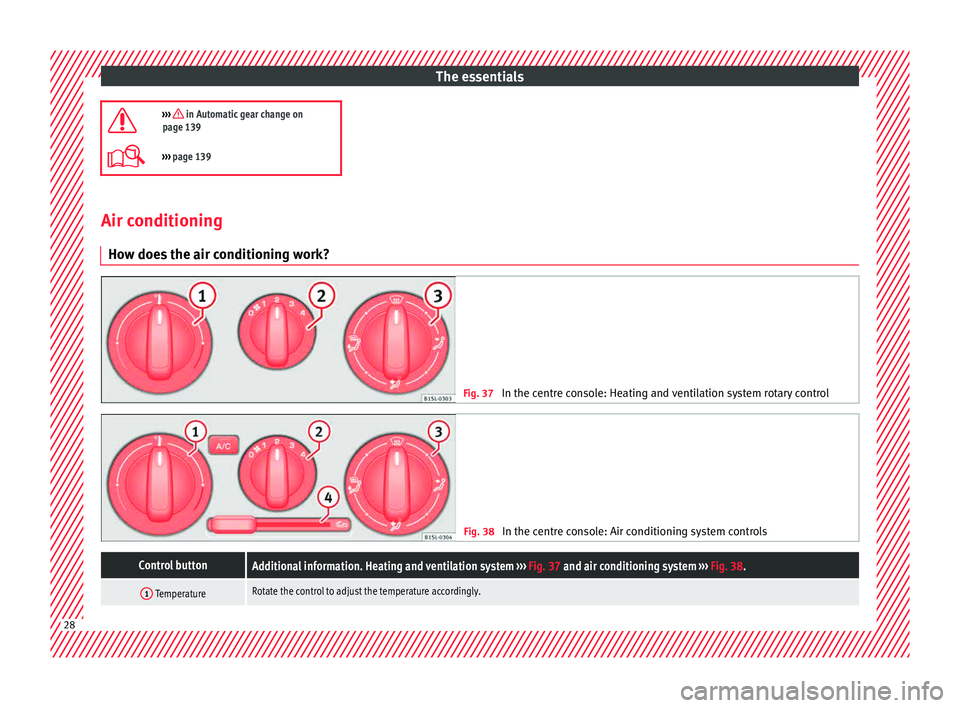
the air conditioning work? Fig. 37
In the centre console: Heating and ventilation system rotary control Fig. 38
In the centre console: Air conditioning system controls
Control buttonAdditional information. Heating and ventilation system ››› Fig. 37 and air conditioning system ››› Fig. 38.
1 TemperatureRotate the control to adjust the temperature accordingly.28
Page 31 of 232
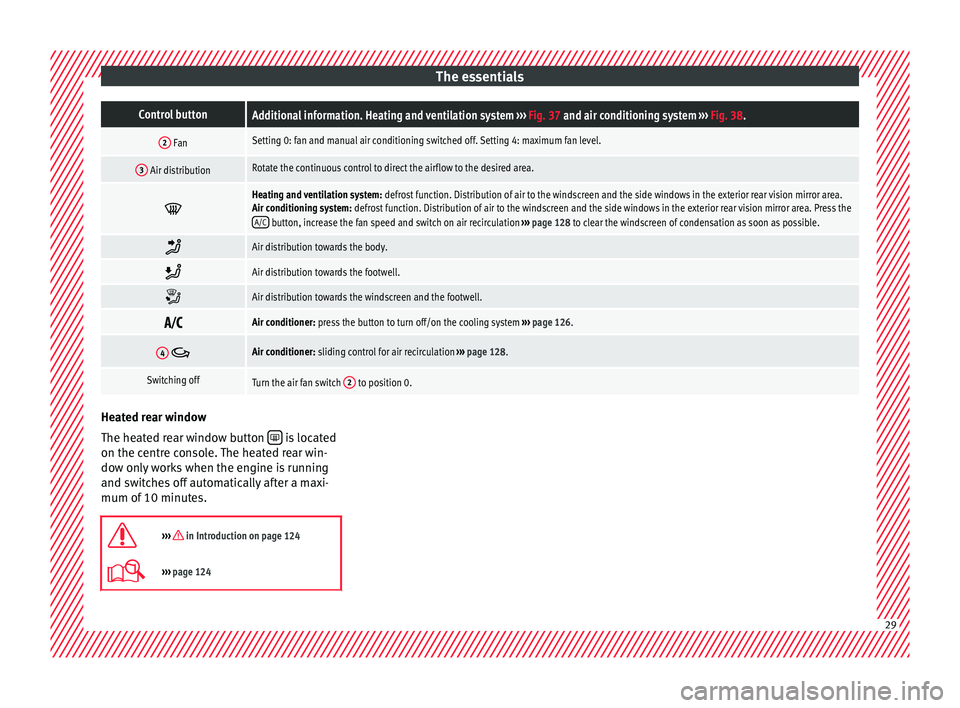
The essentialsControl buttonAdditional information. Heating and ventilation system
››› Fig. 37 and air conditioning system ››› Fig. 38.
2 FanSetting 0: fan and manual air conditioning switched off. Setting 4: maximum fan level.
3 Air distributionRotate the continuous control to direct the airflow to the desired area.
Heating and ventilation system:
defrost function. Distribution of air to the windscreen and the side windows in the exterior rear vision mirror area.
Air conditioning system: defrost function. Distribution of air to the windscreen and the side windows in the exterior rear vision mirror area. Press the
A/C
button, increase the fan speed and switch on air recirculation ››› page 128 to clear the windscreen of condensation as soon as possible.
Air distribution towards the body.
Air distribution towards the footwell.
Air distribution towards the windscreen and the footwell.
Air conditioner: press the button to turn off/on the cooling system
››› page 126.
4 Air conditioner: sliding control for air recirculation ››› page 128.
Switching offTurn the air fan switch 2 to position 0.Heated rear window
The he
at
ed r
ear window button is located
on the c entre c
onsole. The heated rear win-
dow only works when the engine is running
and switches off automatically after a maxi-
mum of 10 minutes.
››› in Introduction on page 124
››› page 124 29
Page 48 of 232
Safety
Safety
Saf e driv
in
g
Safety first! WARNING
● This m
anual contains important informa-
tion about the operation of the vehicle, both
for the driver and the passengers. The other
sections of the on-board documentation also
contain further information that you should
be aware of for your own safety and for the
safety of your passengers.
● Ensure that the on-board documentation is
kept in the
vehicle at all times. This is espe-
cially important when lending or selling the
vehicle to another person. WARNING
Driving under the influence of alcohol, drugs,
medication or n ar
cotics may result in severe
accidents and even loss of life.
● Alcohol, drugs, medication and narcotics
may
significantly alter perception, affect re-
action times and safety while driving, which
could result in the loss of control of the vehi-
cle. Driving advice
B ef
or
e driving For your own safety and the safety of your
pa
s
sengers, always note the following points
before every trip:
– Make sure that the vehicle's lights and turn
signal
s are working properly.
– Check tyre pressure.
– Ensure that all windows provide a clear and
good v
iew of the surroundings.
– Make sure all luggage is secured
›› ›
page 110.
– Make sure that no objects can interfere
with the pedal
s.
– Adjust front seat, head restraint and rear vi-
sion mirror
s properly according to your
size.
– Ensure that the passengers in the rear
seats alw
ays have the head restraints in
the in-use position ›››
page 50.
– Instruct passengers to adjust the head re-
straints
according to their height.
– Protect children with appropriate child
seats and pr
operly applied seat belts
››› page 63. –
Assume the c
orrect sitting position. Instruct
your passengers also to assume a proper
sitting position. ››› page 47.
– Fasten your seat belt securely. Instruct your
pas
sengers also to fasten their seat belts
properly. ››› page 51.
What affects driving safety? As a driver, you are responsible for yourself
and y
our p
assengers. When your concentra-
tion or driving safety is affected by any cir-
cumstance, you endanger yourself as well as
others on the road ››› , for this reason:
– Always pay attention to traffic and do not
g et
di
stracted by passengers or telephone
calls.
– Never drive when your driving ability is im-
paired (e.
g. by medication, alcohol, drugs).
– Observe traffic laws and speed limits.
– Always reduce your speed as appropriate
for ro
ad, traffic and weather conditions.
– When travelling long distances, take
break
s regularly - at least every two hours.
– If possible, avoid driving when you are tired
or stre
ssed.
46
Page 62 of 232
Safety
● He a
d r
estraints optimised for rear-end colli-
sion.
● Adjustable steering column.
● If necessary, anchor points for child seats
for the re
ar seats.
● Where applicable, mountings for the child
seat up
per retaining strap.
Situations in which the front and side air-
bags do not deploy:
● If the ignition is switched off during the col-
lision.
● In fr
ontal collisions, when the deceleration
meas
ured by the control unit is too low.
● In minor side collisions.
● In rear collisions.
● In the event of the vehicle overturning.
● When the impact speed is lower than the
refer
ence value set in the control unit.
There is a fault in the system if the control
lamp :
● does not light up when the ignition is
switc
hed on,
● turns off after 4 seconds after the ignition
is sw
itched on
● turns off and then lights up again after the
ignition is sw
itched on
● illuminates or flashes while the vehicle is
movin
g. WARNING
● The seat belt
s and airbags can only provide
maximum protection if the occupants are
seated correctly ››› page 47.
● If a fault has occurred in the airbag system,
have the sy
stem checked immediately by a
specialised workshop. Otherwise, during a
frontal collision the system might not trigger
correctly or may fail to trigger at all. Airbag activation
The airbags deploy extremely rapidly, within
thou
s
andths
of a second, to provide addi-
tional protection in the event of an accident.
A fine dust may develop when the airbag de-
ploys. This is normal and it is not an indica-
tion of fire in the vehicle.
The airbag system is only ready to function
when the ignition is on.
In special accidents instances, several air-
bags may activate at the same time.
In the event of minor head-on and side colli-
sions, rear-end collisions, overturning or roll-
over of the vehicle, airbags do not activate.
Activation factors
The conditions that lead to the airbag system
activating in each situation cannot be gener-
alised. Some factors play an important role,
such as the properties of the object the vehi- cle hits (hard/soft), angle of impact, vehicle
speed, etc
.
Deceleration trajectory is key for airbag acti-
vation.
The control unit analyses the collision trajec-
tory and activates the respective restraint
system.
If the deceleration rate is below the prede-
fined reference value in the control unit the
airbags will not be triggered, even though
the accident may cause extensive damage to
the car.
The following airbags are triggered in seri-
ous head-on collisions ● Driver airbag.
● Front passenger front airbag
The fol
lowing airbags are triggered in seri-
ous side-on collisions
● Front side airbag on the side of the acci-
dent.
● Re
ar side airbag on the side of the acci-
dent.
In an acc
ident with airbag activation:
● the interior lights switch on (if the interior
light swit
ch is in the courtesy light position);
● the hazard warning lights switch on;
● all doors are unlocked;
60
Page 75 of 232

Self-help
Contents of the tyre mobility system* Fig. 79
Standard representation: contents of
the anti-p u
nct
ure kit. The anti-puncture kit is located underneath
the floor c
o
v
ering in the luggage compart-
ment. It includes the following components
››› Fig. 79:
Tyre valve remover
Sticker indicating maximum speed “max.
80 km/h” or “max. 50 mph”
Filler tube with cap
Air compressor
Tube for inflating tyres
1 2
3
4
5 Warning provided by tyre pressure moni-
t
orin
g sy
stem1)
Air bleed screw 2)
ON/OFF switch
12 volt connector
Bottle of sealant
Spare tyre valve
The valve insert remover 1 has a gap at the
lo w
er end f
or a valve insert. The valve insert
can only be screwed or unscrewed in this
way. This also applies to its replacement part 11 .
WARNING
When inflating the wheel, the air compressor
and the inflat or t
ube may become hot.
● Protect hands and skin from hot parts.
● Do not place the hot flexible inflator tube or
hot air compr
essor on flammable material.
● Allow them to cool before storing the de-
vice.
● If
it is not possible to inflate the tyre to at
lea
st 2.0 bars (29 psi / 200 kPa), the tyre is
too badly damaged. The sealant is not in a
good condition to seal the tyre. Do not con-
tinue driving. Seek specialist assistance. 6
7
8
9
10
11 CAUTION
Switch off the air compressor after a maxi-
mum of 8 oper ation
al minutes to avoid over-
heating! Before switching on the air compres-
sor again, let it cool for several minutes. Check after 10 minutes of driving
Screw in the inflator tube
›››
Fig. 79 5 again
and chec k
the pressure on the gauge 6 .
1.3 bar (19 p s
i / 130 kPa) and lower:
● Stop the vehicle! The tyre c
annot be sealed
sufficiently with the tyre mobility set.
● You should obtain professional assistance
›››
.
1.4 b ar (20 p
s
i / 140 kPa) and higher:
● Set the tyre pressure to the correct value
again ››
› page 197.
● Carefully resume your journey until you
reac
h the nearest specialised workshop with-
out exceeding 80 km/h (50 mph).
● Have the damaged tyre replaced. »1)
It can also be integrated in the compressor.
2) In its place, the compressor may have a button.
73
Technical data
Advice
Operation
Emergencies
Safety
Page 87 of 232
General instrument panel
Operation
Gener a
l
instrument panel
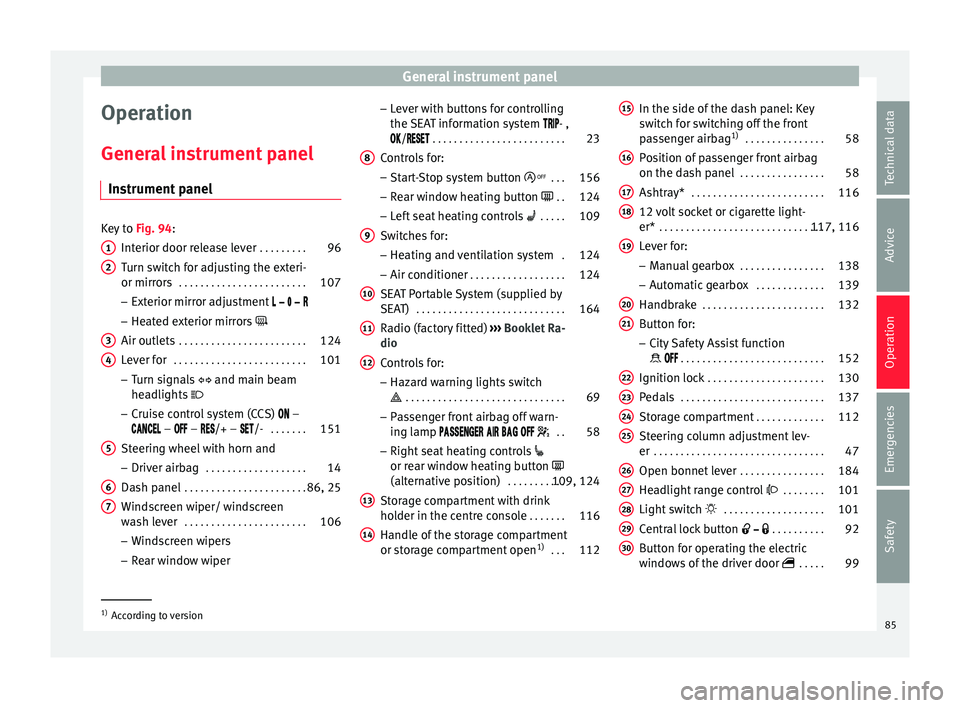
Instrument panel Key to
Fig. 94:
Interior door r el
ease lever . . . . . . . . . 96
Turn switch for adjusting the exteri-
or mirrors . . . . . . . . . . . . . . . . . . . . . . . . 107
– Exterior mirr or a
djustment
– Heated exterior mirrors
Air outlets . . . . . . . . . . . . . . . . . . . . . . . . 124
Lever for . . . . . . . . . . . . . . . . . . . . . . . . . 101
– Turn sign
als and main beam
headlights
– Cruise control system (CCS) –
– – /+ – /- . . . . . . .151
Steering wheel with horn and – Driver airb ag . . . . . . . . . . . . . . . . . . . 14
Da
sh panel . . . . . . . . . . . . . . . . . . . . . . . 86, 25
Windscreen wiper/ windscreen
wash l
ever . . . . . . . . . . . . . . . . . . . . . . . 106
– Wind s
creen wipers
– Rear window wiper
1 2
3
4
5
6
7 –
Lev
er w
ith buttons for controlling
the SEAT information system - ,
/ . . . . . . . . . . . . . . . . . . . . . . . . . 23
Controls for:
– Start
-Stop system button . . .156
– Rear w
indow heating button . .124
– Left
seat heating controls . . . . . 109
Switches for: – Heating and
ventilation system .124
– Air conditioner . . . . . . . . . . . . . . . . . . 124
SEA
T Portable System (supplied by
SEAT) . . . . . . . . . . . . . . . . . . . . . . . . . . . . 164
R
adio (factory fitted) ›››
Booklet Ra-
dio
Controls for:
– Hazard warning lights switch
. . . . . . . . . . . . . . . . . . . . . . . . . . . . . . 69
– Pa s
senger front airbag off warn-
ing lamp . .58
– Right seat
heating controls
or rear window heating button
(alternative position) . . . . . . . . . . .109, 124
Storage compartment with drink
hol der in the c
entre console . . . . . . .116
Handle of the storage compartment
or stor
age compartment open 1)
. . . 112
8 9
10
11
12
13
14 In the side of the dash panel: Key
sw
it
c
h for switching off the front
passenger airbag 1)
. . . . . . . . . . . . . . . 58
Position of passenger front airbag
on the dash p
anel . . . . . . . . . . . . . . . . 58
Ashtray* . . . . . . . . . . . . . . . . . . . . . . . . . 116
12 volt socket or cigarette light-
er* . . . . . . . . . . . . . . . . . . . . . . . . . . . . . . . 117, 116
Lever for:
– Manual g
earbox . . . . . . . . . . . . . . . . 138
– Autom atic
gearbox . . . . . . . . . . . . . 139
Handbrake . . . . . . . . . . . . . . . . . . . . . . . 132
Button for:
– City
Safety Assist function
. . . . . . . . . . . . . . . . . . . . . . . . . . . 152
Ignition lock . . . . . . . . . . . . . . . . . . . . . . 130
Pedals . . . . . . . . . . . . . . . . . . . . . . . . . . . 137
Storage compartment . . . . . . . . . . . . .112
Steering column adjustment lev-
er . . . . . . . . . . . . . . . . . . . . . . . . . . . . . . . . 47
Open bonnet lever . . . . . . . . . . . . . . . . 184
Headlight range control . . . . . . . . 101
Light switch . . . . . . . . . . . . . . . . . . . 101
Central lock button . . . . . . . . . .92
Button for operating the electric
window
s of the driver door . . . . .99
15 16
17
18
19
20
21
22
23
24
25
26
27
28
29
30
1)
According to version
85
Technical data
Advice
Operation
Emergencies
Safety
Page 112 of 232

Operation
●
In the event of
smells, switch off the seat
heating immediately and have the unit in-
spected by a specialised workshop. For the sake of the environment
The seat heating should remain on only when
needed. Other wi
se, it is an unnecessary fuel
waste. Transport and practical
equipment
T r
an
sporting objects
Introduction Always transport heavy loads in the luggage
comp
ar
tment and place the seat backs in a
vertical position. Never overload the vehicle.
Both the carrying capacity as well as the dis-
tribution of the load in the vehicle affect driv-
ing behaviour and braking ability ››› .
WARNING
Unsecured or incorrectly secured objects can
cau se seriou
s injury in case of a sudden ma-
noeuvring or breaking or in case of an acci-
dent. This is especially true when objects are
struck by a detonating airbag and fired
through the vehicle interior. To reduce the
risks, please note the following:
● Secure all objects in the vehicle. Always
keep equipment and he
avy objects in the lug-
gage compartment.
● Always secure objects with suitable rope or
sling
s so that they cannot enter the deploy-
ment areas around the frontal or side airbags
in case of sudden braking or an accident.
● Always ensure that objects inside the vehi-
cle c
annot move into the deployment area of
the bags while driving. ●
Whil e driv
ing, always keep object compart-
ments closed.
● Remove all objects from the front passen-
ger seat
when it is folded down. When the
seat backrest is folded down, it presses on
small and light objects and these are detec-
ted by the weight sensor on the seat; this
sends false information to the airbag control
unit.
● While the backrest of the front passenger
seat i
s folded, the frontal airbag must remain
disconnected and the PASSENGER AIRBAG
OFF light on.
● Objects secured in the vehicle should never
be plac
ed in such a way as to make passen-
gers sit in an incorrect position.
● If secured objects occupy a seat, this seat
should not
be occupied or used by anyone. WARNING
The driving behaviour and braking ability
ch an
ge when transporting heavy and large
objects.
● Adjust your speed and driving style to visi-
bility
, road, traffic and weather conditions.
● Accelerate gently and carefully.
● Avoid sudden braking and manoeuvres.
● Brake early. 110
Page 126 of 232
Operation
support, the roof carrier system and the load
bein g tr
an
sported ››› .
A lw
a
ys check the weight of the base support,
the roof carrier system and the weight of the
load to be transported and, if necessary,
weigh them. Never exceed the maximum au-
thorised roof load.
If you are using a roof carrier with a lower
weight rating, you cannot transport the maxi-
mum roof load. Do not exceed the maximum
weight limit for the roof carrier given in the
fitting instructions.
Distributing a load
Uniformly distribute loads and secure them
correctly ››› .
Chec k
att
achments
After fitting the base supports and the roof
carrier system, always check the attachments
after a short trip and at regular intervals. WARNING
Exceeding the maximum authorised roof load
can r e
sult in accidents and/or vehicle dam-
age.
● Never surpass the maximum authorised
weight f
or the roof, the maximum authorised
weight on the axles and the total maximum
authorised weight of the vehicle. ●
Never e x
ceed the capacity of the roof carri-
er system even if this is less than the maxi-
mum authorised roof load.
● Secure heavy items as far forward as possi-
ble and di
stribute the vehicle load uniformly. WARNING
Loose and incorrectly secured loads can fall
fr om the r oof
carrier system causing acci-
dents and injury.
● Always use suitable ropes and straps in
good condition.
● A
lways secure loads correctly. Air conditioning
He atin
g,
ventilation and air
conditioning system
Introduction Read the additional information carefully
›› ›
page 28
Dust and pollen filter
The dust and pollen filter with its activated
charcoal cartridge serves as a barrier against
impurities in the interior ambient air.
For the air conditioner to work with maximum
efficiency, the dust and pollen filter must be
replaced at the intervals specified in the
Maintenance Programme.
If the filter loses efficiency prematurely due
to use in areas with very high levels of air
pollution, the filter must be changed more
frequently than stated in the Service Sched-
ule. WARNING
Reduced visibility through the windows in-
cr e
ases the risk of serious accidents.
● Ensure that all windows are free of ice and
snow and th
at they are not fogged up pre-
venting a clear view of everything outside. 124
Page 127 of 232

Air conditioning
●
The max imum he
at output required to de-
frost windows as quickly as possible is only
available when the engine has reached its
normal running temperature. Only drive when
you have good visibility.
● Always ensure that you use the heating
syst
em, ventilation, air conditioner and the
heated rear window to maintain good visibili-
ty.
● Never leave the air recirculation on for a
long period of time. If
the cooling system is
switched off and air recirculation mode
switched on, the windows can mist over very
quickly, considerably limiting visibility.
● Switch air recirculation mode off when it is
not requir
ed. WARNING
Stuffy or used air will increase fatigue and re-
duce driv er c
oncentration possibly resulting
in a serious accident.
● Never leave the fresh air fan turned off or
use the air rec
irculation for long periods of
time; the air in the vehicle interior will not be
refreshed. CAUTION
● Swit c
h the air conditioner off if you think it
may be broken. This will avoid additional
damage. Have the air conditioner checked by
a specialised workshop.
● Repairs to the air conditioner require spe-
cia
list knowledge and special tools. SEAT rec-
ommends taking your car in for technical
service. Note
● When the coo lin
g system is turned off, air
coming from the outside will not be dried. To
avoid fogging up the windows, SEAT recom-
mends leaving the cooler (compressor) on. To
do this, press the A/C button. The button
lamp shou l
d light up.
● The maximum heat output required to de-
fros
t windows as quickly as possible is only
available when the engine has reached its
normal running temperature.
● Keep the air intake slots in front of the
winds
creen free of snow, ice and leaves to en-
sure heating and cooling are not impaired, and to prevent the windows from misting
ov
er
. 125
Technical data
Advice
Operation
Emergencies
Safety