display Seat Mii 2015 Owner's manual
[x] Cancel search | Manufacturer: SEAT, Model Year: 2015, Model line: Mii, Model: Seat Mii 2015Pages: 232, PDF Size: 4.23 MB
Page 25 of 232

The essentials
Windscreen wipers and window wiper
b l
a
de Fig. 32
Operating the windscreen wiper and
r e
ar w
iper
More the lever to the required position:
0 Windscreen wiper off.
1
Windscreen interval wipe.
2
Slow wipe.
3
Continuous wipe.
4
Brief wipe - short wipe. Hold the lever
down for more time to increase the wipe
frequency.
5
Automatic wipe for cleaning wind-
screens with the lever up.
6
Interval wipe for rear window. The wiper
will wipe the window approximately ev-
ery six seconds.
More the lever to the required position:
7 Automatic wipe for cleaning rear win-
dows with the lever pressed.
›››
page 106
››› page 44 SEAT information system
Intr oduction With the ignition switched on it is possible to
ac
c
e
ss different messages via the display on
the instrument panel display.
The number of messages displayed on the in-
strument panel display will vary according to
the vehicle electronics and equipment.
A specialised workshop will be able to pro-
gramme or modify additional functions, ac-
cording to the vehicle equipment. SEAT rec-
ommends taking your car in for technical
service. WARNING
Any distraction may lead to an accident, with
the risk of
injury. ●
Do not c on
sult the messages on the instru-
ment panel screen when driving. Note
On the screen of the SEAT Portable System
(s up p
lied by SEAT) ›››
page 164 other
functions of the vehicle can be seen. Management of indications on the
dis
p
lay Fig. 33
Windscreen wiper lever: control but-
t on
s. Calling up options
● Switch the ignition on.
● If a message or vehicle symbol is dis-
p l
a
yed, press OK/RESET (
››
› Fig. 33 A ).
● Press the top or bottom part of the rocker
sw it
c
h ››› Fig. 33 B until the desired option
ap pe
ar
s. 23
Page 26 of 232
The essentials
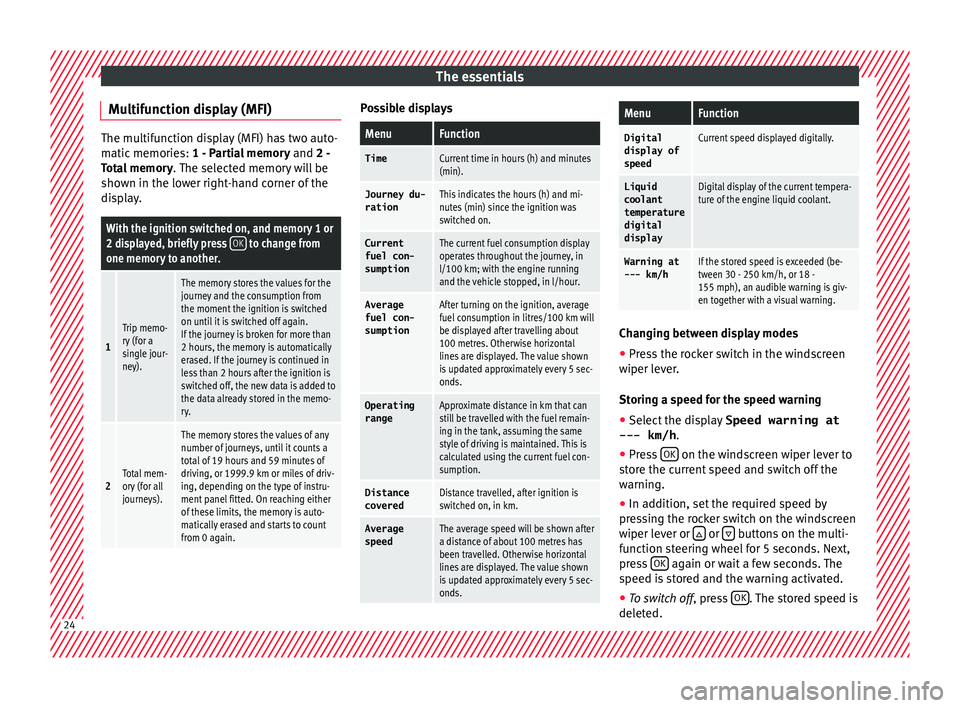
Multifunction display (MFI) The multifunction display (MFI) has two auto-
matic
memorie
s: 1 - Partial memory and 2 -
Total memory . The selected memory will be
shown in the lower right-hand corner of the
display.
With the ignition switched on, and memory 1 or
2 displayed, briefly press OK to change from
one memory to another.
1
Trip memo-
ry (for a
single jour-
ney).
The memory stores the values for the
journey and the consumption from
the moment the ignition is switched
on until it is switched off again.
If the journey is broken for more than
2 hours, the memory is automatically
erased. If the journey is continued in
less than 2 hours after the ignition is
switched off, the new data is added to
the data already stored in the memo-
ry.
2Total mem-
ory (for all
journeys).
The memory stores the values of any
number of journeys, until it counts a
total of 19 hours and 59 minutes of
driving, or 1999.9 km or miles of driv-
ing, depending on the type of instru-
ment panel fitted. On reaching either
of these limits, the memory is auto-
matically erased and starts to count
from 0 again. Possible displays
MenuFunction
TimeCurrent time in hours (h) and minutes
(min).
Journey du-
rationThis indicates the hours (h) and mi-
nutes (min) since the ignition was
switched on.
Current
fuel con-
sumptionThe current fuel consumption display
operates throughout the journey, in
l/100 km; with the engine running
and the vehicle stopped, in l/hour.
Average
fuel con-
sumptionAfter turning on the ignition, average
fuel consumption in litres/100 km will
be displayed after travelling about
100 metres. Otherwise horizontal
lines are displayed. The value shown
is updated approximately every 5 sec-
onds.
Operating rangeApproximate distance in km that can
still be travelled with the fuel remain-
ing in the tank, assuming the same
style of driving is maintained. This is
calculated using the current fuel con-
sumption.
Distance coveredDistance travelled, after ignition is
switched on, in km.
Average
speedThe average speed will be shown after
a distance of about 100 metres has
been travelled. Otherwise horizontal
lines are displayed. The value shown
is updated approximately every 5 sec-
onds.
MenuFunction
Digital
display of
speedCurrent speed displayed digitally.
Liquid coolant
temperature
digital
displayDigital display of the current tempera-
ture of the engine liquid coolant.
Warning at
--- km/hIf the stored speed is exceeded (be-
tween 30 - 250 km/h, or 18 -
155 mph), an audible warning is giv-
en together with a visual warning. Changing between display modes
● Press the rocker switch in the windscreen
w iper l
ev
er.
Storing a speed for the speed warning
● Select the display Speed warning at
--- km/h .
● Pre
ss OK on the windscreen wiper lever to
s t
or
e the current speed and switch off the
warning.
● In addition, set the required speed by
pres
sing the rocker switch on the windscreen
wiper lever or or
buttons on the multi-
f u
nction s
teering wheel for 5 seconds. Next,
press OK again or wait a few seconds. The
s peed i
s
stored and the warning activated.
● To switch off , pres
s OK . The stored speed is
del et
ed. 24
Page 27 of 232
The essentials
Manually erasing memory 1 or 2
● Select the memory to be erased.
● Press and hold the eject button OK for ap-
pr o
x
imately 2 seconds. Note
On the screen of the SEAT Portable System
(sup p
lied by SEAT) ›››
page 164 other
functions of the multifunction display can be
seen. Cruise control
Oper atin
g the c
ruise control system
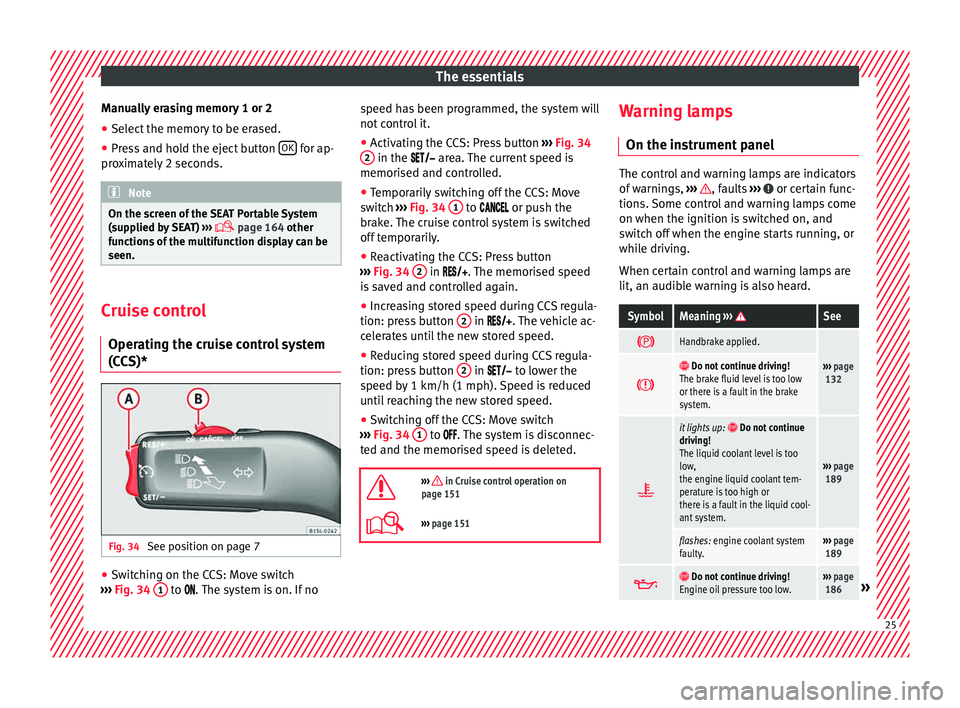
(CCS)* Fig. 34
See position on page 7 ●
Switching on the CCS: Move switch
› ›
›
Fig. 34 1 to .
The system is on. If no s
peed h as been programmed, the system will
not contr
ol it.
● Activating the CCS: Press button ›››
Fig. 34
2 in the ar
e
a. The current speed is
memorised and controlled.
● Temporarily switching off the CCS: Move
switc
h ››› Fig. 34 1 to
or push the
br ak
e. The cruise control system is switched
off temporarily.
● Reactivating the CCS: Press button
›››
Fig. 34 2 in
. The memorised speed
i s
saved and controlled again.
● Increasing stored speed during CCS regula-
tion: pres
s button 2 in
. The vehicle ac-
c
elerates until the new stored speed.
● Reducing stored speed during CCS regula-
tion: pres
s button 2 in t
o lower the
s peed b
y 1 km/h (1 mph). Speed is reduced
until reaching the new stored speed.
● Switching off the CCS: Move switch
›››
Fig. 34 1 to .
The system is disconnec-
t ed and the memori
sed speed is deleted.
››› in Cruise control operation on
page 151
››› page 151 Warning lamps
On the in s
trument
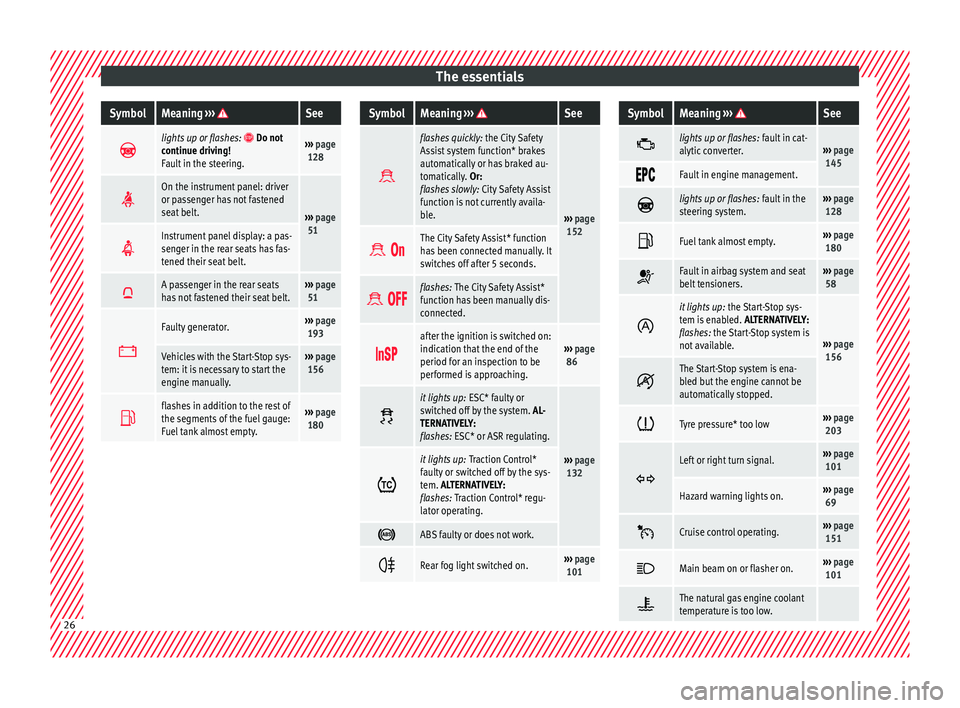
panel The control and warning lamps are indicators
of w
arnin
gs, ››› , faults
››› or certain func-
tions. Some c
ontrol and warning lamps come
on when the ignition is switched on, and
switch off when the engine starts running, or
while driving.
When certain control and warning lamps are
lit, an audible warning is also heard.
SymbolMeaning ››› See
Handbrake applied.
›››
page
132 Do not continue driving!
The brake fluid level is too low
or there is a fault in the brake
system.
it lights up:
Do not continue
driving!
The liquid coolant level is too
low,
the engine liquid coolant tem-
perature is too high or
there is a fault in the liquid cool-
ant system.
››› page
189
flashes: engine coolant system
faulty.››› page
189
Do not continue driving!
Engine oil pressure too low.››› page
186» 25
Page 28 of 232
The essentialsSymbolMeaning
››› See
lights up or flashes:
Do not
continue driving!
Fault in the steering.››› page
128
On the instrument panel: driver
or passenger has not fastened
seat belt.
›››
page
51
Instrument panel display: a pas-
senger in the rear seats has fas-
tened their seat belt.
A passenger in the rear seats
has not fastened their seat belt.›››
page
51
Faulty generator.›››
page
193
Vehicles with the Start-Stop sys-
tem: it is necessary to start the
engine manually.››› page
156
flashes in addition to the rest of
the segments of the fuel gauge:
Fuel tank almost empty.›››
page
180
SymbolMeaning ››› See
flashes quickly:
the City Safety
Assist system function* brakes
automatically or has braked au-
tomatically. Or:
flashes slowly: City Safety Assist
function is not currently availa-
ble.
››› page
152
The City Safety Assist* function
has been connected manually. It
switches off after 5 seconds.
flashes: The City Safety Assist*
function has been manually dis-
connected.
after the ignition is switched on:
indication that the end of the
period for an inspection to be
performed is approaching.››› page
86
it lights up:
ESC* faulty or
switched off by the system. AL-
TERNATIVELY:
flashes: ESC* or ASR regulating.
››› page
132 it lights up:
Traction Control*
faulty or switched off by the sys-
tem. ALTERNATIVELY:
flashes: Traction Control* regu-
lator operating.
ABS faulty or does not work.
Rear fog light switched on.›››
page
101
SymbolMeaning ››› See
lights up or flashes:
fault in cat-
alytic converter.››› page
145
Fault in engine management.
lights up or flashes:
fault in the
steering system.››› page
128
Fuel tank almost empty.›››
page
180
Fault in airbag system and seat
belt tensioners.›››
page
58
it lights up:
the Start-Stop sys-
tem is enabled. ALTERNATIVELY:
flashes: the Start-Stop system is
not available.
››› page
156
The Start-Stop system is ena-
bled but the engine cannot be
automatically stopped.
Tyre pressure* too low›››
page
203
Left or right turn signal.›››
page
101
Hazard warning lights on.››› page
69
Cruise control operating.›››
page
151
Main beam on or flasher on.›››
page
101
The natural gas engine coolant
temperature is too low.
26
Page 54 of 232
Safety
This also applies to other vehicle occupants
when drivin
g in t
own.
● When travelling, children must be secured
in the vehic
le with a child restraint system
suitable for their weight and height and with
the seat belts correctly fastened
››› page 63.
● Instruct your passengers to fasten their
seat belt
s properly before driving off.
● Insert the latch plate into the buckle for the
appropri
ate seat and ensure it is engaged.
Using the latch plate in the buckle of another
seat will not protect you properly and may
cause severe injuries.
● Do not allow liquids or foreign bodies to en-
ter the buc
kle fastenings. This could damage
the buckles and seat belts.
● Never unbuckle your seat belt when the ve-
hicle i
s moving.
● Never allow more than one passenger to
share the s
ame seat belt.
● Never hold children or babies on your lap
sharing the s
ame seat belt.
● Loose, bulky clothing (such as a jacket) im-
pairs
the proper fit and function of the seat
belt. WARNING
It is extremely dangerous to drive using dam-
aged se at
belts and could result in serious in-
jury or loss of life. ●
Av oid d
amaging the seat belt by jamming it
in the door or the seat mechanism.
● If the fabric or other parts of the seat belt
are dam
aged, the seat belts could break in
the event of an accident or sudden braking.
● Always have damaged seatbelts replaced
immediately
by seat belts approved for the
vehicle in question by SEAT. Seat belts which
have been worn in an accident and stretched
must be replaced by a specialised workshop.
Renewal may be necessary even if there is no
apparent damage. The belt anchorage should
also be checked.
● Never attempt to repair, modify or remove a
seat belt
yourself. All repairs to seat belts, re-
tractors and buckles must be carried out by a
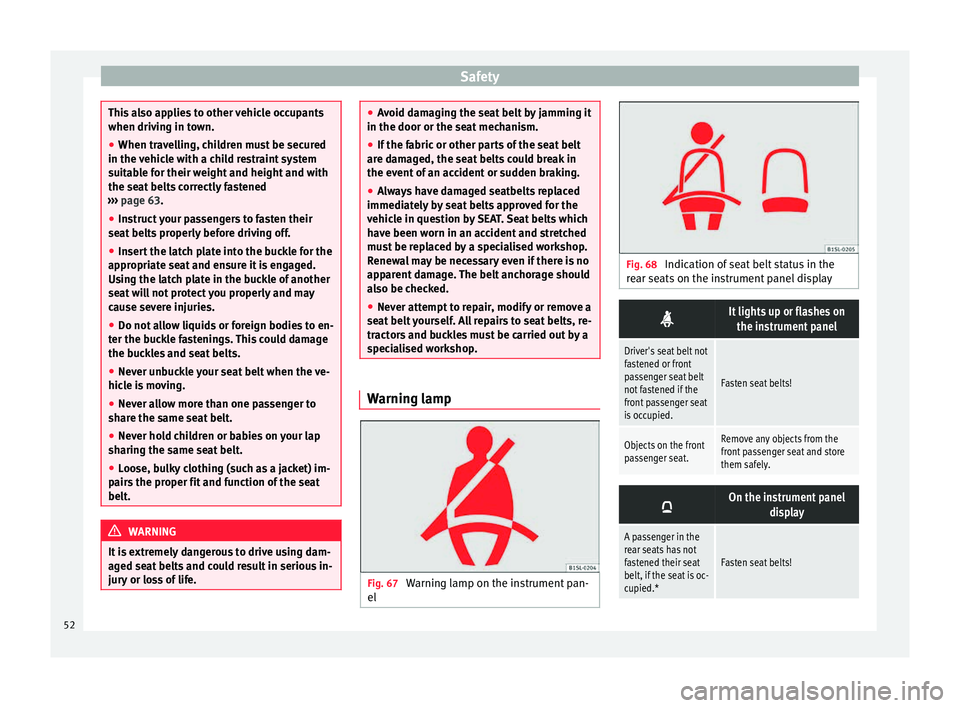
specialised workshop. Warning lamp
Fig. 67
Warning lamp on the instrument pan-
el Fig. 68
Indication of seat belt status in the
re ar se
ats on the instrument panel display
It lights up or flashes on
the instrument panel
Driver's seat belt not
fastened or front
passenger seat belt
not fastened if the
front passenger seat
is occupied.
Fasten seat belts!
Objects on the front
passenger seat.Remove any objects from the
front passenger seat and store
them safely.
On the instrument panel
display
A passenger in the
rear seats has not
fastened their seat
belt, if the seat is oc-
cupied.*
Fasten seat belts!52
Page 55 of 232

Seat belts
On the instrument panel
display
A passenger in the rear seats has fastened their seat
belt, if the seat is occupied.* Several warning and indication lamps light
up for a f
ew sec
onds when the ignition is
switched on, signalling that the function is
being verified. They will switch off after a few
seconds.
An audible warning will be heard if the seat
belts are not fastened as the vehicle drives
off and reaches a speed of more then
25 km/h (15 mph) or if the seat belts are un-
fastened while the vehicle is in motion. The
seat belt warning lamp will also flash.
The warning lamp does not switch off until
the driver and front passenger fasten their
seat belts while the ignition is switched on.
Seat belt status display for rear seats
The seat belt status display on the instru-
ment panel informs the driver, when the igni-
tion is switched on, whether any passengers
in the rear seats have fastened their seat
belts. The symbol indicates that the pas-
senger in this seat has fastened “his or her”
seat belt ›››
Fig. 68.
The seat belt status is displayed for around
30 seconds when a seat belt in the rear seats
is fastened or unfastened. You can switch off
this display by pressing the 0.0 / SET button.The seat belt status flashes for a maximum of
30 sec
ond
s
when a seat belt in the rear seats
is unfastened while the vehicle is in motion.
An audible warning will also be heard if the
vehicle is travelling at over 25 km/h
(15 mph).
The protective function of seat belts Fig. 69
Drivers with properly worn seat belts
w i
l
l not be thrown forward in the event of sud-
den braking Properly worn seat belts hold the occupants
in the pr
oper po
s
ition. They also help prevent
uncontrolled movements that may result in
serious injury and reduce the risk of being
thrown out of the vehicle in case of an acci-
dent.
Vehicle occupants wearing their seat belts
correctly benefit greatly from the ability of the
belts to absorb kinetic energy. In addition, the front part of your vehicle and other pas-
sive s
afety features (such as the airbag sys-
tem) are designed to absorb the kinetic ener-
gy released in a collision. Taken together, all
these features reduce the releasing kinetic
energy and consequently, the risk of injury.
This is why it is so important to fasten seat
belts before every trip, even when "just driv-
ing around the corner".
Ensure that your passengers wear their seat
belts as well. Accident statistics have shown
that wearing seat belts is an effective means
of substantially reducing the risk of injury
and improving the chances of survival when
involved in a serious accident. Furthermore,
properly worn seat belts improve the protec-
tion provided by airbags in the event of an
accident. For this reason, wearing a seat belt
is required by law in most countries.
Although your vehicle is equipped with air-
bags, the seat belts must be fastened and
worn. The front airbags, for example, are only
triggered in some cases of head-on collision.
The front airbags will not be triggered during
minor frontal or side collisions, rear-end colli-
sions, rollovers or accidents in which the air-
bag trigger threshold value in the control unit
is not exceeded.
Therefore, you should always wear your seat
belt and ensure that all vehicle occupants
have fastened their seat belts properly before
you drive off!
53
Technical data
Advice
Operation
Emergencies
Safety
Page 81 of 232
Fuses and bulbs
Additional bulb specifications
The s pec
ific
ations of some headlamp bulbs
and bulbs for the rear lamps fitted at the fac-
tory may be different to those of conventional
bulbs. Bulb information is displayed on the
bulb socket or on the bulb itself. WARNING
If the road is not well-lit and the vehicle is
not c l
early visible to other drivers, there is a
risk of accident. WARNING
Failure to replace bulbs correctly may cause
serious ac
cidents.
● Before carrying out any work in the engine
compar
tment please read and observe the
warnings ››› page 184. In any vehicle, the en-
gine compartment is a hazardous area and
could cause severe injury.
● The bulbs H4, HB4 and H7 are pressurised
and might exp
lode on changing them.
● Only replace the bulbs concerned when
they hav
e cooled.
● Never replace bulbs alone if you are not fa-
miliar w
ith the operations necessary. If you
are not sure about procedures then visit a
specialised workshop to carry out the neces-
sary work.
● Never touch the bulb glass directly. Finger-
prints w
ill be evaporated by the heat of the operating bulb thus “fogging” up the reflec-
tor
.
● The he
adlamp frameworks in the engine
compar
tment and the rear lamps contain
sharp elements. Always protect your hands
when changing bulbs. CAUTION
● Af ter c
hanging a bulb, if the rubber covers
are not replaced correctly on the headlamp
framework, the electrical installation may be
damaged, especially if water is allowed to en-
ter.
● Remove the ignition key before working on
the electric sy
stem. Otherwise, a short circuit
could occur.
● Switch off the lights and the parking light
before c
hanging a bulb.
● Take good care to avoid damaging any com-
ponents. Replacing the bulbs in the headlights
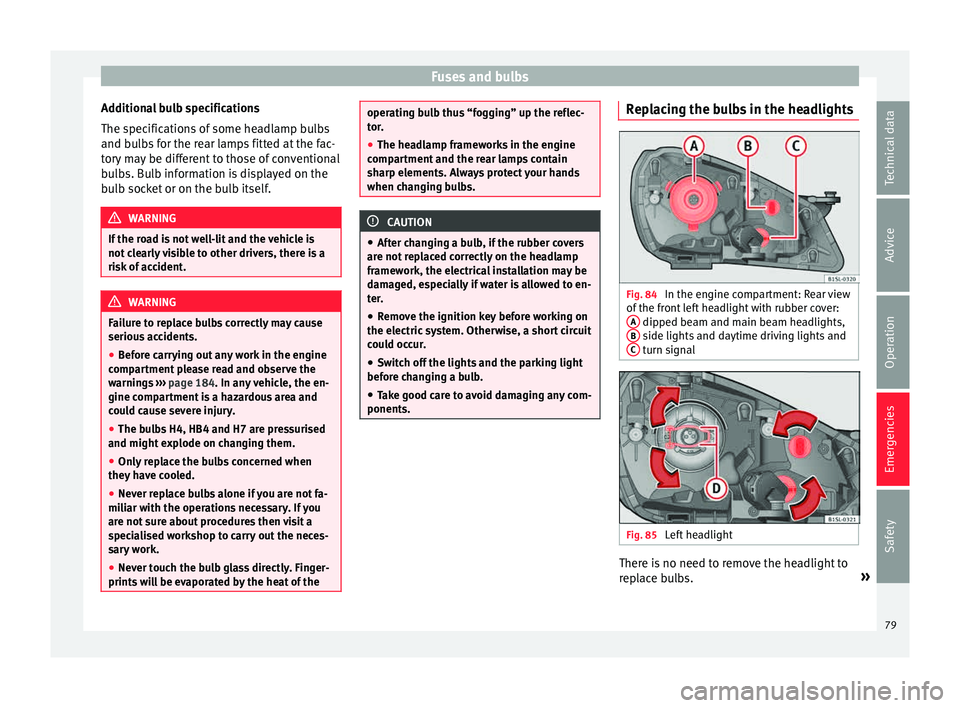
Fig. 84
In the engine compartment: Rear view
of the fr
ont
left headlight with rubber cover:
A dipped beam and main beam headlights,
B side lights and daytime driving lights and
C turn signal
Fig. 85
Left headlight There is no need to remove the headlight to
r
ep l
ace bulbs. »
79
Technical data
Advice
Operation
Emergencies
Safety
Page 88 of 232

Operation
Instruments V iew of
in
strument panelFig. 95
Instrument panel, on dash panel: variant 1 (A) and variant 2 (B). Details of the instruments
››
›
Fig. 95:
Speedometer. Depending on the
vehicle in km/h or in mph.
Displays on the screen . . . . . . . . . . . . 87
Reset knob for trip rec
order (trip).
– Press the button 0.0/SET bri
efly to
sw it
ch the trip odometer and od-
ometer.
1 2
3 –
Pr e
s
s the 0.0/SET for
5 seconds
t
o
r
eset the odometer to zero and,
where necessary, other indicators
on the multifunction display. . . . .23
Fuel reserve display . . . . . . . . . . . . . . . 180
Rev counter (with the engine ru
n-
ning, in thousands of revolutions
per minute).
The beginning of the red zone of
the rev counter indicates the maxi-
4 5 mum speed in any gear after run-
nin
g
-in and w
ith the engine hot.
However, it is advisable to change
up a gear or move the selector lever
to D (or lift your foot off the acceler-
ator) before the needle reaches the
red zone ››› .
C loc
k
set button .
– If necessary, change the time dis-
play by pressing the top and
6
86
Page 89 of 232

General instrument panel
bottom buttons of the rocker
sw it
c
h ›››
Fig. 33
B .
– Pr e
s
s the button to change
the hour , so th
at
it is flashing.
– To continue setting the time,
press button 0.0/SET . Hold button
do wn t
o s
croll through the num-
bers quickly.
– Press the button again to
c h
an
ge the minutes, so that it
flashes.
– To continue setting the time,
press button 0.0/SET . Hold button
do wn t
o s
croll through the num-
bers quickly.
– Press button again to end the
c loc
k
setting. CAUTION
● When the engine i s
cold, avoid high revs
and heavy acceleration and do not make the
engine work hard.
● To prevent damage to the engine, the rev
count
er needle should only remain in the red
zone for a short period of time. For the sake of the environment
Changing up a gear in time reduces fuel con-
sumption and noi se. Note
On the screen of the SEAT Portable System
(sup p
lied by SEAT) ››› page 164 other instru-
ments can be viewed, such as an outside tem-
perature gauge. Indications on the display
A variety of information can be viewed on the
ins
trument
panel display ››› Fig. 95 2 , de-
pending on the v
ehicle equipment:
● Warning and information messages.
● Odometer.
● Time.
● Outside temperature.
● Selector lever positions ››
›
page 137.
● Recommended gear (manual gearbox)
›››
page 137.
● Multifunction display (MFI) ›››
page 23
● Service interval display ›››
page 88 .
● Start-Stop system status display
›››
page 156.
● Fuel gauge ›››
page 180.
● Seat belt status display for rear seats
›››
page 51. Warning and information messages
The syst
em runs a check on certain compo-
nents and functions when the ignition is
switched on and while the vehicle is moving.
Faults in the operation are displayed on the
screen using red and yellow symbols on the
instrument panel display ( ›››
page 25)
and, in some cases, with audible warnings.
The display may vary according to the type of
instrument panel fitted.
Priority 1 warning (red symbols)
Symbol flashing or lit; partly combined with audible
warnings.
Stop the vehicle! It is dangerous ››› !
Check the function that is faulty and repair it. If necessa-
ry, request assistance from specialised personnel.
Priority 2 warning (yellow symbols)
Symbol flashing or lit; partly combined with audible
warnings.
A faulty function, or fluids which are below the correct
levels may cause damage to the vehicle! ›››
Check the faulty function as soon as possible. If neces-
sary, request assistance from specialised personnel. Odometer
The odomet
er
r
egisters the total distance
travelled by the car.
The odometer (trip ) shows the distance
travelled since the last odometer reset. The
last figure indicates 100 m. »
87
Technical data
Advice
Operation
Emergencies
Safety
Page 90 of 232

Operation
Outside temperature indicator!
When the outs ide t
emper
ature is below +4 °C
(+39 °F), the symbol “ice crystal” (warning of
risk of freezing) is also displayed next to the
temperature. At first this symbol flashes and
then it remains lit until the outside tempera-
ture rises above +6 °C (+43 °F) ››› .
When the v
ehic
le is stationary or travelling at
very low speeds, the temperature displayed
may be slightly higher than the actual out-
side temperature as a result of heat coming
from the engine.
The temperatures measured range from
-40 °C to +50 °C (-40 °F to +122 °F).
Selector lever position
The range of engaged gears of the selector
lever is shown on the side of the lever, and
on the instrument panel display. In positions
D and M, and with the Tiptronic, the corre-
sponding gear is also indicated on the dis-
play.
Recommended gear* (manual gearbox)
The recommended gear to save fuel can be
displayed on the instrument panel display
while you are driving ››› page 137.
Seat belt status display for the rear seats*
The seat belt status display on the instru-
ment panel display informs the driver, when
the ignition is switched on, whether any pas- sengers in the rear seats have fastened their
seat belts
››› page 51.
Start-Stop system status display
The instrument panel display shows informa-
tion on the current status ››› page 156. WARNING
If the warning lamps are ignored, the vehicle
ma y
stall in traffic, or may cause accidents
and severe injuries.
● Never ignore the warning lamps.
● Stop the vehicle safely as soon as possible.
● A faulty vehicle represents a risk of acci-
dent for the driv
er and for other road users. If
necessary, switch on the hazard warning
lamps and put out the warning triangle to ad-
vise other drivers.
● Park the vehicle away from traffic and en-
sure th
at no highly flammable materials are
under the vehicle that could come into con-
tact with the exhaust system (e.g. dry grass,
fuel). WARNING
Even though outside temperatures are above
freez in
g, some roads and bridges may be icy.
● At outside temperatures above +4°C
(+39°F), even when the “ice c
rystal symbol”
is not visible, there may still be patches of ice
on the road. ●
Never r ely
on the outside temperature indi-
cator! CAUTION
Failure to heed the warning lamps when they
ap pear m
ay result in faults in the vehicle. Note
● Differ ent
versions of the instrument panel
are available and therefore the versions and
instructions on the display may vary.
● When several warnings are active at the
same time, the symbol
s are shown succes-
sively for a few seconds and will stay on until
the fault is rectified. Service interval display
The inspection message appears on the in-
s
trument
p
anel display ›››
Fig. 95 2 .
S EA
T m
akes a difference between services
with engine oil change (Interval Service) and
services without engine oil change (Inspec-
tion Service). The service interval display only
gives information for service dates which in-
volve an engine oil change. The dates of the
remaining services (e.g. the next Inspection
Service or change of brake fluid) are listed on
the label attached to the door strut, or in the
Maintenance Programme.
88