mirror Seat Mii 2015 Owner's manual
[x] Cancel search | Manufacturer: SEAT, Model Year: 2015, Model line: Mii, Model: Seat Mii 2015Pages: 232, PDF Size: 4.23 MB
Page 5 of 232
Table of Contents
Table of Contents
The e s
senti
als . . . . . . . . . . . . . . . . . . . . . . . . 5
Exterior view . . . . . . . . . . . . . . . . . . . . . . . . . . . . 5
Exterior view . . . . . . . . . . . . . . . . . . . . . . . . . . . . 6
Interior view (left guide) . . . . . . . . . . . . . . . . . . 7
How it works . . . . . . . . . . . . . . . . . . . . . . . . . . . . 8
Unlocking and locking . . . . . . . . . . . . . . . . . . . . 8
Before driving . . . . . . . . . . . . . . . . . . . . . . . . . . . 12
Airbags . . . . . . . . . . . . . . . . . . . . . . . . . . . . . . . . 14
Child seats . . . . . . . . . . . . . . . . . . . . . . . . . . . . . 16
Starting the vehicle . . . . . . . . . . . . . . . . . . . . . . 20
Lights and visibility . . . . . . . . . . . . . . . . . . . . . . 21
SEAT information system . . . . . . . . . . . . . . . . . . 23
Cruise control . . . . . . . . . . . . . . . . . . . . . . . . . . . 25
Warning lamps . . . . . . . . . . . . . . . . . . . . . . . . . . 25
Gearbox lever . . . . . . . . . . . . . . . . . . . . . . . . . . . 27
Air conditioning . . . . . . . . . . . . . . . . . . . . . . . . . 28
Level control . . . . . . . . . . . . . . . . . . . . . . . . . . . . 30
Emergencies . . . . . . . . . . . . . . . . . . . . . . . . . . . . 33
Fuses . . . . . . . . . . . . . . . . . . . . . . . . . . . . . . . . . . 33
Bulbs . . . . . . . . . . . . . . . . . . . . . . . . . . . . . . . . . . 34
Action in the event of a puncture . . . . . . . . . . . 34
Changing a wheel . . . . . . . . . . . . . . . . . . . . . . . 35
Snow chains . . . . . . . . . . . . . . . . . . . . . . . . . . . . 40
Emergency towing of the vehicle . . . . . . . . . . . 41
How to jump start . . . . . . . . . . . . . . . . . . . . . . . . 42
Changing the wiper blades . . . . . . . . . . . . . . . . 44
Safety . . . . . . . . . . . . . . . . . . . . . . . . . . . . . . . . 46
Safe driving . . . . . . . . . . . . . . . . . . . . . . . . . . . . 46
Safety first! . . . . . . . . . . . . . . . . . . . . . . . . . . . . . 46
Driving advice . . . . . . . . . . . . . . . . . . . . . . . . . . . 46
Correct position of the vehicle occupants . . . . 47
Pedal area . . . . . . . . . . . . . . . . . . . . . . . . . . . . . . 51 Seat belts
. . . . . . . . . . . . . . . . . . . . . . . . . . . . . . 51
Why wear a seat belt? . . . . . . . . . . . . . . . . . . . . 51
How to properly adjust your seat belt . . . . . . . . 55
Seat belt tensioners . . . . . . . . . . . . . . . . . . . . . . 57
Airbag system . . . . . . . . . . . . . . . . . . . . . . . . . . 58
Brief introduction . . . . . . . . . . . . . . . . . . . . . . . . 58
Airbag safety instructions . . . . . . . . . . . . . . . . . 61
Deactivating airbags . . . . . . . . . . . . . . . . . . . . . 62
Transporting children safely . . . . . . . . . . . . . . . 63
Safety for children . . . . . . . . . . . . . . . . . . . . . . . 63
Child seats . . . . . . . . . . . . . . . . . . . . . . . . . . . . . 65
Emergencies . . . . . . . . . . . . . . . . . . . . . . . . . . 69
Self-help . . . . . . . . . . . . . . . . . . . . . . . . . . . . . . . 69
In case of emergency . . . . . . . . . . . . . . . . . . . . . 69
Vehicle tool kit* . . . . . . . . . . . . . . . . . . . . . . . . . 69
Changing a wheel . . . . . . . . . . . . . . . . . . . . . . . 71
Tyre repair . . . . . . . . . . . . . . . . . . . . . . . . . . . . . . 71
Changing the windscreen wiper blades . . . . . . 74
Tow-starting and towing . . . . . . . . . . . . . . . . . . 74
Emergency locking and unlocking . . . . . . . . . . 76
Fuses and bulbs . . . . . . . . . . . . . . . . . . . . . . . . . 77
Fuses . . . . . . . . . . . . . . . . . . . . . . . . . . . . . . . . . . 77
Changing bulbs . . . . . . . . . . . . . . . . . . . . . . . . . 78
Operation . . . . . . . . . . . . . . . . . . . . . . . . . . . . . 85
General instrument panel . . . . . . . . . . . . . . . . . 85
Instrument panel . . . . . . . . . . . . . . . . . . . . . . . . 84
Instruments . . . . . . . . . . . . . . . . . . . . . . . . . . . . 86
Opening and closing . . . . . . . . . . . . . . . . . . . . . 90
Vehicle key set . . . . . . . . . . . . . . . . . . . . . . . . . . 90
Central locking* and locking system . . . . . . . . 92
Doors . . . . . . . . . . . . . . . . . . . . . . . . . . . . . . . . . . 96
Rear lid . . . . . . . . . . . . . . . . . . . . . . . . . . . . . . . . 97
Electric windows . . . . . . . . . . . . . . . . . . . . . . . . . 99
Sliding/tilting electric panoramic sunroof . . . . 100 Lights and visibility
. . . . . . . . . . . . . . . . . . . . . . 101
Lights . . . . . . . . . . . . . . . . . . . . . . . . . . . . . . . . . 101
Visibility . . . . . . . . . . . . . . . . . . . . . . . . . . . . . . . 105
Windscreen wiper and window wiper sys-
tems . . . . . . . . . . . . . . . . . . . . . . . . . . . . . . . . . . 106
R
ear vision mirror . . . . . . . . . . . . . . . . . . . . . . . . 107
Seats and head restraints . . . . . . . . . . . . . . . . . 108
Adjusting the seat and head restraints . . . . . . 108
Seat functions . . . . . . . . . . . . . . . . . . . . . . . . . . 109
Transport and practical equipment . . . . . . . . . 110
Transporting objects . . . . . . . . . . . . . . . . . . . . . 110
Practical equipment . . . . . . . . . . . . . . . . . . . . . . 112
Luggage compartment . . . . . . . . . . . . . . . . . . . . 118
Roof carrier . . . . . . . . . . . . . . . . . . . . . . . . . . . . . 122
Air conditioning . . . . . . . . . . . . . . . . . . . . . . . . . 124
Heating, ventilation and air conditioning sys-
tem . . . . . . . . . . . . . . . . . . . . . . . . . . . . . . . . . . . 124
Driv
ing . . . . . . . . . . . . . . . . . . . . . . . . . . . . . . . . 128
Steering . . . . . . . . . . . . . . . . . . . . . . . . . . . . . . . 128
Stopping and starting the engine . . . . . . . . . . . 130
Braking and parking . . . . . . . . . . . . . . . . . . . . . 132
Changing gear . . . . . . . . . . . . . . . . . . . . . . . . . . 137
Run-in and economical driving . . . . . . . . . . . . . 141
Engine management and exhaust gas purifica-
tion syst
em . . . . . . . . . . . . . . . . . . . . . . . . . . . . . 145
Driving abroad . . . . . . . . . . . . . . . . . . . . . . . . . . 146
Driving along flooded roadways . . . . . . . . . . . . 146
Driver assistance systems . . . . . . . . . . . . . . . . . 147
Braking and stability systems . . . . . . . . . . . . . . 147
Parking distance warning system* . . . . . . . . . . 149
Cruise control* (Cruise control system -
CCS)
. . . . . . . . . . . . . . . . . . . . . . . . . . . . . . . . . . . 151
Safety Assist* (City Safety Assist function) . . . . 152
Hill driving assistant* . . . . . . . . . . . . . . . . . . . . 156
Start-Stop System . . . . . . . . . . . . . . . . . . . . . . . . 156
Towing bracket device . . . . . . . . . . . . . . . . . . . . 158
Driving with a trailer . . . . . . . . . . . . . . . . . . . . . . 158
3
Page 15 of 232
The essentials
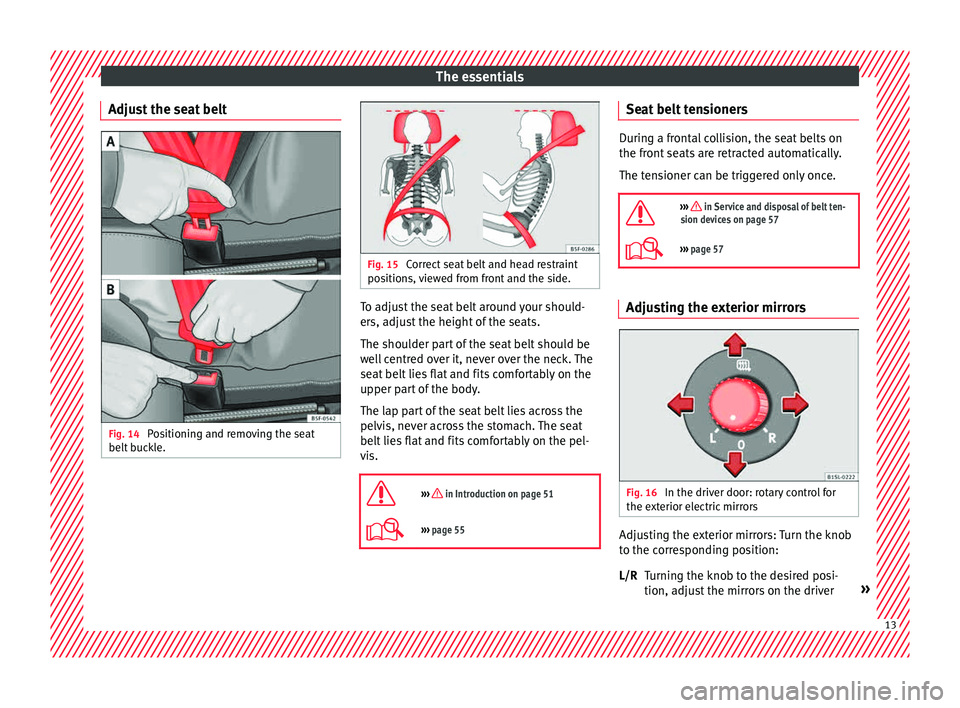
Adjust the seat belt Fig. 14
Positioning and removing the seat
belt b
uc
kle. Fig. 15
Correct seat belt and head restraint
pos ition
s, viewed from front and the side. To adjust the seat belt around your should-
er
s, a
dju
st the height of the seats.
The shoulder part of the seat belt should be
well centred over it, never over the neck. The
seat belt lies flat and fits comfortably on the
upper part of the body.
The lap part of the seat belt lies across the
pelvis, never across the stomach. The seat
belt lies flat and fits comfortably on the pel-
vis.
››› in Introduction on page 51
››› page 55 Seat belt tensioners
During a frontal collision, the seat belts on
the front
se
ats are retracted automatically.
The tensioner can be triggered only once.
››› in Service and disposal of belt ten-
sion devices on page 57
››› page 57 Adjusting the exterior mirrors
Fig. 16
In the driver door: rotary control for
the e xt
erior el
ectric mirrors Adjusting the exterior mirrors: Turn the knob
t
o the c
orr
esponding position:
Turning the knob to the desired posi-
tion, adjust the mirrors on the driver »
L/R 13
Page 16 of 232

The essentials
side (L, left) and the passenger side (R,
right) t o the dir
ection de
sired.
Depending on the equipment fitted on
the vehicle, the mirrors may be heated
according to the outside temperature.
››› in Exterior mirrors on page 107
››› page 107 Adjusting the steering wheel
Fig. 17
Mechanical steering wheel adjust-
ment ●
Push the lever ›
››
Fig. 17 1 downwards.
● Adjust the steering wheel so that you can
ho l
d ont
o the steering wheel with both hands
on the outside of the ring at the 9 o'clock and
3 o'clock
positions and your arms slightly
bent.
● Push the lever firmly upwards until it is
flush to the s
teering column ››› in Adjust-
in g the s
t
eering wheel position on
page 48.
››› in Adjusting the steering wheel po-
sition on page 48
››› page 48 Airbags
Fr ont
airb
ags Fig. 18
Location and deployment area of the
fr ont
airb
ag for the driver. 14
Page 31 of 232
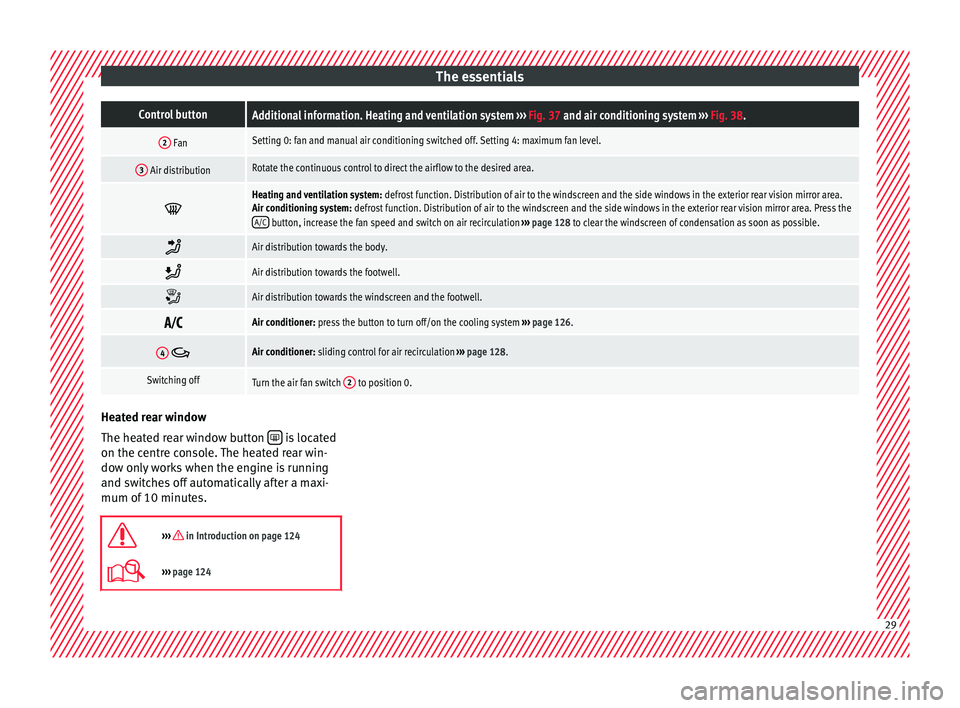
The essentialsControl buttonAdditional information. Heating and ventilation system
››› Fig. 37 and air conditioning system ››› Fig. 38.
2 FanSetting 0: fan and manual air conditioning switched off. Setting 4: maximum fan level.
3 Air distributionRotate the continuous control to direct the airflow to the desired area.
Heating and ventilation system:
defrost function. Distribution of air to the windscreen and the side windows in the exterior rear vision mirror area.
Air conditioning system: defrost function. Distribution of air to the windscreen and the side windows in the exterior rear vision mirror area. Press the
A/C
button, increase the fan speed and switch on air recirculation ››› page 128 to clear the windscreen of condensation as soon as possible.
Air distribution towards the body.
Air distribution towards the footwell.
Air distribution towards the windscreen and the footwell.
Air conditioner: press the button to turn off/on the cooling system
››› page 126.
4 Air conditioner: sliding control for air recirculation ››› page 128.
Switching offTurn the air fan switch 2 to position 0.Heated rear window
The he
at
ed r
ear window button is located
on the c entre c
onsole. The heated rear win-
dow only works when the engine is running
and switches off automatically after a maxi-
mum of 10 minutes.
››› in Introduction on page 124
››› page 124 29
Page 48 of 232
Safety
Safety
Saf e driv
in
g
Safety first! WARNING
● This m
anual contains important informa-
tion about the operation of the vehicle, both
for the driver and the passengers. The other
sections of the on-board documentation also
contain further information that you should
be aware of for your own safety and for the
safety of your passengers.
● Ensure that the on-board documentation is
kept in the
vehicle at all times. This is espe-
cially important when lending or selling the
vehicle to another person. WARNING
Driving under the influence of alcohol, drugs,
medication or n ar
cotics may result in severe
accidents and even loss of life.
● Alcohol, drugs, medication and narcotics
may
significantly alter perception, affect re-
action times and safety while driving, which
could result in the loss of control of the vehi-
cle. Driving advice
B ef
or
e driving For your own safety and the safety of your
pa
s
sengers, always note the following points
before every trip:
– Make sure that the vehicle's lights and turn
signal
s are working properly.
– Check tyre pressure.
– Ensure that all windows provide a clear and
good v
iew of the surroundings.
– Make sure all luggage is secured
›› ›
page 110.
– Make sure that no objects can interfere
with the pedal
s.
– Adjust front seat, head restraint and rear vi-
sion mirror
s properly according to your
size.
– Ensure that the passengers in the rear
seats alw
ays have the head restraints in
the in-use position ›››
page 50.
– Instruct passengers to adjust the head re-
straints
according to their height.
– Protect children with appropriate child
seats and pr
operly applied seat belts
››› page 63. –
Assume the c
orrect sitting position. Instruct
your passengers also to assume a proper
sitting position. ››› page 47.
– Fasten your seat belt securely. Instruct your
pas
sengers also to fasten their seat belts
properly. ››› page 51.
What affects driving safety? As a driver, you are responsible for yourself
and y
our p
assengers. When your concentra-
tion or driving safety is affected by any cir-
cumstance, you endanger yourself as well as
others on the road ››› , for this reason:
– Always pay attention to traffic and do not
g et
di
stracted by passengers or telephone
calls.
– Never drive when your driving ability is im-
paired (e.
g. by medication, alcohol, drugs).
– Observe traffic laws and speed limits.
– Always reduce your speed as appropriate
for ro
ad, traffic and weather conditions.
– When travelling long distances, take
break
s regularly - at least every two hours.
– If possible, avoid driving when you are tired
or stre
ssed.
46
Page 87 of 232
General instrument panel
Operation
Gener a
l
instrument panel
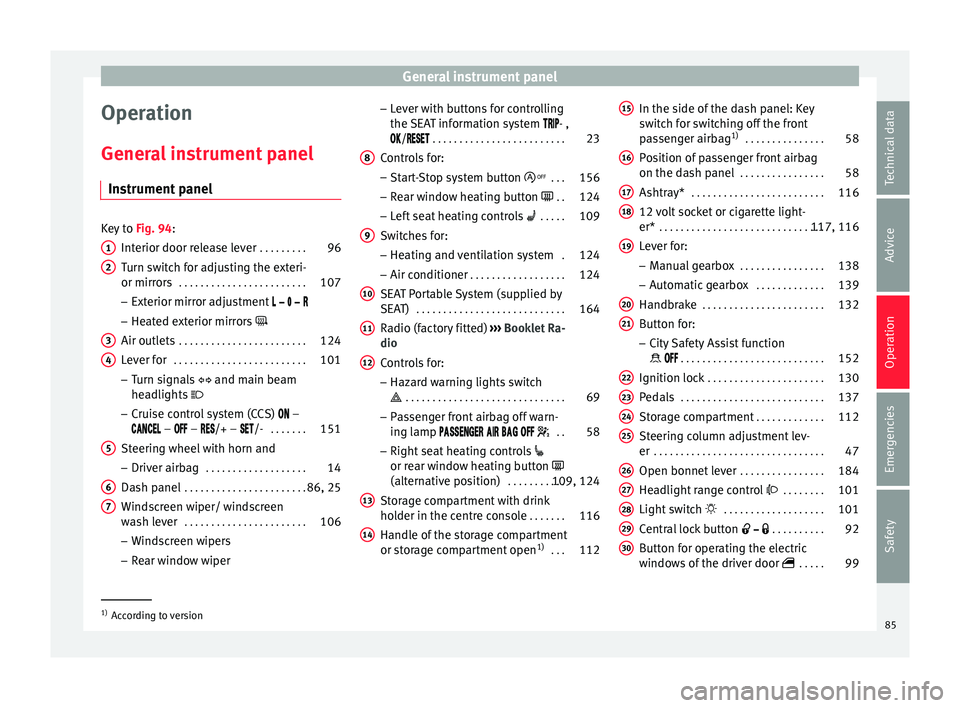
Instrument panel Key to
Fig. 94:
Interior door r el
ease lever . . . . . . . . . 96
Turn switch for adjusting the exteri-
or mirrors . . . . . . . . . . . . . . . . . . . . . . . . 107
– Exterior mirr or a
djustment
– Heated exterior mirrors
Air outlets . . . . . . . . . . . . . . . . . . . . . . . . 124
Lever for . . . . . . . . . . . . . . . . . . . . . . . . . 101
– Turn sign
als and main beam
headlights
– Cruise control system (CCS) –
– – /+ – /- . . . . . . .151
Steering wheel with horn and – Driver airb ag . . . . . . . . . . . . . . . . . . . 14
Da
sh panel . . . . . . . . . . . . . . . . . . . . . . . 86, 25
Windscreen wiper/ windscreen
wash l
ever . . . . . . . . . . . . . . . . . . . . . . . 106
– Wind s
creen wipers
– Rear window wiper
1 2
3
4
5
6
7 –
Lev
er w
ith buttons for controlling
the SEAT information system - ,
/ . . . . . . . . . . . . . . . . . . . . . . . . . 23
Controls for:
– Start
-Stop system button . . .156
– Rear w
indow heating button . .124
– Left
seat heating controls . . . . . 109
Switches for: – Heating and
ventilation system .124
– Air conditioner . . . . . . . . . . . . . . . . . . 124
SEA
T Portable System (supplied by
SEAT) . . . . . . . . . . . . . . . . . . . . . . . . . . . . 164
R
adio (factory fitted) ›››
Booklet Ra-
dio
Controls for:
– Hazard warning lights switch
. . . . . . . . . . . . . . . . . . . . . . . . . . . . . . 69
– Pa s
senger front airbag off warn-
ing lamp . .58
– Right seat
heating controls
or rear window heating button
(alternative position) . . . . . . . . . . .109, 124
Storage compartment with drink
hol der in the c
entre console . . . . . . .116
Handle of the storage compartment
or stor
age compartment open 1)
. . . 112
8 9
10
11
12
13
14 In the side of the dash panel: Key
sw
it
c
h for switching off the front
passenger airbag 1)
. . . . . . . . . . . . . . . 58
Position of passenger front airbag
on the dash p
anel . . . . . . . . . . . . . . . . 58
Ashtray* . . . . . . . . . . . . . . . . . . . . . . . . . 116
12 volt socket or cigarette light-
er* . . . . . . . . . . . . . . . . . . . . . . . . . . . . . . . 117, 116
Lever for:
– Manual g
earbox . . . . . . . . . . . . . . . . 138
– Autom atic
gearbox . . . . . . . . . . . . . 139
Handbrake . . . . . . . . . . . . . . . . . . . . . . . 132
Button for:
– City
Safety Assist function
. . . . . . . . . . . . . . . . . . . . . . . . . . . 152
Ignition lock . . . . . . . . . . . . . . . . . . . . . . 130
Pedals . . . . . . . . . . . . . . . . . . . . . . . . . . . 137
Storage compartment . . . . . . . . . . . . .112
Steering column adjustment lev-
er . . . . . . . . . . . . . . . . . . . . . . . . . . . . . . . . 47
Open bonnet lever . . . . . . . . . . . . . . . . 184
Headlight range control . . . . . . . . 101
Light switch . . . . . . . . . . . . . . . . . . . 101
Central lock button . . . . . . . . . .92
Button for operating the electric
window
s of the driver door . . . . .99
15 16
17
18
19
20
21
22
23
24
25
26
27
28
29
30
1)
According to version
85
Technical data
Advice
Operation
Emergencies
Safety
Page 107 of 232

Lights and visibilityTo reset, turn switch
››› Fig. 111:
ValueVehicle load status a)
1All seats occupied, luggage compartment
empty
2All seats occupied, luggage compartment
full
3Driver only, luggage compartment full
a)
If the vehicle load does not correspond to those shown in the
table, it is possible to select intermediary positions.
Instrument and switch lighting
When the side lights or dipped beam head-
lights are switched on, the lighting for instru-
ments and controls lights up at a constant
brightness. WARNING
Heavy objects in the back of vehicle may
cau se he
adlight dazzle and distract other
drivers. This could result in a serious acci-
dent.
● Adjust the light beam to the vehicle load
stat
us so that it does not blind other drivers. Luggage compartment light
The light is activated when the rear lid is
open, ev
en when the ignition and lights
ar
e
turned off. For this reason, ensure that the
rear lid is always closed. Visibility
Sun
visors Fig. 112
Sun visor Options for adjusting driver and front pas-
sen
g
er s
un visors:
● Lower the sun visor towards the wind-
scr
een.
● The sun visor can be pulled out of its
mounting and t
urned towards the door.
● Swing the sun visor towards the door, lon-
gitudinal
ly backwards.
Vanity mirror*
There may be a vanity mirror in the folded
sun visor on the passenger side and a card-
holder in the driver sun visor. WARNING
Folded sun blinds can reduce visibility.
● Always roll or fold sun blinds and visors
aw a
y when not in use. Heat-insulating glass windscreen
Fig. 113
Windscreen with reflective infrared
and met al
c
oating and small window (red sur-
face) The heat-insulating windscreens include a re-
fl
ectiv
e infr
ared coating. The section above
the rear vision mirror has been left uncoated
(communication window) to allow electric
components from the accessories shop to
operate correctly ›››
Fig. 113. »
105
Technical data
Advice
Operation
Emergencies
Safety
Page 109 of 232
Lights and visibility
Rear vision mirror Int erior r
e
ar vision mirrorFig. 114
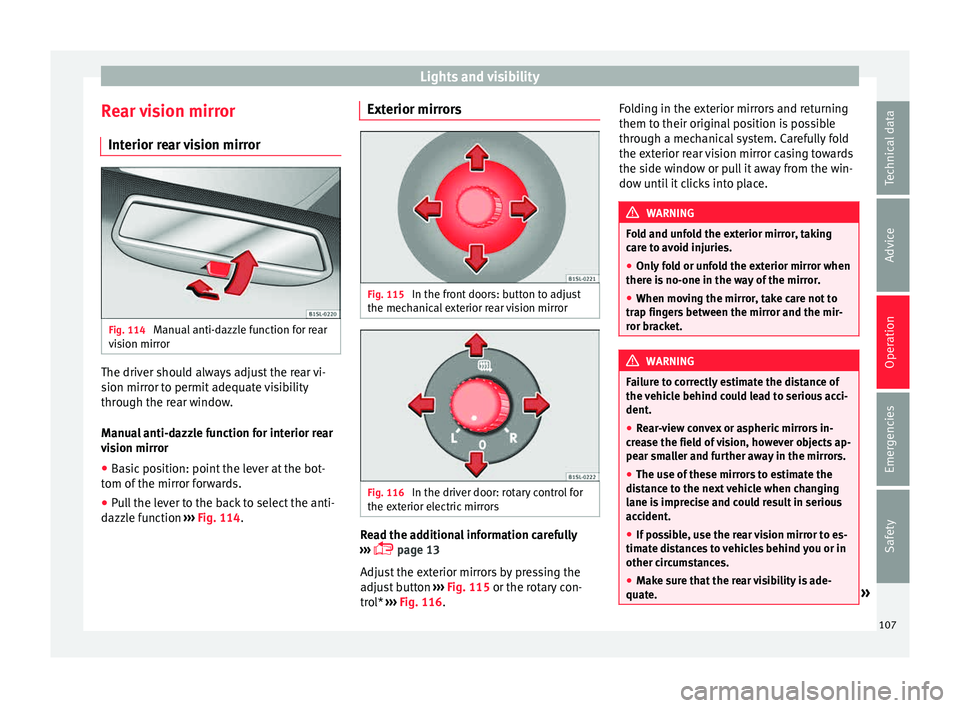
Manual anti-dazzle function for rear
v i
s
ion mirror The driver should always adjust the rear vi-
s
ion mirr
or t
o permit adequate visibility
through the rear window.
Manual anti-dazzle function for interior rear
vision mirror
● Basic position: point the lever at the bot-
tom of the mirr
or forwards.
● Pull the lever to the back to select the anti-
dazzl
e function ››› Fig. 114. Exterior mirrors
Fig. 115
In the front doors: button to adjust
the mec h
anic
al exterior rear vision mirror Fig. 116
In the driver door: rotary control for
the e xt
erior el
ectric mirrors Read the additional information carefully
› ›
›
page 13
Adjust the exterior mirrors by pressing the
adjust button ››› Fig. 115 or the rotary con-
trol* ››› Fig. 116. Folding in the exterior mirrors and returning
them to their original
position is possible
through a mechanical system. Carefully fold
the exterior rear vision mirror casing towards
the side window or pull it away from the win-
dow until it clicks into place. WARNING
Fold and unfold the exterior mirror, taking
car e t
o avoid injuries.
● Only fold or unfold the exterior mirror when
there is
no-one in the way of the mirror.
● When moving the mirror, take care not to
trap fing
ers between the mirror and the mir-
ror bracket. WARNING
Failure to correctly estimate the distance of
the v ehic
le behind could lead to serious acci-
dent.
● Rear-view convex or aspheric mirrors in-
cre
ase the field of vision, however objects ap-
pear smaller and further away in the mirrors.
● The use of these mirrors to estimate the
dist
ance to the next vehicle when changing
lane is imprecise and could result in serious
accident.
● If possible, use the rear vision mirror to es-
timate di
stances to vehicles behind you or in
other circumstances.
● Make sure that the rear visibility is ade-
quate. » 107
Technical data
Advice
Operation
Emergencies
Safety
Page 110 of 232
Operation
For the sake of the environment
The exterior mirror heating should be switch-
ed off when it i
s no longer needed. Other-
wise, it is an unnecessary fuel waste. Note
In the event of a fault, the electric exterior
mirror s
can be adjusted manually by pressing
the edge of the mirror surface. Seats and head restraints
Adju
s
tin
g the seat and head re-
straints
Manual front seat adjustment Read the additional information carefully
›› ›
page 12 WARNING
The safe driving chapter contains important
inform ation, tip
s, suggestions and warnings
that you should read and observe for your
own safety and the safety of your passengers
››› page 47. WARNING
● Adjus t
the front seats only when the vehi-
cle is stationary. Failure to follow this instruc-
tion could result in an accident.
● Be careful when adjusting the seat height.
Carel
ess or uncontrolled adjustment can
cause injuries.
● The front seat backrests must not be re-
clined for driv
ing. Otherwise, seat belts and
the airbag system might not protect as they
should in case of an accident, increasing risk
of injury. Removing and fitting the rear head re-
s
tr
aint
s Fig. 117
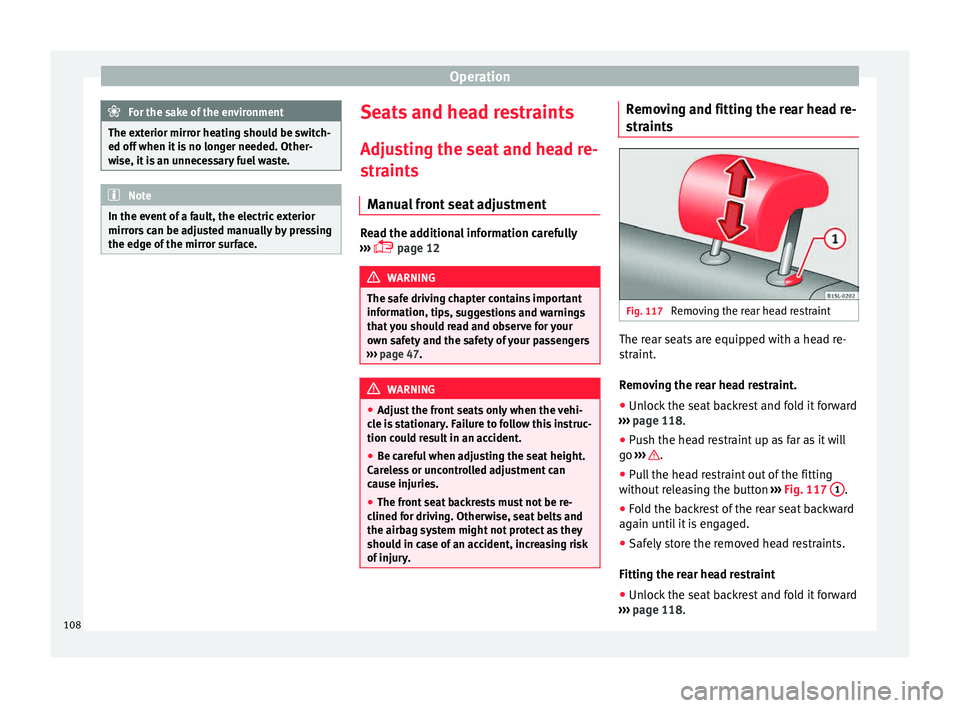
Removing the rear head restraint The rear seats are equipped with a head re-
s
tr
aint
.
Removing the rear head restraint.
● Unlock the seat backrest and fold it forward
›››
page 118.
● Push the head restraint up as far as it will
go ››
› .
● Pull the head restraint out of the fitting
w ithout
r
eleasing the button ››› Fig. 117 1 .
● Fold the backrest of the rear seat backward
ag ain u
nti
l it is engaged.
● Safely store the removed head restraints.
Fitting the re
ar head restraint
● Unlock the seat backrest and fold it forward
›››
page 118.
108
Page 169 of 232

Care and maintenance
also be one of the requirements for acknowl-
edgin g w
arr
anty claims in the event of body-
work corrosion or paint defects.
Products suitable for the care of your vehicle
are available at any technical service. WARNING
Car-care products may be toxic and hazard-
ous. If c
ar care products are not suitable or
are used inappropriately, this could result in
accident, serious injury, burns or intoxica-
tion.
● Car care products must always be stored in
the original
container which should be kept
closed.
● Observe information provided by the manu-
factur
er.
● To prevent confusion, never store car care
products
in empty food cans, bottles or other
containers.
● Keep all care products out of reach of chil-
dren.
● Harmfu
l vapours may be produced when us-
ing car c
are products. Therefore, care prod-
ucts should only be used in well-ventilated
spaces or in the open air.
● Never use fuel, turpentine, engine oil, ace-
tone or any
other volatile liquid to wash,
clean or care for the vehicle. These are toxic
and highly flammable. WARNING
Inappropriate care and cleaning of vehicle
component s
may effect the vehicle safety
equipment, increasing the risk of severe in-
jury.
● Vehicle components should only be
cle
aned and maintained in accordance with
the manufacturer's instructions.
● Only use approved or recommended care
products. CAUTION
Cleaning products which contain solvents will
dam ag
e the material. For the sake of the environment
Only wash the vehicle in areas allocated for
this p
urpose, to prevent dirty water which
may be contaminated by oil, grease or fuel,
from entering the drains. In some places,
even washing it outside the planned areas is
banned. For the sake of the environment
Where possible, always use products which
re s
pect the environment. For the sake of the environment
The remains of car care products should not
be dis po
sed of with ordinary household waste. Observe information provided by the
manuf
act
urer. Washing the vehicle
The longer substances such as insects, bird
drop
pin
gs, resinous tree sap, road dirt, in-
dustrial deposits, tar, soot or road salt and
other aggressive materials remain on the ve-
hicle, the more damage they do to the paint-
work. High temperatures (for instance due to
strong sunlight) further intensify the corro-
sive effect. The vehicle undercarriage should
also be thoroughly washed at regular inter-
vals.
Automatic car washes
Always observe the instructions provided at
the automatic car wash. The standard pre-
cautionary measures prior to entering the car
wash should be taken to avoid damage to
the vehicle (close all windows, fold in exterior
mirrors). If the vehicle is fitted with additional
components (spoiler, roof-rack, aerial, etc.),
check with the car wash supervisor whether
these can enter the car wash ››› .
The v
ehic
le paintwork is so durable that the
vehicle can normally be washed without
problems in an automatic car wash tunnel.
However, wear and damage to the paintwork
will depend on the type of car wash used. »
167
Technical data
Advice
Operation
Emergencies
Safety