key Seat Mii 2016 User Guide
[x] Cancel search | Manufacturer: SEAT, Model Year: 2016, Model line: Mii, Model: Seat Mii 2016Pages: 232, PDF Size: 4.9 MB
Page 63 of 232
Airbag system
● He a
d r
estraints optimised for rear-end colli-
sion.
● Adjustable steering column.
● If necessary, anchor points for child seats
for the re
ar seats.
● Where applicable, mountings for the child
seat up
per retaining strap.
Situations in which the front and side air-
bags do not deploy:
● If the ignition is switched off during the col-
lision.
● In fr
ontal collisions, when the deceleration
meas
ured by the control unit is too low.
● In minor side collisions.
● In rear collisions.
● In the event of the vehicle overturning.
● When the impact speed is lower than the
refer
ence value set in the control unit.
There is a fault in the system if the control
lamp :
● does not light up when the ignition is
switc
hed on,
● turns off after 4 seconds after the ignition
is sw
itched on
● turns off and then lights up again after the
ignition is sw
itched on
● illuminates or flashes while the vehicle is
movin
g. WARNING
● The seat belt
s and airbags can only provide
maximum protection if the occupants are
seated correctly ››› page 48.
● If a fault has occurred in the airbag system,
have the sy
stem checked immediately by a
specialised workshop. Otherwise, during a
frontal collision the system might not trigger
correctly or may fail to trigger at all. Airbag activation
The airbags deploy extremely rapidly, within
thou
s
andths
of a second, to provide addi-
tional protection in the event of an accident.
A fine dust may develop when the airbag de-
ploys. This is normal and it is not an indica-
tion of fire in the vehicle.
The airbag system is only ready to function
when the ignition is on.
In special accidents instances, several air-
bags may activate at the same time.
In the event of minor head-on and side colli-
sions, rear-end collisions, overturning or roll-
over of the vehicle, airbags do not activate.
Activation factors
The conditions that lead to the airbag system
activating in each situation cannot be gener-
alised. Some factors play an important role,
such as the properties of the object the vehi- cle hits (hard/soft), angle of impact, vehicle
speed, etc
.
Deceleration trajectory is key for airbag acti-
vation.
The control unit analyses the collision trajec-
tory and activates the respective restraint
system.
If the deceleration rate is below the prede-
fined reference value in the control unit the
airbags will not be triggered, even though
the accident may cause extensive damage to
the car.
The following airbags are triggered in seri-
ous head-on collisions ● Driver airbag.
● Front passenger front airbag
The fol
lowing airbags are triggered in seri-
ous side-on collisions
● Front side airbag on the side of the acci-
dent.
● Re
ar side airbag on the side of the acci-
dent.
In an acc
ident with airbag activation:
● the interior lights switch on (if the interior
light swit
ch is in the courtesy light position);
● the hazard warning lights switch on;
● all doors are unlocked; »
61
Technical data
Advice
Operation
Emergencies
Safety
Page 65 of 232
Airbag system
Deactivating airbags C ontr
o
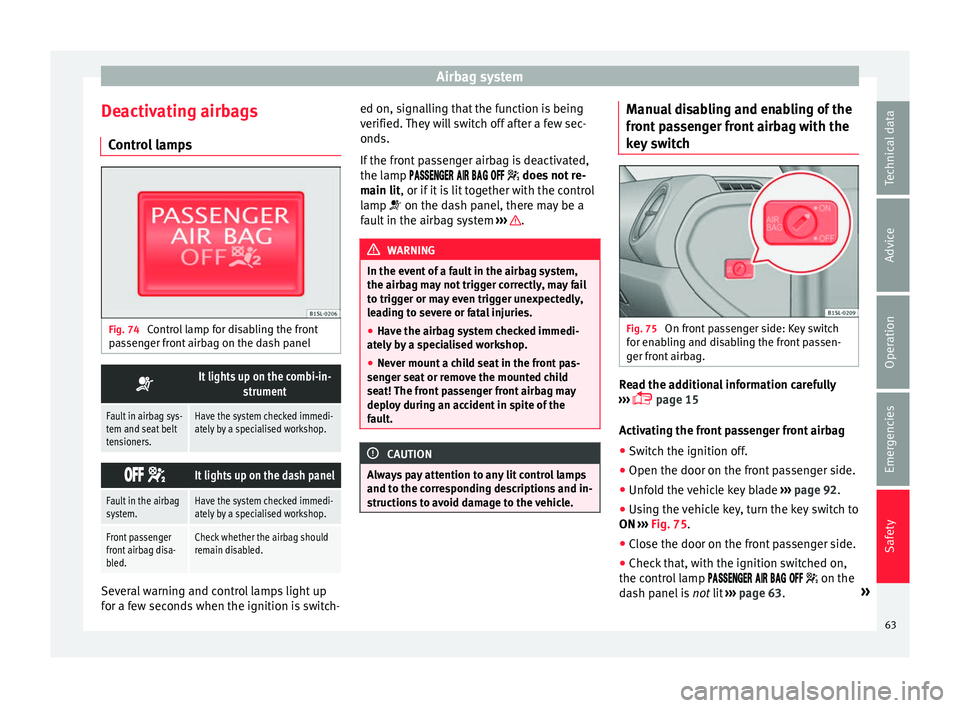
l lamps Fig. 74
Control lamp for disabling the front
p a
s
senger front airbag on the dash panel
It lights up on the combi-in-
strument
Fault in airbag sys-
tem and seat belt
tensioners.Have the system checked immedi-
ately by a specialised workshop.
It lights up on the dash panel
Fault in the airbag
system.Have the system checked immedi-
ately by a specialised workshop.
Front passenger
front airbag disa-
bled.Check whether the airbag should
remain disabled.
Several warning and control lamps light up
f
or a f
ew sec
onds when the ignition is switch- ed on, signalling that the function is being
verified. They
will switch off after a few sec-
onds.
If the front passenger airbag is deactivated,
the lamp does not re-
main lit, or if it is lit together with the control
lamp on the dash panel, there may be a
fault in the airbag system ››› .
WARNING
In the event of a fault in the airbag system,
the airbag m a
y not trigger correctly, may fail
to trigger or may even trigger unexpectedly,
leading to severe or fatal injuries.
● Have the airbag system checked immedi-
ately b
y a specialised workshop.
● Never mount a child seat in the front pas-
senger se
at or remove the mounted child
seat! The front passenger front airbag may
deploy during an accident in spite of the
fault. CAUTION
Always pay attention to any lit control lamps
and to the c orr
esponding descriptions and in-
structions to avoid damage to the vehicle. Manual disabling and enabling of the
fr
ont
p
assenger front airbag with the
key switch Fig. 75
On front passenger side: Key switch
f or en
ab
ling and disabling the front passen-
ger front airbag. Read the additional information carefully
› ›
›
page 15
Activating the front passenger front airbag
● Switch the ignition off.
● Open the door on the front passenger side.
● Unfold the vehicle key blade ›››
page 92.
● Using the vehicle key, turn the key switch to
ON ›››
Fig. 75.
● Close the door on the front passenger side.
● Check that, with the ignition switched on,
the contro
l lamp on the
dash panel is not lit ››› page 63. »
63
Technical data
Advice
Operation
Emergencies
Safety
Page 67 of 232
Transporting children safely
Important information regarding the
fr ont
p
assenger's airbag Read the additional information carefully
›› ›
page 16.
Read and always observe the safety informa-
tion included in the following chapters: ● Safety distance with respect to the passen-
ger airbag ›
›› in Introduction on page 59.
● Objects between the passenger and the
pa s
senger side airbag ››› in Front airbags
on p ag
e 62
.
The passenger side front airbag, when ena-
bled, is a serious risk for a child that is facing
backward since the airbag can strike the seat
with such force that it can cause serious or
fatal injuries. Children up to 12 years old
should always travel on the rear seat.
Therefore we strongly recommend you to
transport children on the rear seats. This is
the safest location in the vehicle. Alternative-
ly, the front passenger airbag can be disa-
bled with a key-operated switch ›››
page 63.
When transporting children, use a child seat
suitable for the age and size of each child
››› page 67. WARNING
● If a c hi
ld seat is secured to the front pas-
senger seat, the risk to the child of sustain- ing critical or fatal injuries in the event of an
acc
ident
increases.
● An inflating front passenger airbag can
strike the r
ear-facing child seat and project it
with great force against the door, the roof or
the backrest.
● Never install a child seat facing backwards
on the front p
assenger seat unless the front
passenger front airbag has been disabled.
Risk of potentially fatal injuries to the child!
However, if it is necessary, in exceptional ca-
ses, to transport a child in the front passen-
ger seat, the front passenger front airbag
must always be disabled ››› page 63. If the
passenger seat has a height adjustment op-
tion, move it to the highest, most upright po-
sition. If you have a fixed seat, do not install
any child restraint system in this location.
● For those vehicles that do not include a key
lock sw
itch to deactivate the airbag, the vehi-
cle must be taken to a technical service.
● All vehicle occupants, especially children,
must
assume the proper sitting position and
be properly belted in while travelling.
● Never hold children or babies on your lap,
this c
an result in potentially fatal injuries to
the child!
● Never allow a child to be transported in a
vehicl
e without being properly secured, or to
stand up or kneel on a seat while travelling.
In an accident, the child could be flung
through the vehicle, causing possibly fatal in-
juries to themselves and to the other vehicle
occupants. ●
If c hi
ldren assume an improper sitting posi-
tion when the vehicle is moving, they expose
themselves to greater risk of injury in the
event of a sudden braking manoeuvre or in an
accident. This is particularly important if the
child is travelling on the front passenger seat
and the airbag system is triggered in an acci-
dent; as this could cause serious injury or
even death.
● A suitable child seat can protect your child!
● Never leave a child alone in the child seat
or inside the
vehicle because depending on
the season, very high temperatures may be
reached inside a parked vehicle, which could
be fatal.
● Children who are less than 1.5 metres tall
must
not wear a normal seat belt without a
child seat, as this could cause injuries to the
abdominal and neck areas during a sudden
braking manoeuvre or in an accident.
● Do not allow the seat belt to become twis-
ted and the seat
belt should be properly in
place ››› page 52.
● Only one child may occupy a child seat
›››
page 67.
● When a child seat is mounted in the rear
seats, the door c
hild-proof lock should be ac-
tivated ››› page 98. 65
Technical data
Advice
Operation
Emergencies
Safety
Page 78 of 232
Emergencies
● Sw it
c
h on the ignition and the hazard warn-
ing lights.
● Release the clutch when both vehicles are
movin
g.
● As soon as the engine starts, press the
clutc
h and move the gear lever into neutral.
This helps to prevent a collision with the tow-
ing vehicle. WARNING
A vehicle with a flat battery should never be
to w
ed.
● Never remove the key from the ignition
lock. Otherw
ise, the steering wheel lock
could suddenly lock. The vehicle would not
be controlled and a serious accident could
ensue. WARNING
When towing the vehicle, the handling and
brak in
g efficiency change considerably.
Please observe the following instructions to
minimise the risk of serious accidents and in-
jury:
● As the driver of the vehicle being towed:
– The brake mu
st be depressed must hard-
er as the brake servo does not operate.
Always remain aware to avoid collision
with the towing vehicle.
– More strength is required at the steering
wheel as the power steering does not op-
erate when the engine is switched off. ●
As the driv er of
the towing vehicle:
– Accelerate gently and carefully.
– Avoid sudden braking and manoeuvres.
– Brake well in advance than usual and
brake gently. CAUTION
● When t ow-
starting, fuel could enter the cat-
alytic converter and damage it.
● Carefully fit and remove the towline anchor-
age and its
cover to avoid damage to the ve-
hicle (e.g. paintwork).
● When towing, fuel could enter the catalytic
conv
erter and cause damage! Note
Fitting a towline anchorage to the rear bump-
er is not
possible. The vehicle is not suitable
for towing other vehicles. Advice for towing the vehicle
Towing vehicles with an automatic gearbox
Not
e the f
o
llowing for a towed vehicle:
● Make sure the gear selector lever is in the N
position.
● Do not
drive faster than 50 km/h (30 mph)
when tow
ing a vehicle.
● Do not tow further than 50 km (30 miles). ●
If a bre
akdown truck is used, the vehicle
must be towed with the front wheels raised.
Situations in which the vehicle should not be
towed
In the following cases, the vehicle should not
be towed but transported on a trailer or spe-
cial vehicle:
● If the vehicle gearbox does not contain lu-
bricant due t
o a fault.
● If the battery is flat and the steering cannot
be unloc
ked as a result, the electronic steer-
ing lock and electronic parking brake cannot
be disengaged.
● If the vehicle to be towed has an automatic
gearbo
x and the distance to be covered is
greater than 50 km (30 miles). Note
The vehicle can only be towed if the steering
lock el
ectronic gearbox lock is deactivated. If
the vehicle has no power supply or there is
an electric system fault, the engine must be
started using jump leads to deactivate the
steering column electronic gearbox lock. 76
Page 79 of 232
Self-help
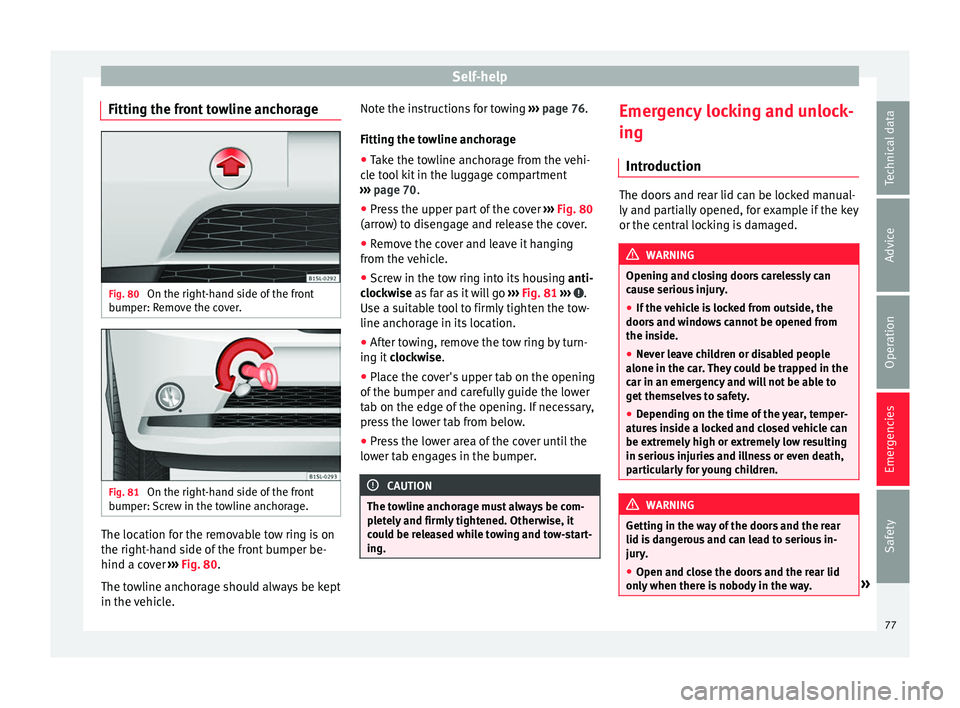
Fitting the front towline anchorage Fig. 80
On the right-hand side of the front
b umper: R
emo
ve the cover. Fig. 81
On the right-hand side of the front
b umper: Sc
rew in the towline anchorage. The location for the removable tow ring is on
the right
-h
and s
ide of the front bumper be-
hind a cover ››› Fig. 80.
The towline anchorage should always be kept
in the vehicle. Note the instructions for towing
›››
page 76.
Fitting the towline anchorage
● Take the towline anchorage from the vehi-
cle t
ool kit in the luggage compartment
››› page 70.
● Press the upper part of the cover ›››
Fig. 80
(arrow) to disengage and release the cover.
● Remove the cover and leave it hanging
from the v
ehicle.
● Screw in the tow ring into its housing anti-
clock
wise as far as it will go ››› Fig. 81 ››› .
U se a s
uit
able tool to firmly tighten the tow-
line anchorage in its location.
● After towing, remove the tow ring by turn-
ing it c
lockwise.
● Place the cover's upper tab on the opening
of the bumper and c
arefully guide the lower
tab on the edge of the opening. If necessary,
press the lower tab from below.
● Press the lower area of the cover until the
lower t
ab engages in the bumper. CAUTION
The towline anchorage must always be com-
pl et
ely and firmly tightened. Otherwise, it
could be released while towing and tow-start-
ing. Emergency locking and unlock-
in
g
Intr oduction The doors and rear lid can be locked manual-
ly and p
ar
tially opened, for example if the key
or the central locking is damaged. WARNING
Opening and closing doors carelessly can
cau se seriou
s injury.
● If the vehicle is locked from outside, the
doors and w
indows cannot be opened from
the inside.
● Never leave children or disabled people
alone in the car
. They could be trapped in the
car in an emergency and will not be able to
get themselves to safety.
● Depending on the time of the year, temper-
ature
s inside a locked and closed vehicle can
be extremely high or extremely low resulting
in serious injuries and illness or even death,
particularly for young children. WARNING
Getting in the way of the doors and the rear
lid is d
angerous and can lead to serious in-
jury.
● Open and close the doors and the rear lid
only when ther
e is nobody in the way. » 77
Technical data
Advice
Operation
Emergencies
Safety
Page 80 of 232
Emergencies
CAUTION
When opening and closing in an emergency,
car ef
ully disassemble components and then
reassemble them carefully to avoid damage
to the vehicle. Fuses and bulbs
F u
se
s
Introduction Due to the constant updating of vehicles,
fu
se a
ssignments based on equipment and
the use of the same fuse for various electrical
components, it is not possible to provide an
up-to-date summary of the fuse positions for
the electrical components at the time of
printing this manual. For detailed information
about the fuse positions, please consult a
technical service.
In general, a fuse can be assigned to various
electrical components. Likewise, an electrical
component can be protected by several
fuses.
Only replace fuses when the cause of the
problem has been solved. If a newly inserted
fuse blows after a short time, you must have
the electrical system checked by a special-
ised workshop as soon as possible. WARNING
The high voltages in the electrical system can
give seriou s
electrical shocks, causing burns
and even death!
● Never touch the electrical wiring of the igni-
tion syst
em. ●
Tak e c
are not to cause short circuits in the
electrical system. WARNING
Using unsuitable fuses, repairing fuses or
bridgin g a curr
ent circuit without fuses can
cause a fire and serious injury.
● Never use a fuse with a higher value. Only
repl
ace fuses with a fuse of the same amper-
age (same colour and markings) and size.
● Never repair a fuse.
● Never replace a fuse by a metal strip, staple
or simil
ar. CAUTION
● To pr ev
ent damage to the vehicle's electric
system, before replacing a fuse always turn
off the ignition, the lights and all electrical
elements and remove the key from the igni-
tion.
● If you replace a fuse with higher-rating
fuse,
you could cause damage to another part
of the electrical system.
● Protect the fuse boxes when open to pre-
vent the entr
y of dust or humidity as they can
damage the electrical system. Note
● One component m
ay have more than one
fuse. 78
Page 82 of 232
Emergencies
Additional bulb specifications
The s pec
ific
ations of some headlamp bulbs
and bulbs for the rear lamps fitted at the fac-
tory may be different to those of conventional
bulbs. Bulb information is displayed on the
bulb socket or on the bulb itself. WARNING
If the road is not well-lit and the vehicle is
not c l
early visible to other drivers, there is a
risk of accident. WARNING
Failure to replace bulbs correctly may cause
serious ac
cidents.
● Before carrying out any work in the engine
compar
tment please read and observe the
warnings ››› page 186. In any vehicle, the en-
gine compartment is a hazardous area and
could cause severe injury.
● The bulbs H4, HB4 and H7 are pressurised
and might exp
lode on changing them.
● Only replace the bulbs concerned when
they hav
e cooled.
● Never replace bulbs alone if you are not fa-
miliar w
ith the operations necessary. If you
are not sure about procedures then visit a
specialised workshop to carry out the neces-
sary work.
● Never touch the bulb glass directly. Finger-
prints w
ill be evaporated by the heat of the operating bulb thus “fogging” up the reflec-
tor
.
● The he
adlamp frameworks in the engine
compar
tment and the rear lamps contain
sharp elements. Always protect your hands
when changing bulbs. CAUTION
● Af ter c
hanging a bulb, if the rubber covers
are not replaced correctly on the headlamp
framework, the electrical installation may be
damaged, especially if water is allowed to en-
ter.
● Remove the ignition key before working on
the electric sy
stem. Otherwise, a short circuit
could occur.
● Switch off the lights and the parking light
before c
hanging a bulb.
● Take good care to avoid damaging any com-
ponents. Replacing the bulbs in the headlights
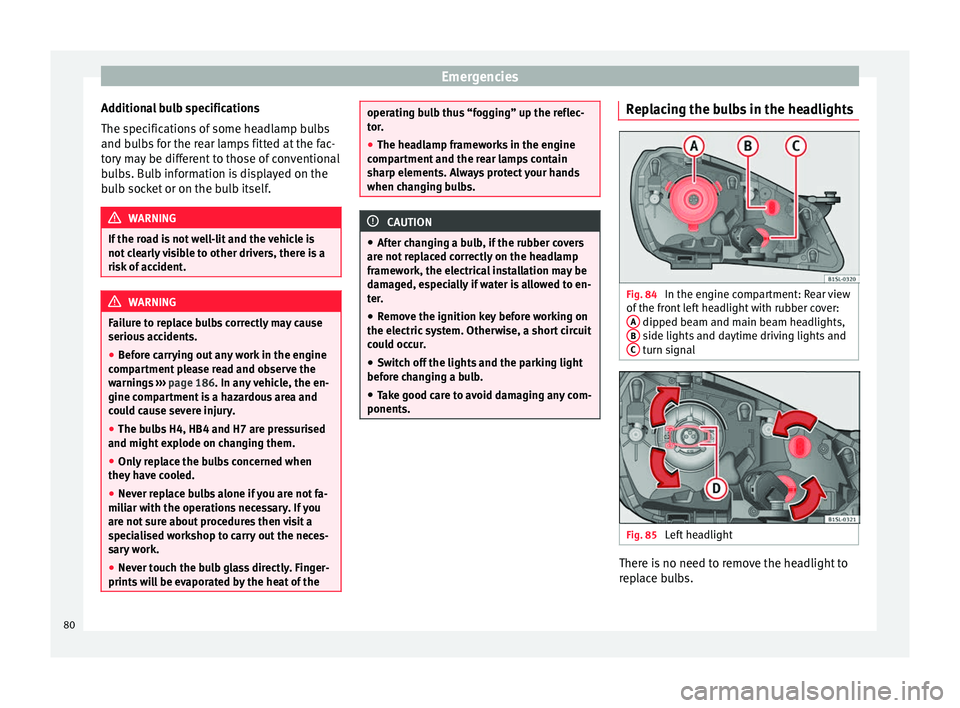
Fig. 84
In the engine compartment: Rear view
of the fr
ont
left headlight with rubber cover:
A dipped beam and main beam headlights,
B side lights and daytime driving lights and
C turn signal
Fig. 85
Left headlight There is no need to remove the headlight to
r
ep l
ace bulbs.
80
Page 89 of 232
General instrument panel
Operation
Gener a
l
instrument panel
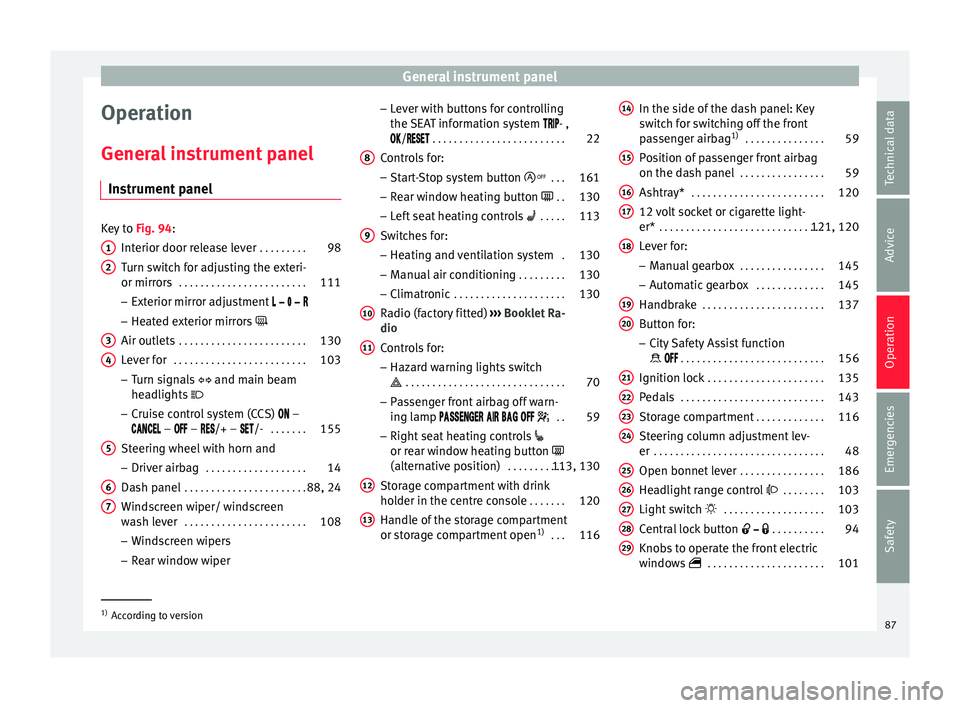
Instrument panel Key to
Fig. 94:
Interior door r el
ease lever . . . . . . . . . 98
Turn switch for adjusting the exteri-
or mirrors . . . . . . . . . . . . . . . . . . . . . . . . 111
– Exterior mirr or a
djustment
– Heated exterior mirrors
Air outlets . . . . . . . . . . . . . . . . . . . . . . . . 130
Lever for . . . . . . . . . . . . . . . . . . . . . . . . . 103
– Turn sign
als and main beam
headlights
– Cruise control system (CCS) –
– – /+ – /- . . . . . . .155
Steering wheel with horn and – Driver airb ag . . . . . . . . . . . . . . . . . . . 14
Da
sh panel . . . . . . . . . . . . . . . . . . . . . . . 88, 24
Windscreen wiper/ windscreen
wash l
ever . . . . . . . . . . . . . . . . . . . . . . . 108
– Wind s
creen wipers
– Rear window wiper
1 2
3
4
5
6
7 –
Lev
er w
ith buttons for controlling
the SEAT information system - ,
/ . . . . . . . . . . . . . . . . . . . . . . . . . 22
Controls for:
– Start
-Stop system button . . .161
– Rear w
indow heating button . .130
– Left
seat heating controls . . . . . 113
Switches for: – Heating and
ventilation system .130
– Manual air c
onditioning . . . . . . . . . 130
– Clim atr
onic . . . . . . . . . . . . . . . . . . . . . 130
Radio (factory fitted) ›››
Booklet Ra-
dio
Controls for:
– Hazard warning lights switch
. . . . . . . . . . . . . . . . . . . . . . . . . . . . . . 70
– Pa s
senger front airbag off warn-
ing lamp . .59
– Right seat
heating controls
or rear window heating button
(alternative position) . . . . . . . . . . .113, 130
Storage compartment with drink
hol der in the c
entre console . . . . . . .120
Handle of the storage compartment
or stor
age compartment open 1)
. . . 116
8 9
10
11
12
13 In the side of the dash panel: Key
sw
it
c
h for switching off the front
passenger airbag 1)
. . . . . . . . . . . . . . . 59
Position of passenger front airbag
on the dash p
anel . . . . . . . . . . . . . . . . 59
Ashtray* . . . . . . . . . . . . . . . . . . . . . . . . . 120
12 volt socket or cigarette light-
er* . . . . . . . . . . . . . . . . . . . . . . . . . . . . . . . 121, 120
Lever for:
– Manual g
earbox . . . . . . . . . . . . . . . . 145
– Autom atic
gearbox . . . . . . . . . . . . . 145
Handbrake . . . . . . . . . . . . . . . . . . . . . . . 137
Button for:
– City
Safety Assist function
. . . . . . . . . . . . . . . . . . . . . . . . . . . 156
Ignition lock . . . . . . . . . . . . . . . . . . . . . . 135
Pedals . . . . . . . . . . . . . . . . . . . . . . . . . . . 143
Storage compartment . . . . . . . . . . . . .116
Steering column adjustment lev-
er . . . . . . . . . . . . . . . . . . . . . . . . . . . . . . . . 48
Open bonnet lever . . . . . . . . . . . . . . . . 186
Headlight range control . . . . . . . . 103
Light switch . . . . . . . . . . . . . . . . . . . 103
Central lock button . . . . . . . . . .94
Knobs to operate the front electric
window
s . . . . . . . . . . . . . . . . . . . . . . 101 14
15
16
17
18
19
20
21
22
23
24
25
26
27
28
29
1)
According to version
87
Technical data
Advice
Operation
Emergencies
Safety
Page 94 of 232
Operation
Opening and closing V ehic
l
e key set
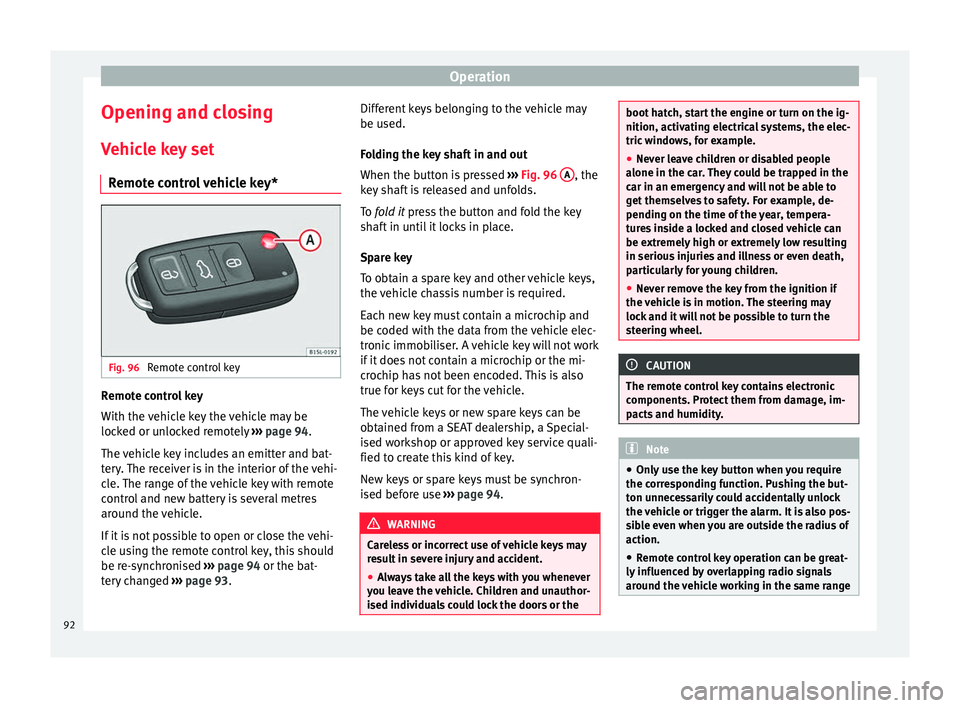
Remote control vehicle key* Fig. 96
Remote control key Remote control key
W
ith the
v
ehicle key the vehicle may be
locked or unlocked remotely ››› page 94.
The vehicle key includes an emitter and bat-
tery. The receiver is in the interior of the vehi-
cle. The range of the vehicle key with remote
control and new battery is several metres
around the vehicle.
If it is not possible to open or close the vehi-
cle using the remote control key, this should
be re-synchronised ››› page 94 or the bat-
tery changed ››› page 93. Different keys belonging to the vehicle may
be used.
Fo
lding the key shaft in and out
When the button is pressed ››› Fig. 96 A , the
k ey
sh
aft is released and unfolds.
To fold it press the button and fold the key
shaft in until it locks in place.
Spare key
To obtain a spare key and other vehicle keys,
the vehicle chassis number is required.
Each new key must contain a microchip and
be coded with the data from the vehicle elec-
tronic immobiliser. A vehicle key will not work
if it does not contain a microchip or the mi-
crochip has not been encoded. This is also
true for keys cut for the vehicle.
The vehicle keys or new spare keys can be
obtained from a SEAT dealership, a Special-
ised workshop or approved key service quali-
fied to create this kind of key.
New keys or spare keys must be synchron-
ised before use ››› page 94. WARNING
Careless or incorrect use of vehicle keys may
re s
ult in severe injury and accident.
● Always take all the keys with you whenever
you le
ave the vehicle. Children and unauthor-
ised individuals could lock the doors or the boot hatch, start the engine or turn on the ig-
nition, activatin
g el
ectrical systems, the elec-
tric windows, for example.
● Never leave children or disabled people
alone in the car
. They could be trapped in the
car in an emergency and will not be able to
get themselves to safety. For example, de-
pending on the time of the year, tempera-
tures inside a locked and closed vehicle can
be extremely high or extremely low resulting
in serious injuries and illness or even death,
particularly for young children.
● Never remove the key from the ignition if
the vehic
le is in motion. The steering may
lock and it will not be possible to turn the
steering wheel. CAUTION
The remote control key contains electronic
component s. Pr
otect them from damage, im-
pacts and humidity. Note
● Only u
se the key button when you require
the corresponding function. Pushing the but-
ton unnecessarily could accidentally unlock
the vehicle or trigger the alarm. It is also pos-
sible even when you are outside the radius of
action.
● Remote control key operation can be great-
ly influenced b
y overlapping radio signals
around the vehicle working in the same range 92
Page 95 of 232
Opening and closing
of frequencies (for example, radio
tran
smitt
ers, mobile telephones).
● Obstacles between the remote control and
the vehic
le, bad weather conditions and
draining batteries can considerably reduce
the range of the remote control.
● If the buttons of the vehicle key are press-
ed ›››
Fig. 96 or one of the central locking but-
tons ››› page 94 is pressed repeatedly in
quick succession, the central locking briefly
disconnects as protection against overload-
ing. The vehicle is then unlocked. Lock it if necessary. Mechanical vehicle key
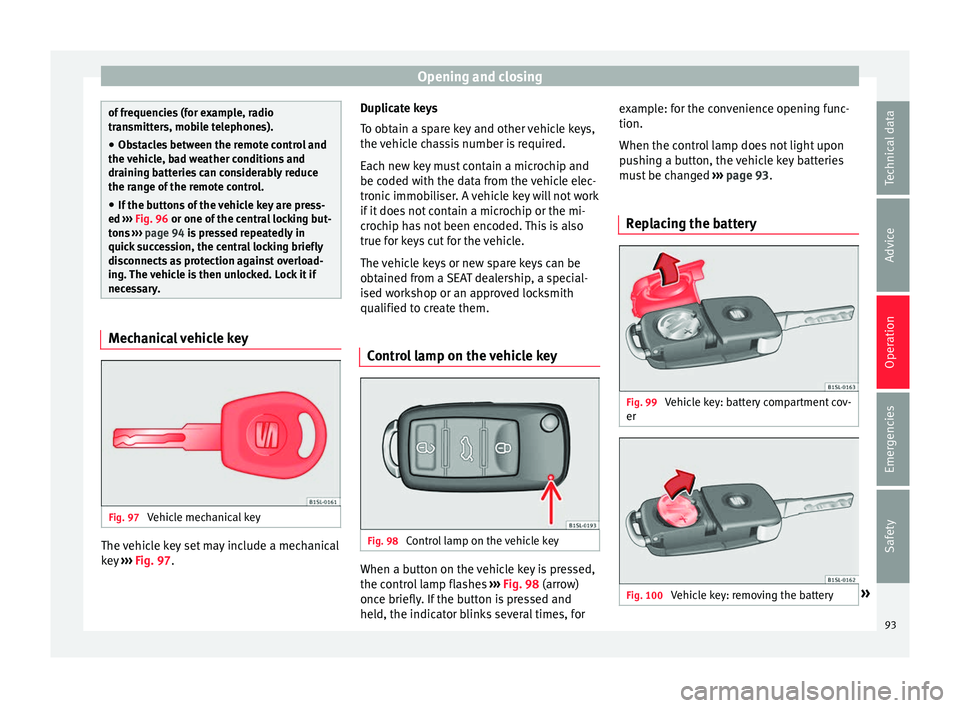
Fig. 97
Vehicle mechanical key The vehicle key set may include a mechanical
k
ey
›
›› Fig. 97. Duplicate keys
To obt
ain a spare key and other vehicle keys,
the vehicle chassis number is required.
Each new key must contain a microchip and
be coded with the data from the vehicle elec-
tronic immobiliser. A vehicle key will not work
if it does not contain a microchip or the mi-
crochip has not been encoded. This is also
true for keys cut for the vehicle.
The vehicle keys or new spare keys can be
obtained from a SEAT dealership, a special-
ised workshop or an approved locksmith
qualified to create them.
Control lamp on the vehicle key Fig. 98
Control lamp on the vehicle key When a button on the vehicle key is pressed,
the c
ontr
o
l lamp flashes ››› Fig. 98 (arrow)
once briefly. If the button is pressed and
held, the indicator blinks several times, for example: for the convenience opening func-
tion.
When the contro
l lamp does not light upon
pushing a button, the vehicle key batteries
must be changed ››› page 93.
Replacing the battery Fig. 99
Vehicle key: battery compartment cov-
er Fig. 100
Vehicle key: removing the battery » 93
Technical data
Advice
Operation
Emergencies
Safety