fold seats Seat Mii 2017 Owner's manual
[x] Cancel search | Manufacturer: SEAT, Model Year: 2017, Model line: Mii, Model: Seat Mii 2017Pages: 232, PDF Size: 4.91 MB
Page 14 of 232
The essentials
● Con
v
enience position: Turn the switch to
position ››› Fig. 11 2 .
● Closing: Turn the switch to position
› ›
›
Fig. 11 1 .
● To tilt open: Push the switch to position
› ›
›
Fig. 12 4 . For an intermediate position,
ho l
d do
wn the switch until you reach the de-
sired position.
● Lowering: Pull the switch to position
›››
Fig. 12 5 . For an intermediate position,
ho l
d do
wn the switch until you reach the de-
sired position.
››› in Opening and closing the panor-
amic sunroof on page 102
››› page 102 Before driving
M anua
l
ly adjusting the seats Fig. 13
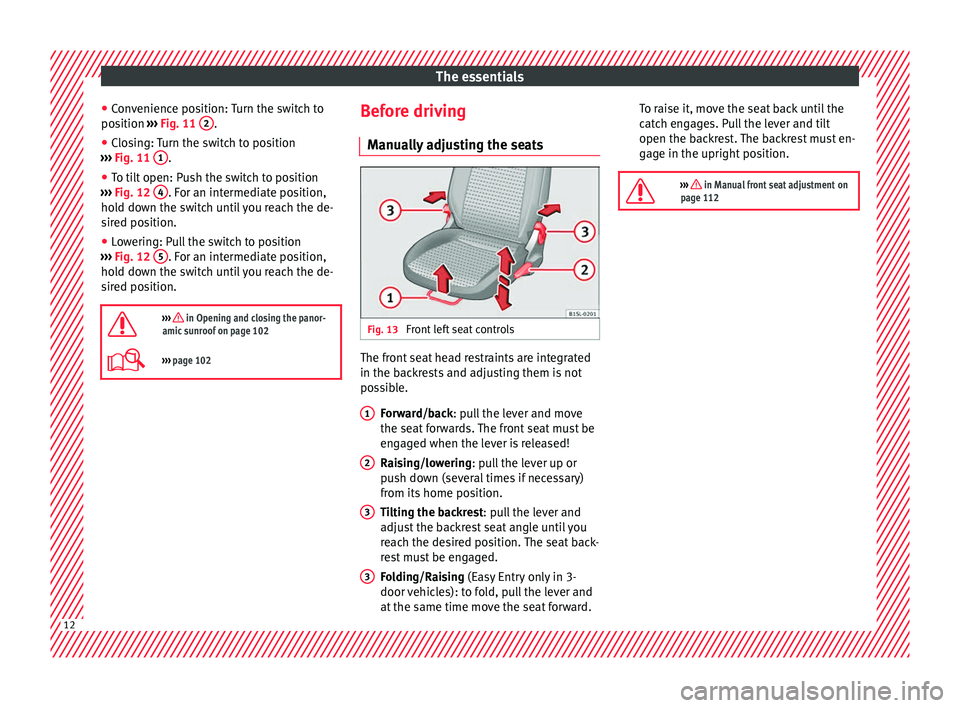
Front left seat controls The front seat head restraints are integrated
in the b
ac
k
rests and adjusting them is not
possible.
Forward/back: pull the lever and move
the seat forwards. The front seat must be
engaged when the lever is released!
Raising/lowering: pull the lever up or
push down (several times if necessary)
from its home position.
Tilting the backrest: pull the lever and
adjust the backrest seat angle until you
reach the desired position. The seat back-
rest must be engaged.
Folding/Raising (Easy Entry only in 3-
door vehicles): to fold, pull the lever and
at the same time move the seat forward.
1
2
3
3 To raise it, move the seat back until the
c
at
c
h engages. Pull the lever and tilt
open the backrest. The backrest must en-
gage in the upright position.
››› in Manual front seat adjustment on
page 112 12
Page 114 of 232
Operation
Seats and head restraints
Adju s
tin
g the seat and head re-
straints
Manual front seat adjustment Read the additional information carefully
›› ›
page 12 WARNING
The safe driving chapter contains important
inform ation, tip
s, suggestions and warnings
that you should read and observe for your
own safety and the safety of your passengers
››› page 48. WARNING
● Adjus t
the front seats only when the vehi-
cle is stationary. Failure to follow this instruc-
tion could result in an accident.
● Be careful when adjusting the seat height.
Carel
ess or uncontrolled adjustment can
cause injuries.
● The front seat backrests must not be re-
clined for driv
ing. Otherwise, seat belts and
the airbag system might not protect as they
should in case of an accident, increasing risk
of injury. Removing and fitting the rear head re-
s
tr
aint
s Fig. 119
Removing the rear head restraint The rear seats are equipped with a head re-
s
tr
aint
.
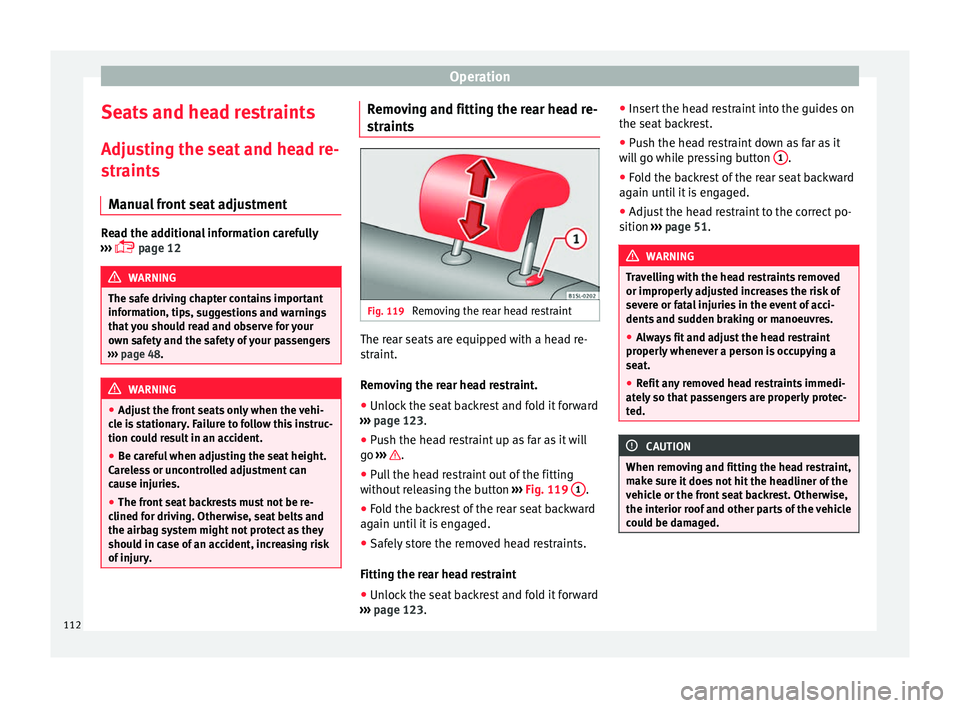
Removing the rear head restraint.
● Unlock the seat backrest and fold it forward
›››
page 123.
● Push the head restraint up as far as it will
go ››
› .
● Pull the head restraint out of the fitting
w ithout
r
eleasing the button ››› Fig. 119 1 .
● Fold the backrest of the rear seat backward
ag ain u
nti
l it is engaged.
● Safely store the removed head restraints.
Fitting the re
ar head restraint
● Unlock the seat backrest and fold it forward
›››
page 123. ●
Insert
the head restraint into the guides on
the seat backrest.
● Push the head restraint down as far as it
wil
l go while pressing button 1 .
● Fold the backrest of the rear seat backward
ag ain u
nti
l it is engaged.
● Adjust the head restraint to the correct po-
sition ››
› page 51. WARNING
Travelling with the head restraints removed
or improperly a
djusted increases the risk of
severe or fatal injuries in the event of acci-
dents and sudden braking or manoeuvres.
● Always fit and adjust the head restraint
properly whenev
er a person is occupying a
seat.
● Refit any removed head restraints immedi-
ately so th
at passengers are properly protec-
ted. CAUTION
When removing and fitting the head restraint,
mak e s
ure it does not hit the headliner of the
vehicle or the front seat backrest. Otherwise,
the interior roof and other parts of the vehicle
could be damaged. 112
Page 126 of 232
Operation
Note
The ventilating slits between the heated rear
windo w and the r
ear shelf must not be cov-
ered so that used air can escape from the ve-
hicle. Folding and lifting up the rear seat
bench b
ac
krestFig. 136
Rear seat: unlock button A ; red
m ark
in
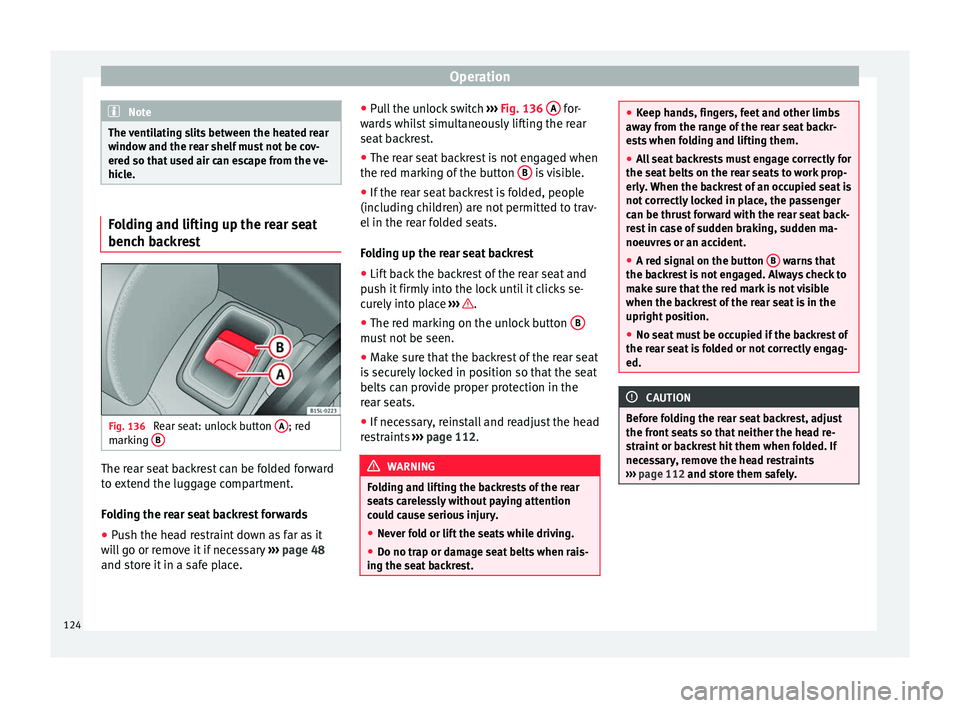
g B The rear seat backrest can be folded forward
t
o e
xt
end the luggage compartment.
Folding the rear seat backrest forwards
● Push the head restraint down as far as it
wil
l go or remove it if necessary ››› page 48
and store it in a safe place. ●
Pul
l the unlock switch ››› Fig. 136 A for-
w ar
d
s whilst simultaneously lifting the rear
seat backrest.
● The rear seat backrest is not engaged when
the red mark
ing of the button B is visible.
● If the rear seat backrest is folded, people
(inc ludin
g c
hildren) are not permitted to trav-
el in the rear folded seats.
Folding up the rear seat backrest
● Lift back the backrest of the rear seat and
push it
firmly into the lock until it clicks se-
curely into place ››› .
● The red marking on the unlock button B must not be seen.
●
Make sure that the backrest of the rear seat
i s
sec
urely locked in position so that the seat
belts can provide proper protection in the
rear seats.
● If necessary, reinstall and readjust the head
res
traints ››› page 112. WARNING
Folding and lifting the backrests of the rear
seat s
carelessly without paying attention
could cause serious injury.
● Never fold or lift the seats while driving.
● Do no trap or damage seat belts when rais-
ing the seat
backrest. ●
Keep h and
s, fingers, feet and other limbs
away from the range of the rear seat backr-
ests when folding and lifting them.
● All seat backrests must engage correctly for
the seat belt
s on the rear seats to work prop-
erly. When the backrest of an occupied seat is
not correctly locked in place, the passenger
can be thrust forward with the rear seat back-
rest in case of sudden braking, sudden ma-
noeuvres or an accident.
● A red signal on the button B warns that
the bac k
rest is not engaged. Always check to
make sure that the red mark is not visible
when the backrest of the rear seat is in the
upright position.
● No seat must be occupied if the backrest of
the rear se
at is folded or not correctly engag-
ed. CAUTION
Before folding the rear seat backrest, adjust
the front se
ats so that neither the head re-
straint or backrest hit them when folded. If
necessary, remove the head restraints
››› page 112 and store them safely.124
Page 178 of 232
Advice
Caring for and cleaning the ve-
hic l
e int
erior
Introduction The dye from many items of modern clothing
(e.g. d
ark
jeans) is not always colour-fast.
Seat upholstery (material and leather), espe-
cially when light-coloured, may visibly discol-
our if the dye comes out of clothing (even
when used correctly). This is not an uphols-
tery defect but indicates that the dye in the
item of clothing is not sufficiently colour-fast. WARNING
Car-care products may be toxic and hazard-
ous. If c
ar care products are not suitable or
are used inappropriately, this could result in
accident, serious injury, burns or intoxica-
tion.
● Car care products must always be stored in
the original
container which should be kept
closed.
● Observe information provided by the manu-
factur
er.
● To prevent confusion, never store car care
products
in empty food cans, bottles or other
containers.
● Keep all care products out of reach of chil-
dren.
● Harmfu
l vapours may be produced when us-
ing car c
are products. Therefore, care prod- ucts should only be used in well-ventilated
sp
ac
es or in the open air.
● Never use fuel, turpentine, engine oil, ace-
tone or any
other volatile liquid to wash,
clean or care for the vehicle. These are toxic
and highly flammable. WARNING
Inappropriate care and cleaning of vehicle
c omponent s
may effect the vehicle safety
equipment, increasing the risk of severe in-
jury.
● Vehicle components should only be
cle
aned and maintained in accordance with
the manufacturer's instructions.
● Only use approved or recommended care
products. CAUTION
● Cle
aning products which contain solvents
will damage the material.
● To avoid damage, stubborn stains should
be remov
ed by a specialised workshop. Note
Suitable vehicle care products are available
from y
our technical service. How to care for the upholstery
To treat and maintain your seat upholstery,
keep the f
o
llowing in mind ››› :
● Before entering the vehicle, close any Vel-
cr o f
asteners that might snag on the uphols-
tery or trim fabric. Any open Velcro fasteners
may damage the trim or upholstery fabrics.
● To prevent damage, avoid direct contact
between sharp dec
orative objects and the
upholstery and trim fabrics. Decorative ob-
jects include zips, rivets and rhinestones on
clothing and belts.
● From time to time, clean the dust that gath-
ers in the per
forations, folds and seams so
that the surfaces of the seats are not dam-
aged by its abrasive effect.
● Make sure clothes are colour-fast to avoid
them running and s
taining the upholstery.
This is especially important if the upholstery
is light in colour. CAUTION
If the instructions for upholstery and trim
car e ar
e not followed, they may deteriorate
and discolour. Note
SEAT recommends you take the vehicle to a
Spec i
alised workshop to treat any stains on
the upholstery caused by the discolouration
of clothing. 176
Page 227 of 232
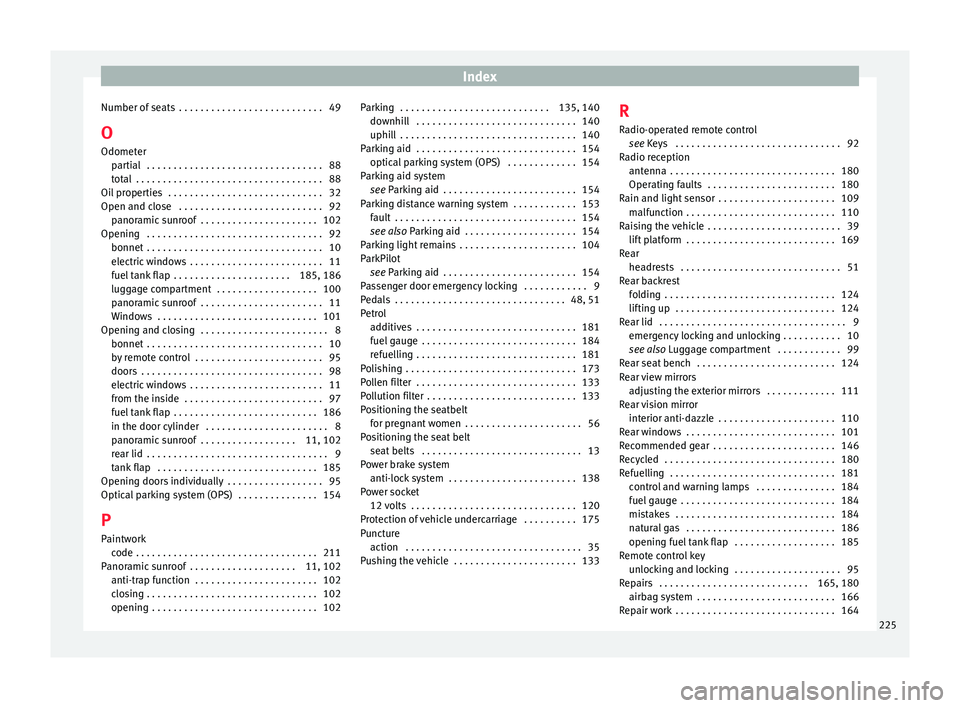
Index
Number of seats . . . . . . . . . . . . . . . . . . . . . . . . . . . 49
O O domet
er
p
artial . . . . . . . . . . . . . . . . . . . . . . . . . . . . . . . . . 88
total . . . . . . . . . . . . . . . . . . . . . . . . . . . . . . . . . . . 88
Oil properties . . . . . . . . . . . . . . . . . . . . . . . . . . . . . 32
Open and close . . . . . . . . . . . . . . . . . . . . . . . . . . . 92 panoramic sunroof . . . . . . . . . . . . . . . . . . . . . . 102
Opening . . . . . . . . . . . . . . . . . . . . . . . . . . . . . . . . . 92 bonnet . . . . . . . . . . . . . . . . . . . . . . . . . . . . . . . . . 10
electric windows . . . . . . . . . . . . . . . . . . . . . . . . . 11
fuel tank flap . . . . . . . . . . . . . . . . . . . . . . 185, 186
luggage compartment . . . . . . . . . . . . . . . . . . . 100
panoramic sunroof . . . . . . . . . . . . . . . . . . . . . . . 11
Windows . . . . . . . . . . . . . . . . . . . . . . . . . . . . . . 101
Opening and closing . . . . . . . . . . . . . . . . . . . . . . . . 8 bonnet . . . . . . . . . . . . . . . . . . . . . . . . . . . . . . . . . 10
by remote control . . . . . . . . . . . . . . . . . . . . . . . . 95
doors . . . . . . . . . . . . . . . . . . . . . . . . . . . . . . . . . . 98
electric windows . . . . . . . . . . . . . . . . . . . . . . . . . 11
from the inside . . . . . . . . . . . . . . . . . . . . . . . . . . 97
fuel tank flap . . . . . . . . . . . . . . . . . . . . . . . . . . . 186
in the door cylinder . . . . . . . . . . . . . . . . . . . . . . . 8
panoramic sunroof . . . . . . . . . . . . . . . . . . 11, 102
rear lid . . . . . . . . . . . . . . . . . . . . . . . . . . . . . . . . . . 9
tank flap . . . . . . . . . . . . . . . . . . . . . . . . . . . . . . 185
Opening doors individually . . . . . . . . . . . . . . . . . . 95
Optical parking system (OPS) . . . . . . . . . . . . . . . 154
P
Paintwork code . . . . . . . . . . . . . . . . . . . . . . . . . . . . . . . . . . 211
Panoramic sunroof . . . . . . . . . . . . . . . . . . . . 11, 102 anti-trap function . . . . . . . . . . . . . . . . . . . . . . . 102
closing . . . . . . . . . . . . . . . . . . . . . . . . . . . . . . . . 102
opening . . . . . . . . . . . . . . . . . . . . . . . . . . . . . . . 102 Parking . . . . . . . . . . . . . . . . . . . . . . . . . . . . 135, 140
downhil l . . . . . . . . . . . . . . . . . . . . . . . . . . . . . . 140
uphill . . . . . . . . . . . . . . . . . . . . . . . . . . . . . . . . . 140
Parking aid . . . . . . . . . . . . . . . . . . . . . . . . . . . . . . 154 optical parking system (OPS) . . . . . . . . . . . . . 154
Parking aid system see Parking aid . . . . . . . . . . . . . . . . . . . . . . . . . 154
Parking distance warning system . . . . . . . . . . . . 153 fault . . . . . . . . . . . . . . . . . . . . . . . . . . . . . . . . . . 154
see also Parking aid . . . . . . . . . . . . . . . . . . . . . 154
Parking light remains . . . . . . . . . . . . . . . . . . . . . . 104
ParkPilot see Parking aid . . . . . . . . . . . . . . . . . . . . . . . . . 154
Passenger door emergency locking . . . . . . . . . . . . 9
Pedals . . . . . . . . . . . . . . . . . . . . . . . . . . . . . . . . 48, 51
Petrol additives . . . . . . . . . . . . . . . . . . . . . . . . . . . . . . 181
fuel gauge . . . . . . . . . . . . . . . . . . . . . . . . . . . . . 184
refuelling . . . . . . . . . . . . . . . . . . . . . . . . . . . . . . 181
Polishing . . . . . . . . . . . . . . . . . . . . . . . . . . . . . . . . 173
Pollen filter . . . . . . . . . . . . . . . . . . . . . . . . . . . . . . 133
Pollution filter . . . . . . . . . . . . . . . . . . . . . . . . . . . . 133
Positioning the seatbelt for pregnant women . . . . . . . . . . . . . . . . . . . . . . 56
Positioning the seat belt seat belts . . . . . . . . . . . . . . . . . . . . . . . . . . . . . . 13
Power brake system anti-lock system . . . . . . . . . . . . . . . . . . . . . . . . 138
Power socket 12 volts . . . . . . . . . . . . . . . . . . . . . . . . . . . . . . . 120
Protection of vehicle undercarriage . . . . . . . . . . 175
Puncture action . . . . . . . . . . . . . . . . . . . . . . . . . . . . . . . . . 35
Pushing the vehicle . . . . . . . . . . . . . . . . . . . . . . . 133 R
Radio-oper ated remote control
see Keys . . . . . . . . . . . . . . . . . . . . . . . . . . . . . . . 92
Radio reception antenna . . . . . . . . . . . . . . . . . . . . . . . . . . . . . . . 180
Operating faults . . . . . . . . . . . . . . . . . . . . . . . . 180
Rain and light sensor . . . . . . . . . . . . . . . . . . . . . . 109 malfunction . . . . . . . . . . . . . . . . . . . . . . . . . . . . 110
Raising the vehicle . . . . . . . . . . . . . . . . . . . . . . . . . 39 lift platform . . . . . . . . . . . . . . . . . . . . . . . . . . . . 169
Rear headrests . . . . . . . . . . . . . . . . . . . . . . . . . . . . . . 51
Rear backrest folding . . . . . . . . . . . . . . . . . . . . . . . . . . . . . . . . 124
lifting up . . . . . . . . . . . . . . . . . . . . . . . . . . . . . . 124
Rear lid . . . . . . . . . . . . . . . . . . . . . . . . . . . . . . . . . . . 9 emergency locking and unlocking . . . . . . . . . . . 10
see also Luggage compartment . . . . . . . . . . . . 99
Rear seat bench . . . . . . . . . . . . . . . . . . . . . . . . . . 124
Rear view mirrors adjusting the exterior mirrors . . . . . . . . . . . . . 111
Rear vision mirror interior anti-dazzle . . . . . . . . . . . . . . . . . . . . . . 110
Rear windows . . . . . . . . . . . . . . . . . . . . . . . . . . . . 101
Recommended gear . . . . . . . . . . . . . . . . . . . . . . . 146
Recycled . . . . . . . . . . . . . . . . . . . . . . . . . . . . . . . . 180
Refuelling . . . . . . . . . . . . . . . . . . . . . . . . . . . . . . . 181 control and warning lamps . . . . . . . . . . . . . . . 184
fuel gauge . . . . . . . . . . . . . . . . . . . . . . . . . . . . . 184
mistakes . . . . . . . . . . . . . . . . . . . . . . . . . . . . . . 184
natural gas . . . . . . . . . . . . . . . . . . . . . . . . . . . . 186
opening fuel tank flap . . . . . . . . . . . . . . . . . . . 185
Remote control key unlocking and locking . . . . . . . . . . . . . . . . . . . . 95
Repairs . . . . . . . . . . . . . . . . . . . . . . . . . . . . 165, 180 airbag system . . . . . . . . . . . . . . . . . . . . . . . . . . 166
Repair work . . . . . . . . . . . . . . . . . . . . . . . . . . . . . . 164
225