heating Seat Mii 2017 Owner's manual
[x] Cancel search | Manufacturer: SEAT, Model Year: 2017, Model line: Mii, Model: Seat Mii 2017Pages: 232, PDF Size: 4.91 MB
Page 5 of 232
Table of Contents
Table of Contents
The e s
senti
als . . . . . . . . . . . . . . . . . . . . . . . . 5
Exterior view . . . . . . . . . . . . . . . . . . . . . . . . . . . . 5
Exterior view . . . . . . . . . . . . . . . . . . . . . . . . . . . . 6
Interior view (left guide) . . . . . . . . . . . . . . . . . . 7
How it works . . . . . . . . . . . . . . . . . . . . . . . . . . . . 8
Unlocking and locking . . . . . . . . . . . . . . . . . . . . 8
Before driving . . . . . . . . . . . . . . . . . . . . . . . . . . . 12
Airbags . . . . . . . . . . . . . . . . . . . . . . . . . . . . . . . . 14
Child seats . . . . . . . . . . . . . . . . . . . . . . . . . . . . . 16
Starting the vehicle . . . . . . . . . . . . . . . . . . . . . . 20
Lights and visibility . . . . . . . . . . . . . . . . . . . . . . 21
SEAT information system . . . . . . . . . . . . . . . . . . 23
Cruise control . . . . . . . . . . . . . . . . . . . . . . . . . . . 24
Warning lamps . . . . . . . . . . . . . . . . . . . . . . . . . . 25
Gearbox lever . . . . . . . . . . . . . . . . . . . . . . . . . . . 26
Air conditioning . . . . . . . . . . . . . . . . . . . . . . . . . 28
Fluid Level control . . . . . . . . . . . . . . . . . . . . . . . 31
Emergencies . . . . . . . . . . . . . . . . . . . . . . . . . . . . 34
Fuses . . . . . . . . . . . . . . . . . . . . . . . . . . . . . . . . . . 34
Bulbs . . . . . . . . . . . . . . . . . . . . . . . . . . . . . . . . . . 35
Action in the event of a puncture . . . . . . . . . . . 35
Changing a wheel . . . . . . . . . . . . . . . . . . . . . . . 36
Snow chains . . . . . . . . . . . . . . . . . . . . . . . . . . . . 41
Emergency towing of the vehicle . . . . . . . . . . . 42
How to jump start . . . . . . . . . . . . . . . . . . . . . . . . 43
Changing the wiper blades . . . . . . . . . . . . . . . . 45
Safety . . . . . . . . . . . . . . . . . . . . . . . . . . . . . . . . 47
Safe driving . . . . . . . . . . . . . . . . . . . . . . . . . . . . 47
Safety first! . . . . . . . . . . . . . . . . . . . . . . . . . . . . . 47
Driving advice . . . . . . . . . . . . . . . . . . . . . . . . . . . 47
Correct position of the vehicle occupants . . . . 48
Pedal area . . . . . . . . . . . . . . . . . . . . . . . . . . . . . . 51 Seat belts
. . . . . . . . . . . . . . . . . . . . . . . . . . . . . . 52
Why wear a set belt . . . . . . . . . . . . . . . . . . . . . . 52
How to properly adjust your seatbelt . . . . . . . . 56
Seat belt tensioners . . . . . . . . . . . . . . . . . . . . . . 57
Airbag system . . . . . . . . . . . . . . . . . . . . . . . . . . 58
Brief introduction . . . . . . . . . . . . . . . . . . . . . . . . 58
Airbag safety instructions . . . . . . . . . . . . . . . . . 61
Deactivating airbags . . . . . . . . . . . . . . . . . . . . . 62
Transporting children safely . . . . . . . . . . . . . . . 64
Safety for children . . . . . . . . . . . . . . . . . . . . . . . 64
Child seats . . . . . . . . . . . . . . . . . . . . . . . . . . . . . 65
Emergencies . . . . . . . . . . . . . . . . . . . . . . . . . . 70
Self-help . . . . . . . . . . . . . . . . . . . . . . . . . . . . . . . 70
In case of emergency . . . . . . . . . . . . . . . . . . . . . 70
Vehicle tool kit* . . . . . . . . . . . . . . . . . . . . . . . . . 70
Changing a wheel . . . . . . . . . . . . . . . . . . . . . . . 72
Tyre repair . . . . . . . . . . . . . . . . . . . . . . . . . . . . . . 72
Changing the windscreen wiper blades . . . . . . 75
Tow-starting and towing . . . . . . . . . . . . . . . . . . 75
Emergency locking and unlocking . . . . . . . . . . 77
Fuses and bulbs . . . . . . . . . . . . . . . . . . . . . . . . . 78
Fuses . . . . . . . . . . . . . . . . . . . . . . . . . . . . . . . . . . 78
Changing bulbs . . . . . . . . . . . . . . . . . . . . . . . . . 79
Operation . . . . . . . . . . . . . . . . . . . . . . . . . . . . . 87
General instrument panel . . . . . . . . . . . . . . . . . 87
Instrument panel . . . . . . . . . . . . . . . . . . . . . . . . 86
Instruments . . . . . . . . . . . . . . . . . . . . . . . . . . . . 88
Opening and closing . . . . . . . . . . . . . . . . . . . . . 92
Vehicle key set . . . . . . . . . . . . . . . . . . . . . . . . . . 92
Central locking* and locking system . . . . . . . . 94
Doors . . . . . . . . . . . . . . . . . . . . . . . . . . . . . . . . . . 98
Rear lid . . . . . . . . . . . . . . . . . . . . . . . . . . . . . . . . 99
Controls for the windows . . . . . . . . . . . . . . . . . . 101
Sliding/tilting electric panoramic sunroof . . . . 102 Lights and visibility
. . . . . . . . . . . . . . . . . . . . . . 103
Lights . . . . . . . . . . . . . . . . . . . . . . . . . . . . . . . . . 103
Visibility . . . . . . . . . . . . . . . . . . . . . . . . . . . . . . . 108
Windscreen wiper and window wiper sys-
tems . . . . . . . . . . . . . . . . . . . . . . . . . . . . . . . . . . 108
Mirr
or . . . . . . . . . . . . . . . . . . . . . . . . . . . . . . . . . 110
Seats and head restraints . . . . . . . . . . . . . . . . . 112
Adjusting the seat and head restraints . . . . . . 112
Seat functions . . . . . . . . . . . . . . . . . . . . . . . . . . 113
Transport and practical equipment . . . . . . . . . 114
Transporting objects . . . . . . . . . . . . . . . . . . . . . 114
Practical equipment . . . . . . . . . . . . . . . . . . . . . . 115
Luggage compartment . . . . . . . . . . . . . . . . . . . . 123
Roof carrier . . . . . . . . . . . . . . . . . . . . . . . . . . . . . 127
Air conditioning . . . . . . . . . . . . . . . . . . . . . . . . . 129
Heating, ventilation and air conditioning . . . . . 129
Driving . . . . . . . . . . . . . . . . . . . . . . . . . . . . . . . . 133
Stopping and starting the engine . . . . . . . . . . . 133
Braking and parking . . . . . . . . . . . . . . . . . . . . . 135
Changing gear . . . . . . . . . . . . . . . . . . . . . . . . . . 142
Steering . . . . . . . . . . . . . . . . . . . . . . . . . . . . . . . 147
Run-in and economical driving . . . . . . . . . . . . . 148
Engine management and exhaust gas purifica-
tion syst
em . . . . . . . . . . . . . . . . . . . . . . . . . . . . . 151
Driving tips . . . . . . . . . . . . . . . . . . . . . . . . . . . . . 152
Driver assistance systems . . . . . . . . . . . . . . . . . 153
Parking distance warning system* . . . . . . . . . . 153
Cruise control* (Cruise control system -
CCS)
. . . . . . . . . . . . . . . . . . . . . . . . . . . . . . . . . . . 155
Safety Assist* (City Safety Assist function) . . . . 156
Hill driving assistant* . . . . . . . . . . . . . . . . . . . . 160
Start-Stop System . . . . . . . . . . . . . . . . . . . . . . . . 160
Towing bracket device . . . . . . . . . . . . . . . . . . . . 163
Driving with a trailer . . . . . . . . . . . . . . . . . . . . . . 163
3
Page 22 of 232
The essentials
Securing a child seat with the Top
T ether r
et
aining strapFig. 27
Example of an upper retaining strap
c onnect
ed. ●
Observe the manufacturer's instructions
when in s
t
alling and removing the child seat
››› in Safety instructions on page 65.
● Unlock the seat backrest and fold it gently
f or
w
ard ››› page 12.
● Remove the head restraints situated be-
hind the chil
d seat and store them safely in
the vehicle ›››
page 48.
● Guide the upper retaining strap from of the
chil
d seat back to the luggage compartment,
feeding it through the seat backrest and the
rear shelf.
● Fold back the seat backrest and push it
firmly int
o the lock.
● Secure the child seat to the lower anchor
points ››
› page 18 ●
Hook the upper r
etaining strap in the lug-
gage compartment, to the corresponding re-
taining ring ››› Fig. 27.
● Tighten the strap so that the top of the
chil
d seat rests on the seat backrest.
››› in Safety instructions on page 65 Starting the vehicle
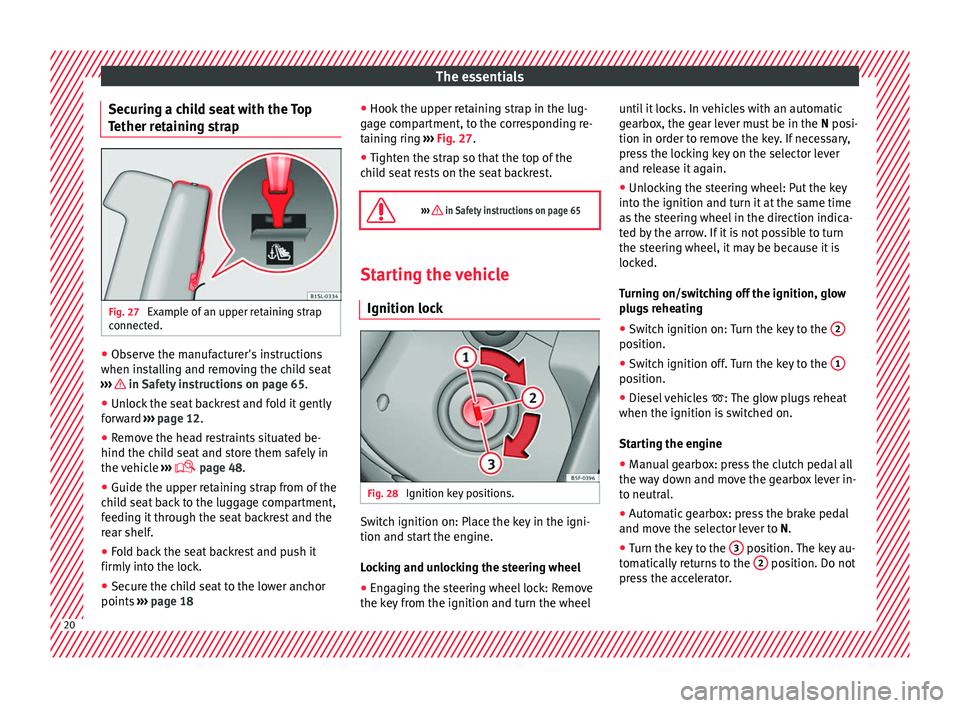
Ignition lock Fig. 28
Ignition key positions. Switch ignition on: Place the key in the igni-
tion and s
t
ar
t the engine.
Locking and unlocking the steering wheel
● Engaging the steering wheel lock: Remove
the key fr
om the ignition and turn the wheel until it locks. In vehicles with an automatic
gearbo
x, the gear lever must be in the N posi-
tion in order to remove the key. If necessary,
press the locking key on the selector lever
and release it again.
● Unlocking the steering wheel: Put the key
into the ignition and turn it
at the same time
as the steering wheel in the direction indica-
ted by the arrow. If it is not possible to turn
the steering wheel, it may be because it is
locked.
Turning on/switching off the ignition, glow
plugs reheating
● Switch ignition on: Turn the key to the 2 position.
●
Switch ignition off. Turn the key to the 1 position.
●
Diesel vehicles : The glo
w p
lugs reheat
when the ignition is switched on.
Starting the engine
● Manual gearbox: press the clutch pedal all
the way
down and move the gearbox lever in-
to neutral.
● Automatic gearbox: press the brake pedal
and move the sel
ector lever to N.
● Turn the key to the 3 position. The key au-
t om
atic
ally returns to the 2 position. Do not
pr e
s
s the accelerator. 20
Page 31 of 232
The essentials
Removing ice from the windscreen
The
››› Fig. 37 button is used to remove ice from the windscreen as quickly as possible and to demist it (defrost/demist function). When the
temperature is above +3°C (+38°F), the air is dehumidified and fan speed increases.
Air recirculation
The
››› Fig. 37 button switches that air recirculation on and off ››› page 130.
Heated rear window
The button, located in the upper part of the centre console, switches the heated rear window on and off when the engine is running. The heated
rear window switches off automatically after 10 minutes at most.
››› in Introduction on page 130
›››
page 129 How does the manual air conditioning and the heating and fresh air system work?
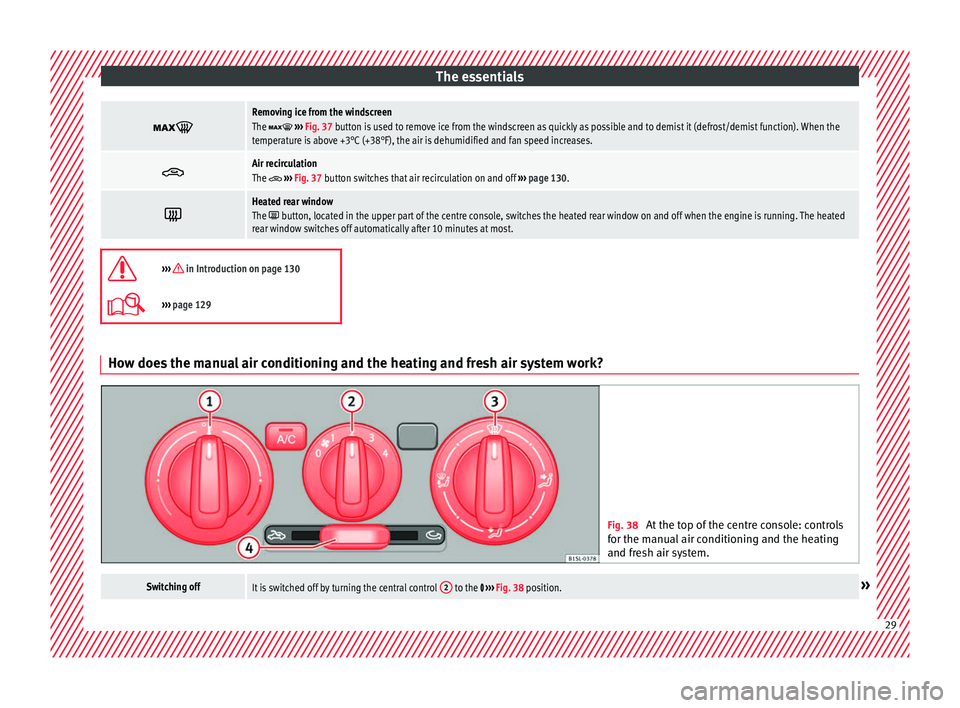
Fig. 38
At the top of the centre console: controls
for the m anual
air conditioning and the heating
and fresh air system.
Switching offIt is switched off by turning the central control 2 to the
››› Fig. 38 position. » 29
Page 76 of 232
Emergencies
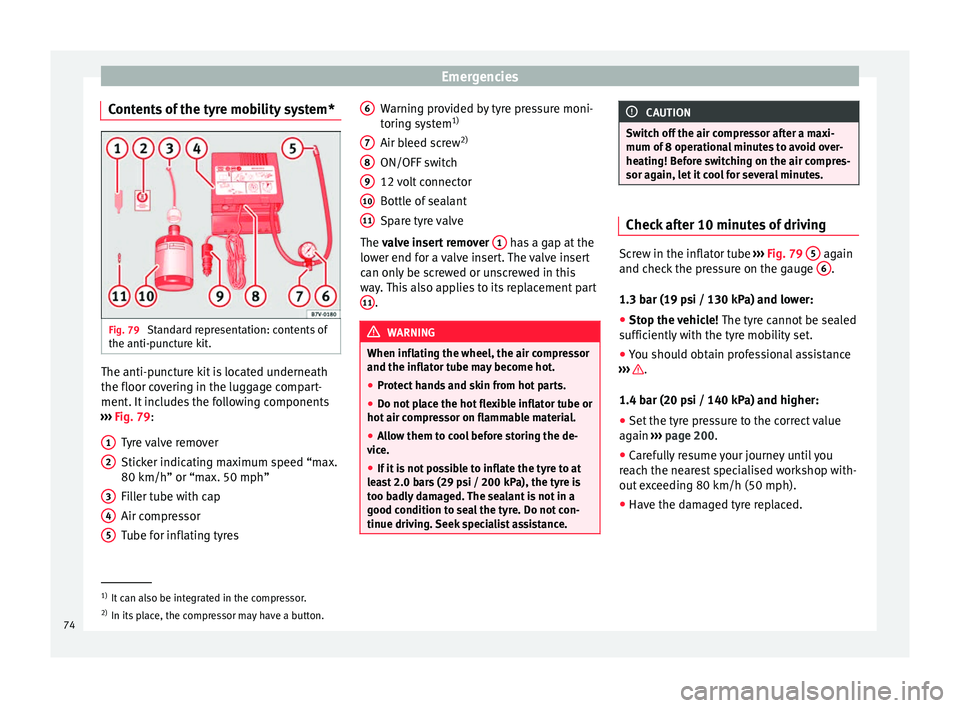
Contents of the tyre mobility system* Fig. 79
Standard representation: contents of
the anti-p u
nct
ure kit. The anti-puncture kit is located underneath
the floor c
o
v
ering in the luggage compart-
ment. It includes the following components
››› Fig. 79:
Tyre valve remover
Sticker indicating maximum speed “max.
80 km/h” or “max. 50 mph”
Filler tube with cap
Air compressor
Tube for inflating tyres
1 2
3
4
5 Warning provided by tyre pressure moni-
t
orin
g sy
stem1)
Air bleed screw 2)
ON/OFF switch
12 volt connector
Bottle of sealant
Spare tyre valve
The valve insert remover 1 has a gap at the
lo w
er end f
or a valve insert. The valve insert
can only be screwed or unscrewed in this
way. This also applies to its replacement part 11 .
WARNING
When inflating the wheel, the air compressor
and the inflat or t
ube may become hot.
● Protect hands and skin from hot parts.
● Do not place the hot flexible inflator tube or
hot air compr
essor on flammable material.
● Allow them to cool before storing the de-
vice.
● If
it is not possible to inflate the tyre to at
lea
st 2.0 bars (29 psi / 200 kPa), the tyre is
too badly damaged. The sealant is not in a
good condition to seal the tyre. Do not con-
tinue driving. Seek specialist assistance. 6
7
8
9
10
11 CAUTION
Switch off the air compressor after a maxi-
mum of 8 oper ation
al minutes to avoid over-
heating! Before switching on the air compres-
sor again, let it cool for several minutes. Check after 10 minutes of driving
Screw in the inflator tube
›››
Fig. 79 5 again
and chec k
the pressure on the gauge 6 .
1.3 bar (19 p s
i / 130 kPa) and lower:
● Stop the vehicle! The tyre c
annot be sealed
sufficiently with the tyre mobility set.
● You should obtain professional assistance
›››
.
1.4 b ar (20 p
s
i / 140 kPa) and higher:
● Set the tyre pressure to the correct value
again ››
› page 200.
● Carefully resume your journey until you
reac
h the nearest specialised workshop with-
out exceeding 80 km/h (50 mph).
● Have the damaged tyre replaced. 1)
It can also be integrated in the compressor.
2) In its place, the compressor may have a button.
74
Page 89 of 232
General instrument panel
Operation
Gener a
l
instrument panel
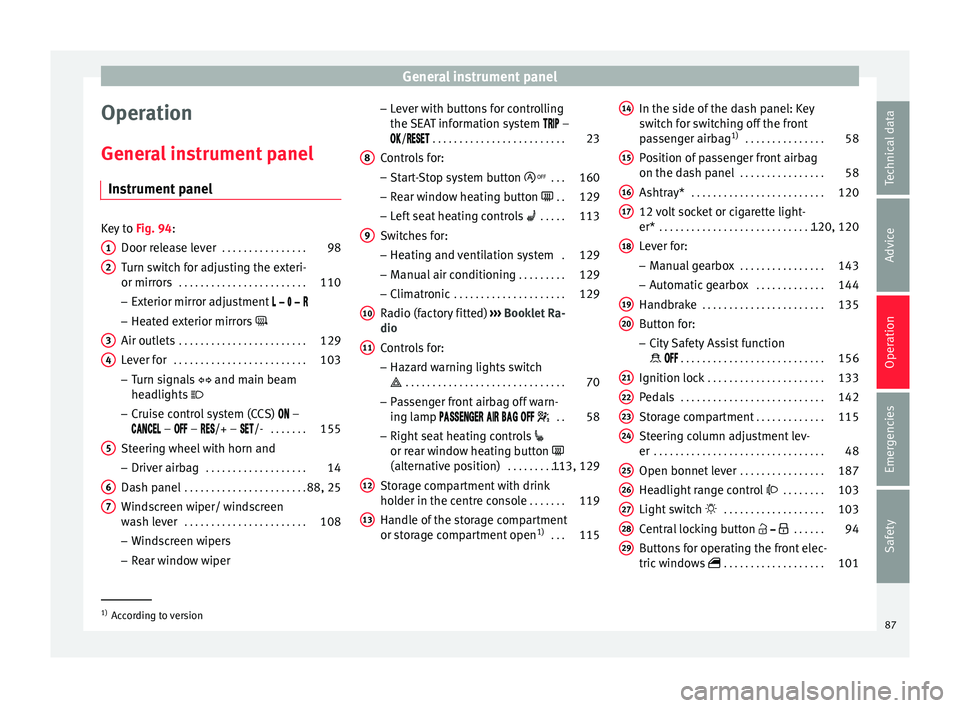
Instrument panel Key to
Fig. 94:
Door rel e
ase lever . . . . . . . . . . . . . . . . 98
Turn switch for adjusting the exteri-
or mirrors . . . . . . . . . . . . . . . . . . . . . . . . 110
– Exterior mirr or a
djustment
– Heated exterior mirrors
Air outlets . . . . . . . . . . . . . . . . . . . . . . . . 129
Lever for . . . . . . . . . . . . . . . . . . . . . . . . . 103
– Turn sign
als and main beam
headlights
– Cruise control system (CCS) –
– – /+ – /- . . . . . . .155
Steering wheel with horn and – Driver airb ag . . . . . . . . . . . . . . . . . . . 14
Da
sh panel . . . . . . . . . . . . . . . . . . . . . . . 88, 25
Windscreen wiper/ windscreen
wash l
ever . . . . . . . . . . . . . . . . . . . . . . . 108
– Wind s
creen wipers
– Rear window wiper
1 2
3
4
5
6
7 –
Lev
er w
ith buttons for controlling
the SEAT information system –
/ . . . . . . . . . . . . . . . . . . . . . . . . . 23
Controls for:
– Start
-Stop system button . . .160
– Rear w
indow heating button . .129
– Left
seat heating controls . . . . . 113
Switches for: – Heating and
ventilation system .129
– Manual air c
onditioning . . . . . . . . . 129
– Clim atr
onic . . . . . . . . . . . . . . . . . . . . . 129
Radio (factory fitted) ›››
Booklet Ra-
dio
Controls for:
– Hazard warning lights switch
. . . . . . . . . . . . . . . . . . . . . . . . . . . . . . 70
– Pa s
senger front airbag off warn-
ing lamp . .58
– Right seat
heating controls
or rear window heating button
(alternative position) . . . . . . . . . . .113, 129
Storage compartment with drink
hol der in the c
entre console . . . . . . .119
Handle of the storage compartment
or stor
age compartment open 1)
. . . 115
8 9
10
11
12
13 In the side of the dash panel: Key
sw
it
c
h for switching off the front
passenger airbag 1)
. . . . . . . . . . . . . . . 58
Position of passenger front airbag
on the dash p
anel . . . . . . . . . . . . . . . . 58
Ashtray* . . . . . . . . . . . . . . . . . . . . . . . . . 120
12 volt socket or cigarette light-
er* . . . . . . . . . . . . . . . . . . . . . . . . . . . . . . . 120, 120
Lever for:
– Manual g
earbox . . . . . . . . . . . . . . . . 143
– Autom atic
gearbox . . . . . . . . . . . . . 144
Handbrake . . . . . . . . . . . . . . . . . . . . . . . 135
Button for:
– City
Safety Assist function
. . . . . . . . . . . . . . . . . . . . . . . . . . . 156
Ignition lock . . . . . . . . . . . . . . . . . . . . . . 133
Pedals . . . . . . . . . . . . . . . . . . . . . . . . . . . 142
Storage compartment . . . . . . . . . . . . .115
Steering column adjustment lev-
er . . . . . . . . . . . . . . . . . . . . . . . . . . . . . . . . 48
Open bonnet lever . . . . . . . . . . . . . . . . 187
Headlight range control . . . . . . . . 103
Light switch . . . . . . . . . . . . . . . . . . . 103
Central locking button . . . . . .94
Buttons for operating the front elec-
tric windo
ws . . . . . . . . . . . . . . . . . . . 101 14
15
16
17
18
19
20
21
22
23
24
25
26
27
28
29
1)
According to version
87
Technical data
Advice
Operation
Emergencies
Safety
Page 104 of 232
Operation
Sliding/tilting electric panor-
amic s
u
nroof
Opening and closing the panoramic
sunroof Read the additional information carefully
›› ›
page 11
The sliding/tilting sunroof only works when
switched on. After switching off, it is still pos-
sible to open or close the sliding/tilting sun-
roof during a short space of time provided
that neither the driver nor passenger door is
opened.
All operations are interrupted when the rotary
knob is actuated.
If it were not possible to close the sliding/tilt-
ing sunroof electrically, it would need to be
closed manually. It is not possible to do an
emergency close of the sliding/tilting sun-
roof without removing components of the ve-
hicle. In such a case, obtain professional as-
sistance.
Sliding blind
With the roof grab handle situated in the rear
part of the roof opening, it is possible to
move the sliding blind to the required posi-
tion. WARNING
If the sliding/tilting electric panoramic sun-
roof i
s used negligently or without paying
due attention, it can cause serious injury.
● The sliding/tilting sunroof should only be
opened or closed when no one i
s blocking its
path.
● After switching off, it is still possible to
open or close the s
liding/tilting sunroof dur-
ing a short space of time provided that nei-
ther the driver nor passenger door is opened. CAUTION
● To pr ev
ent damage, when there are winter
temperatures any ice or snow that there may
be on the roof of the vehicle must be removed
before opening or raising the sliding/tilting
electric panoramic sunroof.
● Before leaving the vehicle or in the case of
heavy r
ain, the sliding/tilting sunroof must
always be closed. With the sliding/tilting
sunroof open or raised, water can enter the
passenger compartment and can cause con-
siderable damage to the electrical system. As
a result, other damage can occur in the vehi-
cle.
● In the case of heavy rain, if the sliding/tilt-
ing su
nroof is open, the interior equipment of
the vehicle may get wet, destroying the seat
heating and damaging the electrical system
of the vehicle. Note
● Le av
es and other loose objects that land in
the guides of the sliding/tilting sunroof
should be removed periodically by hand or
using a vacuum cleaner.
● If the sliding/tilting sunroof does not work
correctly
, the anti-trap function will not work
either. In this case, you should take the vehi-
cle to a specialised workshop.
● The convenience position permits sufficient
ventil
ation with a level of sound produced by
low wind. Anti-trap function of the sliding/tilt-
in
g el
ectric
panoramic sunroof The anti-trap function can reduce the risk of
injur
y
when c
losing the sliding/tilting electric
panoramic sunroof ››› . If the sliding/tilting
s u
nr
oof encounters resistance or an obstacle
when closing, it will immediately reopen.
● Check why the sliding/tilting sunroof has
not clo
sed.
● Try to close it again.
● If it is still not possible to close it due to an
obs
tacle or resistance, it will remain in the
corresponding position. Close it without the
anti-trap function.
102
Page 113 of 232
Lights and visibility
The driver should always adjust the rear vi-
s ion mirr
or t
o permit adequate visibility
through the rear window.
Manual anti-dazzle function for interior rear
vision mirror
● Basic position: point the lever at the bot-
tom of the mirr
or forwards.
● Pull the lever to the back to select the anti-
dazzl
e function ››› Fig. 116.
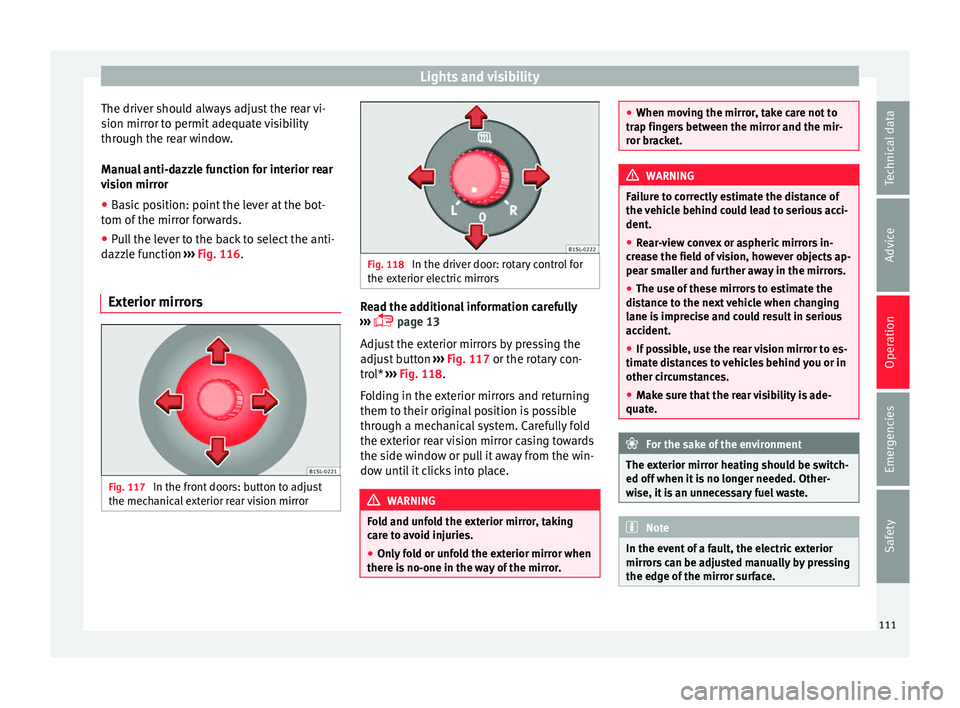
Exterior mirrors Fig. 117
In the front doors: button to adjust
the mec h
anic
al exterior rear vision mirror Fig. 118
In the driver door: rotary control for
the ext erior el
ectric mirrors Read the additional information carefully
› ›
›
page 13
Adjust the exterior mirrors by pressing the
adjust button ››› Fig. 117 or the rotary con-
trol* ››› Fig. 118.
Folding in the exterior mirrors and returning
them to their original position is possible
through a mechanical system. Carefully fold
the exterior rear vision mirror casing towards
the side window or pull it away from the win-
dow until it clicks into place. WARNING
Fold and unfold the exterior mirror, taking
car e t
o avoid injuries.
● Only fold or unfold the exterior mirror when
there is
no-one in the way of the mirror. ●
When mov in
g the mirror, take care not to
trap fingers between the mirror and the mir-
ror bracket. WARNING
Failure to correctly estimate the distance of
the vehic
le behind could lead to serious acci-
dent.
● Rear-view convex or aspheric mirrors in-
cre
ase the field of vision, however objects ap-
pear smaller and further away in the mirrors.
● The use of these mirrors to estimate the
dist
ance to the next vehicle when changing
lane is imprecise and could result in serious
accident.
● If possible, use the rear vision mirror to es-
timate di
stances to vehicles behind you or in
other circumstances.
● Make sure that the rear visibility is ade-
quate. For the sake of the environment
The exterior mirror heating should be switch-
ed off when it i
s no longer needed. Other-
wise, it is an unnecessary fuel waste. Note
In the event of a fault, the electric exterior
mirror s
can be adjusted manually by pressing
the edge of the mirror surface. 111
Technical data
Advice
Operation
Emergencies
Safety
Page 115 of 232
Seats and head restraints
Seat functions Se at
he
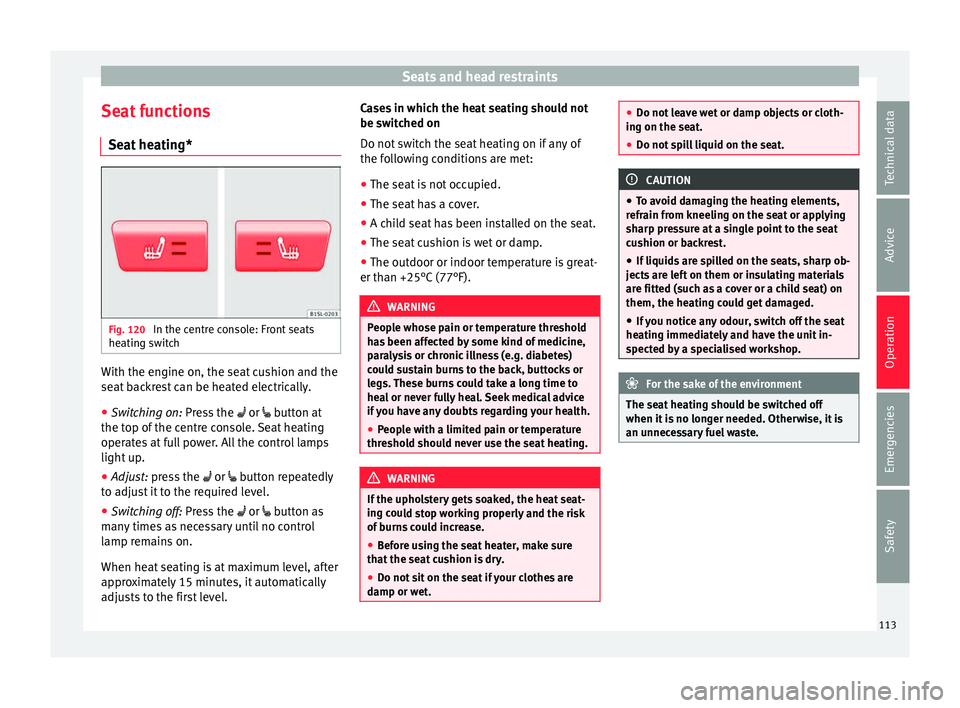
ating* Fig. 120
In the centre console: Front seats
he atin
g sw
itch With the engine on, the seat cushion and the
se
at
b
ackrest can be heated electrically.
● Switching on: Pres
s the or button at
the top of the centre console. Seat heating
operates at full power. All the control lamps
light up.
● Adjust: press the or butt
on repeatedly
to adjust it to the required level.
● Switching off: Pres
s the or button as
many times as necessary until no control
lamp remains on.
When heat seating is at maximum level, after
approximately 15 minutes, it automatically
adjusts to the first level. Cases in which the heat seating should not
be switc
hed on
Do not switch the seat heating on if any of
the following conditions are met:
● The seat is not occupied.
● The seat has a cover.
● A child seat has been installed on the seat.
● The seat cushion is wet or damp.
● The outdoor or indoor temperature is great-
er than +25°C (77°F). WARNING
People whose pain or temperature threshold
ha s
been affected by some kind of medicine,
paralysis or chronic illness (e.g. diabetes)
could sustain burns to the back, buttocks or
legs. These burns could take a long time to
heal or never fully heal. Seek medical advice
if you have any doubts regarding your health.
● People with a limited pain or temperature
thresho
ld should never use the seat heating. WARNING
If the upholstery gets soaked, the heat seat-
ing c ou
ld stop working properly and the risk
of burns could increase.
● Before using the seat heater, make sure
that the se
at cushion is dry.
● Do not sit on the seat if your clothes are
damp or wet
. ●
Do not l e
ave wet or damp objects or cloth-
ing on the seat.
● Do not spill liquid on the seat. CAUTION
● To av oid d
amaging the heating elements,
refrain from kneeling on the seat or applying
sharp pressure at a single point to the seat
cushion or backrest.
● If liquids are spilled on the seats, sharp ob-
jects
are left on them or insulating materials
are fitted (such as a cover or a child seat) on
them, the heating could get damaged.
● If you notice any odour, switch off the seat
heating immedi
ately and have the unit in-
spected by a specialised workshop. For the sake of the environment
The seat heating should be switched off
when it i s
no longer needed. Otherwise, it is
an unnecessary fuel waste. 113
Technical data
Advice
Operation
Emergencies
Safety
Page 116 of 232
Operation
Transport and practical
equipment T r
an
sporting objects
Introduction Always transport heavy loads in the luggage
comp
ar
tment and place the seat backs in a
vertical position. Never overload the vehicle.
Both the carrying capacity as well as the dis-
tribution of the load in the vehicle affect driv-
ing behaviour and braking ability ››› .
WARNING
Unsecured or incorrectly secured objects can
cau se seriou
s injury in case of a sudden ma-
noeuvring or breaking or in case of an acci-
dent. This is especially true when objects are
struck by a detonating airbag and fired
through the vehicle interior. To reduce the
risks, please note the following:
● Secure all objects in the vehicle. Always
keep equipment and he
avy objects in the lug-
gage compartment.
● Always secure objects with suitable rope or
sling
s so that they cannot enter the deploy-
ment areas around the frontal or side airbags
in case of sudden braking or an accident.
● Always ensure that objects inside the vehi-
cle c
annot move into the deployment area of
the bags while driving. ●
Whil e driv
ing, always keep object compart-
ments closed.
● Remove all objects from the front passen-
ger seat
when it is folded down. When the
seat backrest is folded down, it presses on
small and light objects and these are detec-
ted by the weight sensor on the seat; this
sends false information to the airbag control
unit.
● While the backrest of the front passenger
seat i
s folded, the frontal airbag must remain
disconnected and the PASSENGER AIRBAG
OFF light on.
● Objects secured in the vehicle should never
be plac
ed in such a way as to make passen-
gers sit in an incorrect position.
● If secured objects occupy a seat, this seat
should not
be occupied or used by anyone. WARNING
The driving behaviour and braking ability
ch an
ge when transporting heavy and large
objects.
● Adjust your speed and driving style to visi-
bility
, road, traffic and weather conditions.
● Accelerate gently and carefully.
● Avoid sudden braking and manoeuvres.
● Brake early. Transporting the load
Secure all objects in the vehicle
● Distribute the load throughout the vehicle
and on the roof a
s uniformly as possible.
● Transport heavy objects as far forward as
poss
ible in the luggage compartment and
lock the seat backs in the vertical position.
● Check the headlight adjustment
›››
page 103.
● Use the suitable tyre pressure according to
the load bein
g transported. Read the tyre in-
flation information label ›››
page 200. CAUTION
Objects on the shelf could chafe against the
wir e
s of the heating element in the heated
rear window and cause damage. Note
Please refer to the notes on loading the roof
carrier ››
› page 127. Driving with the rear lid open
Driving with the rear lid open creates an addi-
tion
al
ri
sk. Secure all objects and secure the
rear lid correctly and take all measures possi-
ble to reduce toxic gases from entering the
vehicle.
114
Page 118 of 232
Operation
●
Mak e s
ure the pedals can be used at all
times, with no objects rolling underneath
them.
● The floor mat should always be secured to
the floor.
● Never p
lace other mats or rugs on top of
the original
mat supplied by the factory.
● Make sure that no objects can fall into the
driver's f
ootwell while the vehicle is in mo-
tion. CAUTION
● Obj
ects on the shelf could chafe against
the wires of the heating element in the heat-
ed rear window and cause damage.
● Do not keep temperature-sensitive objects,
food or medicine
s inside the vehicle. Heat
and cold could damage them or render them
useless.
● Light-transparent objects placed inside the
vehicl
e, such as lenses, magnifying glasses
or transparent suction caps on the windows,
may concentrate the sun's rays and cause
damage to the vehicle. Note
The ventilating slits between the heated rear
windo w and the r
ear shelf must not be cov-
ered so that used air can escape from the ve-
hicle. Storage compartment on the driver
s
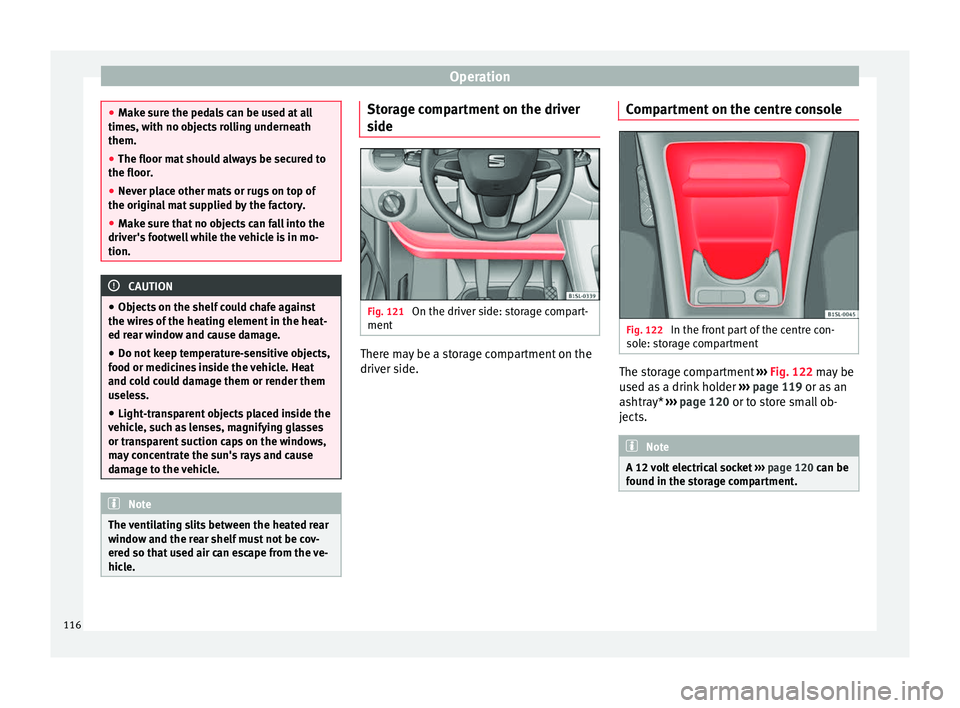
ide Fig. 121
On the driver side: storage compart-
ment There may be a storage compartment on the
driv
er s
ide. C
ompartment on the centre console Fig. 122
In the front part of the centre con-
so l
e: s
torage compartment The storage compartment
››
›
Fig. 122 may be
used as a drink holder ››› page 119 or as an
ashtray* ››› page 120 or to store small ob-
jects. Note
A 12 volt electrical socket ›››
page 120 can be
found in the storage compartment. 116