service indicator Seat Mii 2017 Owner's manual
[x] Cancel search | Manufacturer: SEAT, Model Year: 2017, Model line: Mii, Model: Seat Mii 2017Pages: 232, PDF Size: 4.91 MB
Page 91 of 232
General instrument panel
bottom buttons of the rocker
sw it
c
h ›››
Fig. 33
B .
– Pr e
s
s the button to change the
hour, so that it is flashing.
– To continue setting the time,
press button 0.0/SET . Hold button
do wn t
o s
croll through the num-
bers quickly.
– Press the button again to
change the minutes, so that it
flashes.
– To continue setting the time,
press button 0.0/SET . Hold button
do wn t
o s
croll through the num-
bers quickly.
– Press the button again to end
the clock setting. CAUTION
● When the engine i s
cold, avoid high revs
and heavy acceleration and do not make the
engine work hard.
● To prevent damage to the engine, the rev
count
er needle should only remain in the red
zone for a short period of time. For the sake of the environment
Changing up a gear in time reduces fuel con-
sumption and noi se. Indications on the display
A variety of information can be viewed on the
ins
trument
panel display ››› Fig. 95 2 , de-
pending on the v
ehicle equipment:
● Warning and information messages.
● Odometer.
● Time.
● Outside temperature.
● Selector lever positions ›››
page 142.
● Recommended gear (manual gearbox)
›› ›
page 142.
● Multifunction display (MFI) ›››
page 23
● Service interval display ›››
page 90 .
● Start-Stop system status display
›››
page 160.
● Fuel gauge ›››
page 183.
● Seat belt status display for rear seats
›››
page 52.
Warning and information messages
The system runs a check on certain compo-
nents and functions when the ignition is
switched on and while the vehicle is moving.
Faults in the operation are displayed on the
screen using red and yellow symbols on the
instrument panel display ( ›››
page 25)
and, in some cases, with audible warnings.
The display may vary according to the type of
instrument panel fitted.
Priority 1 warning (red symbols)
Symbol flashing or lit; partly combined with audible
warnings.
Stop the vehicle! It is dangerous ››› !
Check the function that is faulty and repair it. If necessa-
ry, request assistance from specialised personnel.
Priority 2 warning (yellow symbols)
Symbol flashing or lit; partly combined with audible
warnings.
A faulty function, or fluids which are below the correct
levels may cause damage to the vehicle! ›››
Check the faulty function as soon as possible. If neces-
sary, request assistance from specialised personnel. Odometer
The odomet
er
r
egisters the total distance
travelled by the car.
The odometer (trip ) shows the distance
travelled since the last odometer reset. The
last figure indicates 100 m.
Outside temperature indicator!
When the outside temperature is below +4°C
(+39°F), the “ice crystal” symbol (warning of
risk of freezing) is also displayed next to the
temperature. At first this symbol flashes and
then it remains lit until the outside tempera-
ture rises above +6°C (+43°F) ››› .
When the v
ehic
le is stationary or travelling at
very low speeds, the temperature displayed
may be slightly higher than the actual »
89
Technical data
Advice
Operation
Emergencies
Safety
Page 191 of 232
Checking and refilling levels
●
To av oid d
amage to the bonnet and to the
windscreen wiper arms, only open it when
the windscreen wipers are in place against
the windscreen.
● Before driving, always lower the wiper
arms. For the sake of the environment
Service fluids leaks are harmful to the envi-
r onment . F
or this reason you should make
regular checks on the ground underneath
your vehicle. Take the vehicle to a specialised
workshop to be checked if you see stains, oil
or other fluids on the ground. Collect any
spilt service fluids and allow a professional to
dispose of them. Engine oil
Intr oduction WARNING
Incorrectly handling engine oil can cause in-
jury and seriou
s burns.
● Always protect your eyes when handling
engine oil
.
● Oil is toxic and must be kept out of the
reac
h of children. ●
Engine oi l
should only be kept in its origi-
nal packaging; the same goes for used oil un-
til it is disposed of.
● Never store engine oil in empty food con-
tainers
or bottles as other people may acci-
dentally drink it.
● Regular contact with engine oil can be bad
for the skin. If
you come into contact with en-
gine oil, wash your skin with soap and water.
● With the engine running, the engine oil
gets
extremely hot and can cause severe skin
burns. Always wait until the engine has fully
cooled. For the sake of the environment
Similar to the other service liquids, spilled
engine oi l
can be bad for the environment.
Collect these liquids in suitable containers
and dispose of them while respecting the en-
vironment. Warning and control lamps
Flashes
Engine oil pres-
sure too low.
Stop the vehicle!
Switch off the engine. Check the
engine oil level, and if necessary,
refill with ››› page 190.
engine oil - If the warning indicator
flashes although the oil level is cor-
rect, do not continue driving or
leave the engine running. Other-
wise, the engine could be dam-
aged. Seek specialist assistance. WARNING
Observe the safety warnings ›››
in On the
ins trument
panel on page 26. Engine oil specifications
Read the additional information carefully
› ›
›
page 31
Replacement engine oil must strictly comply
with the specifications.
The correct oil must be used to ensure the
correct operation and long service life of the
engine. The engine comes with a high-quality
multigrade oil that can generally be used all
year round.
Only use an engine oil that complies to SEAT
standards whenever possible ››› . Only refill
»
189
Technical data
Advice
Operation
Emergencies
Safety
Page 200 of 232
Advice
Checking the battery electrolyte level
● Make sure there is sufficient lighting to
c l
e
arly recognise the colours. Never use
flames or shiny objects as a light source.
● Depending on the level of acid, the Magic
eye on the top of
the battery will change col-
our.
Colour indica-
torNecessary operations
Light yellow or
colourlessThe electrolyte level of the vehicle's
battery is too low. Have the battery
checked and, where applicable, re-
placed by a specialised workshop.
BlackThe electrolyte level of the vehicle's
battery is correct. WARNING
Working with the vehicle battery involves a
risk of
corrosion, explosions and electric
shock.
● Never tilt the vehicle battery. Battery acid
coul
d spill out of the openings for the release
of gases and cause corrosion damage.
● Never open the vehicle battery.
● If battery acid splashes on you, immediate-
ly rinse
your eyes and skin abundantly with
water for several minutes. Then seek medical
care immediately.
● If acid is swallowed by mistake, consult a
doctor immediat
ely. Charging, replacing and connecting or
di
s
c
onnecting the battery Charging the battery
The v
ehic
le battery should be charged by a
specialised workshop only, as batteries us-
ing special technology have been installed
and they must be charged in a controlled en-
vironment ››› . SEAT recommends taking
your c ar in f
or technical service.
Replacing a vehicle battery
The battery has been developed to suit the
conditions of its location and has special
safety features. If the battery must be re-
placed, consult a technical service for infor-
mation on electromagnetic compatibility, the
size and maintenance, performance and
safety requirements of the new battery in
your vehicle before you purchase one. SEAT
recommends you have the battery replaced
by a technical service.
Use only maintenance-free genuine batteries
conforming to TL 825 06 and VW 7 50 73
Standards. These standards must be dated
April 2008 or later.
Vehicles fitted with the Start-Stop system are
equipped with a special battery. Therefore,
this battery must only be replaced by another
with the same specifications. Disconnecting the vehicle's battery
If
y
ou must disconnect the battery from the
electrical system, please note the following:
● Switch off the ignition and all electrical
equipment.
● The v
ehicle must be unlocked before dis-
connecting the b
attery, otherwise the alarm
will be triggered.
● First disconnect the negative cable and
then the positiv
e ››› .
C onnectin
g the
vehicle's battery
● Before reconnecting the battery, switch off
the engine and all
electrical devices.
● First reconnect the positive cable and then
the negativ
e ››› .
Diff er
ent
control lamps may light up after
connecting the battery and switching the ig-
nition on. They will be turned off after a short
trip at a speed of between 15-20 km/h
(10-12 mph). If the warning indicators remain
lit, please visit a specialised workshop to
have the vehicle checked.
If the battery has been disconnected for a
long time, it is possible that the next service
date is not displayed or calculated correctly
››› page 88. Respect the maximum service in-
tervals permitted ››› Booklet Maintenance
Programme.
198
Page 206 of 232
Advice
››› Fig. 174 i s
loc ated on the driver's door pil-
lar.
Under-inflation or over-inflation will reduce
the life of the tyres considerably and also im-
pair the car's handling ››› . It is essential to
m aint
ain the c
orrect tyre pressures, especial-
ly if driving at high speeds. Incorrect tyre
pressure causes premature wear and could
cause tyre blow-out.
The pressure should therefore be checked at
least once a month and before starting a
journey.
As a general rule, the pressures given are for
cold tyres. When the tyres are hot, the pres-
sures are greater.
Never deflate a hot tyre in order to obtain the
required pressure. This could result in very
low tyre pressures which may lead to sudden
blow-outs.
Tyre pressure monitoring system
Check tyre pressures only when the vehicle
has not been driven for more than a few kilo-
metres at low speeds in the past three hours.
● The tyre pressures should be checked regu-
larly, and on
ly when the tyres are cold. Al-
ways check all tyres, including the spare
wheel. Tyre pressures should be checked
more often in colder regions, and only when
the vehicle has not been driven recently. Al-
ways use a correctly-operating tyre gauge. ●
Adjust
tyre pressures to the loads carried in
the vehicle.
● After adjusting the tyre pressure, check that
the caps
are properly screwed on.
The spare wheel or temporary spare wheel
must always be kept at the maximum pres-
sure stipulated. WARNING
If tyre pressures are too high or too low, the
tyr e m
ay deflate or burst suddenly while driv-
ing. This could result in a serious accident.
● If the tyre pressure is too low, they could
overhe
at, resulting in tread detachment or
even burst tyres.
● When driving at high speeds and/or fully
loaded, the ty
re could suddenly overheat,
burst or be subject to tread detachment, with
the resultant loss of control of the vehicle.
● Tyre pressures which are too high or too
low reduc
e the service life of the tyre, affect-
ing the vehicle's performance.
● Tyre pressures should be checked regularly,
at le
ast once a month and before long jour-
neys.
● Adjust the pressures of all the tyres to the
vehicl
e load.
● Never deflate excess pressure from hot
tyre
s. CAUTION
● Tak e c
are not to tilt the manometer when
placing it on the valve. Otherwise, the valve
may be damaged.
● If tyre valves are not protected by caps, or if
the caps
are not screwed on correctly, they
may become damaged. Check that the caps
are identical to the standard caps and have
been correctly tightened. For the sake of the environment
Under-inflated tyres will increase fuel con-
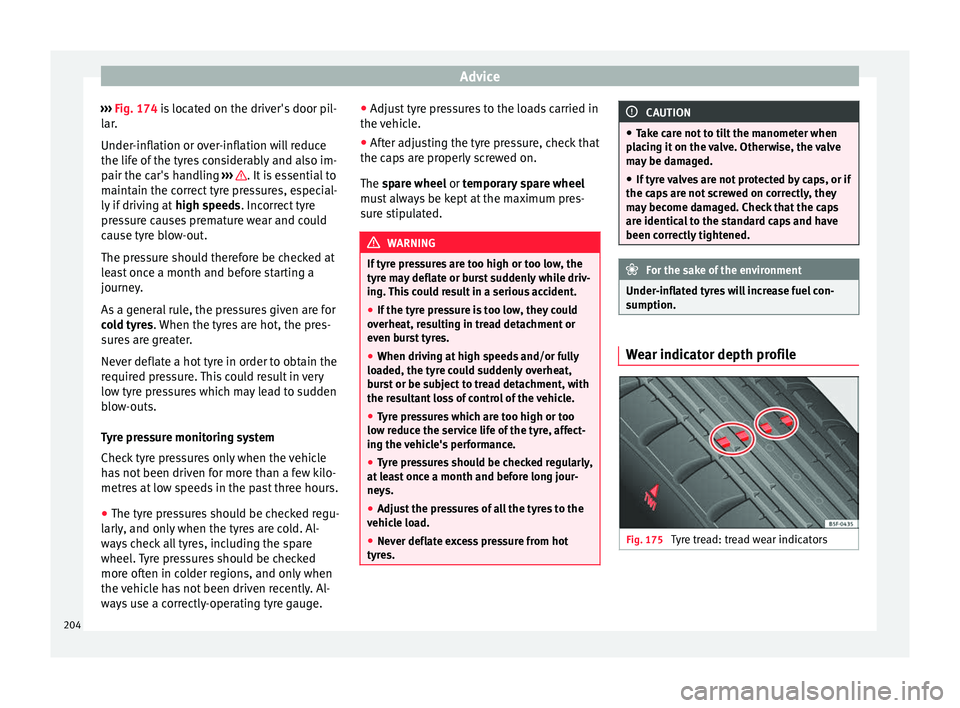
sumption. Wear indicator depth profile
Fig. 175
Tyre tread: tread wear indicators204
Page 211 of 232
Wheels and tyresTyre code (example): Meaning
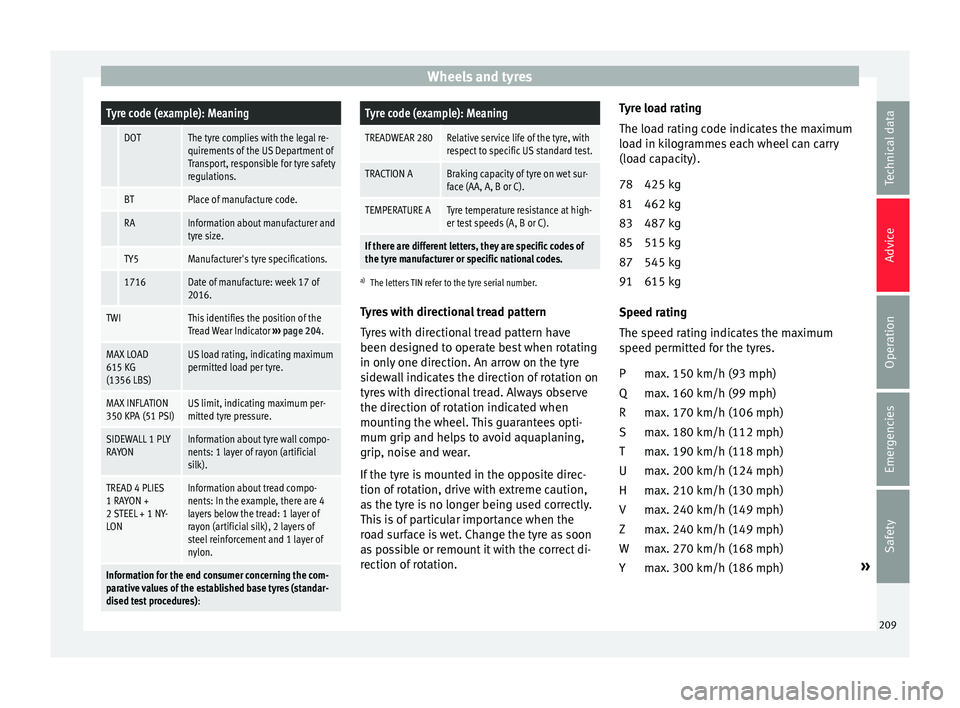
DOTThe tyre complies with the legal re-
quirements of the US Department of
Transport, responsible for tyre safety
regulations.
BTPlace of manufacture code.
RAInformation about manufacturer and
tyre size.
TY5Manufacturer's tyre specifications.
1716Date of manufacture: week 17 of
2016.
TWIThis identifies the position of the
Tread Wear Indicator
››› page 204.
MAX LOAD
615 KG
(1356 LBS)US load rating, indicating maximum
permitted load per tyre.
MAX INFLATION
350 KPA (51 PSI)US limit, indicating maximum per-
mitted tyre pressure.
SIDEWALL 1 PLY
RAYONInformation about tyre wall compo-
nents: 1 layer of rayon (artificial
silk).
TREAD 4 PLIES
1 RAYON +
2 STEEL + 1 NY-
LONInformation about tread compo-
nents: In the example, there are 4
layers below the tread: 1 layer of
rayon (artificial silk), 2 layers of
steel reinforcement and 1 layer of
nylon.
Information for the end consumer concerning the com-
parative values of the established base tyres (standar-
dised test procedures) :
Tyre code (example): Meaning
TREADWEAR 280Relative service life of the tyre, with
respect to specific US standard test.
TRACTION ABraking capacity of tyre on wet sur-
face (AA, A, B or C).
TEMPERATURE ATyre temperature resistance at high-
er test speeds (A, B or C).
If there are different letters, they are specific codes of
the tyre manufacturer or specific national codes.
a)
The letters TIN refer to the tyre serial number.
Tyres with directional tread pattern
Tyres with directional tread pattern have
been designed to operate best when rotating
in only one direction. An arrow on the tyre
sidewall indicates the direction of rotation on
tyres with directional tread. Always observe
the direction of rotation indicated when
mounting the wheel. This guarantees opti-
mum grip and helps to avoid aquaplaning,
grip, noise and wear.
If the tyre is mounted in the opposite direc-
tion of rotation, drive with extreme caution,
as the tyre is no longer being used correctly.
This is of particular importance when the
road surface is wet. Change the tyre as soon
as possible or remount it with the correct di-
rection of rotation. Tyre load rating
The load r
ating code indicates the maximum
load in kilogrammes each wheel can carry
(load capacity).
425 kg
462 kg
487 kg
515 kg
545 kg
615 kg
Speed rating
The speed rating indicates the maximum
speed permitted for the tyres. max. 150 km/h (93 mph)
max. 160 km/h (99 mph)
max. 170 km/h (106 mph)
max. 180 km/h (112 mph)
max. 190 km/h (118 mph)
max. 200 km/h (124 mph)
max. 210 km/h (130 mph)
max. 240 km/h (149 mph)
max. 240 km/h (149 mph)
max. 270 km/h (168 mph)
max. 300 km/h (186 mph) »
78
81
83
85
87
91
P
Q
R
S
T
U
H
V
Z
W
Y
209
Technical data
Advice
Operation
Emergencies
Safety
Page 230 of 232
Index
V
V alv
e c
aps . . . . . . . . . . . . . . . . . . . . . . . . . . . . . . . 204
Vanity mirror . . . . . . . . . . . . . . . . . . . . . . . . . . . . . 108
Vehicle chassis number . . . . . . . . . . . . . . . . . . . . . . . . 211
data label . . . . . . . . . . . . . . . . . . . . . . . . . . . . . 211
identification data . . . . . . . . . . . . . . . . . . . . . . 211
identification number . . . . . . . . . . . . . . . . . . . . 211
loading . . . . . . . . . . . . . . . . . . . . . . . . . . . . . . . 114
raising . . . . . . . . . . . . . . . . . . . . . . . . . . . . . . . . . 39
recycling . . . . . . . . . . . . . . . . . . . . . . . . . . . . . . 180
Vehicle battery . . . . . . . . . . . . . . . . . . . . . . . 33, 196 acid . . . . . . . . . . . . . . . . . . . . . . . . . . . . . . . . . . 198
assisted starting . . . . . . . . . . . . . . . . . . . . . . . . . 43
automatic device disconnection . . . . . . . . . . . 199
charging . . . . . . . . . . . . . . . . . . . . . . . . . . . . . . 198
checking the battery electrolyte level . . . . . . . 197
connecting . . . . . . . . . . . . . . . . . . . . . . . . . . . . 198
control and warning lamps . . . . . . . . . . . . . . . 197
discharging . . . . . . . . . . . . . . . . . . . . . . . . . . . . 134
disconnecting . . . . . . . . . . . . . . . . . . . . . . . . . . 198
preparations . . . . . . . . . . . . . . . . . . . . . . . . . . . 197
replacing . . . . . . . . . . . . . . . . . . . . . . . . . . . . . . 198
running flat . . . . . . . . . . . . . . . . . . . . . . . . . . . . 199
Vehicle care . . . . . . . . . . . . . . . . . . . . . . . . . . . . . 170 airbag modules (dash panel) . . . . . . . . . . . . . 178
aluminium wheel rims . . . . . . . . . . . . . . . . . . . 174
anodized surfaces . . . . . . . . . . . . . . . . . . . . . . 174
antenna incorporated in window . . . . . . . . . . . 180
chrome wheel rims . . . . . . . . . . . . . . . . . . . . . . 174
cleaning wheels . . . . . . . . . . . . . . . . . . . . . . . . 174
dash panel . . . . . . . . . . . . . . . . . . . . . . . . . . . . 178
de-icing the door lock cylinder . . . . . . . . . . . . 175
engine compartment . . . . . . . . . . . . . . . . . . . . 175
exterior mirrors . . . . . . . . . . . . . . . . . . . . . . . . . 172
interior . . . . . . . . . . . . . . . . . . . . . . . . . . . . . . . . 176
plastic parts . . . . . . . . . . . . . . . . . . . . . . . . . . . 178 protection of vehicle undercarriage . . . . . . . . 175
rubber seals
. . . . . . . . . . . . . . . . . . . . . . . . . . . 174
vehicle paintwork . . . . . . . . . . . . . . . . . . . . . . . 173
windows . . . . . . . . . . . . . . . . . . . . . . . . . . . . . . 172
wooden trim . . . . . . . . . . . . . . . . . . . . . . . . . . . 178
Vehicle care products . . . . . . . . . . . . . . . . . . . . . . 170
Vehicle code vehicle data label . . . . . . . . . . . . . . . . . . . . . . . 211
Vehicle key set . . . . . . . . . . . . . . . . . . . . . . . . . . . . 92
Vehicle tool kit . . . . . . . . . . . . . . . . . . . . . . . . . 36, 70 components . . . . . . . . . . . . . . . . . . . . . . . . . . . . 71
location . . . . . . . . . . . . . . . . . . . . . . . . . . . . . . . . 71
Vibrations steering . . . . . . . . . . . . . . . . . . . . . . . . . . . . . . . 205
W
Warning lamps . . . . . . . . . . . . . . . . . . . . . . . . . . . . 25
Warning triangle . . . . . . . . . . . . . . . . . . . . . . 70, 106
Washing the vehicle . . . . . . . . . . . . . . . . . . . . . . . 171 sensors . . . . . . . . . . . . . . . . . . . . . . . . . . . . . . . 154
Water box . . . . . . . . . . . . . . . . . . . . . . . . . . . . . . . 175
Wax . . . . . . . . . . . . . . . . . . . . . . . . . . . . . . . . . . . . 173
Wear indicators . . . . . . . . . . . . . . . . . . . . . . . . . . 205
Weights . . . . . . . . . . . . . . . . . . . . . . . . . . . . . . . . . 212
What negatively affects driving safety? . . . . . . . . 47
Wheel bolts . . . . . . . . . . . . . . . . . . . . . . . . . . 72, 213 anti-theft . . . . . . . . . . . . . . . . . . . . . . . . . . . . . . . 72
caps . . . . . . . . . . . . . . . . . . . . . . . . . . . . . . . . . . . 37
loosening . . . . . . . . . . . . . . . . . . . . . . . . . . . . . . 38
Tightening torque . . . . . . . . . . . . . . . . . . . . . . . . 38
Wheel load capacity . . . . . . . . . . . . . . . . . . . . . . . 208
Wheel rims beadlock . . . . . . . . . . . . . . . . . . . . . . . . . . . . . . 202
bolted trims . . . . . . . . . . . . . . . . . . . . . . . . . . . 202
Wheels . . . . . . . . . . . . . . . . . . . . . . . . 200, 202, 212 changing . . . . . . . . . . . . . . . . . . . . . . . . . . . . 36, 40
changing a wheel . . . . . . . . . . . . . . . . . . . . . . . . 72 hubcaps . . . . . . . . . . . . . . . . . . . . . . . . . . . . . . . 37
spar
e wheel or temporary spare wheel . . . . . . 207
storing the replaced wheel . . . . . . . . . . . . . . . 207
Wheel trim hubcaps . . . . . . . . . . . . . . . . . . . . . . . . . . . . . . . 37
remove . . . . . . . . . . . . . . . . . . . . . . . . . . . . . . . . 37
Wheel trims Full hub caps . . . . . . . . . . . . . . . . . . . . . . . . . . . . 37
Windows . . . . . . . . . . . . . . . . . . . . . . . . . . . . . . . . 101 electric . . . . . . . . . . . . . . . . . . . . . . . . . . . . . . . . . 11
removing ice . . . . . . . . . . . . . . . . . . . . . . . . . . . 172
Window wiper . . . . . . . . . . . . . . . . . . . . . . . . . . . . 108 window wiper lever . . . . . . . . . . . . . . . . . . . . . . 108
Window wiper blade . . . . . . . . . . . . . . . . . . . . . . . . 22
Windscreen heat-insulating glass . . . . . . . . . . . . . . . . . . . . 108
infrared coating . . . . . . . . . . . . . . . . . . . . . . . . 108
removing ice . . . . . . . . . . . . . . . . . . . . . . . . . 29, 30
Windscreen and rear window wiper blades . . . . . 75
Windscreen washer . . . . . . . . . . . . . . . . . . . 33, 108 rain and light sensor . . . . . . . . . . . . . . . . . . . . 109
Windscreen washer water checking . . . . . . . . . . . . . . . . . . . . . . . . . . . . . . 195
topping up . . . . . . . . . . . . . . . . . . . . . . . . . . . . 195
Windscreen wipers . . . . . . . . . . . . . . . . . . . . 22, 108 functions . . . . . . . . . . . . . . . . . . . . . . . . . . . . . . 109
heated windscreen washer jets . . . . . . . . . . . . 109
lifting the wiper blade . . . . . . . . . . . . . . . . . . . . 45
replacing the wiper blade . . . . . . . . . . . . . . . . . 45
service position . . . . . . . . . . . . . . . . . . . . . . . . . 45
Windscreen wipers service position . . . . . . . . . . . 45
228