warning light Seat Toledo 2016 Owner's manual
[x] Cancel search | Manufacturer: SEAT, Model Year: 2016, Model line: Toledo, Model: Seat Toledo 2016Pages: 248, PDF Size: 5.82 MB
Page 5 of 248
Table of Contents
Table of Contents
The e s
senti
als . . . . . . . . . . . . . . . . . . . . . . . . 5
Exterior view . . . . . . . . . . . . . . . . . . . . . . . . . . . . 5
Exterior view . . . . . . . . . . . . . . . . . . . . . . . . . . . . 6
Interior view (left-hand drive) . . . . . . . . . . . . . . 7
Interior view (right-hand drive) . . . . . . . . . . . . . 8
How it works . . . . . . . . . . . . . . . . . . . . . . . . . . . . 9
Unlocking and locking . . . . . . . . . . . . . . . . . . . . 9
Before driving . . . . . . . . . . . . . . . . . . . . . . . . . . . 11
Airbags . . . . . . . . . . . . . . . . . . . . . . . . . . . . . . . . 14
Child seats . . . . . . . . . . . . . . . . . . . . . . . . . . . . . 16
Starting the vehicle . . . . . . . . . . . . . . . . . . . . . . 18
Lights and visibility . . . . . . . . . . . . . . . . . . . . . . 18
Easy Connect . . . . . . . . . . . . . . . . . . . . . . . . . . . 21
Driver information system . . . . . . . . . . . . . . . . . 23
Driving data . . . . . . . . . . . . . . . . . . . . . . . . . . . . 26
Cruise control . . . . . . . . . . . . . . . . . . . . . . . . . . . 31
Warning lamps . . . . . . . . . . . . . . . . . . . . . . . . . . 32
Gearbox lever . . . . . . . . . . . . . . . . . . . . . . . . . . . 34
Air conditioning . . . . . . . . . . . . . . . . . . . . . . . . . 36
Fluid Level control . . . . . . . . . . . . . . . . . . . . . . . 39
Emergencies . . . . . . . . . . . . . . . . . . . . . . . . . . . . 43
Fuses . . . . . . . . . . . . . . . . . . . . . . . . . . . . . . . . . . 43
Bulbs . . . . . . . . . . . . . . . . . . . . . . . . . . . . . . . . . . 44
Action in the event of a puncture . . . . . . . . . . . 44
Changing a wheel . . . . . . . . . . . . . . . . . . . . . . . 46
Snow chains . . . . . . . . . . . . . . . . . . . . . . . . . . . . 49
Emergency towing of the vehicle . . . . . . . . . . . 50
How to jump start . . . . . . . . . . . . . . . . . . . . . . . . 51
Changing the windscreen wiper blades . . . . . . 53
Safety . . . . . . . . . . . . . . . . . . . . . . . . . . . . . . . . 55
Safe driving . . . . . . . . . . . . . . . . . . . . . . . . . . . . 55
Safety first! . . . . . . . . . . . . . . . . . . . . . . . . . . . . . 55
Advice about driving . . . . . . . . . . . . . . . . . . . . . 55 Correct position for passengers . . . . . . . . . . . . 56
Pedal area . . . . . . . . . . . . . . . . . . . . . . . . . . . . . . 60
Seat belts
. . . . . . . . . . . . . . . . . . . . . . . . . . . . . . 61
The whys and wherefores of seat belts . . . . . . . 61
How to properly adjust your seatbelt . . . . . . . . 64
Seat belt tensioners . . . . . . . . . . . . . . . . . . . . . . 65
Airbag system . . . . . . . . . . . . . . . . . . . . . . . . . . 66
Brief introduction . . . . . . . . . . . . . . . . . . . . . . . . 66
Airbag safety instructions . . . . . . . . . . . . . . . . . 69
Deactivating airbags . . . . . . . . . . . . . . . . . . . . . 71
Transporting children safely . . . . . . . . . . . . . . . 72
Safety for children . . . . . . . . . . . . . . . . . . . . . . . 72
Child seats . . . . . . . . . . . . . . . . . . . . . . . . . . . . . 74
Emergencies . . . . . . . . . . . . . . . . . . . . . . . . . . 75
Self-help . . . . . . . . . . . . . . . . . . . . . . . . . . . . . . . 75
Emergency equipment . . . . . . . . . . . . . . . . . . . . 75
Changing a wheel . . . . . . . . . . . . . . . . . . . . . . . 75
Tyre repairs . . . . . . . . . . . . . . . . . . . . . . . . . . . . . 76
Towing the vehicle . . . . . . . . . . . . . . . . . . . . . . . 78
Fuses and bulbs . . . . . . . . . . . . . . . . . . . . . . . . . 80
Fuses . . . . . . . . . . . . . . . . . . . . . . . . . . . . . . . . . . 80
Changing bulbs . . . . . . . . . . . . . . . . . . . . . . . . . 83
Changing the fog light bulbs . . . . . . . . . . . . . . . 86
Changing the rear lights (on the side panel) . . 87
Changing tail lights (on the rear lid) . . . . . . . . . 89
Changing the bulb on the number plate . . . . . . 91
Operation . . . . . . . . . . . . . . . . . . . . . . . . . . . . . 93
Controls and displays . . . . . . . . . . . . . . . . . . . . 93
General instrument panel . . . . . . . . . . . . . . . . . 92
Instruments and warning lamps . . . . . . . . . . . . 94
Instruments . . . . . . . . . . . . . . . . . . . . . . . . . . . . 94
Control lamps . . . . . . . . . . . . . . . . . . . . . . . . . . . 98
Introduction to the Easy Connect system* . . . . 99
System settings (CAR)* . . . . . . . . . . . . . . . . . . . 99 Communications and multimedia
. . . . . . . . . . . 100
Steering wheel controls* . . . . . . . . . . . . . . . . . . 100
Multimedia . . . . . . . . . . . . . . . . . . . . . . . . . . . . . 104
Opening and closing . . . . . . . . . . . . . . . . . . . . . 104
Remote control . . . . . . . . . . . . . . . . . . . . . . . . . . 104
Keys . . . . . . . . . . . . . . . . . . . . . . . . . . . . . . . . . . . 105
Central locking system . . . . . . . . . . . . . . . . . . . . 107
Anti-theft alarm system* . . . . . . . . . . . . . . . . . . 112
Rear lid . . . . . . . . . . . . . . . . . . . . . . . . . . . . . . . . 113
Opening and closing of electric windows . . . . . 115
Lights and visibility . . . . . . . . . . . . . . . . . . . . . . 116
Lights . . . . . . . . . . . . . . . . . . . . . . . . . . . . . . . . . 116
Interior lights . . . . . . . . . . . . . . . . . . . . . . . . . . . 122
Visibility . . . . . . . . . . . . . . . . . . . . . . . . . . . . . . . 123
Windscreen wipers and windscreen wash-
ers . . . . . . . . . . . . . . . . . . . . . . . . . . . . . . . . . . . . 124
Mirr
ors . . . . . . . . . . . . . . . . . . . . . . . . . . . . . . . . . 126
Seats and head restraints . . . . . . . . . . . . . . . . . 127
Adjusting seats and head restraints . . . . . . . . . 127
Seat functions . . . . . . . . . . . . . . . . . . . . . . . . . . 128
Transport and practical equipment . . . . . . . . . 131
Practical equipment . . . . . . . . . . . . . . . . . . . . . . 131
Storing objects . . . . . . . . . . . . . . . . . . . . . . . . . . 137
Luggage compartment . . . . . . . . . . . . . . . . . . . . 138
Roof rack* . . . . . . . . . . . . . . . . . . . . . . . . . . . . . . 141
Air conditioning . . . . . . . . . . . . . . . . . . . . . . . . . 142
Heating and air conditioning . . . . . . . . . . . . . . . 142
Heating and fresh air . . . . . . . . . . . . . . . . . . . . . 144
Air conditioning (manual)* . . . . . . . . . . . . . . . . 145
Climatronic* (automatic air conditioning) . . . . 147
Driving . . . . . . . . . . . . . . . . . . . . . . . . . . . . . . . . 149
Starting and stopping the engine . . . . . . . . . . . 149
Brakes and brake servo systems . . . . . . . . . . . . 152
Braking and stability systems . . . . . . . . . . . . . . 154
Manual gearbox . . . . . . . . . . . . . . . . . . . . . . . . . 156
Automatic gearbox . . . . . . . . . . . . . . . . . . . . . . . 157
Run-in and economical driving . . . . . . . . . . . . . 161
3
Page 11 of 248
The essentials
How it works
Un loc
k
ing and locking
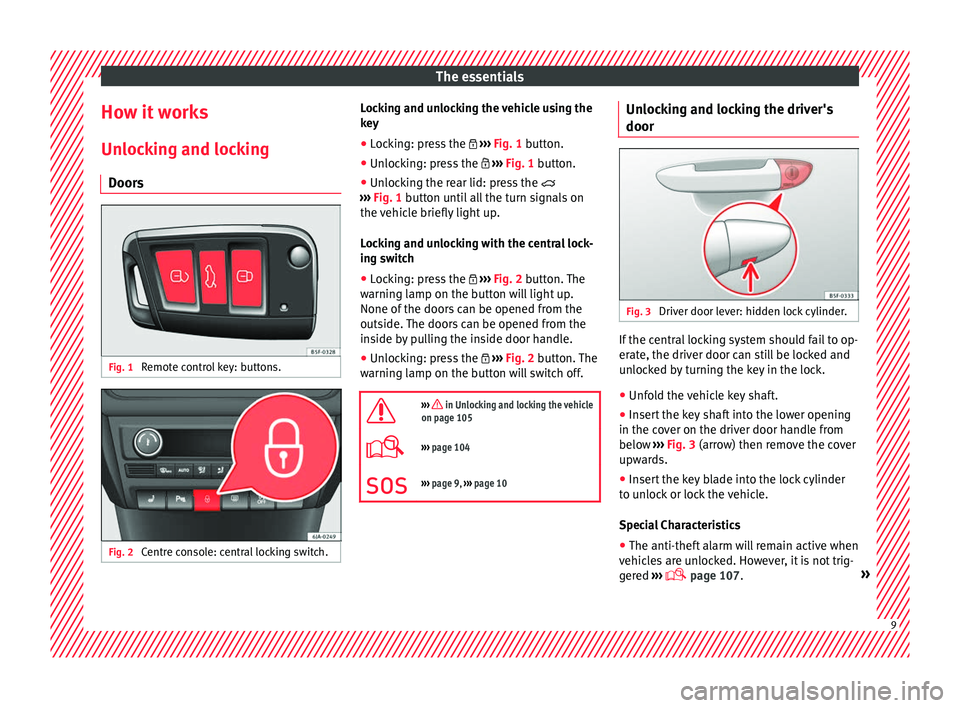
Doors Fig. 1
Remote control key: buttons. Fig. 2
Centre console: central locking switch. Locking and unlocking the vehicle using the
k
ey
● Loc
king: press the ›››
Fig. 1 button.
● Unlocking: press the ›››
Fig. 1 button.
● Unlocking the rear lid: press the
›››
Fig. 1 button until all the turn signals on
the vehicle briefly light up.
Locking and unlocking with the central lock-
ing switch
● Locking: press the ›››
Fig. 2 button. The
warning lamp on the button will light up.
None of the doors can be opened from the
outside. The doors can be opened from the
inside by pulling the inside door handle.
● Unlocking: press the ›››
Fig. 2 button. The
warning lamp on the button will switch off.
››› in Unlocking and locking the vehicle
on page 105
››› page 104
››› page 9, ››› page 10 Unlocking and locking the driver's
door
Fig. 3
Driver door lever: hidden lock cylinder. If the central locking system should fail to op-
er
at
e, the driv
er door can still be locked and
unlocked by turning the key in the lock.
● Unfold the vehicle key shaft.
● Insert the key shaft into the lower opening
in the cov
er on the driver door handle from
below ››› Fig. 3 (arrow) then remove the cover
upwards.
● Insert the key blade into the lock cylinder
to un
lock or lock the vehicle.
Special Characteristics
● The anti-theft alarm will remain active when
vehicl
es are unlocked. However, it is not trig-
gered ›››
page 107. » 9
Page 21 of 248
The essentials
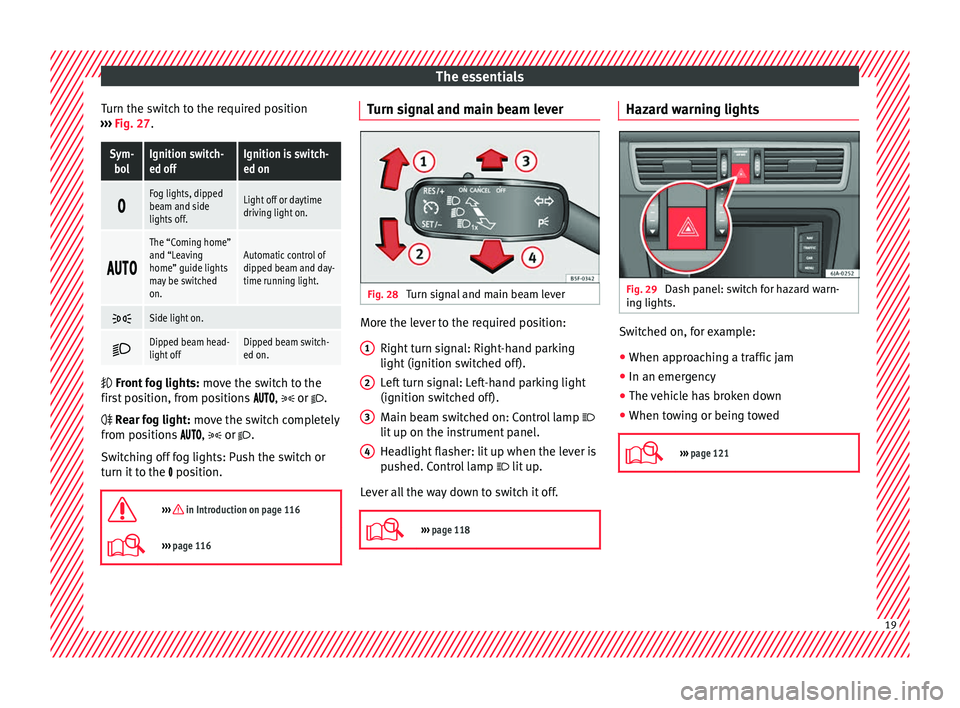
Turn the switch to the required position
› ›
›
Fig. 27.
Sym-
bolIgnition switch-
ed offIgnition is switch-
ed on
Fog lights, dipped
beam and side
lights off.Light off or daytime
driving light on.
The “Coming home”
and “Leaving
home” guide lights
may be switched
on.Automatic control of
dipped beam and day-
time running light.
Side light on.
Dipped beam head-
light offDipped beam switch-
ed on.
Front
fog lights: mo
ve the switch to the
first position, from positions , or .
Rear fog light: move the switch completely
from positions , or .
Switching off fog lights: Push the switch or
turn it to the position.
››› in Introduction on page 116
››› page 116 Turn signal and main beam lever
Fig. 28
Turn signal and main beam lever More the lever to the required position:
Right t
urn s
ignal: Right-hand parking
light (ignition switched off).
Left turn signal: Left-hand parking light
(ignition switched off).
Main beam switched on: Control lamp
lit up on the instrument panel.
Headlight flasher: lit up when the lever is
pushed. Control lamp lit up.
Lever all the way down to switch it off.
››› page 118 1
2
3
4 Hazard warning lights
Fig. 29
Dash panel: switch for hazard warn-
in g lights. Switched on, for example:
●
When approaching a traffic jam
● In an emergency
● The vehicle has broken down
● When towing or being towed
››› page 121 19
Page 24 of 248
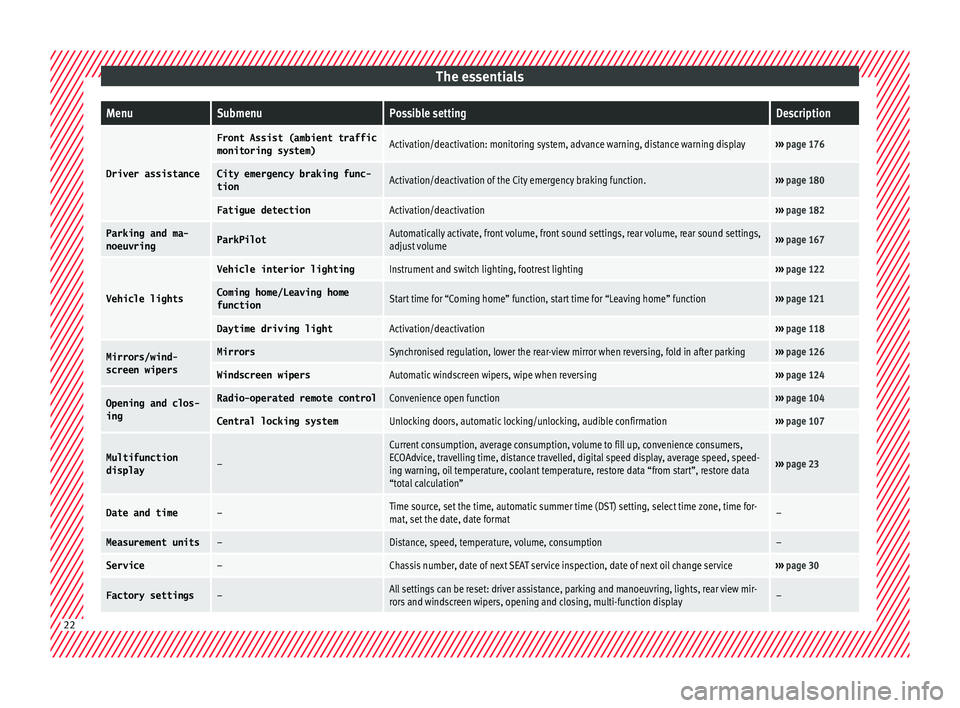
The essentialsMenuSubmenuPossible settingDescription
Driver assistance
Front Assist (ambient traffic
monitoring system)Activation/deactivation: monitoring system, advance warning, distance warning display›››
page 176
City emergency braking func-
tionActivation/deactivation of the City emergency braking function.››› page 180
Fatigue detectionActivation/deactivation››› page 182
Parking and ma-
noeuvringParkPilotAutomatically activate, front volume, front sound settings, rear volume, rear sound settings,
adjust volume››› page 167
Vehicle lights
Vehicle interior lightingInstrument and switch lighting, footrest lighting››› page 122
Coming home/Leaving home
functionStart time for “Coming home” function, start time for “Leaving home” function››› page 121
Daytime driving lightActivation/deactivation››› page 118
Mirrors/wind‐
screen wipersMirrorsSynchronised regulation, lower the rear-view mirror when reversing, fold in after parking››› page 126
Windscreen wipersAutomatic windscreen wipers, wipe when reversing››› page 124
Opening and clos-
ingRadio-operated remote controlConvenience open function››› page 104
Central locking systemUnlocking doors, automatic locking/unlocking, audible confirmation››› page 107
Multifunction
display–
Current consumption, average consumption, volume to fill up, convenience consumers,
ECOAdvice, travelling time, distance travelled, digital speed display, average speed, speed-
ing warning, oil temperature, coolant temperature, restore data “from start”, restore data
“total calculation”
››› page 23
Date and time–Time source, set the time, automatic summer time (DST) setting, select time zone, time for-
mat, set the date, date format–
Measurement units–Distance, speed, temperature, volume, consumption–
Service–Chassis number, date of next SEAT service inspection, date of next oil change service››› page 30
Factory settings–All settings can be reset: driver assistance, parking and manoeuvring, lights, rear view mir-
rors and windscreen wipers, opening and closing, multi-function display– 22
Page 35 of 248
The essentials
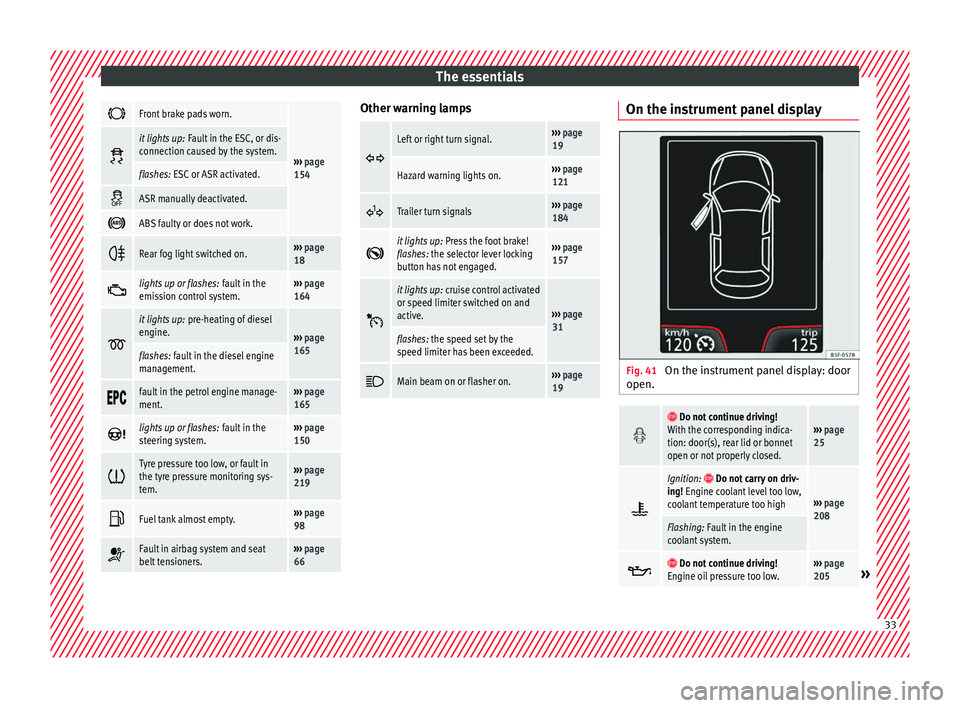
Front brake pads worn.
›››
page
154
it lights up:
Fault in the ESC, or dis-
connection caused by the system.
flashes: ESC or ASR activated.
ASR manually deactivated.
ABS faulty or does not work.
Rear fog light switched on.›››
page
18
lights up or flashes:
fault in the
emission control system.››› page
164
it lights up:
pre-heating of diesel
engine.
››› page
165
flashes: fault in the diesel engine
management.
fault in the petrol engine manage-
ment.›››
page
165
lights up or flashes:
fault in the
steering system.››› page
150
Tyre pressure too low, or fault in
the tyre pressure monitoring sys-
tem.›››
page
219
Fuel tank almost empty.›››
page
98
Fault in airbag system and seat
belt tensioners.›››
page
66 Other warning lamps
Left or right turn signal.›››
page
19
Hazard warning lights on.››› page
121
Trailer turn signals›››
page
184
it lights up:
Press the foot brake!
flashes: the selector lever locking
button has not engaged.››› page
157
it lights up:
cruise control activated
or speed limiter switched on and
active.
››› page
31
flashes: the speed set by the
speed limiter has been exceeded.
Main beam on or flasher on.›››
page
19 On the instrument panel display
Fig. 41
On the instrument panel display: door
open.
Do not continue driving!
With the corresponding indica-
tion: door(s), rear lid or bonnet
open or not properly closed.››› page
25
Ignition: Do not carry on driv-
ing! Engine coolant level too low,
coolant temperature too high
››› page
208
Flashing: Fault in the engine
coolant system.
Do not continue driving!
Engine oil pressure too low.››› page
205» 33
Page 36 of 248
The essentials
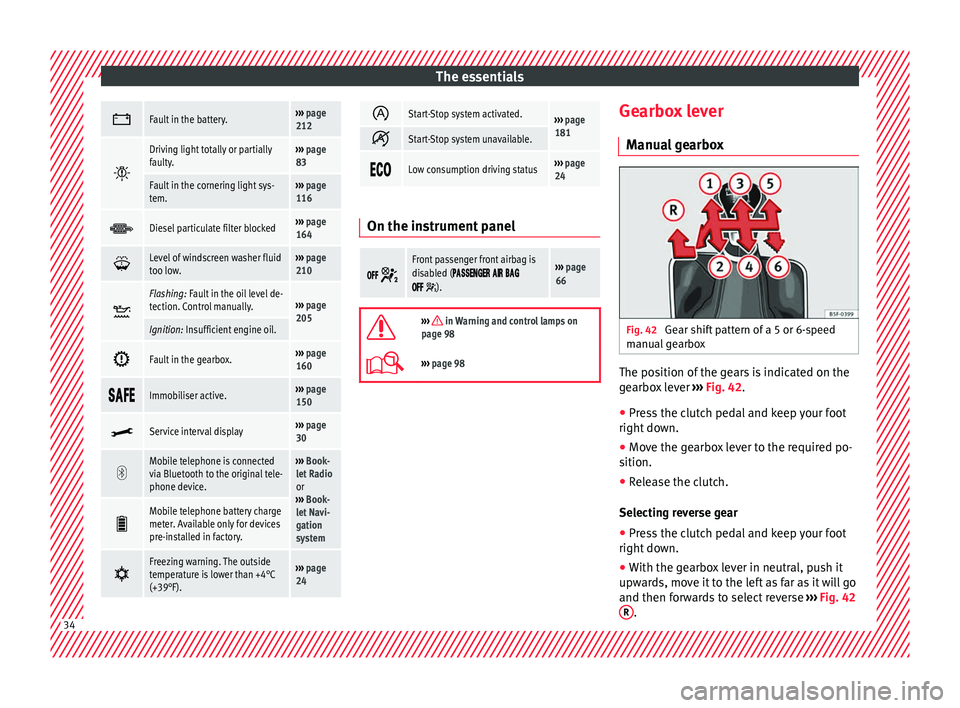
Fault in the battery.›››
page
212
Driving light totally or partially
faulty.›››
page
83
Fault in the cornering light sys-
tem.››› page
116
Diesel particulate filter blocked›››
page
164
Level of windscreen washer fluid
too low.›››
page
210
Flashing: Fault in the oil level de-
tection. Control manually.›››
page
205
Ignition: Insufficient engine oil.
Fault in the gearbox.›››
page
160
Immobiliser active.›››
page
150
Service interval display›››
page
30
Mobile telephone is connected
via Bluetooth to the original tele-
phone device.›››
Book-
let Radio
or
››› Book-
let Navi-
gation
system
Mobile telephone battery charge
meter. Available only for devices
pre-installed in factory.
Freezing warning. The outside
temperature is lower than +4°C
(+39°F).›››
page
24
Start-Stop system activated.›››
page
181
Start-Stop system unavailable.
Low consumption driving status›››
page
24 On the instrument panel
Front passenger front airbag is
disabled (
).
››› page
66
››› in Warning and control lamps on
page 98
››› page 98 Gearbox lever
M anua
l
gearbox Fig. 42
Gear shift pattern of a 5 or 6-speed
m anual
g
earbox The position of the gears is indicated on the
g
e
arbo
x lever ››› Fig. 42.
● Press the clutch pedal and keep your foot
right down.
● Mo
ve the gearbox lever to the required po-
sition.
● Rel
ease the clutch.
Selecting r
everse gear
● Press the clutch pedal and keep your foot
right down.
● W
ith the gearbox lever in neutral, push it
upwar
ds, move it to the left as far as it will go
and then forwards to select reverse ››› Fig. 42
R .
34
Page 46 of 248

The essentials
To replace a fuse
● Remove the fuse.
● Replace the blown fuse by one with an
iden tic
a
l amperage rating (same colour and
markings) and identical size.
● Replace the cover again or close the fuse
box lid.
B
ulbs
Bul
bs (12 V) Full-LED headlights are designed to last the
lif
etime of
the c
ar and cannot be replaced. If
the headlight becomes damaged, go to a
specialised workshop.
Below, the light source used for all functions
is broken down.
Halogen headlightsType
Daytime running light/side
lightP21W SLL
Dipped beam headlightsH7 LL
Main beam headlightsH7 LL
Turn signalPY21W
Full-LED main headlightsType
No bulbs may be replaced. All functions are with LEDs
Front fog lightType
Fog/cornering lights*H8
Rear bulb lightType
Brake light/tail lightP21/5W
Side lightsP21/5W (side panel)
R5W (rear lid)
Turn signalPY21W
Retro fog lightP21W
Reverse lightsP21W
LED rear lightsType
Turn signalPY21W
Retro fog lightP21W
Reverse lightsP21W
The remaining functions work with LEDs Action in the event of a punc-
t
ur
e
Wh
at to do first ●
Park the vehicle on a horizontal surface
and in a s af
e p
lace as far away from traffic as
possible. ●
Apply
the handbrake.
● Switch on the hazard warning lights.
● Manual gearbox: select the 1s
t gear.
● Automatic gearbox: Move the sel
ector lever
to position P.
● If you are towing a trailer, unhitch it from
your v
ehicle.
● Have the vehicle tool kit* ›››
page 75
and the spare wheel ›››
page 218 ready.
● Observe the applicable legislation for each
countr
y (reflective vest, warning triangles,
etc.).
● All occupants should leave the vehicle and
wait in a s
afe place (for instance behind the
roadside crash barrier). WARNING
● Alw a
ys observe the above steps and pro-
tect yourself and other road users.
● If you change the wheel on a slope, block
the wheel on the oppo
site side of the car with
a stone or similar to prevent the vehicle from
moving. 44
Page 50 of 248
The essentials
● Grip the end of the bo
x
spanner and turn
the wheel bolt about one turn anti-clockwise
››› Fig. 62.
Tightening wheel bolts ● Insert the box spanner onto the wheel bolt
as f
ar as it will go 1)
.
● Grip the box spanner as close to the end as
poss
ible and tighten the bolt firmly by turn-
ing clockwise. WARNING
The wheel bolts should only be loosened
slightly (about
one turn) before raising the
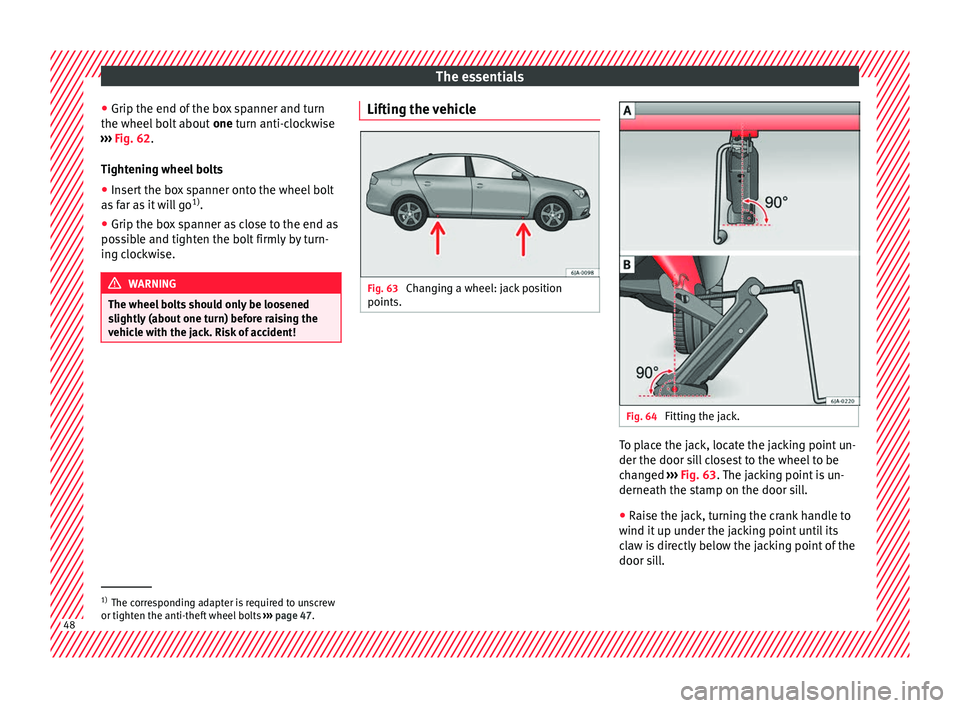
vehicle with the jack. Risk of accident! Lifting the vehicle
Fig. 63
Changing a wheel: jack position
points. Fig. 64
Fitting the jack. To place the jack, locate the jacking point un-
der the door s
i
l
l closest to the wheel to be
changed ››› Fig. 63. The jacking point is un-
derneath the stamp on the door sill.
● Raise the jack, turning the crank handle to
wind it up u
nder the jacking point until its
claw is directly below the jacking point of the
door sill. 1)
The corresponding adapter is required to unscrew
or tighten the anti-thef t
wheel bolts ››› page 47. 48
Page 53 of 248
The essentials
Notes for the driver of the towing vehicle
● The tow rope must be taut before you drive
off .
● Rel
ease the clutch very carefully when start-
ing the v
ehicle (manual gearbox), or acceler-
ate gently (automatic gearbox).
Driving style
Towing requires some experience, especially
when using a tow rope. Both drivers should
realise how difficult it is to tow a vehicle. In-
experienced drivers should not attempt to
tow.
Do not pull too hard with the towing vehicle
and take care to avoid jerking the tow rope.
When towing on an unpaved road, there is al-
ways a risk of overloading and damaging the
anchorage points.
The towline anchorages are located under
the floor panel in the luggage compartment.
Switch on the ignition so that the turn sig-
nals, windscreen wipers and windscreen
washer can work. Ensure that the steering
wheel is unlocked and moves freely.
Place the gear lever in neutral on vehicles
with a manual gearbox. With an automatic
gearbox, place the lever in N.
To brake, press the brake pedal firmly. The
brake servo does not work when the engine
is switched off. The power steering only works when the igni-
tion is sw
itched on and the vehicle is moving,
provided that the battery is sufficiently charg-
ed. Otherwise, it will need more force.
Ensure that the tow rope remains taut at all
times.
››› page 78 Tow-starting
If the engine will not start, first try starting it
u
s
in
g the battery of another vehicle
››› page 51. You should only attempt to tow-
start a vehicle if charging the battery does
not work. This is done by leveraging wheel
movement.
When tow-starting a vehicle with a petrol en-
gine, do not tow it more than a short dis-
tance, otherwise unburned fuel can enter the
catalytic converter.
● Engage 2nd or 3rd gear before moving off.
● Press the clutch and hold the pedal down.
● Switch the ignition on.
● Once both vehicles are moving, release the
clutc
h.
● As soon as the engine has started, press
the clutc
h and move the gear lever to neutral. How to jump start
Jump lea
ds The jump lead must have a sufficient wire
cr
o
ss section.
If the engine fails to start because of a dis-
charged battery, the battery can be connec-
ted to the battery of another vehicle to start
the engine.
Both batteries need to have nominal voltage
of 12 V. The capacity (Ah) of the back-up bat-
tery should not be notably less than the
drained battery.
Jump leads must comply with standard DIN
72553 (see cable manufacturer's instruc-
tions). The wire cross section must be at least
25 mm 2
for petrol engines and at least
35 mm 2
for diesel engines.
Jump leads
Positive cable – usually red
Negative cable – usually black WARNING
● A flat b
attery can also freeze at tempera-
tures slightly below to 0°C (32°F). Do not at-
tempt to start the vehicle with a frozen bat-
tery. Risk of explosion! » 51
Page 55 of 248
The essentials
Starting
7. Start the engine of the vehicle with the boo s
tin
g battery and let it run at idling
speed.
8. Start the engine of the vehicle with the flat batter
y and wait for 2 or 3 minutes until
the engine is running.
Removing the jump leads
9. Before you remove the jump leads, switch off the dipped be
am headlights if they are
switched on.
10.
Turn on the heater blower and heated rear
window in the vehicle with the flat battery.
This helps minimise voltage peaks which
are generated when the leads are discon-
nected.
11.When the engine is running, disconnect the lea
ds in reverse order to the details
given above.
Make sure the battery clamps have sufficient
metal-to-metal contact with the battery termi-
nals.
If the engine fails to start, switch off the start-
er after about 10 seconds and try again after
about 1 minute. WARNING
● Ple a
se note the safety warnings referring to
working in the engine compartment
››› page 202.
● The battery providing assistance must have
the same v
oltage as the flat battery (12V) and
approximately the same capacity (see imprint
on battery). Failure to comply could result in
an explosion.
● Never use jump leads when one of the bat-
teries
is frozen. Danger of explosion! Even af-
ter the battery has thawed, battery acid could
leak and cause chemical burns. If a battery
freezes, it should be replaced.
● Keep sparks, flames and lighted cigarettes
awa
y from batteries, danger of explosion.
Failure to comply could result in an explo-
sion.
● Observe the instructions provided by the
manufact
urer of the jump leads.
● Do not connect the negative cable from the
other vehic
le directly to the negative terminal
of the flat battery. The gas emitted from the
battery could be ignited by sparks. Danger of
explosion.
● Do not attach the negative cable from the
other vehic
le to parts of the fuel system or to
the brake line.
● The non-insulated parts of the battery
clamp
s must not be allowed to touch. The
jump lead attached to the positive battery
terminal must not touch metal parts of the ve-
hicle, this can cause a short circuit. ●
Po s
ition the leads in such a way that they
cannot come into contact with any moving
parts in the engine compartment.
● Do not lean on the batteries. This could re-
sult
in chemical burns. Note
The vehicles must not touch each other, oth-
er wi
se electricity could flow as soon as the
positive terminals are connected. Changing the windscreen wiper
b
l
a
des
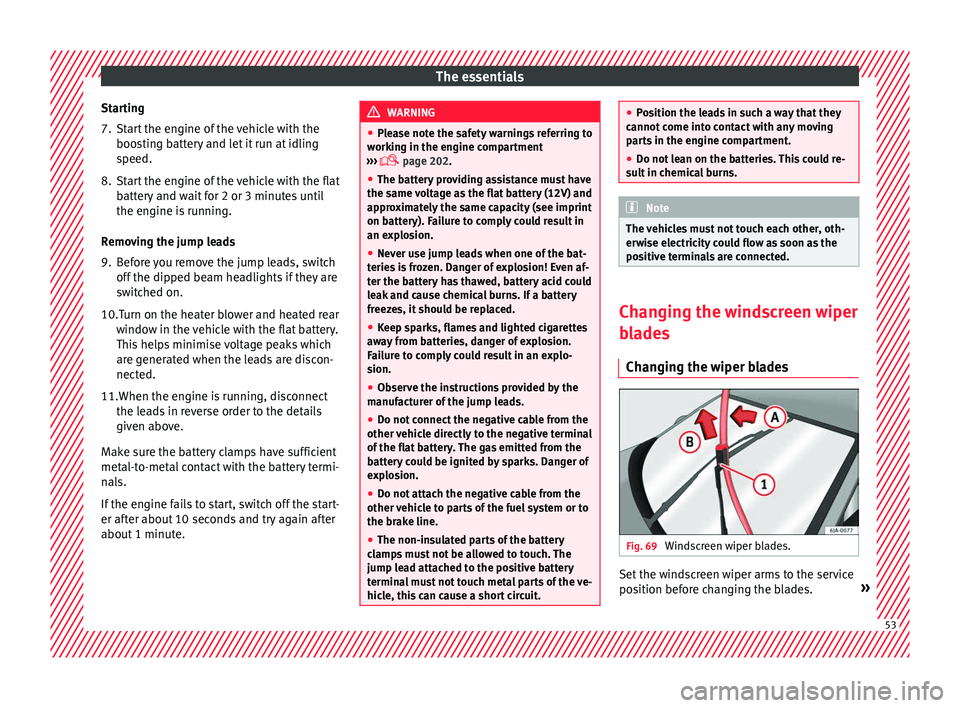
Changing the wiper blades Fig. 69
Windscreen wiper blades. Set the windscreen wiper arms to the service
po
s
ition bef
ore changing the blades. » 53