ESP Seat Toledo 2017 MEDIA SYSTEM PLUS - NAVI SYSTEM - NAVI SYSTEM PLUS
[x] Cancel search | Manufacturer: SEAT, Model Year: 2017, Model line: Toledo, Model: Seat Toledo 2017Pages: 108, PDF Size: 2.84 MB
Page 47 of 108
Audio and Media ModeFunction button: Media source
CD/DVDb)Internal CD/DVD drive
››› page 48.
SD CARD 1SD memory card ››› page 48.SD CARD 2*
USB 1External data storage device connected
to the USB port ››› page 49.USB 2*
AUXExternal audio source connected to the
AUX-IN multimedia socket ››› page 50.
BT AUDIOBluetooth ®
audio ››› page 50.
WLANa)External audio source connected by
WLAN ››› page 53
a)
Only available for the model: “Navi System Plus”.
b) The DVD drive is only available for the model: “Navi System
Plus”. Note
The Media source can be changed in the Tr ac
k
list view ››› page 46. Changing track in the MEDIA main
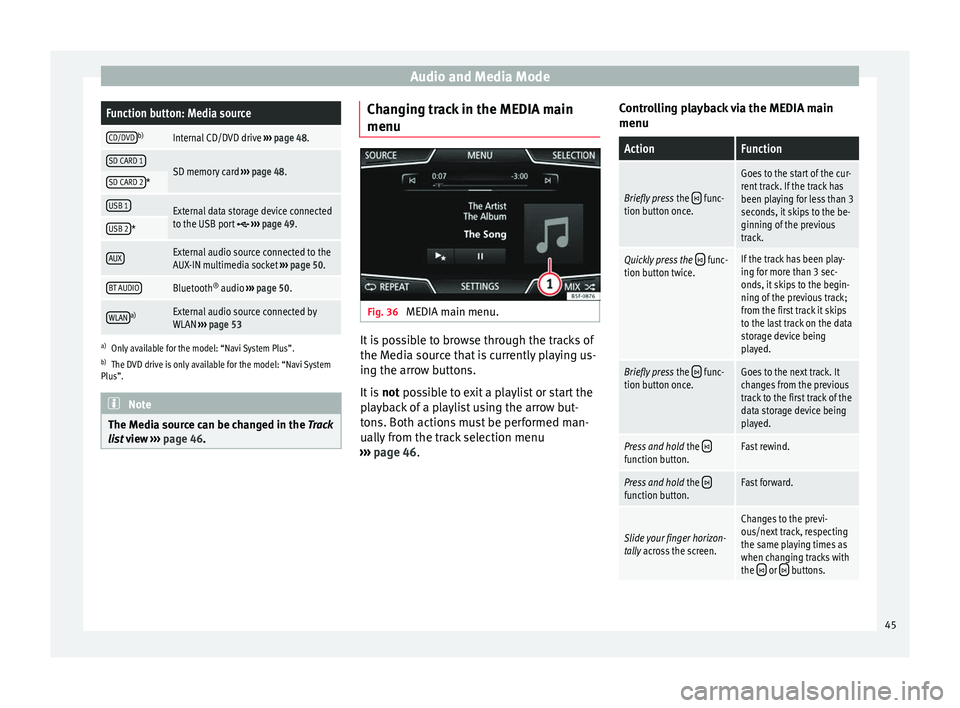
menu
Fig. 36
MEDIA main menu. It is possible to browse through the tracks of
the M
edi
a sour
ce that is currently playing us-
ing the arrow buttons.
It is not possible to exit a playlist or start the
playback of a playlist using the arrow but-
tons. Both actions must be performed man-
ually from the track selection menu
››› page 46. Controlling playback via the MEDIA main
menu
ActionFunction
Briefly press
the func-
tion button once.
Goes to the start of the cur-
rent track. If the track has
been playing for less than 3
seconds, it skips to the be-
ginning of the previous
track.
Quickly press the func-
tion button twice.If the track has been play-
ing for more than 3 sec-
onds, it skips to the begin-
ning of the previous track;
from the first track it skips
to the last track on the data
storage device being
played.
Briefly press the func-
tion button once.Goes to the next track. It
changes from the previous
track to the first track of the
data storage device being
played.
Press and hold the function button.Fast rewind.
Press and hold the function button.Fast forward.
Slide your finger horizon-
tally across the screen.
Changes to the previ-
ous/next track, respecting
the same playing times as
when changing tracks with
the
or buttons. 45
Page 50 of 108
Audio and Media Mode
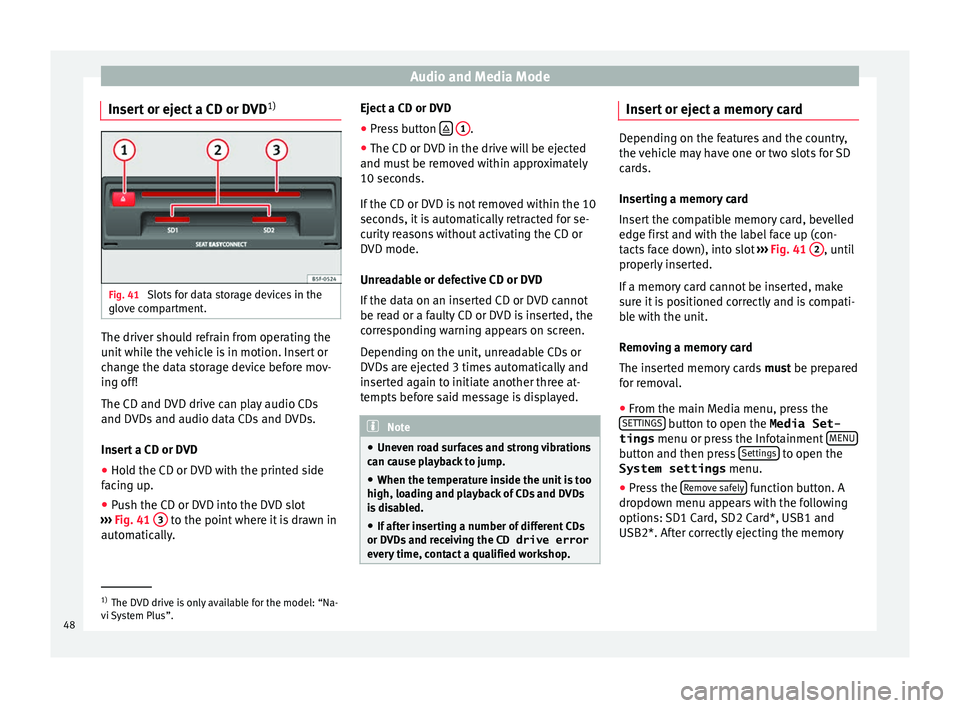
Insert or eject a CD or DVD 1)Fig. 41
Slots for data storage devices in the
glo v
e c
ompartment. The driver should refrain from operating the
u
nit
whi
le the vehicle is in motion. Insert or
change the data storage device before mov-
ing off!
The CD and DVD drive can play audio CDs
and DVDs and audio data CDs and DVDs.
Insert a CD or DVD
● Hold the CD or DVD with the printed side
facin
g up.
● Push the CD or DVD into the DVD slot
›››
Fig. 41 3 to the point where it is drawn in
aut om
atic
ally. Eject a CD or DVD
●
Press button
1 .
● The CD or DVD in the drive will be ejected
and mu s
t
be removed within approximately
10 seconds.
If the CD or DVD is not removed within the 10
seconds, it is automatically retracted for se-
curity reasons without activating the CD or
DVD mode.
Unreadable or defective CD or DVD
If the data on an inserted CD or DVD cannot
be read or a faulty CD or DVD is inserted, the
corresponding warning appears on screen.
Depending on the unit, unreadable CDs or
DVDs are ejected 3 times automatically and
inserted again to initiate another three at-
tempts before said message is displayed. Note
● Uneven r o
ad surfaces and strong vibrations
can cause playback to jump.
● When the temperature inside the unit is too
high, loadin
g and playback of CDs and DVDs
is disabled.
● If after inserting a number of different CDs
or DVDs
and receiving the CD drive error
every time, contact a qualified workshop. Insert or eject a memory card
Depending on the features and the country,
the v
ehic
le may have one or two slots for SD
cards.
Inserting a memory card
Insert the compatible memory card, bevelled
edge first and with the label face up (con-
tacts face down), into slot ››› Fig. 41 2 , until
properly in
serted.
If a memory card cannot be inserted, make
sure it is positioned correctly and is compati-
ble with the unit.
Removing a memory card
The inserted memory cards must be prepared
for removal.
● From the main Media menu, press the
SET TINGS button to open the Media Set-
tings menu or pr e
s
s the Infotainment MENU button and then press
Settin
g
s to open the
System settings menu.
● Press the R
emo
v
e safely function button. A
dr opdo
wn menu ap
pears with the following
options: SD1 Card, SD2 Card*, USB1 and
USB2*. After correctly ejecting the memory 1)
The DVD drive is only available for the model: “Na-
vi S
ystem Plus”.
48
Page 57 of 108
Audio and Media ModeFunction button: function
DUse the arrow buttons to browse the DVD
menu. Confirm the selection by pressing
OK.
EPress to open the DVD main menu.
/ To move to the next or previous chapter.
Playback stops. The function button
changes to .
Playback is resumed. The function button
changes to .
SET-
TINGSThis menu contains the Video (DVD) settings
››› page 55. Note
● The v i
sual appearance of the DVD film me-
nus and the menu options which it offers are
the responsibility of the DVD manufacturer.
● The difference in behaviour of some films
when usin
g the same mode is the responsi-
bility of the DVD manufacturer.
● You may not be able to play video DVDs
which y
ou have burned yourself.
● The Infotainment system screen only dis-
pla
ys the image when the vehicle is stopped.
Whilst in motion, the screen disconnects (the
image), but the audio remains active. Video settings (DVD)
3 Only available for the model: Navi System Plus
In the D
VD mode main menu, press the
SETTINGS function button and then select the
option V ideo settin
gs (DVD).
Function button: function
Format: To select the screen format. If Automatic is se-
lected, it adjusts automatically to the optimal format for
the screen.
Audio channel: select language for acoustic voice output.
Subtitles: To select the subtitle language.
Enter/change PIN for parental settings: Parental settings pass-
word.
Parental settings: To select the level of protection for DVD
playback. The options in the Video setup (DVD) menu
m
a
y
vary depending on the DVD or the chap-
ter currently being played.
The available audio language channels and
subtitles depend on the inserted DVD.
All or a part of the DVD video content may be
protected by means of a password (PIN) if the
DVD is compatible with parental settings. Fur-
thermore, the level of protection can be set
according to age with 1 being the least re-
strictive (appropriate for all audiences) and
8, the most restrictive (adults). Media settings ●
Select the MEDIA main menu b y
pressing
the Infotainment MEDIA button.
● Press the SET
TINGS function button to open
the Media Settings menu.
Function button: function
Sound: Sound settings ››› page 93.
Manage jukeboxa)
: To import files to the jukebox or delete
stored files ››› page 51.
Mix/Repeat including subfolders: Subfolders will be inclu-
ded in the selected playback mode ››› page 39.
Bluetooth: Bluetooth ®
settings ››› page 89
WLANa)
: WLAN settings ››› page 53.
Video settings: Settings for playback of DVD videos or
files.
Remove safely: In order to prepare the external data stor-
age devices for their removal or disconnection. See also
››› page 48, Insert or eject a memory card and
››› page 49, External data storage device connected to
USB port
.
Traffic programme (TP): The TP function (traffic news sta-
tion tracking) is active ››› page 35.
a)
Only available for the model: “Navi System Plus”.
55
Page 58 of 108
Audio and Media Mode
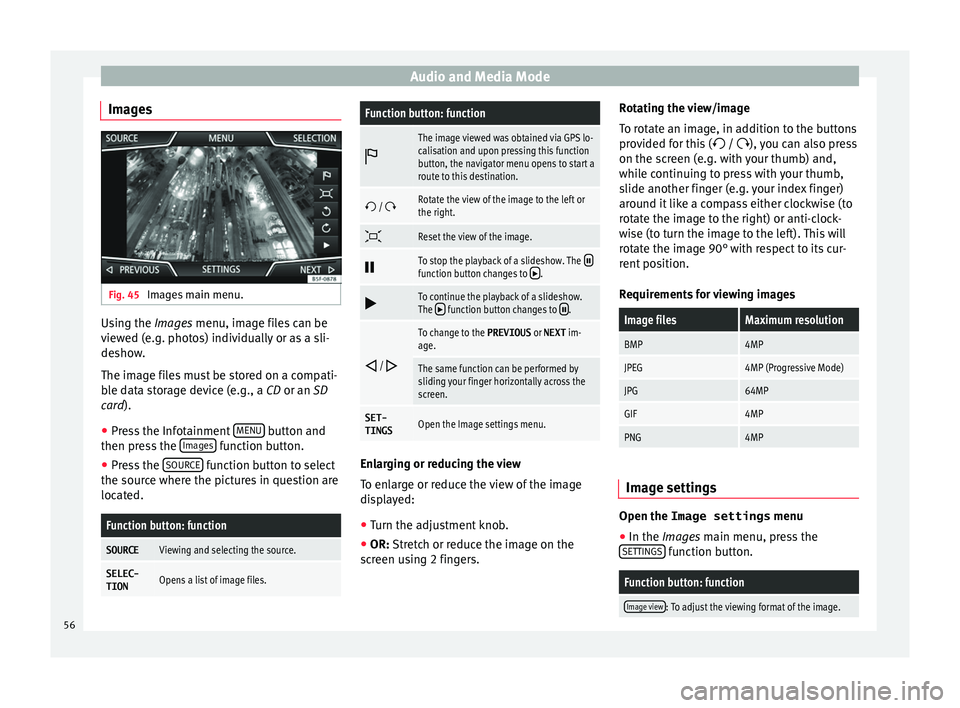
Images Fig. 45
Images main menu. Using the Ima
ge
s menu, image files can be
viewed (e.g. photos) individually or as a sli-
deshow.
The image files must be stored on a compati-
ble data storage device (e.g., a CD or an SD
card).
● Press the Infotainment MENU button and
then pr e
s
s the Images function button.
● Press the SOURC
E function button to select
the sour c
e wher
e the pictures in question are
located.
Function button: function
SOURCEViewing and selecting the source.
SELEC-
TIONOpens a list of image files.
Function button: function
The image viewed was obtained via GPS lo-
calisation and upon pressing this function
button, the navigator menu opens to start a
route to this destination.
/ Rotate the view of the image to the left or
the right.
Reset the view of the image.
To stop the playback of a slideshow. The function button changes to .
To continue the playback of a slideshow.
The function button changes to .
/
To change to the PREVIOUS
or NEXT im-
age.
The same function can be performed by
sliding your finger horizontally across the
screen.
SET- TINGSOpen the Image settings menu. Enlarging or reducing the view
T
o en
l
arge or reduce the view of the image
displayed:
● Turn the adjustment knob.
● OR: Stretch or reduce the image on the
sc
reen using 2 fingers. Rotating the view/image
To rot
ate an image, in addition to the buttons
provided for this ( / ), you can also press
on the screen (e.g. with your thumb) and,
while continuing to press with your thumb,
slide another finger (e.g. your index finger)
around it like a compass either clockwise (to
rotate the image to the right) or anti-clock-
wise (to turn the image to the left). This will
rotate the image 90° with respect to its cur-
rent position.
Requirements for viewing images
Image filesMaximum resolution
BMP4MP
JPEG4MP (Progressive Mode)
JPG64MP
GIF4MP
PNG4MP Image settings
Open the Image settings
menu
● In the Ima ges main menu, press the
S ET
TINGS function button.
Function button: function
Image view: To adjust the viewing format of the image.
56
Page 63 of 108

Navigation
instruction “Start Route Guidance” a route to
the giv en de
s
tination will start.
Search
Search for addresses and Points of Interest
using the keypad to enter them ››› Fig. 49.
For cities, post codes and points of interest,
the full details must be entered. You can also
search for points of interest by names or cat-
egories. When necessary, enter the name of
the city to refine the search.
››› Fig. 49
APress to open the cursor buttons (, ), which
allow you to move within the text. Address
Af
t
er ent
ering a country and a town, you can
start navigating towards the centre of the se-
lected town.
When narrowing down the destination ad-
dress, please note that every entry restricts
the available range of subsequent selections.
For instance, if the street you are looking for
is not in the postcode area you have selected
in a previous window, you will not be able to
find the street at the street selection stage.
Function button: function
Country: To select the desired country.
Function button: function
City: To enter the desired city or postcode.
Street: To enter the desired street name.
House number: To enter the desired house number.
Junction: To select the desired intersection.
Last destinations: Open the My destinations menu
››› page 63.
Start: Start route guidance to the selected address. Using the
● Select the destination on the map or enter
it u
s
ing GPS coordinates and confirm with
OK .
Function button: function
Save: To save the selected point of interest in the desti-
nation memory ››› page 63.
Edit: To edit a destination or to enter another destina-
tion.
Route options: To adjust route options, see Navigation
Setup ››› page 70.
Start: Starts guided navigation to the selected point of
interest. After starting route guidance
Fig. 50
Route calculation. After starting route guidance, the route to the
fir
s
t
destination will be calculated.
The calculation will be performed in accord-
ance with the data selected in the Route options menu ››› page 70.
After starting route guidance, three alterna-
tive routes will be suggested depending on
the selected setup ››› Fig. 50. These 3 routes
correspond to the selectable route options:
Economical, Fast and Short.
Route criteria: Meaning
Blue route: Economical route, the route is calculated by taking into consideration economic factors.
Red route: Fastest route to the destination, even if it is
necessary to make a deviation.» 61
Page 76 of 108

CAR menu
CAR menu Intr oduction t
o m
anaging the
CAR menu
Car menu By pressing the “CAR” infotainment button
you w
i
ll access its main menu with the follow-
ing options:
● VIEW
● MINIPLAYER, in the top right corner (Radio
or Medi a f
unction if the HDC descent control*
is not active).
● PREVIOUS-NEXT (to change screen)
● SETTINGS ›››
Booklet Instruction Manual,
chapter System setup (CAR)
With the function button VIEW you can ac-
c e
s
s the following information:
● SPORT*
● OFFROAD*
● CONSUMERS
● DRIVING DATA
● ECOTRAINER* ●
VEHICLE S
TATUS
Sport* Fig. 62
SPORT menu Fig. 63
Lap Timer SPORT menu ●
Pr e
s
s the CAR button on the Infotainment
sy s
t
em.
● Press the VIEW function button and then
sel ect
S
PORT.
If the corresponding equipment is available,
the information that appears in the Sport op-
tion is the following ››› Fig. 62:
Instantaneous power expressed in kW
G forces
Turbo pressure, expressed in bar
(“bar”), kilopascals (“kPa”) or in pounds
per square inch (“psi”). Press the Setup
button to change the units of pressure
››› page 92
Coolant temperature
Oil temperature
Only three of these items of information can
be displayed at the same time, but the user
chooses which to display, and in what order,
by moving the finger vertically over the dials.
If the NEXT button is pressed, the
Lap timer1)
menu i s
di
splayed; this is described below
››› Fig. 63:
Analogue lap timer.
1.
2.
3.
4.
5.
1 1)
This lap timer is independent of the one that ap-
pear s
on the instrument panel ››› Booklet Instruction
Manual
74
Page 77 of 108
CAR menu
A new lap timer recording is started by
pr e
s
sing on the surface of the digital lap
timer + .
Stop lap timer/Partial time.
The analogue lap timer stops for 5 sec-
onds. After 5 seconds, the analogue lap
timer goes back to showing the real time.
Statistics/delete last lap timer recording.
Offroad* Fig. 64
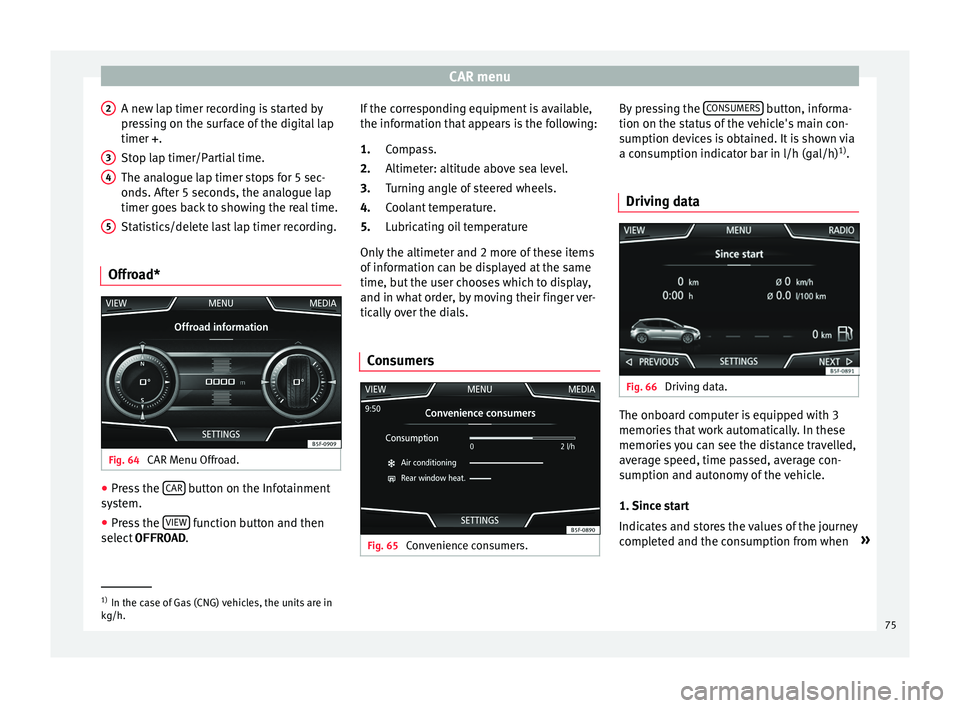
CAR Menu Offroad. ●
Press the CAR button on the Infotainment
sy s
t
em.
● Press the VIEW function button and then
sel ect
OFFROAD .
2 3
4
5 If the corresponding equipment is available,
the inf
orm
ation th
at appears is the following:
Compass.
Altimeter: altitude above sea level.
Turning angle of steered wheels.
Coolant temperature.
Lubricating oil temperature
Only the altimeter and 2 more of these items
of information can be displayed at the same
time, but the user chooses which to display,
and in what order, by moving their finger ver-
tically over the dials.
Consumers Fig. 65
Convenience consumers. 1.
2.
3.
4.
5.
By pressing the
C
ONSUMERS button, informa-
tion on the s t
at
us of the vehicle's main con-
sumption devices is obtained. It is shown via
a consumption indicator bar in l/h (gal/h) 1)
.
Driving data Fig. 66
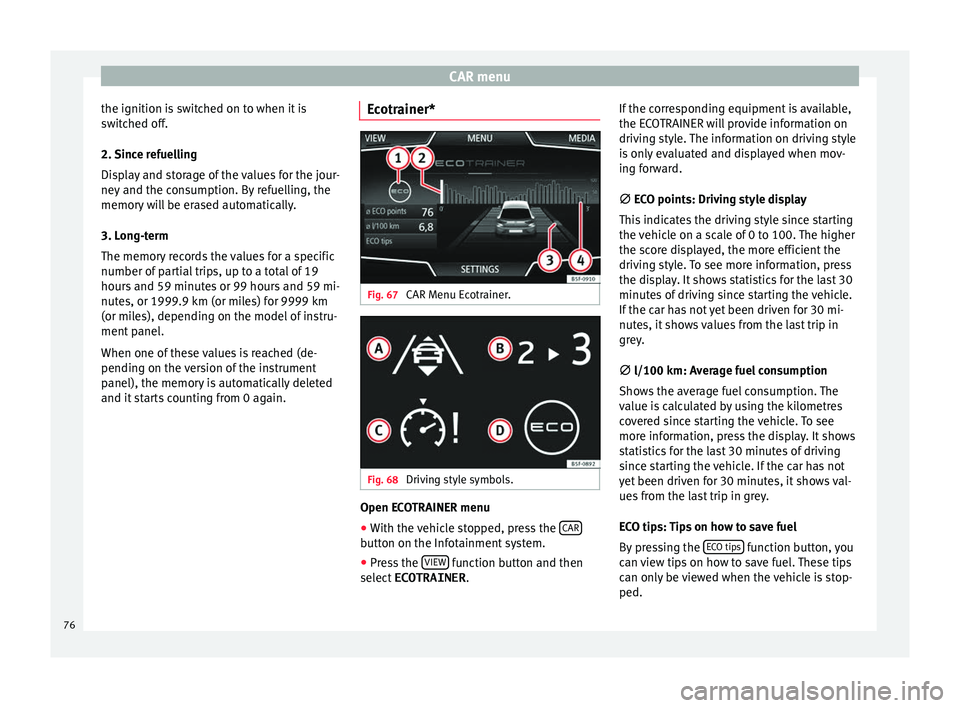
Driving data. The onboard computer is equipped with 3
memorie
s
th
at work automatically. In these
memories you can see the distance travelled,
average speed, time passed, average con-
sumption and autonomy of the vehicle.
1. Since start
Indicates and stores the values of the journey
completed and the consumption from when »1)
In the case of Gas (CNG) vehicles, the units are in
kg/h. 75
Page 78 of 108
CAR menu
the ignition is switched on to when it is
sw it
c
hed off.
2. Since refuelling
Display and storage of the values for the jour-
ney and the consumption. By refuelling, the
memory will be erased automatically.
3. Long-term
The memory records the values for a specific
number of partial trips, up to a total of 19
hours and 59 minutes or 99 hours and 59 mi-
nutes, or 1999.9 km (or miles) for 9999 km
(or miles), depending on the model of instru-
ment panel.
When one of these values is reached (de-
pending on the version of the instrument
panel), the memory is automatically deleted
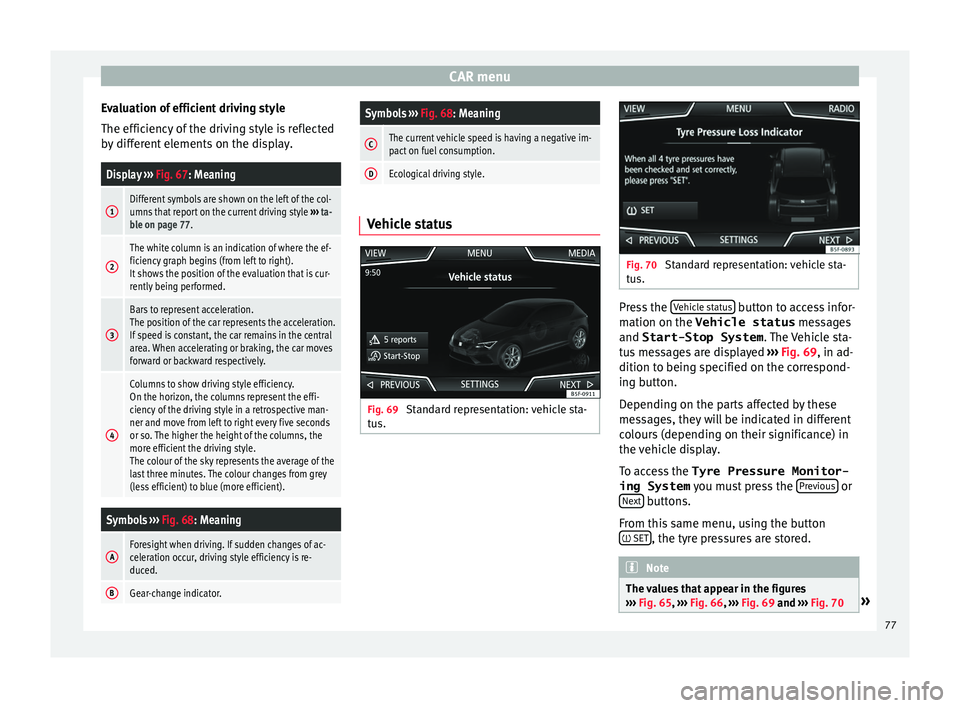
and it starts counting from 0 again. Ecotrainer* Fig. 67
CAR Menu Ecotrainer. Fig. 68
Driving style symbols. Open ECOTRAINER menu
● With the vehicle stopped, press the CAR button on the Infotainment system.
● Press the VIEW function button and then
sel ect
ECOTRAINER . If
the corresponding equipment is available,
the ECO
TRAINER will provide information on
driving style. The information on driving style
is only evaluated and displayed when mov-
ing forward.
∅ ECO points: Driving style display
This indicates the driving style since starting
the vehicle on a scale of 0 to 100. The higher
the score displayed, the more efficient the
driving style. To see more information, press
the display. It shows statistics for the last 30
minutes of driving since starting the vehicle.
If the car has not yet been driven for 30 mi-
nutes, it shows values from the last trip in
grey.
∅ l/100 km: Average fuel consumption
Shows the average fuel consumption. The
value is calculated by using the kilometres
covered since starting the vehicle. To see
more information, press the display. It shows
statistics for the last 30 minutes of driving
since starting the vehicle. If the car has not
yet been driven for 30 minutes, it shows val-
ues from the last trip in grey.
ECO tips: Tips on how to save fuel
By pressing the ECO tips function button, you
c an
v
iew tips on how to save fuel. These tips
can only be viewed when the vehicle is stop-
ped.
76
Page 79 of 108
CAR menu
Evaluation of efficient driving style
The effic iency
of
the driving style is reflected
by different elements on the display.
Display ››› Fig. 67: Meaning
1Different symbols are shown on the left of the col-
umns that report on the current driving style ››› ta-
ble on page 77.
2
The white column is an indication of where the ef-
ficiency graph begins (from left to right).
It shows the position of the evaluation that is cur-
rently being performed.
3
Bars to represent acceleration.
The position of the car represents the acceleration.
If speed is constant, the car remains in the central
area. When accelerating or braking, the car moves
forward or backward respectively.
4
Columns to show driving style efficiency.
On the horizon, the columns represent the effi-
ciency of the driving style in a retrospective man-
ner and move from left to right every five seconds
or so. The higher the height of the columns, the
more efficient the driving style.
The colour of the sky represents the average of the
last three minutes. The colour changes from grey
(less efficient) to blue (more efficient).
Symbols ››› Fig. 68: Meaning
AForesight when driving. If sudden changes of ac-
celeration occur, driving style efficiency is re-
duced.
BGear-change indicator.
Symbols ››› Fig. 68: Meaning
CThe current vehicle speed is having a negative im-
pact on fuel consumption.
DEcological driving style. Vehicle status
Fig. 69
Standard representation: vehicle sta-
t u
s. Fig. 70
Standard representation: vehicle sta-
tu s. Press the
V
ehic
l
e status button to access infor-
m ation on the Vehicle status
me
s
sages
and Start-Stop System . The Vehicle sta-
tus messages are displayed ››› Fig. 69, in ad-
dition to being specified on the correspond-
ing button.
Depending on the parts affected by these
messages, they will be indicated in different
colours (depending on their significance) in
the vehicle display.
To access the Tyre Pressure Monitor-
ing System you must press the Previous or
Ne xt buttons.
Fr om thi
s
same menu, using the button
SET , the tyre pressures are stored.
Note
The values that appear in the figures
›› ›
Fig. 65, ››› Fig. 66, ››› Fig. 69 and ››› Fig. 70 » 77
Page 81 of 108
Telephone management system (PHONE)
Telephone management sys-
t em (PHONE)
Intr oduction t
o the telephone
management system
Related video Fig. 71
Telephone man-
agement sy
stem
(Toledo) Fig. 72
Telephone man-
agement sy
stem (Ateca) General information
The Telephone functions described below
c
an be u
sed thr
ough the Infotainment system
if there is a mobile telephone connected to it
via Bluetooth ®
›››
page 81. In order for the mobile telephone to be able
to connect
to the Infotainment system the tel-
ephone must be equipped with Bluetooth®
.
If there is no mobile telephone connected to
the Infotainment system, the telephone man-
agement system will not be available.
The instructions shown on the screen for the
telephone menus will depend on the mobile
telephone used. There may be variations.
Only use compatible Bluetooth ®
devices. For
further information on compatible Blue-
tooth ®
products, ask your nearest SEAT deal-
er or check on the internet.
Use the instruction manual of the mobile tel-
ephone and of any accessories.
If you detect any operating issues between
your mobile telephone and the Infotainment
system, restart your mobile by switching it off
and on again.
You may experience poor reception or may be
cut off in areas where the signal is weak.
Most electronic devices are shielded against
HF (high-frequency) signals. In any case, the
electronic equipment may not be protected
from the HF signals of the telephone man-
agement system. This may cause interfer-
ence. WARNING
Speaking by telephone and operating the mo-
bi l
e telephone whilst driving can distract you
from the road and cause an accident.
● Always drive carefully and responsibly.
● Select volume settings that allow you to
eas
ily hear signals from outside the vehicle
at all times (e.g. emergency services sirens
and horns).
● In areas of little or no coverage or, in some
case
s, in a tunnel, garage or underpass, your
call may be cut off and you may not be able to
make even emergency calls. WARNING
If a mobile telephone is not secured or is in-
corr ectly
secured in the vehicle, it could move
around the passenger compartment in the
event of a sudden driving manoeuvre or emer-
gency stop, resulting in injury.
● While the vehicle is in motion, always se-
cure the mo
bile telephone properly outside
the airbag deployment zone. WARNING
Mobile telephones may interfere with and al-
ter the c orr
ect operation of pacemakers if
they are carried directly over them.
● Maintain a minimum distance of at least
20 centimetre
s between the aerials of the » 79