ECO mode Seat Toledo 2017 MEDIA SYSTEM PLUS - NAVI SYSTEM - NAVI SYSTEM PLUS
[x] Cancel search | Manufacturer: SEAT, Model Year: 2017, Model line: Toledo, Model: Seat Toledo 2017Pages: 108, PDF Size: 2.84 MB
Page 64 of 108
NavigationRoute criteria: Meaning
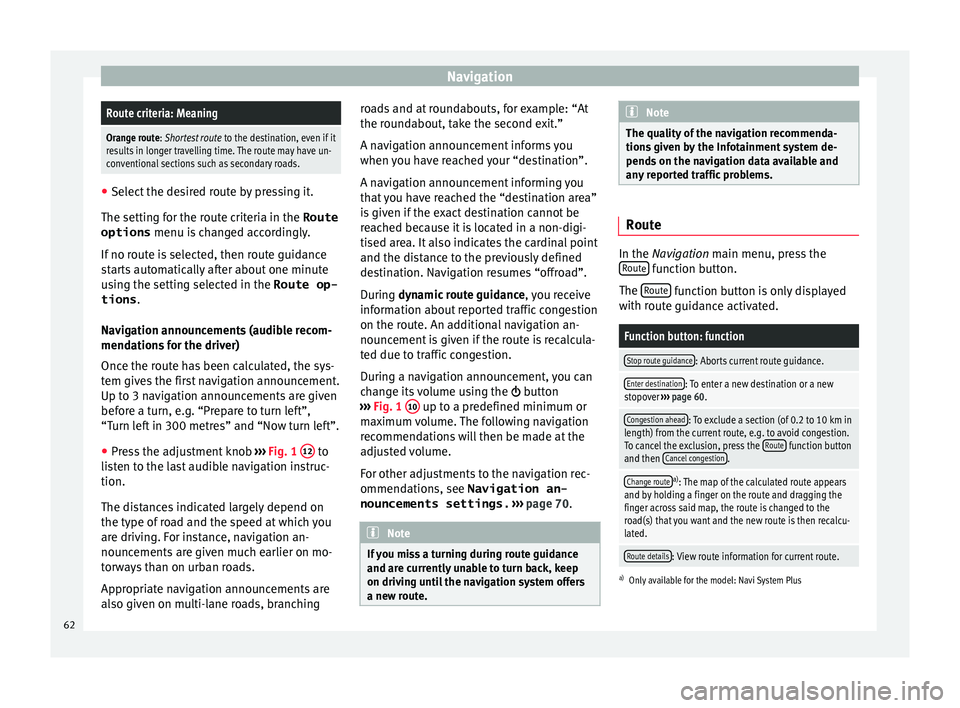
Orange route: Shortest route
to the destination, even if it
results in longer travelling time. The route may have un-
conventional sections such as secondary roads. ●
Select the desired route by pressing it.
The setting f or the r
oute criteria in the Route
options menu is changed accordingly.
If no route is selected, then route guidance
starts automatically after about one minute
using the setting selected in the Route op- tions .
Navigation announcements (audible recom-
mendations for the driver)
Once the route has been calculated, the sys-
tem gives the first navigation announcement.
Up to 3 navigation announcements are given
before a turn, e.g. “Prepare to turn left”,
“Turn left in 300 metres” and “Now turn left”.
● Press the adjustment knob ››
›
Fig. 1 12 to
li s
t
en to the last audible navigation instruc-
tion.
The distances indicated largely depend on
the type of road and the speed at which you
are driving. For instance, navigation an-
nouncements are given much earlier on mo-
torways than on urban roads.
Appropriate navigation announcements are
also given on multi-lane roads, branching roads and at roundabouts, for example: “At
the round
about, take the second exit.”
A navigation announcement informs you
when you have reached your “destination”.
A navigation announcement informing you
that you have reached the “destination area”
is given if the exact destination cannot be
reached because it is located in a non-digi-
tised area. It also indicates the cardinal point
and the distance to the previously defined
destination. Navigation resumes “offroad”.
During dynamic route guidance , you receive
information about reported traffic congestion
on the route. An additional navigation an-
nouncement is given if the route is recalcula-
ted due to traffic congestion.
During a navigation announcement, you can
change its volume using the button
››› Fig. 1 10 up to a predefined minimum or
m ax
imum
volume. The following navigation
recommendations will then be made at the
adjusted volume.
For other adjustments to the navigation rec-
ommendations, see Navigation an-
nouncements settings. ››› page 70. Note
If you miss a turning during route guidance
and are c urr
ently unable to turn back, keep
on driving until the navigation system offers
a new route. Note
The quality of the navigation recommenda-
tions giv
en by the Infotainment system de-
pends on the navigation data available and
any reported traffic problems. Route
In the Navigation main menu, press the
R out
e function button.
The Rout
e function button is only displayed
w ith r
out
e guidance activated.
Function button: function
Stop route guidance: Aborts current route guidance.
Enter destination: To enter a new destination or a new
stopover ››› page 60.
Congestion ahead: To exclude a section (of 0.2 to 10 km in
length) from the current route, e.g. to avoid congestion.
To cancel the exclusion, press the Route
function button
and then Cancel congestion.
Change routea)
: The map of the calculated route appears
and by holding a finger on the route and dragging the
finger across said map, the route is changed to the
road(s) that you want and the new route is then recalcu-
lated.
Route details: View route information for current route.
a) Only available for the model: Navi System Plus
62
Page 68 of 108
NavigationFunction button: function
Position: current vehicle position in coordinates and GPS
status (satellite reception).
a) This function button is only shown when route guidance is
not active or when predictive route guidance is active.
Press the function button to close the split
sc r
een.
At any moment during navigation, pressing
inside the map will make a pop-up menu ap-
pear with the following functions:
Function button: function
Street name or coordinates: shows the details of the point
selected on the map.
Only when you press on an icon on the map:
POI: name of the point of interest (when only one
appears on the map).
Group of POIs: more points of interest (when you
press on the map on various POIs grouped togeth-
er).
Favourite: name of the favourite.
Home: Home address.
Start route guidance: starts guidance directly.
Add stopover destination: only when you have an active
route.
Search nearby: enters in the search menu, but only for the
area around the point selected on the map.
Function button: function
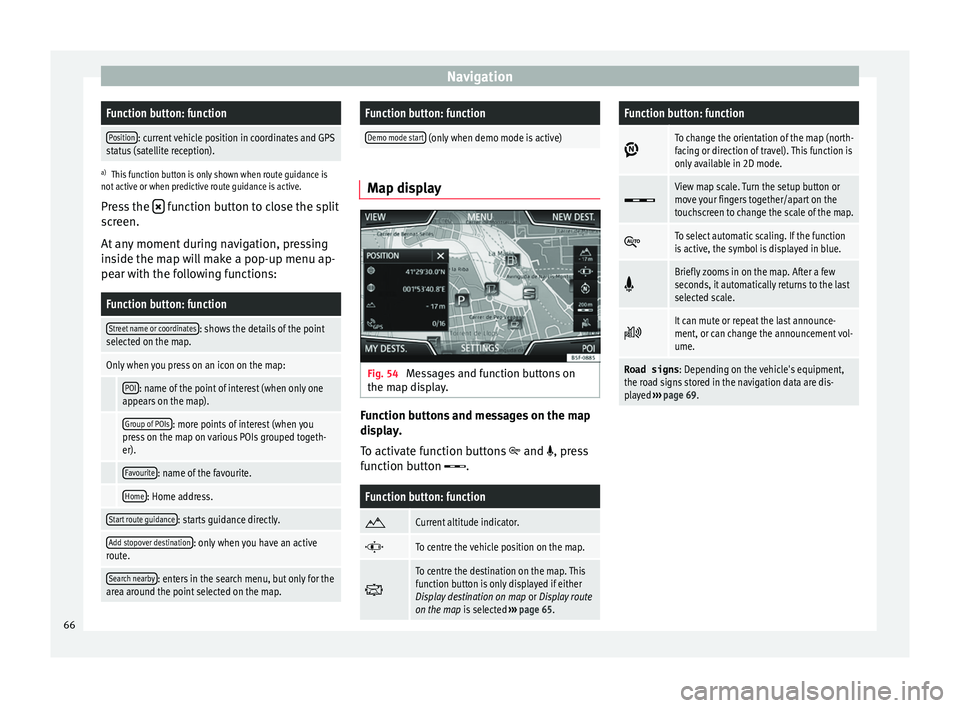
Demo mode start (only when demo mode is active) Map display
Fig. 54
Messages and function buttons on
the m ap di
s
play. Function buttons and messages on the map
di
s
p
lay.
To activate function buttons
and , press
function button .
Function button: function
Current altitude indicator.
To centre the vehicle position on the map.
To centre the destination on the map. This
function button is only displayed if either
Display destination on map
or Display route
on the map is selected ››› page 65.
Function button: function
To change the orientation of the map (north-
facing or direction of travel). This function is
only available in 2D mode.
View map scale. Turn the setup button or
move your fingers together/apart on the
touchscreen to change the scale of the map.
To select automatic scaling. If the function
is active, the symbol is displayed in blue.
Briefly zooms in on the map. After a few
seconds, it automatically returns to the last
selected scale.
It can mute or repeat the last announce-
ment, or can change the announcement vol-
ume.
Road signs
: Depending on the vehicle's equipment,
the road signs stored in the navigation data are dis-
played ››› page 69. 66
Page 71 of 108

Navigation
Navigation with images Fig. 57
Images main menu. Selecting an image and starting route guid-
anc
e
B e
ar in mind the requirements and formats of
the compatible images ››› page 39.
● Insert the data storage device with the stor-
ed image
s or connect it to the Infotainment
system.
● Press the Infotainment system MENU but-
t on and then sel
ect
Images .
● Press the SOURC
E
› ›
› Fig. 57
function button
and select the data storage device where the
images are stored.
● Select the desired image.
● If the image displayed was taken using GPS
localis
ation, the function button will ap-
pe ar
. Pr
ess to start guidance to a destination. Road sign indicators The road sign indicators must be active in the
Navigation Setup menu ›››
page 70.
If road signs for the road being travelled are
stored in the navigation data, the system can
show them on the map display (e.g. a speed
restriction).
Please bear in mind how recent the naviga-
tion data is and the limitations of the system
››› page 58 !
Traffic sign recognition Some vehicles are also equipped with a cam-
er
a f
or tr
affic sign recognition. If traffic sign
recognition is installed in the vehicle and ac-
tivated, the recognised traffic signs and addi-
tional information are displayed in the map
view.
Read and take note of the information and in-
dications provided by the traffic sign recogni-
tion system in the vehicle ›››
Booklet Instruc-
tion Manual.
Route guidance in demo mode If demo mode is activated in the
Naviga-
tion Settings menu ››
›
page 70, an ad-
ditional pop-up window opens when you
start route guidance. ●
Pres
sing the Demo mode function button
s t
ar
ts a “virtual route guidance” to the desti-
nation you have entered.
● If you press the Normal function button, a
“r e
al
route guidance” starts.
The sequence of events and the operations in
virtual route guidance are similar to those in
real route guidance.
Virtual route guidance is repeated when you
reach the fictitious destination and always
starts again from the starting point if not
aborted beforehand.
If the starting point for demo mode has been
defined manually in the Navigation Set-
tings menu, virtual route guidance will start
from the position set.
A manually entered starting point is overwrit-
ten with the current vehicle location if the ve-
hicle moves off. Note
Disable demo mode after use, otherwise you
wi l
l be prompted to choose between virtual
and normal route guidance each time you
start route guidance. 69
Page 73 of 108
NavigationFunction button: function
Select preferred fuel station: The selected petrol station
mark will be shown before other points of interest in
the search.
Fuel warning: The warning to refuel is active.
If the fuel level reaches the reserve level, the corre-
sponding warning is generated which permits the
search for petrol stations.
Version information: Information on the stored navigation
data.
Maximum speeds: Shows the speed limits, depending on
the road, for the current country.
Advanced settings: To make advanced adjustments to the
navigation.
Time display: displayed during route guidance.
Estimated time of arrival: The estimated time of arrival
at the final destination is displayed.
Duration: The estimated travelling time to the final
destination is displayed.
Status line: displayed during route guidance.
Destination: The distance calculated to final desti-
nation is displayed.
Next stopover: The calculated distance until next
stopover is displayed.
Note: National border crossed: Displays the speed lim-
its of the country in question when crossing the bor-
der.
Demo mode: When Demo mode is activated and
route guidance is started, virtual guidance to the en-
tered destination can be initiated ››› page 69.
Function button: function
Define demo mode starting point: if demo mode is acti-
vated, a fictitious starting point for virtual route
guidance can be defined when the vehicle is sta-
tionary.
Waypoint modeb) : To start Offroad navigation.
a) This function depends on the country.
b) Only available for the model: “Navi System Plus”.
Navigation in Offroad mode*
Introduction 3 Only
available for the model: Navi System Plus
O
ffroad* navigation is a function for offroad
driving that provides directions in “non-digi-
tised areas” at low speeds.
Non-digitised areas are areas about which
the system does not have information for the
streets or terrain. It does not detect streets,
buildings or natural limits such as mountains
or rivers, although they may be shown on the
map.
Offroad* navigation is not suitable for driving
on conventional roads as it does not detect
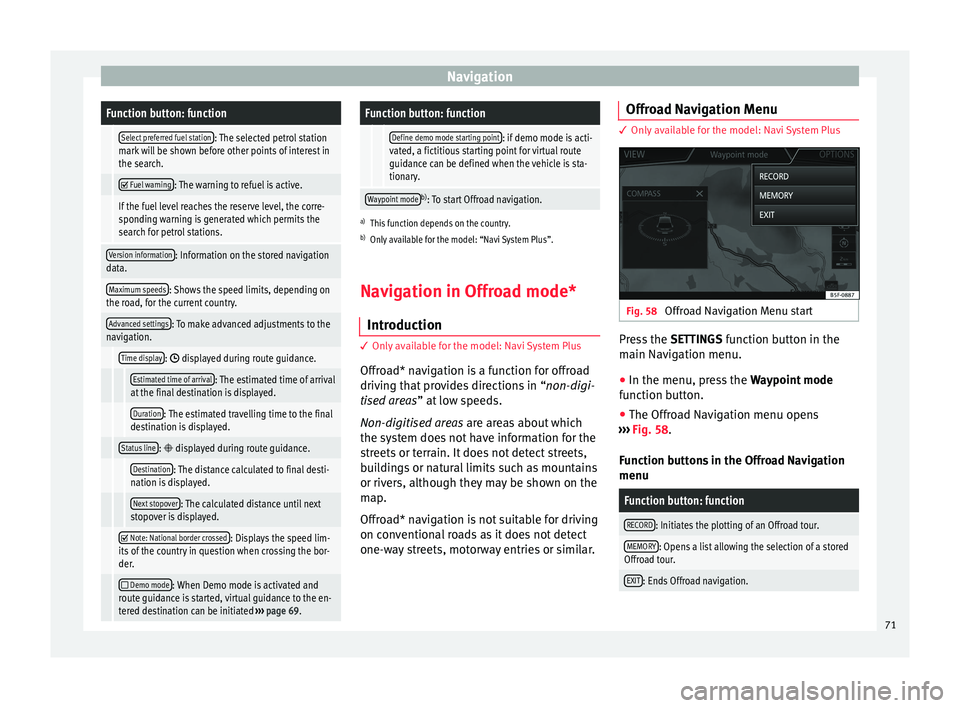
one-way streets, motorway entries or similar. Offroad Navigation Menu 3 Only available for the model: Navi System Plus
Fig. 58
Offroad Navigation Menu start Press the
SETTINGS function button in the
m ain Nav
igation menu.
● In the menu, press the Way
point mode
function button.
● The Offroad Navigation menu opens
›››
Fig. 58.
Function buttons in the Offroad Navigation
menu
Function button: function
RECORD: Initiates the plotting of an Offroad tour.
MEMORY: Opens a list allowing the selection of a stored
Offroad tour.
EXIT: Ends Offroad navigation. 71
Page 74 of 108
Navigation
Recording an Offroad tour 3 Only available for the model: Navi System Plus
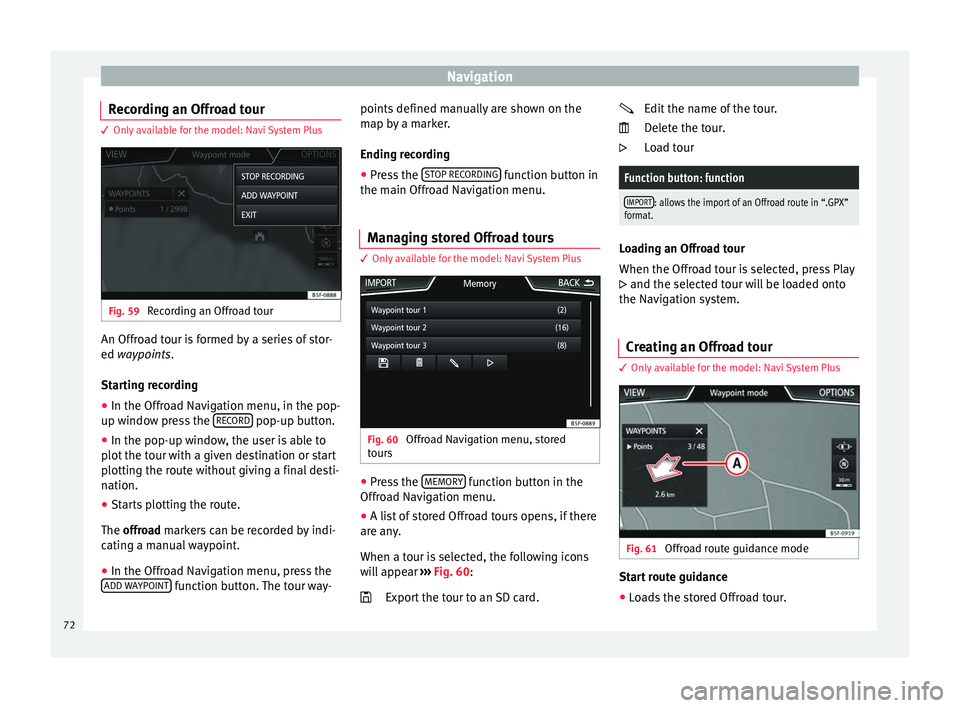
Fig. 59
Recording an Offroad tour An Offroad tour is formed by a series of stor-
ed wa
ypoin
t
s.
Starting recording
● In the Offroad Navigation menu, in the pop-
up window pr
ess the RECORD pop-up button.
● In the pop-up window, the user is able to
p lot
the t
our with a given destination or start
plotting the route without giving a final desti-
nation.
● Starts plotting the route.
The offroa
d markers can be recorded by indi-
cating a manual waypoint.
● In the Offroad Navigation menu, press the
ADD WA
YPOINT function button. The tour way- points defined manually are shown on the
m
ap b
y
a marker.
Ending recording ● Press the STOP RE
CORDING function button in
the m ain O
ffr
oad Navigation menu.
Managing stored Offroad tours 3 Only available for the model: Navi System Plus
Fig. 60
Offroad Navigation menu, stored
t our s ●
Press the MEMORY function button in the
O ffr
o
ad Navigation menu.
● A list of stored Offroad tours opens, if there
are any
.
When a tour is selected, the following icons
will appear ››› Fig. 60:
Export the tour to an SD card.
Edit the name of the tour.
Delet
e the tour.
Load tour
Function button: function
IMPORT: allows the import of an Offroad route in “.GPX”
format. Loading an Offroad tour
When the Offr
o
ad tour is selected, press Play
and the selected tour will be loaded onto
the Navigation system.
Creating an Offroad tour 3 Only
available for the model: Navi System Plus Fig. 61
Offroad route guidance mode Start route guidance
● Loads the stored Offroad tour.
72
Page 78 of 108
CAR menu
the ignition is switched on to when it is
sw it
c
hed off.
2. Since refuelling
Display and storage of the values for the jour-
ney and the consumption. By refuelling, the
memory will be erased automatically.
3. Long-term
The memory records the values for a specific
number of partial trips, up to a total of 19
hours and 59 minutes or 99 hours and 59 mi-
nutes, or 1999.9 km (or miles) for 9999 km
(or miles), depending on the model of instru-
ment panel.
When one of these values is reached (de-
pending on the version of the instrument
panel), the memory is automatically deleted
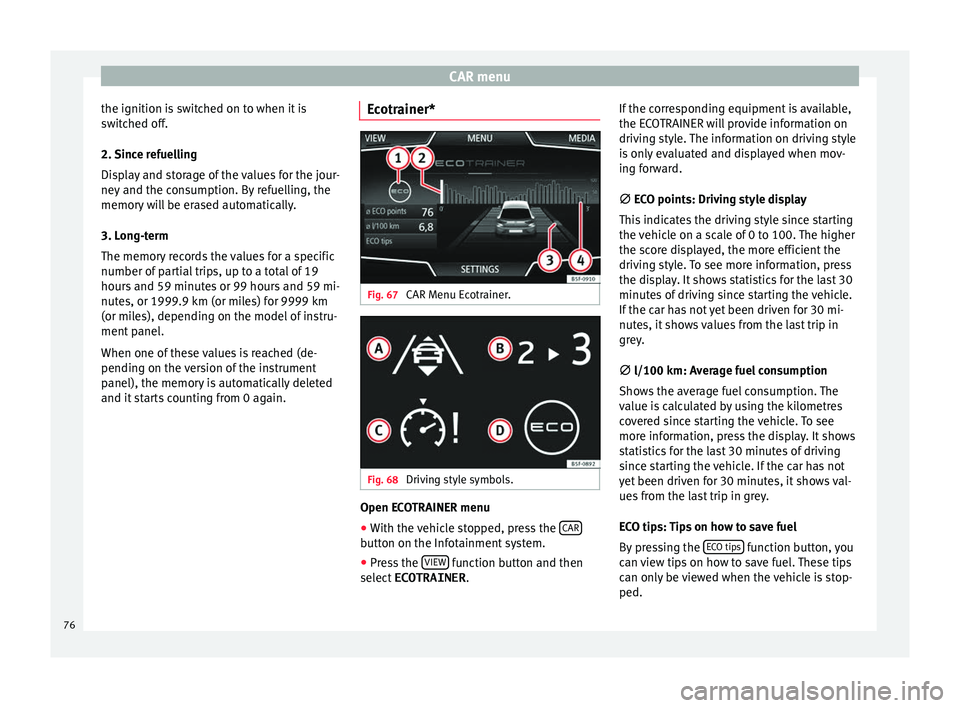
and it starts counting from 0 again. Ecotrainer* Fig. 67
CAR Menu Ecotrainer. Fig. 68
Driving style symbols. Open ECOTRAINER menu
● With the vehicle stopped, press the CAR button on the Infotainment system.
● Press the VIEW function button and then
sel ect
ECOTRAINER . If
the corresponding equipment is available,
the ECO
TRAINER will provide information on
driving style. The information on driving style
is only evaluated and displayed when mov-
ing forward.
∅ ECO points: Driving style display
This indicates the driving style since starting
the vehicle on a scale of 0 to 100. The higher
the score displayed, the more efficient the
driving style. To see more information, press
the display. It shows statistics for the last 30
minutes of driving since starting the vehicle.
If the car has not yet been driven for 30 mi-
nutes, it shows values from the last trip in
grey.
∅ l/100 km: Average fuel consumption
Shows the average fuel consumption. The
value is calculated by using the kilometres
covered since starting the vehicle. To see
more information, press the display. It shows
statistics for the last 30 minutes of driving
since starting the vehicle. If the car has not
yet been driven for 30 minutes, it shows val-
ues from the last trip in grey.
ECO tips: Tips on how to save fuel
By pressing the ECO tips function button, you
c an
v
iew tips on how to save fuel. These tips
can only be viewed when the vehicle is stop-
ped.
76
Page 84 of 108
Telephone management system (PHONE)
● Use
y
our mobile telephone to enter and
confirm your PIN code, as indicated in the
display of the infotainment system.
OR:
● Compare the PIN code shown on the dis-
pla
y of the Infotainment system with that
shown on the mobile telephone. If they
match, confirm on both devices.
The infotainment system and the mobile tele-
phone will now be connected to each other.
When the pairing has been finalized correct-
ly, the PHONE main menu will appear. The
phonebook and call lists stored in the mobile
phone will be loaded once the requests have
been accepted in the mobile phone. The du-
ration of the loading process depends on the
amount of data stored on the mobile tele-
phone. After loading, the data will be availa-
ble on the Infotainment system.
Pairing and connection of mobile telephones
You can pair up to 20 mobile telephones to
the Infotainment system, but there can only
be two mobile phones simultaneously con-
nected as hands-free, and a third device as
BT audio at any time.
When the Infotainment system is switched
on, it automatically connects to the last con-
nected mobile telephone. If it is not possible
to connect to this mobile telephone, the tele-
phone management system will try to auto- matically connect to the next mobile tele-
phone on the list
of paired devices.
The maximum range of the Bluetooth ®
is ap-
proximate. 10 metres. The active Bluetooth ®
connection disconnects if this distance is ex-
ceeded. The connection is automatically re-
established as soon as the device is once
again within Bluetooth ®
range.
If the maximum number of paired devices is
reached and you wish to pair another one to
the system, it will automatically replace the
one least used recently. If you wish to replace
it with another one, the user must erase it be-
forehand. To do so:
● Press the Setup button on the device while
in telephone mode.
● Pr
ess the function button Bluetooth setting
s .
● Activate the P
air
ed dev
ices function button.
● In the list of paired devices, press the function button next to the mobile telephone
t
o be del
et
ed and then press Delete to con-
firm the process. Note
● It m a
y be necessary to confirm the phone-
book data transfer request on the mobile tel-
ephone.
● Check that there are no requests pending
accept
ance in your mobile phone. If there are,
this could block some of the functions in the
PHONE menu. Description of the telephone
m
an
ag
ement system
Introduction Some functions and setup can only be per-
formed when the
v
ehicle is stopped and are
not available on all mobile telephones.
With the help of the telephone manager, up
to 3 mobile telephones can be connected to
the Infotainment system via the Bluetooth
profiles (for example, one used as a Blue-
tooth-audio player and/or another two as
hands-free telephones). Note
● Us in
g a mobile telephone inside the vehicle
may provoke noise in the speakers.
● Some networks may not recognise all lan-
guage ch
aracters or offer all services.82
Page 86 of 108
Telephone management system (PHONE)
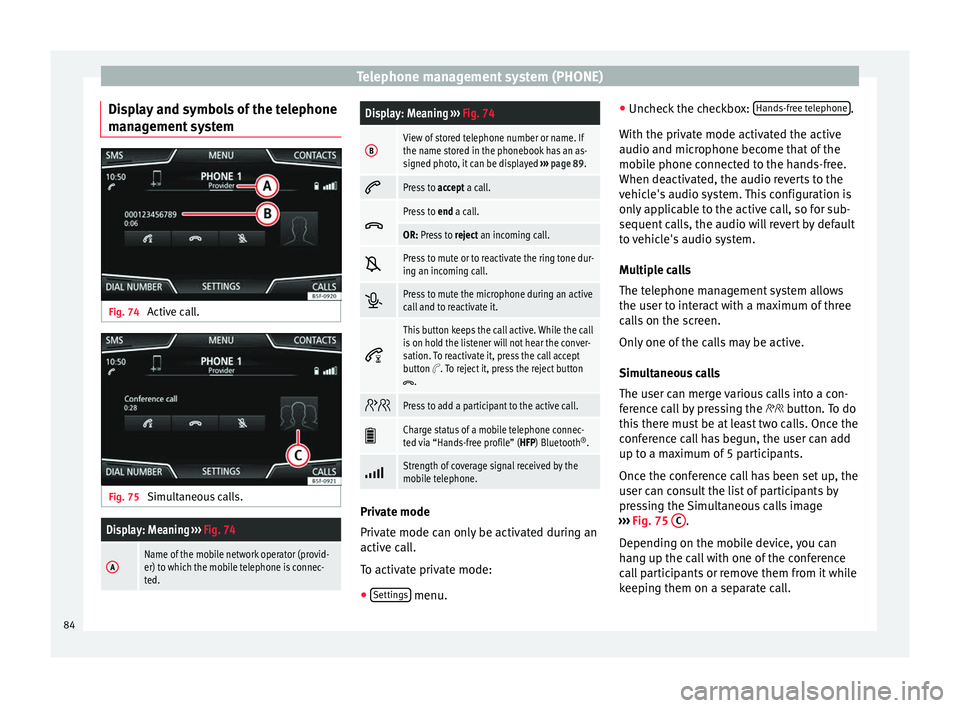
Display and symbols of the telephone
m an
ag
ement system Fig. 74
Active call. Fig. 75
Simultaneous calls.
Display: Meaning ››› Fig. 74
AName of the mobile network operator (provid-
er) to which the mobile telephone is connec-
ted.
Display: Meaning ››› Fig. 74
BView of stored telephone number or name. If
the name stored in the phonebook has an as-
signed photo, it can be displayed ››› page 89.
Press to
accept a call.
Press to
end a call.
OR: Press to reject an incoming call.
Press to mute or to reactivate the ring tone dur-
ing an incoming call.
Press to mute the microphone during an active
call and to reactivate it.
This button keeps the call active. While the call
is on hold the listener will not hear the conver-
sation. To reactivate it, press the call accept
button
. To reject it, press the reject button.
Press to add a participant to the active call.
Charge status of a mobile telephone connec-
ted via “Hands-free profile” (HFP) Bluetooth
®
.
Strength of coverage signal received by the
mobile telephone.
Private mode
Priv
at
e mode c
an only be activated during an
active call.
To activate private mode:
● Settings menu.●
Unc hec
k
the checkbox: Hands-free telephone .
W ith the priv
at
e mode activated the active
audio and microphone become that of the
mobile phone connected to the hands-free.
When deactivated, the audio reverts to the
vehicle's audio system. This configuration is
only applicable to the active call, so for sub-
sequent calls, the audio will revert by default
to vehicle's audio system.
Multiple calls
The telephone management system allows
the user to interact with a maximum of three
calls on the screen.
Only one of the calls may be active.
Simultaneous calls
The user can merge various calls into a con-
ference call by pressing the button. To do
this there must be at least two calls. Once the
conference call has begun, the user can add
up to a maximum of 5 participants.
Once the conference call has been set up, the
user can consult the list of participants by
pressing the Simultaneous calls image
››› Fig. 75 C .
D ependin
g on the mo
bile device, you can
hang up the call with one of the conference
call participants or remove them from it while
keeping them on a separate call.
84
Page 92 of 108

Telephone management system (PHONE)
Note
Some telephones need to be restarted to re-
down lo
ad the most recent contacts added. Connectivity Box* / Wireless Charger*
3 Applies to the model: ATECA
Fig. 82
In the centre console: pad for con-
nectin g a mo
b
ile phone. The Connectivity Box includes different func-
tion
s
th
at will help to use your mobile device.
They are the “Wireless Charger ” and the “Mo-
bile Signal Amplifier”.
The Wireless Charger only features the “Wire-
less Charger ” function. “Wireless Charger”
The “Wire
less Charger ” allows mobile devi-
ces with Qi 1)
technology to be charged with-
out a cable.
To charge your mobile phone wirelessly:
● Place your mobile device with Qi technolo-
gy 1)
in the middl
e of the pad with the screen
facing up ››› Fig. 82.
When you do so, make sure there are no ob-
jects between the pad and the mobile phone.
The mobile phone will start charging auto-
matically. For further information about
whether your mobile device uses Qi technolo-
gy, please check your mobile phone's user
manual or visit the SEAT website.
“Mobile Signal Amplifier”
The “Mobile Signal Amplifier” allows you to
reduce the radiation in your vehicle and en-
joy better reception.
For safety reasons, it is recommended that
you pair the radio and the mobile device us-
ing Bluetooth ®
and place the mobile phone
on the Connectivity Box pad, so as to have
better reception without having to handle the
mobile phone. To establish a connection with the vehicle's
extern
al aerial:
● Place your mobile device in the middle of
the pad w
ith the screen facing up ››› Fig. 82.
When you do so, make sure there are no ob-
jects between the pad and the mobile phone.
Your mobile phone will automatically be
ready to make use of the external aerial. WARNING
The mobile phone may heat up due to the
wir el
ess charging. Think about the tempera-
ture of your device before you pick it up, and
take care when removing it. Note
● Your mo b
ile device must support the Qi
wireless inductive charging interface stand-
ard for proper operation.
● If your mobile phone has a cover or a pro-
tective c
asing, this may affect the Connectivi-
ty Box functions.
● There must be no metallic objects between
the pad and the mo
bile device that might af-
fect the wireless charging or the connection
with the external aerial. 1)
Qi technology allows you to charge your mobile
phone wir el
essly.
90
Page 94 of 108
Setup
Setup
M enu and sy
s
tem settings
Main menu System settings The selection of possible settings will de-
pend on the cou
ntr
y, the unit in question and
the vehicle equipment.
● Press the Infotainment system MENU but-
ton and then pr e
ss the SETUP function but-
ton.
● To a
djust the settings for a certain function,
pre s
s the appropriate function button in the
main menu. Changes are automatically stor-
ed when a menu is closed.
Function button: function
Screen: To perform screen setup.
Select display mode: Grid or Carousel.
Switch off screen (in 10 seconds): If this function is ac-
tive and the Infotainment system is not in use, the
screen will switch off after approximately 10 sec-
onds. Pressing the screen or pressing one of the Info-
tainment system buttons will switch the screen back
on.
Brightness: To select the brightness level of the
screen.
Day/Night: To select the display type ( Day, Night or
Automatic ).
Function button: function
Touchscreen tone: Confirmation tone for pressing a
function button is activated.
Proximity sensor: The proximity sensors are activa-
ted. Also see ››› page 13, Proximity sensors .
Show clock in standby mode: In standby mode, the cur-
rent time is shown on the Infotainment system dis-
play.
Date and time: To alter the time and date.
Clock time source: To select the time source (GPS or
manual).
GPS: The date and time can be selected using the
Time zone function button. In this case, the Dateand Time function buttons for manually entering
the data will not be active.
Manually: The date and time can be manually ad-
justed using the Date and Time function buttons.
Time: To manually alter the time.
Time zone: To change to the desired time zone.
Time format: To select the time display format (12- or
24-hour clock).
Date: To adjust the current time.
Date format: To select the display format for the date
(DD.MM.YYYY , YY-MM-DD or MM-DD-YY ).
Language: To select the desired language for the texts
and announcements in the voice control system.
Additional keypad languages: To select the additional key-
pad languages.
Function button: function
Units: To set the measurement units for the vehicle dis-
plays.
Distance , vehicle speed , temperature, volume,
consumption and pressure .
Mobile device data transfer
Data transfer for SEAT apps: Allows the exchange of infor-
mation between the vehicle and SEAT applications.
These are not personal data.
Operation via apps: Changes the level of interaction
with the applications.
Deactivate: Limits specific functions that require a
higher level of security. Confirm
: Allows 100% functionality of the App but
with certain actions relating to the Infotainment
system requiring confirmation. Allow
: Allows the execution of all the available
functions from the App.
Voice control: To perform the voice control setup
››› page 15.
Remove safely: To eject the data storage device (SD card
1/SD card 2/USB) from the system. After correctly eject-
ing the data storage device from the system, the func-
tion button becomes inactive (grey colour).
Factory settings: When resetting factory settings, all en-
tries and changes made are deleted, depending on the
selected setup.
Bluetooth: To perform Bluetooth ®
settings ››› page 89.
WLANa)
: To adjust the WLAN mobile hotspot settings
››› page 53. 92