clock setting Seat Toledo 2017 MEDIA SYSTEM PLUS - NAVI SYSTEM - NAVI SYSTEM PLUS
[x] Cancel search | Manufacturer: SEAT, Model Year: 2017, Model line: Toledo, Model: Seat Toledo 2017Pages: 108, PDF Size: 2.84 MB
Page 12 of 108
Introduction
●
On some v ehic
les with ParkPilot, the vol-
ume of the audio source is automatically low-
ered when reverse gear is selected. You can
change settings for lowering the volume in
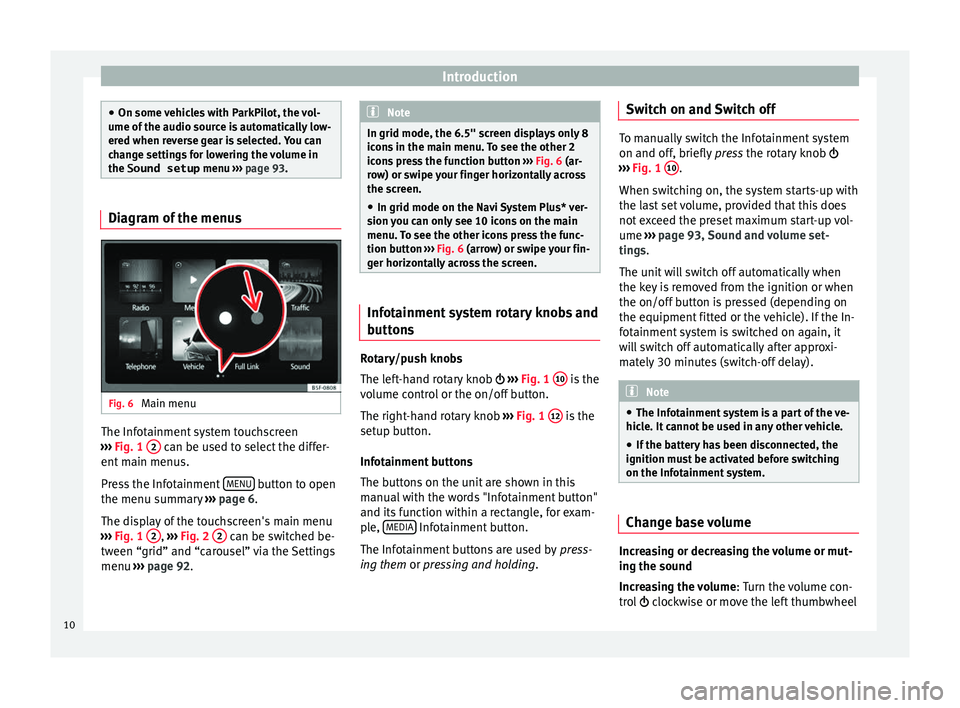
the Sound setup menu ››› page 93. Diagram of the menus
Fig. 6
Main menu The Infotainment system touchscreen
› ›
›
Fig. 1 2 can be used to select the differ-
ent m
ain menu
s.
Press the Infotainment MENU button to open
the menu s umm
ar
y ››› page 6.
The display of the touchscreen's main menu
››› Fig. 1 2 ,
››
› Fig. 2 2 can be switched be-
tw een “grid” and “c
ar
ousel” via the Settings
menu ››› page 92. Note
In grid mode, the 6.5" screen displays only 8
icon s
in the main menu. To see the other 2
icons press the function button ››› Fig. 6 (ar-
row) or swipe your finger horizontally across
the screen.
● In grid mode on the Navi System Plus* ver-
sion y
ou can only see 10 icons on the main
menu. To see the other icons press the func-
tion button ››› Fig. 6 (arrow) or swipe your fin-
ger horizontally across the screen. Infotainment system rotary knobs and
b
utt
on
s Rotary/push knobs
The l
ef
t
-hand rotary knob ›››
Fig. 1 10 is the
v o
lume c
ontrol or the on/off button.
The right-hand rotary knob ›››
Fig. 1 12 is the
set up b
utt
on.
Infotainment buttons
The buttons on the unit are shown in this
manual with the words "Infotainment button"
and its function within a rectangle, for exam-
ple, MEDIA Infotainment button.
The Inf ot
ainment
buttons are used by press-
ing them or pressing and holding. Switch on and Switch off To manually switch the Infotainment system
on and off, briefly
pr
ess the rotary knob
››› Fig. 1 10 .
When swit c
hing on, the system starts-up with
the last set volume, provided that this does
not exceed the preset maximum start-up vol-
ume ››› page 93, Sound and volume set-
tings.
The unit will switch off automatically when
the key is removed from the ignition or when
the on/off button is pressed (depending on
the equipment fitted or the vehicle). If the In-
fotainment system is switched on again, it
will switch off automatically after approxi-
mately 30 minutes (switch-off delay). Note
● The Infot ainment
system is a part of the ve-
hicle. It cannot be used in any other vehicle.
● If the battery has been disconnected, the
ignition must
be activated before switching
on the Infotainment system. Change base volume
Increasing or decreasing the volume or mut-
in
g the sou
nd
Inc
reasing the volume : Turn the volume con-
trol clockwise or move the left thumbwheel
10
Page 13 of 108
Introduction
on the multifunction steering wheel upward
››
›
Booklet Instruction Manual.
Lowering the volume : Turn the volume con-
trol anti-clockwise or move the left thumb-
wheel on the multifunction steering wheel
downward ››› Booklet Instruction Manual.
Changes in volume are indicated by a volume
bar on the screen. The volume can be control-
led using the steering wheel controls. In this
case, the changes in volume are displayed on
the instrument panel by a volume bar.
It is possible to preset certain volume set-
tings and adjustments ››› page 93, Sound
and volume settings .
Muting the Infotainment system sound
● Turn the volume control anti-clock
wise
until it displays .
Muting the Infotainment system sound stops
the media source that is playing The screen
displays . Note
If the base volume has been considerably in-
cr e
ased to play a certain audio source, lower
the volume again before switching to another
audio source. Operation of the function buttons and
the in
s
truction
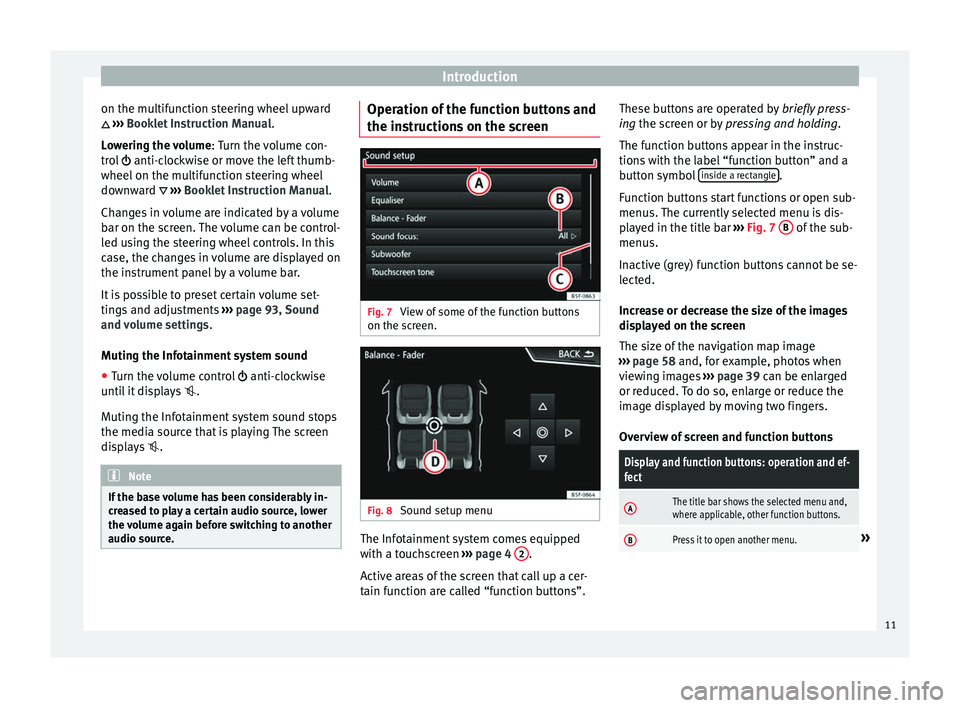
s on the screen Fig. 7
View of some of the function buttons
on the s c
r
een. Fig. 8
Sound setup menu The Infotainment system comes equipped
w ith a t
ouc
hscreen ››› page 4 2 .
A ctiv
e ar
eas of the screen that call up a cer-
tain function are called “function buttons”. These buttons are operated by
briefly
press-
ing the screen or by pressing and holding.
The function buttons appear in the instruc-
tions with the label “function button” and a
button symbol inside a rectangle .
F u
nction b
uttons start functions or open sub-
menus. The currently selected menu is dis-
played in the title bar ››› Fig. 7 B of the sub-
menu s.
In activ
e (grey) function buttons cannot be se-
lected.
Increase or decrease the size of the images
displayed on the screen
The size of the navigation map image
››› page 58 and, for example, photos when
viewing images ››› page 39 can be enlarged
or reduced. To do so, enlarge or reduce the
image displayed by moving two fingers.
Overview of screen and function buttons
Display and function buttons: operation and ef-
fect
AThe title bar shows the selected menu and,
where applicable, other function buttons.
BPress it to open another menu.» 11
Page 58 of 108
Audio and Media Mode
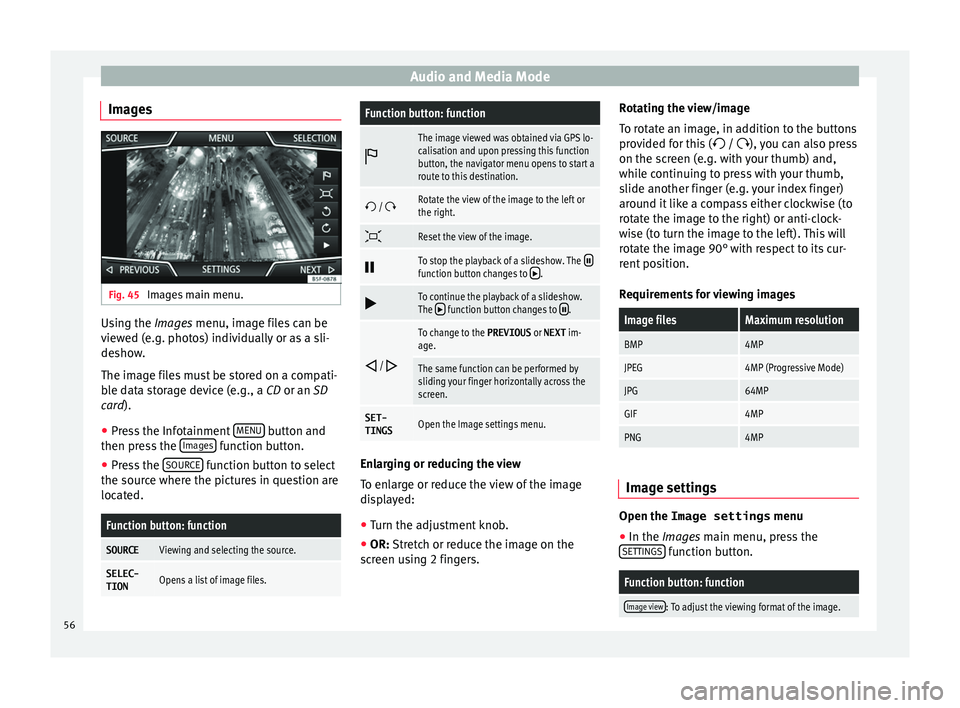
Images Fig. 45
Images main menu. Using the Ima
ge
s menu, image files can be
viewed (e.g. photos) individually or as a sli-
deshow.
The image files must be stored on a compati-
ble data storage device (e.g., a CD or an SD
card).
● Press the Infotainment MENU button and
then pr e
s
s the Images function button.
● Press the SOURC
E function button to select
the sour c
e wher
e the pictures in question are
located.
Function button: function
SOURCEViewing and selecting the source.
SELEC-
TIONOpens a list of image files.
Function button: function
The image viewed was obtained via GPS lo-
calisation and upon pressing this function
button, the navigator menu opens to start a
route to this destination.
/ Rotate the view of the image to the left or
the right.
Reset the view of the image.
To stop the playback of a slideshow. The function button changes to .
To continue the playback of a slideshow.
The function button changes to .
/
To change to the PREVIOUS
or NEXT im-
age.
The same function can be performed by
sliding your finger horizontally across the
screen.
SET- TINGSOpen the Image settings menu. Enlarging or reducing the view
T
o en
l
arge or reduce the view of the image
displayed:
● Turn the adjustment knob.
● OR: Stretch or reduce the image on the
sc
reen using 2 fingers. Rotating the view/image
To rot
ate an image, in addition to the buttons
provided for this ( / ), you can also press
on the screen (e.g. with your thumb) and,
while continuing to press with your thumb,
slide another finger (e.g. your index finger)
around it like a compass either clockwise (to
rotate the image to the right) or anti-clock-
wise (to turn the image to the left). This will
rotate the image 90° with respect to its cur-
rent position.
Requirements for viewing images
Image filesMaximum resolution
BMP4MP
JPEG4MP (Progressive Mode)
JPG64MP
GIF4MP
PNG4MP Image settings
Open the Image settings
menu
● In the Ima ges main menu, press the
S ET
TINGS function button.
Function button: function
Image view: To adjust the viewing format of the image.
56
Page 94 of 108
Setup
Setup
M enu and sy
s
tem settings
Main menu System settings The selection of possible settings will de-
pend on the cou
ntr
y, the unit in question and
the vehicle equipment.
● Press the Infotainment system MENU but-
ton and then pr e
ss the SETUP function but-
ton.
● To a
djust the settings for a certain function,
pre s
s the appropriate function button in the
main menu. Changes are automatically stor-
ed when a menu is closed.
Function button: function
Screen: To perform screen setup.
Select display mode: Grid or Carousel.
Switch off screen (in 10 seconds): If this function is ac-
tive and the Infotainment system is not in use, the
screen will switch off after approximately 10 sec-
onds. Pressing the screen or pressing one of the Info-
tainment system buttons will switch the screen back
on.
Brightness: To select the brightness level of the
screen.
Day/Night: To select the display type ( Day, Night or
Automatic ).
Function button: function
Touchscreen tone: Confirmation tone for pressing a
function button is activated.
Proximity sensor: The proximity sensors are activa-
ted. Also see ››› page 13, Proximity sensors .
Show clock in standby mode: In standby mode, the cur-
rent time is shown on the Infotainment system dis-
play.
Date and time: To alter the time and date.
Clock time source: To select the time source (GPS or
manual).
GPS: The date and time can be selected using the
Time zone function button. In this case, the Dateand Time function buttons for manually entering
the data will not be active.
Manually: The date and time can be manually ad-
justed using the Date and Time function buttons.
Time: To manually alter the time.
Time zone: To change to the desired time zone.
Time format: To select the time display format (12- or
24-hour clock).
Date: To adjust the current time.
Date format: To select the display format for the date
(DD.MM.YYYY , YY-MM-DD or MM-DD-YY ).
Language: To select the desired language for the texts
and announcements in the voice control system.
Additional keypad languages: To select the additional key-
pad languages.
Function button: function
Units: To set the measurement units for the vehicle dis-
plays.
Distance , vehicle speed , temperature, volume,
consumption and pressure .
Mobile device data transfer
Data transfer for SEAT apps: Allows the exchange of infor-
mation between the vehicle and SEAT applications.
These are not personal data.
Operation via apps: Changes the level of interaction
with the applications.
Deactivate: Limits specific functions that require a
higher level of security. Confirm
: Allows 100% functionality of the App but
with certain actions relating to the Infotainment
system requiring confirmation. Allow
: Allows the execution of all the available
functions from the App.
Voice control: To perform the voice control setup
››› page 15.
Remove safely: To eject the data storage device (SD card
1/SD card 2/USB) from the system. After correctly eject-
ing the data storage device from the system, the func-
tion button becomes inactive (grey colour).
Factory settings: When resetting factory settings, all en-
tries and changes made are deleted, depending on the
selected setup.
Bluetooth: To perform Bluetooth ®
settings ››› page 89.
WLANa)
: To adjust the WLAN mobile hotspot settings
››› page 53. 92
Page 103 of 108
Index
voice control . . . . . . . . . . . . . . . . . . . . . . . . . . . . 17
v o
lume
. . . . . . . . . . . . . . . . . . . . . . . . . . . . . . . . 93
WLAN . . . . . . . . . . . . . . . . . . . . . . . . . . . . . . . . . . 53
Setup AM . . . . . . . . . . . . . . . . . . . . . . . . . . . . . . . . . . . . 37
FM . . . . . . . . . . . . . . . . . . . . . . . . . . . . . . . . . . . . 36
Short messages (SMS) . . . . . . . . . . . . . . . . . . . . . . 87
Show clock . . . . . . . . . . . . . . . . . . . . . . . . . . . . . . . 92
Slider . . . . . . . . . . . . . . . . . . . . . . . . . . . . . . . . . . . . 12
Slide (screen) . . . . . . . . . . . . . . . . . . . . . . . . . . . . . 12
SMS . . . . . . . . . . . . . . . . . . . . . . . . . . . . . . . . . . . . . 87
Sound distribution (Balance and Fader) . . . . . . . . 93
Sound settings (bass and treble) . . . . . . . . . . . . . 93
Sound suppression . . . . . . . . . . . . . . . . . . . . . . . . 10
Sound suppression (mute) . . . . . . . . . . . . . . . . . . 10
Special features displays . . . . . . . . . . . . . . . . . . . . . . . . . . . . . . . . 14
lowering the volume . . . . . . . . . . . . . . . . . . . . . . 10
store station logos . . . . . . . . . . . . . . . . . . . . . . . 33
Speed-dependent volume . . . . . . . . . . . . . . . . . . . 93
Speed dial buttons see PHONE . . . . . . . . . . . . . . . . . . . . . . . . . . . . . 88
Split screen NAV (navigation) . . . . . . . . . . . . . . . . . . . . . . . . . 65
SSD (Media mode) see Jukebox (SSD) . . . . . . . . . . . . . . . . . . . . . . . 51
Station select . . . . . . . . . . . . . . . . . . . . . . . . . . . . . . . . . . 34
setting a station name . . . . . . . . . . . . . . . . . . . . 31
store . . . . . . . . . . . . . . . . . . . . . . . . . . . . . . . . . . 34
tune . . . . . . . . . . . . . . . . . . . . . . . . . . . . . . . . . . . 34
Station logos store . . . . . . . . . . . . . . . . . . . . . . . . . . . . . . . . . . 33
store automatically . . . . . . . . . . . . . . . . . . . . . . . 33
Station names . . . . . . . . . . . . . . . . . . . . . . . . . . . . 31
Stations SCAN function . . . . . . . . . . . . . . . . . . . . . . . . . . . 35 Station search . . . . . . . . . . . . . . . . . . . . . . . . . . . . 35
Station trac
king . . . . . . . . . . . . . . . . . . . . . . . . . . . 31
Store audio files (jukebox SSD) . . . . . . . . . . . . . . . . . . 51
Switch off . . . . . . . . . . . . . . . . . . . . . . . . . . . . . . . . 10
Switch on . . . . . . . . . . . . . . . . . . . . . . . . . . . . . . . . 10
T Text entry . . . . . . . . . . . . . . . . . . . . . . . . . . . . . . . . 13
Things to note AUX mode . . . . . . . . . . . . . . . . . . . . . . . . . . . . . . 50
TMCpro traffic reports . . . . . . . . . . . . . . . . . . . . . . 67
TMC traffic reports . . . . . . . . . . . . . . . . . . . . . . . . . 67
TP (traffic news) activate and deactivate . . . . . . . . . . . . . . . . . . . 35
EON . . . . . . . . . . . . . . . . . . . . . . . . . . . . . . . . . . . 35
TP (Traffic programme) traffic announcement (INFO) . . . . . . . . . . . . . . . 36
Track list . . . . . . . . . . . . . . . . . . . . . . . . . . . . . . . . . 46
Traffic announcement (INFO) . . . . . . . . . . . . . . . . . 36
Traffic news see: TP (traffic news) . . . . . . . . . . . . . . . . . . . . . 35
Traffic reports . . . . . . . . . . . . . . . . . . . . . . . . . . . . . 67 online . . . . . . . . . . . . . . . . . . . . . . . . . . . . . . . . . 67
on the map . . . . . . . . . . . . . . . . . . . . . . . . . . . . . 67
symbols . . . . . . . . . . . . . . . . . . . . . . . . . . . . . . . . 67
TMC/TMCpro . . . . . . . . . . . . . . . . . . . . . . . . . . . . 67
Traffic sign recognition . . . . . . . . . . . . . . . . . . . . . 69
U
Unit buttons . . . . . . . . . . . . . . . . . . . . . . . . . . 4, 5, 10
USB connect an external data storage device . . . . . 49
disconnect . . . . . . . . . . . . . . . . . . . . . . . . . . . . . 49
error messages . . . . . . . . . . . . . . . . . . . . . . . . . . 49
faults . . . . . . . . . . . . . . . . . . . . . . . . . . . . . . . . . . 49 select . . . . . . . . . . . . . . . . . . . . . . . . . . . . . . . . . . 44
unre
adable . . . . . . . . . . . . . . . . . . . . . . . . . . . . . 49
USB port
iPad management . . . . . . . . . . . . . . . . . . . . . . . 49
iPhone management . . . . . . . . . . . . . . . . . . . . . 49
USB port iPod management . . . . . . . . . . . . . . . . . . . . . . . 49
Use check boxes . . . . . . . . . . . . . . . . . . . . . . . . . . . . 11
User profile settings . . . . . . . . . . . . . . . . . . . . . . . . . . . . . . . . 89
V
vCards importing . . . . . . . . . . . . . . . . . . . . . . . . . . . . . . 68
video settings . . . . . . . . . . . . . . . . . . . . . . . . . . . . . . . . 55
View NAV (navigation) . . . . . . . . . . . . . . . . . . . . . . . . . 65
Virtual buttons see: Function buttons . . . . . . . . . . . . . . . . . . . . . 11
Voice control . . . . . . . . . . . . . . . . . . . . . . . . . . . . . . 15 languages available . . . . . . . . . . . . . . . . . . . . . . 15
Volume announcements . . . . . . . . . . . . . . . . . . . . . . . . . 93
base volume . . . . . . . . . . . . . . . . . . . . . . . . . . . . 10
change . . . . . . . . . . . . . . . . . . . . . . . . . . . . . . . . 10
set for external audio sources . . . . . . . . . . . . . . 93
speed-dependent volume adjustment (GALA) . 93
Volume distribution (Balance and Fader) . . . . . . . 93
W Waiting time . . . . . . . . . . . . . . . . . . . . . . . . . . . . . . 10
Wireless Charger . . . . . . . . . . . . . . . . . . . . . . . . . . 90
WLAN . . . . . . . . . . . . . . . . . . . . . . . . . . . . . . . . . . . . 27 connect external audio source . . . . . . . . . . . . . 53
settings . . . . . . . . . . . . . . . . . . . . . . . . . . . . . . . . 53
101