ECO mode Seat Toledo 2017 MEDIA SYSTEM TOUCH - COLOUR
[x] Cancel search | Manufacturer: SEAT, Model Year: 2017, Model line: Toledo, Model: Seat Toledo 2017Pages: 52, PDF Size: 1.56 MB
Page 2 of 52
SEAT S.A. is permanently concerned about continuous development of its t\
ypes and models. For this reason we ask you to under-
stand, that at any given time, changes regarding shape, equipment and te\
chnique may take place on the car delivered. For this reason
no right at all may derive based on the data, drawings and descriptions \
in this current handbook.
All texts, illustrations and standards in this handbook are based on the\
status of information at the time of printing. Except for error
or omission, the information included in the current handbook is valid a\
s of the date of closing print.
Re-printing, copying or translating, whether total or partial is not all\
owed unless SEAT allows it in written form.
SEAT reserves all rights in accordance with the “Copyright” Act.
All rights on changes are reserved.
❀This paper has been manufactured using bleached non-chlorine cellulose.
© SEAT S.A. - Reprint: 15.11.17
About this manual
This manual contains information, recommen -
dations, advice and warnings related to your
radio system. The other publications in the
vehicle documentation contain further infor -
mation of which you should be aware for your
own safety and for that of your passengers.
Ensure that the onboard documentation is
kept in the vehicle at all times. This is espe -
cially important when lending or selling the
vehicle to another person.
This manual contains a description of the
equipment supplied with the vehicle at the
time of press. Some of the units described
herein will not be available until a later date or
is only available in certain markets. The
illustrations are intended as a general
guide and may vary from the equipment �tted
in your vehicle in some details.
The screen colour and the colour of the infor -
mation displayed on it can vary according to
vehicle model.
Directions and positions of components (e.g.
right, left, front, rear) are always relative to the
direction of travel of the vehicle unless other -
wise stated.
The equipment marked with an aster -
isk* is �tted as standard only in certain
versions, and is only supplied as op -
tional extras for some versions, or are
only offered in certain countries.
® All registered marks are indicated with
®. Although the copyright symbol does
not appear, it is a copyrighted mark.
>> The section is continued on the follow -
ing page.
WARNING
Texts preceded by this symbol contain infor -
mation on safety. They warn you about possi -
ble dangers of accident or injury.
CAUTION
Texts with this symbol draw your attention to
potential sources of damage to your vehicle.
For the sake of the environment
Texts preceded by this symbol contain rele-
vant information concerning environmental
protection.
Note
Texts preceded by this symbol contain additio -
nal information.
Page 17 of 52
Radio
Scan function (SCAN) When the scan function is running, all availa-
bl
e s
tations on the current frequency band
are played in sequence for about 5 seconds
each.
Starting and stopping the scan function
Starting the
scan functionPress the SETTINGS function button
and then select SCAN.
Stopping the
scan functionPress the function button to
stop the scan function at the station
that is currently playing.
OR: Briefly press the adjustment
knob.
Manually selecting a station with the
memory buttons or changing the
screen also stops the scan function. Traffic information (TP)
Traffic information tracking with the TP func-
tion i
s
on
ly possible if the station is availa-
ble. The stations with the traffic information
function are indicated in the Radio main
menu and in the list of stations by the TP
symbol ›››
Fig. 8 and ›››
Fig. 9.
Some stations that do not have their own
traffic news support the TP function by broad-
casting traffic announcements from other
stations (EON). Switching the TP function on and off
● In the menu Setup (FM, AM and
DAB), pres
s the function button
Traffic programme (TP) to activate or de
acti-
v at
e this function ››› page 15.
Active TP function and station selection
Traffic warnings are played in Audio mode.
In FM mode, the station tuned in must have
the TP function. If a station without the TP
function is selected, this will be indicated
half way up the left of the screen .
In AM mode or media mode, the unit will al-
ways automatically tune to a traffic news sta-
tion in the background, provided that one is
available. Depending on your location, this
process can take some time.
Incoming traffic information
In active Audio mode, an incoming traffic an-
nouncement will play automatically.
During the traffic announcement, a pop-up
window is displayed and the radio changes,
depending on the case, to the traffic news
station (EON).
The media mode is paused and the volume is
adjusted to the preset level ›››
page 41.
The volume of the traffic announcement can
be adjusted with the volume control. The ad- justed volume setting will be applied to sub-
sequent announc
ements.
● Press the function button Cancel to end the
c urr
ent
traffic announcement. The TP function
remains activated.
● OR: Press the function button De
activate to
end the c urr
ent
traffic announcement and
permanently deactivate the TP function. This
can be reactivated in the setup menu.
Setup (FM, AM, DAB) FM setup
● Select the frequency band FM by
pr
essing
the infotainment button RADIO .
● Press the function button Settin
g
s to open
the menu FM setup .
Function button: function
SCAN: Scan function. When the scan function is active,
all available stations on the current frequency band are
played in sequence for approximately 5 seconds each
››› page 15.
Seek mode: determines the setup of the buttons with ar-
rows and . This setting applies to all frequency
bands (FM, AM and DAB).
Preset list: All stored stations on the selected frequen-
cy band can be selected with the arrow buttons.
Station list: All available stations on the selected fre-
quency band can be selected with the arrow buttons.» 15
Page 18 of 52
RadioFunction button: function
Sort by: to choose the mode in which the stations will be
arranged a)
.
Group: sort by station group.
Alphabet: sort by alphabetical order.
Traffic programme (TP): The TP function (traffic news sta-
tion tracking) is active ››› page 15 a)
.
Delete presets: to delete all or some of the stored sta-
tions.
Advanced settingsa) :
Radio Data System (RDS)a)
: radio data system (RDS) ac-
tivated ››› page 12. With the checkbox deselected ,
the functions depending on the RDS system will not
be available. The function buttons depending on the
RDS system will remain inactive (in grey).
Alternative frequency (AF): the automatic station track-
ing is active. With the checkbox deselected the
function button Regional RDS remains inactive (grey). a)
RDS Regional: determines the setup for the regional au-
tomatic station tracking via the RDS ››› page 12 a)
.
Fixed: the unit only switches to alternative frequen-
cies for the selected station if the same regional
service is being broadcast.
Automatic: the unit always switches to the station's
frequency that currently offers the best reception. As
a result, regional programmes may be interrupted.
a) This depends on the country and unit in question.
AM setup
● Select the AM frequency b
and by pressing
the RADIO infotainment button.
● Press the function button Settin
g
s to open
the menu AM setup .
Function button: function
SCAN: Scan function. When the scan function is active,
all available stations on the current frequency band are
played in sequence for approximately 5 seconds each
››› page 15.
Traffic programme (TP): the TP function (traffic news sta-
tion tracking) is active ››› page 15.
Seek mode: determines the setup of the buttons with ar-
rows and . This setting applies to all frequency
bands (FM, AM and DAB).
Preset list: all stored stations on the selected frequen-
cy band can be selected with the arrow buttons.
Station list: all available stations on the selected fre-
quency band can be selected with the arrow buttons.
Delete presets: to delete all or some of the stored sta-
tions. DAB setup
● Select the DAB
fr
equency band by pressing
the RADIO infotainment button.
● Press the function button Settin
g
s to open
the menu DAB setup .
Function button: function
SCAN: Scan function. When the scan function is active,
all available stations on the current frequency band are
played in sequence for approximately 5 seconds each
››› page 15.
Seek mode: determines the setup of the buttons with ar-
rows and . This setting applies to all frequency
bands (FM, AM and DAB).
Preset list: all stored stations on the selected frequen-
cy band can be selected with the arrow buttons.
Station list: all available stations on the selected fre-
quency band can be selected with the arrow buttons.
VIEW: to select the type of view of the DAB station list.
Ensemble: hierarchical view of stations and ensembles
in alphabetical order.
Station list: overall view of stations in alphabetical or-
der.
Traffic programme (TP): the TP function (traffic news station
tracking) is active ››› page 15.
Delete presets: to delete all or some of the stored sta-
tions.
Advanced settings: DAB services setup.
DAB traffic announcements: DAB traffic announcements
are played in the same way as TP traffic announce-
ments in all operating modes.
Other DAB announcements: DAB announcements
(news, sport, weather, warnings etc.) will interrupt the
current DAB radio mode. 16
Page 20 of 52
Media
Media
M edi
a mode
Intr
oduction Media sources are audio sour
c
es containing
audio files on various different data storage
devices (e.g. SD memory card, USB, external
MP3 player, etc.). These audio files can be
played by the infotainment system from its
corresponding drives or audio input sockets
(memory card slot, AUX-IN multi-media sock-
et etc.) Note
● The audio coding technology MPEG-4 HE-
AAC and p
atents have a Fraunhofer IIS li-
cence.
● This product is protected by copyright and
property
rights of Microsoft Corporation. Us-
ing or distributing similar technology outside
of this product without a licence from Micro-
soft or any of its authorised subsidiaries is
prohibited.
● The infotainment system only plays undam-
aged comp
atible audio files; other files are
ignored.
● Consult the list of supported devices on the
web
. Requirements for the media sources
and audio fi
l
e
s The supported file formats listed are collec-
tively
r
eferred to below as "audio files".
Media sourcesRequirements for playing
in the unit
SD and MMC Mem-
ory cards compatible
with the FAT12, FAT16,
FAT32, XFAT or VFAT file
system (max. 2GB), as
well as SDHC and
SDXC memory cards.– MP3 files (.mp3) with a rate
of 8 to 320 kbit/s or variable.
– WMA files (.wma) of up to
9.2 mono/stereo with no copy
protection.
– Playlists in PLS, M3U, WPL
and ASX formats.
– Playlists no larger than
1000 elements or 20 kB.
– Filenames and addresses
no larger than 256 characters.
– On memory cards: a maxi-
mum of 1000 folders and a
maximum of 2048 files.
USB data storage
device with 2.0 specifi-
cation, compatible
with the FAT12, FAT16,
FAT32, or VFAT file sys-
tem (max. 2GB).
Audio file playback
via Bluetooth ®a)
.– The external media player
must support the Bluetooth
profile A2DP.
a)Bluetooth ®
is a registered trademark of Bluetooth SIG, Inc.
Restrictions and instructions
Contamination, exposure to high tempera-
tures and mechanical damage may render a data medium unusable. Please observe the
manufact
urer's instructions.
Variations in the quality of data media pro-
duced by different manufacturers may lead to
anomalies during playback.
Please observe copyright laws.
The unit may be unable to read individual
tracks or the entire data medium due to the
data medium configuration or the devices
and programs used for recording. Informa-
tion can be found on the internet regarding
the best ways to create audio files and data
media (compression rate, ID3 tag etc.).
Depending on the size, its condition due to
use (copy and delete processes), the folder
structure and file type, the read time of the
data media used can vary considerably.
Playlists only determine a certain playing or-
der. There are no files stored in a playlist. The
unit will not play a playlist if the files are not
on the data medium at the locations referred
to by the playlist (relative file paths). Note
● Do not u se a
daptors for memory cards.
● We will not accept any responsibility for
file
s damaged or lost on the data medium. 18
Page 26 of 52
Media
and via the USB port
with the Infot ain-
ment system, as this could cause playback
limitations.
● If the external player is an Apple device™,
it cannot
be simultaneously connected by
USB and by Bluetooth.
● If a connected device is not recognised, dis-
connect a
ll the connected devices and try
connecting the device again.
● Do not use memory card adaptors, USB ex-
tens
ion cords or USB hubs! Connect external audio source via
Bluet
ooth® In Bluetooth audio mode, audio files from an
e
xt
ern
al audio source that is connected via
Bluetooth ®
, for example a mobile telephone
(Bluetooth audio playback), can be played
over the vehicle speakers.
Conditions
● The Bluetooth ®
audio source mu
st support
the A2DP Bluetooth ®
profile.
● In the Bluetooth Settings menu the
Bluetooth Audio (A2DP/AVRCP)
function must
be on. Starting Bluetooth
®
audio transmi
ssion
● Activate Bluetooth ®
vis
ibility on the exter-
nal Bluetooth ®
audio source (e.g., mobile tel-
ephone).
● Lower the base volume on the Infotainment
syst
em.
● Press the Infotainment MEDIA button.
● Click on the MEDIA function button and se-
l ect
B
T Audio .
● Press Se
ar
c
h for new device in order to con-
nect an e
xt
ernal Bluetooth ®
audio source for
the first time ››› page 27.
● OR: Select a Bluetooth ®
ext
ernal audio
source from the list.
● Please refer to the instructions on the
scr
een of the Infotainment system and on the
Bluetooth ®
audio source regarding the rest
of the procedure.
You may still need to manually start playback
on the Bluetooth ®
source.
When playback on the Bluetooth ®
audio
source is stopped, the Infotainment system
remains in Bluetooth ®
Audio mode.
Controlling playback
The extent to which the Bluetooth ®
audio
source can be controlled via the Infotainment
system depends on the connected Blue-
tooth ®
audio source. The available functions will depend on the
Bluetooth
®
Audio profi
le that the connected
external player supports.
With media players that support the AVRCP
Bluetooth ®
profile, playback on the Blue-
tooth ®
audio source can be automatically
started or stopped when the unit is switched
to Bluetooth ®
Audio mode or to a different
audio source. In addition, it is possible to
view or change the track via the Infotainment
system. Note
● Due t o the l
arge number of different Blue-
tooth audio sources available, it is not possi-
ble to guarantee fault-free operation of all
functions described here.
● Deactivate the service and warning sounds
of a connect
ed Bluetooth audio source (for
example, the key tones of the mobile tele-
phone) to avoid interference noise and
anomalies in the operation.
● Depending on the external player connec-
ted, the re
sponse time of the system can
vary.
● Do not connect an external media player at
the same time to p
lay music via Bluetooth®
and via the USB port with the Infotainment
system, as this could cause playback limita-
tions.
● If the external player is an Apple device™,
it cannot
be simultaneously connected by
USB and by Bluetooth. 24
Page 31 of 52
Telephone management system (PHONE)*
and this or another device as a Bluetooth
audio pr ofi
l
e.
When the Infotainment system is switched
on, it automatically connects to the last con-
nected mobile telephone. If it is not possible
to connect to this mobile telephone, the tele-
phone management system will try to auto-
matically connect to the next mobile tele-
phone on the list of paired devices.
The maximum range of the Bluetooth ®
con-
nection is approx. 10 metres. The active
Bluetooth ®
connection disconnects if this
distance is exceeded. The connection is auto-
matically re-established as soon as the de-
vice is once again within Bluetooth ®
range.
If the maximum number of paired devices is
reached and you wish to pair another one to
the system, it will automatically replace the
one least used recently. If you wish to replace
it with another one, the user must erase it be-
forehand. To do so:
● Press the Setup button on the device while
in telephone mode.
● Pr
ess the Bluetooth function button.
● Activate the P
air
ed dev
ices function button.
● In the list of paired devices, press the function button next to the mobile telephone
t
o be del
et
ed and then press Delete to con-
firm the process. Note
● It m a
y be necessary to confirm the phone-
book data transfer request on the mobile tel-
ephone.
● Check that there are no requests pending
accept
ance in your mobile phone. If there are,
this could block some of the functions in the
PHONE menu. Description of the telephone
man
ag
ement system
Introduction Some functions and setup can only be per-
f
ormed when the
v
ehicle is stopped and are
not available on all mobile telephones.
With the help of the telephone manager, up
to 2 mobile telephones can be connected to
the Infotainment system via the Bluetooth
profiles (for example, one used as a Blue-
tooth-audio player and/or another as a
hands-free telephone). Note
● Us in
g a mobile telephone inside the vehicle
may provoke noise in the speakers.
● Some networks may not recognise all lan-
guage ch
aracters or offer all services. PHONE main menu
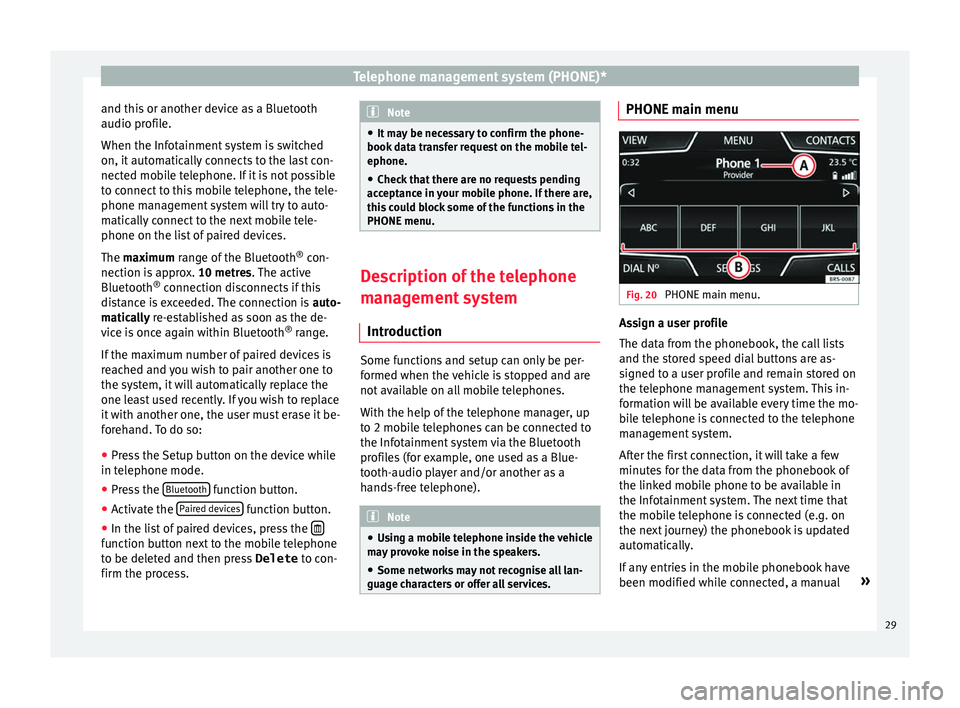
Fig. 20
PHONE main menu. Assign a user profile
The d
at
a fr
om the phonebook, the call lists
and the stored speed dial buttons are as-
signed to a user profile and remain stored on
the telephone management system. This in-
formation will be available every time the mo-
bile telephone is connected to the telephone
management system.
After the first connection, it will take a few
minutes for the data from the phonebook of
the linked mobile phone to be available in
the Infotainment system. The next time that
the mobile telephone is connected (e.g. on
the next journey) the phonebook is updated
automatically.
If any entries in the mobile phonebook have
been modified while connected, a manual »
29
Page 33 of 52
Telephone management system (PHONE)*
Private mode
Priv at
e mode c
an only be activated during an
active call.
To activate or deactivate private mode:
● Press the button t
o activate or deactivate
private mode.
With the private mode activated the active
audio and microphone become that of the
mobile phone connected to the hands-free.
When deactivated, the audio reverts to the
vehicle's audio system. This configuration is
only applicable to the active call, so for sub-
sequent calls, the audio will revert by default
to vehicle's audio system.
Multiple calls
The telephone management system allows
the user to interact with a maximum of three
calls on the screen ››› Fig. 22.
Only one of the calls may be active. Note
The multiple call function is subject to the
serv ic
es associated with the user's SIM card. Enter telephone number menu
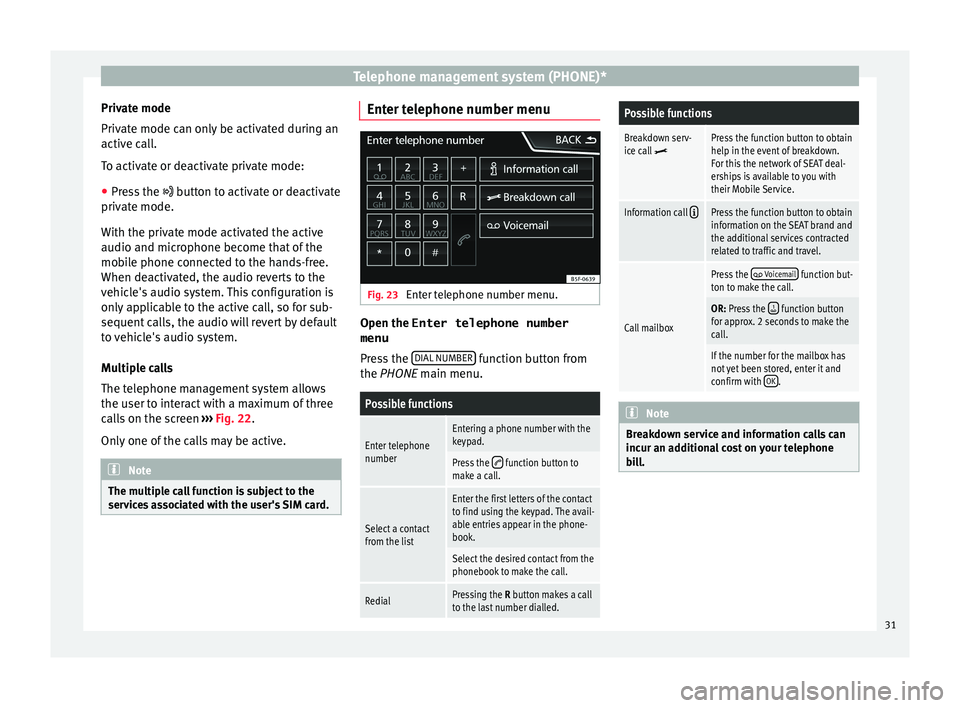
Fig. 23
Enter telephone number menu. Open the
Enter telephone number
menu
Pr e
s
s the DIAL NUMBER function button from
the PHONE m ain menu.
Possible functions
Enter telephone
numberEntering a phone number with the
keypad.
Press the function button to
make a call.
Select a contact
from the list
Enter the first letters of the contact
to find using the keypad. The avail-
able entries appear in the phone-
book.
Select the desired contact from the
phonebook to make the call.
RedialPressing the R button makes a call
to the last number dialled.
Possible functions
Breakdown serv-
ice call Press the function button to obtain
help in the event of breakdown.
For this the network of SEAT deal-
erships is available to you with
their Mobile Service.
Information call Press the function button to obtain
information on the SEAT brand and
the additional services contracted
related to traffic and travel.
Call mailbox
Press the Voicemail function but-
ton to make the call.
OR: Press the function button
for approx. 2 seconds to make the
call.
If the number for the mailbox has
not yet been stored, enter it and
confirm with OK
. Note
Breakdown service and information calls can
incur an a d
ditional cost on your telephone
bill. 31
Page 39 of 52
CAR menu
Since refuelling
Di s
p
lay and storage of the values for the jour-
ney and the consumption. By refuelling, the
memory will be erased automatically.
Long-term
The memory records the values for a specific
number of partial trips, up to a total of 19
hours and 59 minutes or 99 hours and 59 mi-
nutes, or 1999.9 km (or miles) for 9999 km
(or miles), depending on the model of instru-
ment panel.
When one of these values is reached (de-
pending on the version of the instrument
panel), the memory is automatically deleted
and it starts counting from 0 again. Note
The values that appear in the figure are indi-
cativ e and m
ay vary depending on the fea-
tures. Ecotrainer*
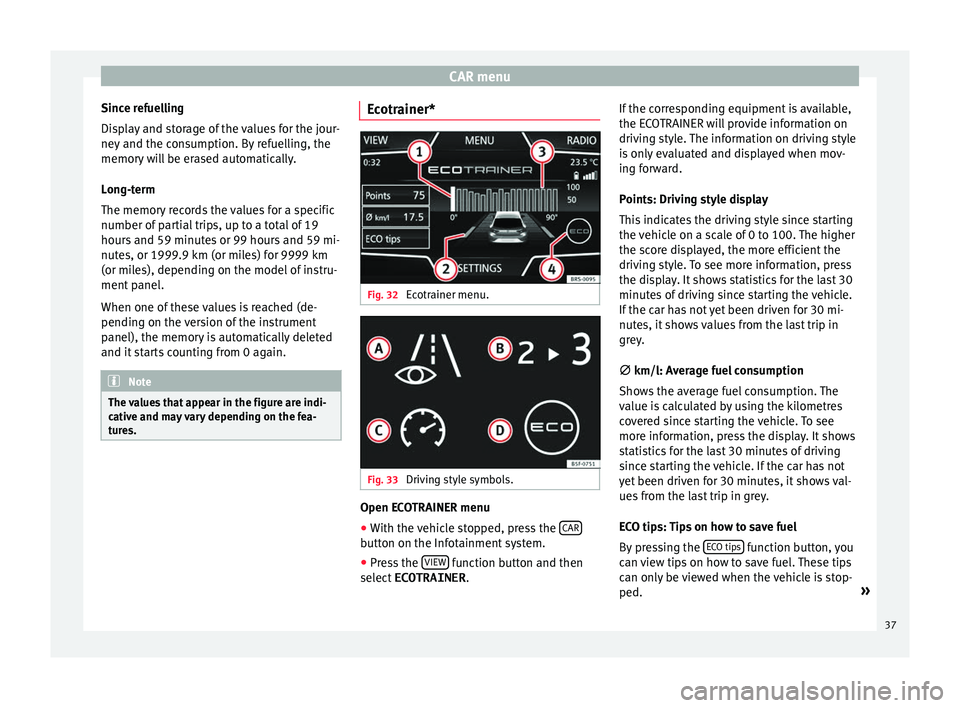
Fig. 32
Ecotrainer menu. Fig. 33
Driving style symbols. Open ECOTRAINER menu
● With the vehicle stopped, press the CAR button on the Infotainment system.
● Press the VIEW function button and then
sel ect
ECOTRAINER . If
the corresponding equipment is available,
the ECO
TRAINER will provide information on
driving style. The information on driving style
is only evaluated and displayed when mov-
ing forward.
Points: Driving style display
This indicates the driving style since starting
the vehicle on a scale of 0 to 100. The higher
the score displayed, the more efficient the
driving style. To see more information, press
the display. It shows statistics for the last 30
minutes of driving since starting the vehicle.
If the car has not yet been driven for 30 mi-
nutes, it shows values from the last trip in
grey.
∅ km/l: Average fuel consumption
Shows the average fuel consumption. The
value is calculated by using the kilometres
covered since starting the vehicle. To see
more information, press the display. It shows
statistics for the last 30 minutes of driving
since starting the vehicle. If the car has not
yet been driven for 30 minutes, it shows val-
ues from the last trip in grey.
ECO tips: Tips on how to save fuel
By pressing the ECO tips function button, you
c an
v
iew tips on how to save fuel. These tips
can only be viewed when the vehicle is stop-
ped. »
37
Page 51 of 52
SEAT S.A. is permanently concerned about continuous development of its t\
ypes and models. For this reason we ask you to under-
stand, that at any given time, changes regarding shape, equipment and te\
chnique may take place on the car delivered. For this reason
no right at all may derive based on the data, drawings and descriptions \
in this current handbook.
All texts, illustrations and standards in this handbook are based on the\
status of information at the time of printing. Except for error
or omission, the information included in the current handbook is valid a\
s of the date of closing print.
Re-printing, copying or translating, whether total or partial is not all\
owed unless SEAT allows it in written form.
SEAT reserves all rights in accordance with the “Copyright” Act.
All rights on changes are reserved.
❀This paper has been manufactured using bleached non-chlorine cellulose.
© SEAT S.A. - Reprint: 15.11.17
About this manual
This manual contains information, recommen -
dations, advice and warnings related to your
radio system. The other publications in the
vehicle documentation contain further infor -
mation of which you should be aware for your
own safety and for that of your passengers.
Ensure that the onboard documentation is
kept in the vehicle at all times. This is espe -
cially important when lending or selling the
vehicle to another person.
This manual contains a description of the
equipment supplied with the vehicle at the
time of press. Some of the units described
herein will not be available until a later date or
is only available in certain markets. The
illustrations are intended as a general
guide and may vary from the equipment �tted
in your vehicle in some details.
The screen colour and the colour of the infor -
mation displayed on it can vary according to
vehicle model.
Directions and positions of components (e.g.
right, left, front, rear) are always relative to the
direction of travel of the vehicle unless other -
wise stated.
The equipment marked with an aster -
isk* is �tted as standard only in certain
versions, and is only supplied as op -
tional extras for some versions, or are
only offered in certain countries.
® All registered marks are indicated with
®. Although the copyright symbol does
not appear, it is a copyrighted mark.
>> The section is continued on the follow -
ing page.
WARNING
Texts preceded by this symbol contain infor -
mation on safety. They warn you about possi -
ble dangers of accident or injury.
CAUTION
Texts with this symbol draw your attention to
potential sources of damage to your vehicle.
For the sake of the environment
Texts preceded by this symbol contain rele-
vant information concerning environmental
protection.
Note
Texts preceded by this symbol contain additio -
nal information.