sensor Seat Toledo 2017 User Guide
[x] Cancel search | Manufacturer: SEAT, Model Year: 2017, Model line: Toledo, Model: Seat Toledo 2017Pages: 248, PDF Size: 5.86 MB
Page 126 of 248
Operation
If the light switch is in position
, the
symbol located next to the light switch will
light up. If the light illuminates automatically,
symbol located next to the light switch
will also illuminate.
Automatic headlights in case of rain
If the light switch is in position and the
automatic wiping in rain is on for more than
10 seconds, or the wipe (position 2 or
3 )
i s
on f
or longer than 15 seconds,
››› page 129 then the side lights and dipped
beam headlights will automatically switch
on.
The light automatically switches off if more
than 4 minutes have elapsed and the auto-
matic wipe or wipe (position 2 or
3 ) have
not been sw
it
ched on. CAUTION
Do not cover the windscreen light sensor with
stic k
ers or similar objects; this could impair
operation. Fog lights*
Fig. 134
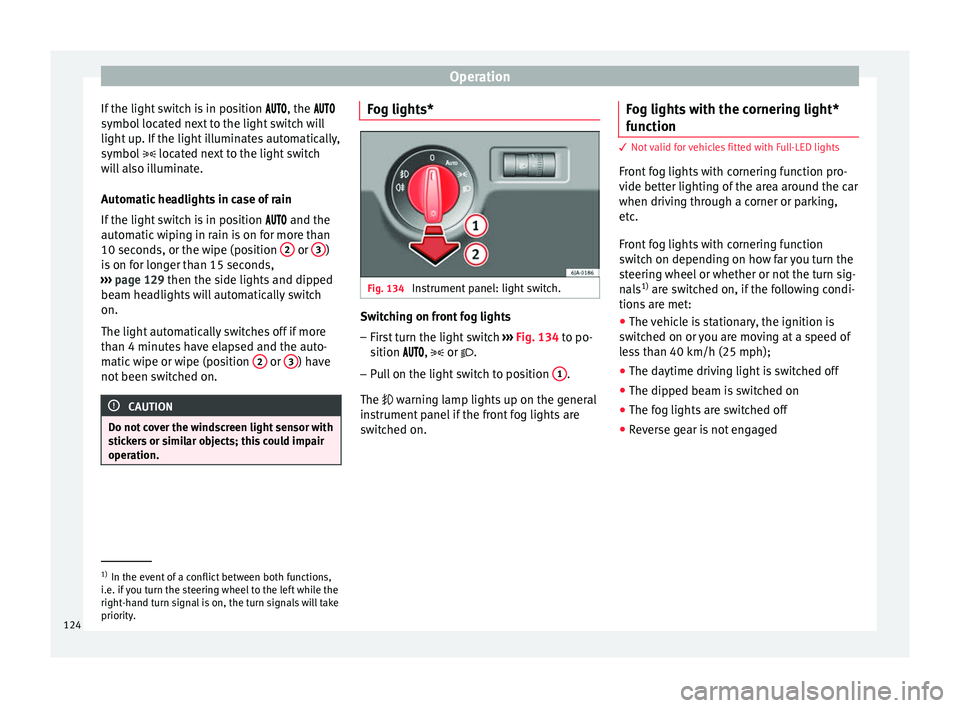
Instrument panel: light switch. Switching on front fog lights
– First turn the light switch ››
›
Fig. 134 to po-
sition , or .
– Pull on the light switch to position 1 .
The w arnin
g l
amp lights up on the general
instrument panel if the front fog lights are
switched on. Fog lights with the cornering light*
function 3
Not valid for vehicles fitted with Full-LED lights
Fr ont
fog lights with cornering function pro-
vide better lighting of the area around the car
when driving through a corner or parking,
etc.
Front fog lights with cornering function
switch on depending on how far you turn the
steering wheel or whether or not the turn sig-
nals 1)
are switched on, if the following condi-
tions are met:
● The vehicle is stationary, the ignition is
swit c
hed on or you are moving at a speed of
less than 40 km/h (25 mph);
● The daytime driving light is switched off
● The dipped beam is switched on
● The fog lights are switched off
● Reverse gear is not engaged 1)
In the event of a conflict between both functions,
i.e. if
you turn the steering wheel to the left while the
right-hand turn signal is on, the turn signals will take
priority.
124
Page 127 of 248

Lights and visibility
Rear fog light Switching on the rear fog light
– First turn the light switch ››› Fig. 134
››› page 124 to position , or .
– Pull on the light switch to position 2 .
If the v
ehicle is not equipped with front fog
lights ››› page 124, the rear fog light is
switched on by turning the switch to position
or and pulling it to position 2 . This
type of sw it
ch only has one position.
The ››› page 100 warning lamp lights up on
the general instrument panel if the rear fog
lights are switched on.
If you are towing a trailer or caravan equip-
ped with a rear fog light on a vehicle with a
factory-fitted towing bracket or one installed
using parts from the original SEAT parts
catalogue, only the rear fog light on the trail-
er or caravan will light up.
Function “Coming Home”/“Leaving
Home”* This function makes it possible, under poor
v
i
s
ibility conditions, to automatically turn on
the lights for a brief period of time after the
vehicle has been parked or when approach-
ing the vehicle. The function is automatically turned on if the
fol
lowing conditions are met:
● The light switch is in position
››
› page 123.
● The visibility around the vehicle is reduced.
● The ignition is switched off.
To turn on thi
s function, switch on the head-
light flasher prior to exiting the vehicle.
The light is adjusted according to the data re-
corded by the light sensor that is installed
between the windscreen and the inside rear
view mirror.
The function automatically turns on the side
lights and headlights, the lighting for the en-
try area on the exterior mirrors and the num-
ber plate light.
“Coming Home” function
The light is automatically switched on when
the driver door is opened (for 60 seconds af-
ter the ignition is switched off).
The light is switched off when all the doors
and the rear lid are closed.
If a door or the rear lid remains open, the
light will switch off after 60 seconds.
“Leaving Home” function
The light is automatically switched on when
the vehicle is unlocked using the remote con-
trol. The light is switched off after 10 seconds or
when the vehic
le is locked.
Hazard warning lights switch Fig. 135
Instrument panel: switch for hazard
w arnin
g lights. –
Press the button ››
›
Fig. 135 to switch
the hazard warning lights on or off.
The warning lamps on the instrument panel
and the warning lamp on the switch will flash
at the same time as the turn signals when
the hazard warning lights are switched on.
The hazard warning lights also work when
the ignition is switched off.
The hazard warning lights come on automati-
cally in the event of an accident in which an
airbag is triggered. »
125
Technical data
Advice
Operation
Emergencies
Safety
Page 131 of 248
Lights and visibility
the ignition. If you switch on the windscreen
wiper
s
when the wiper blades are frozen to
the glass, this could damage both the wiper
blades and the wiper motor.
● If the ignition is switched off when the
winds
creen wipers are on, they will start op-
erating in the same mode when the ignition
is switched back on. The wiper blades may be
frozen to the glass at low temperatures when
the ignition is switched off.
● Carefully separate the frozen wipers from
the winds
creen or rear window.
● Remove snow and ice from the wipers be-
fore s
tarting your journey.
● Careless handling could lead to the wiper
arms dam
aging the windscreen.
● For safety reasons, the wiper blades should
be chan
ged once or twice a year. They can be
purchased at a SEAT Authorised Service.
● The ignition cannot be switched on while
the winds
creen wiper arms are in a raised po-
sition. Otherwise, the windscreen wipers
would return to their original position and
could damage the paintwork on the bonnet. Note
Keep the wipers clean. The wipers can be
soil ed w
ith remains of wax solutions from car
washes ››› page 196.
● On vehicles equipped with windscreen
washer j
ets, these are heated once the en-
gine is running. Operating windscreen wipers and
w
a
sher
s Fig. 142
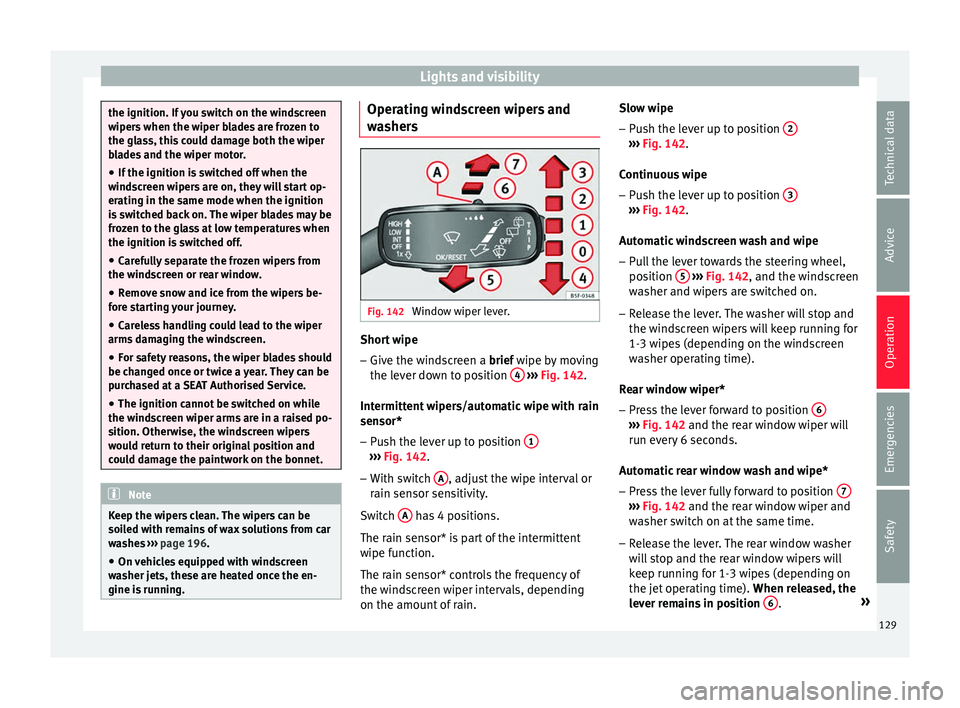
Window wiper lever. Short wipe
– Give the windscreen a brief w ipe b
y
moving
the lever down to position 4
› ›
› Fig. 142 .
Intermittent wipers/automatic wipe with rain
sensor* – Push the lever up to position 1 ›››
Fig. 142.
– With switch A , adjust the wipe interval or
r ain sen
sor sen
sitivity.
Switch A has 4 positions.
The r ain sen
sor* i
s part of the intermittent
wipe function.
The rain sensor* controls the frequency of
the windscreen wiper intervals, depending
on the amount of rain. Slow wipe
–
Push the lever up to position 2 ›››
Fig. 142.
C ontinuou
s
wipe
– Push the lever up to position 3 ›››
Fig. 142.
Aut om
atic
windscreen wash and wipe
– Pull the lever towards the steering wheel,
position 5
› ››
Fig. 142
, and the w
indscreen
washer and wipers are switched on.
– Release the lever. The washer will stop and
the winds
creen wipers will keep running for
1-3 wipes (depending on the windscreen
washer operating time).
Rear window wiper*
– Press the lever forward to position 6 ›››
Fig. 142 and the re ar w
indow wiper will
run every 6 seconds.
Automatic rear window wash and wipe* – Press the lever fully forward to position 7 ›››
Fig. 142 and the re ar w
indow wiper and
washer switch on at the same time.
– Release the lever. The rear window washer
wi l
l stop and the rear window wipers will
keep running for 1-3 wipes (depending on
the jet operating time). When released, the
lever remains in position 6 .
»
129
Technical data
Advice
Operation
Emergencies
Safety
Page 132 of 248
Operation
Switching off the wipers – Move the lever to position 0
› ››
Fig. 142
. WARNING
The rain sensor may not detect enough rain
to sw it
ch on the wipers.
● If necessary, switch on the wipers manually
when water on the w
indscreen obstructs visi-
bility. Note
Do not put stickers on the windscreen in front
of the r
ain sensor*. This may cause sensor
disruption or faults. Headlight washers*
The headlight washers operate briefly if the
dip
ped he
a
dlights or headlights are on and
the lever is moved to position 5
› ›
›
Fig. 142.
The headlight washer system also operates
every 10 windscreen wash cycles.
Clean off stubborn dirt (insects, etc.) from the
headlights at regular intervals, for instance
when filling the fuel tank. Please observe the
following indications ›››
page 198, Head-
lights.
To ensure the system works properly in win-
ter, keep the nozzle holders free of snow and
remove any ice with a de-icer spray. CAUTION
Never pull on the nozzle holders. Risk of
dam ag
e to the system! Mirrors
Re ar
view mirror with manual anti-
dazzle device Basic settings
– Push the lever at the bottom of the mirror
for w
ard.
Rear vision mirror anti-dazzle setting – Pull the lever at the bottom of the mirror to-
ward
s you.
Exterior mirrors Read the additional information carefully
› ›
›
page 13
Before beginning any journey, adjust the rear
view mirrors for a good rear visibility. WARNING
● Con v
ex (wide-angle) rear vision mirrors give
a larger field of vision. However, they make
objects appear smaller and further away than
they really are. For this reason, you should not rely on these rear vision mirrors for judg-
ing the di
s
tance of vehicle behind.
● If possible, use the interior rear vision mir-
ror to e
stimate distances to vehicles behind
you. Note
● Ext erior mirr or
s are only heated when the
engine is running.
● Do not touch the exterior mirrors when the
heating sy
stem is running.
● If the electrical adjustment should ever fail
to operat
e, the rear vision mirrors can be ad-
justed by hand by pressing the edge of the
mirror glass.
● Visit the technical service in the event of a
fault
in the electrical rear vision mirror ad-
justment system. 130
Page 153 of 248
Air conditioning
The system also allows for the effect of sun-
light, so ther e i
s
no need for manual adjust-
ment. It also has a humidity sensor that
helps to automatically demist the wind-
screen.
Automatic operations ››› page 151 guaran-
tee maximum comfort any time of year.
Climatronic description
Cooling only works if the following conditions
are met:
● The engine is running
● the outside temperature is above +2°C
(+36°F);
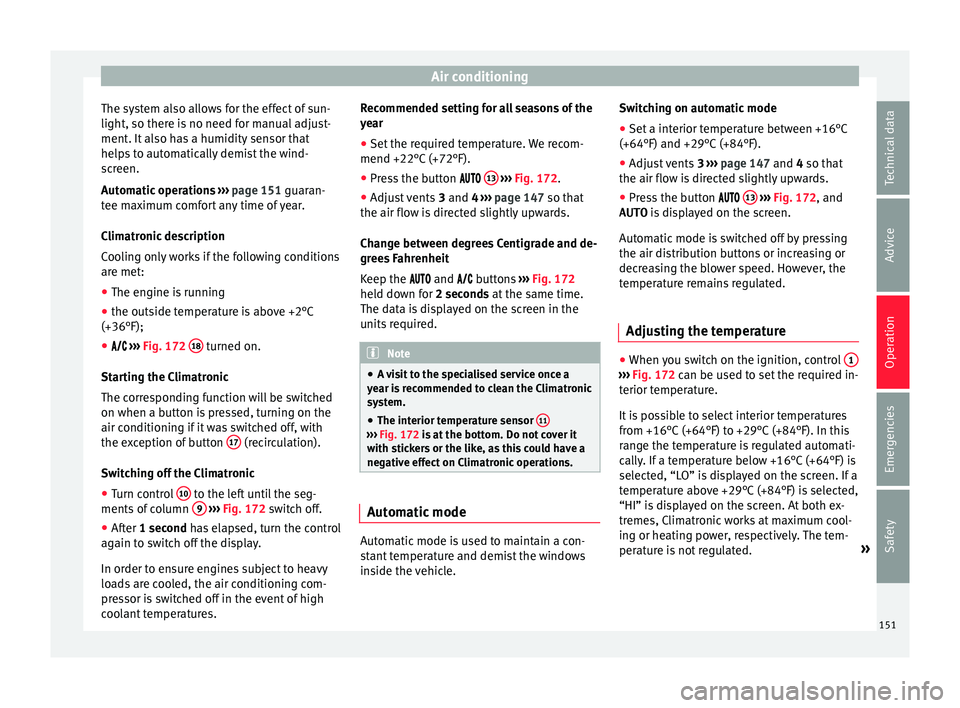
● ››› Fig. 172 18 turned on.
St ar
tin
g the Climatronic
The corresponding function will be switched
on when a button is pressed, turning on the
air conditioning if it was switched off, with
the exception of button 17 (recirculation).
Sw it
c
hing off the Climatronic
● Turn control 10 to the left until the seg-
ments of
c
olumn 9
› ›
› Fig. 172 switch off.
● After 1 second has elapsed, turn the control
again t
o switch off the display.
In order to ensure engines subject to heavy
loads are cooled, the air conditioning com-
pressor is switched off in the event of high
coolant temperatures. Recommended setting for all seasons of the
year
● Set
the required temperature. We recom-
mend +22°C (+72°F).
● Pre
ss the button 13
› ››
Fig. 172
.
● Adju
st vents 3 and 4 ›››
page 147 so that
the air flow is directed slightly upwards.
Change between degrees Centigrade and de-
grees Fahrenheit
Keep the and buttons ››› Fig. 172
held down for 2 seconds at the same time.
The data is displayed on the screen in the
units required. Note
● A v i
sit to the specialised service once a
year is recommended to clean the Climatronic
system.
● The interior temperature sensor 11 ›››
Fig. 172 is at
the bottom. Do not cover it
with stickers or the like, as this could have a
negative effect on Climatronic operations. Automatic mode
Automatic mode is used to maintain a con-
s
t
ant
temperature and demist the windows
inside the vehicle. Switching on automatic mode
● Set a interior temperature between +16°C
(+64°F) and +29°C (+84°F).
● Adjus
t vents 3 ›››
page 147 and 4 so that
the air flow is directed slightly upwards.
● Press the button 13
› ››
Fig. 172
, and
AUTO i
s displayed on the screen.
Automatic mode is switched off by pressing
the air distribution buttons or increasing or
decreasing the blower speed. However, the
temperature remains regulated.
Adjusting the temperature ●
When you switch on the ignition, control 1 ›››
Fig. 172 can be u sed t
o set the required in-
terior temperature.
It is possible to select interior temperatures
from +16°C (+64°F) to +29°C (+84°F). In this
range the temperature is regulated automati-
cally. If a temperature below +16°C (+64°F) is
selected, “LO” is displayed on the screen. If a
temperature above +29°C (+84°F) is selected,
“HI” is displayed on the screen. At both ex-
tremes, Climatronic works at maximum cool-
ing or heating power, respectively. The tem-
perature is not regulated. »
151
Technical data
Advice
Operation
Emergencies
Safety
Page 172 of 248
Operation
WARNING
● Drivin g thr
ough water, dirt and mud can re-
duce braking capability and prolong the brak-
ing distance – Risk of accident!
● Do not carry out any sudden or strong brak-
ing manoeu
vres after driving through water.
● Clean and dry the brakes as soon as possi-
ble af
ter driving through water by breaking
intermittently. Carry out braking in order to
dry the brakes and clean the brake discs only
if traffic so permits. Do not put other drivers
at risk. CAUTION
● In the event of
driving through water, parts
of the vehicle can be seriously damaged,
such as the engine, gearbox, catalytic con-
verter, suspension or the electrical system.
● Oncoming vehicles that drive through wa-
ter can c
ause waves that exceed your vehi-
cle's permitted level for driving through wa-
ter.
● There may be pot-holes mud or rocks under
the water th
at can hinder or prevent driving
through water.
● Do not drive through salt water. The salt
can cau
se rust. All components that are ex-
posed to salt water must be rinsed immedi-
ately with fresh water. Note
After driving through water we recommend
that
you contact a specialised service for an
inspection. Preventing damage to the vehicle
In order to prevent damage to the vehicle,
tak
e s
pecial care:
● on roads that are in poor condition,
● when mounting kerbs,
● when approaching very steep ramps, etc.,
● with the parts of the vehicle situated on the
low er p
art of the vehicle, i.e. the spoiler, the
exhaust pipe.
This applies especially to vehicles with a very
low suspension (sport) and when the vehicle
is fully loaded. Driver assistance systems
P ark
in
g aid
General information Assorted assistance systems – which vary
depending on the equipment
fitt
ed in the car
– will help you when parking or manoeu-
vring.
The rear parking aid is an audible assistant
that warns about obstacles located behind
the vehicle ›››
page 171.
During parking, Parking System Plus assists
the driver by visually and audibly warning
them about obstacles detected in front and
behind the vehicle ›››
page 172. WARNING
● Alw a
ys pay attention, also when looking
straight ahead, to traffic and the vehicle sur-
roundings. The assistance systems are not a
replacement for driver awareness. When in-
serting or removing the vehicle from a park-
ing space, or when performing similar ma-
noeuvres the driver always assumes the re-
sponsibility.
● Adapt your speed and driving style at all
times t
o suit visibility, weather, road and traf-
fic conditions.
● The ultrasound sensors have blind spots in
which ob
stacles and people are not170
Page 173 of 248
Driver assistance systems
registered. Pay special attention to children
and anima
l
s.
● Always keep visual control of the vehicle
surrou
ndings: use the mirrors for additional
help. CAUTION
Parking Aid functions may be negatively af-
f ect ed b
y different factors that may lead to
damage to the vehicle or its immediate sur-
rounds:
● Under certain circumstances, the system
does not
detect or display certain objects:
– Objects such as chains, trailer draw bars,
fences, posts and thin trees.
– Objects that are located above the sen-
sors, such as protrusions in a wall.
– Objects with certain surfaces or struc-
tures, such as wire mesh fences or pow-
der snow.
● Certain surfaces of objects and garments
do not refl
ect the ultrasound sensors' sig-
nals. The system cannot detect, at least cor-
rectly, these objects or people wearing such
clothes.
● Ultrasound sensor signals may be affected
by e
xternal sound sources. In certain circum-
stances this may prevent them from detect-
ing people or objects.
● Please note that low obstacles detected by
the syst
em may no longer be registered by
the sensors as the car moves closer, so the system will not give any further warning. In
cer
t
ain circumstances, objects such as high
kerbs that could damage the bottom of the
vehicle are not detected either.
● If the first warning from the Parking Aid is
ignored, the v
ehicle could suffer considerable
damage.
● The knocks or damage on the radiator
grill
e, bumper, wheel arch and vehicle under-
body can adjust the orientation of the sen-
sors. This can affect the parking aid function.
Have the function checked by a specialised
workshop. Note
● In cer t
ain situations, the system can give a
warning even though there is no obstacle in
the detected area, e.g:
–with rough or cobbled floors or ground
with long grass;
– with external ultrasound sources, such as
cleaning vehicles or other vehicles;
– In downpours, intense snow or dense ex-
haust gases;
– if the registration plate (front or rear) is
not properly affixed to the bumper sur-
face;
– or in locations such as the brow of a hill.
● In order to guarantee good system opera-
tion, keep the ultr
asound sensors clean, free
of snow or ice, and do not cover them with
adhesives or other objects. ●
If y
ou use high-pressure or vapour equip-
ment to clean the ultrasound sensors, apply
it directly only very briefly and always from a
distance of more than 10 cm.
● Retrofitting of accessories to the vehicle,
such a
s a bicycle rack, may interfere with the
operation of the Parking Aid.
● In order to familiarise yourself with the sys-
tem, it i
s advised that you practice parking in
an area or car park that is free from traffic.
There must be good weather and light condi-
tions.
● The volume and tone of the warnings can
be modified, in addition t
o the indications
››› page 174.
● In vehicles without a driv
er information
system, these parameters can be modified in
a SEAT Official Service or in a specialised
workshop.
● Please observe information on towing a
trail
er ››› page 175.
● The display on the Easy Connect screen
shows
a slight time delay. Rear parking aid*
The rear Parking Aid assists the driver in
p
ark
in
g by means of audible warning
sounds. »
171
Technical data
Advice
Operation
Emergencies
Safety
Page 174 of 248

Operation
Description
Ther e ar
e sen
sors integrated in the rear
bumper. When the sensors detect an obsta-
cle, you are alerted by audible warnings.
Make particularly sure that the sensors are
not covered by adhesives, residues and the
like, as this could affect the system's opera-
tion. Cleaning instructions ››› page 197.
The approximate measurement range of the
rear sensors is:
side area0.90 m
central area1.60 m As you approach the obstacle, the time inter-
v
al
betw
een the audible warnings will be re-
duced. When you reach around 0.30 m the
warning will be constant: Do not continue to
move forward (or backward) ››› in General
inf orm
ation on p
age 170, ››› in General in-
f orm
ation on p
age 171 !
If you maintain separation from the obstacle,
the volume of the warning begins to reduce
after four seconds (does not affect the tone
of the constant warning).
Activating/Deactivating
When engaging reverse gear, the parking aid
is automatically switched on. This is con-
firmed with a short warning. On disengaging reverse gear, the Parking Aid
syst
em is disconnected immediately.
Parking aid plus* Fig. 182
Represented area. Parking system plus assists you audibly and
v
i
s
ually when parking.
There are sensors integrated in the front and
rear bumpers. When they detect an obstacle,
you are alerted by audible warnings and visu-
ally on the Easy Connect system.
In the event of danger of a frontal collision,
the audible warnings come from the front of
the vehicle, and in the event of the danger of
a rear-end collision they come from the rear.
Make particularly sure that the sensors are
not covered by adhesives, residues and the
like, as this could affect the system's opera-
tion. Cleaning instructions ››› page 197. The approximate measurement range of the
sensors
is:
1.20 m
0.90 m
1.60 m
0.90 m
As you approach the obstacle, the time inter-
val between the audible warnings will be re-
duced. When you reach around 0.30 m the
warning will be constant: do not continue to
move forward (or backward)!
If you maintain separation from the obstacle,
the volume of the warning begins to reduce
after four seconds (does not affect the tone
of the constant warning).
Parking aid operation Fig. 183
Centre console: parking aid button. A
B
C
D
172
Page 177 of 248
Driver assistance systems
Error messages When the Parking Aid is activated or when it
is
sw
itched on, if a continuous warning can
be heard for several seconds (additionally, in
the case of Parking system Plus, the LED of
the button flashes), there is a fault in the
system.
Parking System Plus*
If there is a fault in a sensor, the symbol is
displayed on the Easy Connect display in
front of/behind the vehicle. If a rear sensor is
faulty, only the obstacles in the areas A and
B are displayed
››
›
Fig. 182. If a front sensor
is faulty, only the obstacles in the areas Cand
D are displayed.
Hav e the f
au
lt corrected by a specialised
workshop without delay.
Towing bracket In vehicles equipped with a towing bracket
dev
ic
e fr
om the factory, when the trailer is
connected electrically, the Parking Aid rear
sensors will not be activated when reverse
gear is engaged, when the selector lever is
turned to position R or when the button is
pressed. Parking System Plus
The dist
ance to possible obstacles at the rear
of the vehicle will not be displayed on the
screen and nor will it be indicated by means
of audible sound signals.
The Easy Connect system screen will only dis-
play objects detected at the front, and the ve-
hicle's trajectory will be hidden.
Rear Assist “Rear View Cam-
era”*
Operatin
g and safety warnings WARNING
● The Re ar As
sist does not make it possible
to precisely calculate the distance from ob-
stacles (people, vehicles, etc.) and nor can it
overcome the system's own limits, hence us-
ing it may cause serious accidents and inju-
ries if used negligently or without due care.
The driver should be aware of his/her sur-
roundings at all times to ensure safe driving.
● The camera lens expands and distorts the
field of
vision and displays the objects on the
screen in a different, vague manner. The per-
ception of distances is also distorted by this
effect.
● Due to the screen resolution or insufficient
light condition
s, some items may be dis-
played in an unsatisfactory manner or not at all. Take special care with thin posts, fences,
rai
lin
gs or trees that might not be displayed
on screen and could damage the vehicle.
● The rear assist has blind spots where it is
not pos
sible to represent people or objects
(small children, animals and certain objects
cannot be detected in its field of vision). Mon-
itor the vehicle's surrounding area at all
times.
● Keep the camera lens clean, free of ice and
snow
, and do not cover it.
● The system is not a replacement for driver
awar
eness. Supervise the parking operation
at all times, as well as the vehicle's surround-
ing area. Adapt your speed and driving style
at all times to suit visibility, weather, road
and traffic conditions.
● Do not be distracted from the traffic by
looking at
the screen.
● The images on the rear assist screen are
only tw
o-dimensional. Due to a lack of spatial
depth, protruding parts or holes in the road,
for example, are more difficult to detect or
may not be seen at all.
● Vehicle load modifies the representation of
the orientation lines
displayed. The width
represented by the lines diminishes with ve-
hicle load. Pay special attention to the vehi-
cle's surroundings when the inside of the ve-
hicle of the luggage compartment is carrying
a heavy load.
● In the following situations, the objects or
other vehic
les shown in the navigation sys-
tem display appear to be further away or » 175
Technical data
Advice
Operation
Emergencies
Safety
Page 182 of 248
Operation
The function is intended to prevent collisions
w ith p
ark
ed vehicles or vehicles in the same
lane travelling in the same direction. It may
fail to activate in other danger situations.
The Front Assist function is active within a
range of speeds between 4 km/h (2.5 mph)
and 250 km/h (156 mph). Depending on
speed, traffic conditions and driver behav-
iour, some of the sub-functions described be-
low are omitted in order to optimise the sys-
tem’s general behaviour.
The Front Assist is a driving assistance func-
tion that can never replace the driver’s atten-
tion.
Safety distance warning
If the system detects a situation of danger
because the vehicle is too close to the vehi-
cle ahead, it will warn the driver by means of
an indication on the instrument panel display
.
The timing of the warning varies depending
on driver behaviour and the traffic situation.
Advance warning
If the system detects a possible collision with
the vehicle in front, it may alert the driver by
means of an audible warning and an indica-
tion on the instrument panel display
››› Fig. 189. The warning moment varies depending on
the traffic s
ituation and driver behaviour. At
the same time, the vehicle will prepare for a
possible emergency braking ››› .
C ritic
a
l warning
If the driver fails to react to the pre-warning
(advance warning), the system may actively
intervene in the brakes and generate a brief
jolt to warn the driver of the imminent danger
of a collision.
Automatic braking
If the driver also fails to react to the critical
warning, the system may initiate independ-
ent emergency braking by progressively in-
creasing the braking effect in accordance
with how critical the situation is.
Driver emergency brake assist system
Faced with an imminent collision, the system
may detect that the driver is not braking hard
enough to avoid the collision. In this case, it
will automatically increase the braking effect.
Due to certain driving circumstances and the
limitations of its operation, there are some
cases in which the system cannot prevent a
collision, although it can significantly mini-
mise the consequences by reducing the
speed and the force of the impact. WARNING
Observe the safety warnings ›››
in Control
and warnin g l
amps on page 101. WARNING
The Front Assist system cannot change the
la w
s of physics or replace the driver in terms
of keeping control of the vehicle and reacting
to a possible emergency situation. WARNING
Following a Front Assist emergency warning,
pa y
immediate attention to the situation and
try to avoid the collision by braking or by
dodging the obstacle, as applicable.
● If the Front Assist does not work as descri-
bed in this c
hapter (e.g. it repeatedly inter-
venes unnecessarily), switch it off.
● Adapt your speed and safe distance to the
vehicl
e in front of you at all times to suit visi-
bility, weather, road and traffic conditions.
● The Front Assist alone cannot avoid acci-
dents and seriou
s injuries.
● In complex driving situations, occasionally
the Front As
sist may issue warnings and in-
tervene in braking unnecessarily, for example
at traffic islands.
● If the operation of the Front Assist is im-
paired, f
or example, by dirt or because the ra-
dar sensor has lost its settings, the system
may issue unnecessary warnings and inter-
vene inopportunely in the braking. 180