engine oil Seat Toledo 2017 Owner's manual
[x] Cancel search | Manufacturer: SEAT, Model Year: 2017, Model line: Toledo, Model: Seat Toledo 2017Pages: 248, PDF Size: 5.86 MB
Page 4 of 248
Frequently Asked Ques-
tion
sBefore driving
How do you adjust the seat?
››› page 11
How do you adjust the steering wheel? ››› page 13
How do you adjust the exterior mirrors? ››› page 13
How do you turn on the exterior lights? ››› page 18
How does the automatic gearbox selector lever work?
››› page 36
How do you refuel? ››› page 40
How do you activate the windscreen wipers and wind-
screen washer system? ››› page 20
Emergency situations
A warning lamp lights up or flashes. What does this
mean? ››› page 33
Where are the first-aid kit and the warning triangle in
the vehicle? ››› page 76
How do you open the bonnet? ››› page 11
How do you perform a jump start? ››› page 52
Where is the vehicle tool kit located? ››› page 47
How do you repair a tyre with the anti-puncture kit?
››› page 46
How do you change a wheel? ››› page 47
How do you change a fuse? ››› page 44
How do you change a light? ››› page 45
How do you tow a vehicle? ››› page 51
Useful tips
How do you set the time? ››› page 97
When should the vehicle inspection should be per-
formed? ››› page 31
What functions do the buttons/thumbwheels on the
steering wheel perform? ››› page 103
How do you drive in an economical and environmental-
ly-friendly way? ››› page 166
How do you check and top up the engine oil?
››› page 41
How do you check and top up the engine coolant?
››› page 42
How do you top up the windscreen washer fluid?
››› page 43
How do you check and top up the brake fluid?
››› page 43
How do you check and adjust tyre pressure values?
››› page 218
Vehicle washing tips ››› page 196
Functions of interest
Easy Connect, CAR menu ››› page 21
How does the START-STOP system work? ››› page 183
What parking assistants are available? ››› page 170
How does the rear assist work? ››› page 175
How does tyre pressure monitoring work? ››› page 221
How do you open the vehicle without a key (Keyless Ac-
cess)? ››› page 114
Interior lighting and ambient light ››› page 126
Page 6 of 248
Table of Contents
Engine management and emission control sys-
t em
. . . . . . . . . . . . . . . . . . . . . . . . . . . . . . . . . . . 167
Driv
ing tips . . . . . . . . . . . . . . . . . . . . . . . . . . . . . 169
Driver assistance systems . . . . . . . . . . . . . . . . . 170
Parking aid . . . . . . . . . . . . . . . . . . . . . . . . . . . . . 170
Rear Assist “Rear View Camera”* . . . . . . . . . . . 175
Cruise speed (Cruise Control)* . . . . . . . . . . . . . 178
Emergency brake assist system (Front As-
sis
t)* . . . . . . . . . . . . . . . . . . . . . . . . . . . . . . . . . . 179
Start-Stop System* . . . . . . . . . . . . . . . . . . . . . . . 183
Fatigue detection (break recommendation)* . . 185
Towing bracket device . . . . . . . . . . . . . . . . . . . . 186
Driving with a trailer . . . . . . . . . . . . . . . . . . . . . . 186
Towing bracket device . . . . . . . . . . . . . . . . . . . . 188
Advice . . . . . . . . . . . . . . . . . . . . . . . . . . . . . . . . 194
Care and maintenance . . . . . . . . . . . . . . . . . . . . 194
Accessories and modifications to the vehi-
cle
. . . . . . . . . . . . . . . . . . . . . . . . . . . . . . . . . . . . 194
Care and cleaning . . . . . . . . . . . . . . . . . . . . . . . 195
Checking and refilling levels . . . . . . . . . . . . . . . 201
Fuel . . . . . . . . . . . . . . . . . . . . . . . . . . . . . . . . . . . 201
Engine compartment . . . . . . . . . . . . . . . . . . . . . 204
Engine oil . . . . . . . . . . . . . . . . . . . . . . . . . . . . . . 207
Coolant . . . . . . . . . . . . . . . . . . . . . . . . . . . . . . . . 210
Brake fluid . . . . . . . . . . . . . . . . . . . . . . . . . . . . . 211
Window washer system . . . . . . . . . . . . . . . . . . . 212
Battery . . . . . . . . . . . . . . . . . . . . . . . . . . . . . . . . . 213
Wheels and tyres . . . . . . . . . . . . . . . . . . . . . . . . 217
Tyres . . . . . . . . . . . . . . . . . . . . . . . . . . . . . . . . . . 217
Spare wheel . . . . . . . . . . . . . . . . . . . . . . . . . . . . 220
Tyre monitoring systems . . . . . . . . . . . . . . . . . . 221
Winter service . . . . . . . . . . . . . . . . . . . . . . . . . . . 222
Technical data . . . . . . . . . . . . . . . . . . . . . . . . 223
Technical specifications . . . . . . . . . . . . . . . . . . 223
Important information . . . . . . . . . . . . . . . . . . . . 223
Information on fuel consumption . . . . . . . . . . . 224 Driving with a trailer . . . . . . . . . . . . . . . . . . . . . . 225
Wheels . . . . . . . . . . . . . . . . . . . . . . . . . . . . . . . . 226
Engine data . . . . . . . . . . . . . . . . . . . . . . . . . . . . . 227
Dimensions . . . . . . . . . . . . . . . . . . . . . . . . . . . . . 233
Index . . . . . . . . . . . . . . . . . . . . . . . . . . . . . . . . . 235
4
Page 28 of 248

The essentials
Data summaryMenuFunction
Current fuel
consumption
The current fuel consumption dis-
play operates throughout the jour-
ney, in litres/100 km; and with the
engine running and the vehicle
stopped, in litres/hour.
Average fuel consumption
After turning on the ignition, aver-
age fuel consumption in li-
tres/100 km will be displayed after
travelling about 100 metres. Other-
wise horizontal lines are displayed.
The value shown is updated approxi-
mately every 5 seconds.
ACT ®
*: Depending on the equip-
ment, number of active cylinders.
Operating range
Approximate distance in km that can
still be travelled with the fuel re-
maining in the tank, assuming the
same style of driving is maintained.
This is calculated using the current
fuel consumption.
Travelling timeThis indicates the hours (h) and mi-
nutes (min) since the ignition was
switched on.
JourneyDistance covered in km (m) after
switching on the ignition.
Average
speed
The average speed will be shown af-
ter a distance of about 100 metres
has been travelled. Otherwise hori-
zontal lines are displayed. The value
shown is updated approximately ev-
ery 5 seconds.
MenuFunction
Digital dis-
play of
speedCurrent speed displayed in digital
format.
Speed warn-
ing at ---
km/h or Speed
warning at
--- mphIf the stored speed is exceeded (be-
tween 30 - 250 km/h, or 19 -
155 mph), an audible warning is
given together with a visual warn-
ing.
Oil tempera-
tureUpdated engine oil temperature dig-
ital display
Coolant tem-
perature
gaugeDigital display of the current temper-
ature of the liquid coolant.
Convenience consumersInformation about the vehicle’s
main convenience consumers. It is
displayed by means of a consump-
tion indicator bar.
Eco tipsTips on how to save fuel.
Reset data “when set-
ting off”Reset journey data when setting off.
Reset data
for “total
calculation”Reset travel journey to zero. Storing a speed with the speed warning
● Select the display Speed warning at
--- km/h (---
mph)
● Press the button
on the windscreen
w iper l
ev
er or the button on the multifunc-tion steering wheel to store the current speed
and activ
at
e the w
arning.
● To switch system on: adjust to the desired
speed within 5 sec
onds using the rocker
switch on the windscreen wiper lever or
b y
t
urning the thumbwheel on the multifunc-
tion steering wheel. Next, press the button or
again or wait several seconds.
The s peed i
s
stored and the warning activa-
ted.
● To switch system off: press the but-
ton or
. The stored speed is de-
l et
ed.
Assist systems menu
MenuFunction
Front As-
sistSwitching the monitoring system on
and off ››› page 179.
Fatigue
detection *Switching the fatigue detection on or
off (pause recommendation)
››› page 185. Timer*
You can access the timer via the selection
menu
››
›
page 24.
It allows you to manually time lap times on a
racing circuit, memorise them and compare
them to the vehicle's previous best times. 26
Page 31 of 248
The essentials
Gear-change indicator Fig. 38
Instrument panel: gear-change indica-
t or (m
anual
gearbox). A gear change will be recommended if the
g
e
ar
you are in is not the most economical
choice. If no gear-change is recommended, it
means that you are already in the most eco-
nomical gear.
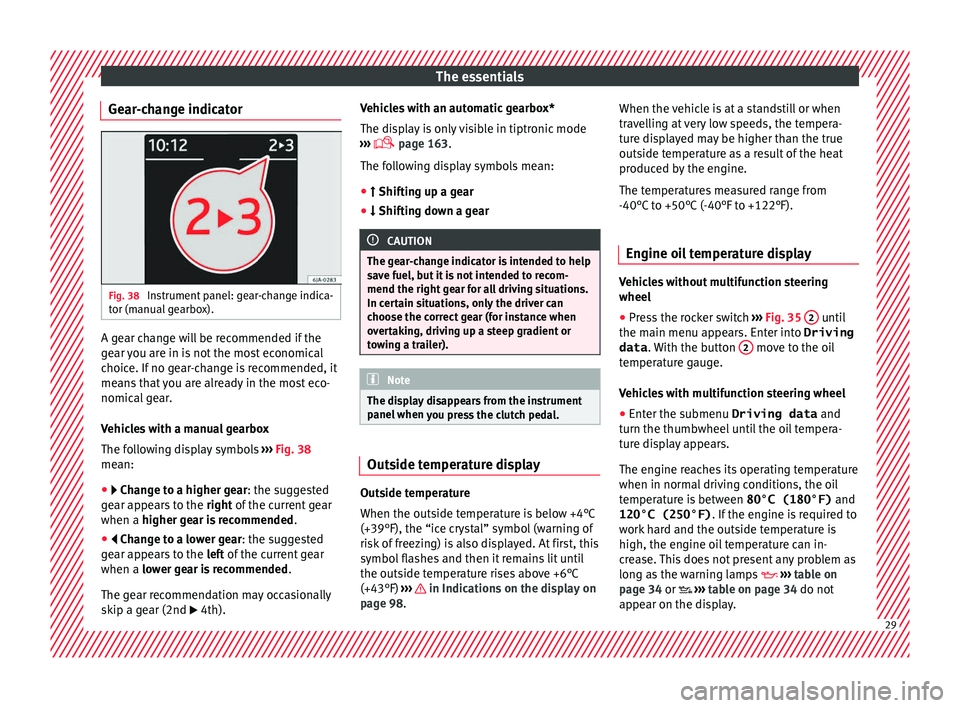
Vehicles with a manual gearbox
The following display symbols ›››
Fig. 38
mean:
● Chan ge to a higher gear: the suggested
g
ear appears to the right of the current gear
when a higher gear is recommended .
● Change to a lower gear: the suggested
g
ear appears to the left of the current gear
when a lower gear is recommended .
The gear recommendation may occasionally
skip a gear (2nd 4th). Vehicles with an automatic gearbox*
The dis
p
lay is only visible in tiptronic mode
››› page 163.
The following display symbols mean:
● Shiftin g up a gear
●
Shifting down a gear CAUTION
The gear-change indicator is intended to help
sav e f
uel, but it is not intended to recom-
mend the right gear for all driving situations.
In certain situations, only the driver can
choose the correct gear (for instance when
overtaking, driving up a steep gradient or
towing a trailer). Note
The display disappears from the instrument
panel when
you press the clutch pedal. Outside temperature display
Outside temperature
When the outs
ide t
emper
ature is below +4°C
(+39°F), the “ice crystal” symbol (warning of
risk of freezing) is also displayed. At first, this
symbol flashes and then it remains lit until
the outside temperature rises above +6°C
(+43°F) ››› in Indications on the display on
p ag
e 98
. When the vehicle is at a standstill or when
travel
ling at very low speeds, the tempera-
ture displayed may be higher than the true
outside temperature as a result of the heat
produced by the engine.
The temperatures measured range from
-40°C to +50°C (-40°F to +122°F).
Engine oil temperature display Vehicles without multifunction steering
wheel
● Press the rocker switch ›
››
Fig. 35 2 until
the m ain menu ap
pe
ars. Enter into Driving
data . With the button 2 move to the oil
t emper
at
ure gauge.
Vehicles with multifunction steering wheel
● Enter the submenu Driving data and
turn the thumbwheel
until the oil tempera-
ture display appears.
The engine reaches its operating temperature
when in normal driving conditions, the oil
temperature is between 80°C (180°F) and
120°C (250°F) . If the engine is required to
work hard and the outside temperature is
high, the engine oil temperature can in-
crease. This does not present any problem as
long as the warning lamps ›››
table on
page 34 or ››› table on page 34 do not
appear on the display. 29
Page 33 of 248
The essentials
Service intervals Fig. 39
Instrument panel The service interval indication appears on the
in
s
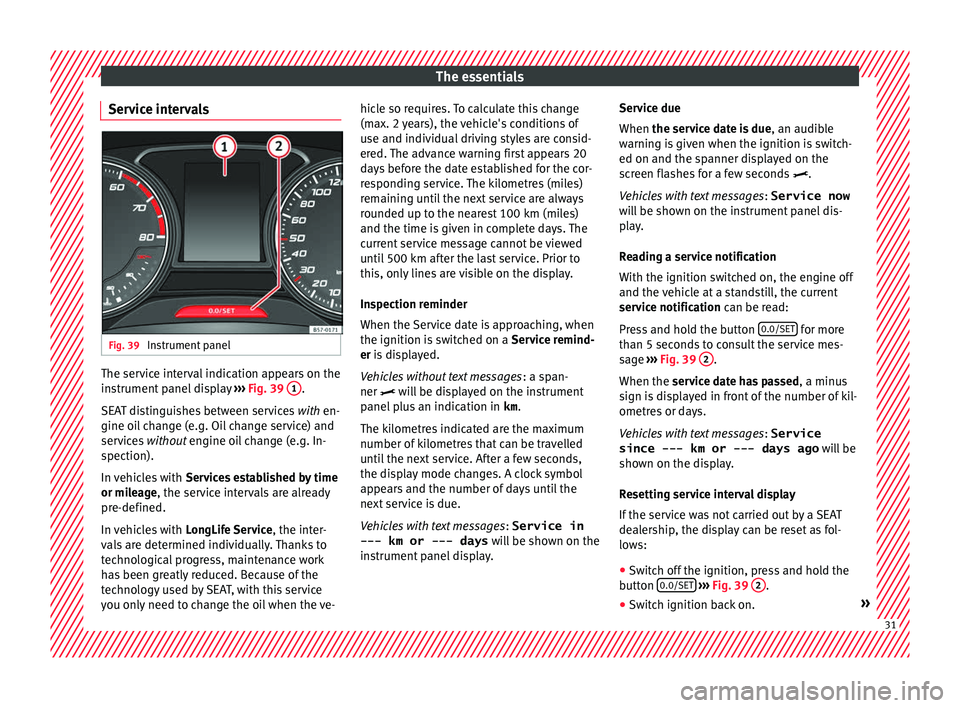
trument
panel display ››› Fig. 39 1 .
S EA
T di
stinguishes between services with en-
gine oil change (e.g. Oil change service) and
services without engine oil change (e.g. In-
spection).
In vehicles with Services established by time
or mileage, the service intervals are already
pre-defined.
In vehicles with LongLife Service , the inter-
vals are determined individually. Thanks to
technological progress, maintenance work
has been greatly reduced. Because of the
technology used by SEAT, with this service
you only need to change the oil when the ve- hicle so requires. To calculate this change
(max. 2 y
ears), the vehicle's conditions of
use and individual driving styles are consid-
ered. The advance warning first appears 20
days before the date established for the cor-
responding service. The kilometres (miles)
remaining until the next service are always
rounded up to the nearest 100 km (miles)
and the time is given in complete days. The
current service message cannot be viewed
until 500 km after the last service. Prior to
this, only lines are visible on the display.
Inspection reminder
When the Service date is approaching, when
the ignition is switched on a Service remind-
er is displayed.
Vehicles without text messages : a span-
ner will be displayed on the instrument
panel plus an indication in km.
The kilometres indicated are the maximum
number of kilometres that can be travelled
until the next service. After a few seconds,
the display mode changes. A clock symbol
appears and the number of days until the
next service is due.
Vehicles with text messages : Service in
--- km or --- days will be shown on the
instrument panel display. Service due
When the servic
e date is due, an audible
warning is given when the ignition is switch-
ed on and the spanner displayed on the
screen flashes for a few seconds .
Vehicles with text messages : Service now
will be shown on the instrument panel dis-
play.
Reading a service notification
With the ignition switched on, the engine off
and the vehicle at a standstill, the current
service notification can be read:
Press and hold the button 0.0/SET for more
th an 5 sec
ond
s to consult the service mes-
sage ››› Fig. 39 2 .
When the ser v
ic
e date has passed , a minus
sign is displayed in front of the number of kil-
ometres or days.
Vehicles with text messages : Service
since --- km or --- days ago will be
shown on the display.
Resetting service interval display
If the service was not carried out by a SEAT
dealership, the display can be reset as fol-
lows:
● Switch off the ignition, press and hold the
button 0.0/S
ET
› ›
› Fig. 39 2 .
● Switch ignition back on. » 31
Page 36 of 248
The essentials
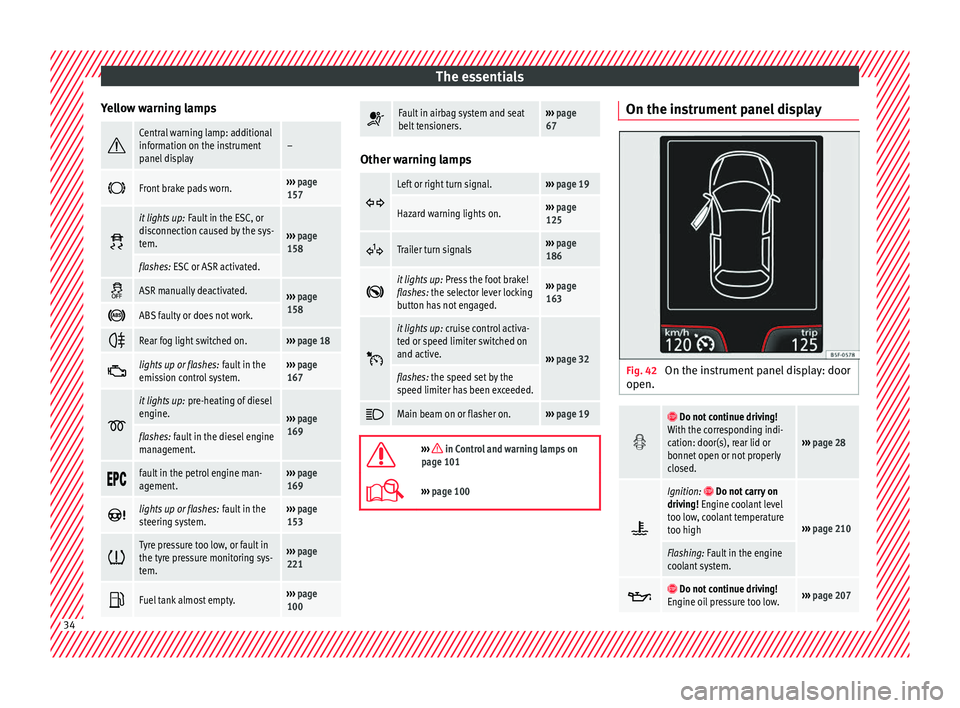
Yellow warning lamps Central warning lamp: additional
information on the instrument
panel display–
Front brake pads worn.›››
page
157
it lights up:
Fault in the ESC, or
disconnection caused by the sys-
tem.
››› page
158
flashes: ESC or ASR activated.
ASR manually deactivated.›››
page
158
ABS faulty or does not work.
Rear fog light switched on.›››
page 18
lights up or flashes:
fault in the
emission control system.››› page
167
it lights up:
pre-heating of diesel
engine.
››› page
169
flashes: fault in the diesel engine
management.
fault in the petrol engine man-
agement.›››
page
169
lights up or flashes:
fault in the
steering system.››› page
153
Tyre pressure too low, or fault in
the tyre pressure monitoring sys-
tem.›››
page
221
Fuel tank almost empty.›››
page
100
Fault in airbag system and seat
belt tensioners.›››
page
67 Other warning lamps
Left or right turn signal.›››
page 19
Hazard warning lights on.››› page
125
Trailer turn signals›››
page
186
it lights up:
Press the foot brake!
flashes: the selector lever locking
button has not engaged.››› page
163
it lights up:
cruise control activa-
ted or speed limiter switched on
and active.
››› page 32
flashes: the speed set by the
speed limiter has been exceeded.
Main beam on or flasher on.›››
page 19
››› in Control and warning lamps on
page 101
››› page 100 On the instrument panel display
Fig. 42
On the instrument panel display: door
open.
Do not continue driving!
With the corresponding indi-
cation: door(s), rear lid or
bonnet open or not properly
closed.
››› page 28
Ignition: Do not carry on
driving! Engine coolant level
too low, coolant temperature
too high
››› page 210
Flashing: Fault in the engine
coolant system.
Do not continue driving!
Engine oil pressure too low.››› page 207 34
Page 37 of 248
The essentials
Fault in the battery.›››
page 214
Driving light totally or partially
faulty.›››
page 84
Fault in the cornering light
system.››› page 120
Diesel particulate filter
blocked›››
page 168
Level of windscreen washer
fluid too low.›››
page 212
Flashing: Fault in the oil level
detection. Control manually.
›››
page 207Ignition: Insufficient engine
oil.
Fault in the gearbox.›››
page 164
Immobiliser active.›››
page 154
Service interval display›››
page 31
Mobile telephone is connec-
ted via Bluetooth to the origi-
nal telephone device.
›››
Booklet
Radio or
››› Booklet
Navigation
system
Mobile telephone battery
charge meter. Available only
for devices pre-installed in
factory.
Freezing warning. The outside
temperature is lower than
+4°C (+39°F).›››
page 29
Start-Stop system activated.
›››
page 183 Start-Stop system unavaila-
ble.
Low consumption driving sta-
tus›››
page 97
›››
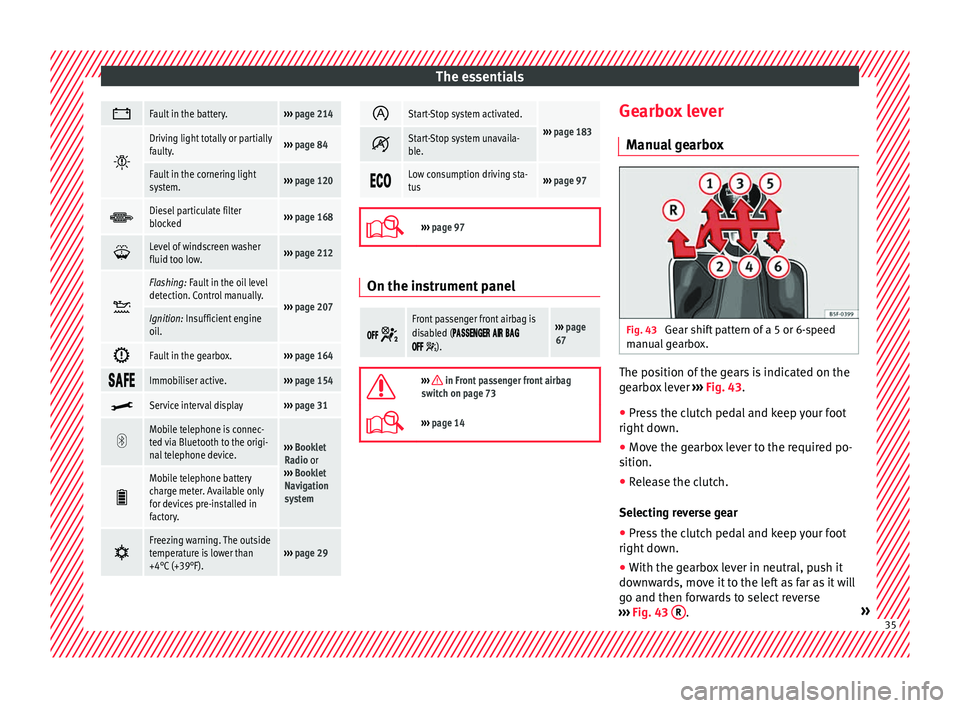
page 97 On the instrument panel
Front passenger front airbag is
disabled (
).
››› page
67
››› in Front passenger front airbag
switch on page 73
››› page 14 Gearbox lever
M anua
l
gearbox Fig. 43
Gear shift pattern of a 5 or 6-speed
m anual
g
earbox. The position of the gears is indicated on the
g
e
arbo
x lever ››› Fig. 43.
● Press the clutch pedal and keep your foot
right down.
● Mo
ve the gearbox lever to the required po-
sition.
● Rel
ease the clutch.
Selecting r
everse gear
● Press the clutch pedal and keep your foot
right down.
● W
ith the gearbox lever in neutral, push it
downw
ards, move it to the left as far as it will
go and then forwards to select reverse
››› Fig. 43 R .
» 35
Page 43 of 248

The essentials
Oil Fig. 50
Engine oil dipstick. Fig. 51
In the engine compartment: Engine
oil fi
ller cap. The level is measured using the dipstick loca-
t
ed in the en
gine c
ompartment
››› page 207.
The oil should leave a mark between zones A and
C . It should never exceed zone
A .
● Zone A : Do not add oil.
● Zone B : You can add oil but keep the level
in th at
zone. ●
Zone C : Add oil up to zone
B .
T op
pin
g up engine oil
● Unscrew cap from engine oil filler opening
›››
Fig. 51.
● Add oil slowly.
● At the same time, check the level to ensure
you do not a
dd too much. ●
When the oil l
evel reaches at least zone B ,
u n
s
crew the engine oil filler cap carefully.
Engine oil additives
No type of additive should be mixed with the
engine oil. The deterioration caused by these
additives is not covered by the warranty. » 41
Page 44 of 248
The essentials
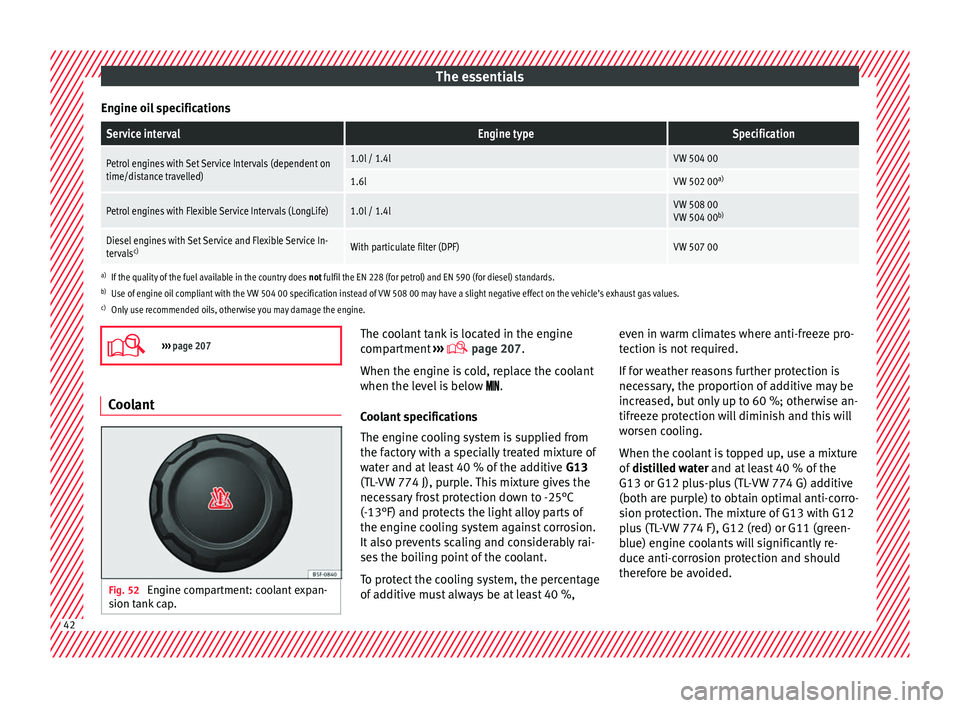
Engine oil specificationsService intervalEngine typeSpecification
Petrol engines with Set Service Intervals (dependent on
time/distance travelled)1.0l / 1.4lVW 504 00
1.6lVW 502 00 a)
Petrol engines with Flexible Service Intervals (LongLife)1.0l / 1.4lVW 508 00
VW 504 00b)
Diesel engines with Set Service and Flexible Service In-
tervalsc)With particulate filter (DPF)VW 507 00
a)
If the quality of the fuel available in the country does not fulfil the EN 228 (for petrol) and EN 590 (for diesel) standards.
b) Use of engine oil compliant with the VW 504 00 specification instead of VW 508 00 may have a slight negative effect on the vehicle’s exhaust gas values.
c) Only use recommended oils, otherwise you may damage the engine.
››› page 207 Coolant
Fig. 52
Engine compartment: coolant expan-
s ion t
ank
cap. The coolant tank is located in the engine
c
omp
ar
tment ›››
page 207.
When the engine is cold, replace the coolant
when the level is below .
Coolant specifications
The engine cooling system is supplied from
the factory with a specially treated mixture of
water and at least 40 % of the additive G13
(TL-VW 774 J), purple. This mixture gives the
necessary frost protection down to -25°C
(-13°F) and protects the light alloy parts of
the engine cooling system against corrosion.
It also prevents scaling and considerably rai-
ses the boiling point of the coolant.
To protect the cooling system, the percentage
of additive must always be at least 40 %, even in warm climates where anti-freeze pro-
tection is
not required.
If for weather reasons further protection is
necessary, the proportion of additive may be
increased, but only up to 60 %; otherwise an-
tifreeze protection will diminish and this will
worsen cooling.
When the coolant is topped up, use a mixture
of distilled water and at least 40 % of the
G13 or G12 plus-plus (TL-VW 774 G) additive
(both are purple) to obtain optimal anti-corro-
sion protection. The mixture of G13 with G12
plus (TL-VW 774 F), G12 (red) or G11 (green-
blue) engine coolants will significantly re-
duce anti-corrosion protection and should
therefore be avoided. 42
Page 79 of 248

Self-help
distance. Observe applicable local legal regu-
lation
s.
This is for your own safety and that of
other drivers.
● If you have a flat tyre, stop the vehicle as
far aw
ay as possible from moving traffic. Stop
on flat, solid ground.
● If you have to change the tyre on a gradi-
ent, block
the wheel opposite the wheel be-
ing changed by placing a stone or similar ob-
ject under it to prevent the vehicle from roll-
ing away unexpectedly.
● If the vehicle has been fitted with tyres or
allo
ys that are different to those fitted in
manufacture, the instructions ››› page 219,
New tyres or wheels must be followed.
● Always raise the vehicle with the doors
closed.
● Nev
er place parts of your body, e.g. arms
and leg
s, underneath the vehicle when it is
supported only by the jack.
● Secure the base of the jack with suitable
suppor
ts so that it cannot slip. The jack could
slide if the ground below it is soft and slip-
pery and the vehicle could slip off it. There-
fore, place the jack on a firm surface or use a
large, stable base. On a slippery surface, e.g.
tile, use a non-slip base such as a rubber
mat.
● Never start the engine when the vehicle is
jack
ed. Risk of injury.
● The jack should only be used in the correct
jack
ing points. CAUTION
● The pre s
cribed tightening torque for wheel
bolts on steel and alloy wheels is 120 Nm.
● If the anti-theft wheel bolt is overly tight-
ened, this c
ould damage the bolt and the
adapter. Note
● The set of anti-thef
t wheel bolts or the
adapter are available from authorised SEAT
dealers.
● Please observe the relevant local legal reg-
ulation
s when changing the wheel. Wheel bolts
The wheel
bolts
ar
e m
atched to the rims.
When installing different wheels, e.g. to fit
light alloy wheels or wheels with winter tyres,
it is important to use the correct wheel bolts
with the right length and correctly shaped
bolt heads. This is essential for a secure fit of
the wheels and for proper operation of the
brake system. Note
● Never gr e
ase or oil the wheel bolts!
● If the wheel bolt is very tight, it may be
poss
ible to loosen it by pushing down the
end of the box spanner carefully with your foot. Hold on to the vehicle for support and
tak
e c
are not to slip.
● If you notice that the wheel bolts are rusty
and difficult
to turn when changing a wheel,
they must be replaced before having the
tightening torque checked. Tyre repairs
TMS Anti-p
uncture kit (Tyre Mobility
System)* Read the additional information carefully
› ›
›
page 46
The Tyre Mobility System is stored in a box
under the carpet in the boot.
Using the Tyre Mobility System you can relia-
bly seal tyres damaged by foreign bodies,
provided that cuts or punctures are no larger
than approx. 4 mm in diameter. Do not re-
move the foreign bodies, e.g. bolts or nails,
from the tyre!
The tyre must be repaired immediately.
The repair made using the Tyre Mobility Sys-
tem under no circumstances replaces perma-
nent tyre repair and should only be used to
drive to the nearest official service. »
77
Technical data
Advice
Operation
Emergencies
Safety