power steering Seat Toledo 2017 Owner's manual
[x] Cancel search | Manufacturer: SEAT, Model Year: 2017, Model line: Toledo, Model: Seat Toledo 2017Pages: 248, PDF Size: 5.86 MB
Page 54 of 248
The essentials
Notes for the driver of the towing vehicle
● The tow rope must be taut before you drive
off .
● Rel
ease the clutch very carefully when start-
ing the v
ehicle (manual gearbox), or acceler-
ate gently (automatic gearbox).
Driving style
Towing requires some experience, especially
when using a tow rope. Both drivers should
realise how difficult it is to tow a vehicle. In-
experienced drivers should not attempt to
tow.
Do not pull too hard with the towing vehicle
and take care to avoid jerking the tow rope.
When towing on an unpaved road, there is al-
ways a risk of overloading and damaging the
anchorage points.
The towline anchorages are located under
the floor panel in the luggage compartment.
Switch on the ignition so that the turn sig-
nals, windscreen wipers and windscreen
washer can work. Ensure that the steering
wheel is unlocked and moves freely.
Place the gear lever in neutral on vehicles
with a manual gearbox. With an automatic
gearbox, place the lever in N.
To brake, press the brake pedal firmly. The
brake servo does not work when the engine
is switched off. The power steering only works when the igni-
tion is sw
itched on and the vehicle is moving,
provided that the battery is sufficiently charg-
ed. Otherwise, it will need more force.
Ensure that the tow rope remains taut at all
times.
››› page 79 Tow-starting
If the engine will not start, first try starting it
u
s
in
g the battery of another vehicle
››› page 52. You should only attempt to tow-
start a vehicle if charging the battery does
not work. This is done by leveraging wheel
movement.
When tow-starting a vehicle with a petrol en-
gine, do not tow it more than a short dis-
tance, otherwise unburned fuel can enter the
catalytic converter.
● Engage 2nd or 3rd gear before moving off.
● Press the clutch and hold the pedal down.
● Switch the ignition on.
● Once both vehicles are moving, release the
clutc
h.
● As soon as the engine has started, press
the clutc
h and move the gear lever to neutral. How to jump start
Jump lea
ds The jump lead must have a sufficient wire
cr
o
ss section.
If the engine fails to start because of a dis-
charged battery, the battery can be connec-
ted to the battery of another vehicle to start
the engine.
Both batteries need to have nominal voltage
of 12 V. The capacity (Ah) of the back-up bat-
tery should not be notably less than the
drained battery.
Jump leads must comply with standard DIN
72553 (see cable manufacturer's instruc-
tions). The wire cross section must be at least
25 mm 2
for petrol engines and at least
35 mm 2
for diesel engines.
Jump leads
Positive cable – usually red
Negative cable – usually black WARNING
● A flat b
attery can also freeze at tempera-
tures slightly below 0°C (+32°F). Do not at-
tempt to start the vehicle with a frozen bat-
tery. Risk of explosion! 52
Page 84 of 248
Emergencies
●
Prot ect
the fuse boxes when open to pre-
vent the entry of dust or humidity as they can
damage the electrical system.
● Always carefully remove the fuse box cov-
ers and r
efit them correctly to avoid problems
with your vehicle. Note
● One c omponent m
ay have more than one
fuse.
● Several components may run on a single
fuse.
● In the
vehicle, there are more fuses than
those indicat
ed in this chapter. These should
only be changed by a specialised workshop.
● Positions not containing a fuse do not ap-
pear in the fo
llowing tables.
● Some of the equipment listed in the tables
below pert
ain only to certain versions of the
model or are optional extras.
● Please note that the above lists, while cor-
rect at
the time of printing, are subject to
change. Fuses in the dash panel
Fig. 86
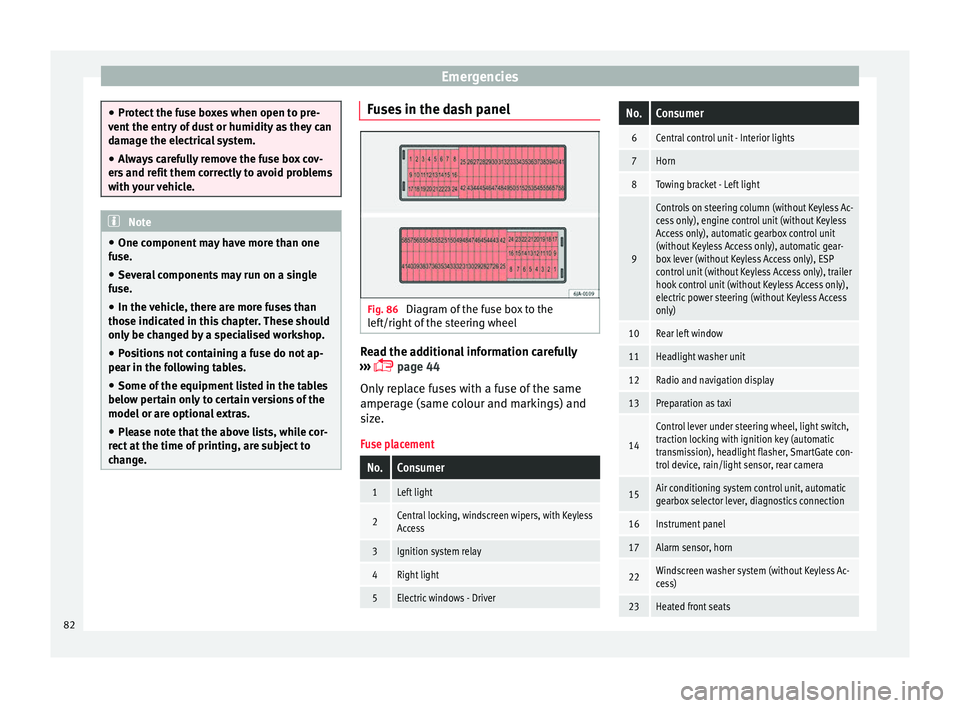
Diagram of the fuse box to the
l ef
t/right
of the steering wheel Read the additional information carefully
› ›
›
page 44
Only replace fuses with a fuse of the same
amperage (same colour and markings) and
size.
Fuse placement
No.Consumer
1Left light
2Central locking, windscreen wipers, with Keyless
Access
3Ignition system relay
4Right light
5Electric windows - Driver
No.Consumer
6Central control unit - Interior lights
7Horn
8Towing bracket - Left light
9
Controls on steering column (without Keyless Ac-
cess only), engine control unit (without Keyless
Access only), automatic gearbox control unit
(without Keyless Access only), automatic gear-
box lever (without Keyless Access only), ESP
control unit (without Keyless Access only), trailer
hook control unit (without Keyless Access only),
electric power steering (without Keyless Access
only)
10Rear left window
11Headlight washer unit
12Radio and navigation display
13Preparation as taxi
14
Control lever under steering wheel, light switch,
traction locking with ignition key (automatic
transmission), headlight flasher, SmartGate con-
trol device, rain/light sensor, rear camera
15Air conditioning system control unit, automatic
gearbox selector lever, diagnostics connection
16Instrument panel
17Alarm sensor, horn
22Windscreen washer system (without Keyless Ac-
cess)
23Heated front seats 82
Page 85 of 248
Fuses and bulbsNo.Consumer
24Air conditioning fan, heating, control unit for air
conditioning, heating
26Front seat heating switch.
27Rear window wiper
29Airbag
30
Electric windows, reversing light switch, air con-
ditioning control unit, Park Assist control unit,
exterior mirror, power supply for middle button
bar, power supply for the side button bar, interi-
or mirror
31Fuel pump, radiator fan control unit, cruise con-
trol, relay coil for the windscreen and rear win-
dow washer system, switch for the lights
32Diagnostics socket, headlight range regulator,
control lever under the steering wheel, ambient
lighting regulator
33Ignition relay coil, clutch pedal switch
34Heatable washer jets of windscreen washer
36USB charging socket
37Radar
39Additional electric heating
41Rear window heater
42Electric windows - passenger
43Towing bracket - Connector contact
No.Consumer
4412 V connection in the interior, 12 V connection
in the boot
45Rear right window
46Windshield and front window washing system,
control lever under the steering wheel
47Towing bracket - Connector contact
48Towing bracket - Right hand light
49Fuel pump control unit
50Radio
51Heat for exterior mirrors
52Keyless Access
53Steering lock (Keyless Access)
54ABS/ESC control unit
56Diagnosis
59Full LED
Fuses in the engine compartment
Fig. 87
In the engine compartment: fuse box
c o
v
er - 1st variant » 83
Technical data
Advice
Operation
Emergencies
Safety
Page 155 of 248
Driving
●
Never l e
ave the vehicle unattended if the
engine is running.
● Never switch the engine off until the vehi-
cle h
as come to a complete stop. Risk of acci-
dent! CAUTION
● Turnin g the s
teering wheel fully in either
direction when the vehicle is stationary and
the engine is in gear puts the power steering
under great stress. This could lead to noise.
Never leave the steering wheel turned fully in
either direction for more than 15 seconds.
Risk of damage to the power steering system!
● The starter motor may only be used (key
position 3
››› Fig. 173 ›
›› page 154 in the ig-
nition) if the engine is off. Using the starter
motor when the engine is running could dam-
age it.
● Immediately release the ignition key when
the engine st
arts, otherwise damage could be
caused to the starter motor.
● When the engine is cold, you should avoid
high engine speed
s, driving at full throttle
and over-loading the engine before it reaches
operating temperature. Risk of engine dam-
age!
● Do not tow-start the engine. Risk of engine
damag
e! In vehicles with a catalytic convert-
er, fuel that has not been burned could reach
the catalytic converter and catch fire in it.
This would lead to a fault in the catalytic con-
verter. You may use the battery from another vehicle to help you start your engine
›› ›
page 52.
● After prolonged and demanding operation
of the engine, when the j
ourney has ended,
do not stop the engine immediately. Let the
engine run at idle for about one more minute.
This will stop the engine from overheating. For the sake of the environment
Do not warm up the engine when the vehicle
i s s
tationary. If possible, move off immediate-
ly after starting the engine. This will help the
engine reach operating temperature more
quickly, reducing the quantity of emissions. Note
● The engine c an on
ly be started with the
original SEAT key.
● Loud running noises may be heard briefly
after c
old-starting the engine. This is normal
and is no cause for concern.
● After the engine has been stopped and the
ignition switc
hed off, the radiator fan may
continue running for around 10 minutes.
● If the engine still does not start after a sec-
ond attempt, the fuel
pump fuse might have
blown. Check it and replace if necessary
››› page 81 or contact your Specialised Serv-
ice.
● You should always engage the steering lock
when you e
xit the vehicle. This will hinder
any attempts at theft. Power steering
The power steering allows you to turn the
st
eerin
g wheel more easily.
If the power steering fails or the engine is off
(towing), it is still possible to turn the vehi-
cle's steering wheel fully. However, you need
more strength to steer the vehicle.
Driver control lamps and warnings (in red) Faulty steering! To
park the vehicle
If the warning lamp remains on and the driver
indication appears, the power steering could
be faulty.
Do not continue driving. Seek specialist as-
sistance. (in yellow) Steering: System
fault! You may continue driving.
If the warning lamp comes on, the steering
could react with more difficultly or more sen-
sitivity than normal. In addition, when driving
in a straight line the steering wheel may be
off-centre.
Drive slowly to a specialised workshop and
have the fault repaired. (in yellow) Steering lock:
fault! Go to an Official Service
The electronic steering lock is malfunction-
ing. »
153
Technical data
Advice
Operation
Emergencies
Safety
Page 160 of 248
Operation
Handbrake Fig. 176
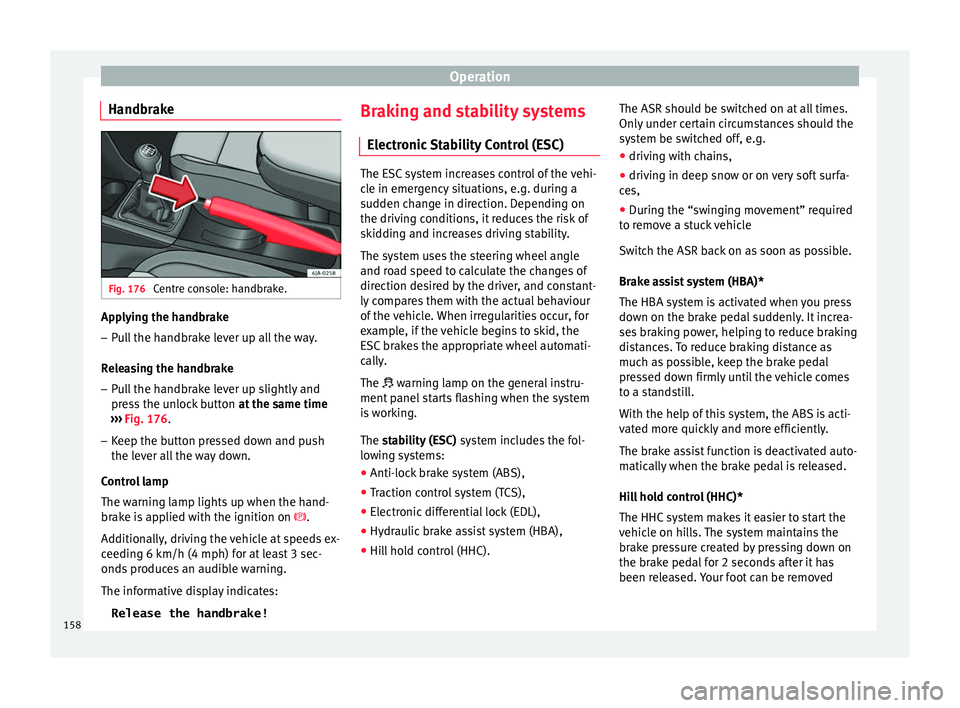
Centre console: handbrake. Applying the handbrake
– Pull the handbrake lever up all the way.
R el
e
asing the handbrake
– Pull the handbrake lever up slightly and
pres
s the unlock button at the same time
››› Fig. 176.
– Keep the button pressed down and push
the lever al
l the way down.
Control lamp
The warning lamp lights up when the hand-
brake is applied with the ignition on .
Additionally, driving the vehicle at speeds ex-
ceeding 6 km/h (4 mph) for at least 3 sec-
onds produces an audible warning.
The informative display indicates: Release the handbrake! Braking and stability systems
Electronic
Stability Control (ESC) The ESC system increases control of the vehi-
cl
e in emer
gency situations, e.g. during a
sudden change in direction. Depending on
the driving conditions, it reduces the risk of
skidding and increases driving stability.
The system uses the steering wheel angle
and road speed to calculate the changes of
direction desired by the driver, and constant-
ly compares them with the actual behaviour
of the vehicle. When irregularities occur, for
example, if the vehicle begins to skid, the
ESC brakes the appropriate wheel automati-
cally.
The warning lamp on the general instru-
ment panel starts flashing when the system
is working.
The stability (ESC) system includes the fol-
lowing systems:
● Anti-lock brake system (ABS),
● Traction control system (TCS),
● Electronic differential lock (EDL),
● Hydraulic brake assist system (HBA),
● Hill hold control (HHC). The ASR should be switched on at all times.
Only
u
nder certain circumstances should the
system be switched off, e.g.
● driving with chains,
● driving in deep snow or on very soft surfa-
ces,
● D
uring the “swinging movement” required
to remo
ve a stuck vehicle
Switch the ASR back on as soon as possible.
Brake assist system (HBA)*
The HBA system is activated when you press
down on the brake pedal suddenly. It increa-
ses braking power, helping to reduce braking
distances. To reduce braking distance as
much as possible, keep the brake pedal
pressed down firmly until the vehicle comes
to a standstill.
With the help of this system, the ABS is acti-
vated more quickly and more efficiently.
The brake assist function is deactivated auto-
matically when the brake pedal is released.
Hill hold control (HHC)*
The HHC system makes it easier to start the
vehicle on hills. The system maintains the
brake pressure created by pressing down on
the brake pedal for 2 seconds after it has
been released. Your foot can be removed
158
Page 180 of 248
Operation
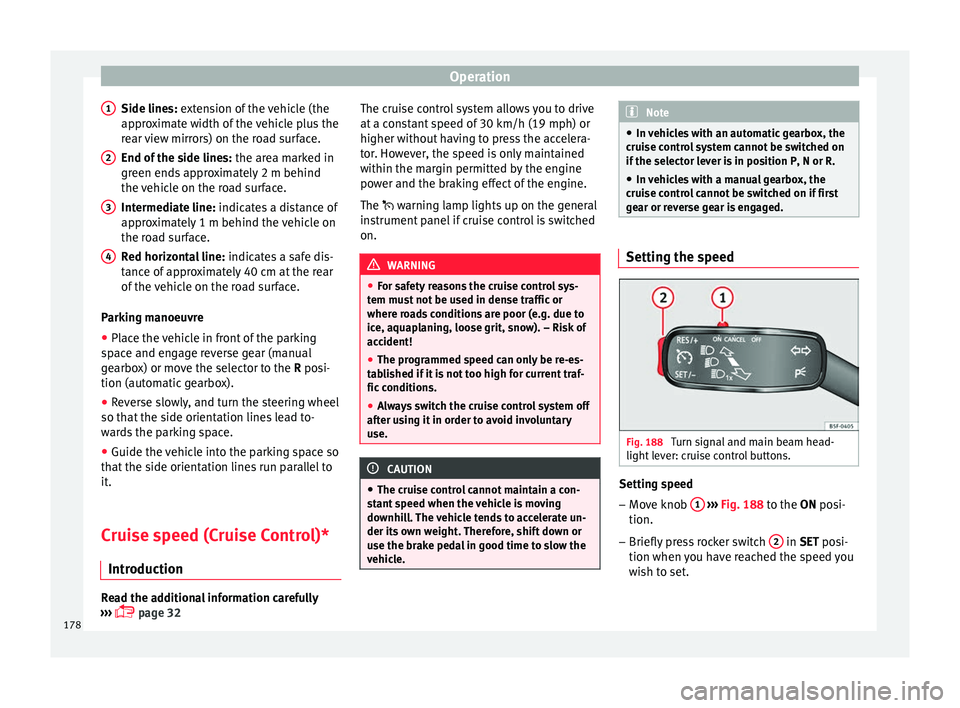
Side lines: e xt
en sion of the vehicle (the
approximate width of the vehicle plus the
rear view mirrors) on the road surface.
End of the side lines: the area marked in
green ends approximately 2 m behind
the vehicle on the road surface.
Intermediate line: indicates a distance of
approximately 1 m behind the vehicle on
the road surface.
Red horizontal line: indicates a safe dis-
tance of approximately 40 cm at the rear
of the vehicle on the road surface.
Parking manoeuvre
● Place the vehicle in front of the parking
spac
e and engage reverse gear (manual
gearbox) or move the selector to the R posi-
tion (automatic gearbox).
● Reverse slowly, and turn the steering wheel
so that the s
ide orientation lines lead to-
wards the parking space.
● Guide the vehicle into the parking space so
that the s
ide orientation lines run parallel to
it.
Cruise speed (Cruise Control)*
Introduction Read the additional information carefully
› ››
page 32
1
2
3
4 The cruise control system allows you to drive
at
a c
on
stant speed of 30 km/h (19 mph) or
higher without having to press the accelera-
tor. However, the speed is only maintained
within the margin permitted by the engine
power and the braking effect of the engine.
The warning lamp lights up on the general
instrument panel if cruise control is switched
on. WARNING
● For s af
ety reasons the cruise control sys-
tem must not be used in dense traffic or
where roads conditions are poor (e.g. due to
ice, aquaplaning, loose grit, snow). – Risk of
accident!
● The programmed speed can only be re-es-
tabli
shed if it is not too high for current traf-
fic conditions.
● Always switch the cruise control system off
after u
sing it in order to avoid involuntary
use. CAUTION
● The crui se c
ontrol cannot maintain a con-
stant speed when the vehicle is moving
downhill. The vehicle tends to accelerate un-
der its own weight. Therefore, shift down or
use the brake pedal in good time to slow the
vehicle. Note
● In v ehic
les with an automatic gearbox, the
cruise control system cannot be switched on
if the selector lever is in position P, N or R.
● In vehicles with a manual gearbox, the
cruise c
ontrol cannot be switched on if first
gear or reverse gear is engaged. Setting the speed
Fig. 188
Turn signal and main beam head-
light l
ev
er: cruise control buttons. Setting speed
– Move knob 1
› ›
› Fig. 188
to the ON posi-
tion.
– Briefly press rocker switch 2 in S
ET posi-
tion when y
ou have reached the speed you
wish to set.
178
Page 186 of 248
Operation
– Shif t
t
o neutral.
– Release the clutch pedal.
Automatic
engine start up (Start phase)
– Press the clutch.
Switc
hing the Start-Stop system on and off
The Start-Stop system can be switched on
and off by pressing the button
››› Fig. 192.
The warning lamp in the button will light up
when the system is switched off.
If the vehicle is in Stop phase when the but-
ton is pressed, the engine will start immedi-
ately.
The Start-Stop system works under complex
driving conditions that are difficult to detect
without specialist technology. The set of nec-
essary conditions for the correct operating of
the Start-Stop system are indicated below.
Conditions for automatic engine shut down
(Stop phase) ● Selector lever in neutral.
● Clutch pedal not pressed.
● Driver with seat belt fastened.
● Driver door closed.
● The bonnet closed.
● Vehicle stationary. ●
The factor
y-fitted towing bracket is not elec-
trically connected to a trailer.
● Engine at operating temperature.
● Vehicle's battery sufficiently charged.
● Vehicle not on a very steep slope
● Engine speed below 1,200 rpm.
● Vehicle battery temperature is neither too
high nor too low
.
● Sufficient brake system pressure.
● Difference between outside temperature
and set interior t
emperature not too great
● Vehicle speed since the last time the en-
gine star
ted was above 3 km/h (2 mph).
● Particulate filter not being cleaned
›››
page 168.
● Front wheels not overly turned (steering
wheel turned l
ess than three quarters of a
turn)
Conditions for engine start up (Start phase)
● Clutch pedal pressed.
● Max./min. temperature set.
● Windscreen defrost function switched on.
● High blower speed.
● Start-Stop button pressed. Conditions for automatic engine start up
without driv
er involvement
● Vehicle moving at a speed of over 3 km/h
(2 mph).
● Difference between outside temperature
and interior temper
ature is too great
● Vehicle's battery insufficiently charged.
● Insufficient brake system pressure.
If the driver se
at belt is unfastened for more
than 30 seconds in Stop phase, the engine
must be started using the ignition key.
Please observe the messages on the general
instrument panel display.
Warnings on the instrument panel display
(valid for vehicles not fitted with an informa-
tive display)
FAULT: Start-StopFault in the Start-Stop sys-
tem
START-STOP IMPOSSI-
BLEEngine cannot be auto-
matically shut down
START-STOP ACTIVEAutomatic engine shut
down (Stop phase)
SWITCH OFF IGNITIONSwitch the ignition off
START MANUALLYStart the engine manually WARNING
● If the en gine i
s switched off, neither the
brake servo nor the power steering will work. 184
Page 239 of 248
Index
depress the brake . . . . . . . . . . . . . . . . . . . . . . . 179
die sel
p
articulate filter . . . . . . . . . . . . . . . . . . . 168
disabling airbag . . . . . . . . . . . . . . . . . . . . . . . . . 72
emission control . . . . . . . . . . . . . . . . . . . . . . . . 169
engine management . . . . . . . . . . . . . . . . . . . . 169
engine oil . . . . . . . . . . . . . . . . . . . . . . . . . . . . . 208
engine pre-heating/fault system . . . . . . . . . . . 169
ESC . . . . . . . . . . . . . . . . . . . . . . . . . . . . . . . . . . 158
fuel level . . . . . . . . . . . . . . . . . . . . . . . . . . . . . . 100
gearbox malfunctions . . . . . . . . . . . . . . . . . . . 164
hand brake . . . . . . . . . . . . . . . . . . . . . . . . . . . . 158
instrument panel . . . . . . . . . . . . . . . . . . . . . 33, 35
instrument panel display . . . . . . . . . . . . . . . . . . 34
lights . . . . . . . . . . . . . . . . . . . . . . . . . . . . . . . . . 121
power steering . . . . . . . . . . . . . . . . . . . . . . . . . 153
seat belt . . . . . . . . . . . . . . . . . . . . . . . . . . . . . . . 62
Start-Stop . . . . . . . . . . . . . . . . . . . . . . . . . . . . . 183
tyre pressure . . . . . . . . . . . . . . . . . . . . . . . . . . . 221
Controls and displays general instrument panel . . . . . . . . . . . . . . . . . . 95
Controls for the windows . . . . . . . . . . . . . . . 11, 119
Controls on the steering wheel without voice control . . . . . . . . . . . . . . . . . . . . 106
with voice control . . . . . . . . . . . . . . . . . . . . . . . 104
Cooling coolant temperature gauge . . . . . . . . . . . . . . . . 99
Cooling system checking coolant . . . . . . . . . . . . . . . . . . . . . . . 210
topping up coolant . . . . . . . . . . . . . . . . . . . . . . 210
Correct sitting position . . . . . . . . . . . . . . . . . . . . . 57 driver . . . . . . . . . . . . . . . . . . . . . . . . . . . . . . . . . . 57
front passenger . . . . . . . . . . . . . . . . . . . . . . . . . 58
rear seat passengers . . . . . . . . . . . . . . . . . . . . . 59
Cruise control . . . . . . . . . . . . . . . . . . . . . . . . 32, 178 adjusting the stored speed . . . . . . . . . . . . . . . 179
setting the speed . . . . . . . . . . . . . . . . . . . . . . . 178 temporary deactivation . . . . . . . . . . . . . . . . . . 179
turning off
the cruise control system . . . . . . . 179
D Damage to the vehicle . . . . . . . . . . . . . . . . . . . . . 170
Dash panel . . . . . . . . . . . . . . . . . . . . . . . . . . . . . . . 33
Data label . . . . . . . . . . . . . . . . . . . . . . . . . . . . . . . 223
Deactivating the front passenger front airbag . . . 14
Deactivation of front airbag . . . . . . . . . . . . . . . 69, 72
Defective bulbs changing a bulb . . . . . . . . . . . . . . . . . . . . . . . . . 84
Defrosting rear window . . . . . . . . . . . . . . . . . . . . 127
Diesel diesel particulate filter . . . . . . . . . . . . . . . . . . . 168
engine oil . . . . . . . . . . . . . . . . . . . . . . . . . . . . . 207
preheating . . . . . . . . . . . . . . . . . . . . . . . . . . . . 152
refuelling . . . . . . . . . . . . . . . . . . . . . . . . . . . . . . 203
Diesel particulate filter . . . . . . . . . . . . . . . . . . . . 168 control lamp . . . . . . . . . . . . . . . . . . . . . . . . . . . 168
malfunction . . . . . . . . . . . . . . . . . . . . . . . . . . . . 168
Digital clock . . . . . . . . . . . . . . . . . . . . . . . . . . . . . . 98
Dimensions . . . . . . . . . . . . . . . . . . . . . . . . . . . . . . 233
Direction of rotation tyres . . . . . . . . . . . . . . . . . . . . . . . . . . . . . . . . . . . 50
Display . . . . . . . . . . . . . . . . . . . . . . . . . . . . . . . 96, 97
Disposal belt tensioners . . . . . . . . . . . . . . . . . . . . . . . . . . 67
Door cylinder . . . . . . . . . . . . . . . . . . . . . . . . . . . . . . 9
Door handle . . . . . . . . . . . . . . . . . . . . . . . . . . . . . . . 9
Door lock . . . . . . . . . . . . . . . . . . . . . . . . . . . . . . . . . . 9
Doors child-proof locking . . . . . . . . . . . . . . . . . . . . . . 116
opening and closing . . . . . . . . . . . . . . . . . . . . . . 9
Drink holder centre console . . . . . . . . . . . . . . . . . . . . . . . . . 136
rear seat armrest . . . . . . . . . . . . . . . . . . . . . . . 137 Driver
see Correct sitting position . . . . . . . . . 57, 58, 59
Driver information system engine oil temperature display . . . . . . . . . . . . . 29
operation through the windscreen wiper lever . 23
Driving economical . . . . . . . . . . . . . . . . . . . . . . . . . . . . 166
safe . . . . . . . . . . . . . . . . . . . . . . . . . . . . . . . . . . . 56
Driving abroad headlights . . . . . . . . . . . . . . . . . . . . . . . . . . . . . 126
Driving data data summary . . . . . . . . . . . . . . . . . . . . . . . . . . . 26
memory . . . . . . . . . . . . . . . . . . . . . . . . . . . . . . . . 25
Driving through water . . . . . . . . . . . . . . . . . . . . . 169
Driving with a trailer . . . . . . . . . . . . . . . . . . 186, 225
Dynamic headlight range control . . . . . . . . . . . . 122
E
E10 see Ethanol (fuel) . . . . . . . . . . . . . . . . . . . . . . . 202
Easy Connect . . . . . . . . . . . . . . . . . . . . . . . . 21, 101
EDL see Electronic differential lock . . . . . . . . 158, 160
Efficiency program saving tips . . . . . . . . . . . . . . . . . . . . . . . . . . . . . . 30
Efficiency Program additional consumers . . . . . . . . . . . . . . . . . . . . 30
Electric windows . . . . . . . . . . . . . . . . . . . . . . 11, 119
Electronic differential lock . . . . . . . . . . . . . 158, 160
Electronic immobiliser . . . . . . . . . . . . . . . . . . . . . . . 9
Electronic Stability Control (ESC) . . . . . . . . . . . . 158
Emergencies . . . . . . . . . . . . . . . . . . . . . . . . . . . . . . 76 automatic gearbox emergency program . . . . . 164
bulbs . . . . . . . . . . . . . . . . . . . . . . . . . . . . . . . . . . 45
changing a wheel . . . . . . . . . . . . . . . . . . . . . 47, 76
emergency towing of the vehicle . . . . . . . . . . . . 51
hazard warning lights . . . . . . . . . . . . . . . . . . . 125
237
Page 243 of 248
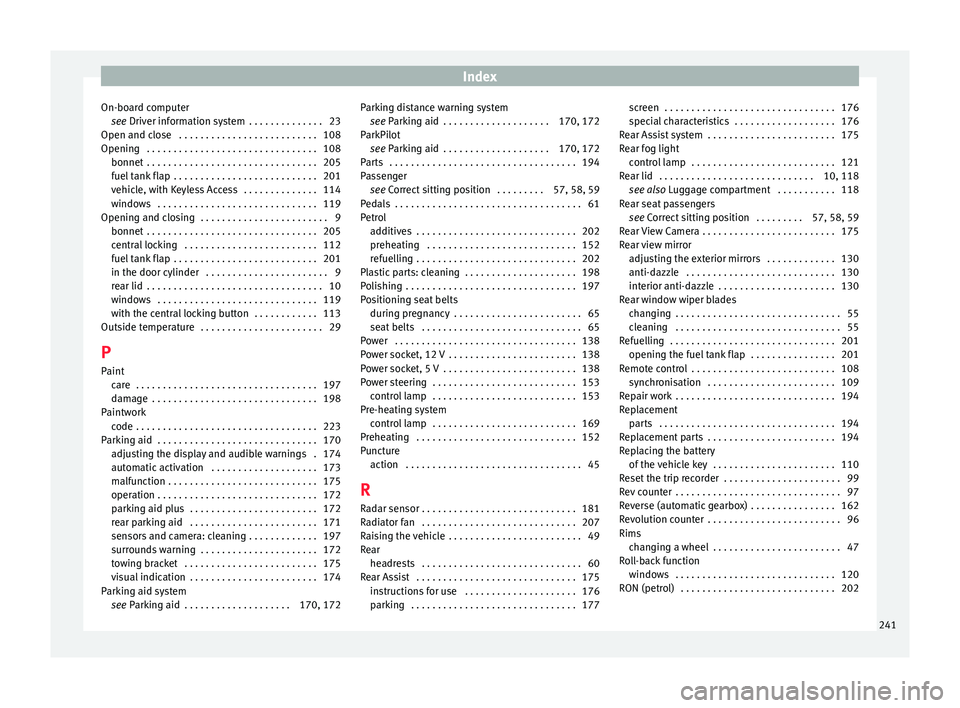
Index
On-board computer se
e
Driver information system . . . . . . . . . . . . . . 23
Open and close . . . . . . . . . . . . . . . . . . . . . . . . . . 108
Opening . . . . . . . . . . . . . . . . . . . . . . . . . . . . . . . . 108 bonnet . . . . . . . . . . . . . . . . . . . . . . . . . . . . . . . . 205
fuel tank flap . . . . . . . . . . . . . . . . . . . . . . . . . . . 201
vehicle, with Keyless Access . . . . . . . . . . . . . . 114
windows . . . . . . . . . . . . . . . . . . . . . . . . . . . . . . 119
Opening and closing . . . . . . . . . . . . . . . . . . . . . . . . 9 bonnet . . . . . . . . . . . . . . . . . . . . . . . . . . . . . . . . 205
central locking . . . . . . . . . . . . . . . . . . . . . . . . . 112
fuel tank flap . . . . . . . . . . . . . . . . . . . . . . . . . . . 201
in the door cylinder . . . . . . . . . . . . . . . . . . . . . . . 9
rear lid . . . . . . . . . . . . . . . . . . . . . . . . . . . . . . . . . 10
windows . . . . . . . . . . . . . . . . . . . . . . . . . . . . . . 119
with the central locking button . . . . . . . . . . . . 113
Outside temperature . . . . . . . . . . . . . . . . . . . . . . . 29
P Paint care . . . . . . . . . . . . . . . . . . . . . . . . . . . . . . . . . . 197
damage . . . . . . . . . . . . . . . . . . . . . . . . . . . . . . . 198
Paintwork code . . . . . . . . . . . . . . . . . . . . . . . . . . . . . . . . . . 223
Parking aid . . . . . . . . . . . . . . . . . . . . . . . . . . . . . . 170 adjusting the display and audible warnings . 174
automatic activation . . . . . . . . . . . . . . . . . . . . 173
malfunction . . . . . . . . . . . . . . . . . . . . . . . . . . . . 175
operation . . . . . . . . . . . . . . . . . . . . . . . . . . . . . . 172
parking aid plus . . . . . . . . . . . . . . . . . . . . . . . . 172
rear parking aid . . . . . . . . . . . . . . . . . . . . . . . . 171
sensors and camera: cleaning . . . . . . . . . . . . . 197
surrounds warning . . . . . . . . . . . . . . . . . . . . . . 172
towing bracket . . . . . . . . . . . . . . . . . . . . . . . . . 175
visual indication . . . . . . . . . . . . . . . . . . . . . . . . 174
Parking aid system see Parking aid . . . . . . . . . . . . . . . . . . . . 170, 172 Parking distance warning system
see Parking aid . . . . . . . . . . . . . . . . . . . . 170, 172
ParkPilot see Parking aid . . . . . . . . . . . . . . . . . . . . 170, 172
Parts . . . . . . . . . . . . . . . . . . . . . . . . . . . . . . . . . . . 194
Passenger see Correct sitting position . . . . . . . . . 57, 58, 59
Pedals . . . . . . . . . . . . . . . . . . . . . . . . . . . . . . . . . . . 61
Petrol additives . . . . . . . . . . . . . . . . . . . . . . . . . . . . . . 202
preheating . . . . . . . . . . . . . . . . . . . . . . . . . . . . 152
refuelling . . . . . . . . . . . . . . . . . . . . . . . . . . . . . . 202
Plastic parts: cleaning . . . . . . . . . . . . . . . . . . . . . 198
Polishing . . . . . . . . . . . . . . . . . . . . . . . . . . . . . . . . 197
Positioning seat belts during pregnancy . . . . . . . . . . . . . . . . . . . . . . . . 65
seat belts . . . . . . . . . . . . . . . . . . . . . . . . . . . . . . 65
Power . . . . . . . . . . . . . . . . . . . . . . . . . . . . . . . . . . 138
Power socket, 12 V . . . . . . . . . . . . . . . . . . . . . . . . 138
Power socket, 5 V . . . . . . . . . . . . . . . . . . . . . . . . . 138
Power steering . . . . . . . . . . . . . . . . . . . . . . . . . . . 153 control lamp . . . . . . . . . . . . . . . . . . . . . . . . . . . 153
Pre-heating system control lamp . . . . . . . . . . . . . . . . . . . . . . . . . . . 169
Preheating . . . . . . . . . . . . . . . . . . . . . . . . . . . . . . 152
Puncture action . . . . . . . . . . . . . . . . . . . . . . . . . . . . . . . . . 45
R
Radar sensor . . . . . . . . . . . . . . . . . . . . . . . . . . . . . 181
Radiator fan . . . . . . . . . . . . . . . . . . . . . . . . . . . . . 207
Raising the vehicle . . . . . . . . . . . . . . . . . . . . . . . . . 49
Rear headrests . . . . . . . . . . . . . . . . . . . . . . . . . . . . . . 60
Rear Assist . . . . . . . . . . . . . . . . . . . . . . . . . . . . . . 175 instructions for use . . . . . . . . . . . . . . . . . . . . . 176
parking . . . . . . . . . . . . . . . . . . . . . . . . . . . . . . . 177 screen . . . . . . . . . . . . . . . . . . . . . . . . . . . . . . . . 176
speci
al characteristics . . . . . . . . . . . . . . . . . . . 176
Rear Assist system . . . . . . . . . . . . . . . . . . . . . . . . 175
Rear fog light control lamp . . . . . . . . . . . . . . . . . . . . . . . . . . . 121
Rear lid . . . . . . . . . . . . . . . . . . . . . . . . . . . . . 10, 118 see also Luggage compartment . . . . . . . . . . . 118
Rear seat passengers see Correct sitting position . . . . . . . . . 57, 58, 59
Rear View Camera . . . . . . . . . . . . . . . . . . . . . . . . . 175
Rear view mirror adjusting the exterior mirrors . . . . . . . . . . . . . 130
anti-dazzle . . . . . . . . . . . . . . . . . . . . . . . . . . . . 130
interior anti-dazzle . . . . . . . . . . . . . . . . . . . . . . 130
Rear window wiper blades changing . . . . . . . . . . . . . . . . . . . . . . . . . . . . . . . 55
cleaning . . . . . . . . . . . . . . . . . . . . . . . . . . . . . . . 55
Refuelling . . . . . . . . . . . . . . . . . . . . . . . . . . . . . . . 201 opening the fuel tank flap . . . . . . . . . . . . . . . . 201
Remote control . . . . . . . . . . . . . . . . . . . . . . . . . . . 108 synchronisation . . . . . . . . . . . . . . . . . . . . . . . . 109
Repair work . . . . . . . . . . . . . . . . . . . . . . . . . . . . . . 194
Replacement parts . . . . . . . . . . . . . . . . . . . . . . . . . . . . . . . . . 194
Replacement parts . . . . . . . . . . . . . . . . . . . . . . . . 194
Replacing the battery of the vehicle key . . . . . . . . . . . . . . . . . . . . . . . 110
Reset the trip recorder . . . . . . . . . . . . . . . . . . . . . . 99
Rev counter . . . . . . . . . . . . . . . . . . . . . . . . . . . . . . . 97
Reverse (automatic gearbox) . . . . . . . . . . . . . . . . 162
Revolution counter . . . . . . . . . . . . . . . . . . . . . . . . . 96
Rims changing a wheel . . . . . . . . . . . . . . . . . . . . . . . . 47
Roll-back function windows . . . . . . . . . . . . . . . . . . . . . . . . . . . . . . 120
RON (petrol) . . . . . . . . . . . . . . . . . . . . . . . . . . . . . 202
241