jump start SKODA CITIGO 2012 1.G Owner's Manual
[x] Cancel search | Manufacturer: SKODA, Model Year: 2012, Model line: CITIGO, Model: SKODA CITIGO 2012 1.GPages: 157, PDF Size: 3.9 MB
Page 6 of 157
Do-it-yourself
Do-it-yourself 127
First-aid kit and warning triangle 127
Fire extinguisher 127
Vehicle tool kit 127
Changing a wheel 128
Breakdown kit 132
Jump-starting 134
Towing the vehicle 136
Fuses and light bulbs 138
Fuses 138
Bulbs 141
Technical data
Technical data 145
Introductory information 145
Data on the vehicle sticker and the type plate 145
Dimensions 146
Specifications and engine oil capacity 146
Vehicle-specific information depending on
engine type 147
Index
4 Table of Contents
Page 58 of 157
Starting-off and Driving
Starting and stopping the engine
ä
Introduction
This chapter contains information on the following subjects:
Adjusting the steering wheel position 57
Electromechanical power steering 57
Electronic immobiliser 57
Ignition lock 58
Starting engine 58
Switching the engine off 58
WARNING
■ Never adjust the steering wheel when the vehicle is moving only when the
vehicle is stationary!
■ Maintain a distance of 25 cm B
to the steering wheel
» Fig. 62 on page 57.
Not maintaining this minimum distance will mean that the airbag system will
not be able to properly protect you – hazard! ■ The lever for adjusting the steering wheel must be locked whilst driving so
that the position of the steering wheel cannot accidently change during the
journey – risk of accident! ■ If the steering wheel is adjusted further towards the head, the protection
provided by the driver airbag in the event of an accident is reduced. Check
that the steering wheel is aligned to the chest. ■ When driving, hold the steering wheel with both hands firmly on the outer
edge in the 9
o'clock and 3 o'clock position. Never hold the steering wheel in
the 12 o'clock position or in any other way (e.g. in the middle or inner edge of
the steering wheel). In such cases, you could injure the arms, hands and head
when the driver airbag is deployed. ■ When driving, the ignition key must always be in the position 2
» Fig. 63 on
page 58
(ignition switched on) without the engine running. This position is
indicated by the warning lights coming on. If this is not the case, it could result
in unexpected locking of the steering wheel – risk of accident! WARNING (Continued)
■ Only pull the ignition key from the ignition lock when the vehicle has come
to a complete stop (by applying the handbrake). Otherwise the steering wheel
could block – risk of accident!
■ When leaving the vehicle, the ignition must always be removed. This is par-
ticularly important if children are left in the vehicle. Otherwise the children
could, for example, start the engine – risk of accident or injury!
■ Never leave the engine running in unventilated or closed rooms. The ex-
haust gases of the engine contain besides the odorless and colourless carbon
monoxide a poisonous gas – hazard! Carbon monoxide can cause uncon-
sciousness and death. ■ Never leave the vehicle unattended with the engine running.
■ Never switch off the engine before the vehicle is stationary – risk of acci-
dent! CAUTION
■ The starter may only be operated (ignition key position 3
» page 58), if the
engine is not running. The starter or engine can be damaged if the starter is acti-
vated when the engine is running. ■ Let go of the ignition key as soon as the engine starts otherwise the starter
could be damaged. ■ Avoid high engine revolutions, full throttle and high engine loads as long as the
engine has not yet reached its operating temperature – risk of damaging the en-
gine!
■ Do not tow start the engine - danger of damaging the engine! On vehicles with
a catalytic converter, unburnt fuel may get into the catalytic converter where it
may ignite. This in turn may damage the catalytic converter. The battery from an-
other vehicle can be used as a jump-start aid » page 134, Jump-starting .
■ Do not switch the engine off immediately at the end of your journey after the
engine has been operated over a prolonged period at high loads but leave it to
run at an idling speed for about 1
minute. This prevents any possible accumulation
of heat when the engine is switched off. For the sake of the environment
Do not warm up the engine while the vehicle is stationary. If possible, start your
journey as soon as the engine has started. Through this the engine reaches its
operating temperature more rapidly and the pollutant emissions are lower. £
56 Using the system
Page 117 of 157
Vehicle battery
ä
Introduction
This chapter contains information on the following subjects:
Checking the battery electrolyte level 116
Operation in winter 117
Charging a vehicle battery 117
Disconnecting and reconnecting the vehicle battery 117
Replacing the vehicle battery 117
Automatic load deactivation 118
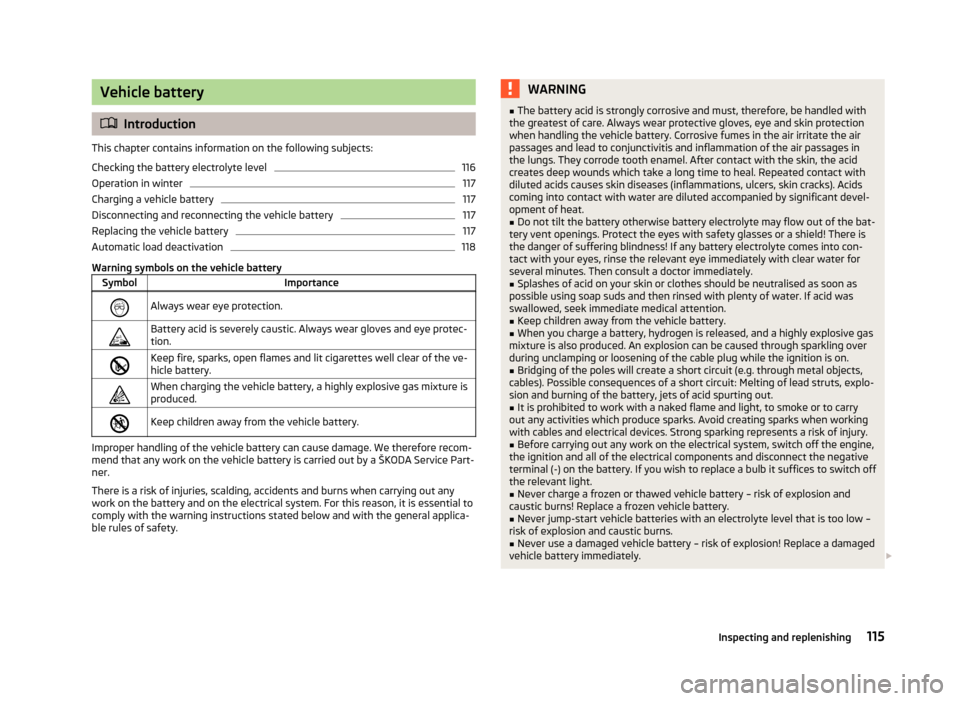
Warning symbols on the vehicle battery Symbol Importance
Always wear eye protection.
Battery acid is severely caustic. Always wear gloves and eye protec-
tion.
Keep fire, sparks, open flames and lit cigarettes well clear of the ve-
hicle battery.
When charging the vehicle battery, a highly explosive gas mixture is
produced.
Keep children away from the vehicle battery. Improper handling of the vehicle battery can cause damage. We therefore recom-
mend that any work on the vehicle battery is carried out by a
ŠKODA Service Part-
ner.
There is a risk of injuries, scalding, accidents and burns when carrying out any
work on the battery and on the electrical system. For this reason, it is essential to
comply with the warning instructions stated below and with the general applica-
ble rules of safety. WARNING
■ The battery acid is strongly corrosive and must, therefore, be handled with
the greatest of care. Always wear protective gloves, eye and skin protection
when handling the vehicle battery. Corrosive fumes in the air irritate the air
passages and lead to conjunctivitis and inflammation of the air passages in
the lungs. They corrode tooth enamel. After contact with the skin, the acid
creates deep wounds which take a long time to heal. Repeated contact with
diluted acids causes skin diseases (inflammations, ulcers, skin cracks). Acids
coming into contact with water are diluted accompanied by significant devel-
opment of heat.
■ Do not tilt the battery otherwise battery electrolyte may flow out of the bat-
tery vent openings. Protect the eyes with safety glasses or a shield! There is
the danger of suffering blindness! If any battery electrolyte comes into con-
tact with your eyes, rinse the relevant eye immediately with clear water for
several minutes. Then consult a doctor immediately.
■ Splashes of acid on your skin or clothes should be neutralised as soon as
possible using soap suds and then rinsed with plenty of water. If acid was
swallowed, seek immediate medical attention.
■ Keep children away from the vehicle battery.
■ When you charge a battery, hydrogen is released, and a highly explosive gas
mixture is also produced. An explosion can be caused through sparkling over
during unclamping or loosening of the cable plug while the ignition is on.
■ Bridging of the poles will create a short circuit (e.g. through metal objects,
cables). Possible consequences of a short circuit: Melting of lead struts, explo-
sion and burning of the battery, jets of acid spurting out.
■ It is prohibited to work with a naked flame and light, to smoke or to carry
out any activities which produce sparks. Avoid creating sparks when working
with cables and electrical devices. Strong sparking represents a risk of injury. ■ Before carrying out any work on the electrical system, switch off the engine,
the ignition and all of the electrical components and disconnect the negative
terminal
(-) on the battery. If you wish to replace a bulb it suffices to switch off
the relevant light. ■ Never charge a frozen or thawed vehicle battery – risk of explosion and
caustic burns! Replace a frozen vehicle battery. ■ Never jump-start vehicle batteries with an electrolyte level that is too low –
risk of explosion and caustic burns. ■ Never use a damaged vehicle battery – risk of explosion! Replace a damaged
vehicle battery immediately. £
115
Inspecting and replenishing
Page 119 of 157
Operation in winter
First read and observe the introductory information and safety warn-
ings on page 115.
At low temperatures, the vehicle battery only has part of the initial power output
that it has at normal temperatures.
A discharged vehicle battery may already freeze at temperatures just below 0
°C.
We therefore recommend that you have the battery checked and, if necessary, re-
charged by a ŠKODA Service Partner before the start of the winter.
ÐCharging a vehicle battery
First read and observe the introductory information and safety warn-
ings on page 115.
A properly charged vehicle battery is essential for reliably starting the engine.
›
Switch off the ignition and all of the electrical components.
› Only for “quick-charging”: Disconnect both battery cables (first of all “negative”,
then “positive”).
› Attach the terminal clamps of the charger to the battery terminals (red =
“posi-
tive
”, black = “negative”).
› Only now plug the mains cable of the charger into the power socket and switch
on the device.
› When charging is completed: Switch off the charger and remove the mains ca-
ble from the power socket.
› Only then disconnect the charger's terminal clamps.
› Reconnect the cables to the battery, if necessary (first of all
“positive”, then
“negative
”).
It is not normally necessary to disconnect the cables of the battery if you re-
charge the vehicle battery using low amperages (as for example from a mini-
charger). Refer to the instructions of the charger manufacturer.
A charging current of 0.1 multiple of the total vehicle battery capacity (or lower)
must be used until full charging is achieved.
It is, however, necessary to disconnect both cables before charging the battery
with high amperages, so-called “ quick-charging”.
ä
ä “Quick-charging” the vehicle battery is
dangerous
and requires a special charger
and specialist knowledge. We therefore recommend having the quick charging of
vehicle batteries undertaken by a ŠKODA specialist garage.
The vent plugs of the vehicle battery should not be opened for charging. CAUTION
On vehicles with the START/STOP system, the pole terminal of the charger must
not be connected directly to the negative terminal of the vehicle battery, but only
to the engine earth » page 136, Jump-starting in vehicles with the
START-STOP
system . Ð Disconnecting and reconnecting the vehicle battery
First read and observe the introductory information and safety warn-
ings on page 115.
On disconnecting and reconnecting the vehicle battery the following functions
are initially deactivated or are no longer able to operate fault-free:
Operation Operating measure
Enter radio code number » Radio manual
Setting the clock » page 12
Data in the multifunction display are deleted. » page 11 Note
We recommend having the vehicle checked by a ŠKODA Service Partner to ensure
the full functionality of all electrical systems. Ð Replacing the vehicle battery
First read and observe the introductory information and safety warn-
ings on page 115.
When replacing a battery, the new vehicle battery must have the same capacity,
voltage, amperage and be the same size. Suitable types of vehicle batteries can
be purchased from a
ŠKODA Service Partner. £
ä
ä
117
Inspecting and replenishing
Page 136 of 157
Inflating
›
Screw the tyre inflation hose 5
» Fig. 115 on page 133
of the air compressor
firmly onto the tyre valve.
› Check that the air release valve 7
is closed.
› Start the engine and run it in idle.
› Plug the connector 9
into 12 Volt socket »
page 46, 12-volt power socket.
› Switch on the air compressor with the ON and OFF switch 8
.
› Allow the air compressor to run until a pressure of 2.0 - 2.5 bar is achieved.
Maximum run time of 8 minutes » !
› Switch off the air compressor.
› If you cannot reach an air pressure of 2.0 – 2.5 bar, unscrew the tyre inflation
hose 5
from the tyre valve.
› Drive the vehicle 10 metres forwards or backwards to allow the sealing agent to
“distribute” in the tyre.
› Firmly screw the tyre inflation hose 5
back onto the tyre valve and repeat the
inflation process.
› If you cannot reach the required tyre inflation pressure here either, this means
the tyre has sustained too much damage. You cannot seal with tyre with the
breakdown kit » .
› Switch off the air compressor.
› Remove the tyre inflation hose 5
from the tyre valve.
Once a tyre inflation pressure of 2.0
– 2.5 bar is achieved, continue the journey at
a maximum speed of 80 km/h (50 mph).
Check the tyre inflation pressure after driving for 10 minutes » page 134.WARNING
■ During inflation, the tyre inflation hose and air compressor may get hot- risk
of injury!
■ Do not place the hot tyre inflation hose or hot air compressor on flammable
materials – risk of fire! ■ If you cannot inflate the tyre to at least 2.0 bar, this means the damage sus-
tained was too serious. The sealing agent cannot be used to seal the tyre.
Do not drive the vehicle. Get professional assistance! CAUTION
Switch off the air compressor after running 8 minutes at the latest – danger of
overheating! Allow the air compressor to cool a few minutes before switching it
on again. Ð Check after driving for 10 minutes
First read and observe the introductory information and safety warn-
ings on page 132.
Check the tyre inflation pressure after driving for 10 minutes!
If the tyre inflation pressure is 1.3 bar or less:
›
Do not drive the vehicle!
You cannot properly seal with tyre with the break-
down kit.
› Get professional assistance.
If the tyre inflation pressure is 1.3 bar or more:
› Adjust the tyre inflation pressure to the correct value (see inside of fuel filler
cap).
› Continue driving carefully to the nearest ŠKODA specialist garage at a maxi-
mum speed of 80 km/h (50
mph). Ð Jump-starting
ä
Introduction
This chapter contains information on the following subjects:
Jump-starting 135
Jump-starting in vehicles with the START-STOP system 136
The battery of another vehicle can be used to jump-start your vehicle if the en-
gine will not start because the battery is flat. Jump-start cables are required for
this purpose.
Both batteries must have a rated voltage of 12 V. The capacity (Ah) of the battery
supplying the power must not be significantly less than the capacity of the dis-
charged battery in your vehicle.
Jump-start cables
Only use jump-start cables which have an adequately large cross-section and in-
sulated terminal clamps. Observe the manufacturer's instructions.
Positive cable – colour coding in the majority of cases is red.
Negative cable – colour coding in the majority of cases is black. £
ä
134 Do-it-yourself
Page 137 of 157
WARNING
■ A discharged vehicle battery may already freeze at temperatures just below
0 °C. In case of frozen battery carry out no jump-starting – risk of explosion!
■ Pay attention to the warning instructions relating to working in the engine
compartment » page 108, Engine compartment .
■ The non-insulated parts of the terminal clamps must never make contact
with each other. In addition, the jump-start cable connected to the positive
terminal of the battery must not come into contact with electrically conduct-
ing parts of the vehicle – risk of short circuit! ■ Do not clamp the jump-start cable to the negative terminal of the dis-
charged battery. There is the risk of detonating gas seeping out the battery
being ignited by the strong spark which results from the engine being started. ■ Route the jump-start cables so that they cannot be caught by any rotating
parts in the engine compartment. ■ Do not bend over the battery – risk of caustic burns!
■ The vent screws of the battery cells must be tightened firmly.
■ Keep any sources of ignition (naked flame, smouldering cigarettes, etc.)
away from the battery – risk of an explosion!
■ Never jump-start vehicle batteries with an electrolyte level that is too low –
risk of explosion and caustic burns. Note
■ There must not be any contact between the two vehicles otherwise current
may flow as soon as the negative terminals are connected. ■ The discharged battery must be properly connected to the system of the vehi-
cle. ■ We recommend you buy jump-start cables from a car battery specialist. Ð Jump-starting
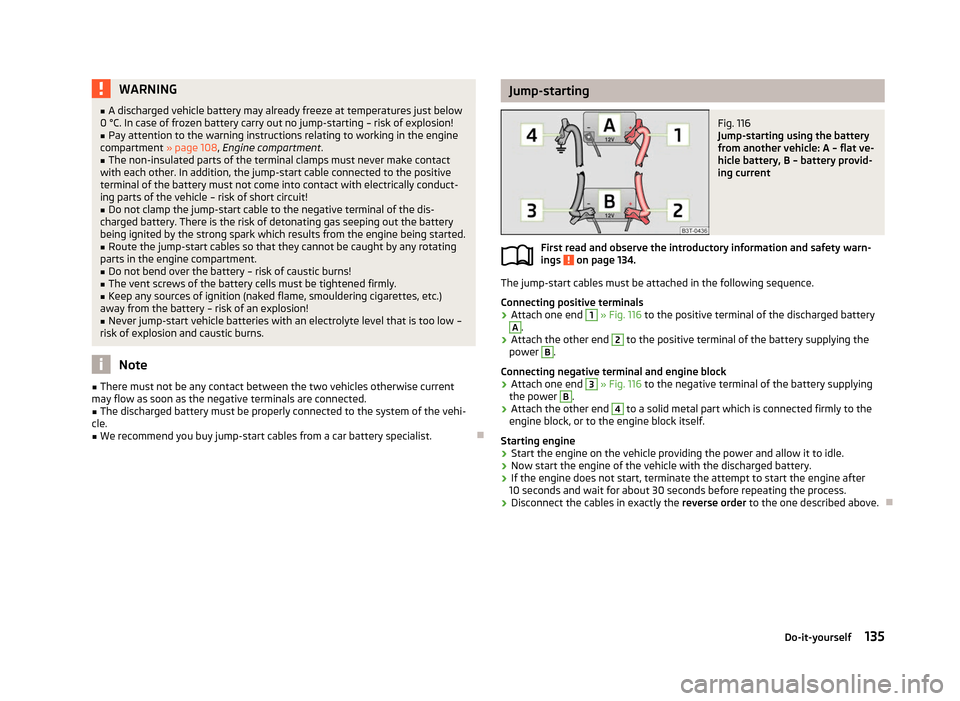
Fig. 116
Jump-starting using the battery
from another vehicle: A – flat ve-
hicle battery, B – battery provid-
ing current
First read and observe the introductory information and safety warn-
ings on page 134.
The jump-start cables must be attached in the following sequence.
Connecting positive terminals
› Attach one end 1
» Fig. 116
to the positive terminal of the discharged battery A
.
› Attach the other end 2
to the positive terminal of the battery supplying the
power B
.
Connecting negative terminal and engine block
› Attach one end 3
»
Fig. 116
to the negative terminal of the battery supplying
the power B
.
› Attach the other end 4
to a solid metal part which is connected firmly to the
engine block, or to the engine block itself.
Starting engine
› Start the engine on the vehicle providing the power and allow it to idle.
› Now start the engine of the vehicle with the discharged battery.
› If the engine does not start, terminate the attempt to start the engine after
10 seconds and wait for about 30 seconds before repeating the process.
› Disconnect the cables in exactly the
reverse order to the one described above. Ð
ä
135
Do-it-yourself
Page 138 of 157
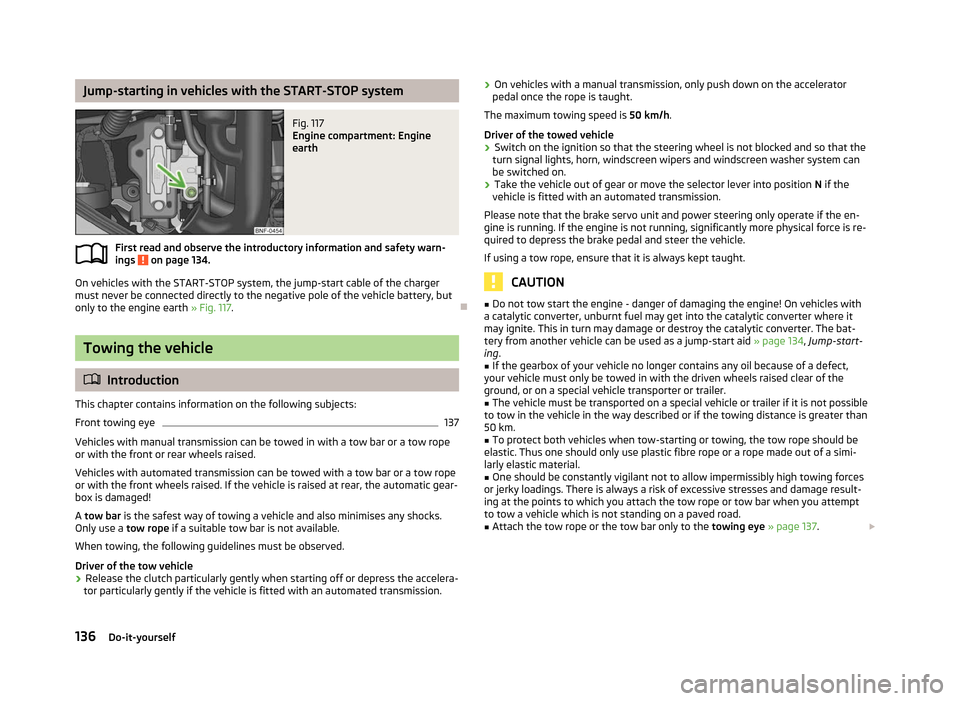
Jump-starting in vehicles with the START-STOP system
Fig. 117
Engine compartment: Engine
earth
First read and observe the introductory information and safety warn-
ings on page 134.
On vehicles with the START-STOP system, the jump-start cable of the charger
must never be connected directly to the negative pole of the vehicle battery, but
only to the engine earth
» Fig. 117. ÐTowing the vehicle
ä
Introduction
This chapter contains information on the following subjects:
Front towing eye 137
Vehicles with manual transmission can be towed in with a tow bar or a tow rope
or with the front or rear wheels raised.
Vehicles with automated transmission can be towed with a tow bar or a tow rope
or with the front wheels raised. If the vehicle is raised at rear, the automatic gear-
box is damaged!
A tow bar is the safest way of towing a vehicle and also minimises any shocks.
Only use a tow rope if a suitable tow bar is not available.
When towing, the following guidelines must be observed.
Driver of the tow vehicle
› Release the clutch particularly gently when starting off or depress the accelera-
tor particularly gently if the vehicle is fitted with an automated transmission.
ä
›
On vehicles with a manual transmission, only push down on the accelerator
pedal once the rope is taught.
The maximum towing speed is 50 km/h.
Driver of the towed vehicle
› Switch on the ignition so that the steering wheel is not blocked and so that the
turn signal lights, horn, windscreen wipers and windscreen washer system can
be switched on.
› Take the vehicle out of gear or move the selector lever into position
N if the
vehicle is fitted with an automated transmission.
Please note that the brake servo unit and power steering only operate if the en-
gine is running. If the engine is not running, significantly more physical force is re-
quired to depress the brake pedal and steer the vehicle.
If using a tow rope, ensure that it is always kept taught. CAUTION
■ Do not tow start the engine - danger of damaging the engine! On vehicles with
a catalytic converter, unburnt fuel may get into the catalytic converter where it
may ignite. This in turn may damage or destroy the catalytic converter. The bat-
tery from another vehicle can be used as a jump-start aid » page 134, Jump-start-
ing .
■ If the gearbox of your vehicle no longer contains any oil because of a defect,
your vehicle must only be towed in with the driven wheels raised clear of the
ground, or on a special vehicle transporter or trailer.
■ The vehicle must be transported on a special vehicle or trailer if it is not possible
to tow in the vehicle in the way described or if the towing distance is greater than
50 km. ■ To protect both vehicles when tow-starting or towing, the tow rope should be
elastic. Thus one should only use plastic fibre rope or a rope made out of a simi-
larly elastic material.
■ One should be constantly vigilant not to allow impermissibly high towing forces
or jerky loadings. There is always a risk of excessive stresses and damage result-
ing at the points to which you attach the tow rope or tow bar when you attempt
to tow a vehicle which is not standing on a paved road.
■ Attach the tow rope or the tow bar only to the towing eye » page 137. £
136 Do-it-yourself
Page 151 of 157
Plastic parts 99
Wheels 101
Clock 12
Clothes hooks 50
CNG 106
Fuel gauge 9
Refuelling 106
Cockpit 12-volt power socket 46
Ash tray 45
Cigarette lighter 46
Cup holder 45
General view 7
Light 32
Storage compartments 47
Compartments 47
Compressed natural gas see CNG 106
Computer see Multifunction display 11
Coolant Checking 112
Replenishing 113
Correct seated position 75
Counter for distance driven 10
Cruise control system (CCS) 63
Cup holder 45
D
Dash panel insert 8
Daytime running light 30
Defrsoting rear window 33
Digital clock 12
Dipstick 111
Display Fuel level 9
Service interval 10
Distance driven 10Door
Child safety lock 21
Door opening lever locking of 22
Door opening leverl unlocking of 22
Doors Emergency locking 25
Driving Abroad 95
Driving through water on the street 96
Emissions 145
Fuel consumption 145
Towing a trailer 126
E
Economical and environmentally friendly driving 92
EDL 61
Electrical power windows Button in the driver's door 26
Electronic differential lock 61
Electronic immobiliser 57
Emergency Changing a wheel 128
Hazard warning light system 31
Jump-starting 134
locking of the doors 25
Towing the vehicle 136
Tyre repair 132
Unlocking the luggage compartment lid 26
Emissions 145
Engine Running in 91
Starting and stopping the engine 56
Engine compartment Brake fluid 113
Coolant 112
Overview 110
Vehicle battery 115Engine oil
Capacity 146
Changing 112
Checking 111
Replenishing 111
Specification 146
Engine revolutions counter 9
Environment 92
Environmental compatibility 94
Environmentally friendly driving 92
ESC Function 60
Warning light 17
F
Fire extinguisher 127
First-aid kit 127
Floor mats 62
Front airbag 83
Front seats 38
Fuel 104
Fuel gauge 9
refer to Fuel 104
Refuelling 104
Unleaded petrol 105
Fuel consumption 92
Fuses Assignment 138
Replacing 138
G
Gear Recommended gear 10
General view Cockpit 7
H
Handbrake 60
149
Index
Page 152 of 157
Head-Thorax 84
Headlights Driving abroad 95
Head restraint 40
Heating 52
Exterior mirror 36
Rear window 33
recommended settings 53
Seats 39
Heating rear window 33
Horn 7
I
Ignition 58
Ignition lock 58
Immobiliser 57
Instrument cluster 8
ISOFIX 89
J
Jacking points Raise vehicle 131
Jump-starting 134
L
Lever Main beam 31
Turn signal 31
Light Cockpit 32
Daytime running light 30
Fog lights 30
Hazard warning light system 31
Headlight beam adjustment 30
Headlight flasher 32
Low beam 29
Main beam 31
Parking light 29, 30Rear fog light 30
Replacing bulbs 141
Turn signal 31
Lights Switching lights on and off 29
Loads 145
Lock Central locking system 22
Locking Door opening lever 22
Emergency locking 25
Remote control 24
Locking and unlocking from the inside 23
luggage compartment see luggage compartment lid 25
Luggage compartment Bag hooks 42
cover 43
Emergency unlocking 26
Fixing nets 43
Lashing eyes 42
Unlocking the luggage compartment lid 26
Luggage compartment lid 25
M
Mirror Additional interior mirror 36
Exterior 36
Vanity 33
Mobile phone 72
Multifunction display Functions 11
Memory 11
Operation 12
O
Oil refer to Engine oil 111Onboard computer
see Multifunction display 11
Operation in winter De-icing windows 100
Vehicle battery 117
Outside temperature 12
Overview Engine compartment 110
Warning lights 14
P
Paint see Paint damage 99
Paint damage 99
Parking Parking aid 62
Visual parking system 63
Parking ticket holder 50
Passive Safety 74
Periodic wiping 34
Petrol refer to Fuel 105
Polishing the paintwork refer to Taking care of your vehicle 99
Power steering 57
Power windows Button in the driver's door 27
Preservation refer to Taking care of your vehicle 99
R
Radiator fan 113
Radio reception Operating problem 100
Raise vehicle 131
Rear mirror Exterior 36
Interior 35
150 Index
Page 153 of 157
Rear windows
closing 27
opening 27
Recirculated air mode 55
Recommended gear 10
Refuelling 104
Fuel 104
Regulation Headlight beam 30
Remote control 23
Synchronisation process 24
Remote control key Replacing the battery 20
Replacement of parts 125
Replacing bulbs 141
Fuses 138
Vehicle battery 117
Windscreen wiper blade 35
Replenishing Coolant 113
Engine oil 111
Windscreen washer fluid 114
Rof rack system Attachment points 44
Roof rack system Roof load 45
Running in Brake pads 91
Engine 91
The first 1 500 km 91
Tyres 91
S
Safe securing system 22
Safety 74
Airbags 82
Child safety 87
Child safety seats 87
Head restraints 40ISOFIX 89
TOP TETHER 90
Save electrical energy 92
Seat Adjusting 38
Seat belt Warning light 19
Seat belts 78
Belt tensioners 80
Cleaning 103
fastening and unfastening 80
Warning light 15
Seats Folding forwards 40
Head restraints 40
Heating 39
Selector lever see selector lever positions 70
Selector lever positions 70
Service display 10
Setting Air conditioning system 55
Heating 53
Steering wheel 57
Setting the clock Clock 12
Shifting Diving economically 92
Gearshift lever 61
Side airbag 84
Sliding/tilting roof Closing 27
Opening and tilting 27
Operating 27
Snow chains 123
Spare wheel 122
Speedometer 9
START/STOP Function 65
Starting and stopping the engine 56Starting engine
Jump-starting 134
START STOP Jump-starting 136
Warning light 19
Steering force assistance 57
Steering wheel 57
Storage 47
Storage compartments 47
Sun visors 33
Switching lights on and off 29
Switching off the front seat passenger 85
T
Taking care of the vehicle Artificial leather 101
Material coverings 102
Materials 101
Natural leather 102
Seat belts 103
Taking care of your vehicle 97
Automatic car wash system 98
Chrome parts 99
Cleaning the wheels 101
Door lock cylinders 100
Headlight lenses 100
High-pressure cleaner 98
Plastic parts 99
Polishing the paintwork 99
Preservation 99
Rubber seals 100
Washing 98
Washing by hand 98
Wash system 98
TCS 61
Technical data 145
Tiptronic 69
see automatic gearbox 70
Tool 127
TOP TETHER 90
151
Index