instrument panel SKODA CITIGO 2013 1.G Owner's Manual
[x] Cancel search | Manufacturer: SKODA, Model Year: 2013, Model line: CITIGO, Model: SKODA CITIGO 2013 1.GPages: 176, PDF Size: 10.54 MB
Page 24 of 176
Cruise control systemFirst read and observe the introductory information and safety warn-
ings
on page 16.
The warning light comes on when the cruise control is operating » page 83.
Main beam
First read and observe the introductory information and safety warn-ings
on page 16.
The warning light
comes on when the main beam or headlight flasher are se-
lected » page 33 .
/ Safety belt (belt status display) - rear seat
First read and observe the introductory information and safety warn-ings
on page 16.
After switching on the ignition, the belt status warning lights up for the rear
seats in the instrument panel display for 30 seconds and indicates whether any
rear seat passengers have fastened their seat belts. The belt status indicator will
then light up when the passenger on the rear seat fastens or unfastens the seat
belt (when the ignition is switched on or during the journey).
If the warning light
, is switched on, the passenger on the rear seat has their
seat belt on.
If the warning light ,
is switched on, the passenger on the rear seat does not
have their seat belt on.
If a seat belt is unfastened on the rear seat during the journey at a speed of more than 25 km/h, an acoustic signal will sound, and the belt status indicator for the
rear seats will flash for around 30 seconds.
Further information » page 94, Seat belts .
City Safe Drive
First read and observe the introductory information and safety warn-
ings
on page 16.
If the City Safe Drive system is currently slowing the vehicle down automatically,
the warning light will flash quickly .
If the City Safe Drive system is not currently available, or if there is a system fault, the warning light will flash slowly .
When the City Safe Drive system is switched off while the vehicle is travelling at a
speed between 5–30 km/h (3-19 mph), the warning light will light up in the
instrument cluster display.
If the City Safe Drive system is switched on, the warning light in the instrument
cluster display
will light up for around 5 seconds.
Further information » page 86, City Safe Drive .
START STOP
First read and observe the introductory information and safety warn-
ings
on page 16.
If the START STOP system is active, the warning light will light up
.
If the START STOP system is active, but automatic engine shut down is not possi-
ble, the warning light will light up
.
When the warning light flashes
the START STOP system will not be available.
Further information » page 85, START-STOP .
21warning lights and instruments
Page 36 of 176
Lights and visibility
Lights
Introduction
This chapter contains information on the following subjects:
Lights and low beam
33
Headlight beam adjustment
34
Daytime running light (DAY LIGHT)
34
Turn signal and main beam
34
Fog lights
35
Rear fog light
35
Hazard warning light system
36
Parking light
36
Unless otherwise stated, the lights only work when the ignition is on.
On models fitted with right-hand steering the position of the controls differs
from that shown in » Fig. 22 on page 33 . The symbols which mark the positions
of the controls are however identical.
WARNING■ The activation of the lights should only be undertaken in accordance with
national legal requirements.■
The driver is always responsible for the correct settings and use of the
lights.
■
Never drive with only the side lights on! The side lights are not bright
enough to light up the road sufficiently in front of you or to be seen by other oncoming traffic. Therefore always switch on the low beam when it is dark or
if visibility is poor.
Note■ The instruments are also illuminated when the side light or low beam light is
switched on.■
The headlights may mist up temporarily. When the driving lights are switched
on, the light outlet surfaces are free from mist after a short period, although the
headlight lenses may still be misted up in the peripheral areas. This mist has no
influence on the life of the lighting system.
Lights and low beam
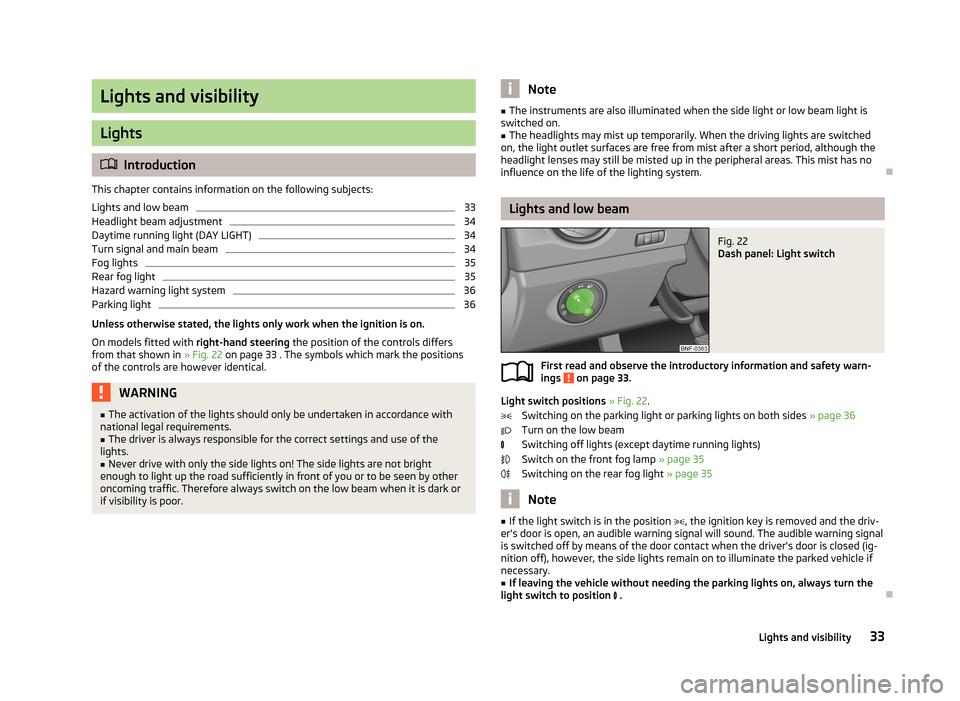
Fig. 22
Dash panel: Light switch
First read and observe the introductory information and safety warn-
ings on page 33.
Light switch positions » Fig. 22 .
Switching on the parking light or parking lights on both sides » page 36
Turn on the low beam
Switching off lights (except daytime running lights)
Switch on the front fog lamp » page 35
Switching on the rear fog light » page 35
Note
■
If the light switch is in the position , the ignition key is removed and the driv-
er's door is open, an audible warning signal will sound. The audible warning signal
is switched off by means of the door contact when the driver's door is closed (ig- nition off), however, the side lights remain on to illuminate the parked vehicle ifnecessary.■
If leaving the vehicle without needing the parking lights on, always turn the
light switch to position .
33Lights and visibility
Page 37 of 176
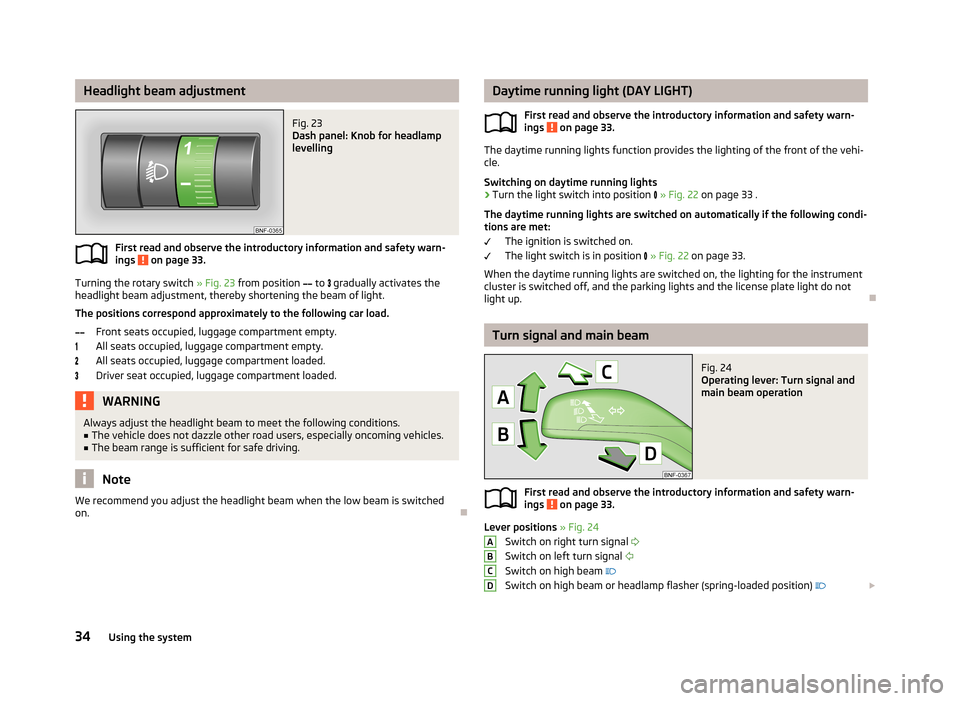
Headlight beam adjustmentFig. 23
Dash panel: Knob for headlamp
levelling
First read and observe the introductory information and safety warn-
ings on page 33.
Turning the rotary switch » Fig. 23 from position
to
gradually activates the
headlight beam adjustment, thereby shortening the beam of light.
The positions correspond approximately to the following car load. Front seats occupied, luggage compartment empty.All seats occupied, luggage compartment empty.All seats occupied, luggage compartment loaded.
Driver seat occupied, luggage compartment loaded.
WARNINGAlways adjust the headlight beam to meet the following conditions.■The vehicle does not dazzle other road users, especially oncoming vehicles.■
The beam range is sufficient for safe driving.
Note
We recommend you adjust the headlight beam when the low beam is switched
on.
Daytime running light (DAY LIGHT)
First read and observe the introductory information and safety warn-ings
on page 33.
The daytime running lights function provides the lighting of the front of the vehi-
cle.
Switching on daytime running lights
›
Turn the light switch into position » Fig. 22 on page 33 .
The daytime running lights are switched on automatically if the following condi- tions are met:
The ignition is switched on.
The light switch is in position
» Fig. 22 on page 33.
When the daytime running lights are switched on, the lighting for the instrument
cluster is switched off, and the parking lights and the license plate light do not light up.
Turn signal and main beam
Fig. 24
Operating lever: Turn signal and
main beam operation
First read and observe the introductory information and safety warn-
ings on page 33.
Lever positions » Fig. 24
Switch on right turn signal
Switch on left turn signal
Switch on high beam
Switch on high beam or headlamp flasher (spring-loaded position)
ABCD34Using the system
Page 38 of 176
When the left or right turn signal is on, the warning light or flashes in the
instrument cluster.
When the high beam or headlight flasher is on, the warning light lights up in
the instrument cluster.
Turn signal for changing lanes - to only flash briefly, only move the lever up or
down to the pressure point and hold it in this position.
Convenience turn signal
If you only wish to flash three times, briefly push the lever to the upper or lower
pressure point and release again.WARNINGOnly turn on the main beam or the headlight flasher if other road users will
not be dazzled.
Note
■ The main beam can only be switched on when the low beam lights are on.■The turn signal only operates if the ignition is switched on.■
The turn signal is automatically cancelled after negotiating a curve.
■
An acoustic warning signal will sound when the driver's door is opened if the
lever is not in the middle position after removing the ignition key from the igni-
tion lock. The acoustic warning signal will stop just as soon as the driver's door is closed.
Fog lights
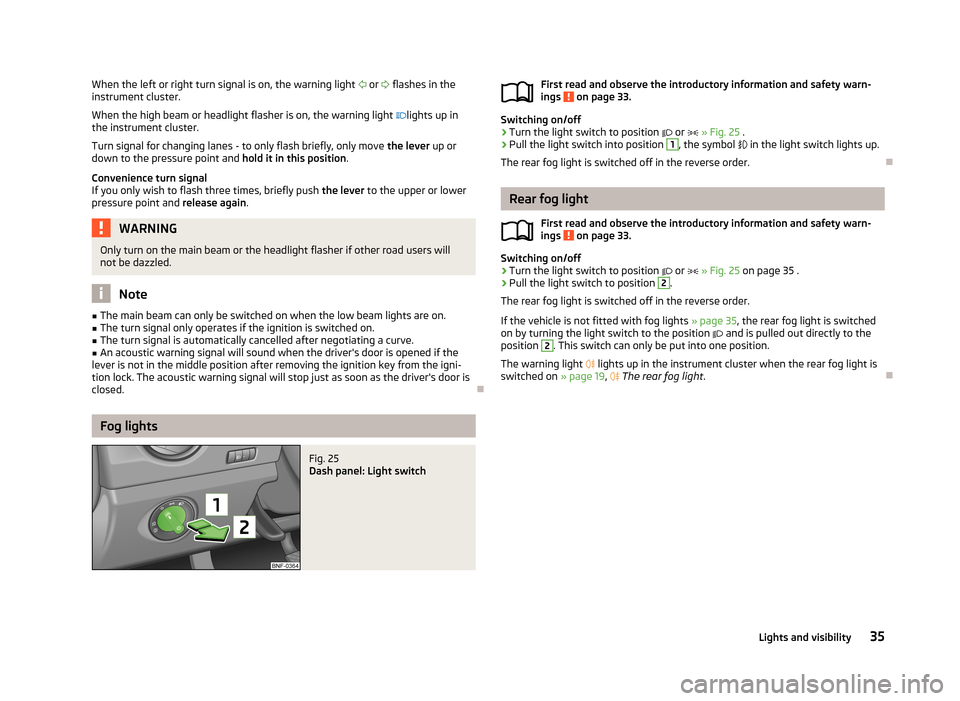
Fig. 25
Dash panel: Light switch
First read and observe the introductory information and safety warn-ings on page 33.
Switching on/off
›
Turn the light switch to position or » Fig. 25 .
›
Pull the light switch into position
1
, the symbol in the light switch lights up.
The rear fog light is switched off in the reverse order.
Rear fog light
First read and observe the introductory information and safety warn-
ings
on page 33.
Switching on/off
›
Turn the light switch to position
or
» Fig. 25 on page 35 .
›
Pull the light switch to position
2
.
The rear fog light is switched off in the reverse order.
If the vehicle is not fitted with fog lights » page 35, the rear fog light is switched
on by turning the light switch to the position
and is pulled out directly to the
position
2
. This switch can only be put into one position.
The warning light
lights up in the instrument cluster when the rear fog light is
switched on » page 19,
The rear fog light .
35Lights and visibility
Page 45 of 176
Seats and stowing
Front seats
Introduction
This chapter contains information on the following subjects:
Adjusting the front seats
43
Foldable front passenger seat
43
Front seat heating
44
The driver's seat should be adjusted in such a way that the pedals can be fully
pressed to the floor with slightly bent legs.
The seat backrest on the driver's seat should be adjusted in such a way that the
upper point of the steering wheel can be easily reached with slightly bent arms.
Correct adjustment of the seats is particularly important:
› for safely and quickly reaching the controls;
› for a relaxed body position that reduces fatigue;
› for achieving maximum protection from the seat belts and the airbag system.
WARNINGGeneral information■Caution when adjusting the seat! You may suffer injuries or bruises as a re-
sult of adjusting the seat without paying proper attention.■
The seat backrests must not be tilted too far back when driving, as this will
impair the function of the seat belts and of the airbag system – risk of injury!
■
Never carry more people than the number of seats in the vehicle.
■
Each occupant must correctly fasten the seat belt belonging to the seat.
Children must be fastened » page 103, Transporting children safely with a
suitable restraint system.
■
The front seats and the head restraints must always be adjusted according
to height, so that the occupants can be protected as effectively as possible.
■
Do not carry any objects on the front passenger seat except objects de-
signed for this purpose (e.g. child seat) – risk of accident!
WARNINGInformation for the driver■Only adjust the driver's seat when the vehicle is stationary – risk of accident!■
Maintain a distance of at least 25 cm to the steering wheel. Not maintaining
this minimum distance will mean that the airbag system will not be able to
properly protect you – risk to life!
■
Ensure that there are no objects in the driver's footwell, as these may get
caught in the pedal apparatus when driving or braking. You would then no
longer be able to operate the clutch, brake or acceleration pedals.
WARNINGInformation for the front seat passenger■Maintain a distance of at least 25 cm to the dash panel. Not maintaining this
minimum distance will mean that the airbag system will not be able to proper-
ly protect you – hazard!■
Always keep your feet in the footwell when the car is being driven – never
place your feet on the instrument panel, out of the window or on the surfaces
of the seats. You will be exposed to increased risk of injury if it becomes nec-
essary to apply the brake or in the event of an accident. If an airbag is de-
ployed, you may suffer fatal injuries when adopting an incorrect seated posi-
tion!
Note
After a certain time, play can develop within the adjustment mechanism of the
backrest angle.
42Using the system
Page 70 of 176
It is still fully possible to steer the vehicle if the power steering fails or if the en-gine is not running (e.g. when towing). However, greater physical effort is re-
quired to turn the steering wheel.
If there is a fault in the power steering, the warning light or
lights up in the
instrument cluster » page 18.
Starting and stopping the engine
Introduction
This chapter contains information on the following subjects:
Electronic immobilizer
68
Ignition lock
68
Starting the engine
68
Switching off the engine
68
The engine can only be started using a correctly coded original key.
The engine running noises may louder at first be louder for a short time afterstarting the cold engine. This is quite normal and is not an operating problem.
WARNING■ When driving, the ignition key must always be in the position 2 » Fig. 68 on
page 68 (ignition switched on) without the engine running. This position is
indicated by the warning lights coming on. If this is not the case, this could re-
sult in unexpected locking of the steering wheel – risk of accident!■
Only pull the ignition key from the ignition lock when the vehicle has come
to a complete stop (by applying the handbrake). Otherwise, the steering could
be blocked – risk of accident!
■
When leaving the vehicle, the ignition must always be removed. This is par-
ticularly important if children are left in the vehicle. Children could otherwise
start the engine for example – risk of accident or injury!
■
Never leave the vehicle unattended with the engine running.
■
Never switch off the engine before the vehicle is stationary – risk of acci-
dent!
WARNING■ Never leave the engine running in unventilated or closed rooms. The ex-
haust gases from the engine contain substances such as odourless and col-
ourless carbon monoxide (a poisonous gas) – risk to life!■
Carbon monoxide can cause unconsciousness and death.
CAUTION
■ The starter must only be operated when the engine is not running and the vehi-
cle is at a standstill. The starter or engine can be damaged if the starter is activa-
ted when the engine is running 3
» Fig. 68 on page 68.
■
If the engine does not start up after a second attempt, the fuse for the fuel
pump may have a fault. Check the fuse and replace if necessary » page 154,
Fuses on the underside of the dash panel , or seek assistance from a specialist ga-
rage.
■
Let go of the ignition key as soon as the engine starts otherwise the starter
could be damaged.
■
Do not tow start the engine – there is a risk of damaging the engine and the
catalytic converter. The battery from another vehicle can be used as a jump-start
aid » page 150 , Jump-starting .
CAUTION
■
Avoid high engine revolutions, full throttle and high engine loads before the en-
gine has reached its operating temperature – risk of damaging the engine!■
Do not switch the engine off immediately at the end of your journey after the
engine has been operated over a prolonged period at high loads but leave it to
run at an idling speed for about 1 minute. This prevents any possible accumulation
of heat when the engine is switched off.
For the sake of the environment
Do not warm up the engine while the vehicle is stationary. If possible, start your
journey as soon as the engine has started. Through this the engine reaches its
operating temperature more rapidly and the pollutant emissions are lower.
Note
After switching off the ignition, the radiator fan can intermittently continue to op-
erate for approx. 10 minutes.
67Starting-off and Driving
Page 76 of 176
When the accelerator pedal is fully depressed, the Kick-down function is activated
in any forward driving mode.
The gearbox shifts down one or more gears depending on the vehicle speed and engine speed, and the vehicle accelerates.
The gearbox does not shift up into the highest gear until the engine has reached
its maximum revolutions for this gear range.WARNINGRapid acceleration, particularly on slippery roads, can lead to loss of vehicle
control – risk of accident!
Operational faults
First read and observe the introductory information and safety warn-
ings
on page 71.
In the event of a fault in the automatic gearbox, warning lights may light up in the instrument panel » page 20,
Automated transmission
.
Emergency programme
The transmission switches to the emergency programme, if there is a fault in the
automatic transmission.
Indications of an activated emergency programme include the following.
› Only certain gears are selected.
› The reverse gear
R cannot be used.
Gearbox overheating
The gearbox may become too hot due to frequent repeated starting or stop-and-
go traffic, for example.
The vehicle does not start off after engaging the selector lever position
If the vehicle does not start off, the problem may be that the selector lever is not
completely in the selected position. In such an instance, press the brake pedal
and put the selector lever into the required position.
Running in
Introduction
This chapter contains information on the following subjects:
New engine
73
New tyres
74
New brake pads
74
New engine
First read and observe the introductory information given on page 73.
The engine has to be run in during the first 1 500 kilometres.
Up to 1 000 kilometres
›
Do not drive faster than 3/4 of the maximum speed of the gear in use, i.e. 3/4 of
the maximum permissible engine speed.
›
No full throttle.
›
Avoid high engine speeds.
›
Do not tow a trailer.
From 1 000 up to 1 500 kilometres
Gradually increase the power output of the engine up to the full speed of the
gear engaged, i.e. up to the maximum permissible engine speed.
The red scale of the rev counter indicates the range in which the system beginsto limit the engine speed.
During the first operating hours the engine has higher internal friction than later until all of the moving parts have harmonized. The driving style which you adopt
during the first approx.1 500 kilometres plays a decisive part in the success of running in your car.
Never drive at unnecessarily high engine speeds even after the running-in period.
On vehicles fitted with a manual gearbox, at the very latest shift up into the next
gear when the red area is reached. Observe the recommended gear » page 12,
Recommended gear . Very high engine speeds when accelerating (accelerator) are
automatically restricted »
.
73Starting-off and Driving
Page 94 of 176
What influences the driving safety?First read and observe the introductory information and safety warn-ings
on page 90.
The driver is fully responsible for himself and his occupants. If your driving safety is effected, you place yourself and the oncoming traffic at risk.
The following guidelines must therefore be observed. › Do not become distracted from concentrating on the traffic situation, e.g. by
your passengers or mobile phone calls.
› Never drive when your driving ability is impaired, e.g. due to medication, alcohol
or drugs.
› Keep to the traffic regulations and the permissible speed limit.
› Always adjust the driving speed to the road, traffic and weather conditions.
› Take regular breaks on long journeys – at least every two hours.
Correct seated position
Introduction
This chapter contains information on the following subjects:
Correct seated position for the driver
92
Correct seated position for the front passenger
92
Correct seated position for the passengers in the rear seats
92
Examples of incorrect seated positions
92WARNINGGeneral information■The front seats and the head restraints must always be adjusted according
to height, so that the occupants can be protected as effectively as possible.■
If the occupant adopts an incorrect seated position, he is exposed to life-
threatening injuries, in case he is hit by a deployed airbag.
■
If the occupants on the rear seats are not sitting upright, the risk of injury is
increased due to incorrect routing of the seat belt.
■
The seat backrests must not be tilted too far back when driving, as this will
impair the function of the seat belts and of the airbag system – risk of injury!
WARNINGInformation for the driver■Always assume the correct seated position before setting off and do not
change this position while driving. Also advise your passengers to adopt the
correct seated position and not to change this position while the car is mov-
ing.■
Maintain a distance of at least 25 cm to the steering wheel. Not maintaining
this minimum distance will mean that the airbag system will not be able to
properly protect you – hazard!
■
When driving, hold the steering wheel with both hands firmly on the outer
edge in the 9 o'clock and 3 o'clock position. Never hold the steering wheel in
the 12 o'clock position or in any other way (e.g. in the middle or inner edge of
the steering wheel). In such cases, you could severely injure the arms, handsand head when the driver airbag is deployed.
■
Ensure that there are no objects in the driver's footwell, as these may get
caught in the pedal apparatus when driving or braking. You would then no
longer be able to operate the clutch, brake or acceleration pedals.
WARNINGInformation for the front seat passenger■Maintain a distance of at least 25 cm to the dash panel. Not maintaining this
minimum distance will mean that the airbag system will not be able to proper-
ly protect you – hazard!■
Always keep your feet in the footwell when the car is being driven – never
place your feet on the instrument panel, out of the window or on the surfaces
of the seats. You will be exposed to increased risk of injury if it becomes nec-
essary to apply the brake or in the event of an accident. If an airbag is de-
ployed, you may suffer fatal injuries when adopting an incorrect seated posi-
tion!
91Passive Safety
Page 101 of 176
Airbag system
Description of the airbag system
Introduction
This chapter contains information on the following subjects:
System description
98
Airbag deployment
98WARNING■ An airbag can only offer you optimal protection in combination with a fas-
tened seat belt .■
The airbag is not a substitute for the seat belt, but instead forms part of the
complete passive vehicle safety concept.
■
To ensure passengers are protected with the greatest possible effect when
the airbag is deployed, the front seats must be correctly adjusted to match
the body size » page 91, Correct seated position .
■
If you do not fasten the seat belts when driving, lean too far forward or
adopt an incorrect seated position, you are exposing yourself to increased risk
of injury in the event of an accident.
WARNINGObserve the following instructions for handling the airbag system.■If there is a fault, the airbag system must be checked by a specialist garage
immediately. Otherwise, there is a risk that the airbag will not be deployed in the event of an accident.■
No modifications of any kind must be made to parts of the airbag system.
■
Any work on the airbag system including the installation and removal of sys-
tem components due to other repair work (e.g. removal of the steering wheel)
must only be carried out by a specialist garage.
■
Never make any changes to the front bumper or bodywork.
■
It is prohibited to manipulate individual parts of the airbag system as this
might result in the airbag being deployed.
■
The protective function of the airbag system is sufficient for only one acci-
dent. The airbag system must then be replaced if the airbag has been de-
ployed.
System description
First read and observe the introductory information and safety warn-ings
on page 98.
The functional status of the airbag system is indicated by the indicator light in
the instrument cluster » page 20.
When the airbags are deployed, they fill with gas and inflate.
A grey white or red, non-harmful gas is released when the airbag is inflated. This
is perfectly normal and is not an indication of a fire in the vehicle.
Depending on the vehicle equipment, the airbag system consists of the
following modules.
› Electronic control unit.
› Front airbag for the driver and the front passenger
» page 99.
› Side airbags Head-thorax
» page 100;
› Airbag warning light in the instrument cluster
» page 20,
Airbag system .
› Key switch for the front passenger airbag
» page 102.
› Warning light for the front passenger airbag deactivation/activation in the mid-
dle of the dash panel » page 102.
Note
■
The airbag system needs no maintenance during its working life.■If you sell your vehicle, provide the complete vehicle documentation to the new
owner. Please note that the information relating to the possibility of deactivating
the front passenger airbag must be included!■
When disposing of vehicle or parts of the airbag system, it is important to com-
ply with the national legal requirements.
Airbag deployment
First read and observe the introductory information and safety warn-
ings
on page 98.
The airbags inflate in fractions of a second and at a high speed in order to be able
to offer additional protection in the event of an accident.
The airbag system is only functional when the ignition is switched on.
In certain accident situations, several airbags may be deployed simultaneously.
98Safety
Page 158 of 176
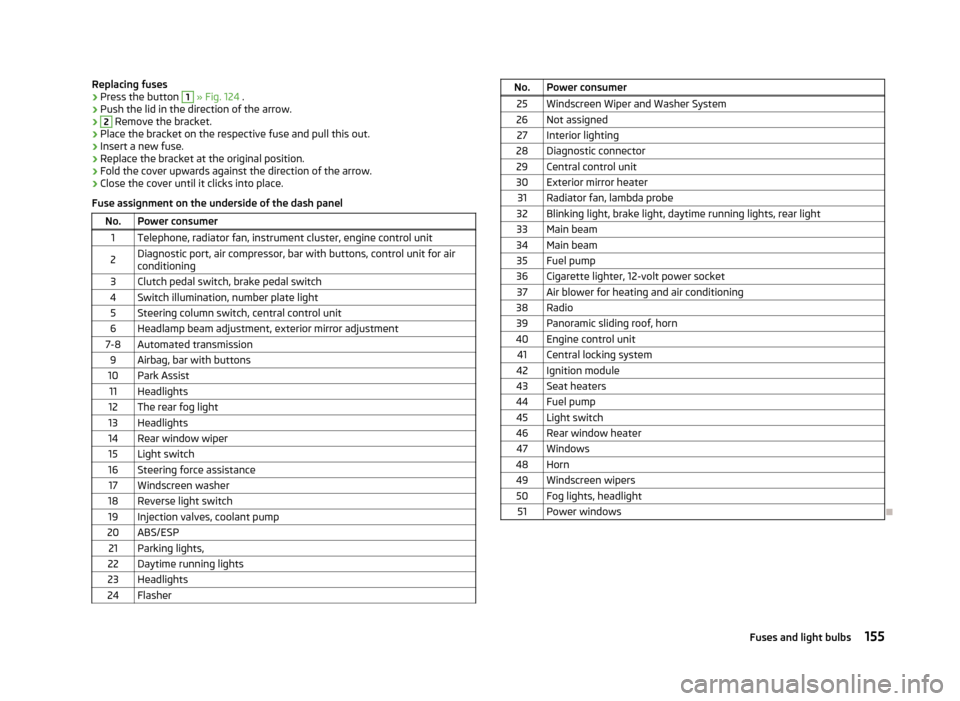
Replacing fuses›Press the button 1 » Fig. 124 .›
Push the lid in the direction of the arrow.
›2
Remove the bracket.
›
Place the bracket on the respective fuse and pull this out.
›
Insert a new fuse.
›
Replace the bracket at the original position.
›
Fold the cover upwards against the direction of the arrow.
›
Close the cover until it clicks into place.
Fuse assignment on the underside of the dash panel
No.Power consumer1Telephone, radiator fan, instrument cluster, engine control unit2Diagnostic port, air compressor, bar with buttons, control unit for air
conditioning3Clutch pedal switch, brake pedal switch4Switch illumination, number plate light5Steering column switch, central control unit6Headlamp beam adjustment, exterior mirror adjustment7-8Automated transmission9Airbag, bar with buttons10Park Assist11Headlights12The rear fog light13Headlights14Rear window wiper15Light switch16Steering force assistance17Windscreen washer18Reverse light switch19Injection valves, coolant pump20ABS/ESP21Parking lights,22Daytime running lights23Headlights24FlasherNo.Power consumer25Windscreen Wiper and Washer System26Not assigned27Interior lighting28Diagnostic connector29Central control unit30Exterior mirror heater31Radiator fan, lambda probe32Blinking light, brake light, daytime running lights, rear light33Main beam34Main beam35Fuel pump36Cigarette lighter, 12-volt power socket37Air blower for heating and air conditioning38Radio39Panoramic sliding roof, horn40Engine control unit41Central locking system42Ignition module43Seat heaters44Fuel pump45Light switch46Rear window heater47Windows48Horn49Windscreen wipers50Fog lights, headlight51Power windows
155Fuses and light bulbs