engine overheat SKODA CITIGO 2014 1.G Owner's Manual
[x] Cancel search | Manufacturer: SKODA, Model Year: 2014, Model line: CITIGO, Model: SKODA CITIGO 2014 1.GPages: 164, PDF Size: 12.08 MB
Page 38 of 164
CAUTIONIf in addition to the symbol the symbol » page 35 illuminates while driv-
ing, stop driving - risk of engine damage! Switch off the engine and seek as-
sistance from a specialist garage.
Engine oil
Read and observe
on page 34 first.
When the warning light is
illuminated or is flashing , the engine oil pressure
is too low.
An audible signal sounds as a warning.
›
Stop the vehicle and switch the engine off if the warning light does not ex-
tinguish or if it begins to flash while you are driving.
›
Check the oil level and top up with engine oil if necessary
» page 110, Check-
ing the oil level .
If the oil level is within the specified range and the warning light illuminates
or blinks again after the engine is started, do not continue driving! Switch
off the engine and seek assistance from a specialist garage.
CAUTION
■ The red oil pressure light is not an oil level indicator! One should there-
fore check the oil level at regular intervals, preferably after every refuelling
stop.■
Stop driving if for some reason it is not possible to top up the engine oil
under the current conditions. Switch off the engine and seek assistance from a
specialist garage.
Coolant
Read and observe
on page 34 first.
If the warning light
illuminates or flashes , either the coolant temperature is
too high or the coolant level is too low.
An audible signal sounds as a warning tone.
›
Stop the vehicle, switch off the engine, and check the coolant lev-
el » page 112 , Checking the coolant level .
›
If the coolant level is too low, add coolant to the reservoir » page 112.
Do not continue if for some reason it is not possible to fill with coolant under
the current circumstances! This can cause serious engine damage. Therefore,
switch the engine off and seek help from a specialist garage.
If the coolant is within the specified range, the increased temperature may be
caused by an operating problem at the radiator fan.›
Switch off the ignition.
›
Check the fuse for the radiator fan, replace if necessary » page 137, Fuses in
the engine compartment .
If the coolant level and fan fuse are OK and the warning light
illuminates
again after switching on the ignition,
stop driving!
Seek help from a specialist garage.
WARNING■ Carefully open the coolant expansion bottle. If the engine is hot, the cool-
ing system is pressurized – risk of scalding! It is therefore best to allow the
engine to cool down before removing the cap.■
Do not touch the radiator fan. The radiator fan may switch itself on auto-
matically even if the ignition is off - a danger of injury is present!
CAUTION
■ Additional headlights and other attached components in front of the air inlet
impair the cooling efficiency of the coolant.■
Never cover the radiator - there is a risk of the engine overheating.
Automated transmission
Read and observe
on page 34 first.
Warning light
If the warning light
illuminates and a beep sounds, then there is a fault to
the automated transmission.
Do not drive the vehicle! Switch off the engine
and seek assistance from a specialist garage.
Warning light
If the warning light
illuminates and no gear change is possible, there may
be technical reasons for why the functionality of the automatic transmission is
limited.
›
Stop the car, turn the ignition off and on again.
35Instruments and control lights
Page 39 of 164
If the warning light illuminates after you switch on the ignition, seek assis-
tance from a specialist garage.
If the warning light
or also the warning light
illuminates and an acoustic
signal sounds, this means that the automatic gearbox has overheated.›
Stop and allow the transmission to cool down or drive more quickly than
20 km/h (12 mph).
If the warning light
illuminates repeatedly , park the vehicle, shut off the en-
gine and allow the gearbox to cool down.
Further information » page 80, Automated transmission .
Power steering
Read and observe
on page 34 first.
If the warning light
or
illuminates while driving or after switching on the
ignition does not extinguish, there is an error in the electromechanical power
steering.
If the indicator light
illuminates, this indicates a
complete failure of the
power steering and the steering assist has failed (significantly higher steering
forces).
If the indicator light
illuminates, this indicates a
partial failure of the power
steering and the steering forces can be greater.
›
Stop the car, turn the ignition off and on again.
If the indicator light does not illuminate after the engine has been turned on
again, the power steering is fully operational again.
If the warning light illuminates again, then immediately obtain assistance from
an authorised dealer.
Note
If the vehicle's battery has been disconnected and reconnected, the warning
light illuminates after switching on the ignition. If the warning light does
not extinguish after moving a short distance, this means there is an error in
the system. Seek assistance from a specialist garage immediately. Electronic Stability Control (ESC)
Read and observe
on page 34 first.
The warning light
flashes to show that the ESC is currently operating.
If the warning light
illuminates , there is a fault in the ESC. Seek assistance
from a specialist garage immediately.
As the ESC operates in conjunction with the ABS, the ESC warning light will al-
so come on if the ABS system fails.
If the warning light
illuminates immediately after you start the engine, the
ESC might be switched off due to technical reasons.
›
Switch the ignition off and on again.
If the indicator light
does not illuminate after you switch the engine back
on, the ESC is fully functional again.
Further information » page 84, Electronic Stability Control (ESC) .
Note
If the vehicle's battery has been disconnected and reconnected, the warning
light illuminates after switching on the ignition. If the warning light does
not extinguish after moving a short distance, this means there is an error in
the system. Seek assistance from a specialist garage immediately.
Traction Control System (TCS)
Read and observe
on page 34 first.
The warning light
flashes it shows that the TCS currently operating.
If the warning light
illuminates permanently, there is a fault in the TCS.
Seek assistance from a specialist garage immediately.
The fact that the TCS operates together with the ABS means that the TCS
warning light will also come on if the ABS system is not operating properly.
If the warning light
illuminates immediately after you start the engine, the
TCS might be switched off due to technical reasons.
›
Switch the ignition off and on again.
If the warning light
does not illuminate after you switch the engine back
on, the TCS is fully functional again.
Further information » page 85, Traction Control System (TC) .
36Using the system
Page 81 of 164
WARNING■Greater physical effort is required for braking when the engine is switch-
ed off – risk of accident!■
The clutch pedal must be actuated when braking on a vehicle with man-
ual gearbox, when the vehicle is in gear and at low revs. Otherwise, the
functionality of the brake system may be impaired – risk of accident!
■
When leaving the vehicle, never leave persons who might, for example,
release the handbrake or take the vehicle out of gear unattended in the ve-
hicle. The vehicle could then start to move – risk of accident!
■
Observe the recommendations on the new brake pads » page 82, New
brake pads .
CAUTION
Never let the brakes slip with light pressure on the pedal if braking is not nec-
essary. This causes the brakes to overheat and can also result in a longer brak-
ing distance and excessive wear.
Information on braking
Read and observe
and on page 78 first.
Wear-and-tear
The wear of the brake pads is dependent on the operating conditions and driv-
ing style.
The brake pads wear more quickly if a lot of journeys are completed in towns
and over short distances or if a very sporty style of driving is adopted.
Under these severe conditions , the thickness of the brake pads must also be
checked by a specialist garage between service intervals.
Wet roads or road salt
The performance of the brakes can be delayed as the brake discs and brake
pads may be moist or have a coating of ice or layer of salt on them in winter.
The brakes are cleaned and dried by applying the brakes several times »
.
Corrosion
Corrosion on the brake discs and dirt on the bake pads occur if the vehicle has
been parked for a long period and if you do not make much use of the braking
system. The brakes are cleaned by applying the brakes several times »
.
Long or steep slopes
Before travelling a long distance with a steep gradient, reduce speed and shift into the next lowest gear. As a result, the braking effect of the engine will be
used, reducing the load on the brakes. Any additional braking should be com-
pleted intermittently, not continuously.
Emergency brake display
If the brakes are applied in full and the control unit for the braking system con-
siders the situation to be dangerous for the following traffic, the brake light
flashes automatically.
After the speed was reduced below around 10 km/h or the vehicle was stop-
ped, the brake light stops flashing and the hazard warning light system
switches on. The hazard warning light system is switched off automatically af-
ter accelerating or driving off again.
Faults in the brake surface
If it is found that the braking distance has suddenly become longer and that
the brake pedal can be depressed further, the brake system may be faulty.
Visit a specialist garage immediately and adjust your style of driving appropri-
ately as you will not know the exact extent of the damage.
Low brake fluid level
An insufficient level of brake fluid may result in problems in the brake system.
The level of the brake fluid is monitored electronically » page 34,
Braking
system .
Brake booster
The brake booster increases the pressure generated with the brake pedal. The
brake booster only operates when the engine is running.WARNINGOnly apply the brakes for the purpose of drying and cleaning the brake
discs if the traffic conditions permit this. Do not place any other road users
in jeopardy.78Driving
Page 82 of 164
HandbrakeFig. 79
Handbrake
Read and observe and on page 78 first.
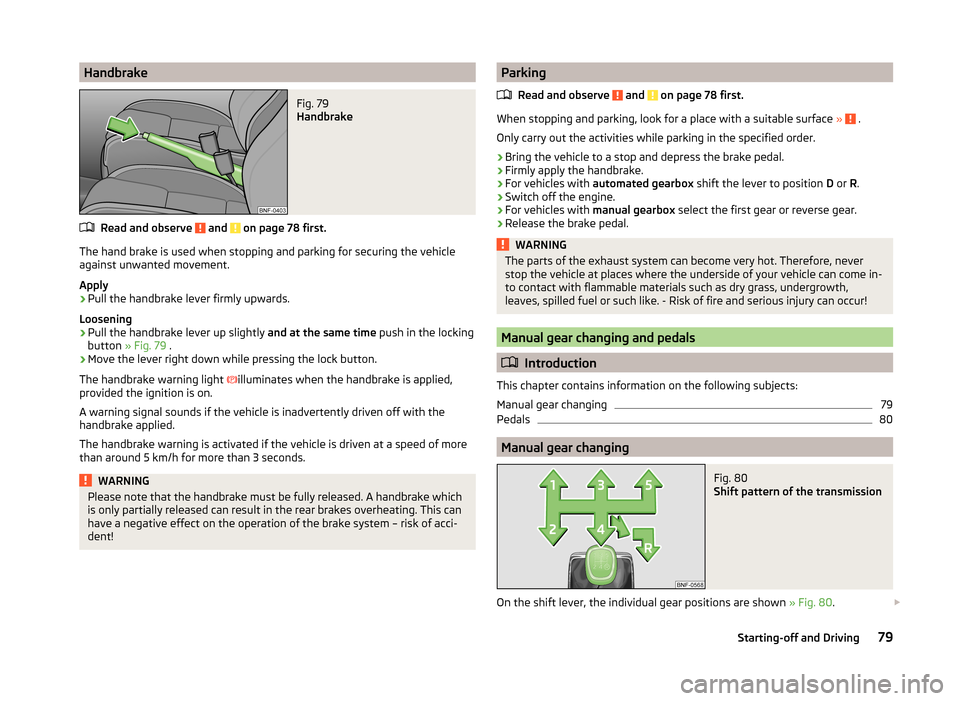
The hand brake is used when stopping and parking for securing the vehicle
against unwanted movement.
Apply
›
Pull the handbrake lever firmly upwards.
Loosening
›
Pull the handbrake lever up slightly and at the same time push in the locking
button » Fig. 79 .
›
Move the lever right down while pressing the lock button.
The handbrake warning light illuminates when the handbrake is applied,
provided the ignition is on.
A warning signal sounds if the vehicle is inadvertently driven off with the
handbrake applied.
The handbrake warning is activated if the vehicle is driven at a speed of more
than around 5 km/h for more than 3 seconds.
WARNINGPlease note that the handbrake must be fully released. A handbrake which
is only partially released can result in the rear brakes overheating. This can
have a negative effect on the operation of the brake system – risk of acci-
dent!Parking
Read and observe
and on page 78 first.
When stopping and parking, look for a place with a suitable surface » .
Only carry out the activities while parking in the specified order.
›
Bring the vehicle to a stop and depress the brake pedal.
›
Firmly apply the handbrake.
›
For vehicles with automated gearbox shift the lever to position D or R.
›
Switch off the engine.
›
For vehicles with manual gearbox select the first gear or reverse gear.
›
Release the brake pedal.
WARNINGThe parts of the exhaust system can become very hot. Therefore, never
stop the vehicle at places where the underside of your vehicle can come in-
to contact with flammable materials such as dry grass, undergrowth,
leaves, spilled fuel or such like. - Risk of fire and serious injury can occur!
Manual gear changing and pedals
Introduction
This chapter contains information on the following subjects:
Manual gear changing
79
Pedals
80
Manual gear changing
Fig. 80
Shift pattern of the transmission
On the shift lever, the individual gear positions are shown » Fig. 80.
79Starting-off and Driving
Page 115 of 164
CAUTION■ Do not continue if for some reason it is not possible to fill with coolant un-
der the current circumstances! Switch off the engine and seek assistance from
a specialist garage.■
If the expansion tank is empty, do not top up with coolant. The system could
fill with air - risk of engine damage,
stop driving! Switch off the engine and
seek assistance from a specialist garage.
■
The concentration of coolant additive in the coolant must never be under
40%.
■
Over 60% of coolant additive in the coolant reduces the antifreeze protec-
tion and cooling effect.
■
A coolant additive that does not comply with the correct specification can
significantly reduce the corrosion protection of the cooling system.
■
Any faults resulting from corrosion may cause a loss of coolant and can con-
sequently result in major engine damage!
■
Do not fill the coolant above the mark
» Fig. 101 on page 112 .
■
If an error occurs, leading to the engine overheating, the help of a professio-
nal garage is to be sought - there is a risk of serious engine damage occurring.
■
Additional headlights and other attached components in front of the air inlet
impair the cooling efficiency of the coolant.
■
Never cover the radiator - there is a risk of the engine overheating.
Checking the coolant level
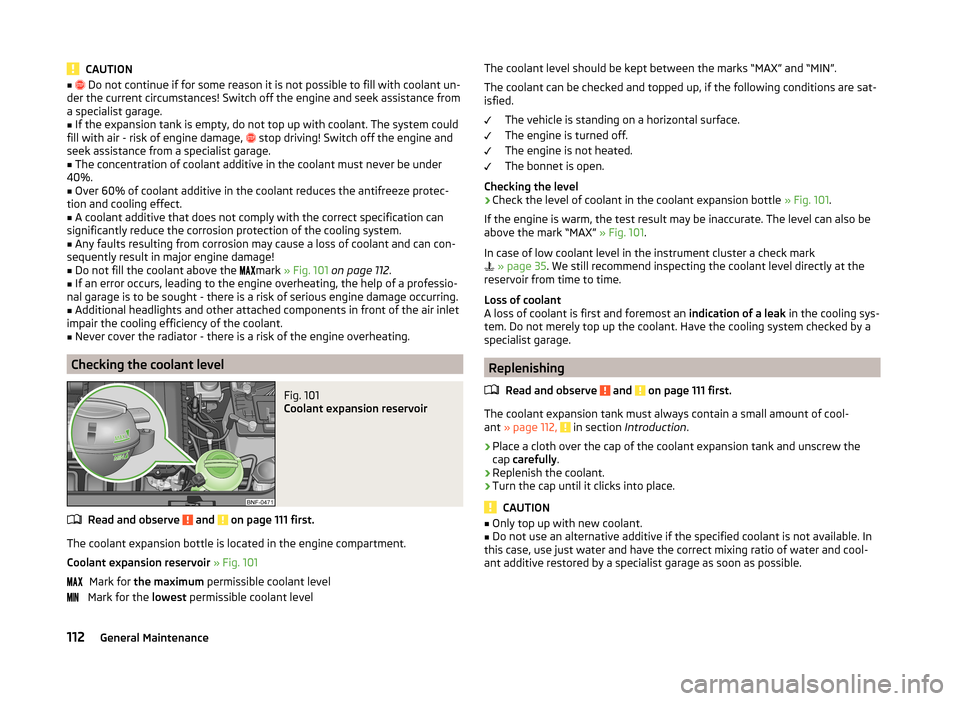
Fig. 101
Coolant expansion reservoir
Read and observe and on page 111 first.
The coolant expansion bottle is located in the engine compartment.
Coolant expansion reservoir » Fig. 101
Mark for the maximum permissible coolant level
Mark for the lowest permissible coolant level
The coolant level should be kept between the marks “MAX” and “MIN”.
The coolant can be checked and topped up, if the following conditions are sat-isfied.
The vehicle is standing on a horizontal surface.
The engine is turned off.
The engine is not heated.
The bonnet is open.
Checking the level›
Check the level of coolant in the coolant expansion bottle » Fig. 101.
If the engine is warm, the test result may be inaccurate. The level can also be
above the mark “MAX” » Fig. 101.
In case of low coolant level in the instrument cluster a check mark
» page 35 . We still recommend inspecting the coolant level directly at the
reservoir from time to time.
Loss of coolant
A loss of coolant is first and foremost an indication of a leak in the cooling sys-
tem. Do not merely top up the coolant. Have the cooling system checked by a
specialist garage.
Replenishing
Read and observe
and on page 111 first.
The coolant expansion tank must always contain a small amount of cool-
ant » page 112, in section Introduction .
›
Place a cloth over the cap of the coolant expansion tank and unscrew the
cap carefully .
›
Replenish the coolant.
›
Turn the cap until it clicks into place.
CAUTION
■
Only top up with new coolant.■Do not use an alternative additive if the specified coolant is not available. In
this case, use just water and have the correct mixing ratio of water and cool-
ant additive restored by a specialist garage as soon as possible.112General Maintenance
Page 132 of 164
Preparations for using the breakdown kitRead and observe
on page 127 first.
The following preparatory work must be carried out before using the puncture
repair kit.
›
Switch off the engine.
›
Select first gear or place the selector lever for automatic gearbox in the D or
R position .
›
Firmly apply the handbrake.
›
Check that you can carry out the repairs with the breakdown kit » page 127.
›
Remove the breakdown kit from the luggage compartment.
›
Stick the sticker
2
» Fig. 114 on page 128 on the dashboard in the driver's
field of view.
›
Unscrew the valve cap.
›
Use the valve remover
1
to unscrew the valve core and place it on a clean
surface (rag, paper, etc.).
Sealing and inflating the tyre
Read and observe
on page 127 first.
Sealing
›
Forcefully shake the tyre inflator bottle
10
» Fig. 114 on page 128 several
times.
›
Firmly screw the inflation hose
3
onto the tyre inflator bottle
10
clockwise.
The film on the cap is pierced automatically.
›
Remove the plug from the inflation hose
3
and plug the open end fully onto
the tyre valve.
›
Hold the bottle
10
with the bottom facing upwards and fill all of the sealing
agent from the tyre inflator bottle into the tyre.
›
Remove the empty tyre inflator bottle from the valve.
›
Screw the valve core back into the tyre valve using the valve remover
1
.
Inflating
›
Screw the tyre inflation hose
5
» Fig. 114 on page 128 of the air compressor
firmly onto the tyre valve.
›
Check that the air release valve
7
is closed.
›
Start the engine and run it in idle.
›
Plug the connector
9
into 12 Volt socket » page 62, 12-Volt power outlet .
›
Switch on the air compressor with the ON and OFF switch
8
.
›Allow the air compressor to run until a pressure of 2.0 - 2.5 bar is achieved.
Maximum run time of 8 minutes » .›
Switch off the air compressor.
›
If you cannot reach an air pressure of 2.0 – 2.5 bar, unscrew the tyre inflation
hose
5
from the tyre valve.
›
Drive the vehicle 10 metres forwards or backwards to allow the sealing agent
to “distribute” in the tyre.
›
Firmly screw the tyre inflation hose
5
back onto the tyre valve and repeat
the inflation process.
›
If you cannot reach the required tyre inflation pressure here either, this
means the tyre has sustained too much damage. You cannot seal with tyre with the breakdown kit »
.
›
Switch off the air compressor.
›
Remove the tyre inflation hose
5
from the tyre valve.
Once a tyre inflation pressure of 2.0 – 2.5 bar is achieved, continue the journey
at a maximum speed of 80 km/h (50 mph).
WARNING■ If you cannot inflate the tyre to at least 2.0 bar, this means the damage
sustained was too serious. The sealing agent cannot be used to seal the
tyre.
Do not drive the vehicle! Seek help from a specialist garage.■
The tyre inflation hose and air compressor may get hot as the tyre is be-
ing inflated – risk of burning.
CAUTION
Switch off the air compressor after running 8 minutes at the latest – there is a
risk of overheating. Allow the air compressor to cool a few minutes before
switching it on again.
Notes for driving with repaired tyres
Read and observe
on page 127 first.
The inflation pressure of the repaired tyre must be checked after driving for 10
minutes.
If the tyre pressure is 1.3 bar or less
›
Do not drive the vehicle! You cannot properly seal with tyre with the
breakdown kit.
If the tyre pressure is 1.3 bar or more
›
Set the tyre pressure to the correct value.
129Emergency equipment and self-help