seats SKODA CITIGO 2015 1.G User Guide
[x] Cancel search | Manufacturer: SKODA, Model Year: 2015, Model line: CITIGO, Model: SKODA CITIGO 2015 1.GPages: 160, PDF Size: 23.1 MB
Page 21 of 160
CAUTIONAn insufficiently folded out key bit can damage the key switch!Transporting children safely
Child seat
Introduction
This chapter contains information on the following subjects:
Using a child seat on the front passenger seat
20
Use of the child seat in the front passenger seat
21
Child safety and side airbag
21
Classification of child seats
21
Use of child seats fastened with a seat belt
22
To avoid serious injury or death children are always to be in an appropriate
child safety seat with regards to height, weight, and age.
For safety reasons, we recommend that you always transport child seats on the rear seats.
Child seats complying with the ECE-R 44 Economic Commission for Europe
standard must be used.
Child seats that comply with the ECE-R 44 standard are identified with a test
mark that cannot be removed: a large E within a circle with the test number
below.
With child safety seats in groups 2 and 3, make sure that the loop-around fit-
tings attached to the child seat headrest is positioned in front of or at the
same height as the loop-around fittings on the B pillar on the passenger side.
WARNING■ One should never carry children, and also not babies! - on one's lap.■Never leave children unattended in the vehicle. Certain outside climatic
conditions can cause life-threatening temperatures in the vehicle.■
The child must be secured in the vehicle during the entire journey! Other-
wise, the child would be thrown through the vehicle in the event of an acci-
dent, causing fatal injuries to both the child and other occupants.
19Transporting children safely
Page 22 of 160
WARNING (Continued)■Children are exposed to an increased risk of injury in the event of an acci-
dent if they lean forward or adopt an incorrect seated position when the
vehicle is moving. This particularly applies to children who are transported
on the front passenger seat as they can suffer severe, or even fatal injuries
if the airbag system is deployed!■
Pay particular attention to the information provided by the manufacturer
of the child safety seat regarding the correct routing of the belt. Seat belts
which are not correctly adjusted can themselves cause injuries even in mi-
nor accidents.
■
Safety belts must be checked to ensure that they are running properly.
One should also ensure that the belt is not damaged by sharp-edged fit-
tings.
■
The front passenger airbag must be deactivated if using a rear-facing
child seat on the front passenger seat. Further information » page 20, Us-
ing a child seat on the front passenger seat . As soon as the rear-facing
child seat is no longer being used on the passenger seat, the front passen-
ger airbag should be re-activated again.
■
When installing the child seat on the back seat, the corresponding front
seat must be adjusted so that there is no contact between the front seat
and the child seat or the child being transported in a child seat.
CAUTION
■ When installing a child seat in which the child faces forward, adjust the head
restraints so that they are as high as possible (valid for the rear seats).■
If the head restraints still prevent the child seat from being installed, even in
the highest position, you will need to remove them (valid for the rear seats)
» page 55 . After removing the child seat, refit the head restraints.
Note
We recommend that you use child seats from ŠKODA Original Accessories.
These child seats were developed and also tested for use in ŠKODA vehicles.
They meet the ECE-R 44 standard.Using a child seat on the front passenger seat
Does not apply to TaiwanFig. 11
Sticker on the B column on the
front passenger side
Fig. 12
Front passenger sun visor / label
Read and observe
and on page 19 first.
Never use a rearward-facing child restraint system on a seat which is protec-
ted by an active airbag. This could cause serious injury to the child, even
death.
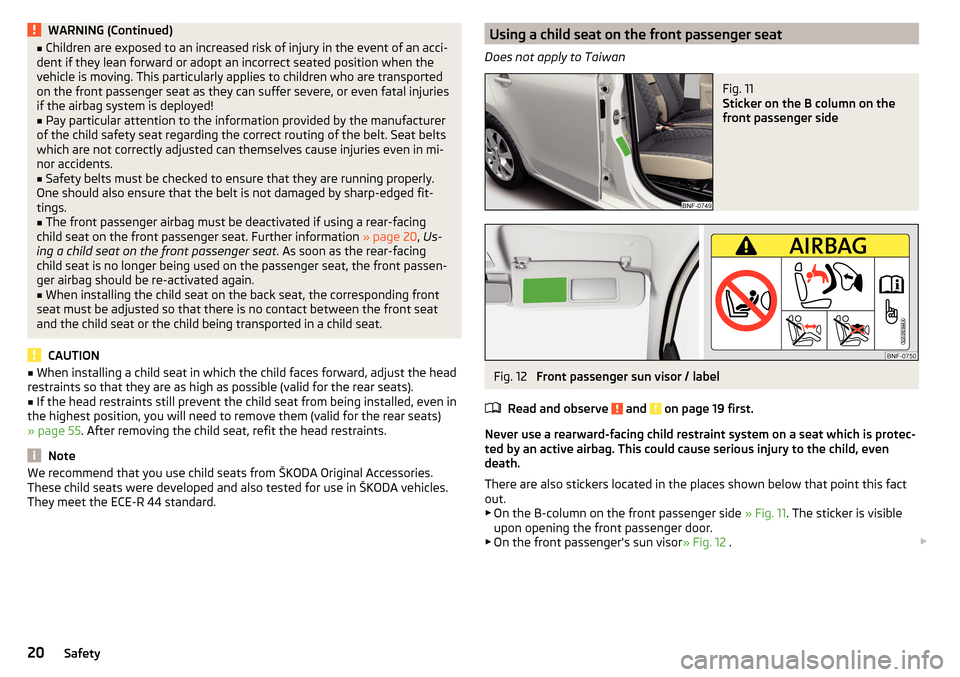
There are also stickers located in the places shown below that point this fact
out.
▶ On the B-column on the front passenger side » Fig. 11. The sticker is visible
upon opening the front passenger door.
▶ On the front passenger's sun visor » Fig. 12 .
20Safety
Page 23 of 160
The following instructions must be followed when using a child seat on the
front passenger seat.
▶ The front passenger airbag must be deactivated if using a rear-facing child
seat »
.
▶ If possible, adjust the front passenger seat backrest so that it is as vertical,
so as to ensure secure contact between the passenger seat backrest and the
back of the child seat.
▶ If possible, move the front passenger seat backwards so that there is no con-
tact between the front passenger seat and the child seat behind it.
▶ Set the height-adjustable front passenger seat as high up as possible.
WARNINGNever use a rear-facing child seat on the front passenger seat if the pas-
senger airbag is activated. This child safety seat is positioned in the deploy-
ment area of the front passenger airbag. The airbag may cause the child se-
vere, or even fatal injuries, in the event of it being deployed.
Use of the child seat in the front passenger seat
Applies to Taiwan
Fig. 13
Front passenger sun visor / label
Read and observe
and on page 19 first.
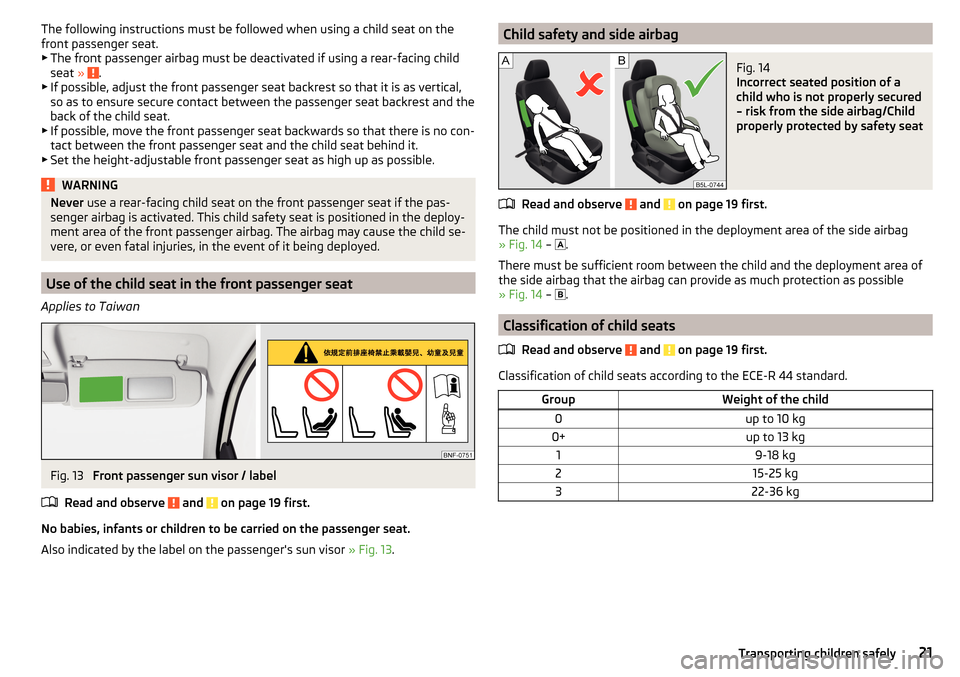
No babies, infants or children to be carried on the passenger seat.
Also indicated by the label on the passenger's sun visor » Fig. 13.
Child safety and side airbagFig. 14
Incorrect seated position of a
child who is not properly secured
– risk from the side airbag/Child
properly protected by safety seat
Read and observe and on page 19 first.
The child must not be positioned in the deployment area of the side airbag
» Fig. 14 –
.
There must be sufficient room between the child and the deployment area of
the side airbag that the airbag can provide as much protection as possible
» Fig. 14 –
.
Classification of child seats
Read and observe
and on page 19 first.
Classification of child seats according to the ECE-R 44 standard.
GroupWeight of the child0up to 10 kg0+up to 13 kg19-18 kg215-25 kg322-36 kg21Transporting children safely
Page 24 of 160
Use of child seats fastened with a seat belt
Never use a rear-facing child seat on the front passenger seat if the passen- ger airbag is activated. This child safety seat is positioned in the deployment
area of the front passenger airbag. The airbag may cause the child severe, or
even fatal injuries, in the event of it being deployed.
Read and observe
and on page 19 first.
GroupFront passenger seatRear seats0
up to 10 kgUU0+
up to 13 kgUU1
9-18 kgUU2
15-25 kgUU3
22-36 kgUU
The seat is suitable for the use of approved child seats in the “Universal”
weight group category.
Fastening systems
Introduction
This chapter contains information on the following subjects:
securing system
22
Use of child seats with the
system
23
Securing of the child seat with the
system
24Usecuring systemFig. 15
Attachment points of the
system
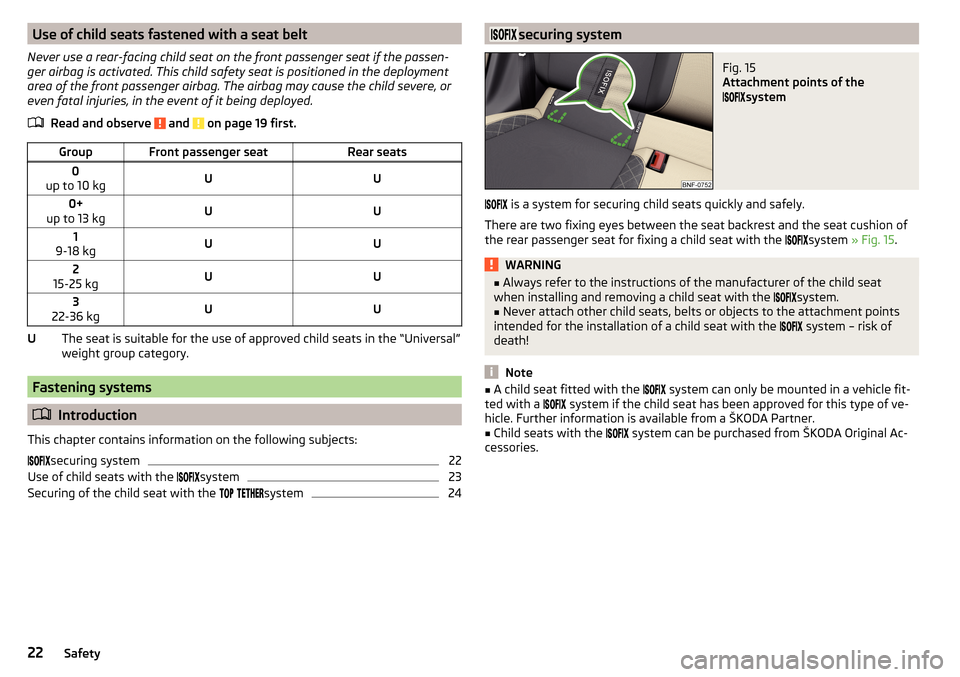
is a system for securing child seats quickly and safely.
There are two fixing eyes between the seat backrest and the seat cushion of
the rear passenger seat for fixing a child seat with the system
» Fig. 15 .
WARNING■
Always refer to the instructions of the manufacturer of the child seat
when installing and removing a child seat with the system.■
Never attach other child seats, belts or objects to the attachment points
intended for the installation of a child seat with the
system – risk of
death!
Note
■ A child seat fitted with the system can only be mounted in a vehicle fit-
ted with a system if the child seat has been approved for this type of ve-
hicle. Further information is available from a ŠKODA Partner.■
Child seats with the
system can be purchased from ŠKODA Original Ac-
cessories.
22Safety
Page 25 of 160
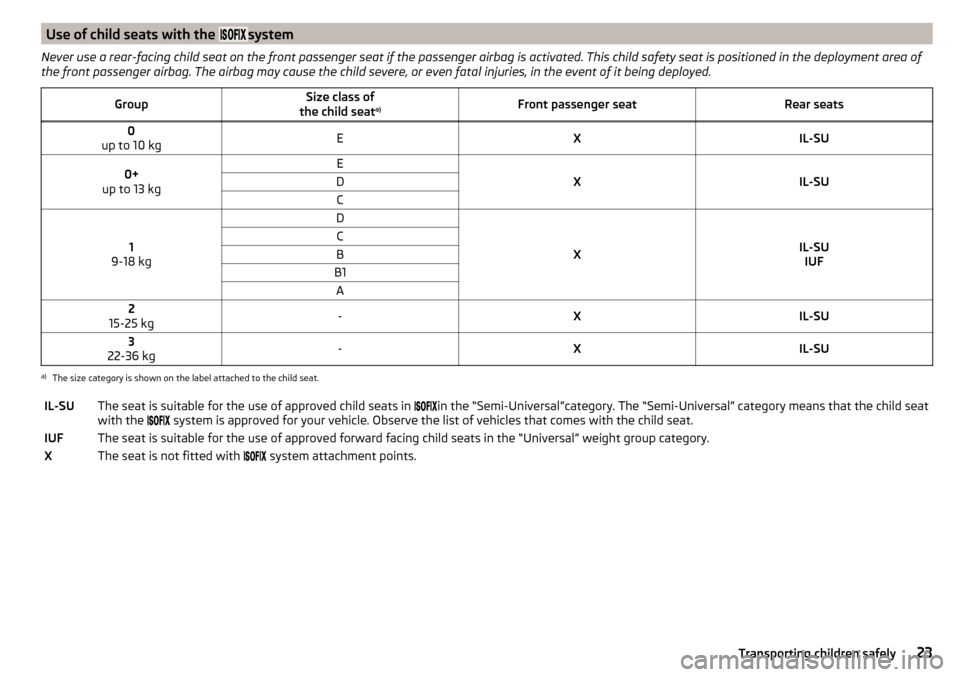
Use of child seats with the system
Never use a rear-facing child seat on the front passenger seat if the passenger airbag is activated. This child safety seat is positioned in the deployment area of
the front passenger airbag. The airbag may cause the child severe, or even fatal injuries, in the event of it being deployed.GroupSize class of
the child seat a)Front passenger seatRear seats0
up to 10 kgEXIL-SU0+
up to 13 kgE
XIL-SU
DC
1
9-18 kg
D
XIL-SU IUF
CBB1A2
15-25 kg-XIL-SU3
22-36 kg-XIL-SUa)
The size category is shown on the label attached to the child seat.
IL-SUThe seat is suitable for the use of approved child seats in in the “Semi-Universal”category. The “Semi-Universal” category means that the child seat
with the
system is approved for your vehicle. Observe the list of vehicles that comes with the child seat.IUFThe seat is suitable for the use of approved forward facing child seats in the “Universal” weight group category.XThe seat is not fitted with system attachment points.23Transporting children safely
Page 26 of 160
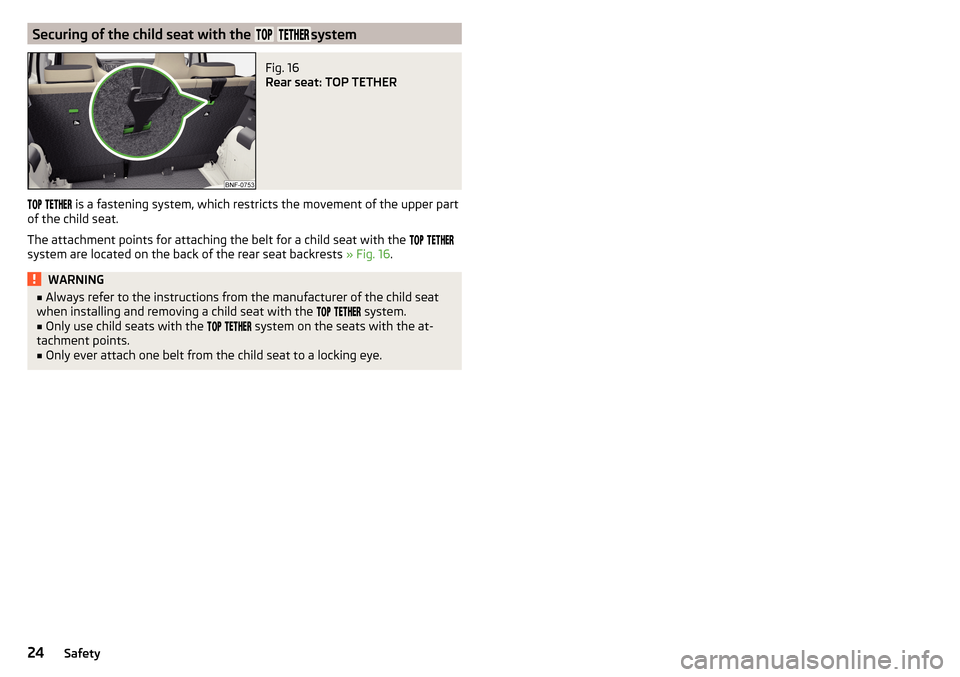
Securing of the child seat with the systemFig. 16
Rear seat: TOP TETHER
is a fastening system, which restricts the movement of the upper part
of the child seat.
The attachment points for attaching the belt for a child seat with the
system are located on the back of the rear seat backrests » Fig. 16.
WARNING■
Always refer to the instructions from the manufacturer of the child seat
when installing and removing a child seat with the system.■
Only use child seats with the
system on the seats with the at-
tachment points.
■
Only ever attach one belt from the child seat to a locking eye.
24Safety
Page 49 of 160
Lights and visibility
Lights
Introduction
This chapter contains information on the following subjects:
Operation of the light function
47
Daylight running lights (DAY LIGHT)
48
Turn signal and main beam
48
Front and rear fog light
49
Hazard warning light system
49
Parking light
49
Driving abroad
50
Unless otherwise stated, the lights only work when the ignition is on.
The arrangement of the controls right-hand drive models may differ from the layout shown in » Fig. 40 on page 47 . The symbols which mark the positions
of the controls are identical.
WARNING■ The driver is always responsible for the correct settings and use of the
lights.■
Never drive with only the side lights on! The side lights are not bright
enough to light up the road sufficiently in front of you or to be seen by oth-
er oncoming traffic. Therefore always switch on the low beam when it is
dark or if visibility is poor.
Note
■ The instruments are also illuminated when the side light or low beam light is
switched on.■
The headlights may mist up temporarily. When the driving lights are switched
on, the light outlet surfaces are free from mist after a short period, although
the headlight lenses may still be misted up in the peripheral areas. This mist
has no influence on the life of the lighting system.
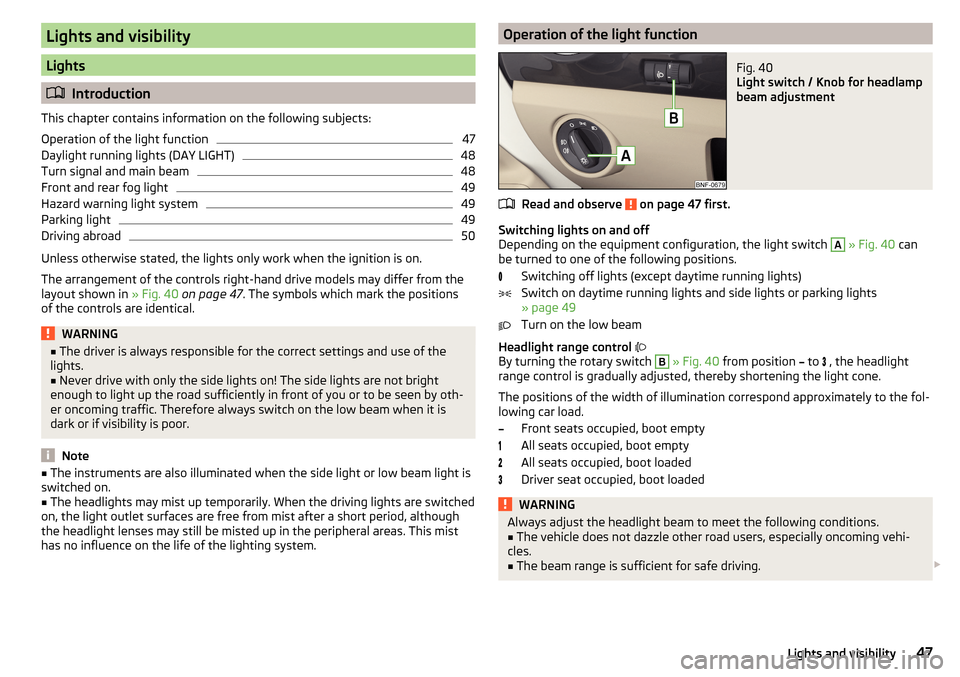
Operation of the light functionFig. 40
Light switch / Knob for headlamp
beam adjustment
Read and observe on page 47 first.
Switching lights on and off
Depending on the equipment configuration, the light switch
A
» Fig. 40 can
be turned to one of the following positions.
Switching off lights (except daytime running lights)
Switch on daytime running lights and side lights or parking lights
» page 49
Turn on the low beam
Headlight range control
By turning the rotary switch
B
» Fig. 40 from position
to
, the headlight
range control is gradually adjusted, thereby shortening the light cone.
The positions of the width of illumination correspond approximately to the fol-
lowing car load.
Front seats occupied, boot empty
All seats occupied, boot empty
All seats occupied, boot loaded
Driver seat occupied, boot loaded
WARNINGAlways adjust the headlight beam to meet the following conditions.■The vehicle does not dazzle other road users, especially oncoming vehi-
cles.■
The beam range is sufficient for safe driving.
47Lights and visibility
Page 56 of 160
Seats and head restraints
Seats and head restraints
Introduction
This chapter contains information on the following subjects:
Adjusting the front seats
54
Head restraints - adjusting height
54
Headrests - removing and installing
55WARNING■ Only adjust the driver's seat when the vehicle is stationary – risk of acci-
dent!■
Caution when adjusting the seat! You may suffer injuries or bruises as a
result of adjusting the seat without paying proper attention.
■
Do not carry any objects on the front passenger seat except objects de-
signed for this purpose (e.g. child seat) – risk of accident!
Note
After a certain time, play can develop within the adjustment mechanism of the
backrest angle.
Adjusting the front seats
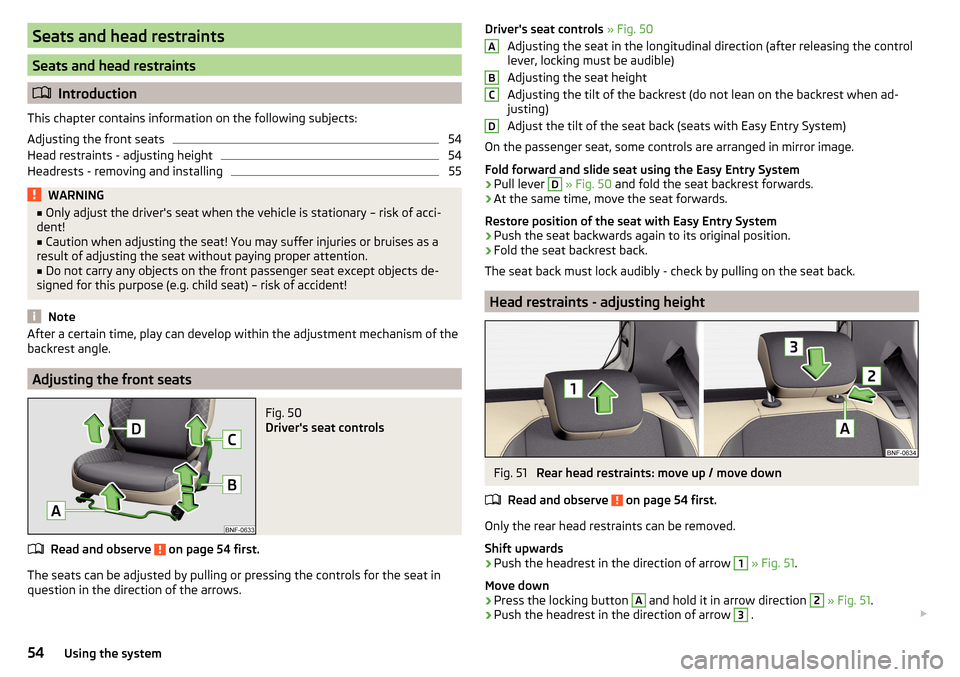
Fig. 50
Driver's seat controls
Read and observe on page 54 first.
The seats can be adjusted by pulling or pressing the controls for the seat in
question in the direction of the arrows.
Driver's seat controls » Fig. 50
Adjusting the seat in the longitudinal direction (after releasing the control
lever, locking must be audible)
Adjusting the seat height
Adjusting the tilt of the backrest (do not lean on the backrest when ad-
justing)
Adjust the tilt of the seat back (seats with Easy Entry System)
On the passenger seat, some controls are arranged in mirror image.
Fold forward and slide seat using the Easy Entry System›
Pull lever
D
» Fig. 50 and fold the seat backrest forwards.
›
At the same time, move the seat forwards.
Restore position of the seat with Easy Entry System
›
Push the seat backwards again to its original position.
›
Fold the seat backrest back.
The seat back must lock audibly - check by pulling on the seat back.
Head restraints - adjusting height
Fig. 51
Rear head restraints: move up / move down
Read and observe
on page 54 first.
Only the rear head restraints can be removed.
Shift upwards
›
Push the headrest in the direction of arrow
1
» Fig. 51 .
Move down
›
Press the locking button
A
and hold it in arrow direction
2
» Fig. 51 .
›
Push the headrest in the direction of arrow
3
.
ABCD54Using the system
Page 57 of 160
WARNINGPlease note the following points about the head restraint settings
» page 8 , Correct and safe seated position .
Note
The front headrests are integrated into the seat backrests and cannot be ad-
justed in height.
Headrests - removing and installing
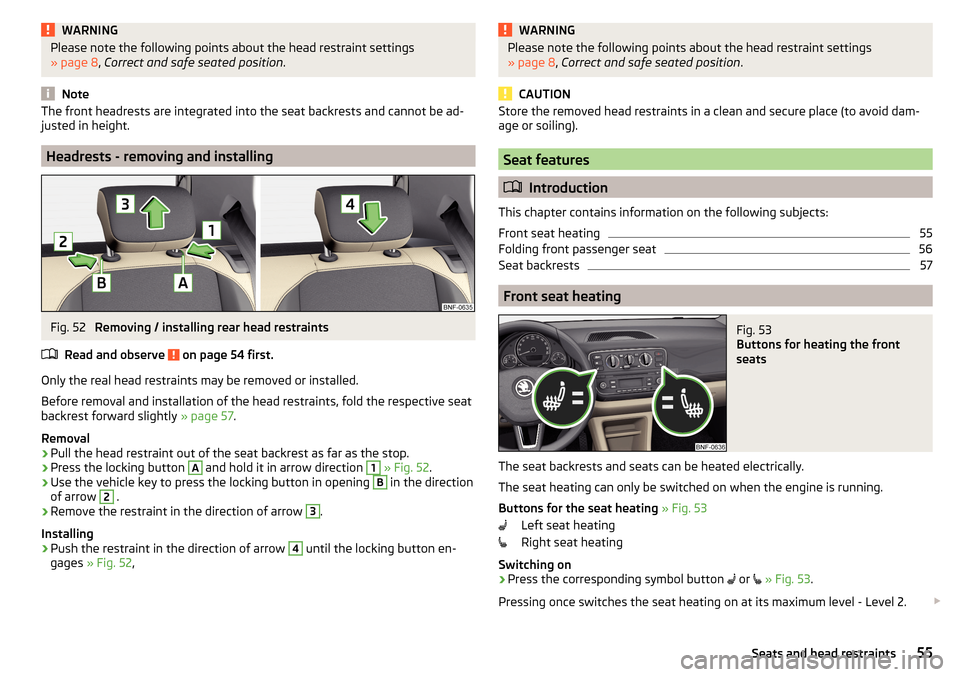
Fig. 52
Removing / installing rear head restraints
Read and observe
on page 54 first.
Only the real head restraints may be removed or installed.
Before removal and installation of the head restraints, fold the respective seat
backrest forward slightly » page 57.
Removal
›
Pull the head restraint out of the seat backrest as far as the stop.
›
Press the locking button
A
and hold it in arrow direction
1
» Fig. 52 .
›
Use the vehicle key to press the locking button in opening
B
in the direction
of arrow
2
.
›
Remove the restraint in the direction of arrow
3
.
Installing
›
Push the restraint in the direction of arrow
4
until the locking button en-
gages » Fig. 52 ,
WARNINGPlease note the following points about the head restraint settings
» page 8 , Correct and safe seated position .
CAUTION
Store the removed head restraints in a clean and secure place (to avoid dam-
age or soiling).
Seat features
Introduction
This chapter contains information on the following subjects:
Front seat heating
55
Folding front passenger seat
56
Seat backrests
57
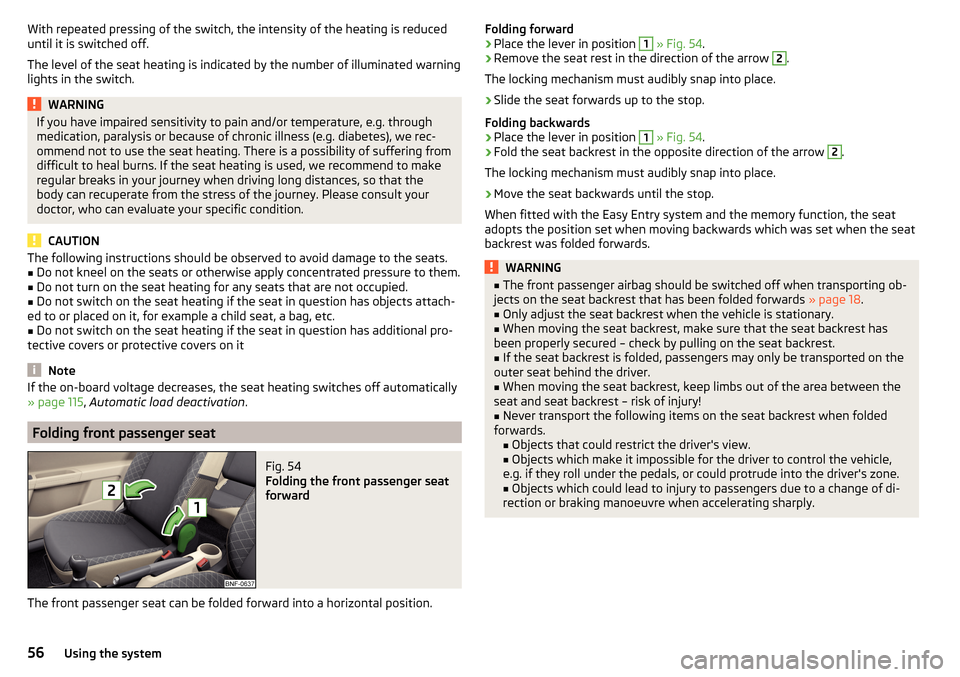
Front seat heating
Fig. 53
Buttons for heating the front
seats
The seat backrests and seats can be heated electrically.
The seat heating can only be switched on when the engine is running.
Buttons for the seat heating » Fig. 53
Left seat heating
Right seat heating
Switching on
›
Press the corresponding symbol button
or
» Fig. 53 .
Pressing once switches the seat heating on at its maximum level - Level 2.
55Seats and head restraints
Page 58 of 160
With repeated pressing of the switch, the intensity of the heating is reduced
until it is switched off.
The level of the seat heating is indicated by the number of illuminated warning
lights in the switch.WARNINGIf you have impaired sensitivity to pain and/or temperature, e.g. through
medication, paralysis or because of chronic illness (e.g. diabetes), we rec-
ommend not to use the seat heating. There is a possibility of suffering from
difficult to heal burns. If the seat heating is used, we recommend to make
regular breaks in your journey when driving long distances, so that the
body can recuperate from the stress of the journey. Please consult your
doctor, who can evaluate your specific condition.
CAUTION
The following instructions should be observed to avoid damage to the seats.■Do not kneel on the seats or otherwise apply concentrated pressure to them.■
Do not turn on the seat heating for any seats that are not occupied.
■
Do not switch on the seat heating if the seat in question has objects attach-
ed to or placed on it, for example a child seat, a bag, etc.
■
Do not switch on the seat heating if the seat in question has additional pro-
tective covers or protective covers on it
Note
If the on-board voltage decreases, the seat heating switches off automatically
» page 115 , Automatic load deactivation .
Folding front passenger seat
Fig. 54
Folding the front passenger seat
forward
The front passenger seat can be folded forward into a horizontal position.
Folding forward›Place the lever in position 1 » Fig. 54 .›
Remove the seat rest in the direction of the arrow
2
.
The locking mechanism must audibly snap into place.
›
Slide the seat forwards up to the stop.
Folding backwards
›
Place the lever in position
1
» Fig. 54 .
›
Fold the seat backrest in the opposite direction of the arrow
2
.
The locking mechanism must audibly snap into place.
›
Move the seat backwards until the stop.
When fitted with the Easy Entry system and the memory function, the seat
adopts the position set when moving backwards which was set when the seat
backrest was folded forwards.
WARNING■ The front passenger airbag should be switched off when transporting ob-
jects on the seat backrest that has been folded forwards » page 18.■
Only adjust the seat backrest when the vehicle is stationary.
■
When moving the seat backrest, make sure that the seat backrest has
been properly secured – check by pulling on the seat backrest.
■
If the seat backrest is folded, passengers may only be transported on the
outer seat behind the driver.
■
When moving the seat backrest, keep limbs out of the area between the
seat and seat backrest – risk of injury!
■
Never transport the following items on the seat backrest when folded
forwards. ■ Objects that could restrict the driver's view.
■ Objects which make it impossible for the driver to control the vehicle,
e.g. if they roll under the pedals, or could protrude into the driver's zone. ■ Objects which could lead to injury to passengers due to a change of di-
rection or braking manoeuvre when accelerating sharply.
56Using the system