check engine SKODA CITIGO 2016 1.G User Guide
[x] Cancel search | Manufacturer: SKODA, Model Year: 2016, Model line: CITIGO, Model: SKODA CITIGO 2016 1.GPages: 172, PDF Size: 24.59 MB
Page 114 of 172
WARNING (Continued)â Do not manipulate individual parts of the airbag system, as this might re-
sult in the airbag being deployed.â
If the airbag has been deployed, the airbag system must be replaced.
WARNINGThe airbag system operates using pressure sensors located in the front
doors. For this reason, no adjustments may be carried out to the doors or
door panels (e.g. installation of additional loudspeakers). Resulting damage
can impair the functioning of the airbag system - risk of accidents and fatal
injuries! The following guidelines must therefore be observed.â
Any work on the front doors and their door panels must be carried out by
a specialist garage.
â
Never drive the vehicle with the inner door panels removed or with open-
ings in the panelling.
Trailer operation
Read and observe
on page 110 first.
The vehicle is not approved for towing a trailer. The vehicle is not factory-
equipped with a towing device and it cannot be retrofitted with a towing de-
vice.
WARNINGNever attach a towing device to the vehicle.
Acceptance and recycling of used vehicles
Read and observe
on page 110 first.
All new Å KODA vehicles are 95% recyclable.
ï¤ï¤Service intervals
ï¤ Introduction
This chapter contains information on the following subjects:
Overview of service intervals
113
Fixed service intervals QI1 - QI4
113
Digital Service Plan
113
The service interval display in the display of the instrument cluster will remind
you to carry out every service stipulated by the manufacturer at the right time
in order to prevent you from forgetting any » page 42.
The completion of services can be verified through the printed verification
from the digital service schedule and the respective receipts.
The specified service intervals are tailored to normal operating conditions.
In the case of aggravated operating conditions, it will be necessary to have
some service work carried out before the date of the next regular service or
between the specified service intervals. This applies mainly to the cleaning or
the replacement of the air filter insert in regions with heavy dust pollution as
well as checking and replacing the toothed belt, but also to vehicles with die-
sel particle filters, which can put greater strain on the engine oil.
The following is taken to mean aggravated operating conditions: ⶠFrequent short trips.
ⶠLonger periods of engine idling (e.g. taxis).
ⶠOperation in areas with heavy dust pollution.
ⶠPredominantly stop-and-go traffic as is e.g. often the case in city driving.
ⶠOperation predominantly during winter.
You will be told at the specialist garage whether the operating conditions of
your vehicle may make it necessary for service work to be carried out between
the normal service intervals.
Different service charges may apply according to the particular scope of work
required, the vehicle type and specification, and your vehicleâs condition.
Note
â The customer is responsible for covering the cost of all services including
changing or replenishing the oil, even during the warranty period, unless sta-
ted otherwise in the Å KODA AUTO warranty terms or other agreements.â
You will be informed about the service checks and actions at each service by
the specialist garage.
112General Maintenance
Page 121 of 172
CAUTIONPetrol additives (additives)â Unleaded petrol complying with the EN 228 standard1)
meets all the condi-
tions for problem-free engine operation. We therefore do not recommend mix-
ing fuel additives into the petrol - risk of engine damage or damage to the ex-
haust system.â
The following additives may not be used - risk of engine damage or damage
to the exhaust system! â Additives with metal components (metallic additives), in particular with
manganese and iron content.
â Fuels with metallic content (e.g. LRP - lead replacement petrol).
Note
â Unleaded petrol that has a higher octane number than that required by the
engine can be used without limitations.â
On vehicles using the prescribed unleaded petrol of min. 95 RON, the use of
petrol with a higher octane number than 95 RON can lead to an increase in
power and reduction in fuel consumption.
Refuelling with CNG (compressed natural gas)
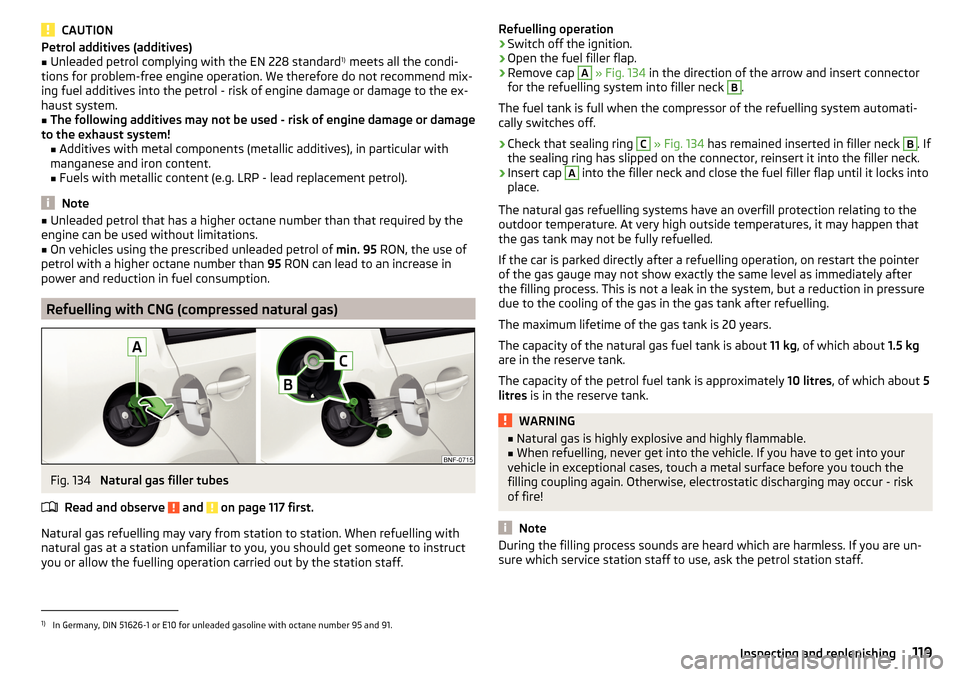
Fig. 134
Natural gas filler tubes
Read and observe
and on page 117 first.
Natural gas refuelling may vary from station to station. When refuelling with natural gas at a station unfamiliar to you, you should get someone to instruct
you or allow the fuelling operation carried out by the station staff.
ï¤Refuelling operationâºSwitch off the ignition.âº
Open the fuel filler flap.
âº
Remove cap
A
» Fig. 134 in the direction of the arrow and insert connector
for the refuelling system into filler neck
B
.
The fuel tank is full when the compressor of the refuelling system automati-
cally switches off.
âº
Check that sealing ring
C
» Fig. 134 has remained inserted in filler neck
B
. If
the sealing ring has slipped on the connector, reinsert it into the filler neck.
âº
Insert cap
A
into the filler neck and close the fuel filler flap until it locks into
place.
The natural gas refuelling systems have an overfill protection relating to the
outdoor temperature. At very high outside temperatures, it may happen that
the gas tank may not be fully refuelled.
If the car is parked directly after a refuelling operation, on restart the pointer
of the gas gauge may not show exactly the same level as immediately after
the filling process. This is not a leak in the system, but a reduction in pressure
due to the cooling of the gas in the gas tank after refuelling.
The maximum lifetime of the gas tank is 20 years.
The capacity of the natural gas fuel tank is about 11 kg, of which about 1.5 kg
are in the reserve tank.
The capacity of the petrol fuel tank is approximately 10 litres, of which about 5
litres is in the reserve tank.
WARNINGâ
Natural gas is highly explosive and highly flammable.â When refuelling, never get into the vehicle. If you have to get into your
vehicle in exceptional cases, touch a metal surface before you touch the
filling coupling again. Otherwise, electrostatic discharging may occur - risk
of fire!
Note
During the filling process sounds are heard which are harmless. If you are un-
sure which service station staff to use, ask the petrol station staff.1)
In Germany, DIN 51626-1 or E10 for unleaded gasoline with octane number 95 and 91.
119Inspecting and replenishing
Page 122 of 172
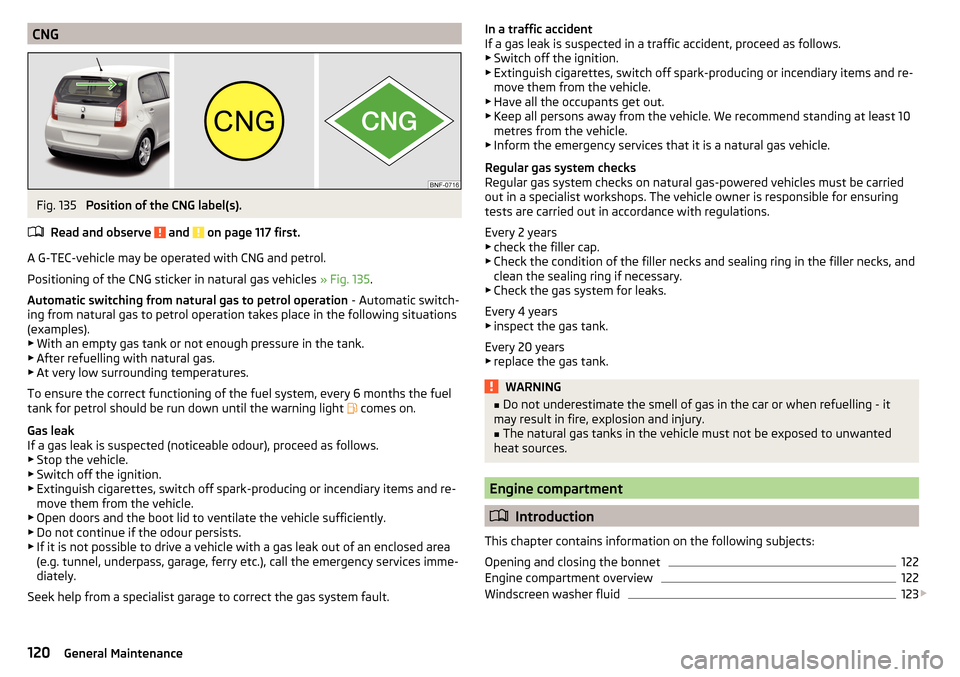
CNGFig. 135
Position of the CNG label(s).
Read and observe
and on page 117 first.
A G-TEC-vehicle may be operated with CNG and petrol.
Positioning of the CNG sticker in natural gas vehicles » Fig. 135.
Automatic switching from natural gas to petrol operation - Automatic switch-
ing from natural gas to petrol operation takes place in the following situations
(examples). ⶠWith an empty gas tank or not enough pressure in the tank.
ⶠAfter refuelling with natural gas.
ⶠAt very low surrounding temperatures.
To ensure the correct functioning of the fuel system, every 6 months the fuel tank for petrol should be run down until the warning light ï comes on.
Gas leak
If a gas leak is suspected (noticeable odour), proceed as follows. ⶠStop the vehicle.
ⶠSwitch off the ignition.
ⶠExtinguish cigarettes, switch off spark-producing or incendiary items and re-
move them from the vehicle.
ⶠOpen doors and the boot lid to ventilate the vehicle sufficiently.
ⶠDo not continue if the odour persists.
ⶠIf it is not possible to drive a vehicle with a gas leak out of an enclosed area
(e.g. tunnel, underpass, garage, ferry etc.), call the emergency services imme-
diately.
Seek help from a specialist garage to correct the gas system fault.
ï¤In a traffic accident
If a gas leak is suspected in a traffic accident, proceed as follows.
ⶠSwitch off the ignition.
ⶠExtinguish cigarettes, switch off spark-producing or incendiary items and re-
move them from the vehicle.
ⶠHave all the occupants get out.
ⶠKeep all persons away from the vehicle. We recommend standing at least 10
metres from the vehicle.
ⶠInform the emergency services that it is a natural gas vehicle.
Regular gas system checks
Regular gas system checks on natural gas-powered vehicles must be carried
out in a specialist workshops. The vehicle owner is responsible for ensuring
tests are carried out in accordance with regulations.
Every 2 years ⶠcheck the filler cap.
ⶠCheck the condition of the filler necks and sealing ring in the filler necks, and
clean the sealing ring if necessary.
ⶠCheck the gas system for leaks.
Every 4 years ⶠinspect the gas tank.
Every 20 years
ⶠreplace the gas tank.WARNINGâ Do not underestimate the smell of gas in the car or when refuelling - it
may result in fire, explosion and injury.â
The natural gas tanks in the vehicle must not be exposed to unwanted
heat sources.
Engine compartment
ï¤ Introduction
This chapter contains information on the following subjects:
Opening and closing the bonnet
122
Engine compartment overview
122
Windscreen washer fluid
123
ï£
120General Maintenance
Page 125 of 172
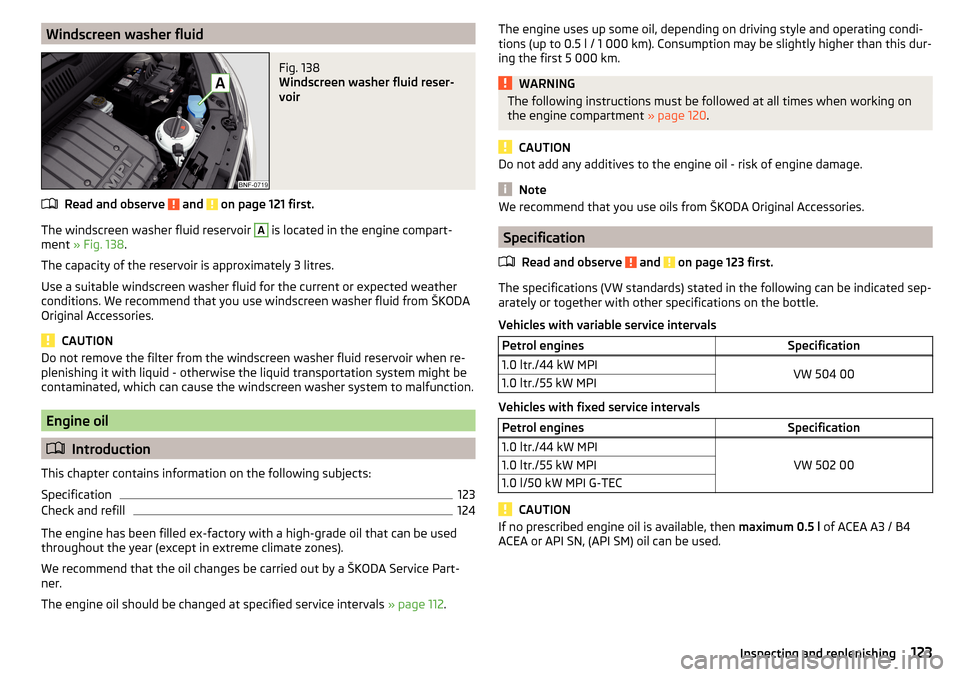
Windscreen washer fluidFig. 138
Windscreen washer fluid reser-
voir
Read and observe and on page 121 first.
The windscreen washer fluid reservoir
A
is located in the engine compart-
ment » Fig. 138 .
The capacity of the reservoir is approximately 3 litres.
Use a suitable windscreen washer fluid for the current or expected weather
conditions. We recommend that you use windscreen washer fluid from Å KODA
Original Accessories.
CAUTION
Do not remove the filter from the windscreen washer fluid reservoir when re-
plenishing it with liquid - otherwise the liquid transportation system might be
contaminated, which can cause the windscreen washer system to malfunction.
Engine oil
ï¤ Introduction
This chapter contains information on the following subjects:
Specification
123
Check and refill
124
The engine has been filled ex-factory with a high-grade oil that can be used
throughout the year (except in extreme climate zones).
We recommend that the oil changes be carried out by a Å KODA Service Part-
ner.
The engine oil should be changed at specified service intervals » page 112.
ï¤The engine uses up some oil, depending on driving style and operating condi-
tions (up to 0.5 l / 1 000 km). Consumption may be slightly higher than this dur-
ing the first 5 000 km.WARNINGThe following instructions must be followed at all times when working on
the engine compartment » page 120.
CAUTION
Do not add any additives to the engine oil - risk of engine damage.
Note
We recommend that you use oils from Å KODA Original Accessories.
Specification
Read and observe
and on page 123 first.
The specifications (VW standards) stated in the following can be indicated sep-arately or together with other specifications on the bottle.
Vehicles with variable service intervals
Petrol enginesSpecification1.0 ltr./44 kW MPIVW 504 001.0 ltr./55 kW MPI
Vehicles with fixed service intervals
Petrol enginesSpecification1.0 ltr./44 kW MPI
VW 502 00
1.0 ltr./55 kW MPI1.0 l/50 kW MPI G-TEC
CAUTION
If no prescribed engine oil is available, then maximum 0.5 l of ACEA A3 / B4
ACEA or API SN, (API SM) oil can be used.ï¤123Inspecting and replenishing
Page 126 of 172
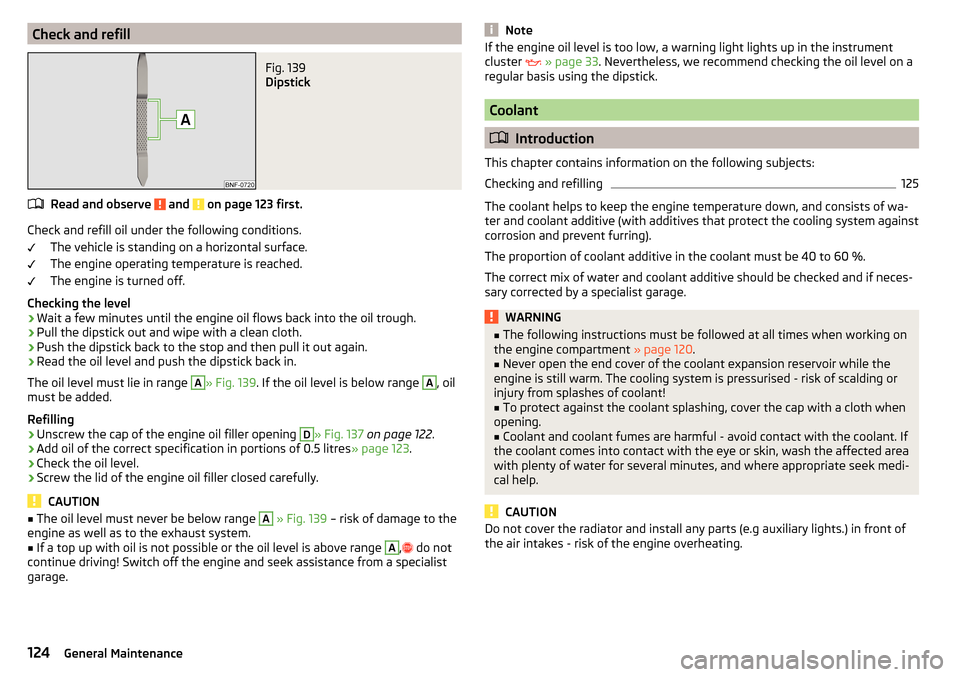
Check and refillFig. 139
Dipstick
Read and observe and on page 123 first.
Check and refill oil under the following conditions.The vehicle is standing on a horizontal surface.
The engine operating temperature is reached.
The engine is turned off.
Checking the level
âº
Wait a few minutes until the engine oil flows back into the oil trough.
âº
Pull the dipstick out and wipe with a clean cloth.
âº
Push the dipstick back to the stop and then pull it out again.
âº
Read the oil level and push the dipstick back in.
The oil level must lie in range
A
» Fig. 139 . If the oil level is below range
A
, oil
must be added.
Refilling
âº
Unscrew the cap of the engine oil filler opening
D
» Fig. 137 on page 122 .
âº
Add oil of the correct specification in portions of 0.5 litres
» page 123.
âº
Check the oil level.
âº
Screw the lid of the engine oil filler closed carefully.
CAUTION
â
The oil level must never be below range A » Fig. 139 â risk of damage to the
engine as well as to the exhaust system.â
If a top up with oil is not possible or the oil level is above range
A
, ï²
do not
continue driving! Switch off the engine and seek assistance from a specialist
garage.
ï¤ï¥ï¥ï¥NoteIf the engine oil level is too low, a warning light lights up in the instrument
cluster ï¥ Â» page 33 . Nevertheless, we recommend checking the oil level on a
regular basis using the dipstick.
Coolant
ï¤ Introduction
This chapter contains information on the following subjects:
Checking and refilling
125
The coolant helps to keep the engine temperature down, and consists of wa-
ter and coolant additive (with additives that protect the cooling system against
corrosion and prevent furring).
The proportion of coolant additive in the coolant must be 40 to 60 %.
The correct mix of water and coolant additive should be checked and if neces-
sary corrected by a specialist garage.
WARNINGâ The following instructions must be followed at all times when working on
the engine compartment » page 120.â
Never open the end cover of the coolant expansion reservoir while the
engine is still warm. The cooling system is pressurised - risk of scalding or
injury from splashes of coolant!
â
To protect against the coolant splashing, cover the cap with a cloth when
opening.
â
Coolant and coolant fumes are harmful - avoid contact with the coolant. If
the coolant comes into contact with the eye or skin, wash the affected area
with plenty of water for several minutes, and where appropriate seek medi-
cal help.
CAUTION
Do not cover the radiator and install any parts (e.g auxiliary lights.) in front of
the air intakes - risk of the engine overheating.124General Maintenance
Page 127 of 172
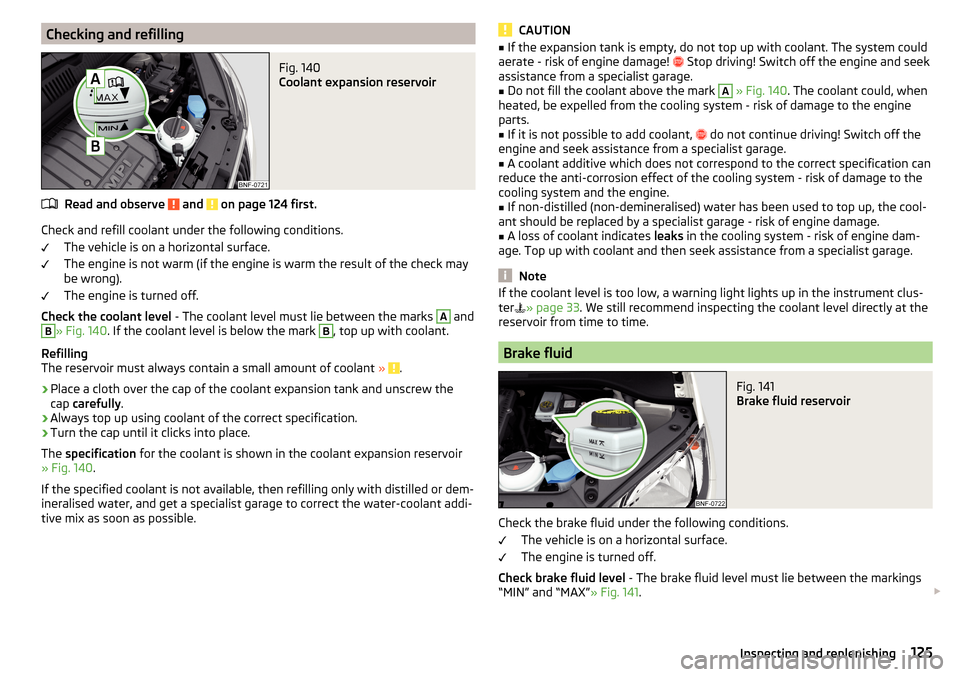
Checking and refillingFig. 140
Coolant expansion reservoir
Read and observe and on page 124 first.
Check and refill coolant under the following conditions.The vehicle is on a horizontal surface.
The engine is not warm (if the engine is warm the result of the check may
be wrong).
The engine is turned off.
Check the coolant level - The coolant level must lie between the marks
A
and
B
» Fig. 140. If the coolant level is below the mark
B
, top up with coolant.
Refilling
The reservoir must always contain a small amount of coolant »
.
âº
Place a cloth over the cap of the coolant expansion tank and unscrew the
cap carefully .
âº
Always top up using coolant of the correct specification.
âº
Turn the cap until it clicks into place.
The specification for the coolant is shown in the coolant expansion reservoir
» Fig. 140 .
If the specified coolant is not available, then refilling only with distilled or dem-
ineralised water, and get a specialist garage to correct the water-coolant addi-
tive mix as soon as possible.
ï¤ï¥ï¥ï¥CAUTIONâ If the expansion tank is empty, do not top up with coolant. The system could
aerate - risk of engine damage! ï² Stop driving! Switch off the engine and seek
assistance from a specialist garage.â
Do not fill the coolant above the mark
A
» Fig. 140 . The coolant could, when
heated, be expelled from the cooling system - risk of damage to the engine
parts.
â
If it is not possible to add coolant, ï²
do not continue driving! Switch off the
engine and seek assistance from a specialist garage.
â
A coolant additive which does not correspond to the correct specification can
reduce the anti-corrosion effect of the cooling system - risk of damage to the
cooling system and the engine.
â
If non-distilled (non-demineralised) water has been used to top up, the cool-
ant should be replaced by a specialist garage - risk of engine damage.
â
A loss of coolant indicates leaks in the cooling system - risk of engine dam-
age. Top up with coolant and then seek assistance from a specialist garage.
Note
If the coolant level is too low, a warning light lights up in the instrument clus-
ter ï¯Â» page 33 . We still recommend inspecting the coolant level directly at the
reservoir from time to time.
Brake fluid
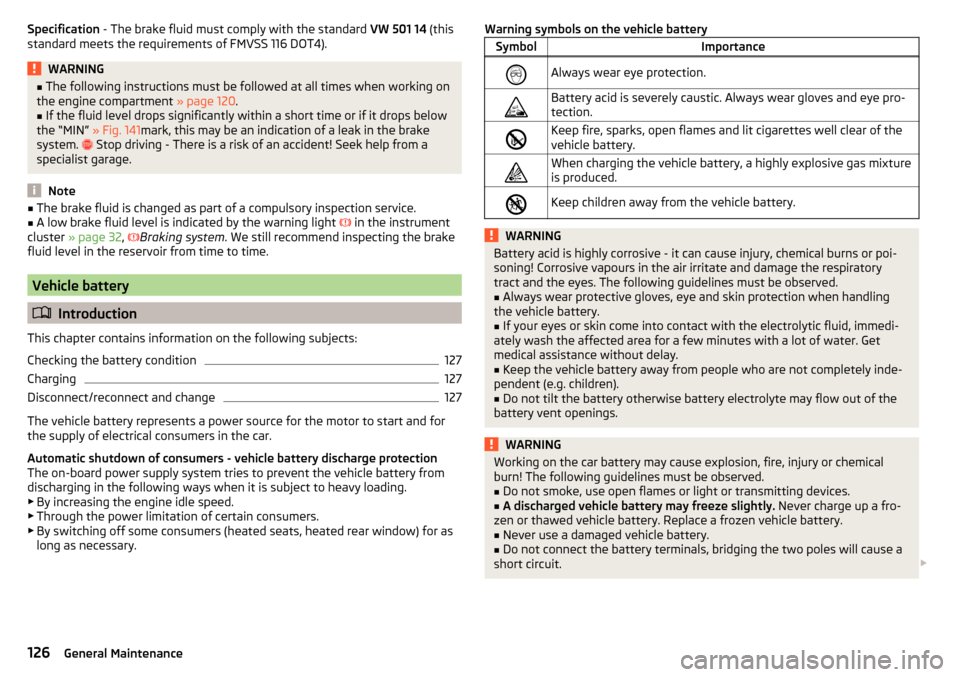
Fig. 141
Brake fluid reservoir
Check the brake fluid under the following conditions.
The vehicle is on a horizontal surface.
The engine is turned off.
Check brake fluid level - The brake fluid level must lie between the markings
âMINâ and âMAXâ » Fig. 141. ï£
ï¥ï¥125Inspecting and replenishing
Page 128 of 172
Specification - The brake fluid must comply with the standard VW 501 14 (this
standard meets the requirements of FMVSS 116 DOT4).WARNINGâ The following instructions must be followed at all times when working on
the engine compartment » page 120.â
If the fluid level drops significantly within a short time or if it drops below
the âMINâ » Fig. 141mark, this may be an indication of a leak in the brake
system. ï²
Stop driving - There is a risk of an accident! Seek help from a
specialist garage.
Note
â The brake fluid is changed as part of a compulsory inspection service.â A low brake fluid level is indicated by the warning light ï¨ in the instrument
cluster » page 32 , ï¨
Braking system . We still recommend inspecting the brake
fluid level in the reservoir from time to time.
Vehicle battery
ï¤ Introduction
This chapter contains information on the following subjects:
Checking the battery condition
127
Charging
127
Disconnect/reconnect and change
127
The vehicle battery represents a power source for the motor to start and for
the supply of electrical consumers in the car.
Automatic shutdown of consumers - vehicle battery discharge protection
The on-board power supply system tries to prevent the vehicle battery from
discharging in the following ways when it is subject to heavy loading. ⶠBy increasing the engine idle speed.
ⶠThrough the power limitation of certain consumers.
ⶠBy switching off some consumers (heated seats, heated rear window) for as
long as necessary.
Warning symbols on the vehicle batterySymbolImportanceïAlways wear eye protection.ïBattery acid is severely caustic. Always wear gloves and eye pro-
tection.ïKeep fire, sparks, open flames and lit cigarettes well clear of the
vehicle battery.ïWhen charging the vehicle battery, a highly explosive gas mixture
is produced.ïKeep children away from the vehicle battery.WARNINGBattery acid is highly corrosive - it can cause injury, chemical burns or poi-
soning! Corrosive vapours in the air irritate and damage the respiratory
tract and the eyes. The following guidelines must be observed.â
Always wear protective gloves, eye and skin protection when handling
the vehicle battery.
â
If your eyes or skin come into contact with the electrolytic fluid, immedi-
ately wash the affected area for a few minutes with a lot of water. Get
medical assistance without delay.
â
Keep the vehicle battery away from people who are not completely inde-
pendent (e.g. children).
â
Do not tilt the battery otherwise battery electrolyte may flow out of the
battery vent openings.
WARNINGWorking on the car battery may cause explosion, fire, injury or chemical
burn! The following guidelines must be observed.â
Do not smoke, use open flames or light or transmitting devices.
â
A discharged vehicle battery may freeze slightly. Never charge up a fro-
zen or thawed vehicle battery. Replace a frozen vehicle battery.
â
Never use a damaged vehicle battery.
â
Do not connect the battery terminals, bridging the two poles will cause a
short circuit. ï£
126General Maintenance
Page 129 of 172
CAUTIONEnsure that battery acid does not come into contact with the bodywork â risk
of damage to the paintwork.
Note
â We recommend having all work on the vehicle battery carried out by a spe-
cialist garage.â
You should replace batteries older than 5 years.
Checking the battery condition
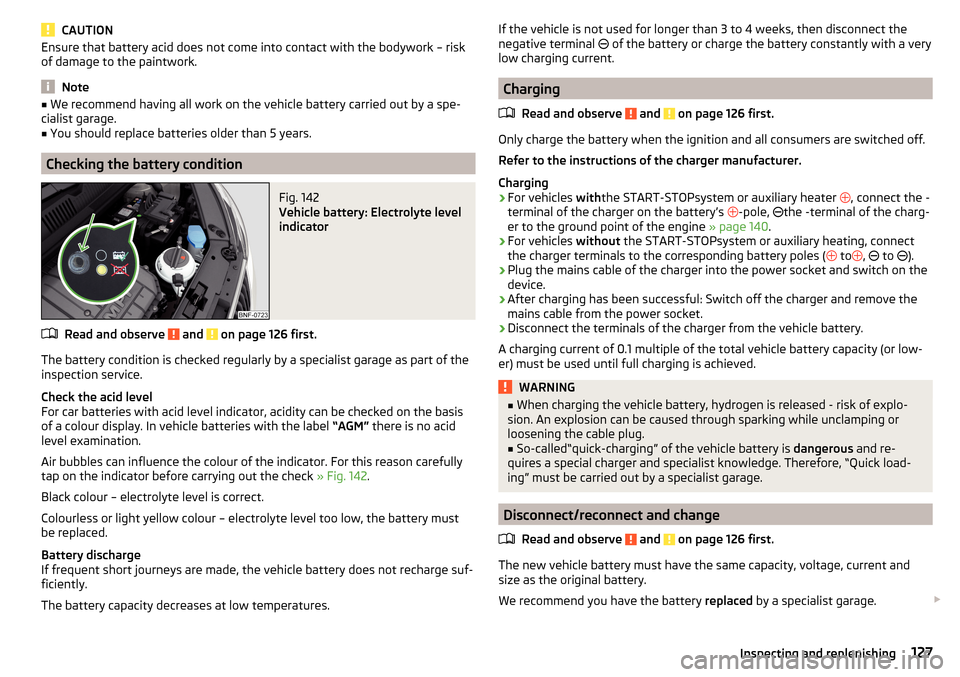
Fig. 142
Vehicle battery: Electrolyte level
indicator
Read and observe and on page 126 first.
The battery condition is checked regularly by a specialist garage as part of the inspection service.
Check the acid level
For car batteries with acid level indicator, acidity can be checked on the basis
of a colour display. In vehicle batteries with the label âAGMâ there is no acid
level examination.
Air bubbles can influence the colour of the indicator. For this reason carefully
tap on the indicator before carrying out the check » Fig. 142.
Black colour â electrolyte level is correct.
Colourless or light yellow colour â electrolyte level too low, the battery must
be replaced.
Battery discharge
If frequent short journeys are made, the vehicle battery does not recharge suf-
ficiently.
The battery capacity decreases at low temperatures.
ï¤If the vehicle is not used for longer than 3 to 4 weeks, then disconnect the
negative terminal ï of the battery or charge the battery constantly with a very
low charging current.
Charging
Read and observe
and on page 126 first.
Only charge the battery when the ignition and all consumers are switched off.Refer to the instructions of the charger manufacturer.
Charging
âº
For vehicles withthe START-STOPsystem or auxiliary heater
ï, connect the -
terminal of the charger on the batteryâs ï-pole,
ïthe -terminal of the charg-
er to the ground point of the engine » page 140.
âº
For vehicles
without the START-STOPsystem or auxiliary heating, connect
the charger terminals to the corresponding battery poles ( ï to
ï,
ï to
ï).
âº
Plug the mains cable of the charger into the power socket and switch on the
device.
âº
After charging has been successful: Switch off the charger and remove the
mains cable from the power socket.
âº
Disconnect the terminals of the charger from the vehicle battery.
A charging current of 0.1 multiple of the total vehicle battery capacity (or low-
er) must be used until full charging is achieved.
WARNINGâ When charging the vehicle battery, hydrogen is released - risk of explo-
sion. An explosion can be caused through sparking while unclamping or
loosening the cable plug.â
So-calledâquick-chargingâ of the vehicle battery is dangerous and re-
quires a special charger and specialist knowledge. Therefore, âQuick load-
ingâ must be carried out by a specialist garage.
Disconnect/reconnect and change
Read and observe
and on page 126 first.
The new vehicle battery must have the same capacity, voltage, current and
size as the original battery.
We recommend you have the battery replaced by a specialist garage. ï£
ï¤ï¤127Inspecting and replenishing
Page 136 of 172
Wheel wrench
Extraction pliers for the wheel bolt caps
Breakdown kitWARNINGâ The factory-supplied lifting jack is only intended for your model of vehicle.
Under no circumstances attempt to lift other vehicles or loads with it â
there is a risk of injury.â
Always stow the tool safely in the box and make sure that it is attached
with the belt to the spare wheel - otherwise it could cause injury to the oc-
cupants if breaking suddenly or colliding with another vehicle.
CAUTION
Screw the jack back to its starting position prior to putting it back in its box -
risk of damage to the box.
Note
The declaration of conformity is included with the jack or the log folder.
Changing a wheel
Preliminary work
For safety's sake, the following instructions must be observed before
changing a wheel on the road.
âº
As far as possible park the vehicle as far as possible away from the traffic
flow - choose a place with a flat and firm surface.
âº
Switch off the engine.
âº
For vehicles with manual transmission select 1st gear .
âº
For vehicles with
automated transmission shift the lever to position D or R.
âº
Firmly apply the handbrake.
âº
Switch on the hazard warning lights and set up the warning triangle at the
prescribed distance.
âº
Have all the occupants get out . The passengers should not stand on the
road while the wheel is being changed (they should remain behind a crash
barrier, for instance).
Changing a wheel
âº
Take out the emergency or spare wheel » page 135.
âº
Remove the full wheel trim » page 135 or caps » page 135 .
678âºLoosen the wheel bolts
» page 136 » .âºJack up the vehicle until the wheel that needs changing, is clear of the
ground » page 136 .âº
Unscrew the wheel bolts and place them on a clean surface (cloth, paper,
etc.).
âº
Remove the wheel carefully.
âº
Attach the spare wheel and slightly screw on the wheel bolts.
âº
Lower the vehicle.
âº
Tighten the wheel bolts opposite each other using the wheel wrench (âpull- ing crosswaysâ) » page 136.
âº
Replace the wheel trim » page 135 and caps » page 135 .
When fitting unidirectional tyres, ensure that the direction of rotation is cor-
rect » page 129 .
All bolts must be clean and must turn easily. If screws are corroded and diffi-
cult to move, these must be replaced.
WARNINGâ Undo the wheel bolts just a little (about one turn), provided the vehicle
has not yet been jacked up. Otherwise the wheel could come loose and fall
off â risk of injury.â
Under no circumstances must the bolts be greased or oiled - cause an ac-
cident.
Subsequent steps
After changing the wheel, the following work must be carried out.
âº
Stow the replaced wheel in the well under the floor covering of the luggage
compartment and secure it with a nut.
âº
Stow the tool kit in the space provided and secure using the band.
âº
Check tyre pressure on the mounted wheel and adjust if necessary and, with
vehicles with tyre pressure monitoring, save the tyre pressure values in the
system » page 109 .
âº
Have the tightening torque of the wheel bolts checked as soon as possible.
The prescribed tightening torque is 110 Nm.
Replace the damaged wheel or consult a specialist garage about repair op-
tions. ï£
134Do-it-yourself
Page 141 of 172
âºFor vehicles with
automated manual transmission leave the selector lever in
position N.âº
Check that the screw for the tire pressure reduction
6
is closed.
âº
Start the engine.
âº
Plug the connector
4
into 12 volt socket » page 63, 12-volt socket .
âº
Switch on the air compressor with the ON and OFF switch
9
.
âº
Once tyre inflation pressure of 2.0-2.5 bar has been reached, turn off the air
compressor. Maximum run time of 6 minutes » .
âº
If you cannot reach an air pressure of 2.0 - 2.5 bar, unscrew the tyre inflation
hose
8
from the tyre valve.
âº
Drive the vehicle 10 metres forwards or backwards to allow the sealing agent
to âdistributeâ in the tyre.
âº
Firmly screw the tyre inflation hose
8
back onto the tyre valve and repeat
the inflation process.
âº
Stick the sticker
1
» Fig. 154 on page 138 on the dash panel in the driver's
field of view.
At a tyre inflation pressure of 2.0 â 2.5 bar, the journey can be continued at a maximum speed of 80 km/h or 50 mph.
WARNINGâ If the tire does not inflate at least. 2.0 bar, the damage is too great. The
sealing agent cannot be used to seal the tyre. ï² Stop driving! Seek help
from a specialist garage.â
The tyre inflation hose and air compressor may get hot as the tyre is be-
ing inflated â risk of burning.
CAUTION
Switch off the air compressor if it has been running for as much as 6 minutes â
risk of damage to the compressor! Allow the air compressor to cool a few mi-
nutes before switching it on again.
Information on driving with repaired tyres
Read and observe
on page 137 first.
The inflation pressure of the repaired tyre must be checked after driving for 10minutes.
If the tyre pressure is 1.3 bar or less
âº
The tyre cannot be properly sealed with the breakdown kit. ï²
Do not contin-
ue to drive! Seek help from a specialist garage.
ï¤If the tyre pressure is 1.3 bar or moreâºSet the tyre pressure back to the correct value » page 129.âº
Continue driving carefully to the nearest specialist garage at a maximum
speed of 80 km/h (50 mph).
WARNINGA tyre filled with sealant has the same driving characteristics as a standard
tyre. The following guidelines must therefore be observed.â
Do not drive faster than 80 km/h (50 mph).
â
Avoid accelerating at full throttle, sharp braking and fast cornering.
Jump-starting
ï¤ Introduction
This chapter contains information on the following subjects:
Jump-starting using the battery from another vehicle
140WARNINGâ The following instructions must be followed at all times when working on
the engine compartment » page 120.â
When handling the vehicle battery, the following warnings must be ob-
served » page 126 .
â
A discharged vehicle battery may already freeze at temperatures just be-
low 0 °C. If the battery is frozen, do not carry out a jump start with the bat-
tery of another vehicle â risk of explosion and injury!
â
Never jump-start vehicle batteries with an electrolyte level that is too low
â risk of explosion and caustic burns.
139Emergency equipment and self-help