display SKODA CITIGO 2017 User Guide
[x] Cancel search | Manufacturer: SKODA, Model Year: 2017, Model line: CITIGO, Model: SKODA CITIGO 2017Pages: 172, PDF Size: 24.54 MB
Page 40 of 172
›Release the button and keep it pressed down until the hour display starts
flashing.›
Release the button and set the hour by pressing repeatedly.
›
Press and hold the button until the minutes display flashes.
›
Release the button and set the minutes by pressing repeatedly.
›
Keep the button pressed down until the minute indicator stops flashing on
the display.
Trip counter
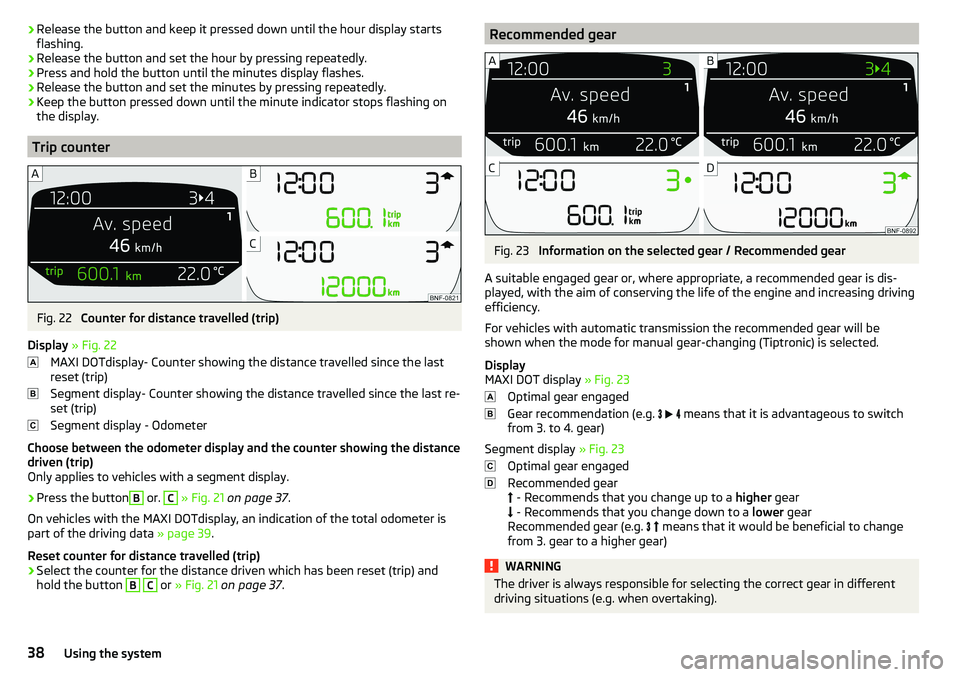
Fig. 22
Counter for distance travelled (trip)
Display » Fig. 22
MAXI DOTdisplay- Counter showing the distance travelled since the last
reset (trip)
Segment display- Counter showing the distance travelled since the last re-
set (trip)
Segment display - Odometer
Choose between the odometer display and the counter showing the distance
driven (trip)
Only applies to vehicles with a segment display.
›
Press the button
B
or.
C
» Fig. 21 on page 37 .
On vehicles with the MAXI DOTdisplay, an indication of the total odometer is
part of the driving data » page 39.
Reset counter for distance travelled (trip)
›
Select the counter for the distance driven which has been reset (trip) and
hold the button
B
C
or » Fig. 21 on page 37 .
Recommended gearFig. 23
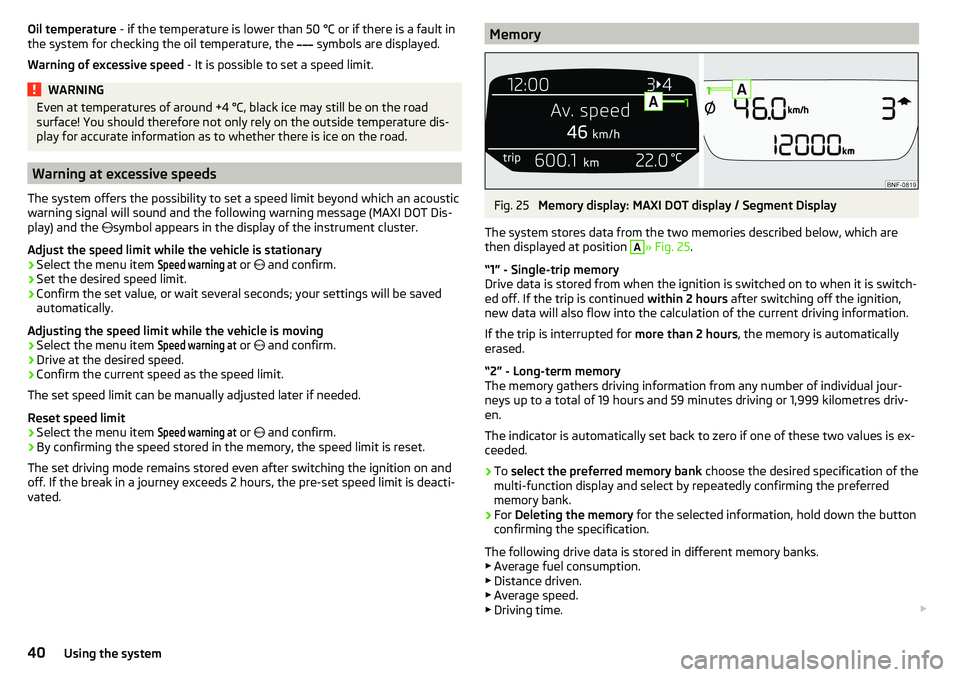
Information on the selected gear / Recommended gear
A suitable engaged gear or, where appropriate, a recommended gear is dis- played, with the aim of conserving the life of the engine and increasing driving
efficiency.
For vehicles with automatic transmission the recommended gear will be
shown when the mode for manual gear-changing (Tiptronic) is selected.
Display
MAXI DOT display » Fig. 23
Optimal gear engaged
Gear recommendation (e.g.
means that it is advantageous to switch
from 3. to 4. gear)
Segment display » Fig. 23
Optimal gear engaged
Recommended gear
- Recommends that you change up to a higher gear
- Recommends that you change down to a lower gear
Recommended gear (e.g.
means that it would be beneficial to change
from 3. gear to a higher gear)
WARNINGThe driver is always responsible for selecting the correct gear in different
driving situations (e.g. when overtaking).38Using the system
Page 41 of 172

Operating the information systemFig. 24
Buttons on the control lever
Operating the multifunction displayPress (up or down) - Select data / Setting values
Press Show / confirm entry
Operating the MAXI DOT display Press (up or down) - move to the selected menu
Hold (up or down) - display main menu
Press - confirm selected menu item
Driving data (multifunction display)
Introduction
This chapter contains information on the following subjects:
Information overview
39
Warning at excessive speeds
40
Memory
40
The driving data is displayed in the multifunction display when is ignition is
switched on.
If vehicles with MAXI DOTdisplay do not show the driving data after switching
on the ignition, select the menu item
MFD
in the main menu and confirm
» page 41 , MAXI DOT display .
On vehicles with a MAXI DOT display, there is an option to fade out the units
and some of the information » page 41, Menu item
Settings
.
ABABInformation overview
Overview of driving data (depending on the vehicle equipment).
Clock - current time is displayed.
Outside temperature - If the outside temperature drops below +4 °C, the tem-
perature indicator appears and a snowflake symbol
(display for low temper-
ature) flashes for a few seconds, then remains displayed together with the
outside temperature.
Driving time - Driving time since last clearing the memory.
Current fuel consumption - When the vehicle is stationary or moving slowly,
the fuel consumption is displayed in l/h (in models in some countries the fol-
lowing appears --,- km/l). With G-TEC vehicles the current consumption of the
fuel currently being used is displayed ( with regards to a stationary or slow
moving vehicle, the natural gas consumption is displayed in kg/h).
Average fuel consumption - Is calculated continuously since the last clearing
of the memory. After erasing the memory, no data will appear for the first 300
m driven. With G-TEC vehicles, the average consumption of fuel currently being
used is displayed.
Natural gas quality The details of the quality of natural gas are displayed as a
percentage of between 70% to 100%. The higher the value of natural gas, the
lower is the consumption.
Range - Drive distance in km which can be covered with the existing tank ca-
pacity and with the same driving style. If you drive more efficiently this value
can increase. With G-TEC vehicles the following details are displayed - Range
with natural gas / petrol.
Distance driven - Distance driven since the memory was last cleared.
Total distance travelled - Odometer
Average speed - Value constantly recalculated, for distance since last clearing
the memory. After erasing the memory, no data will appear for the first 300 m
driven.
Current Speed - Digital speedometer.
Coolant temperature - If the coolant temperature is in the range 70-120 °C,
the engine operating temperature has been reached. If the temperature is be-
low 70 ° C, high engine speeds and straining the engine should be avoided. If
the temperature is over 120 ° C, the warning light lights up the instrument
cluster
» page 33 . 39Information system
Page 42 of 172
Oil temperature - if the temperature is lower than 50 °C or if there is a fault in
the system for checking the oil temperature, the symbols are displayed.
Warning of excessive speed - It is possible to set a speed limit.WARNINGEven at temperatures of around +4 °C, black ice may still be on the road
surface! You should therefore not only rely on the outside temperature dis- play for accurate information as to whether there is ice on the road.
Warning at excessive speeds
The system offers the possibility to set a speed limit beyond which an acoustic
warning signal will sound and the following warning message (MAXI DOT Dis-
play) and the symbol appears in the display of the instrument cluster.
Adjust the speed limit while the vehicle is stationary
›
Select the menu item
Speed warning at
or and confirm.
›
Set the desired speed limit.
›
Confirm the set value, or wait several seconds; your settings will be saved
automatically.
Adjusting the speed limit while the vehicle is moving
›
Select the menu item
Speed warning at
or and confirm.
›
Drive at the desired speed.
›
Confirm the current speed as the speed limit.
The set speed limit can be manually adjusted later if needed.
Reset speed limit
›
Select the menu item
Speed warning at
or and confirm.
›
By confirming the speed stored in the memory, the speed limit is reset.
The set driving mode remains stored even after switching the ignition on and
off. If the break in a journey exceeds 2 hours, the pre-set speed limit is deacti-
vated.
MemoryFig. 25
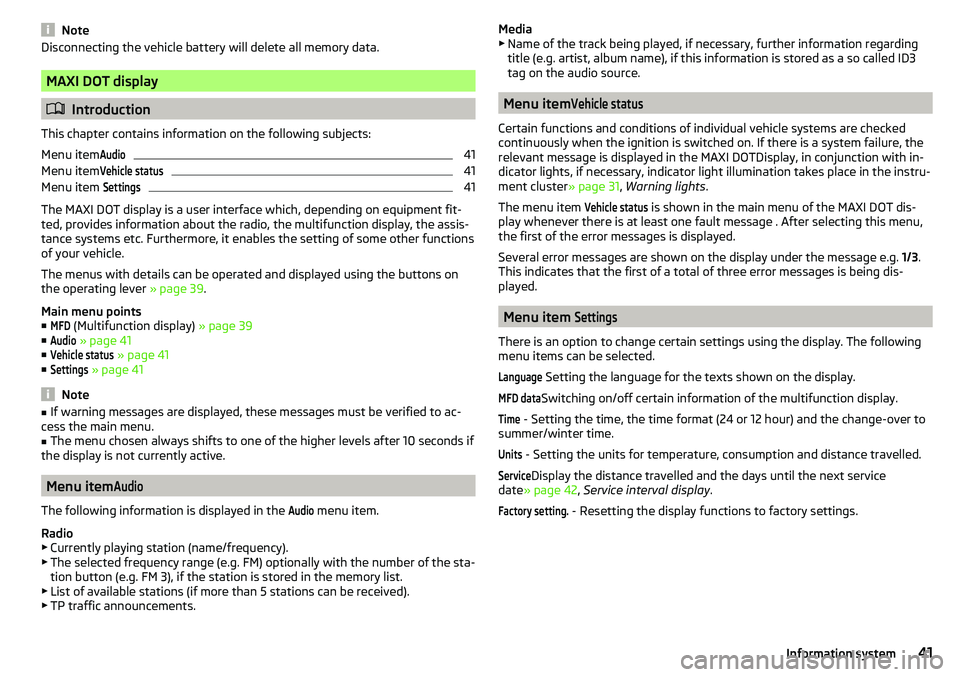
Memory display: MAXI DOT display / Segment Display
The system stores data from the two memories described below, which are
then displayed at position
A
» Fig. 25 .
“1” - Single-trip memory
Drive data is stored from when the ignition is switched on to when it is switch-
ed off. If the trip is continued within 2 hours after switching off the ignition,
new data will also flow into the calculation of the current driving information.
If the trip is interrupted for more than 2 hours, the memory is automatically
erased.
“2” - Long-term memory
The memory gathers driving information from any number of individual jour-
neys up to a total of 19 hours and 59 minutes driving or 1,999 kilometres driv-
en.
The indicator is automatically set back to zero if one of these two values is ex-
ceeded.
›
To select the preferred memory bank choose the desired specification of the
multi-function display and select by repeatedly confirming the preferred
memory bank.
›
For Deleting the memory for the selected information, hold down the button
confirming the specification.
The following drive data is stored in different memory banks.
▶ Average fuel consumption.
▶ Distance driven.
▶ Average speed.
▶ Driving time.
40Using the system
Page 43 of 172
NoteDisconnecting the vehicle battery will delete all memory data.
MAXI DOT display
Introduction
This chapter contains information on the following subjects:
Menu item
Audio41
Menu item
Vehicle status41
Menu item
Settings41
The MAXI DOT display is a user interface which, depending on equipment fit-
ted, provides information about the radio, the multifunction display, the assis-
tance systems etc. Furthermore, it enables the setting of some other functions
of your vehicle.
The menus with details can be operated and displayed using the buttons on
the operating lever » page 39.
Main menu points ■
MFD
(Multifunction display) » page 39
■
Audio
» page 41
■
Vehicle status
» page 41
■
Settings
» page 41
Note
■
If warning messages are displayed, these messages must be verified to ac-
cess the main menu.■
The menu chosen always shifts to one of the higher levels after 10 seconds if
the display is not currently active.
Menu item
Audio
The following information is displayed in the
Audio
menu item.
Radio
▶ Currently playing station (name/frequency).
▶ The selected frequency range (e.g. FM) optionally with the number of the sta-
tion button (e.g. FM 3), if the station is stored in the memory list.
▶ List of available stations (if more than 5 stations can be received).
▶ TP traffic announcements.
Media
▶ Name of the track being played, if necessary, further information regarding
title (e.g. artist, album name), if this information is stored as a so called ID3
tag on the audio source.
Menu item
Vehicle status
Certain functions and conditions of individual vehicle systems are checked
continuously when the ignition is switched on. If there is a system failure, the
relevant message is displayed in the MAXI DOTDisplay, in conjunction with in-
dicator lights, if necessary, indicator light illumination takes place in the instru-
ment cluster » page 31, Warning lights .
The menu item
Vehicle status
is shown in the main menu of the MAXI DOT dis-
play whenever there is at least one fault message . After selecting this menu,
the first of the error messages is displayed.
Several error messages are shown on the display under the message e.g. 1/3.
This indicates that the first of a total of three error messages is being dis-
played.
Menu item
Settings
There is an option to change certain settings using the display. The following
menu items can be selected.
Language
Setting the language for the texts shown on the display.
MFD data
Switching on/off certain information of the multifunction display.
Time
- Setting the time, the time format (24 or 12 hour) and the change-over to
summer/winter time.
Units
- Setting the units for temperature, consumption and distance travelled.
Service
Display the distance travelled and the days until the next service
date » page 42 , Service interval display .
Factory setting.
- Resetting the display functions to factory settings.
41Information system
Page 44 of 172
Service interval display
Introduction
This chapter contains information on the following subjects:
Prompt in the MAXI DOT display
42
Prompt in the segment display
42
The service interval display shows the kilometres or days until the next service
event.
Information regarding the service intervals » page 112.
Prompt in the MAXI DOT display
Before the next service date has been reached , the symbol as well as a mes-
sage about the mileage or days until the next service event appears in the dis-
play after switching on the ignition.
At the time of the service , a message appears in the display after switching on
the ignition.
Displaying the distance and days until the next service interval
Messages regarding the kilometres and days until the next service appoint-
ment can be displayed any time when the ignition is on, in the
service
menu item
» page 41 , Menu item
Settings
» page 41 .
Prompt in the segment display
Before the next service interval is reached , a key symbol
and the remain-
ing kilometres are indicated on the display for several seconds after switching
on the ignition.
At the time of the service , an acoustic signal will sound and the lettering
appears for a few seconds after switching on the ignition.
Unlocking and opening
Unlocking and locking
Introduction
This chapter contains information on the following subjects:
Unlock / lock using key and lock
43
Unlocking/locking with the remote control key
43
Vehicle unlocking / locking with the door opening lever
44
Vehicle locking / unlocking with the central locking button
44
SafeLock
44
Opening/closing a door
45
Child safety lock
45
Malfunctions
45
The vehicle may be equipped with a central locking system which makes it
possible to unlock/lock all doors and the boot lid simultaneously.
The turn signal lights flash twice as confirmation that the vehicle has been un-
locked .
If you unlock the vehicle and do not open a door or the boot lid within the next
30 seconds, the vehicle will lock again automatically.
The turn signal lights flash once as confirmation that the vehicle has been
locked .
If the driver's door has been opened, the vehicle cannot be locked.
If the doors or the luggage compartment lid remain open after the vehicle has
been locked, the turn signal lights do not flash until they have been closed.
Automatic locking / unlocking of a vehicle with central locking system
This function enables the locking of all doors and the boot lid from a speed of
15 km / h. Opening the doors and the boot lid from the outside is not possible.
Renewed automatic unlocking of all doors as well as the luggage compartment
door when removing the ignition key or by opening any of the doors.
42Using the system
Page 46 of 172
Vehicle unlocking / locking with the door opening leverFig. 28
Door opening lever
Read and observe
and on page 43 first.
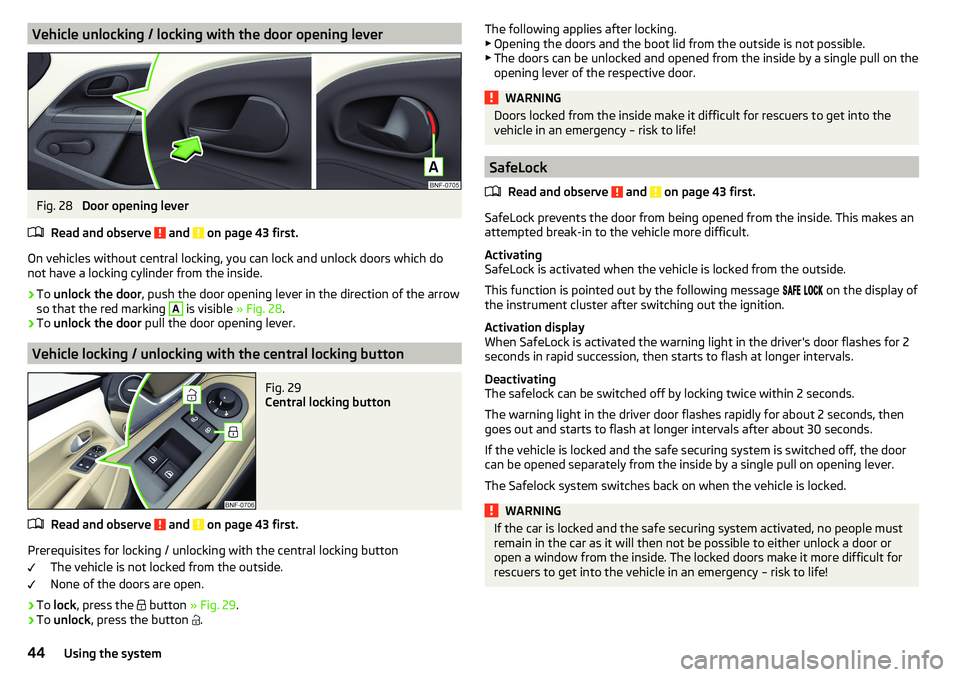
On vehicles without central locking, you can lock and unlock doors which do
not have a locking cylinder from the inside.
›
To unlock the door , push the door opening lever in the direction of the arrow
so that the red marking
A
is visible » Fig. 28.
›
To unlock the door pull the door opening lever.
Vehicle locking / unlocking with the central locking button
Fig. 29
Central locking button
Read and observe and on page 43 first.
Prerequisites for locking / unlocking with the central locking button
The vehicle is not locked from the outside.
None of the doors are open.
›
To lock , press the
button » Fig. 29 .
›
To unlock , press the button
.
The following applies after locking.
▶ Opening the doors and the boot lid from the outside is not possible.
▶ The doors can be unlocked and opened from the inside by a single pull on the
opening lever of the respective door.WARNINGDoors locked from the inside make it difficult for rescuers to get into the
vehicle in an emergency – risk to life!
SafeLock
Read and observe
and on page 43 first.
SafeLock prevents the door from being opened from the inside. This makes an
attempted break-in to the vehicle more difficult.
Activating
SafeLock is activated when the vehicle is locked from the outside.
This function is pointed out by the following message
on the display of
the instrument cluster after switching out the ignition.
Activation display
When SafeLock is activated the warning light in the driver's door flashes for 2
seconds in rapid succession, then starts to flash at longer intervals.
Deactivating
The safelock can be switched off by locking twice within 2 seconds.
The warning light in the driver door flashes rapidly for about 2 seconds, then
goes out and starts to flash at longer intervals after about 30 seconds.
If the vehicle is locked and the safe securing system is switched off, the door
can be opened separately from the inside by a single pull on opening lever.
The Safelock system switches back on when the vehicle is locked.
WARNINGIf the car is locked and the safe securing system activated, no people must
remain in the car as it will then not be possible to either unlock a door or
open a window from the inside. The locked doors make it more difficult for
rescuers to get into the vehicle in an emergency – risk to life!44Using the system
Page 62 of 172
WARNING (Continued)■For safety reasons, lockable storage compartments should be closed
while driving - there is a risk of injury from the opened lid or through the
loose objects in the compartment.■
Make sure no objects protrude from the storage compartments - danger
of injury!
■
Do not exceed the permissible loads for the storage compartments and
pockets - risk of injury and risk of damage to the compartments and pock-
ets!
■
Ash, cigarettes, cigars and the like should only be stored in the ashtray -
danger of fire/burns!
■
The storage compartments, multimedia holder and waste container are
not a substitute for the ashtray and must not be used for such purposes –
risk of fire!
CAUTION
Do not place any large or sharp objects in the storage compartments and pock-
ets - there is a risk of damage to the compartments and pockets.
Ticket holder
Fig. 56
Ticket holder
Read and observe and on page 59 first.
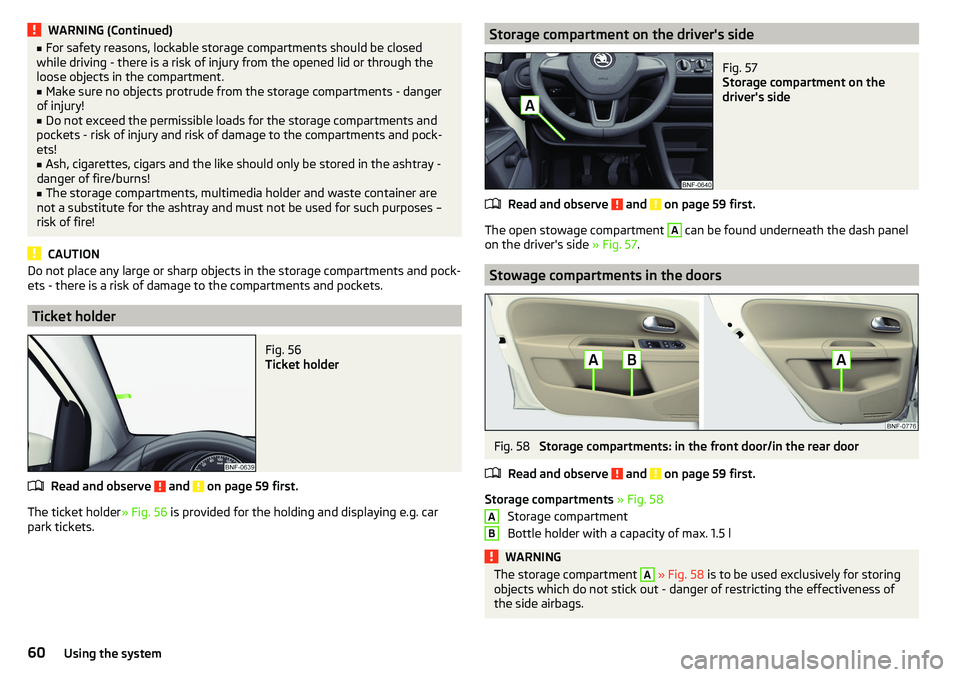
The ticket holder » Fig. 56 is provided for the holding and displaying e.g. car
park tickets.
Storage compartment on the driver's sideFig. 57
Storage compartment on the
driver's side
Read and observe and on page 59 first.
The open stowage compartment
A
can be found underneath the dash panel
on the driver's side » Fig. 57.
Stowage compartments in the doors
Fig. 58
Storage compartments: in the front door/in the rear door
Read and observe
and on page 59 first.
Storage compartments » Fig. 58
Storage compartment
Bottle holder with a capacity of max. 1.5 l
WARNINGThe storage compartment A » Fig. 58 is to be used exclusively for storing
objects which do not stick out - danger of restricting the effectiveness of
the side airbags.AB60Using the system
Page 75 of 172
Climatronic (automatic air conditioning)Fig. 88
Controls the Climatronic
Read and observe
on page 72 first.
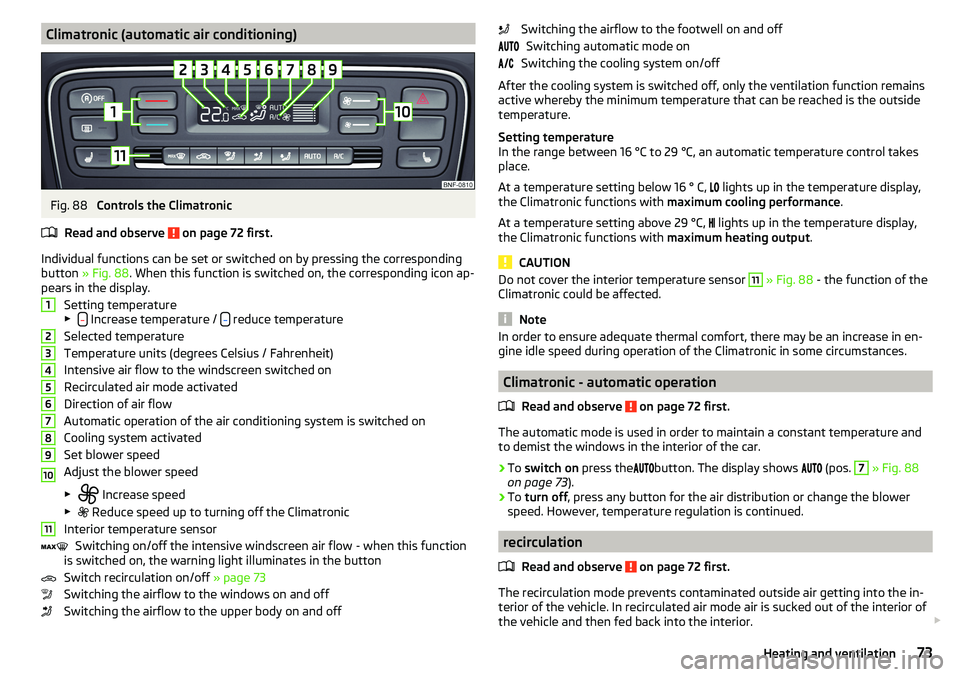
Individual functions can be set or switched on by pressing the corresponding
button » Fig. 88 . When this function is switched on, the corresponding icon ap-
pears in the display.
Setting temperature
▶
Increase temperature / reduce temperature
Selected temperature
Temperature units (degrees Celsius / Fahrenheit)
Intensive air flow to the windscreen switched on
Recirculated air mode activated
Direction of air flow
Automatic operation of the air conditioning system is switched on
Cooling system activated
Set blower speed
Adjust the blower speed
▶ Increase speed
▶ Reduce speed up to turning off the Climatronic
Interior temperature sensor Switching on/off the intensive windscreen air flow - when this function
is switched on, the warning light illuminates in the button
Switch recirculation on/off » page 73
Switching the airflow to the windows on and off
Switching the airflow to the upper body on and off
1234567891011Switching the airflow to the footwell on and off Switching automatic mode on
Switching the cooling system on/off
After the cooling system is switched off, only the ventilation function remains
active whereby the minimum temperature that can be reached is the outside
temperature.
Setting temperature
In the range between 16 °C to 29 °C, an automatic temperature control takes
place.
At a temperature setting below 16 ° C,
lights up in the temperature display,
the Climatronic functions with maximum cooling performance .
At a temperature setting above 29 °C, lights up in the temperature display,
the Climatronic functions with maximum heating output.
CAUTION
Do not cover the interior temperature sensor 11 » Fig. 88 - the function of the
Climatronic could be affected.
Note
In order to ensure adequate thermal comfort, there may be an increase in en-
gine idle speed during operation of the Climatronic in some circumstances.
Climatronic - automatic operation
Read and observe
on page 72 first.
The automatic mode is used in order to maintain a constant temperature and
to demist the windows in the interior of the car.
›
To switch on press the
button. The display shows
(pos.
7
» Fig. 88
on page 73 ).
›
To turn off , press any button for the air distribution or change the blower
speed. However, temperature regulation is continued.
recirculation
Read and observe
on page 72 first.
The recirculation mode prevents contaminated outside air getting into the in-
terior of the vehicle. In recirculated air mode air is sucked out of the interior of
the vehicle and then fed back into the interior.
73Heating and ventilation
Page 78 of 172
Unit overview and operation
Device Description - Swing
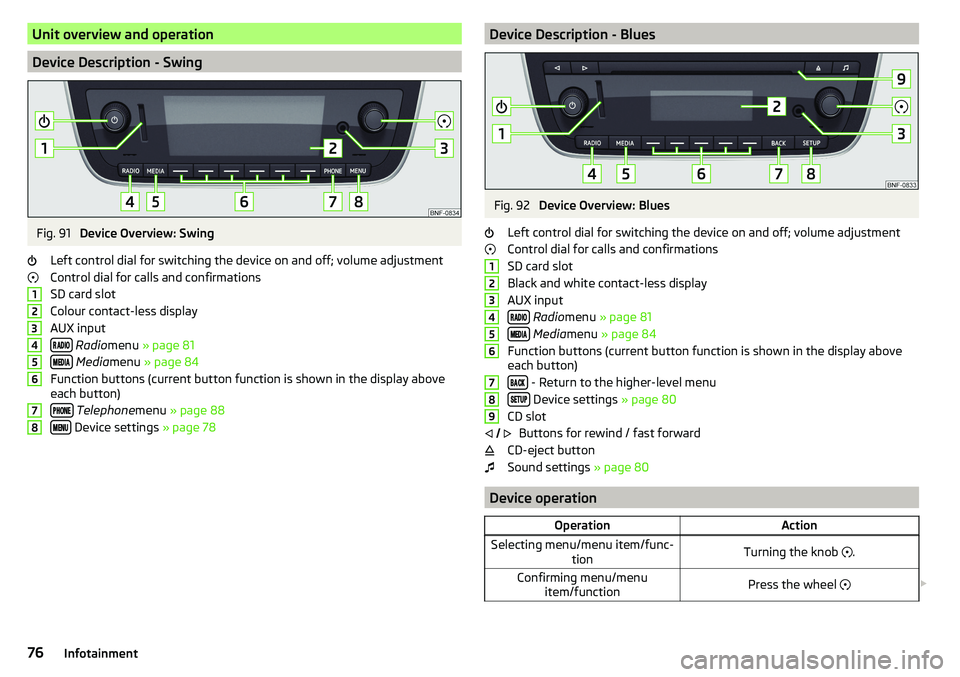
Fig. 91
Device Overview: Swing
Left control dial for switching the device on and off; volume adjustment
Control dial for calls and confirmations
SD card slot
Colour contact-less display
AUX input
Radio menu » page 81
Media menu » page 84
Function buttons (current button function is shown in the display above
each button)
Telephone menu » page 88
Device settings » page 78
12345678Device Description - BluesFig. 92
Device Overview: Blues
Left control dial for switching the device on and off; volume adjustment
Control dial for calls and confirmations
SD card slot
Black and white contact-less display
AUX input
Radio menu » page 81
Media menu » page 84
Function buttons (current button function is shown in the display above
each button)
- Return to the higher-level menu
Device settings » page 80
CD slot Buttons for rewind / fast forward
CD-eject button
Sound settings » page 80
Device operation
OperationActionSelecting menu/menu item/func-
tionTurning the knob .Confirming menu/menu
item/functionPress the wheel 123456789
76Infotainment
Page 79 of 172
OperationAction
Returning to higher-level menu
Applies to swing: By pressing the function
button Applies to
blues: By pressing
Select the menu item / function
value
- Selected menu item / function value - Deselected menu item / function val-
ue - Selected menu item / function valueSet valueTurning the knob .Pressing the function key or
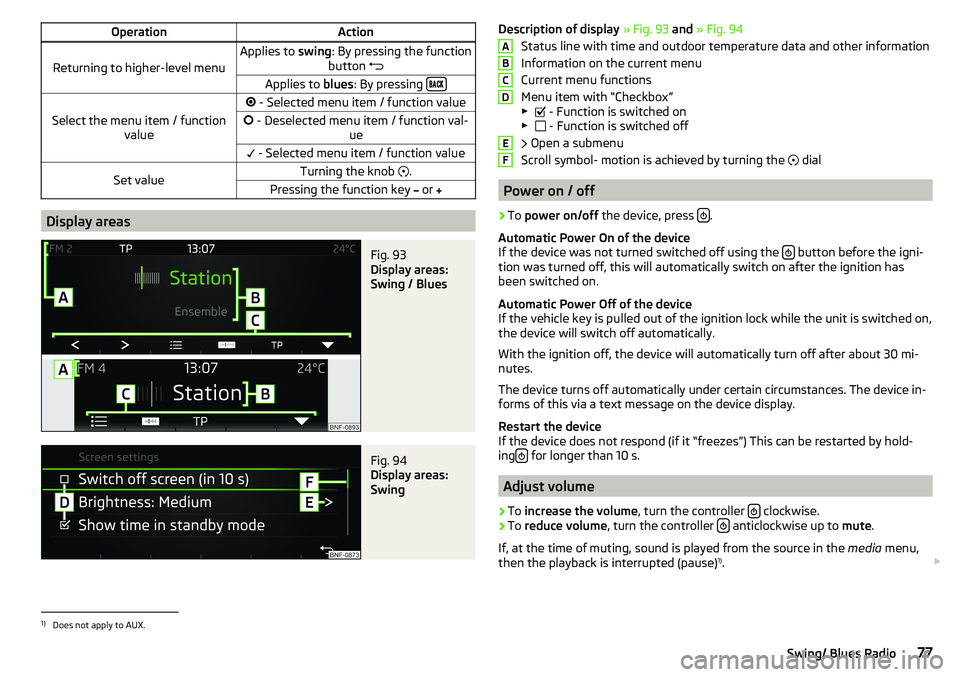
Display areas
Fig. 93
Display areas:
Swing / Blues
Fig. 94
Display areas:
Swing
Description of display » Fig. 93 and » Fig. 94
Status line with time and outdoor temperature data and other information
Information on the current menu
Current menu functions
Menu item with “Checkbox”
▶ - Function is switched on
▶ - Function is switched off
Open a submenu
Scroll symbol- motion is achieved by turning the
dial
Power on / off
›
To power on/off the device, press .
Automatic Power On of the device
If the device was not turned switched off using the
button before the igni-
tion was turned off, this will automatically switch on after the ignition has
been switched on.
Automatic Power Off of the device
If the vehicle key is pulled out of the ignition lock while the unit is switched on,
the device will switch off automatically.
With the ignition off, the device will automatically turn off after about 30 mi-
nutes.
The device turns off automatically under certain circumstances. The device in-
forms of this via a text message on the device display.
Restart the device
If the device does not respond (if it “freezes”) This can be restarted by hold-
ing
for longer than 10 s.
Adjust volume
›
To
increase the volume , turn the controller clockwise.
›
To
reduce volume , turn the controller anticlockwise up to
mute.
If, at the time of muting, sound is played from the source in the media menu,
then the playback is interrupted (pause) 1)
.
ABCDEF1)
Does not apply to AUX.
77Swing/ Blues Radio