Oil SKODA FABIA 2000 1.G / 6Y Owner's Manual
[x] Cancel search | Manufacturer: SKODA, Model Year: 2000, Model line: FABIA, Model: SKODA FABIA 2000 1.G / 6YPages: 86, PDF Size: 3.58 MB
Page 39 of 86

Downloaded from www.Manualslib.com manuals search engine FABIA 2000➤Inspection and Maintenance
EnginesEdition 09.04
S00.5301.14.2002-3 page 19 02
–Unlock hooks -arrows-.
–Loosen the fuel filter and remove.
Installing
–Install new fuel filter.
–Lock hooks -arrows-.
–Fit the new O-ring for the regulating valve.
–Install regulating valve -4- with the connected fuel
hoses.
–Attach retaining clips -3-.
–Install the fuel hoses -1- and -2- and secure with hose
clamps.
The direction of flow is indicated with arrows (do not
switch connections).
–Inspect the fuel system for tightness (visual inspec-
tion).
Draining the fuel filter (diesel engine)
♦Make sure no diesel fuel comes into contact with the
coolant hoses. If necessary clean the hoses immedi-
ately!
♦Collect fuel in a suitable vessel!
♦It is absolutely necessary to observe the oil disposal
instructions!
–Remove retaining clip -2- and remove regulating valve
-1- with the connected fuel hoses.
–Unlock hooks -arrows-.
–Loosen the fuel filter and remove.
Note
Note
S02-0324
1
2
1
2
3
4
S02-0323
Page 41 of 86

Downloaded from www.Manualslib.com manuals search engine FABIA 2000➤Inspection and Maintenance
GearboxEdition 07.03
S00.5301.12.2002-4 page 1 02
02-4 Gearbox
Gearbox/Final drive: Check the oil level
and top it if necessary
5 speed gearbox 002
Gearbox oil specification: G50 SAE 75W90 (synthetic oil)
–Unscrew plug for inspecting gear oil -arrow-.
The oil is at the correct level if the gear is filled up to the
lower edge of the oil filler hole.
–Tighten plug -arrow-, 25 Nm.
When topping up, pay attention to the following
points:
–Unscrew plug for inspecting gear oil -arrow-.
–Pour in gear oil up to lower edge of the filler hole.
–Screw in plug -arrow-.
–Start engine, engage a gear and allow gearbox to ro-
tate for about 2 minutes.
–Switch off engine, unscrew plug -arrow- and top up
gear oil to lower edge of the filler hole.
–Tighten plug -arrow-, 25 Nm.
5 speed gearbox 02R
Gearbox oil specification: G50 SAE 75W90 (synthetic oil)
–Remove noise insulation panel -arrows-.
–Unscrew plug for inspecting gear oil -arrow-.
The oil is at the correct level if the gear is filled up to the
lower edge of the oil filler hole.
–Tighten plug -arrow-, 30 Nm.
When topping up, pay attention to the following
points:
–Unscrew plug for inspecting gear oil -arrow-.
–Pour in gear oil up to lower edge of the filler hole.
–Screw in plug -arrow-.
–Start engine, engage a gear and allow gearbox to ro-
tate for about 2 minutes.
–Switch off engine, unscrew plug -arrow- and top up
gear oil to lower edge of the filler hole.
–Tighten plug -arrow-, 30 Nm.
5 speed gearbox 02T
Special tools, test and measuring equipment and
auxiliary items required
♦Socket wrench insert -T30023 (3357)-
S34-0408
S10-0101
S34-0498
Page 42 of 86
Downloaded from www.Manualslib.com manuals search engine FABIA 2000➤Inspection and Maintenance
GearboxEdition 07.03
S00.5301.12.2002-4 page 2 02
Gearbox oil specification: G50 SAE 75W90 (synthetic
oil).
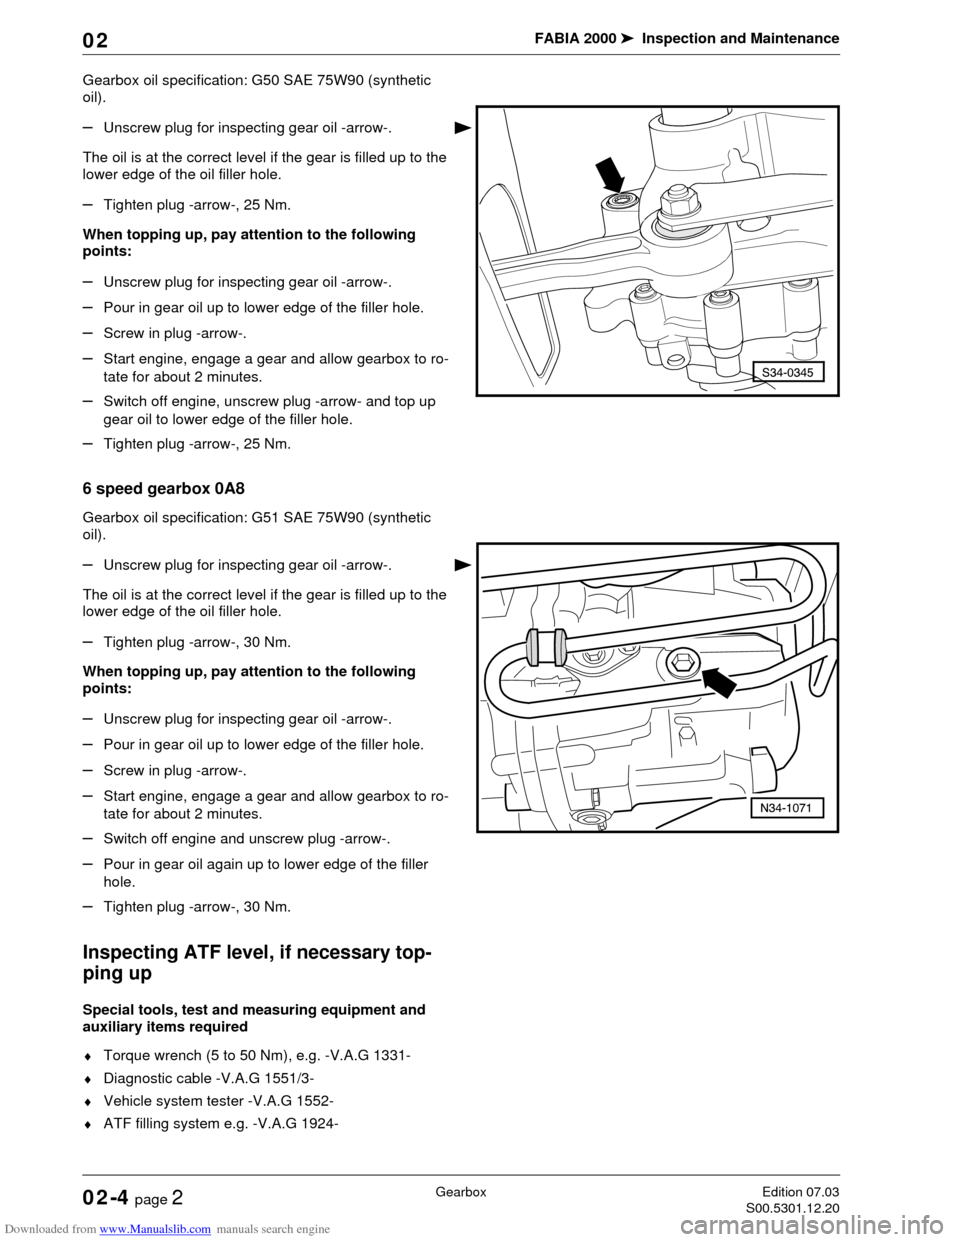
–Unscrew plug for inspecting gear oil -arrow-.
The oil is at the correct level if the gear is filled up to the
lower edge of the oil filler hole.
–Tighten plug -arrow-, 25 Nm.
When topping up, pay attention to the following
points:
–Unscrew plug for inspecting gear oil -arrow-.
–Pour in gear oil up to lower edge of the filler hole.
–Screw in plug -arrow-.
–Start engine, engage a gear and allow gearbox to ro-
tate for about 2 minutes.
–Switch off engine, unscrew plug -arrow- and top up
gear oil to lower edge of the filler hole.
–Tighten plug -arrow-, 25 Nm.
6 speed gearbox 0A8
Gearbox oil specification: G51 SAE 75W90 (synthetic
oil).
–Unscrew plug for inspecting gear oil -arrow-.
The oil is at the correct level if the gear is filled up to the
lower edge of the oil filler hole.
–Tighten plug -arrow-, 30 Nm.
When topping up, pay attention to the following
points:
–Unscrew plug for inspecting gear oil -arrow-.
–Pour in gear oil up to lower edge of the filler hole.
–Screw in plug -arrow-.
–Start engine, engage a gear and allow gearbox to ro-
tate for about 2 minutes.
–Switch off engine and unscrew plug -arrow-.
–Pour in gear oil again up to lower edge of the filler
hole.
–Tighten plug -arrow-, 30 Nm.
Inspecting ATF level, if necessary top-
ping up
Special tools, test and measuring equipment and
auxiliary items required
♦Torque wrench (5 to 50 Nm), e.g. -V.A.G 1331-
♦Diagnostic cable -V.A.G 1551/3-
♦Vehicle system tester -V.A.G 1552-
♦ATF filling system e.g. -V.A.G 1924-
Page 44 of 86
Downloaded from www.Manualslib.com manuals search engine FABIA 2000➤Inspection and Maintenance
GearboxEdition 07.03
S00.5301.12.2002-4 page 4 02
–Bring ATF to test temperature.
Test temperature: 35 C to 45 C
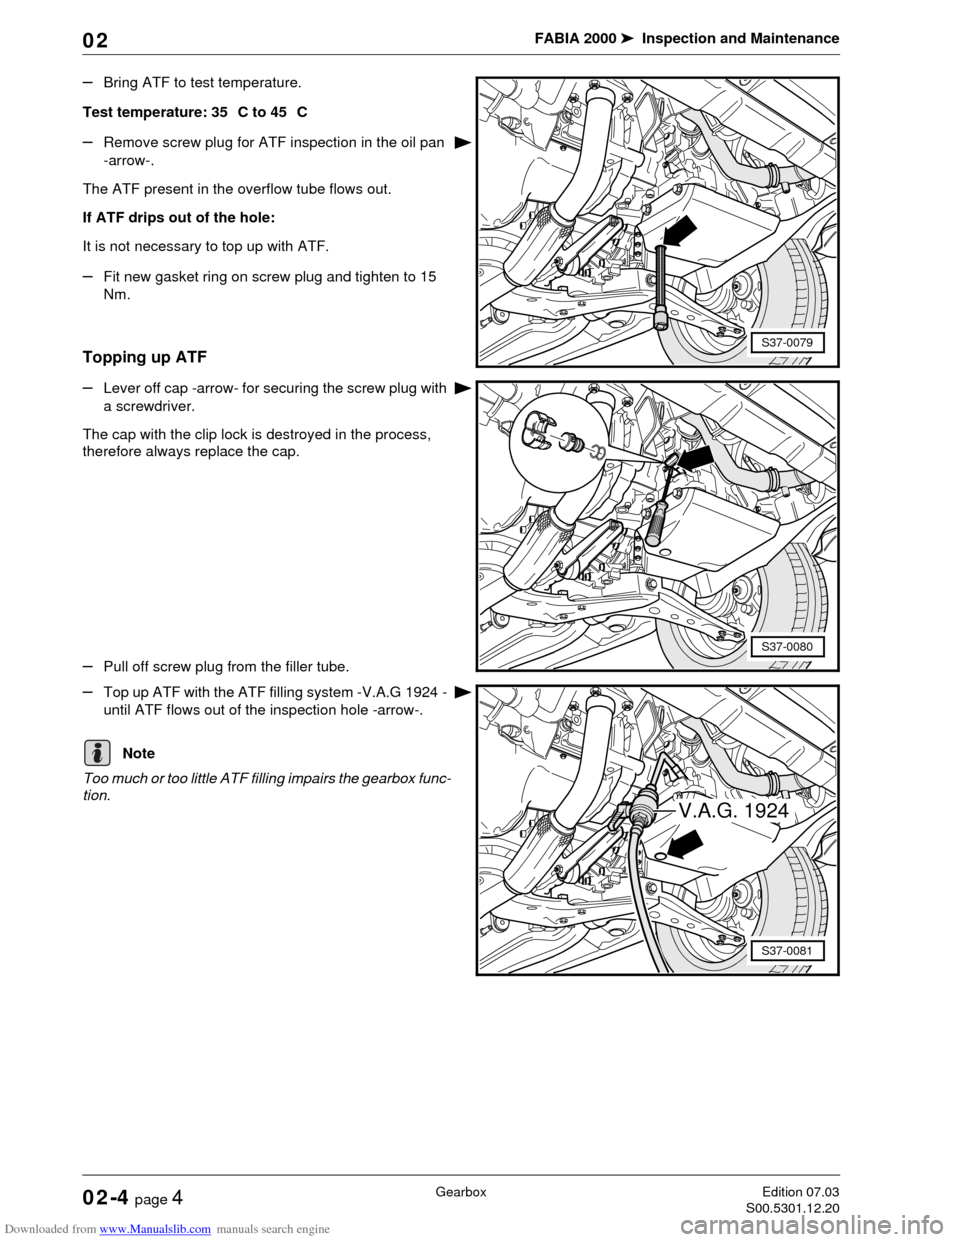
–Remove screw plug for ATF inspection in the oil pan
-arrow-.
The ATF present in the overflow tube flows out.
If ATF drips out of the hole:
It is not necessary to top up with ATF.
–Fit new gasket ring on screw plug and tighten to 15
Nm.
Topping up ATF
–Lever off cap -arrow- for securing the screw plug with
a screwdriver.
The cap with the clip lock is destroyed in the process,
therefore always replace the cap.
–Pull off screw plug from the filler tube.
–Top up ATF with the ATF filling system -V.A.G 1924 -
until ATF flows out of the inspection hole -arrow-.
Too much or too little ATF filling impairs the gearbox func-
tion.
S37-0079
S37-0080
V.A.G. 1924
S37-0081
Note
Page 48 of 86
Downloaded from www.Manualslib.com manuals search engine FABIA 2000➤Inspection and Maintenance
ChassisEdition 02.04
S00.5301.13.2002-5 page 2 02
ways replace the brake linings on both sides (repair
measure).
Avoid soiling from brake fluid or grease flowing out.
Inspecting brake system for leaks and
damage
–Inspect master brake cylinder, brake servo unit (for
ABS: hydraulic unit), brake pressure regulator, brake
calipers for leaks and damage.
–Inspect brake hoses for twisting.
–Ensure that the brake hoses do not touch any parts of
the vehicle when the steering is turned to full left or full
right lock.
–Inspect the brake hoses for porous and brittle points.
Inspect the brake hoses and brake lines for chafing
points.
–Inspect the brake connections and attachments to en-
sure they are correctly fitted, free of leaks and corro-
sion.
Changing brake fluid (every 2 years)
Special tools, test and measuring equipment and
auxiliary items required
♦Extraction device
♦Brake pedal support, e.g. - V.A.G 1869/2-
Use only fresh genuine brake fluid FMVSS 571.116 DOT
4.
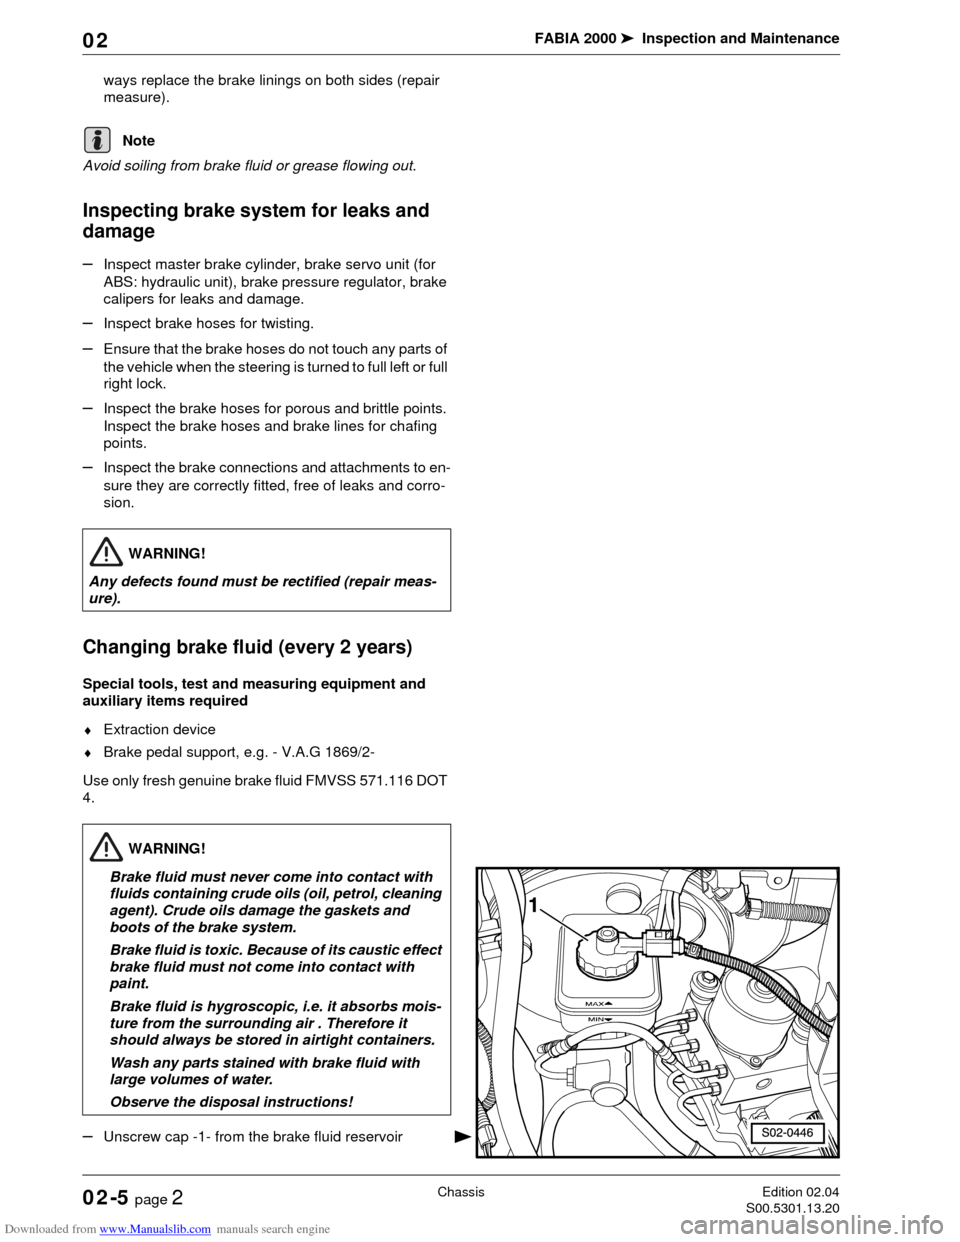
–Unscrew cap -1- from the brake fluid reservoir
Note
WARNING!
Any defects found must be rectified (repair meas-
ure).
WARNING!
Brake fluid must never come into contact with
fluids containing crude oils (oil, petrol, cleaning
agent). Crude oils damage the gaskets and
boots of the brake system.
Brake fluid is toxic. Because of its caustic effect
brake fluid must not come into contact with
paint.
Brake fluid is hygroscopic, i.e. it absorbs mois-
ture from the surrounding air . Therefore it
should always be stored in airtight containers.
Wash any parts stained with brake fluid with
large volumes of water.
Observe the disposal instructions!
Page 58 of 86

Downloaded from www.Manualslib.com manuals search engine FABIA 2000➤Inspection and Maintenance
Electrical SystemEdition 09.04
S00.5301.14.2002-6 page 4 02
Operate the vehicle system tester by referring to the
read-out on the display:
Read out on display:
–Enter 00 for address word „Automatic test sequence“
and confirm with .
The automatic test sequence is carried out with address
word 00, i.e. the fault memory of all self-diagnosable sys-
tems in the vehicle is interrogated.
If a control unit responds with its identification, the display
will show the number of faults stored in the memory or
„No fault detected!“ Eventuell gespeicherte Fehler eines
Systems werden nacheinander angezeigt.
Any faults stored for one of the systems are displayed in
sequence.
If faults are stored, it is necessary to carry out a repair
measure. Displayed faults are to be entered.
–Switch off ignition.
The vehicle system tester -V.A.G 1552 - may have to re-
main connected for the exhaust emission test and for re-
setting the service interval display.
Resetting service interval display (SID)
QG0
If the due date of a service is reached, the service event
appears in the short journey counter below the speedom-
eter as a flashing display, after the ignition is switched on.
The service event also continues flashing for about 60
seconds after the engine is started.
The following displays are possible:
OIL - Oil change service
INSP - Inspection Service
The service event is shown on the indicator when the
service interval has been reached.
The service interval display should be adapted when car-
rying out the Delivery Inspection or during every Inspec-
tion Service.
The following intervals are set when adapting the service
interval display (SID):
Vehicle system test HELP
K cable does not connect to earth
Vehicle system test HELP
K cable does not connect to pos. term.
Vehicle system test HELP
Enter address word XX
Q
Note
Service event Nominal value
(distance)Nominal value
(time)
OIL 15 000 km -
INSP 30 000 km 365 days
Page 59 of 86
Downloaded from www.Manualslib.com manuals search engine FABIA 2000➤Inspection and Maintenance
Electrical SystemEdition 09.04
S00.5301.14.2002-6 page 5 02
Resetting service interval display (SID) with
-V.A.G 1552- (QG0)
–Connect -V.A.G 1552-.
–Switch on ignition.
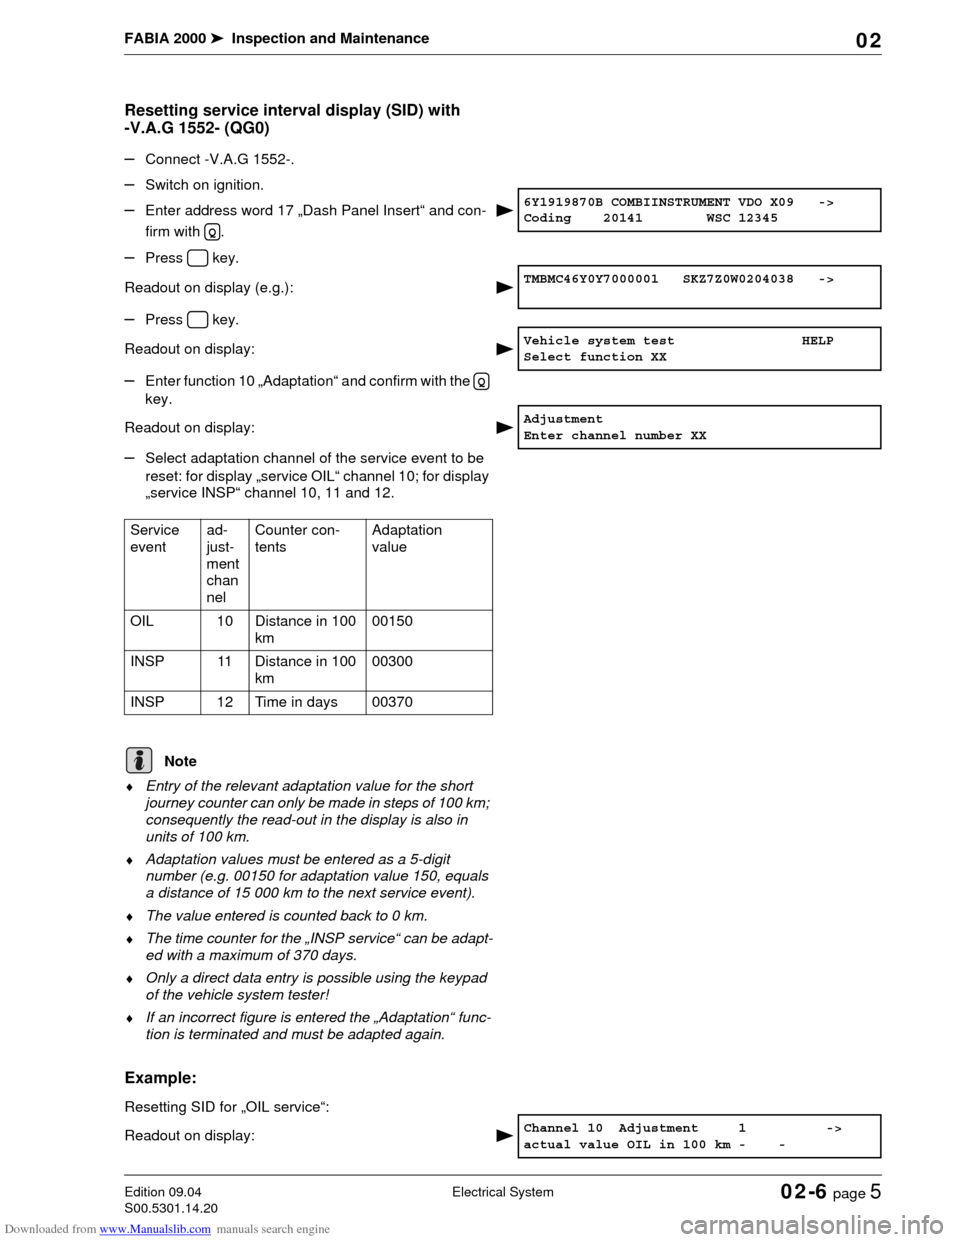
–Enter address word 17 „Dash Panel Insert“ and con-
firm with .
–Press key.
Readout on display (e.g.):
–Press key.
Readout on display:
–Enter function 10 „Adaptation“ and confirm with the
key.
Readout on display:
–Select adaptation channel of the service event to be
reset: for display „service OIL“ channel 10; for display
„service INSP“ channel 10, 11 and 12.
♦Entry of the relevant adaptation value for the short
journey counter can only be made in steps of 100 km;
consequently the read-out in the display is also in
units of 100 km.
♦Adaptation values must be entered as a 5-digit
number (e.g. 00150 for adaptation value 150, equals
a distance of 15 000 km to the next service event).
♦The value entered is counted back to 0 km.
♦The time counter for the „INSP service“ can be adapt-
ed with a maximum of 370 days.
♦Only a direct data entry is possible using the keypad
of the vehicle system tester!
♦If an incorrect figure is entered the „Adaptation“ func-
tion is terminated and must be adapted again.
Example:
Resetting SID for „OIL service“:
Readout on display:
6Y1919870B COMBIINSTRUMENT VDO X09 ->
Coding 20141 WSC 12345
Q
TMBMC46Y0Y7000001 SKZ7Z0W0204038 ->
Vehicle system test HELP
Select function XX
Q
Adjustment
Enter channel number XX
Service
eventad-
just-
ment
chan
nelCounter con-
tentsAdaptation
value
OIL 10 Distance in 100
km00150
INSP 11 Distance in 100
km00300
INSP 12 Time in days 00370
Note
Channel 10 Adjustment 1 ->
actual value OIL in 100 km - -
Page 60 of 86

Downloaded from www.Manualslib.com manuals search engine FABIA 2000➤Inspection and Maintenance
Electrical SystemEdition 09.04
S00.5301.14.2002-6 page 6 02
„in 100 km“ = adaptation value x100
The current read-out of the short journey counter for the
OIL service is displayed (is still 100 km in our example
until the next OIL service).
–Press key.
Readout on display:
The short journey counter must be reset to 150 (equals
15 000 km) for setting the SID for the OIL service.
–Enter adaptation value 00150.
Readout on display:
–Confirm the entry with key .
Read-out on display after entering adaptation value
00150:
–Confirm the entry with key .
Readout on display:
–Confirm the entry with key .
Readout on display:
–Press key.
Readout on display:
–Enter 06 for „End output“.
Readout on display:
–Confirm the entry with key .
–Observe short journey counter.
–Switch off ignition.
After switching off the ignition the short journey counter
display should show the entered service interval for a
short time.
–Switch on ignition.
After switching on the ignition the short journey counter
display does not show a service interval.
The service interval display is now reset.
–Switch off ignition.
–Switch off -V.A.G 1552-.
Resetting service interval display (SID) without
-V.A.G 1552- (QG0)
After completing the service work, the appropriate serv-
ice message „OIL“ or „INSP“ must be reset.
Note
Channel 10 Adaptation 1
Enter adjustment value XXXXX
Channel 10 adjustment 1 Q
Enter adaptation value 00150
Q
Channel 10 adjustment 150 Q
actual value OIL in 100 km - -
Q
Channel 10 adjustment 15 Q
Store changed value?
Q
Channel 10 Adjustment 150 ->
Changed value stored
Vehicle system test HELP
Select function XX
Vehicle system test HELP
06 End output
Q
Page 61 of 86
Downloaded from www.Manualslib.com manuals search engine FABIA 2000➤Inspection and Maintenance
Electrical SystemEdition 09.04
S00.5301.14.2002-6 page 7 02
♦For vehicles with the dash panel insert 6Y0 920 xxx x,
the SID with the set button -1- cannot be reset before
a service is required.
♦Always only reset the desired service interval („OIL
service“ or „INSP service“), otherwise an incorrect
date for another service interval will be set.
–Switch off ignition.
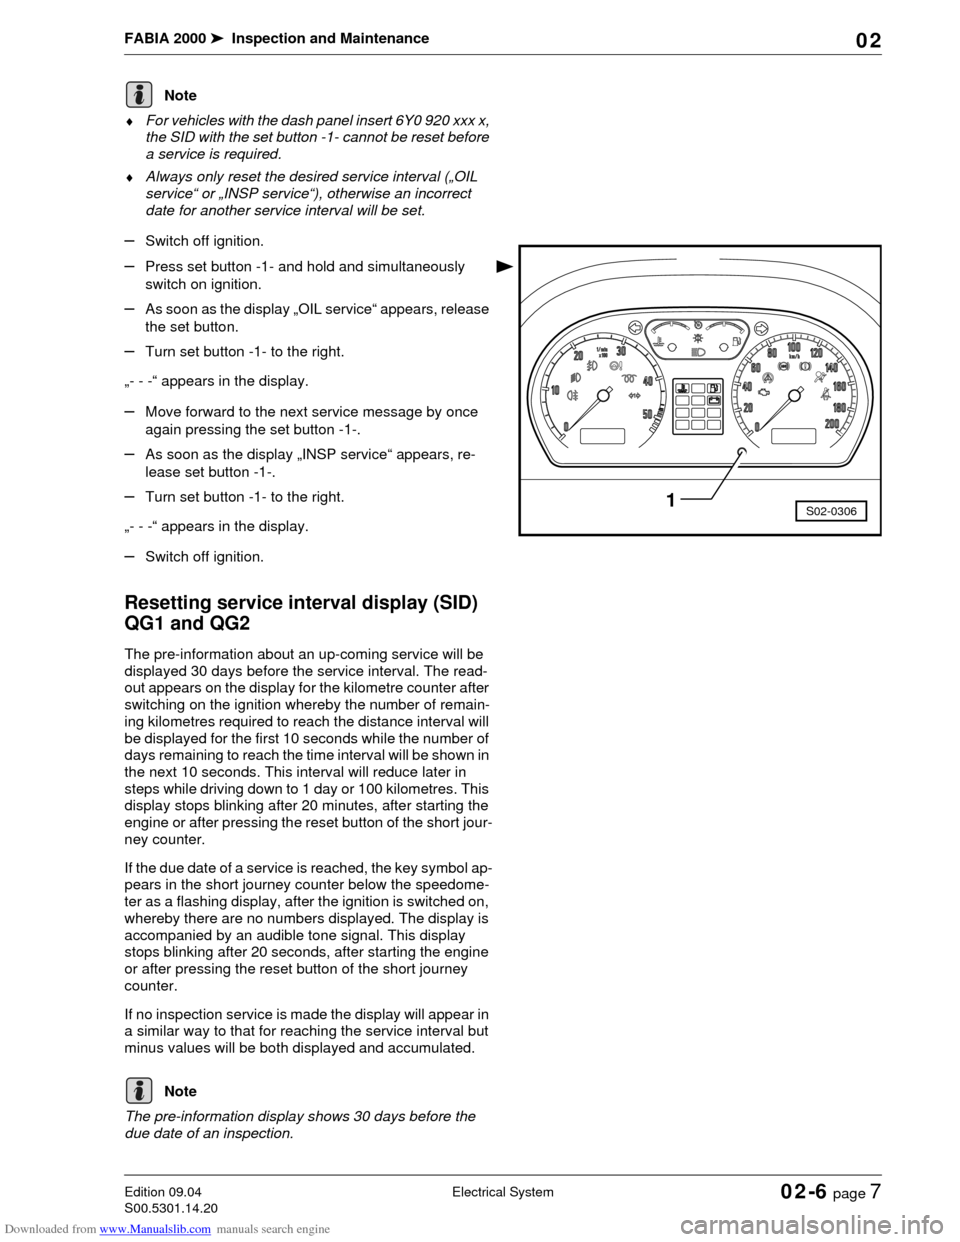
–Press set button -1- and hold and simultaneously
switch on ignition.
–As soon as the display „OIL service“ appears, release
the set button.
–Turn set button -1- to the right.
„- - -“ appears in the display.
–Move forward to the next service message by once
again pressing the set button -1-.
–As soon as the display „INSP service“ appears, re-
lease set button -1-.
–Turn set button -1- to the right.
„- - -“ appears in the display.
–Switch off ignition.
Resetting service interval display (SID)
QG1 and QG2
The pre-information about an up-coming service will be
displayed 30 days before the service interval. The read-
out appears on the display for the kilometre counter after
switching on the ignition whereby the number of remain-
ing kilometres required to reach the distance interval will
be displayed for the first 10 seconds while the number of
days remaining to reach the time interval will be shown in
the next 10 seconds. This interval will reduce later in
steps while driving down to 1 day or 100 kilometres. This
display stops blinking after 20 minutes, after starting the
engine or after pressing the reset button of the short jour-
ney counter.
If the due date of a service is reached, the key symbol ap-
pears in the short journey counter below the speedome-
ter as a flashing display, after the ignition is switched on,
whereby there are no numbers displayed. The display is
accompanied by an audible tone signal. This display
stops blinking after 20 seconds, after starting the engine
or after pressing the reset button of the short journey
counter.
If no inspection service is made the display will appear in
a similar way to that for reaching the service interval but
minus values will be both displayed and accumulated.
The pre-information display shows 30 days before the
due date of an inspection.
Note
S02-03061
Note
Page 63 of 86
Downloaded from www.Manualslib.com manuals search engine FABIA 2000➤Inspection and Maintenance
Electrical SystemEdition 09.04
S00.5301.14.2002-6 page 9 02
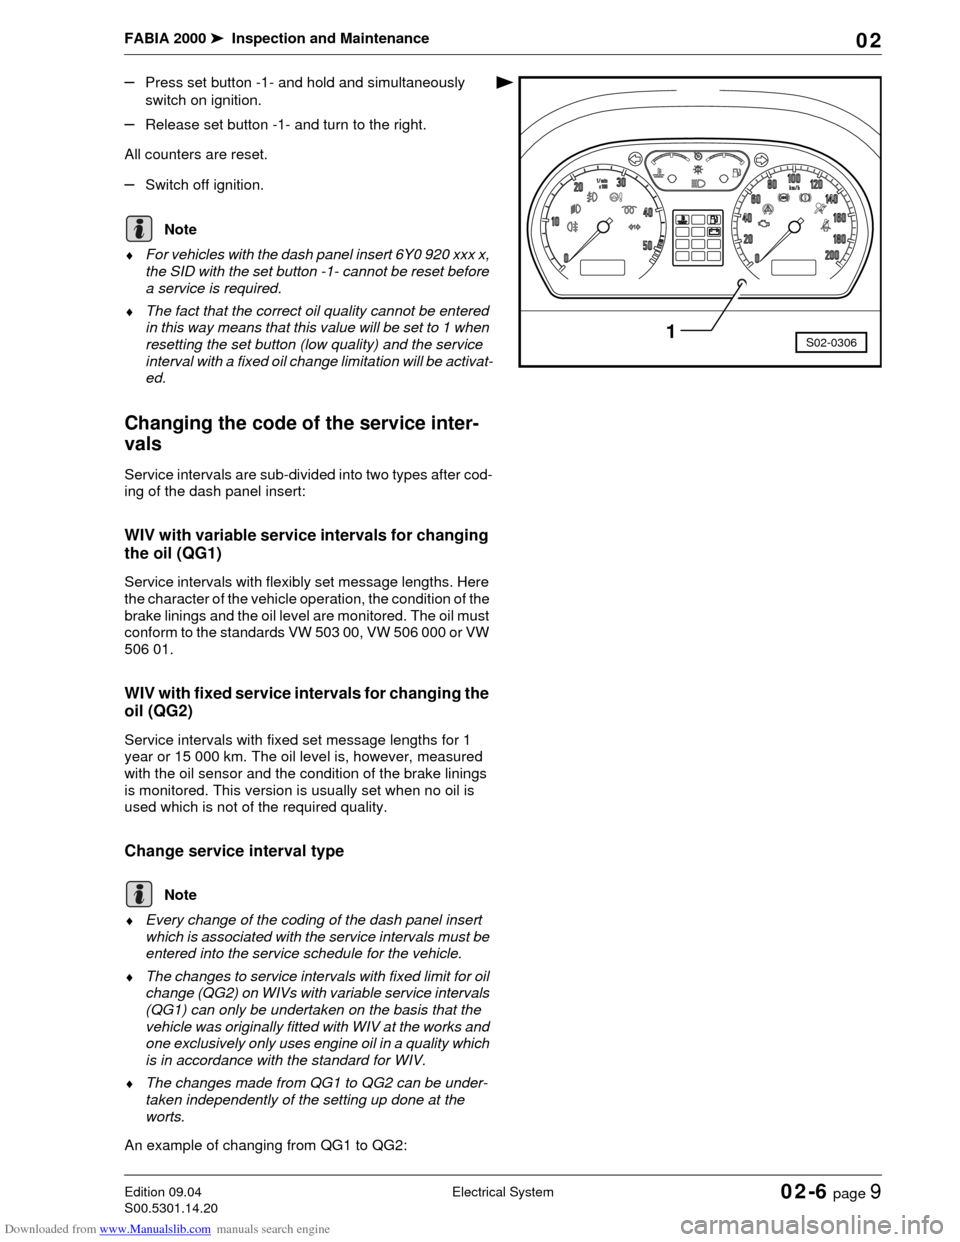
–Press set button -1- and hold and simultaneously
switch on ignition.
–Release set button -1- and turn to the right.
All counters are reset.
–Switch off ignition.
♦For vehicles with the dash panel insert 6Y0 920 xxx x,
the SID with the set button -1- cannot be reset before
a service is required.
♦The fact that the correct oil quality cannot be entered
in this way means that this value will be set to 1 when
resetting the set button (low quality) and the service
interval with a fixed oil change limitation will be activat-
ed.
Changing the code of the service inter-
vals
Service intervals are sub-divided into two types after cod-
ing of the dash panel insert:
WIV with variable service intervals for changing
the oil (QG1)
Service intervals with flexibly set message lengths. Here
the character of the vehicle operation, the condition of the
brake linings and the oil level are monitored. The oil must
conform to the standards VW 503 00, VW 506 000 or VW
506 01.
WIV with fixed service intervals for changing the
oil (QG2)
Service intervals with fixed set message lengths for 1
year or 15 000 km. The oil level is, however, measured
with the oil sensor and the condition of the brake linings
is monitored. This version is usually set when no oil is
used which is not of the required quality.
Change service interval type
♦Every change of the coding of the dash panel insert
which is associated with the service intervals must be
entered into the service schedule for the vehicle.
♦The changes to service intervals with fixed limit for oil
change (QG2) on WIVs with variable service intervals
(QG1) can only be undertaken on the basis that the
vehicle was originally fitted with WIV at the works and
one exclusively only uses engine oil in a quality which
is in accordance with the standard for WIV.
♦The changes made from QG1 to QG2 can be under-
taken independently of the setting up done at the
worts.
An example of changing from QG1 to QG2:
S02-03061
Note
Note