control SKODA FABIA 2000 1.G / 6Y Workshop Manual
[x] Cancel search | Manufacturer: SKODA, Model Year: 2000, Model line: FABIA, Model: SKODA FABIA 2000 1.G / 6YPages: 86, PDF Size: 3.58 MB
Page 13 of 86

Downloaded from www.Manualslib.com manuals search engine FABIA 2000➤Inspection and Maintenance
InspectionEdition 09.04
S00.5301.14.2002-2 page 3 02
Delivery Inspection (Export)
–Proper operation of seat belts, seat belt height adjuster, power windows and sun roof
–Inspect upholstery, interior trim, carpeting and footmats for cleanliness and damage
–Inspect all switches, all electrical components, gauges/indicators and controls02-6
–Radio: Inspect for proper operation, store stations, set clock, encode02-6
–Reset service interval display02-6
–Power windows: Inspecting positioning02-6
–Key switch for airbag deactivation, front passenger side: Check function „ON/OFF“ and
switch-over to the position „ON“02-7
–Fit net in luggage compartment (if available)
–Check the car tool kit, spare wheel and accessories, that they have all been supplied and
are properly secured
–Install the carpets supplied in the vehicle
–Perform a test drive
Underside of vehicle (on lift platform)
–Inspect underbody (underbody protection for damage)02-7
–Inspect for leaks and damage: Engine, gearbox, final drive, steering, brake system, axles,
joint boots. Check proper routing of the brake hoses and brake lines, fuel lines including
ventilation of the fuel system02-3, 02-5
–Inspect tyres and wheels for damage02-5
Concluding operations
–Interrogate fault memory of all systems, if necessary erase02-6
–Remove protective seat covers
–Remove recharging table (if affixed)
–Complete the service schedule, affix the vehicle data sticker in the Service Schedule to
the floor of the luggage compartment next to the spare wheel„Next Service Date“ sticker
and affix to the side of the dash panel on the driver's side, hand the card „Škoda Assist-
ance“ to the customer02-7
–Final inspection to ensure proper condition for handover to the customer
Inspections and operations to be completed Chapter
Vehicle (exterior)
–Plastic and rubber parts: Inspect for cleanliness and damage
–Inspect bodywork and paintwork for damage02-7
–Check operation of the tailgate lock and the fuel filler cap, door contact switch, operation
of the door handles, door locks and safety buttons, central locking from outside as well as
inside, child safety locks, ability to close all locks on the vehicle using all keys (including
the spare key)02-7
–Check operation of the anti-theft alarm system
–Tighten the wheel bolts to specified torque (steel and light alloy wheels 120 Nm), fit wheel
caps02-5
–Check the tyre inflation pressure (including spare wheel), if necessary correct the tyre in-
flation pressure, fit valve caps02-5
–Vehicles in stock for more than 6 months: Change brake fluid02-5
Page 14 of 86

Downloaded from www.Manualslib.com manuals search engine FABIA 2000➤Inspection and Maintenance
InspectionEdition 09.04
S00.5301.14.2002-2 page 4 02
–Fit roof aerial
Engine compartment (from above)
–Check battery no-load voltage; recharge if necessary02-6
–Check tight connection of electric cables and plug connections (in particular battery ca-
bles)
–Brake fluid level (at „MAX“ marking)02-5
–Check the engine oil level (to be in-between the marking on the dipstick)02-3
–Check the coolant level (in-between marking), for special equipment antifreeze down to -
35 °C02-3
–Fill up fluid in washer reservoir, in the winter add antifreeze
–Check windscreen wiper and washer system, the spray nozzle adjustment and the resting
position of the windscreen wipers02-7
Vehicle interior
–Inspect upholstery, interior trim, carpeting and footmats for cleanliness and damage
–Inspect all switches, all electrical components, gauges/indicators and controls02-6
–Radio: Inspect for proper operation, store stations, encode, set clock02-6
–Fit net in luggage compartment (if available)
–Vehicle log book - for completion: Operating manual and service plan (in the correct lan-
guage and with the correct edition data), short introduction, technical data, support in the
case of a breakdown, other manuals (radio,...) ) - all in the vehicle log book pouch
–Reset service interval display02-6
–Power windows: Inspecting positioning02-6
–Key switch for airbag deactivation, front passenger side: Check function „ON/OFF“ and
switch-over to the position „ON“02-7
Underside of vehicle (on lift platform)
–Inspect underbody (underbody protection for damage)02-7
–Inspect for leaks and damage: Engine, gearbox, final drive, steering, brake system, axles,
joint boots. Check proper routing of the brake hoses and brake lines, fuel lines including
ventilation of the fuel system02-3, 02-5
–Inspect tyres and wheels for damage02-5
Concluding operations
–Perform a test drive02-9
–Interrogate fault memory of all systems, if necessary erase02-6
–Complete the service schedule, affix the vehicle data sticker in the Service Schedule to
the floor of the luggage compartment next to the spare wheel, complete the „Next Service
Date“ sticker and affix to the side of the dash panel on the driver's side02-7
–Remove recharging table (if affixed)
–Remove protective seat covers
–Install the carpets supplied in the vehicle
–Final inspection to ensure proper condition for handover to customer
Page 55 of 86

Downloaded from www.Manualslib.com manuals search engine FABIA 2000➤Inspection and Maintenance
Electrical SystemEdition 09.04
S00.5301.14.2002-6 page 1 02
02-6 Electrical System
Power windows: Inspecting positioning
If the battery is diconnected the power windows forget
their current position.
Test conditions:
•All car doors closed
The inspection procedure is carried out from the outside
Close window with the car key using the convenience
closing system.
–Turn car key into close position and hold until all the
windows are closed.
–After closing the windows hold the key in the close po-
sition for approximately another 3 seconds.
Electrical components: Check for proper
operation
–Inspect lighting, main headlights, headlight beam con-
trol, fog lights, turn signal lights, hazard warning light
system, tail lights, rear fog lights, reversing lights,
brake lights, parking light control for brightness and
proper operation.
–Inspect interior lights, illuminated storage compart-
ment, illuminated ashtray for proper operation.
–Airbag warning lamps: Check operation ⇒Chapter
02-7.
–Inspect warning buzzer, onboard computer, all switch-
es in centre console as well as on the dash panel and
horn for proper operation.
–Inspect power windows, exterior mirrors (heated and
electrically adjustable), central locking system, infra-
red remote control and convenience closing system
for proper operation
–Inspect heating of front seats for proper operation.
–Inspect radio for proper reception and absence of in-
terference, also inspect speakers ⇒02-6 page 2.
Battery: Testing no-load voltage
Special tools, test and measuring equipment and
auxiliary items required
♦Multimeter (e.g. -V.A.G 1526 A-)
Prior to the measurement the vehicle must have been in
the no-load state for at least two hours (no engine starts,
no charging or discharging of battery).
The following procedure applies to measuring the battery
voltage in the no-load state (after at least two hours):
–With the battery installed measure the voltage be-
tween the terminals (ignition switched off).
Page 56 of 86
Downloaded from www.Manualslib.com manuals search engine FABIA 2000➤Inspection and Maintenance
Electrical SystemEdition 09.04
S00.5301.14.2002-6 page 2 02
If the tester indicates a voltage of 12.5 Volts or more, the
battery is O.K.
If the voltage is less than 12.5 Volts determine the cause
(repair measure).
Battery: Inspecting electrolyte level, top-
ping up with distilled water if necessary
This procedure is not valid for batteries with the sign
„Magic eye“. Test procedure for these batteries
⇒Electrical System; Rep. Gr. 27.
–Inspect electrolyte level:
–The electrolyte level must be between the „MIN“ and
„MAX“ markings.
–Top up the battery with distilled water up to the „MAX“
marking if necessary.
Before disconnecting the battery determine the code of
radio sets fitted with anti-theft coding.
Radio: Check for proper operation
Precise information on how to operate the radio should
be obtained from the operating instructions before in-
specting proper operation of the radio set.
–Switch radio set on and off.
–Operate the volume control.
–Carry out station programming1).
–Inspect station search1).
–Inspect cassette player (insert cassette and play) 1).
–Inspect activation of the anti-theft code of the radio 1).
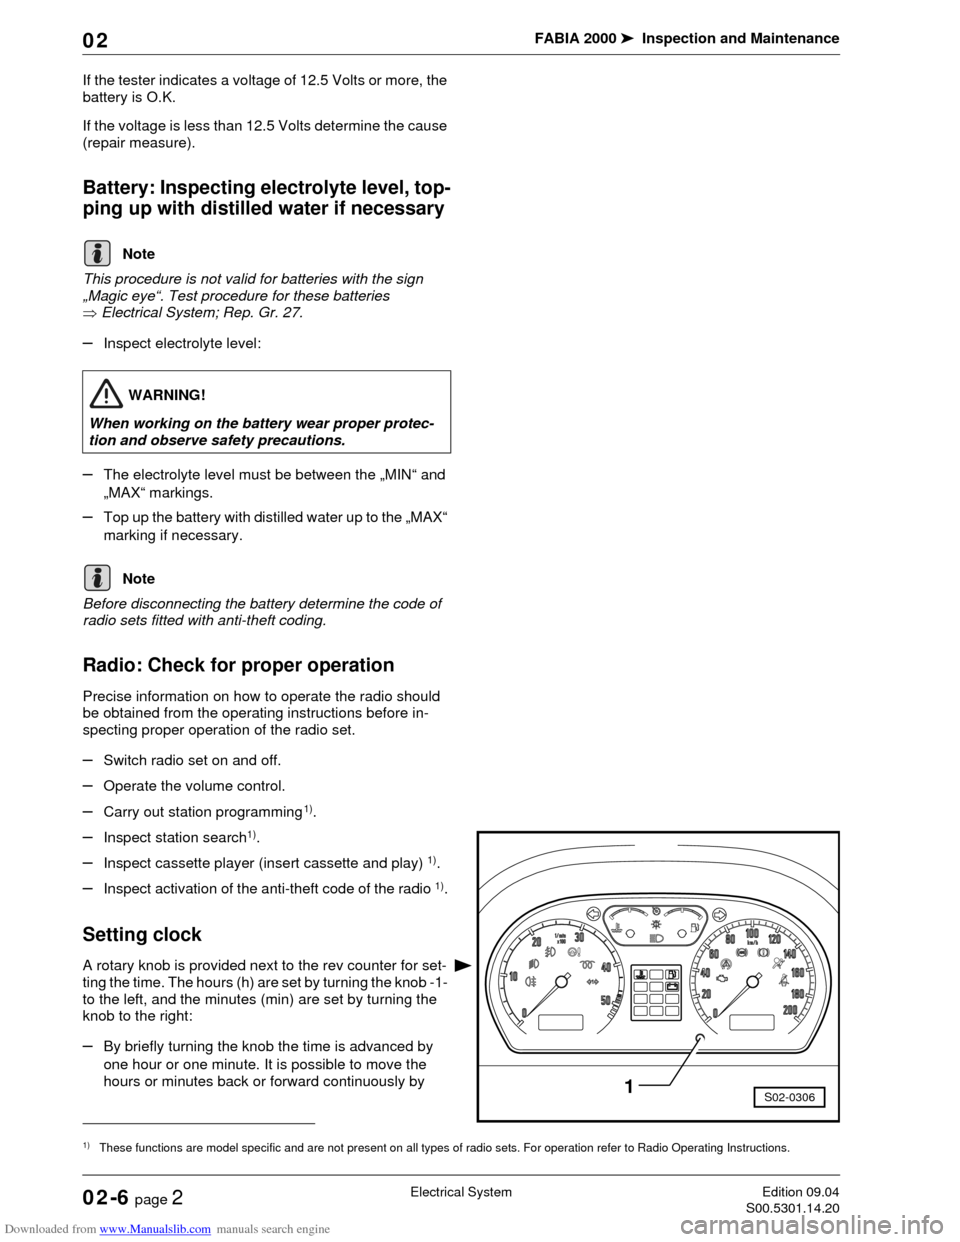
Setting clock
A rotary knob is provided next to the rev counter for set-
ting the time. The hours (h) are set by turning the knob -1-
to the left, and the minutes (min) are set by turning the
knob to the right:
–By briefly turning the knob the time is advanced by
one hour or one minute. It is possible to move the
hours or minutes back or forward continuously by
Note
WARNING!
When working on the battery wear proper protec-
tion and observe safety precautions.
1)These functions are model specific and are not present on all types of radio sets. For operation refer to Radio Operating Instructions.
Note
S02-03061
Page 57 of 86
Downloaded from www.Manualslib.com manuals search engine FABIA 2000➤Inspection and Maintenance
Electrical SystemEdition 09.04
S00.5301.14.2002-6 page 3 02
holding the knob in the left or right position respective-
ly.
Connect vehicle system tester and inter-
rogate fault memory
The stored faults can be read out with vehicle system
tester -V.A.G 1552-, -V.A.G 1551-, or -V.A.S. 5051-.
♦The following description relates to vehicle system
tester -V.A.G 1552- using program card 6.0.
♦The use of vehicle diagnosis, measurement and infor-
mation system -V.A.S 5051- or fault read-out scan
tool -V.A.G 1551- with the program card version 9 is
similar. (A minor deviation on the display read-out is
possible).
Special tools, test and measuring equipment and
auxiliary items required
♦Vehicle system tester -V.A.G 1552 -
♦Diagnostic cable -V.A.G 1551/3, 3A, 3B oder 3C-
Test conditions
•Battery voltage at least 9 V.
•All fuses OK.
•Earth connections between the engine (on gearbox
housing) and body (below the battery) must be O.K.
–Apply handbrake.
–Gearbox: Put the lever into Neutral.
–Automatic gearbox: Move selector lever into position
„P“ or „N“.
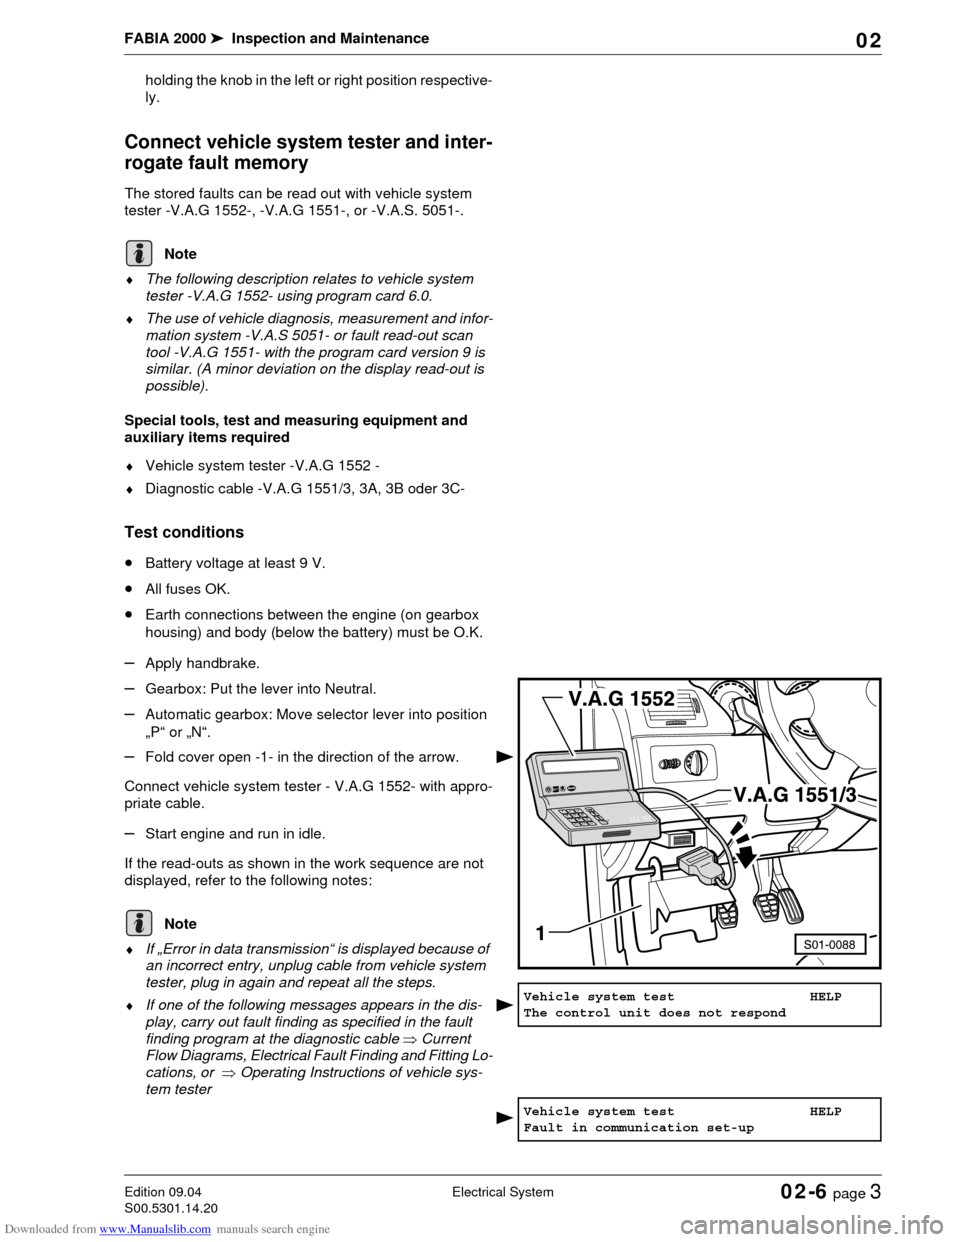
–Fold cover open -1- in the direction of the arrow.
Connect vehicle system tester - V.A.G 1552- with appro-
priate cable.
–Start engine and run in idle.
If the read-outs as shown in the work sequence are not
displayed, refer to the following notes:
♦If „Error in data transmission“ is displayed because of
an incorrect entry, unplug cable from vehicle system
tester, plug in again and repeat all the steps.
♦If one of the following messages appears in the dis-
play, carry out fault finding as specified in the fault
finding program at the diagnostic cable ⇒Current
Flow Diagrams, Electrical Fault Finding and Fitting Lo-
cations, or ⇒Operating Instructions of vehicle sys-
tem tester
Note
1552V.A.
G
.H
E
LPQ O C9 8 76 5 43 2 1
Note
Vehicle system test HELP
The control unit does not respond
Vehicle system test HELP
Fault in communication set-up
Page 58 of 86

Downloaded from www.Manualslib.com manuals search engine FABIA 2000➤Inspection and Maintenance
Electrical SystemEdition 09.04
S00.5301.14.2002-6 page 4 02
Operate the vehicle system tester by referring to the
read-out on the display:
Read out on display:
–Enter 00 for address word „Automatic test sequence“
and confirm with .
The automatic test sequence is carried out with address
word 00, i.e. the fault memory of all self-diagnosable sys-
tems in the vehicle is interrogated.
If a control unit responds with its identification, the display
will show the number of faults stored in the memory or
„No fault detected!“ Eventuell gespeicherte Fehler eines
Systems werden nacheinander angezeigt.
Any faults stored for one of the systems are displayed in
sequence.
If faults are stored, it is necessary to carry out a repair
measure. Displayed faults are to be entered.
–Switch off ignition.
The vehicle system tester -V.A.G 1552 - may have to re-
main connected for the exhaust emission test and for re-
setting the service interval display.
Resetting service interval display (SID)
QG0
If the due date of a service is reached, the service event
appears in the short journey counter below the speedom-
eter as a flashing display, after the ignition is switched on.
The service event also continues flashing for about 60
seconds after the engine is started.
The following displays are possible:
OIL - Oil change service
INSP - Inspection Service
The service event is shown on the indicator when the
service interval has been reached.
The service interval display should be adapted when car-
rying out the Delivery Inspection or during every Inspec-
tion Service.
The following intervals are set when adapting the service
interval display (SID):
Vehicle system test HELP
K cable does not connect to earth
Vehicle system test HELP
K cable does not connect to pos. term.
Vehicle system test HELP
Enter address word XX
Q
Note
Service event Nominal value
(distance)Nominal value
(time)
OIL 15 000 km -
INSP 30 000 km 365 days
Page 64 of 86

Downloaded from www.Manualslib.com manuals search engine FABIA 2000➤Inspection and Maintenance
Electrical SystemEdition 09.04
S00.5301.14.2002-6 page 10 02
–Connect -V.A.G 1552-.
–Switch on ignition.
–Enter address word 17 „Dash Panel Insert“ and con-
firm with .
Readout on display (e.g.):
–Note the dash panel insert coding.
–Press key.
Readout on display (e.g.):
–Press key.
Readout on display:
–Enter function 07 „Code control unit“ and confirm with
key.
Readout on display:
–Enter dash panel insert coding which is identical to the
original coding. The value on the fourth position must,
however, be altered from 1 to 2.
XXX1X - QG1
XXX2X - QG2
Readout on display (e.g.):
–Confirm the entry with key .
Readout on display (e.g.):
–Press key.
Readout on display (e.g.):
–Press key.
Readout on display:
–Enter 06 for „End output“.
Readout on display:
–Confirm the entry with key .
–Switch off ignition.
–Switch off -V.A.G 1552-.
Inspecting headlight beam setting and
adjusting if necessary
Special tools, test and measuring equipment and
auxiliary items required
♦Headlight beam setting device
In principle the following inspection and setting descrip-
tion applies for all countries. However, comply with na-
tional guidelines and legislation of the relevant country.
⇒Operating instructions for the headlight beam setting
device
Q
6Y1919870B COMBIINSTRUMENT VDO X09 ->
Coding 03111 WSC 12345
TMBMC46Y0Y7000001 SKZ7Z0W0204038 ->
Vehicle system test HELP
Select function XX
Q
Coding control unit
Enter code number XXXXX (0-32767)
Coding control unit
Enter code number 03121 (0-32767)
Q
6Y1919870B COMBIINSTRUMENT VDO X09 ->
Coding 03121 WSC 12345
TMBMC46Y0Y7000001 SKZ7Z0W0204038 ->
Vehicle system test HELP
Select function XX
Vehicle system test HELP
06 End output
Q
Page 65 of 86
Downloaded from www.Manualslib.com manuals search engine FABIA 2000➤Inspection and Maintenance
Electrical SystemEdition 09.04
S00.5301.14.2002-6 page 11 02
Test and setting conditions
•Tyre inflation pressure O.K.
•Lenses must neither be damaged nor soiled.
•Reflectors and bulbs O.K.
•Vehicle load must be achieved.
Load: With an individual or 75 kg on the driver's seat in an
otherwise unladen vehicle (dead weight).
The unladen weight is the weight of the vehicle with full
fuel tank (at least 90 %) including the weight of all the op-
erational equipment elements (e.g. spare wheel, tool kit,
jack etc.).
The vehicle must have rolled a few metres or have been
depressed a few times at the front and rear to allow the
springs to settle.
•Both the vehicel and headlight beam setting device
must be on a level flat surface.
•Align the vehicle and headlight beam setting device in
accordance with the device manufaturer's indications.
•Check the control system of vehicles equipped with
headlight beam control by repeatedly turning the
thumbwheel in the dash panel. Then turn the thum-
bwheel to basic position.
•Set the inclination value.
Inclination value:
The inclination value is marked in „%“ at the top of the
headlight housing. The main headlights must be set to
this value. The percentage value applies up to 10 metres
projection distance. This will be 12 cm for an inclination
value of e.g. 1.2 %.
Inspecting headlight beam setting and adjusting
if necessary
Main headlights:
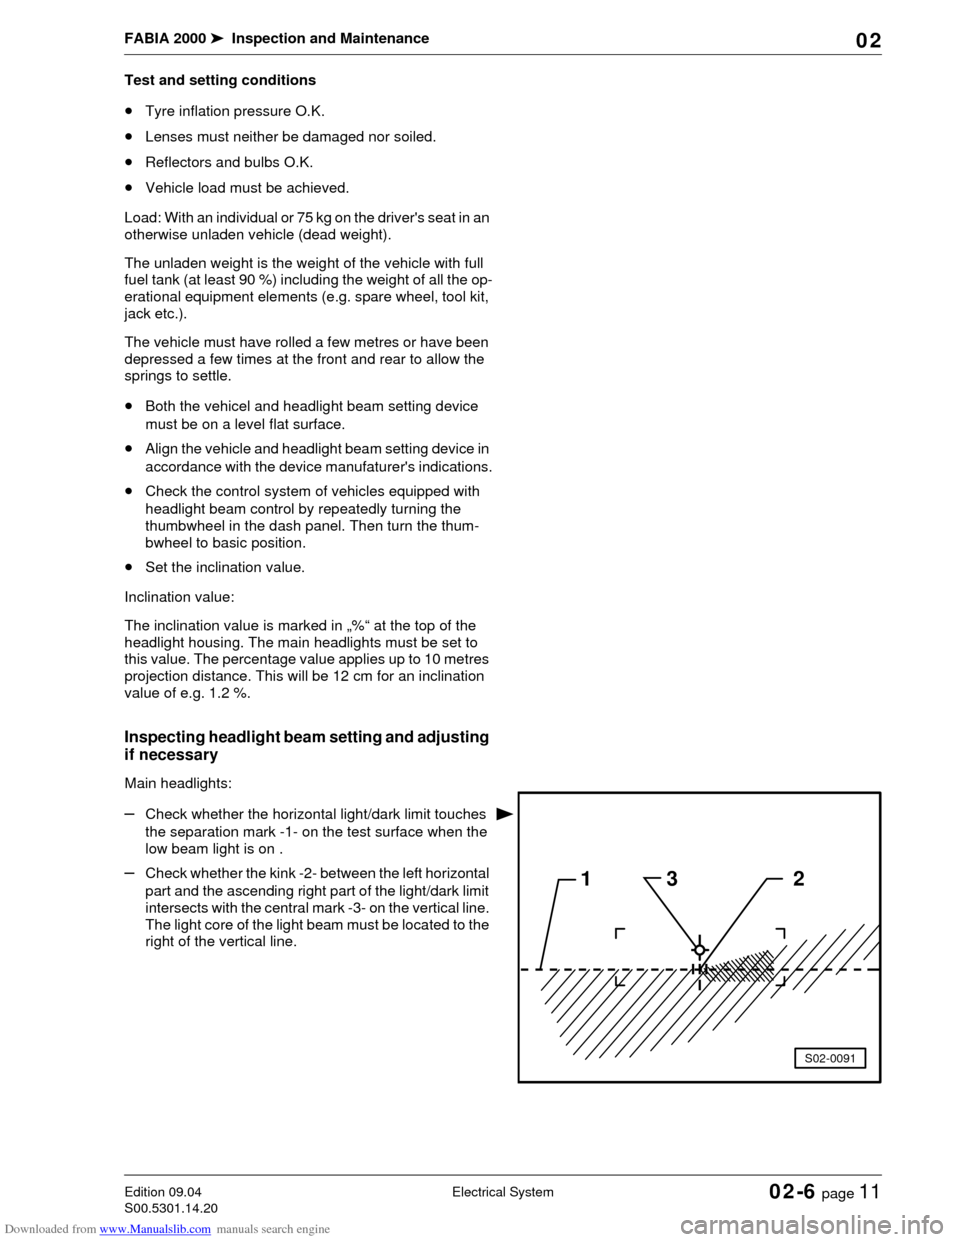
–Check whether the horizontal light/dark limit touches
the separation mark -1- on the test surface when the
low beam light is on .
–Check whether the kink -2- between the left horizontal
part and the ascending right part of the light/dark limit
intersects with the central mark -3- on the vertical line.
The light core of the light beam must be located to the
right of the vertical line.132
S02-0091
Page 66 of 86
Downloaded from www.Manualslib.com manuals search engine FABIA 2000➤Inspection and Maintenance
Electrical SystemEdition 09.04
S00.5301.14.2002-6 page 12 02
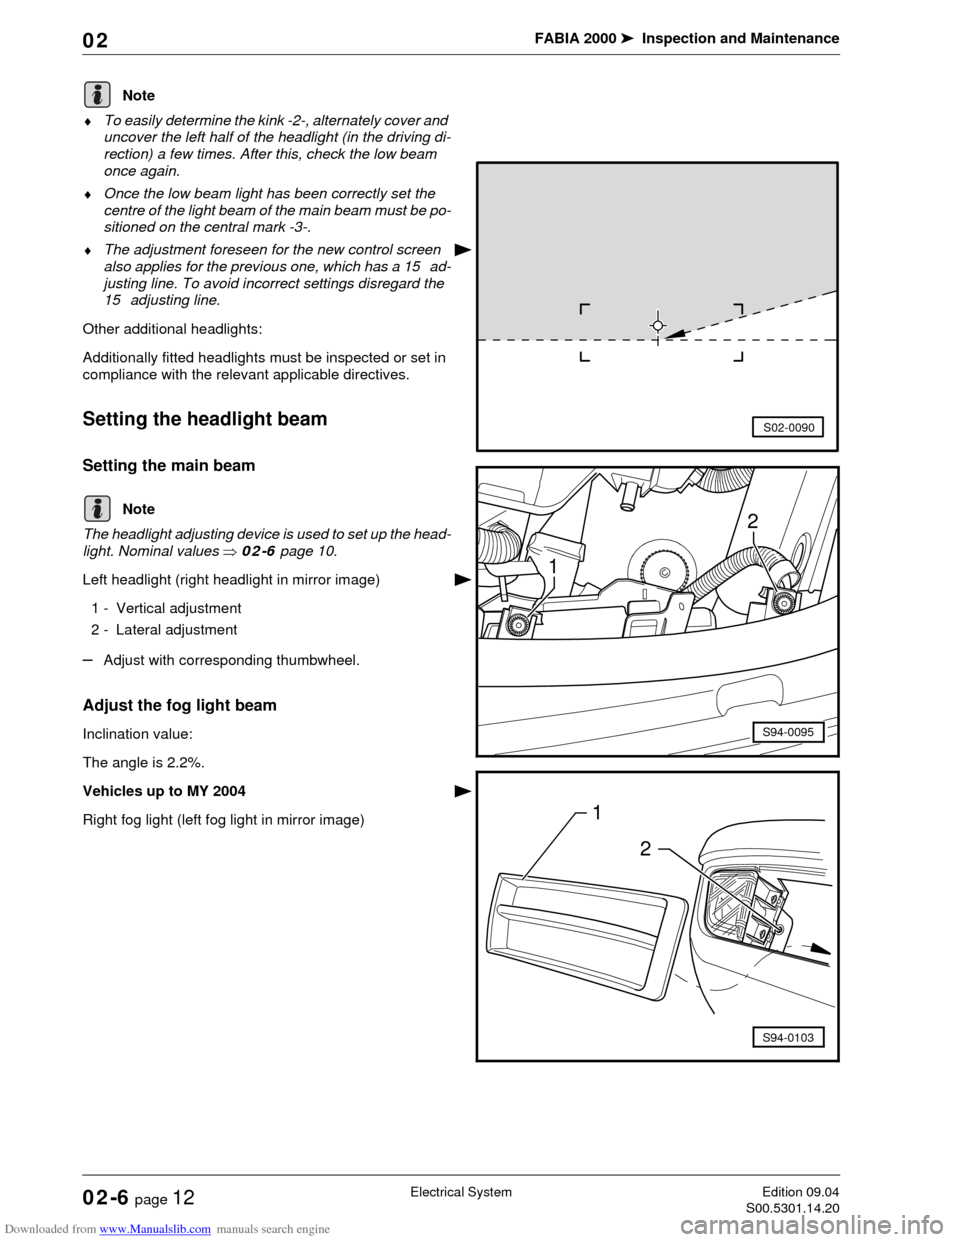
♦To easily determine the kink -2-, alternately cover and
uncover the left half of the headlight (in the driving di-
rection) a few times. After this, check the low beam
once again.
♦Once the low beam light has been correctly set the
centre of the light beam of the main beam must be po-
sitioned on the central mark -3-.
♦The adjustment foreseen for the new control screen
also applies for the previous one, which has a 15 ad-
justing line. To avoid incorrect settings disregard the
15 adjusting line.
Other additional headlights:
Additionally fitted headlights must be inspected or set in
compliance with the relevant applicable directives.
Setting the headlight beam
Setting the main beam
The headlight adjusting device is used to set up the head-
light. Nominal values ⇒02-6 page 10.
Left headlight (right headlight in mirror image)
1 - Vertical adjustment
2 - Lateral adjustment
–Adjust with corresponding thumbwheel.
Adjust the fog light beam
Inclination value:
The angle is 2.2%.
Vehicles up to MY 2004
Right fog light (left fog light in mirror image)
Note
S02-0090
Note2
1
S94-0095
1
2
S94-0103
Page 69 of 86
Downloaded from www.Manualslib.com manuals search engine FABIA 2000➤Inspection and Maintenance
BodyEdition 09.04
S00.5301.14.2002-7 page 1 02
02-7 Body
Airbag units: Visual inspection
Inspecting operation of airbag unit
When the ignition is switched on the airbag warning lamp
K75 lights up for approximately 4 seconds. Should the
warning lamp flash again for a further 12 seconds this is
an indication that the front passenger airbag or the side
airbag unit on the front passenger is electronically locked
(valid for vehicles which do not have an airbag switch-off
function).
The warning lamp will go out after 4 seconds for vehicles
which are fitted with an airbag switch-off function and
switching off of the front passenger airbag will be sig-
nalled by the warning lamp „AIRBAG OFF“ in the middle
of the dash panel.
♦If warning lamp K75 does not go out after 4 seconds
and lights up continously there is a fault.
♦If the warning lamp goes out and then lights up again
the control unit is not coded, the wrong control unit has
been fitted or there is a fault.
♦If the airbag warning light K75 flashes constantly, it is
then necessary to replace the airbag control unit J234.
If the warning light indicates a fault, the fault must be
rectified (repair measure) Body Work; Rep. Gr. 01.
Inspecting airbag for external damage
Driver and front passenger airbag units
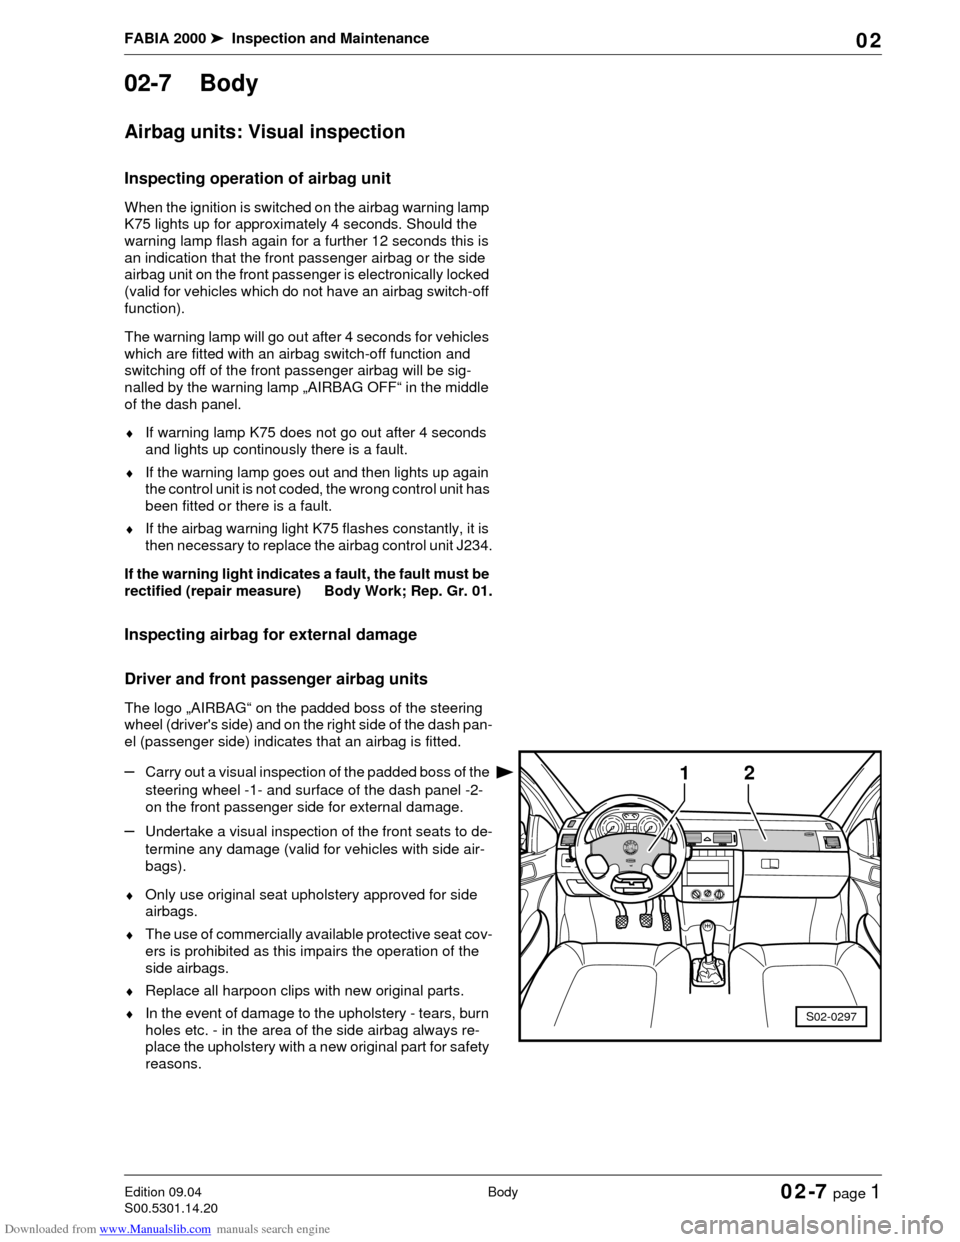
The logo „AIRBAG“ on the padded boss of the steering
wheel (driver's side) and on the right side of the dash pan-
el (passenger side) indicates that an airbag is fitted.
–Carry out a visual inspection of the padded boss of the
steering wheel -1- and surface of the dash panel -2-
on the front passenger side for external damage.
–Undertake a visual inspection of the front seats to de-
termine any damage (valid for vehicles with side air-
bags).
♦Only use original seat upholstery approved for side
airbags.
♦The use of commercially available protective seat cov-
ers is prohibited as this impairs the operation of the
side airbags.
♦Replace all harpoon clips with new original parts.
♦In the event of damage to the upholstery - tears, burn
holes etc. - in the area of the side airbag always re-
place the upholstery with a new original part for safety
reasons.
1
S02-0297
2