gearbox SKODA FABIA 2003 1.G / 6Y Owner's Guide
[x] Cancel search | Manufacturer: SKODA, Model Year: 2003, Model line: FABIA, Model: SKODA FABIA 2003 1.G / 6YPages: 233, PDF Size: 32.04 MB
Page 151 of 233

Driving and the Environment
150
Shifting gears and saving energy
Shifting up early saves on fuel.
Manual gearbox
– Drive no more than about one length of your vehicle in first
gear. Shift up into the next higher gear at about 2 000 revs.
Automatic gearbox
– Depress the accelerator pedal slowly. Do not depress it
beyond the kickdown position, however.
An effective way of achieving good fuel economy is to shift up early. You
will consume more fuel if you drive at unnecessarily high revolutions in
any given gear.
The ⇒fig. 117 shows the ratio of fuel consumption to the speed of your
vehicle for the individual gears. Fuel consumption in 1st gear is the
highest, while that in 5th or the 6th gear is the lowest. Only depress the accelerator pedal slowly if your vehicle is fitted with an
automatic gearbox in order to automatically select an economic driving
programme. You will achieve good fuel economy by shifting up early and
shifting down late.
Note
Also use the information supplied by the multi-functional indicator*
⇒
page 17.
Avoiding full throttle
Driving more slowly means saving fuel.
Sensitive use of the accelerator will not only significantly reduce fuel
consumption but also positively influence environmental pollution and
wear of your vehicle.
Fig. 117 Fuel
consumption in
litres/100 km. and
vehicle speed in km/h.
Fig. 118 Fuel
consumption in
litres/100km. and
speed in km/h.
Page 173 of 233
Inspecting and Replenishing
172
Opening the bonnet
– Unlock the bonnet ⇒page 171, fig. 123 .
– Ensure that the arms of the windscreen wipers are correctly in place against the windscreen before opening the bonnet
otherwise damage could occur to the paintwork.
– Pulling on the handle ⇒page 171, fig. 124 will lock the bonnet
fully.
– Grip with the hand under the radiator grille and lift up the bonnet.
– Take the bonnet support out of its holder and set it in the opening designed for it ⇒page 171, fig. 125 .
Closing the bonnet
– Lift the bonnet slightly and unhook the bonnet support. Press the bonnet support into the holder designed to hold it.
– Allow the bonnet to drop from a height of about 30 cm into the lock - bonnet do not press down on it! Caution
•Never open the bonnet using the handle - danger of causing damage.
•Before opening the bonnet, ensure that the arms of the windscreen
wipers are correctly in place against the windscreen. Otherwise, there is
a risk of damage to the paintwork.
Working in the engine compartment
Particular care is required when carrying out any work in
the engine compartment!
There is a risk of injuries, scalding, accidents and fire when working
in the engine compartment, e.g. inspecting and replenishing oil and
other fluids. For this reason, it is essential to comply with the
warning instructions stated below and with the general applicable
rules of safety. The engine compartment of your car is a hazardous
area ⇒ .
WARNING
•Never open the bonnet if you see that steam or coolant is
flowing out of the engine compartment - risk of scalding! Wait long
enough until the steam or coolant has stopped escaping.
•For safety reasons, the bonnet must always be properly closed
when driving. One should therefore check that the lock has in fact
engaged properly after closing the bonnet.
WARNING (continued)
•Stop your vehicle immediately while driving if you notice that
the lock is not properly engaged and close the bonnet properly -
risk of an accident!
WARNING
•Switch off the engine and pull out the ignition key.
•Apply the handbrake firmly.
•If your vehicle is fitted with a manual gearbox, move the gear-
shift lever into Neutral, or if it is fitted with automatic gearbox,
move the selector lever into position P.
Page 199 of 233
Breakdown assistance
198
•The spare wheel provided with a car fitted with unidirectional tyres has
different dimensions. The wheel is provided with a warning sticker.
•After fitting on the wheel, the warning sticker must not be concealed
(e.g. by the wheel trim).
•Do not drive with this spare wheel at more than 80 km/h - risk of acci-
dent. Avoid accelerating at full throttle, sharp braking and fast cornering.
•The inflation pressure for this spare wheel is identical to the inflation
pressure of the standard tyres.
•Use this spare wheel only to reach the nearest service station as it is
not intended for continuous use.
Note
Some vehicles are only fitted with spray to make tyre repairs
⇒ page 196.
Changing a wheel
Preliminary work
The following steps should be carried out before actually
changing the wheel.
– If it is necessary to change a wheel, park the vehicle as far
away as possible from the traffic flow. The place you choose
should be level.
– Have all the occupants get out. While changing a wheel, the
occupants of the vehicle should not stand on the road (it is
better behind a crash barrier). – Apply the
handbrake firmly.
– Engage 1st gear or if your vehicle is fitted with an automatic
gearbox, move the selector lever into position P .
– If a trailer is coupled, uncouple it.
– Take the vehicle tool kit and the spare wheel ⇒ page 196
out of the luggage compartment.
Caution
If you have to change a wheel on a slope first block the opposite wheel
with a stone or similar object in order to secure the vehicle from unexpect-
edly rolling away.
Note
Comply with any legal regulations.
WARNING
•If you find yourself in flowing traffic put on the hazard warning
lights system and place the warning triangle on the side of the road
at the prescribed distance from your vehicle while observing all
national legal provisions. In this way you are protecting not only
yourself but also other road users.
•Never start the engine with the vehicle sitting on the raised jack
- danger of suffering injury!
Page 206 of 233
Breakdown assistance205
Using the systemSafetyDriving TipsGeneral MaintenanceBreakdown assist-
anceTechnical DataFabia Praktik
Tow-starting and towing vehicle
General
Please pay attention to the following instructions if you are going
to use a tow rope:
Driver of the towing vehicle
– Do not drive off until the tow rope is taught.
– Release the clutch particularly gently when starting off or
depress the accelerator particularly gently if your vehicle is
fitted with an automatic gearbox.
Driver of the towed vehicle
– Switch the ignition on so that the steering wheel is not blocked and you can also operate the turn signal lights, the headlight
flasher, the windscreen wipers and windscreen washer
system.
– Take the vehicle out of gear or move the selector lever into position N if your vehicle is fitted with an automatic gearbox.
– Note that the brake servo unit and power steering only operate if the engine is running. You will require significantly greater
physical force to depress the brake pedal and to steer the
vehicle if the engine is not running.
– Ensure that the tow rope is always kept taught.
Tow rope or tow bar
A tow bar is safest way of towing a vehicle and also minimizes any
shocks. You can use a tow rope only if a suitable tow bar is not available.
The tow rope must be elastic to protect the vehicle. Thus one should only
use plastic fibre rope or a rope made out of a similarly elastic material.
Only attach the tow rope to the towing eyes provided for this purpose
⇒ page 206, “Front towing eye” and ⇒page 207, “Rear towing eye”.
Driving style
Towing another vehicle requires a certain amount of practice. Both drivers
should be familiar with the particular points about towing a vehicle.
Unskilled drivers should not attempt to tow-start or tow in another vehicle.
One should be constantly vigilant not to allow impermissibly high towing
forces or jerky loadings. There is always a risk of excessive stresses and
damage resulting at the points to which you attach the tow rope or tow bar
when you attempt to tow a vehicle which is not standing on a paved road.
Caution
If the gearbox of your vehicle no longer contains any oil because of a
defect, your vehicle must only be towed in with the driven wheels raised
clear of the ground, or on a special vehicle transporter or trailer.
Note
•Please comply with any legal requirements particularly regarding the
switched on signal systems, when towing in or tow-starting another
vehicle.
•The tow rope must not be twisted as it may in certain circumstances
result in the front towing eye being unscrewed out of your vehicle.
Page 208 of 233
Breakdown assistance207
Using the systemSafetyDriving TipsGeneral MaintenanceBreakdown assist-
anceTechnical DataFabia Praktik
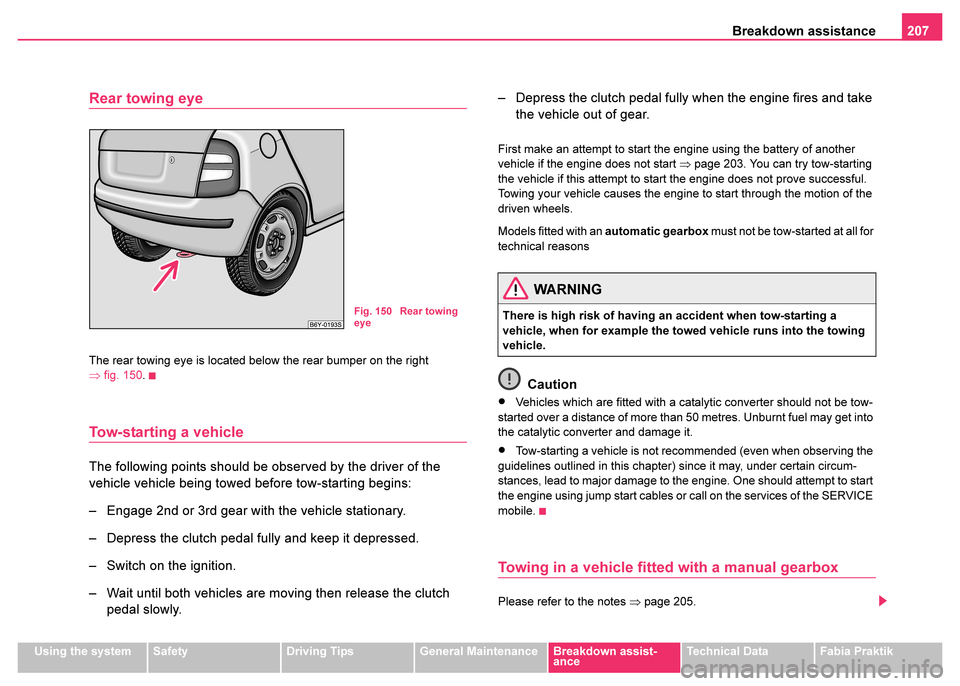
Rear towing eye
The rear towing eye is located below the rear bumper on the right
⇒fig. 150 .
Tow-starting a vehicle
The following points should be observed by the driver of the
vehicle vehicle being towed before tow-starting begins:
– Engage 2nd or 3rd gear with the vehicle stationary.
– Depress the clutch pedal fully and keep it depressed.
– Switch on the ignition.
– Wait until both vehicles are moving then release the clutch
pedal slowly. – Depress the clutch pedal fully when the engine fires and take
the vehicle out of gear.
First make an attempt to start the engine using the battery of another
vehicle if the engine does not start ⇒page 203. You can try tow-starting
the vehicle if this attempt to start the engine does not prove successful.
Towing your vehicle causes the engine to start through the motion of the
driven wheels.
Models fitted with an automatic gearbox must not be tow-started at all for
technical reasons
Caution
•Vehicles which are fitted with a catalytic converter should not be tow-
started over a distance of more than 50 metres. Unburnt fuel may get into
the catalytic converter and damage it.
•Tow-starting a vehicle is not recommended (even when observing the
guidelines outlined in this chapter) since it may, under certain circum-
stances, lead to major damage to the engine. One should attempt to start
the engine using jump start cables or call on the services of the SERVICE
mobile.
Towing in a vehicle fitted with a manual gearbox
Please refer to the notes ⇒page 205.
Fig. 150 Rear towing
eye
WARNING
There is high risk of having an accident when tow-starting a
vehicle, when for example the towed vehicle runs into the towing
vehicle.
Page 209 of 233
Breakdown assistance
208
The car can be towed in with a tow bar or a tow rope or with the front or
rear wheels raised. The maximum towing speed is 50 km/h.
Towing of a vehicle with an automatic gearbox
Please refer to the notes ⇒page 205.
The car can be towed in with a tow bar or a tow rope. Refer at the same
time to the following guidelines:
•Move selector lever into N .
•The maximum towing speed is 50 km/h.
•The maximum permissible towing distance is 50 km. The gear oil
pump does not operate when the engine is not running and the gear would
not be adequately lubricated at higher speeds and over longer towing
distance.
If the vehicle is towed in by a recovery vehicle, the vehicle should only be
towed in with the front wheels raised. The drive shafts drive the front
wheels. The drive shafts will rotate backwards when the vehicle is raised
at the rear - that is it runs backwards. Here the planetary gears in the auto-
matic gearbox will rotate at such a high speed that the gearbox will suffer
severe damage within a short time.
Note
The vehicle must be transported on a special vehicle or trailer if it is not
possible to tow in the vehicle in the way described or if the towing distance
is greater than 50 km.
Page 211 of 233
Fuses and light bulbs
210
Caution
•Never attempt to “repair” fuses and also do not replace them with a
fuse of a higher amperage - risk of fire! This may also cause damage at
another part of the electrical system.
•Have the electrical system checked as quickly as possible by a Škoda
dealer if a newly inserted fuse blows again after a short time.
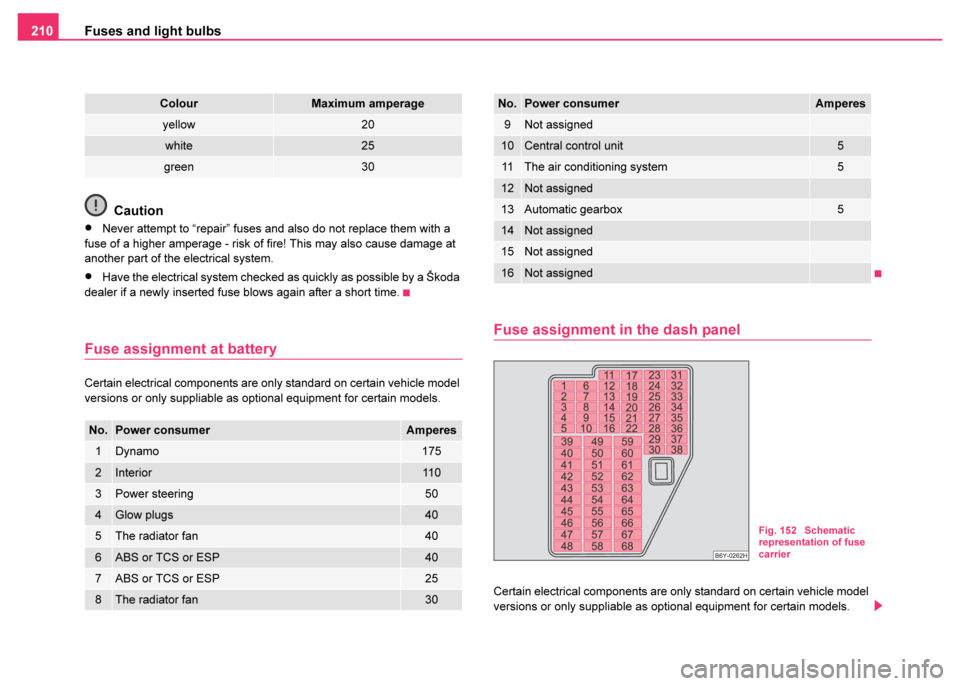
Fuse assignment at battery
Certain electrical components are only standard on certain vehicle model
versions or only suppliable as optional equipment for certain models.
Fuse assignment in the dash panel
Certain electrical components are only standard on certain vehicle model
versions or only suppliable as optional equipment for certain models.
yellow20
white25
green30
No.Power consumerAmperes
1Dynamo175
2Interior11 0
3Power steering50
4Glow plugs40
5The radiator fan40
6ABS or TCS or ESP40
7ABS or TCS or ESP25
8The radiator fan30
ColourMaximum amperage
9Not assigned
10Central control unit5
11The air conditioning system5
12Not assigned
13Automatic gearbox5
14Not assigned
15Not assigned
16Not assigned
No.Power consumerAmperes
Fig. 152 Schematic
representation of fuse
carrier
Page 212 of 233
Fuses and light bulbs211
Using the systemSafetyDriving TipsGeneral MaintenanceBreakdown assist-
anceTechnical DataFabia Praktik
No.Power consumerAmperes
1Instrument cluster, ESP5
2Brake lights10
3Power supply for the diagnostics, air-conditioning
system5
4Interior lighting10
5Door warning light5
6Lights and Visibility5
7Engine electronics, power-assisted steering5
8Not assigned
9Lambda probe10
10S-contact a)5
11Electrically adjustable rear mirror b)5
12Ventilation system, air-conditioning system, Xenon
headlight5
13Reversing light10
14Diesel engine control unit10
15Headlight cleaning system, window wiper10
16Instrument cluster5
17Petrol engine - control unit c)5
18Telephone5
19Automatic gearbox10
20Control unit for lamp failure5
21Heated windscreen washer nozzles5
22Not assigned
23Right main beam10
24Engine electronics10
25Control unit for ABS, TCS
control unit for ESP5
10
26Not assigned
27Not assigned
28Cruise control, switch for the brake and clutch pedal5
29Not assigned
30Main beam on the left and indicator light10
31Central locking system - door lock for the boot lid10
32Rear window wiper10
33Parking light on the right5
34Parking light on the left5
35Injector - petrol engine10
36Licence plate light5
37Rear fog light and indicator light5
38Heating of the external mirror5
39Rear window heater20
40Horn20
41Front window wiper20
42Cigarette lighter, power socket15
43Central control unit, selector lever lock for the auto-
matic gearbox20
44Turn signals15
No.Power consumerAmperes
Page 224 of 233
General223
Using the systemSafetyDriving TipsGeneral MaintenanceBreakdown assist-
anceTechnical DataFabia Praktik
Technical Data
General
Identification data
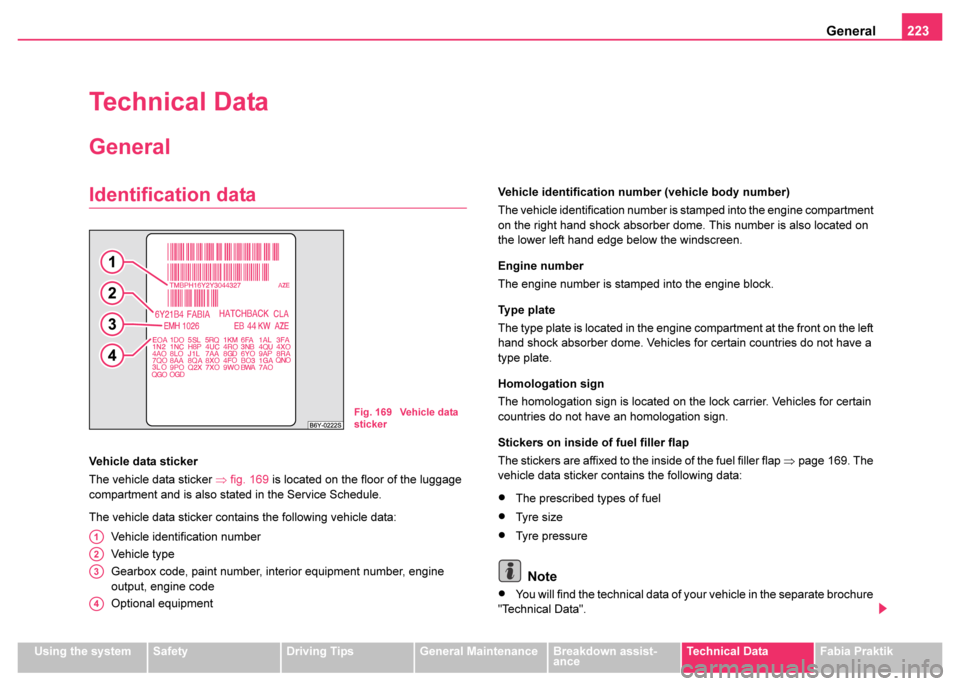
Vehicle data sticker
The vehicle data sticker ⇒fig. 169 is located on the floor of the luggage
compartment and is also stated in the Service Schedule.
The vehicle data sticker contains the following vehicle data:
Vehicle identification number
Vehicle type
Gearbox code, paint number, interior equipment number, engine
output, engine code
Optional equipment Vehicle identification number (vehicle body number)
The vehicle identification number is stamped into the engine compartment
on the right hand shock absorber dome. This number is also located on
the lower left hand edge below the windscreen.
Engine number
The engine number is stamped into the engine block.
Ty p e p l at e
The type plate is located in the engine compartment at the front on the left
hand shock absorber dome. Vehicles for certain countries do not have a
type plate.
Homologation sign
The homologation sign is located on the lock carrier. Vehicles for certain
countries do not have an homologation sign.
Stickers on inside of fuel filler flap
The stickers are affixed to the inside of the fuel filler flap
⇒page 169. The
vehicle data sticker contains the following data:
•The prescribed types of fuel
•Tyre size
•Tyre pressure
Note
•You will find the technical data of your vehicle in the separate brochure
"Technical Data".
Fig. 169 Vehicle data
sticker
A1
A2
A3
A4
Page 228 of 233
Index227
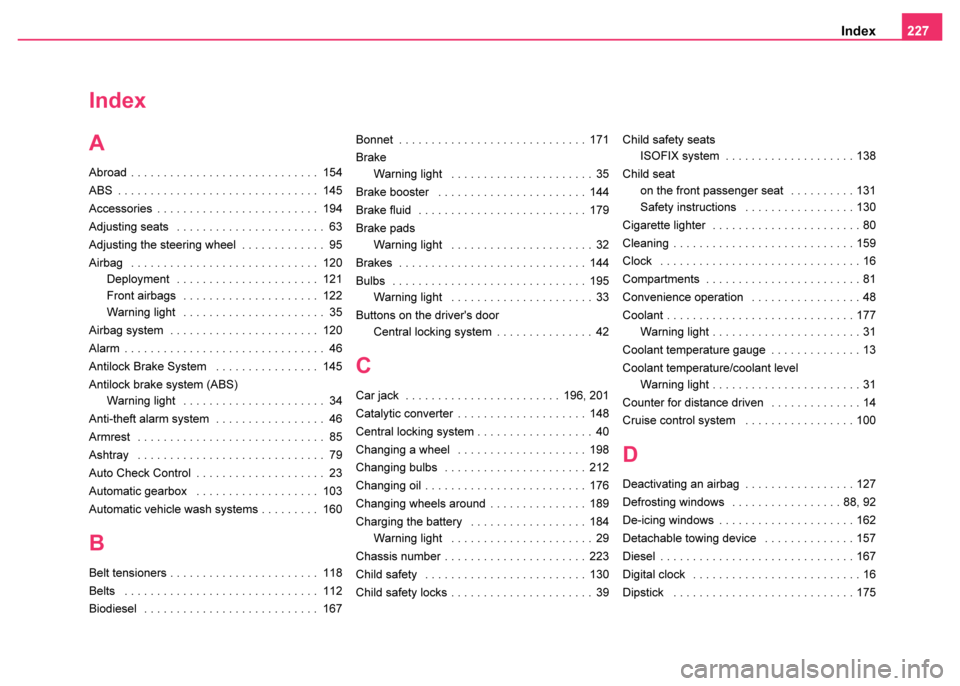
Index
A
Abroad . . . . . . . . . . . . . . . . . . . . . . . . . . . . . 154
ABS . . . . . . . . . . . . . . . . . . . . . . . . . . . . . . . 145
Accessories . . . . . . . . . . . . . . . . . . . . . . . . . 194
Adjusting seats . . . . . . . . . . . . . . . . . . . . . . . 63
Adjusting the steering wheel . . . . . . . . . . . . . 95
Airbag . . . . . . . . . . . . . . . . . . . . . . . . . . . . . 120
Deployment . . . . . . . . . . . . . . . . . . . . . . 121
Front airbags . . . . . . . . . . . . . . . . . . . . . 122
Warning light . . . . . . . . . . . . . . . . . . . . . . 35
Airbag system . . . . . . . . . . . . . . . . . . . . . . . 120
Alarm . . . . . . . . . . . . . . . . . . . . . . . . . . . . . . . 46
Antilock Brake System . . . . . . . . . . . . . . . . 145
Antilock brake system (ABS) Warning light . . . . . . . . . . . . . . . . . . . . . . 34
Anti-theft alarm system . . . . . . . . . . . . . . . . . 46
Armrest . . . . . . . . . . . . . . . . . . . . . . . . . . . . . 85
Ashtray . . . . . . . . . . . . . . . . . . . . . . . . . . . . . 79
Auto Check Control . . . . . . . . . . . . . . . . . . . . 23
Automatic gearbox . . . . . . . . . . . . . . . . . . . 103
Automatic vehicle wash systems . . . . . . . . . 160
B
Belt tensioners . . . . . . . . . . . . . . . . . . . . . . . 118
Belts . . . . . . . . . . . . . . . . . . . . . . . . . . . . . . 112
Biodiesel . . . . . . . . . . . . . . . . . . . . . . . . . . . 167 Bonnet . . . . . . . . . . . . . . . . . . . . . . . . . . . . . 171
Brake
Warning light . . . . . . . . . . . . . . . . . . . . . . 35
Brake booster . . . . . . . . . . . . . . . . . . . . . . . 144
Brake fluid . . . . . . . . . . . . . . . . . . . . . . . . . . 179
Brake pads Warning light . . . . . . . . . . . . . . . . . . . . . . 32
Brakes . . . . . . . . . . . . . . . . . . . . . . . . . . . . . 144
Bulbs . . . . . . . . . . . . . . . . . . . . . . . . . . . . . . 195 Warning light . . . . . . . . . . . . . . . . . . . . . . 33
Buttons on the driver's door Central locking system . . . . . . . . . . . . . . . 42
C
Car jack . . . . . . . . . . . . . . . . . . . . . . . . 196, 201
Catalytic converter . . . . . . . . . . . . . . . . . . . . 148
Central locking system . . . . . . . . . . . . . . . . . . 40
Changing a wheel . . . . . . . . . . . . . . . . . . . . 198
Changing bulbs . . . . . . . . . . . . . . . . . . . . . . 212
Changing oil . . . . . . . . . . . . . . . . . . . . . . . . . 176
Changing wheels around . . . . . . . . . . . . . . . 189
Charging the battery . . . . . . . . . . . . . . . . . . 184Warning light . . . . . . . . . . . . . . . . . . . . . . 29
Chassis number . . . . . . . . . . . . . . . . . . . . . . 223
Child safety . . . . . . . . . . . . . . . . . . . . . . . . . 130
Child safety locks . . . . . . . . . . . . . . . . . . . . . . 39 Child safety seats
ISOFIX system . . . . . . . . . . . . . . . . . . . . 138
Child seat on the front passenger seat . . . . . . . . . . 131
Safety instructions . . . . . . . . . . . . . . . . . 130
Cigarette lighter . . . . . . . . . . . . . . . . . . . . . . . 80
Cleaning . . . . . . . . . . . . . . . . . . . . . . . . . . . . 159
Clock . . . . . . . . . . . . . . . . . . . . . . . . . . . . . . . 16
Compartments . . . . . . . . . . . . . . . . . . . . . . . . 81
Convenience operation . . . . . . . . . . . . . . . . . 48
Coolant . . . . . . . . . . . . . . . . . . . . . . . . . . . . . 177 Warning light . . . . . . . . . . . . . . . . . . . . . . . 31
Coolant temperature gauge . . . . . . . . . . . . . . 13
Coolant temperature/coolant level Warning light . . . . . . . . . . . . . . . . . . . . . . . 31
Counter for distance driven . . . . . . . . . . . . . . 14
Cruise control system . . . . . . . . . . . . . . . . . 100
D
Deactivating an airbag . . . . . . . . . . . . . . . . . 127
Defrosting windows . . . . . . . . . . . . . . . . . 88, 92
De-icing windows . . . . . . . . . . . . . . . . . . . . . 162
Detachable towing device . . . . . . . . . . . . . . 157
Diesel . . . . . . . . . . . . . . . . . . . . . . . . . . . . . . 167
Digital clock . . . . . . . . . . . . . . . . . . . . . . . . . . 16
Dipstick . . . . . . . . . . . . . . . . . . . . . . . . . . . . 175