stop start SKODA FABIA 2003 1.G / 6Y Owner's Manual
[x] Cancel search | Manufacturer: SKODA, Model Year: 2003, Model line: FABIA, Model: SKODA FABIA 2003 1.G / 6YPages: 233, PDF Size: 32.04 MB
Page 25 of 233
Instruments and Indicator/Warning Lights
24
The red symbols indicate danger (priority 1) while the yellow symbols indi-
cate a warning (priortity 2). Information for the driver may also appear in
addition to the symbols ⇒page 27.
Investigate the displayed faults as soon as possible. If several operational
faults exist at the same time, the symbols will appear one after the other
and are each visible for about 2 seconds.
The error messages are faded out after 10 seconds or by actuating the
rocker switch ⇒page 22, fig. 11 and are stored under the information
CAR STATUS .
There is at least one error message to be read when the term CAR
STATUS is flashing in the main menu. The display will show STATUS 1/2
(for example) if a number of error messages are present. This display indi-
cates that the first of a total of two error messages should be displayed.
Actuate the rocker switch , to call up the individual error messages.
If a fault occurs, a warning signal will also sound in addition to the symbol
and text in the display:
•Priority 1 - three warning signals
•Priority 2 - one warning signal
Operational check of the automatic gearbox
When the ignition is switched on, the Auto Check Control automatically
carries out an operational check. The following text will appear first in the
display if the selector lever is the position P or N:
P LOCKED
or N LOCKED You must depress the brake pedal first and press the Shiftlock button at
the same time in order to move the selector lever out of these positions.
The text will disappear once you select a drive position (
R, D etc.), and the
Auto Check Control function is displayed.
Any faults existing will be displayed for about 15 seconds after starting the
engine in place of the text shown above. A warning signal sounds at the
same time.
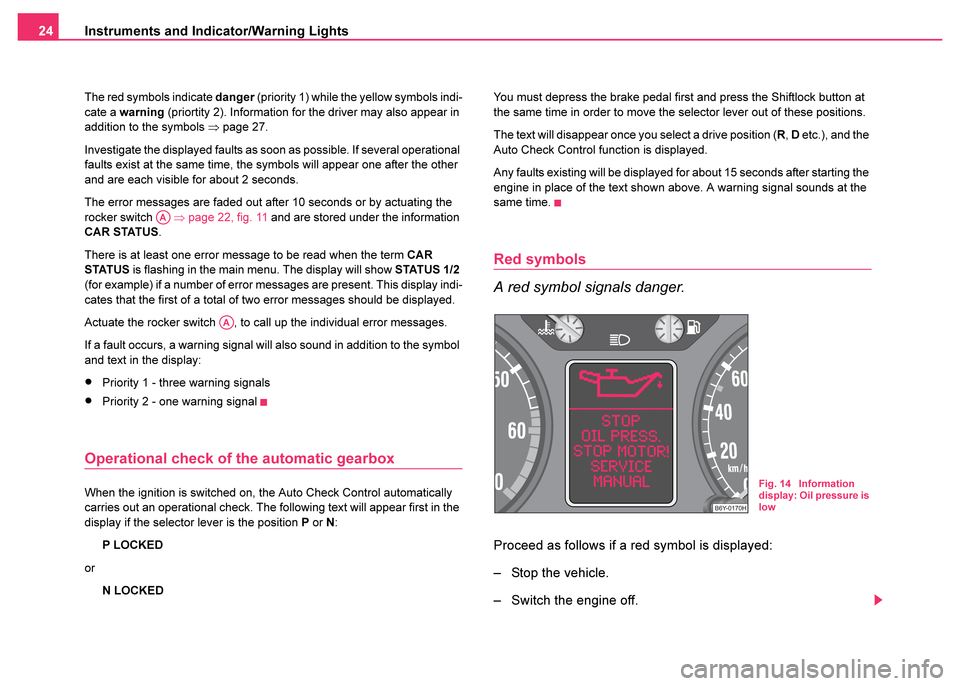
Red symbols
A red symbol signals danger.
Proceed as follows if a red symbol is displayed:
– Stop the vehicle.
– Switch the engine off.
AA
AA
Fig. 14 Information
display: Oil pressure is
low
Page 30 of 233
Instruments and Indicator/Warning Lights29
Using the systemSafetyDriving TipsGeneral MaintenanceBreakdown assist-
anceTechnical DataFabia Praktik
Main beam
The indicator light comes on when the main beam is selected or also
when the headlight flasher is operated.
Further information about the main beam ⇒page 54.
Low beam
The indicator light comes on when low beam is selected ⇒ page 52.
Interlocking of the backrests of the rear seats*
The warning light is only installed on vehicles with a three-point safety
belt on the middle rear seat.
The warning light lights up for 20 seconds after the ignition is switched on
if the backrests of the rear seats are not interlocked.
The warning light will light up permanently if the backrest comes loose
while driving.
The rear fog light
The warning light comes on when the rear fog lights are operating
⇒ page 53.
Dynamo
The warning light comes on after the ignition has been switched on. It
should go out after the engine has started.
If the warning light does not go off after the engine is started or comes on
when driving, stop the car and switch the engine off . Check the V-
ribbed belt.
One can still drive to the next Skoda dealer if the V-ribbed belt is in good
order but the warning light is still lit up. The vehicle battery will be
discharged in this case so switch off all non-essential electrical compo-
nents.
The following text will be displayed in the information display*:
ALTERNATOR WORKSHOP!
Caution
If the warning light comes on when driving and the warning light
(cooling system fault) also comes on in display then you must stop the
vehicle immediately and switch the engine off. The coolant pump is no
longer being driven - risk of damage to engine! WARNING
The three-point safety belt can only fulfil its function reliably when
the backrests of the rear seats are correctly locked into position
⇒ page 67.
Page 32 of 233
Instruments and Indicator/Warning Lights31
Using the systemSafetyDriving TipsGeneral MaintenanceBreakdown assist-
anceTechnical DataFabia Praktik
Coolant temperature/coolant level
The warning light comes on for a few seconds 1) when the ignition is
switched on.
The coolant temperature is too high or the coolant level too low if the
warning light
does not go out after the engine is started or flashes while
driving.
3 peeps sound as an additional warning signal.
In this case stop and switch the engine off and check the coolant level;
top up the coolant as necessary.
Do not continue your journey if for some reason it is not possible under
the conditions prevailing to top up with coolant. Switch off the engine
and obtain professional assistance from a Škoda dealer.
If the coolant is within the specified range, the increased temperature may
be caused by an operating problem at the radiator fan. Check the fuse of
the fan and insert a new fuse, if necessary ⇒page 210.
Do not continue driving if the warning light does not go off although the
fluid is at the correct level and also the fuse of the fan is in proper order.
Contact a Škoda dealer to obtain assistance.
Please also refer to the additional instructions ⇒page 177, “Cooling
system”.
The following text will be displayed in the information display*:
STOP CHECK COOLANT SERVICE MANUAL
Electronic immobiliser
Data is compared between the ignition key and the control unit when
switching on the ignition. The indicator light will light up for a few
seconds when ignition key authorisation is confirmed.
The warning light will start flashing continuously if a non-authorised igni-
tion key (for example the wrong ignition key) has been used. The engine
cannot be started ⇒page 39.
It is only possible to start the engine of the vehicle with a Genuine Škoda
key with the matching code.
Fuel reserve \f
The warning light \f comes on, if the fuel level is still about 7 litres.
A peep sounds as an additional warning signal.
The following text will be displayed in the information display*:
PLEASE REFUEL
1)The warning light on vehicles fitted with information display does not come on
after switching the ignition on, but only if a fault exists or the coolant level is too
low.
WARNING
•Take care when opening the coolant expansion bottle. If the
engine is hot, the cooling system is pressurized - risk of scalding.
It is best to allow the engine to cool down before removing the cap.
•Do not touch the coolant fan The coolant fan may switch on
automatically even if the ignition is off.
Page 33 of 233
Instruments and Indicator/Warning Lights
32
Engine oil
The warning light lights up red (low oil pressure)
The warning light comes on for a few seconds 2) when the ignition is
switched on.
Stop the vehicle and switch the engine off if the warning light does not
go off after the engine has started or flashes while driving. Check the oil
level and top up with oil as necessary ⇒ page 175.
3 peeps sound as an additional warning signal.
Do not continue your journey if for some reason it is not possible under
the conditions prevailing to top up with oil. Switch off the engine and
obtain professional assistance from a Škoda dealer.
Do not drive any further if the warning light blinks even when the oil is at
the correct level. Do not run the engine not at idling speed either. Contact
the nearest Škoda dealer to obtain professional assistance.
The following text will be displayed in the information display*:
STOP! OIL PRESS. STOP MOTOR! SERVICE MANUAL
The warning light
lights up yellow* (oil quantity too low)
If the warning light lights up yellow, the quantity of oil in the engine is too
low. Check oil level as soon as possible or top up ⇒page 175 with oil.
A peep sounds as an additional warning signal.
The warning light will go out if the bonnet is left open for more than 30
seconds. If no engine oil has been replenished, the warning light will come
on again after driving about 100 km. The following text will be displayed in the information display*:
CHECK OIL LEVEL
The warning light
flashes yellow* (engine oil level sensor faulty)
A fault on the engine oil level sensor is indicated additionally by an audible
signal and the warning light coming on several times after the ignition has
been switched on.
In this case have the engine inspected without delay by a Škoda
dealer.
The following text will be displayed in the information display*:
OIL SENSOR WORKSHOP!
Thickness of the brake pads*
If the warning light comes on, contact a Škoda dealer immediately and
have the brake pads on all of the wheels inspected.
A peep sounds as an additional warning signal.
The following text will be displayed in the information display*: CHECK BRAKE PADS
2)The warning light on vehicles fitted with information display does not come on
after switching the ignition on, but only if a fault exists or the engine oil level is too
low.
WARNING
The red oil pressure light is not an oil level indicator! One
should therefore check the oil level at regular intervals, preferably
after every refueling stop.
Page 35 of 233
Instruments and Indicator/Warning Lights
34
The fact that the TCS system operates together with the ABS means that
the TCS warning light will also come on if the ABS system is not operating
properly.
Further information about the TCS ⇒ page 142.
Electronic Stability Programme (ESP)*
The warning light comes on for a few seconds when the ignition is
switched on.
The traction control system (TCS) is also part of the ESP system.
Components of the ESP system also include the Traction Control System
(TCS), Electronic Differential Lock (EDL), and the Antilock Brake System
ABS (ABS).
The warning light comes on when driving when a control cycle is acti-
vated.
The warning light will come on and remains on if the ESP is switched off
or if there is a fault in the system.
The fact that the ESP system operates together with the ABS means that
the ESP warning light will also come on if the ABS system is not operating
properly.
Further information on the ESP ⇒page 141.
Antilock brake system (ABS)*
The warning light shows the functionality of the ABS and the Electronic
Differential Lock (EDL). The warning light comes on for a few seconds after the ignition has been
switched on or when starting the engine. The warning light goes out after
an automatic check sequence has been completed.
A fault in the ABS
The system is not functioning properly if the ABS warning light
does
not go out a few seconds after switching on the ignition, does not light up
at all or lights up while driving. The vehicle will only be braked by the
normal brake system without the effect of the ABS function. Visit a Skoda
dealer as quickly as possible and adjust your style of driving in the mean-
time since you will not know how great the damage is.
Three additional warning tones will sound if there is a major fault in the
ABS.
Further information about ABS ⇒page 145.
A fault in the entire brake system
If the ABS warning light
comes on together with the brake system
warning light (handbrake must be released), there is a fault not only in
the ABS but also in another part of the brake system ⇒.
The following text will be displayed in the information display*: STOP BRAKE FAULT SERVICE MANUAL
Electronic Differential Lock (EDL)*
The EDL is a part of the ABS. A fault in the EDL is indicated by the ABS
warning light
in the instrument cluster. Have the vehicle inspected
without delay by a Škoda dealer. Further information on the EDL
⇒ page 143.
Page 38 of 233
Unlocking and locking37
Using the systemSafetyDriving TipsGeneral MaintenanceBreakdown assist-
anceTechnical DataFabia Praktik
Unlocking and locking
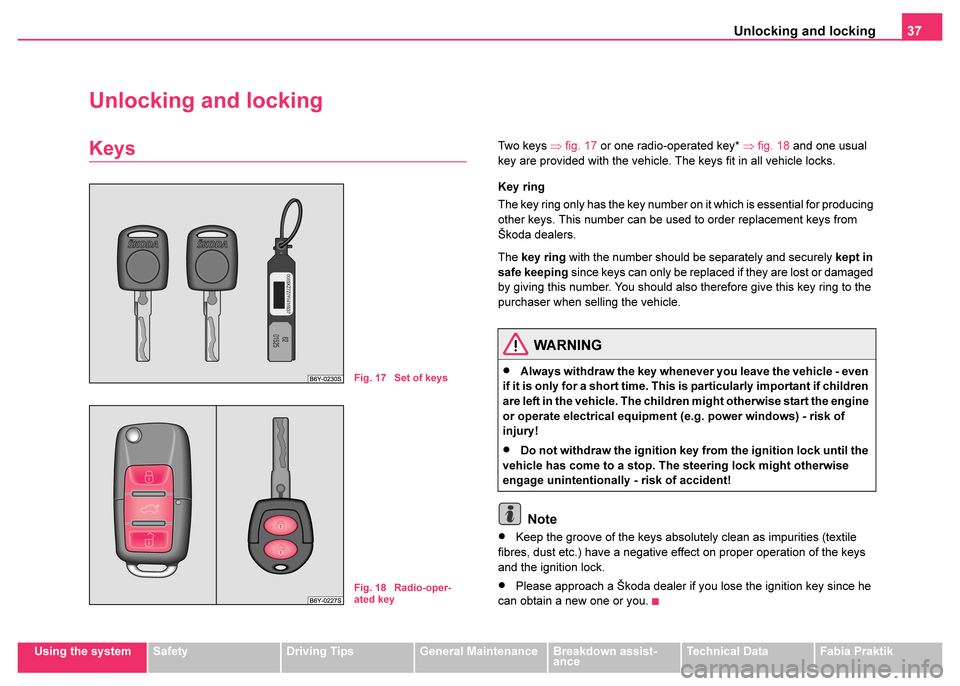
KeysTw o k ey s ⇒fig. 17 or one radio-operated key* ⇒fig. 18 and one usual
key are provided with the vehicle. The keys fit in all vehicle locks.
Key ring
The key ring only has the key number on it which is essential for producing
other keys. This number can be used to order replacement keys from
Škoda dealers.
The key ring with the number should be separately and securely kept in
safe keeping since keys can only be replaced if they are lost or damaged
by giving this number. You should also therefore give this key ring to the
purchaser when selling the vehicle.
Note
•Keep the groove of the keys absolutely clean as impurities (textile
fibres, dust etc.) have a negative effect on proper operation of the keys
and the ignition lock.
•Please approach a Škoda dealer if you lose the ignition key since he
can obtain a new one or you.
Fig. 17 Set of keys
Fig. 18 Radio-oper-
ated key
WARNING
•Always withdraw the key whenever you leave the vehicle - even
if it is only for a short time. This is particularly important if children
are left in the vehicle. The children might otherwise start the engine
or operate electrical equipment (e.g. power windows) - risk of
injury!
•Do not withdraw the ignition key from the ignition lock until the
vehicle has come to a stop. The steering lock might otherwise
engage unintentionally - risk of accident!
Page 100 of 233
Starting-off and Driving99
Using the systemSafetyDriving TipsGeneral MaintenanceBreakdown assist-
anceTechnical DataFabia Praktik
Note
One should not lay the hand on the shift lever while driving the vehicle.
The pressure of the hand will be transferred to the gearshift forks in the
gearbox. This can, over a period of time, lead to early wear of the gearshift
forks.
Handbrake
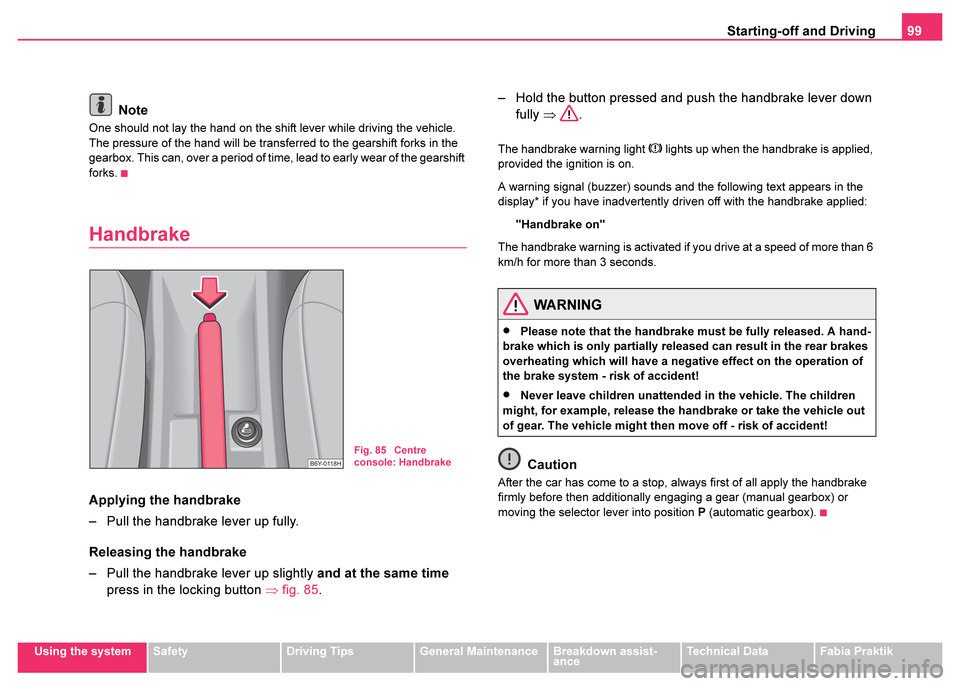
Applying the handbrake
– Pull the handbrake lever up fully.
Releasing the handbrake
– Pull the handbrake lever up slightly and at the same time
press in the locking button ⇒fig. 85 . – Hold the button pressed and push the handbrake lever down
fully ⇒ .
The handbrake warning light lights up when the handbrake is applied,
provided the ignition is on.
A warning signal (buzzer) sounds and the following text appears in the
display* if you have inadvertently driven off with the handbrake applied:
"Handbrake on"
The handbrake warning is activated if you drive at a speed of more than 6
km/h for more than 3 seconds.
Caution
After the car has come to a stop, always first of all apply the handbrake
firmly before then additionally engaging a gear (manual gearbox) or
moving the selector lever into position P (automatic gearbox).
Fig. 85 Centre
console: Handbrake
WARNING
•Please note that the handbrake must be fully released. A hand-
brake which is only partially released can result in the rear brakes
overheating which will have a negative effect on the operation of
the brake system - risk of accident!
•Never leave children unattended in the vehicle. The children
might, for example, release the handbrake or take the vehicle out
of gear. The vehicle might then move off - risk of accident!
Page 103 of 233
Starting-off and Driving
102
– Pressing and holding down the slide switch in this postion will cause the speed of the vehicle to be increased continuously.
Release the slide switch once the vehicle has reached the
desired speed. The set speed is then stored in the memory.
Slower
– You can reduce the stored speed by pressing button .
– If you press and hold the button, the speed of the car is reduced continuously. Once the car has reached the desired
speed, release the button. The set speed is then stored in the
memory.
– If you release the pus hbutton when the vehicle is travelling at
a speed of less than 30 km/h, the speed is not stored and the
memory is erased. It is then necessary to increase the speed
of the car to more than 30 km/h and to once again store the
speed with the pushbutton in the position SET.
Switching cruise control system off temporarily
– You can switch off the cruise control system temporarily by
depressing the brake pedal or clutch pedal, on models with
automatic gearbox and only with brake pedal.
– You can likewise switch off the cruise control system by pushing the slide switch ⇒page 101, fig. 86 to the right
into the intermediate position before the position OFF. The
slide switch then moves back automatically into the ON posi-
tion.
The set speed remains stored in the memory.
The Resumption of the stored speed is achieved by releasing the brake
or clutch pedal, on vehicles fitted with automatic gearbox only after
releasing the brake pedal and after shortly shifting the slide switch
⇒ page 101, fig. 86 to the left up to the stop into the position RES .
Switching off the cruise control system completely
– Move the slide switch ⇒page 101, fig. 86 up to the stop
into the OFF position.
AB
AB
AA
WARNING
First ensure that it is not too high for the traffic conditions which
exist at that moment before resuming the stored speed.
AA
AA
Page 104 of 233
Automatic gearbox*103
Using the systemSafetyDriving TipsGeneral MaintenanceBreakdown assist-
anceTechnical DataFabia Praktik
Automatic gearbox*
4-speed automatic gearbox
Information for driving with an automatic gearbox
Shifting up and down through the gears is performed auto-
matically.
Starting-off and Driving
– Depress the brake pedal and hold it depressed.
– Press the Shiftlock button (button in handle of the selector
lever), move the selector lever into the desired position, e.g. D
⇒ page 104, fig. 87 , and then release the Shiftlock button.
– Wait a moment until the gearbox has shifted (a slight engage- ment nudge can be felt).
– Release the brake pedal and depress the accelerator ⇒.
Stopping for a short time
– The selector lever position N does not have to be selected
when stopping just for a short time, such as at a cross roads.
It is sufficient to hold the vehicle stationary using the foot
brake. The engine can, however, be allowed just to idle.
Parking
– Depress the brake pedal and hold it depressed.
– Apply the handbrake firmly. – Press and Shiftlock button in the selector lever, move the
selector lever to P and then release the Shiftlock button.
The engine can only be started when the selector lever is in position P or
N ⇒ page 96.
It is sufficient to engage selector lever position P when parking on a flat
surface. When parking on a slope you should first apply the handbrake
firmly and then move the selector lever into position P. This is to ensure
that there is no excessive pressure acting on the lock mechanism and that
it is easier to subsequently move the selector lever out of position P.
If the selector lever position N is selected by accident while driving it is first
necessary to release pressure on the accelerator pedal and wait for idling
speed of the engine to be reached before engaging a drive position in the
selector lever.
WARNING
•Do not depress the accelerator when changing the position of
the selector lever if the car is stationary and the engine is running
- risk of accident!
•Never move the selector lever into position R or P when driving
- risk of an accident!
•When the engine is running and the vehicle is stationary, it is
necessary to hold the car with the brake pedal in all the positions
of the selector lever (except P and N) since the power transmission
is never completely interrupted, also not when the engine is idling
- the vehicle "creeps".
Page 157 of 233
Towing a trailer
156
Tyre inflation pressure
Select the tyre inflation pressure on your vehicle for that of “fully laden”,
⇒ page 187. The inflation pressure of the tyres fitted to the trailer adjust
in accordance with the manufacturer's recommendation.
Exterior mirrors
You have to have additional exterior mirrors fitted if you are not able to see
the traffic behind the trailer with the standard rear-view mirrors. Both exte-
rior mirrors should be attached to folding arms. Adjust the mirrors so that
they provide you with an adequate field of view to the rear.
Headlights
Before starting off with a hitched trailer, also check the setting of the head-
lights. Alter the setting as necessary with the aid of the headlight beam
adjuster ⇒page 53.
Detachable ball head
On a car which features a factory-fitted towing device, the ball rod is
detachable. It is stowed together with separate fitting instructions in the
spare wheel well in the luggage compartment of the vehicle.
Further information on the towing device ⇒page 157.
Note
•We recommend that you also have your vehicle inspected between
service intervals if you tow a trailer frequently.
•The handbrake on the towing vehicle must be put on when coupling
and decoupling the trailer.
Driving Tips
Particular caution is required when towing a trailer.
– Do not, as far as possible, drive with your vehicle unladen and the trailer laden.
– Do not make full use of the legal maximum speeds. This applies in particular to downhill sections.
– Apply the brakes in good time.
– Keep a check on the coolant temperature gauge if the outside temperature is high.
Distribution of weight
The distribution of the weight is very poor if your vehicle is unladen and
the trailer is laden. Maintain a particularly low speed if you cannot avoid
driving with this combination.
Driving speed
Do not drive faster than 80 km/hour for safety reasons. This also applies
for countries in which higher speeds are allowed.
The fact that the driving stability of the vehicle + trailer combination
reduces with increasing speed means that the legally allowed speed
should not be used when there are unfavourable road, weather or wind
conditions, particularly near accident black spots.
You must always reduce your speed immediately as soon as you detect
even just the slightest swaying of the trailer. On no account attempt to
stop the trailer from “swaying” by accelerating.
Apply the brakes in good time! If the trailer is fitted with a trailer brake,
apply the brakes gently at first then brake firmly. This will avoid brake jolts
resulting from the trailer wheels locking. Shift down gears in good time