SKODA FABIA 2004 1.G / 6Y Owner's Manual
Manufacturer: SKODA, Model Year: 2004, Model line: FABIA, Model: SKODA FABIA 2004 1.G / 6YPages: 247
Page 111 of 247

Automatic gearbox*
110
Automatic gearbox*
4-speed automatic gearbox
Information for driving wi th an automatic gearbox
Shifting up and down through the gears is performed auto-
matically.
Starting-off and Driving
– Depress the brake pedal and hold it depressed.
– Press the Shiftlock button (button in handle of the selector lever), move the selector lever into the desired position, e.g. D
⇒ page 111, fig. 95, and then release the Shiftlock button.
– Wait a moment until the gearbox has shifted (a slight engage- ment nudge can be felt).
– Release the brake pedal and depress the accelerator ⇒.
Stopping for a short time
– The selector lever position N does not have to be selected
when stopping just for a short time, such as at a cross roads.
It is sufficient to hold the vehicle stationary using the foot
brake. The engine can, however, be allowed just to idle.
Parking
– Depress the brake pedal and hold it depressed.
– Apply the handbrake firmly. – Press and Shiftlock button in the selector lever, move the
selector lever to P and then release the Shiftlock button.
The engine can only be started when the selector lever is in position P or
N ⇒ page 102.
It is sufficient to engage selector lever position P when parking on a flat
surface. When parking on a slope you should first apply the handbrake
firmly and then move the selector lever into position P. This is to ensure
that there is no excessive pressure acting on the lock mechanism and that
it is easier to subsequently move the selector lever out of position P.
If the selector lever position N is selected by accident while driving it is first
necessary to release pressure on the accelerator pedal and wait for idling
speed of the engine to be reached before engaging a drive position in the
selector lever.
WARNING
•Do not depress the accelerator when changing the position of
the selector lever if the car is stationary and the engine is running
- risk of accident!
•Never move the selector lever into position R or P when driving
- risk of an accident!
•When the engine is running and the vehicle is stationary, it is
necessary to hold the car with the brake pedal in all the positions
of the selector lever (except P and N) since the power transmission
is never completely interrupted, also not when the engine is idling
- the vehicle "creeps".
Page 112 of 247
Automatic gearbox*111
Using the systemSafetyDriving TipsGeneral MaintenanceBreakdown assistanceTechnical Data
Selector lever positions
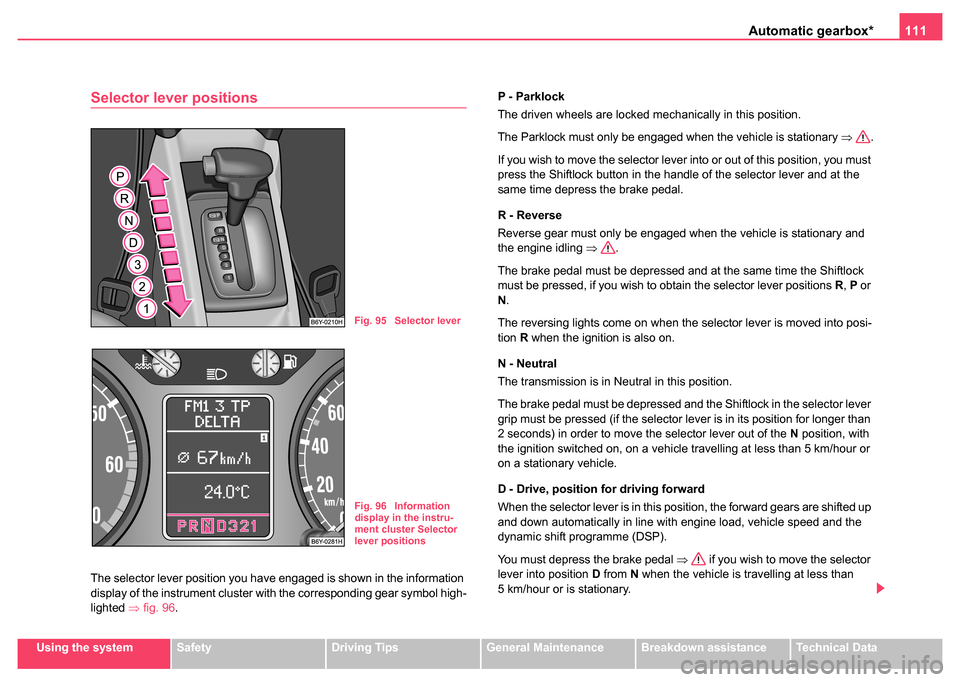
The selector lever position you have engaged is shown in the information
display of the instrument cluster with the corresponding gear symbol high-
lighted ⇒fig. 96. P - Parklock
The driven wheels are locked mechanically in this position.
The Parklock must only be engaged when the vehicle is stationary
⇒.
If you wish to move the selector lever into or out of this position, you must
press the Shiftlock button in the handle of the selector lever and at the
same time depress the brake pedal.
R - Reverse
Reverse gear must only be engaged when the vehicle is stationary and
the engine idling ⇒.
The brake pedal must be depressed and at the same time the Shiftlock
must be pressed, if you wish to obtain the selector lever positions R, P or
N .
The reversing lights come on when the selector lever is moved into posi-
tion R when the ignition is also on.
N - Neutral
The transmission is in Neutral in this position.
The brake pedal must be depressed and the Shiftlock in the selector lever
grip must be pressed (if the selector lever is in its position for longer than
2 seconds) in order to move the selector lever out of the N position, with
the ignition switched on, on a vehicle travelling at less than 5 km/hour or
on a stationary vehicle.
D - Drive, position for driving forward
When the selector lever is in this position, the forward gears are shifted up
and down automatically in line with engine load, vehicle speed and the
dynamic shift programme (DSP).
You must depress the brake pedal ⇒ if you wish to move the selector
lever into position D from N when the vehicle is travelling at less than
5 km/hour or is stationary.
Fig. 95 Selector lever
Fig. 96 Information
display in the instru-
ment cluster Selector
lever positions
Page 113 of 247
Automatic gearbox*
112
3 - Position when driving in hilly areas
We recommend this position if driving with the selector lever in position D
would, in certain circumstances, result in the gearbox frequently shifting
between the gears.
The gearbox shifts up and down automatically into first, second and third
gear in line with engine load, driving style and vehicle speed. Fourth gear
remains locked out in this case. This makes it possible to exploit greater
engine braking power when the accelerator is released ⇒.
The Shiftlock on the selector lever grip must be pressed when moving out
of position 3 into position D.
2 - Position when driving in mountainous regions
This position of the selector lever is suitable for long sloping sections.
The gearbox shifts up and down automatically into first and second gear
in line with engine load, driving style and vehicle speed. The third and
fourth gears remain locked out in order to avoid unnecessary gear
changes. Enhanced engine braking power is thus available.
The Shiftlock on the selector lever grip must not be pressed when moving
out of position 3 into position 2.
1 - Position for extreme mountainous sections
This position of the selector lever is suitable for very steep sections of
road.
The vehicle will only drive first gear. The second, third and fourth gears
remain locked out. This position offers you the maximum possible engine
braking power.
The Shiftlock on the selector lever grip must be pressed when moving out
of position 2 into position 1.
The cruise control system is locked in position 1.WARNING
•Never move the selector lever into position R or P when driving
- risk of an accident!
•When the engine is running and the vehicle is stationary, it is
necessary to hold the car with the brake pedal in all the positions
of the selector lever (except P and N) since the power transmission
is never completely interrupted, also not when the engine is idling
- the vehicle "creeps".
•You must on no account unintentionally operate the throttle
(e.g. by hand from the engine comp artment) if a drive position is
engaged when the car is stationary. The vehicle would otherwise
immediately start off - also when the handbrake is firmly applied -
risk of an accident!
•You must move the selector lever into position P and firmly
apply the handbrake first before you or any other person opens the
bonnet and starts working on the engine when it is running - risk
of accident! Pay particular attention to the guidelines ⇒page 183,
“Working in the engine compartment”.
Note
•Take your foot off the accelerator if you inadvertently shift into N when
driving and wait until the engine speed has dropped to the idling speed
range before shifting into D.
•If you shift gear manually it is possible to select positions 3, 2 and 1,
but the automatic gearbox will not shift down until there is no risk of the
engine overrevving.
Page 114 of 247
Automatic gearbox*113
Using the systemSafetyDriving TipsGeneral MaintenanceBreakdown assistanceTechnical Data
Selector lever lock
Automatic selector lever lock
With the ignition on, the selector lever is locked when it is in the positions
P and N. You must depress the brake pedal first and press the Shiftlock
button at the same time in order to move the selector lever out of these
positions. The following will be displayed in the information display*:
P LOCKED
or
N LOCKED
Symbol
also lights up in the selector lever cover until the brake pedal
is actuated.
A time delay element ensures that the selector lever is not blocked when
rapidly switching over the position N (e.g. from R to D). This does, for
example, allow one to seesaw out a stuck vehicle. The selector lever lock
will click into place if the lever is in the N position for more than 2 seconds
without the brake pedal being pressed.
The selector lever lock is only active if the vehicle is stationary or moving
at speed of less than 5 km/hour. The lock is switched off automatically into
position N when the car is travelling at a higher speed.
Shiftlock button
The Shiftlock button in the handle of selector lever prevents certain
selector lever positions being engaged inadvertently. The selector lever
lock is cancelled when you press the Shiftlock button.
Kickdown function
The kickdown function provides you with maximum accel-
eration power.
Depressing the accelerator pedal beyond the pressure point casues the
automatic gearbox to shift down into a lower gear (in line with vehicle
speed and engine speed). The gearbox shifts up into the next higher gear
when the engine has reached its maximum revolations.
WARNING
Please note that using the kickdown function can result in the
driven wheels spinning on a smooth or slippery road surface - risk
of skidding!
Dynamic shift programme
The automatic gearbox of your vehicle is controlled electronically. Shifting
up and down through the gears is performed automatically on the basis of
pre-defined driving programmes.
Adopting a moderate style of driving will cause the gearbox to select the
most economical driving programme. Shifting up into a higher gear as
soon as possible and shifting down as late as possible will have a favour-
able effect on your fuel consumption.
Adopting a faster style of driving with rapid movements of the acceler-
ator pedal combined with sharp acceleration and frequent changes in
speed, exploiting the top speed of the car or operating the kickdown func-
tion, will cause the gearbox to switch over to the sporty driving
programme. Shifting up later into a higher gear makes it possible to fully
exploit the power reserves of the engine. The gearbox also then shifts
Page 115 of 247
Automatic gearbox*
114
down at higher engine speeds than is the case for the economy-oriented
programmes.
Selecting the most appropriate driving programme for the particular style
of driving is a continuous process. Irrespective of this it is, however,
possible to switch into a sporty driving programme by depressing the
accelerator rapidly. The gearbox shifts down into a lower gear matching
the speed of the car and this allows you to accelerate rapidly (e.g. when
overtaking) without having to depress the accelerator pedal fully into the
kickdown range. The original programme will be reactivated to match your
particular style of driving once the gearbox has shifted up again.
When driving in hilly regions, the gears are selected to match uphill and
downhill sections. This avoids the gearbox frequently shifting up and down
when negotiating an uphill stretch. Depressing the brake pedal while
driving downhill causes the gearbox to shift down into the next lower gear.
This makes it possible for you to exploit the engine braking power without
the need for shifting gears manually.
Emergency programme
An emergency programme exists in the event of a fault in
the system.
The gearbox operates in a corresponding emergency programme if there
are functional faults in the gearbox electronics. This is indicated by all of
the segments in the display lighting up or going out.
•The gearbox still switches automaticallly but stronger switching shocks
are noticeable.
•The gearbox does not switch anymore automatically. The gearbox can
now only be switched manually but there are only 3 gears available over
the selector lever positions namely D, 3 and 2. The 1st gear and reverse
are available as before over the selector lever positions 1 and R. If the gearbox has switched over to emergency mode, drive to the
nearest Škoda dealer in order to have the fault rectified.
Tow-starting and towing vehicle
Tow-starting a vehicle
For technical reasons it is not possible to tow-start a car fitted with an auto-
matic gearbox
⇒page 220.
you can use jump-start cables connected to the battery of another vehicle
for starting your car if the vehicle battery is flat ⇒page 218.
Towing a vehicle
Please pay attention to the following information if it comes necessary to
tow-in your car ⇒page 220.
Page 116 of 247

Communication115
Using the systemSafetyDriving TipsGeneral MaintenanceBreakdown assistanceTechnical Data
Communication
Universal telephone connection*
A telephone mount is factory-fitted. The mount is attached to the
centre console. Adapter “Cullmann” and mobile phone are not
factory-fitted by Škoda Auto.
Initialisation
– Withdraw the ignition key.
– First insert the adapter without the mobile phone into the
mount in the direction of arrow ⇒fig. 97 until the
adapter is touching the stop. Press the adapter slightly in the
direction of arrow until it locks into position. – Plug the adapter cable into the mobile phone socket. The
power socket is located under the front passenger storage
compartment.
– Switch on the ignition.
– Wait for approximately 15 seconds, switch off ignition.
– Insert the mobile phone into the adapter (as specified in manufacturer's instructions) and switch on the ignition.
Removing the mobile phone and adapter
– Press the button and remove the mobile telephone.
An initialisation must be carried out:
•after the first connection of the adapter
•after reconnecting the battery
•after pulling out the adapter cable from the power socket for the mobile
phone
This enables you to make full use of the advantages of a normal carphone
(“handsfree system” using a microphone integrated in the vehicle, optimal
transmission of signals using an external aerial etc.). The battery of the
mobile phone is also constantly charged.
Please contact your Škoda dealer If there are any points which are not
clear.
Please also refer to the additional instructions ⇒page 116, “Mobile
phones and two-way radio systems”.
Fig. 97 Universal tele-
phone connection
ABA1
A2
AA
AC
Page 117 of 247

Communication
116
Mobile phones and two-way radio
systems
The installation of mobile phones and two-way radio systems in a vehicle
should generally be undertaken by a Škoda dealer.
Škoda Auto permits the operation of mobile phones and two-way radio
systems with a professionally installed external aerial and a maximum
transmission power of up to 10 watts.
Our Škoda dealers are also happy to inform you about the possibilities
available for installing and operating mobile telephones and radio trans-
mitters which have an output greater than 10 watts. The Škoda dealers
can provide you with details about the technical possibilities for retrofitting
of mobile telephones and radio transmitters.
Operation of mobile phones or two-way radio systems may interfere with
functioning of the electronic systems of your vehicle. The reasons for this
may be:
•no external aerial
•external aerial incorrectly installed
•transmission power greater than 10 watts.
You should therefore not operate a mobile phone or two-way radio
system inside the vehicle without the use of an external aerial, or with
an external aerial which has been incorrectly installed.
You should also note that only an external aerial makes it possible to
achieve the optimal range of such equipment.
WARNING
•If a mobile phone or two-way radio system is operated inside the
vehicle without using an external aerial, or with an external aerial which has been incorrectly installed, the result can be excessive
electromagnetic fields which ma
y cause harm to your health.
•Please always pay full attention to the traffic situation around
you!
•You must not install two-way radio systems, mobile phones or
mounts on the covers of the airbags or within the immediate
deployment range of airbags. This might result in injuries to the
occupants in the event of an accident.
Note
Please also refer to the operating instructions of the mobile phones and
two-way radio systems.
The CD changer*
The CD changer for the car radio and navigation system is located under
the front passenger seat. A description of how to change the CD can be
found in the operating instructions for the CD changer.
WARNING (continued)
Page 118 of 247
Passive Safety117
Using the systemSafetyDriving TipsGeneral MaintenanceBreakdown assistanceTechnical Data
Safety
Passive Safety
Basic information
Driving the safe way
Passive safety measures reduce the risk of injury in acci-
dent situations.
In this section you will find important information, tips and notes on the
subject of passive safety in your vehicle. We have combined everything
here which you should be familiar with, for example, regarding seat belts,
airbags, child seats and safety of children. It is therefore important, in
particular, to comply with the notes and warnings in this section for your
own interest and in the interest of those travelling with you.
WARNING
•This chapter contains important information on how to use the
vehicle for the driver and his occupants. You will find further infor-
mation on safety, which concerns you and those travelling with
you, in the following chapters of this Owner's Manual.
•The complete on-board literature should always be in the
vehicle. This applies in particular, if you rent out or sell the
vehicle.
Safety equipment
The safety equipment is part of the occupant protection
and it can reduce the risk of injuries in accident situations.
“Do not put at risk” your safety and the safety of those travelling with you
. In the event of an accident, the safety equipment can reduce the risk of
injuries. The following list contains part of the safety equipment in your
vehicle:
•Three-point seat belts for all the seats,*,
•belt force limiter for front seats*,
•belt tensioner for front seats,
•seat belt height adjuster for front seats,
•front airbags*,
•Side airbags*,
•anchoring points for child seat using the “ISOFIX” system,
•head restraint adjustable for height,
•adjustable steering column.
The specified safety equipment works together, in order to optimally
protect you and those travelling with you in accident situations. The safety
equipment does not protect you or the people travelling with you, if you or
your occupants adopt an incorrect seated position or the equipment is not
correctly adjusted or used.
For this reason you will be provided with information on why this equip-
ment is very important, how it protects you and the occupants, what
Page 119 of 247

Passive Safety
118
should be observed when using the equipment and how you and the
people travelling with you can make full use of the existing safety equip-
ment. This Owner's Manual contains important warning notes, which you
and those travelling with you should pay attention to in order to reduce a
risk of injury.
Safety concerns everybody!
Before setting off
The driver is always fully responsible for his occupants
and for the operating safety of the vehicle.
For your own safety and the safety of the people travelling with you,
please pay attention to the following points before setting off.
•Ensure that the lighting and the turn signal system are functioning
properly.
•Inspect the tyre inflation pressure.
•Ensure that all the windows offer a good visibility to the outside.
•Safely attach the items of luggage ⇒page 72, “Loading the luggage
compartment”.
•Ensure that no objects can obstruct the pedal.
•Adjust the mirror, the front seat and the head restraint to match your
body size.
•Point out to your occupants that the head restraints must be adjusted
to match their body size.
•Protect the children in suitable child seats with correctly fastened seat
belts ⇒page 140, “Transporting children safely”.
•Adopt the correct seated position. Also inform your occupants to adopt
the correct seated position.
•Fasten the seat belt correctly. Also inform your occupants to properly
fasten the seat belts ⇒page 126, “How are seat belts correctly
fastened?”.
What influences the driving safety?
The driving safety is primarily determined by the style of
driving and the personal behaviour of all the occupants.
The driver is fully responsible for himself and his occupants. If your driving
safety is effected, you place yourself and the oncoming traffic at risk.
Please refer to the following guidelines.
•Do not get distracted from concentrating on the traffic situation, e.g. by
your occupants or mobile phone calls.
•Never drive when your driving ability is impaired, e.g. through medica-
tion, alcohol, drugs.
•Keep to the traffic regulations and the permissible speed limit.
•Adjust the driving speed at all times to the road condition as well as to
the traffic and weather conditions.
•Take regular breaks on long journeys - at the latest every two hours.
Page 120 of 247
Passive Safety119
Using the systemSafetyDriving TipsGeneral MaintenanceBreakdown assistanceTechnical Data
Correct seated position
Correct seated position for the driver
Correct seated position for the driver is important for safe
and relaxed driving.
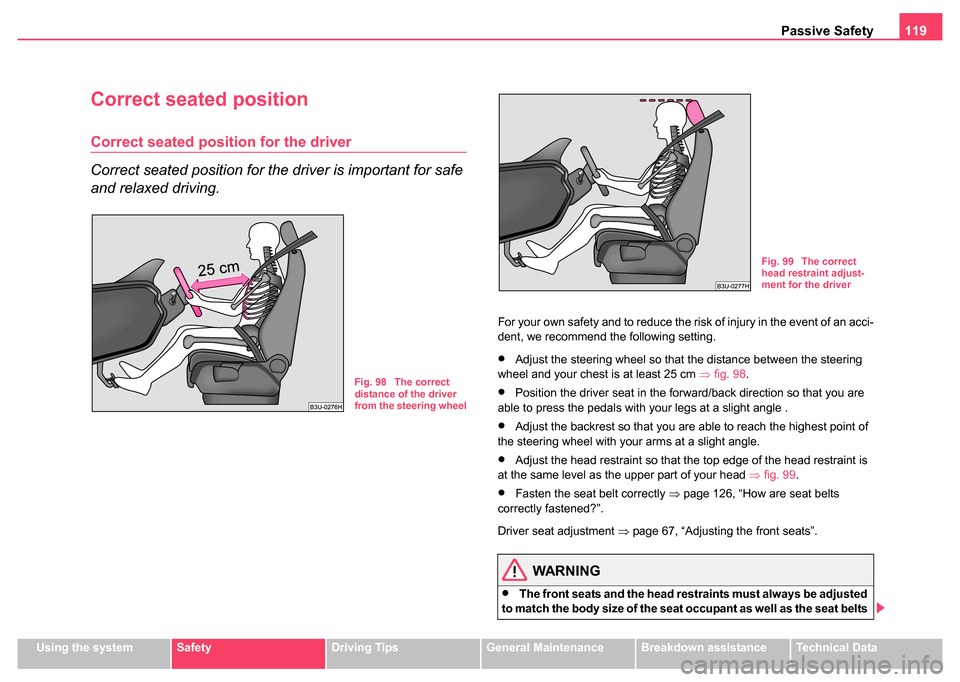
For your own safety and to reduce the risk of injury in the event of an acci-
dent, we recommend the following setting.
•Adjust the steering wheel so that the distance between the steering
wheel and your chest is at least 25 cm ⇒fig. 98 .
•Position the driver seat in the forward/back direction so that you are
able to press the pedals with your legs at a slight angle .
•Adjust the backrest so that you are able to reach the highest point of
the steering wheel with your arms at a slight angle.
•Adjust the head restraint so that the top edge of the head restraint is
at the same level as the upper part of your head ⇒fig. 99 .
•Fasten the seat belt correctly ⇒page 126, “How are seat belts
correctly fastened?”.
Driver seat adjustment ⇒page 67, “Adjusting the front seats”.
WARNING
•The front seats and the head restraints must always be adjusted
to match the body size of the seat occupant as well as the seat belts
Fig. 98 The correct
distance of the driver
from the steering wheel
Fig. 99 The correct
head restraint adjust-
ment for the driver